Seeeduino GPRS

Seeeduino GPRS 是一个物联网面板,您可以通过 GPRS 无线网络连接到互联网。它还支持拨打/接听语音电话和发送/接收短信。同时,Seeeduino GPRS 支持 FM 收音机功能和蓝牙通信。Seeeduino GPRS 基于 Atmage32U4 和 SIM800H。Atmage32U4 是一个微控制器,与 Arduino 兼容。SIM800H 支持四频段 850/900/1800/1900MHz,可以低功耗传输语音、短信和数据信息。SIM800H 还带来了一些额外功能,例如蓝牙和 FM 收音机。它采用节能技术设计,在睡眠模式下电流消耗低至 0.1mA。

应用创意
- 物联网
- 智能家居
- 可穿戴设计
- DIY 手机
- 工业应用
这里有一些有趣的项目供您参考。
| Arduino GPS/GSM 追踪器 | Arduino 手机 2.0 | Arduino GPRS 气象站 |
|---|---|---|
 |  |  |
| 立即制作 | 立即制作 | 立即制作 |
特性
- 与标准 Arduino Leonardo 兼容
- 四频段 850/900/1800/1900MHz
- 耳机插孔
- 便捷的外置 SIM 卡座
- 通过 AT 命令控制
- 支持蓝牙
- 支持 FM 收音机
- 电流 < 2A
- Arduino Leonardo 引导程序
规格参数
SIM800H 模块
| 参数 | 值 |
|---|---|
| GPRS 模块 | SIM800H |
| 四频段 | 850/900/1800/1900MHz |
| GPRS 多时隙等级 | 12/10 |
| GPRS 移动站等级 | B |
| 标准 GSM 阶段 | 2/2+ |
| FM | 76~109MHz |
| 蓝牙 | 符合 3.0+EDR |
| 供电电压范围 | 3.4 ~ 4.4V |
AVR Arduino 微控制器
| 参数 | 值 |
|---|---|
| 微控制器 | ATmega32u4 |
| 闪存 | 32KB |
| SRAM | 2.5kB |
| EEPROM | 1kB |
| 时钟速度 | 16MHz |
| 工作电压 | 5V |
| 数字 I/O 引脚 | 20 |
| PWM 通道 | 7 |
| 模拟输入通道 | 12 |
硬件概述
下面的图片显示了 Seeeduino GPRS 硬件特性的概述。引脚图显示了 Seeeduino GPRS 各个引脚的引脚分布和替代功能。这可以用作快速参考。

-
电源开关 滑动开关用于将板子的逻辑电平和电源输出更改为 5V 或 3.3V。 如今许多新的优秀传感器都被开发为使用 3.3V 工作,使用其他 duino 板时您需要在板子和这些传感器之间放置一个逻辑电平转换器,而使用 Seeeduino GPRS 板您只需要滑动开关即可!
-
DC 输入 DC 输入允许您的 Seeeduino GPRS 板通过墙式适配器供电,这样您可以在需要时为项目提供更多电力,例如使用直流电机或其他大功率设备时。DC 输入可以是 9V-12V,峰值电流为 2A。 但是 Seeeduino GPRS 中有一个您必须注意的硬件错误。当外部电源输入时,5V 引脚会有非常短暂的 6V,持续约 2ms。这有损坏连接到 5V 的设备的风险。 因此我们建议不要使用 DC 输入为系统供电。我们已经考虑修复这个错误,但不会很快推出。
-
SIM800h 分线 您可以通过此接口调试 Sim800h。
-
ICSP 这是 ATMEGA32U4-MUR 的 ICSP 连接,它位于 Arduino Uno、Due、Mega 和 Leonardo 兼容硬件(例如扩展板)的标准 ICSP/SPI 位置,这些硬件可能使用此连接器。此端口中的 SPI 引脚:MISO、SCK 和 MOSI,请注意这些引脚没有连接到 D11~D13。
-
LED PWR2 SIM800H 电源指示
-
LED STA 运行状态指示
-
LED NET
| 状态 | SIM800H 行为 |
|---|---|
| 关闭 | SIM800H 未运行 |
| 64ms 开/800ms 关 | SIM800H 未注册网络 |
| 64ms 开/3000ms 关 | SIM800H 已注册网络 |
| 64ms 开/300ms 关 | SIM800H 通信已建立 |
安装驱动程序
首先,您需要:
-
获取一根 Micro-USB 数据线 您首先需要一根 Micro-USB 数据线;安卓手机的数据线就可以。 如果您找不到,可以在这里购买一根。
-
连接开发板 使用 USB 数据线将 Arduino 开发板连接到您的计算机。绿色电源 LED(标记为 PWR)应该会亮起。
Windows 系统
此驱动程序适用于 Windows XP、Windows Vista、Windows 7、Windows 8/8.1 和 Windows 10。

- 插入您的开发板并等待 Windows 开始驱动程序安装过程。几分钟后,尽管尽了最大努力,该过程仍会失败。
- 点击开始菜单,打开控制面板。
- 在控制面板中,导航到系统和安全。接下来,点击系统。系统窗口打开后,打开设备管理器。
- 查看端口 (COM 和 LPT)。您应该会找到一个名为"Seeeduino GPRS"的开放端口。如果没有 COM 和 LPT 部分,请在"其他设备"下查找"未知设备"。
- 右键点击"Seeeduino GPRS"端口并选择"更新驱动程序软件"选项。
- 接下来,选择"浏览我的计算机以查找驱动程序软件"选项。
- 最后,导航到并选择名为"seeed_usb_serial.inf"的驱动程序文件
- Windows 将从那里完成驱动程序安装。
Mac OSX 系统
您不需要安装任何驱动程序。
入门指南
如果这是您第一次使用 Arduino,我们强烈建议您参考Arduino 入门指南
首先,您需要安装 Arduino 软件。

启动 Arduino 应用程序
双击您之前下载的 Arduino 应用程序 (arduino.exe)。
如果 Arduino 软件以不同语言加载,您可以在首选项对话框中更改它。详情请参见 Arduino 软件 (IDE) 页面。
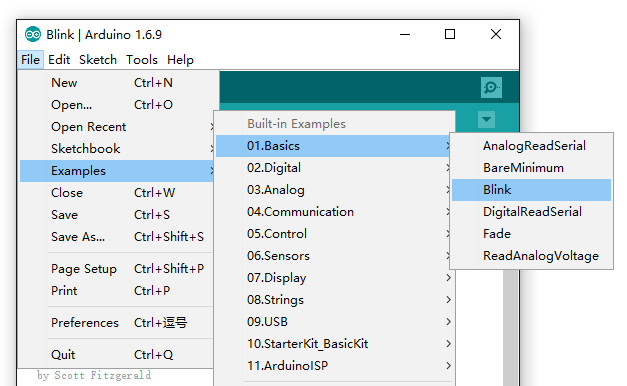
打开 Blink 示例
打开 LED 闪烁示例程序:文件 > 示例 > 01.Basics > Blink。
选择您的开发板
您需要在工具 > 开发板菜单中选择与您的 Arduino 对应的条目。 选择 Arduino Leonardo。如果您找不到 Arduino Leonardo,请查看如何将 Seeed 开发板添加到 Arduino IDE

选择您的串口
从工具 | 串口菜单中选择 Arduino 开发板的串行设备。这很可能是 COM3 或更高(COM1 和 COM2 通常为硬件串口保留)。要找出来,您可以断开 Arduino 开发板的连接并重新打开菜单;消失的条目应该就是 Arduino 开发板。重新连接开发板并选择该串口。

在 Mac 上,这应该是类似 /dev/tty.USBmodem 的内容。
上传程序
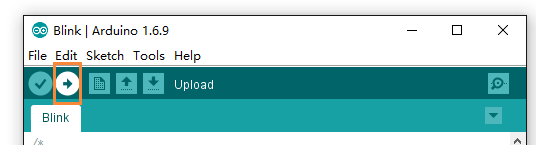
现在,只需点击环境中的"上传"按钮。等待几秒钟,如果上传成功,状态栏中将出现"上传完成"消息。
上传完成几秒钟后,您应该会看到开发板上的引脚 13(LED 引脚 13)LED 开始闪烁(绿色)。如果是这样,恭喜!您已经成功运行了 Arduino。如果遇到问题,请参阅故障排除建议。
在 Linux 上开始使用
要在 Linux 上使用,请访问 在 Linux 上安装 Arduino
GPRS 功能
Seeeduino GPRS 提供了手机功能,如拨打/接听语音通话、发送/接收短信、建立 TCP 连接等。这里是 Seeeduino GPRS 库,请将其下载到您的计算机上以使用 Seeeduino GPRS。以下是简要介绍。
要开始使用 Seeeduino GPRS,需要耳机和 SIM 卡。


拨打电话
打开示例代码 GPRS_CallUp,位于 libraries/Seeeduino_GPRS/example/GPRS_CallUp/,替换 callUp 函数中的电话号码,然后编译代码并上传到您的开发板。Seeeduino GPRS 将拨打代码中指定的号码。
#include <gprs.h>
#include <SoftwareSerial.h>

GPRS gprs;

void setup() {
    Serial.begin(9600);
    Serial.println("GPRS - Call up Test...");
    gprs.preInit();//power on SIM800
    delay(1000);
    while(0 != gprs.init()) { //gprs init
        delay(1000);
        Serial.print("init error\r\n");
    }
    Serial.println("Init success, start to call...");
    gprs.callUp("150****9566");
}

void loop() {
    //nothing to do
}
发送短信
就像拨打电话一样,可以使用 Seeeduino GPRS 发送短信。打开示例代码 GPRS_SendSMS,位于 libraries/Seeeduino_GPRS/example/GPRS_SendSMS/,替换 sendSMS 函数中的电话号码和消息,然后编译代码并上传到您的开发板。Seeeduino GPRS 将向代码中指定的号码发送消息。
#include <gprs.h>
#include <SoftwareSerial.h>

GPRS gprs;

void setup() {
    Serial.begin(9600);
    Serial.println("GPRS - Send SMS Test ...");
    gprs.preInit();
    delay(1000);
    while(0 != gprs.init()) {
        delay(1000);
        Serial.print("init error\r\n");
    }
    Serial.println("Init success, start to send SMS message...");
    gprs.sendSMS("130****3364","hello,world"); //define phone number and text
}

void loop() {
    //nothing to do
}
接听电话和读取短信
如果有人给您打电话或发送消息,Seeeduino GPRS 也可以接听电话或读取消息。打开示例代码 GPRS_LoopHandle,位于 libraries/Seeeduino_GPRS/example/GPRS_LoopHandle/,然后编译代码并上传到您的开发板,Seeeduino GPRS 将轮询检查是否有来电或短信。如果有来电,Seeeduino GPRS 将自动接听电话。如果有来信,Seeeduino GPRS 将在串口监视器中显示消息。
#include <gprs.h>
#include <SoftwareSerial.h>
#include <stdio.h>

char gprsBuffer[64];
int i = 0;
char *s = NULL;
int inComing = 0;

GPRS gprs;

void setup() {
    Serial.begin(9600);
    Serial.println("GPRS - LoopHandle Test...");
    gprs.preInit();
    while(0 != gprs.init()) {
        delay(1000);
        Serial.print("init error\r\n");
    }
    Serial.println("Init success, start to monitor your call or message...");
}

void loop() {
    if(gprs.serialSIM800.available()) {
        inComing = 1;
    }else{
        delay(100);
    }

    if(inComing){
        gprs.readBuffer(gprsBuffer,32,DEFAULT_TIMEOUT);
        Serial.print(gprsBuffer);

        if(NULL != strstr(gprsBuffer,"RING")) {
            gprs.answer();
        }else if(NULL != (s = strstr(gprsBuffer,"+CMTI: \"SM\""))) { //SMS: $$+CMTI: "SM",24$$
            char message[MESSAGE_LENGTH];
            int messageIndex = atoi(s+12);
            gprs.readSMS(messageIndex, message,MESSAGE_LENGTH);
            Serial.print(message);
        }
        gprs.cleanBuffer(gprsBuffer,32);
        inComing = 0;
    }
}
FM 收音机功能
Seeeduino GPRS 具有 FM 收音机功能。打开示例代码 FM_Test,位于 libraries/Seeeduino_GPRS/example/FM_Test/,连接一个按钮到您的开发板,然后编译代码并上传到您的开发板,Seeeduino GPRS 就像一个 FM 收音机一样工作。甚至可以用按钮改变频道。
#include <fm.h>
#include <SoftwareSerial.h>

int channelButton = 5; //used for changing channel
FM fm;

void setup() {
    pinMode(channelButton,INPUT);
    Serial.begin(9600);
    Serial.println("FM Test...");
    fm.preInit();
    while(0 != fm.powerOn()){
        Serial.println("FM power on failed, try again...");
        delay(2000);
    }
    fm.setVolume(6); //0,1,2,3,4,5,6
    fm.scanChannel();
    Serial.println("FM init success");
}

void loop() {
    while(HIGH == digitalRead(channelButton)){
        delay(50);
    }
    Serial.print("change Channel\r\n");
    fm.channelNext();
    while(LOW == digitalRead(channelButton)){
        delay(50);
    }
}
蓝牙功能
Seeeduino GPRS 可以用作蓝牙设备,但目前还不是很稳定。库中有两个示例代码。第一个是 Bluetooth AT Command,您可以通过它向 Seeeduino GPRS 发送 AT 命令,另一个是 Bluetooth_Communicate,您可以通过 SPP 配置文件与 Seeeduino GPRS 通信,但在连接到您的蓝牙设备或手机时可能会出错。以下是蓝牙 AT 命令的代码。
#include <bluetooth.h>
#include <SoftwareSerial.h>

#define DEFAULT_TIMEOUT 5
#define BT_BUF_LEN      32
BlueTooth bluetooth;

char bluetoothBuffer[BT_BUF_LEN];
int start = 0;

void setup() {
    Serial.begin(9600);
    Serial.println("Bluetooth AT Command Test...");
    bluetooth.preInit();
    delay(3*1000);
    while(0 != bluetooth.powerOn()){ //bluetooth PowerOn
        Serial.println("bluetooth power on failed, try again...");
        delay(2000);
    }
}

void loop() {
    if(bluetooth.serialSIM800.available()) {
        start = 1;
    }else{
        delay(500);
    }

    if(start){
        //bluetooth.cleanBuffer(bluetoothBuffer,64);
        bluetooth.readBuffer(bluetoothBuffer,BT_BUF_LEN,DEFAULT_TIMEOUT);
        if(NULL != strstr(bluetoothBuffer,"+BTPAIRING:")){
            bluetooth.acceptPairing();
        }
        if(NULL != strstr(bluetoothBuffer,"+BTCONNECTING:")){
            bluetooth.acceptConnect();
        }
        start = 0;
    }
}
原理图在线查看器
资源
-
原理图
-
固件
-
SIM800 AT 命令
-
Seeeduino GPRS 库
技术支持和产品讨论
感谢您选择我们的产品!我们在这里为您提供不同的支持,以确保您使用我们产品的体验尽可能顺畅。我们提供多种沟通渠道,以满足不同的偏好和需求。