SenseCAP Indicator - Home Assistant 应用开发
介绍
通过将 SenseCAP Indicator 与 Home Assistant 集成,释放智能家居的全部潜力。这种强大的组合让您能够以前所未有的便利性监控和控制您的环境。
在这个综合指南中,学习如何使用 MQTT 将您的 SenseCAP Indicator 与 Home Assistant 无缝集成。
在开始之前,让我们探索设置 Home Assistant 的选项。Home Assistant 可以轻松安装在两个专用硬件选项上:
当然,您可以按照 Installation - Home Assistant (home-assistant.io) 的各种选项来安装 HA。
- Home Assistant Green
- Home Assistant Yellow
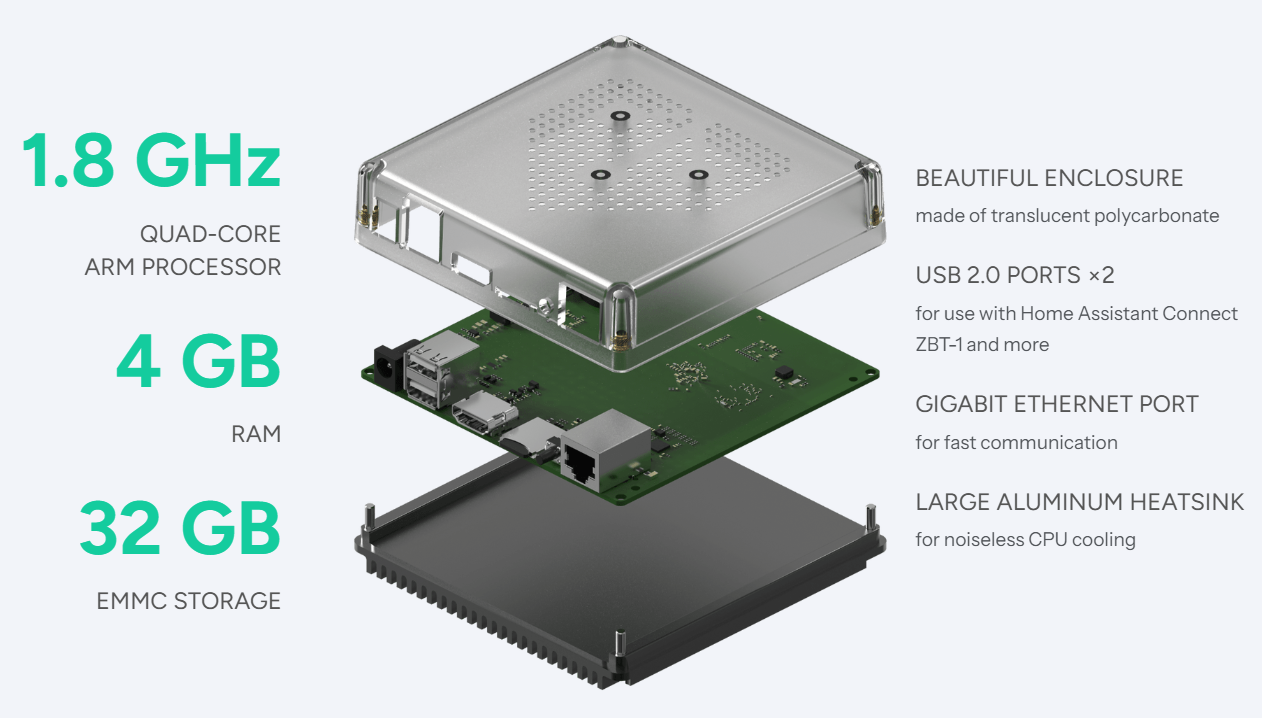
经济实惠的 Home Assistant Green 是您开始使用 Home Assistant 的最简单方式。它即插即用,并且已预装了 Home Assistant。
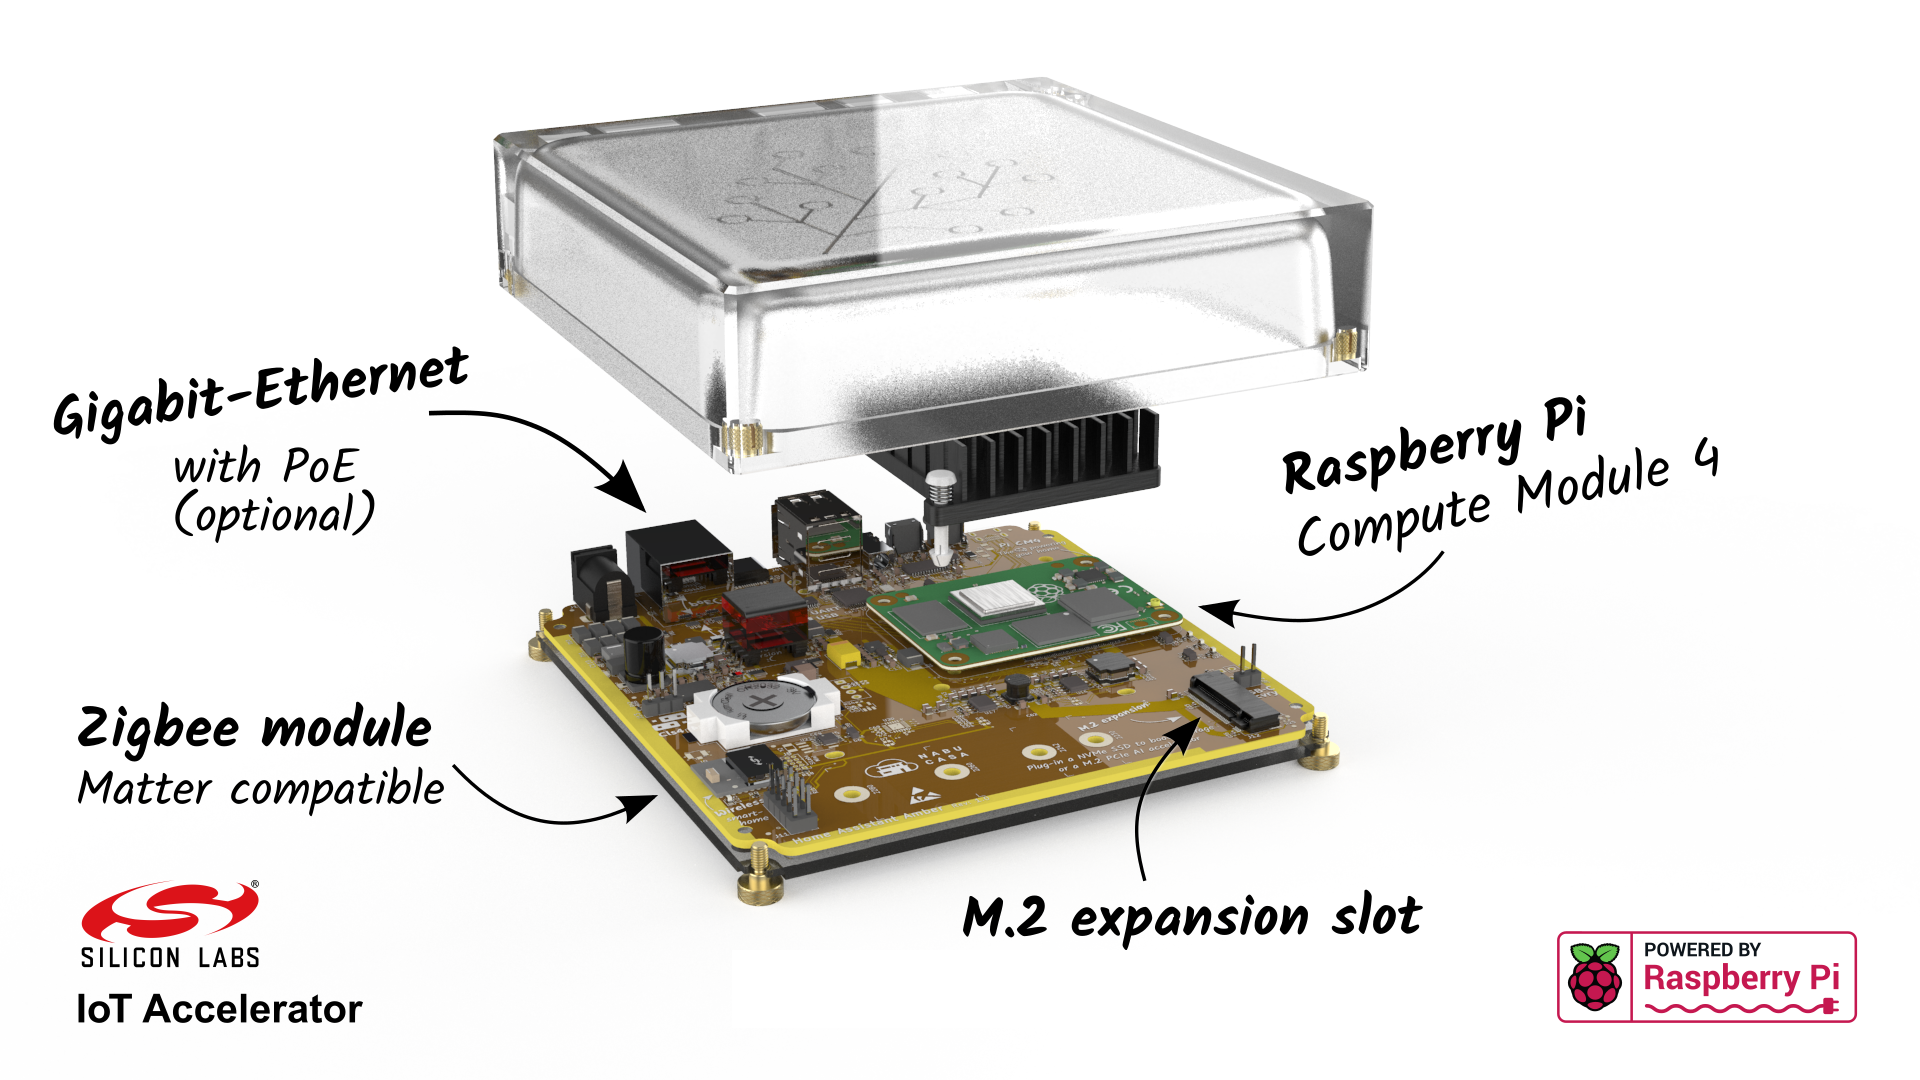
Home Assistant Yellow 预装在定制外壳中,配备 Raspberry Pi Compute Module 4 (CM4) 和定制散热器,实现无风扇静音运行。CM4 是无无线版本,具有 2 GB RAM 和 16 GB eMMC 存储。预装 Home Assistant。
为了最大化 Home Assistant 的功能,我们推荐使用 Home Assistant OS 或 Home Assistant Supervised。这两个选项都提供高级功能和更大的自定义选项,让您可以根据确切需求定制智能家居体验。
现在,让我们开始集成过程。按照以下三个主要步骤让您的 SenseCAP Indicator 与 Home Assistant 协同工作:
前提条件
在开始之前,请确保您已经阅读了 SenseCAP Indicator 板的用户指南,以熟悉其软件和硬件信息。
安装 Home Assistant OS
Home Assistant 是一个功能强大的开源家庭自动化平台,专注于隐私和本地控制。它提供了一个可定制和灵活的框架,可以从单一的统一平台管理和自动化您的所有家庭设备。
使用 Home Assistant Yellow,您可以按照这里提供的说明进行操作。此外,要在任何类型的 Raspberry Pi 或本地服务器上运行,您可以按照这个说明逐步进行。
安装完成后,进入此页面意味着您可以进行下一步。
安装 Home Assistant 后,请查看 Onboarding Home Assistant - Home Assistant 了解详情。
步骤 1:安装附加组件
Home Assistant Yellow 配备 Home Assistant Operating System,可以轻松安装附加组件。但是,Home Assistant Container 不支持附加组件,这意味着您需要在 Home Assistant 之外安装 MQTT 代理应用程序。详情请查看安装方法。
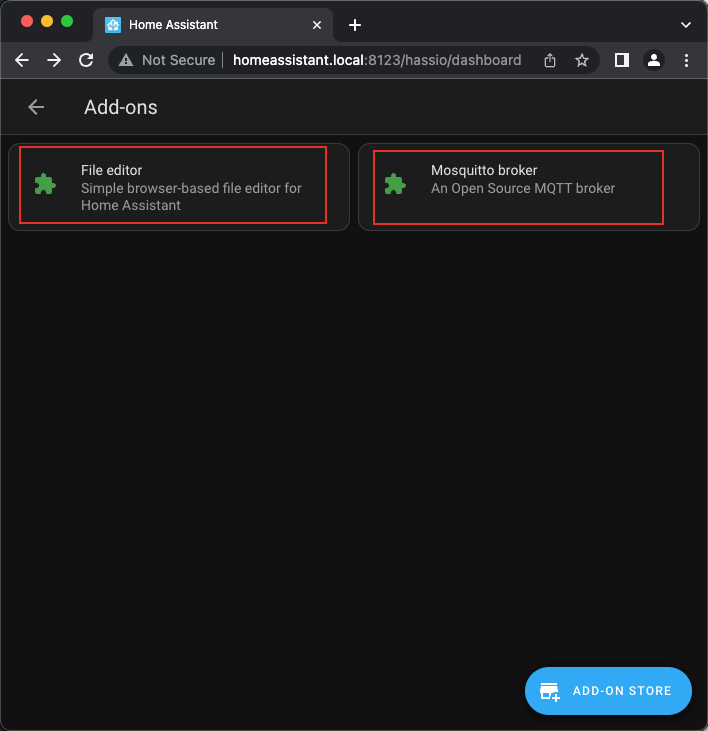
下一步是安装 Mosquitto Broker 和 File Editor。Mosquitto 是一个实现 MQTT 协议的开源消息代理,而 File Editor 允许您在不访问终端的情况下修改 configuration.yaml 文件。
在 Home Assistant Yellow 中,您可以使用附加组件功能安装 Mosquitto Broker 和 File Editor。
 |  |
 |  |
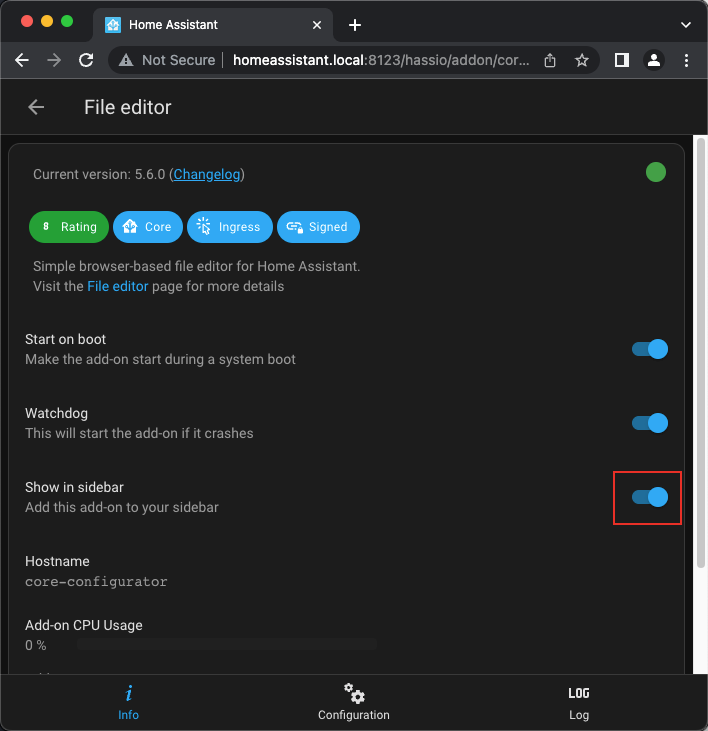
为了方便起见,在侧边栏中显示"文件编辑器":
现在我们有了两个插件。
步骤 2:设置 MQTT 集成
MQTT(消息队列遥测传输)是一种轻量级消息传递协议,对于将您的 SenseCAP Indicator 开发板连接到 Home Assistant 至关重要。要启用此功能,您需要将 MQTT 集成 添加到您的 Home Assistant 设置中。
添加 MQTT 集成允许 Home Assistant 与您的 SenseCAP Indicator 开发板无缝通信,实现实时数据交换和控制。这种双向通信对于监控传感器数据和向您的设备发送命令至关重要。
要设置 MQTT 集成:
- 在您的 Home Assistant 仪表板中导航到集成页面(
设备和服务->集成)。 - 搜索"MQTT"并从列表中选择它。(如果没有自动发现,)
- 按照屏幕上的说明完成设置。
 |  |
如果您使用的是非官方的 MQTT 代理(如 EMQX Broker)而不是标准的 Mosquitto 代理,自动发现可能无法工作。在这种情况下,您需要手动输入代理的 IP 地址来建立连接。这确保了 Home Assistant 可以与您的自定义 MQTT 设置进行通信。
为 MQTT 插件添加用户
在 Home Assistant 中使用官方 Mosquitto Broker 插件时,您可能需要为 MQTT 连接设置凭据。此步骤确保您的设备与 Home Assistant 之间的安全通信。以下是添加用户的方法:
- 在您的 Home Assistant 界面中导航到 Mosquitto broker 插件。
- 在插件配置中查找"Users"部分或选项卡。
- 点击"Add User"或"+"按钮创建新用户。
 |  |
- 在用户创建表单中:
- 输入您选择的用户名。默认为
indicator-usr1。 - 创建一个强密码。默认为
indicator-password。 - 如果需要,您可以设置特定权限。
- 输入您选择的用户名。默认为
- 保存新用户凭据。
确保在配置您的 SenseCAP Indicator 或任何其他 MQTT 设备连接到 Home Assistant 时使用这些凭据。
添加用户后,您可能需要重启 Mosquitto broker 插件以使更改生效。现在您应该能够使用这些凭据建立安全的 MQTT 连接。
记住更新您的 SenseCAP Indicator 的 MQTT 设置,使用新的用户名和密码,以确保它能与 Home Assistant 通信。
设置 SenseCAP Indicator ESP32 项目
在将您的 SenseCAP Indicator 与 Home Assistant 集成之前,您需要为设备设置适当的固件。按照以下步骤下载、构建并将项目刷写到您的 SenseCAP Indicator。
步骤 1:下载项目
有两个项目可用于将 SenseCAP Indicator 与 Home Assistant 集成。选择最适合您需求的项目:
- sensecap-indicator-ha
- SenseCAP_Indicator_ESP32
步骤 2:导航到项目目录
下载或克隆项目后,导航到相应的目录:
- sensecap-indicator-ha
- SenseCAP_Indicator_ESP32
cd sensecap-indicator-ha
cd SenseCAP_Indicator_ESP32/examples/indicator_ha
步骤 3:构建、烧录和监控项目
现在您可以构建固件,将其烧录到您的 SenseCAP Indicator,并监控设备的输出。使用以下命令:
idf.py -p PORT build flash monitor
将 PORT 替换为您设备的相应端口(例如,Windows 上的 COM3 或 Linux 上的 /dev/ttyUSB0)。
如果您不确定设备的端口:
- 在 Windows 上:在设备管理器的"端口 (COM & LPT)"下查看
- 在 Linux/macOS 上:在终端中运行
ls /dev/tty*
此命令将:
- 构建项目
- 将固件刷写到您的 SenseCAP Indicator
- 打开串行监视器以显示设备的输出
要退出串行监视器,请按 Ctrl-]。
步骤 4:验证设置
刷写固件后,串行监视器将显示来自您的 SenseCAP Indicator 的输出。查找指示成功连接到您的 Wi-Fi 网络和 MQTT 代理的消息。
确保您的 SenseCAP Indicator 连接到与您的 Home Assistant 实例相同的网络,并且您的 MQTT 代理已正确配置且可访问。
一旦您成功刷写并验证了 SenseCAP Indicator 上的固件,您就可以继续使用 MQTT 集成将其集成到 Home Assistant 中。
接下来,我们将配置 Home Assistant 以识别并与您的 SenseCAP Indicator 通信。
添加 MQTT 设备
在 Home Assistant 中设置 MQTT 集成后,下一步是添加 MQTT 设备。此过程涉及配置 Home Assistant 以通过 MQTT 识别并与您的 SenseCAP Indicator Board 通信。
步骤 1:添加 Indicator 实体
要将 SenseCAP Indicator 实体添加到 Home Assistant,您需要修改 configuration.yaml 文件。此文件对于定义 Home Assistant 如何与您的设备交互至关重要。
如果您使用的是 Home Assistant Yellow 或任何带有 File editor 附加组件的系统,您可以通过 Web 界面轻松修改 configuration.yaml 文件。对于其他设置,例如 Home Assistant Container,您可能需要通过终端访问来修改文件。
要修改 configuration.yaml 文件:
 |  |  |
- 在您的 Home Assistant 仪表板中导航到 File editor 附加组件。
- 从文件列表中选择
configuration.yaml文件。 - 将以下 MQTT 配置添加到文件中:
点击展开并复制 SenseCAP Indicator 的 MQTT 配置
# Example configuration.yaml entry | SenseCAP Indicator MQTT Configuration
mqtt:
  sensor:
    - unique_id: indicator_temperature
      name: "Indicator Temperature"
      state_topic: "indicator/sensor"
      suggested_display_precision: 1
      unit_of_measurement: "°C"
      value_template: "{{ value_json.temp }}"
    - unique_id: indicator_humidity
      name: "Indicator Humidity"
      state_topic: "indicator/sensor"
      unit_of_measurement: "%"
      value_template: "{{ value_json.humidity }}"
    - unique_id: indicator_co2
      name: "Indicator CO2"
      state_topic: "indicator/sensor"
      unit_of_measurement: "ppm"
      value_template: "{{ value_json.co2 }}"
    - unique_id: indicator_tvoc
      name: "Indicator tVOC"
      state_topic: "indicator/sensor"
      unit_of_measurement: ""
      value_template: "{{ value_json.tvoc }}"
  switch:
    - unique_id: indicator_switch1
      name: "Indicator Switch1"
      state_topic: "indicator/switch/state"
      command_topic: "indicator/switch/set"
      value_template: "{{ value_json.switch1 }}"
      payload_on: '{"switch1":1}'
      payload_off: '{"switch1":0}'
      state_on: 1
      state_off: 0
    - unique_id: indicator_switch2
      name: "Indicator Switch2"
      state_topic: "indicator/switch/state"
      command_topic: "indicator/switch/set"
      value_template: "{{ value_json.switch2 }}"
      payload_on: '{"switch2":1}'
      payload_off: '{"switch2":0}'
      state_on: 1
      state_off: 0
    - unique_id: indicator_switch3
      name: "Indicator Switch3"
      state_topic: "indicator/switch/state"
      command_topic: "indicator/switch/set"
      value_template: "{{ value_json.switch3 }}"
      payload_on: '{"switch3":1}'
      payload_off: '{"switch3":0}'
      state_on: 1
      state_off: 0
    - unique_id: indicator_switch4
      name: "Indicator Switch4"
      state_topic: "indicator/switch/state"
      command_topic: "indicator/switch/set"
      value_template: "{{ value_json.switch4 }}"
      payload_on: '{"switch4":1}'
      payload_off: '{"switch4":0}'
      state_on: 1
      state_off: 0
    - unique_id: indicator_switch6
      name: "Indicator Switch6"
      state_topic: "indicator/switch/state"
      command_topic: "indicator/switch/set"
      value_template: "{{ value_json.switch6 }}"
      payload_on: '{"switch6":1}'
      payload_off: '{"switch6":0}'
      state_on: 1
      state_off: 0
    - unique_id: indicator_switch7
      name: "Indicator Switch7"
      state_topic: "indicator/switch/state"
      command_topic: "indicator/switch/set"
      value_template: "{{ value_json.switch7 }}"
      payload_on: '{"switch7":1}'
      payload_off: '{"switch7":0}'
      state_on: 1
      state_off: 0
  number:
    - unique_id: indicator_switch5
      name: "Indicator Switch5"
      state_topic: "indicator/switch/state"
      command_topic: "indicator/switch/set"
      command_template: '{"switch5": {{ value }} }'
      value_template: "{{ value_json.switch5 }}"
    - unique_id: indicator_switch8
      name: "Indicator Switch8"
      state_topic: "indicator/switch/state"
      command_topic: "indicator/switch/set"
      command_template: '{"switch8": {{ value }} }'
      value_template: "{{ value_json.switch8 }}"
- 保存对
configuration.yaml文件的更改。
如果您的 Home Assistant 设置不支持插件(例如 Home Assistant Container),您需要通过终端或 SSH 连接来修改 configuration.yaml 文件。
步骤 2:应用配置更改
修改 configuration.yaml 文件后,您需要应用这些更改:
- 在您的 Home Assistant 仪表板中导航到
开发者工具。 - 找到并点击"YAML"选项卡。
- 通过
ALL YAML CONFIGURATION重新加载配置。
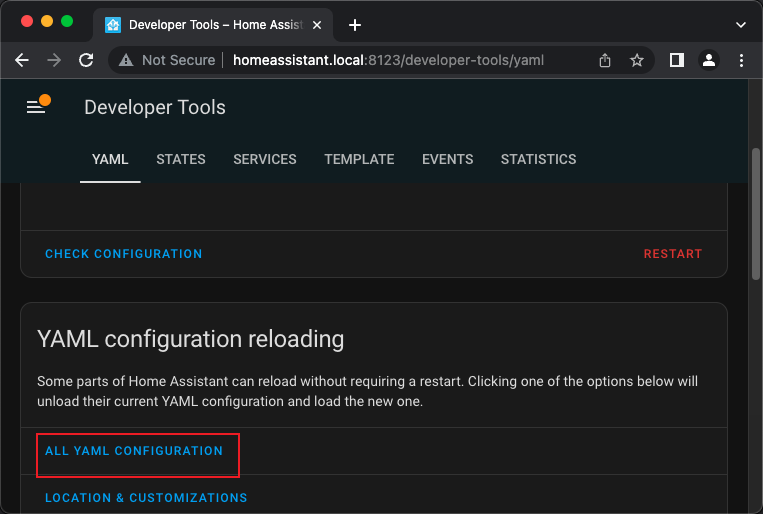
如果出现问题,您可以
- 点击"检查配置"按钮来验证您的更改。
- 如果配置检查通过,点击"重启"按钮来应用新配置。
重启后,Home Assistant 将识别您的 SenseCAP Indicator 实体,您应该能够在仪表板中看到它们。如果实体没有立即出现,您可能需要等待几分钟让 MQTT 发现过程完成。
请记住确保您的 SenseCAP Indicator 已正确配置,能够将其数据发布到配置中定义的正确 MQTT 主题。
通过遵循这些步骤,您已成功通过 MQTT 将您的 SenseCAP Indicator 设备添加到 Home Assistant。现在您可以在自动化、脚本和仪表板中使用这些实体,获得更加集成的智能家居体验。
设置仪表板
将您的 SenseCAP Indicator 与 Home Assistant 集成的最后一步是设置自定义仪表板。这将允许您轻松地可视化和控制设备的数据和功能。
创建新仪表板(可选)
如果您想为您的 SenseCAP Indicator 创建专用仪表板:
- 在 Home Assistant 侧边栏中导航到
设置 -> 仪表板。 - 点击"添加仪表板"按钮。
- 设置标题(例如"SenseCAP Indicator")并选择图标。
- 点击"创建"来完成您的新仪表板。
 |  |
配置仪表板
要将 SenseCAP Indicator 实体添加到您的仪表板:
- 打开您想要编辑的仪表板。
- 点击右上角的三点菜单并选择"编辑仪表板"。
- 点击"接管控制"按钮以启用手动配置。
 |  |
- 在仪表板编辑器中,再次点击三点菜单并选择"原始配置编辑器"。
- 用以下配置替换现有的 YAML 内容:
点击复制仪表板 YAML 以更改 UI
注意:这不是用于
Configuration.YAML的。
views:
  - title: Indicator device
    icon: ''
    badges: []
    cards:
      - graph: line
        type: sensor
        detail: 1
        icon: mdi:molecule-co2
        unit: ppm
        entity: sensor.indicator_co2
      - graph: line
        type: sensor
        entity: sensor.indicator_temperature
        detail: 1
        icon: mdi:coolant-temperature
      - graph: line
        type: sensor
        detail: 1
        entity: sensor.indicator_humidity
      - graph: line
        type: sensor
        entity: sensor.indicator_tvoc
        detail: 1
        icon: mdi:air-filter
      - type: entities
        entities:
          - entity: switch.indicator_switch1
          - entity: switch.indicator_switch2
          - entity: switch.indicator_switch3
          - entity: switch.indicator_switch4
          - entity: number.indicator_switch5
          - entity: switch.indicator_switch6
          - entity: switch.indicator_switch7
          - entity: number.indicator_switch8
        title: Indicator control
        show_header_toggle: false
        state_color: true
此 YAML 配置专门用于仪表板,不应添加到您的 configuration.yaml 文件中。
- 点击"保存"以应用更改。
 |  |
恭喜!您已成功配置您的 Home Assistant 仪表板来显示和控制您的 SenseCAP Indicator。现在您可以监控 CO2 水平、温度、湿度和 TVOC,以及直接从您的 Home Assistant 界面控制各种开关。

资源
- 演示 SDK:SenseCAP Indicator 的演示 SDK 可在 GitHub 上获取。
indicator_ha.c文件:此文件包含 Home Assistant 集成的主要功能。您可以在这里查看。- 用户指南:用户指南提供了关于 SenseCAP Indicator 板软件和硬件的详细信息。您可以在这里阅读。
- Home Assistant 安装指南:如果您是 Home Assistant 的新用户,本指南将帮助您安装和设置。您可以在这里找到。
- ESP-IDF 入门指南:本指南提供了配置和使用 ESP-IDF 构建项目的完整步骤。您可以在这里访问。
- Home Assistant 概念和术语
参考
技术支持
需要 SenseCAP Indicator 的帮助?我们随时为您提供协助!
如果您在学习本教程时遇到任何问题或有任何疑问,请随时联系我们的技术支持。我们随时为您提供帮助!
访问我们的 Seeed 官方 Discord 频道提出您的问题,或访问 GitHub 讨论区分享您想要的一切!