通过 MQTT 将 SenseCAP Indicator 接入 Home Assistant
本指南展示如何将 SenseCAP Indicator 打造成 Home Assistant 的辅助控制面板。完成设置后,Indicator 会通过 MQTT 将其内置传感器读数发布到 Home Assistant,而 Home Assistant 可以向 Indicator 屏幕发送开关和滑块指令。
你将构建什么
该集成使用三个固定的 MQTT 主题:
| 方向 | 主题 | 作用 |
|---|---|---|
| Indicator 到 Home Assistant | indicator/sensor | 发布温度、湿度、CO2 和 tVOC 读数 |
| Home Assistant 到 Indicator | indicator/switch/set | 发送开关和滑块指令 |
| Indicator 到 Home Assistant | indicator/switch/state | 发布当前开关和滑块状态 |
在 Home Assistant 端,你将创建 4 个传感器实体、6 个开关实体和 2 个数字实体。在 Indicator 端,你将配置 Wi-Fi 和 MQTT 代理,然后将屏幕用作本地控制面板。
前置条件
- SenseCAP Indicator D1 或兼容的 SenseCAP Indicator 硬件
- 一套正在运行的 Home Assistant 实例
- 一个可被 Home Assistant 和 Indicator 同时访问的 MQTT 代理
- 如果你计划从源码构建固件,则需要安装 ESP-IDF v5.4.x
- 一根用于烧录和串口监控的 USB 线
在继续之前,如果你还不熟悉该开发板,请先阅读 SenseCAP Indicator 用户指南。
1. 准备 Home Assistant
如果你已经有 Home Assistant 和 MQTT 代理,可以直接跳到步骤 3:构建并烧录固件。
Home Assistant OS 是最简单的路径,因为它支持 Add-ons,包括 Mosquitto 代理和 File editor。
Home Assistant 可以通过多种安装模式运行。如果你使用 Home Assistant Container,则无法使用 Add-ons,因此需要单独运行一个 MQTT 代理,例如 Mosquitto 或 EMQX。
- Home Assistant Green
- Home Assistant Yellow
Home Assistant Green 是一种即插即用的方式来开始使用 Home Assistant。
Home Assistant Yellow 是一款基于 Raspberry Pi Compute Module 4 的 Home Assistant 中枢。
根据你的设备,遵循官方的 Home Assistant 安装指南。完成初始引导后,你应该能看到 Home Assistant 仪表盘。
2. 安装 Mosquitto 并启用 MQTT
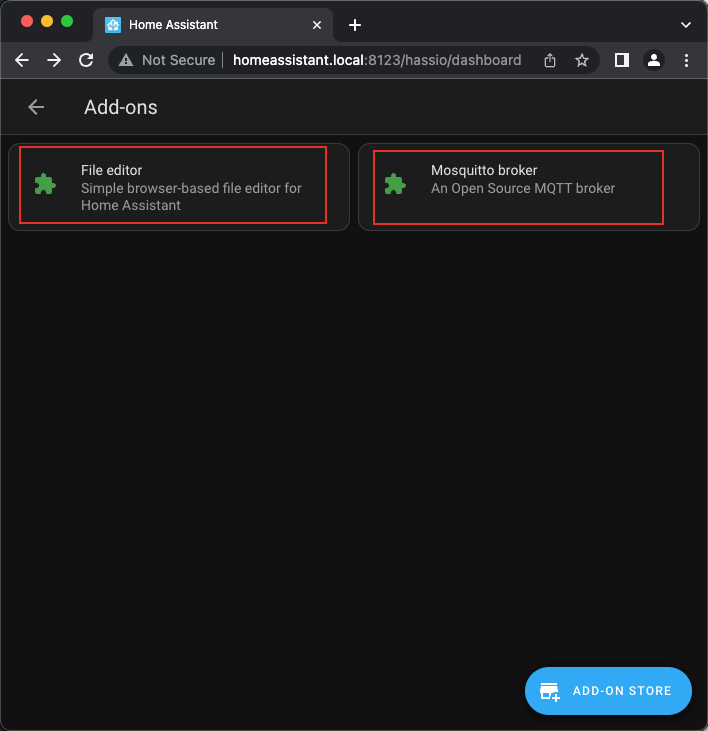
安装 Add-ons
在 Home Assistant OS 中,安装两个 Add-ons:
- Mosquitto broker,用于 MQTT 消息传递
- File editor,用于通过 Home Assistant Web UI 编辑
configuration.yaml
进入 Settings > Add-ons > Add-on Store,然后安装这两个 Add-ons。
 |  |
 |  |
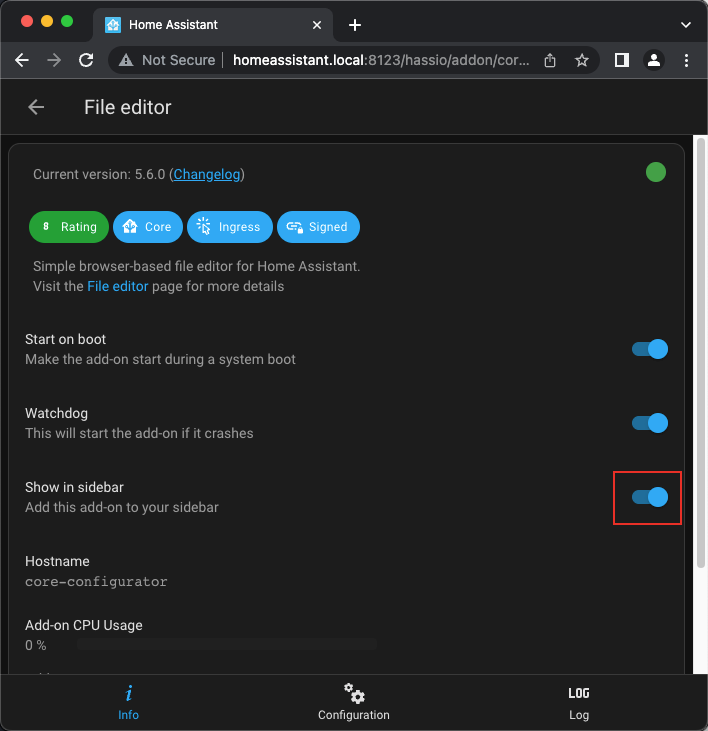
为了方便起见,为 File editor 启用 Show in sidebar。
安装完成后,你应该能看到这两个 Add-ons。
启用 MQTT 集成
进入 Settings > Devices & services > Integrations,搜索 MQTT,并按照向导完成设置。
 |  |
如果 Home Assistant 没有自动发现你的代理,请手动输入代理主机地址。当你使用外部代理而不是 Mosquitto Add-on 时,这种情况很常见。
创建 MQTT 凭据
如果你的 MQTT 代理需要身份验证,请为 Indicator 创建一个用户名和密码。在 Mosquitto broker Add-on 中添加一个用户,并将凭据保存在手边;稍后你会在 Indicator 上输入它们。
 |  |
3. 构建并烧录固件
当前的 Home Assistant 固件维护在 sensecap-indicator-ha 仓库中。
git clone https://github.com/Love4yzp/sensecap-indicator-ha
cd sensecap-indicator-ha
安装 ESP-IDF v5.4.x 并在你的 shell 中导出 IDF_PATH。然后构建、烧录并打开串口监视器:
./dev build
./dev flash
./dev monitor
要退出串口监视器,请按下 Ctrl-]。
./dev flash 会自动检测串口。如果你需要指定端口,请运行 ./dev flash -p /dev/ttyUSB0,或使用与你的操作系统匹配的串口设备名称。
手动 ESP-IDF 命令
如果你更倾向于直接调用 ESP-IDF:
. "$IDF_PATH/export.sh"
idf.py build
idf.py -p /dev/ttyUSB0 -b 460800 flash monitor
ESP32-S3 固件使用 ESP-IDF v5.4.x 和 LVGL 9。请保持项目的 sdkconfig.defaults 设置,尤其是 CONFIG_LV_MEM_CUSTOM=y、PSRAM 120 MHz OCT 模式、CPU 240 MHz,以及 QIO 120 MHz 闪存。
4. 在 Indicator 上配置 Wi-Fi 和 MQTT
烧录完成后,在 Indicator 触摸屏上配置 Wi-Fi 和 MQTT。MQTT 代理地址必须指向 Home Assistant 使用的代理。
你也可以通过串口控制台配置 MQTT:
| 命令 | 描述 |
|---|---|
mqtthelp | 打印代理、主题和负载示例 |
haconfig | 打印当前 MQTT 和 Home Assistant 配置 |
setmqtt -a <addr> | 设置代理地址 |
setmqtt -a <addr> -c <client-id> -u <user> -p <pass> | 设置代理地址、客户端 ID、用户名和密码 |
示例:
setmqtt -a 192.168.1.10 -c indicator-01 -u mqtt_user -p mqtt_password
setmqtt --addr mqtt://192.168.1.10:1883
setmqtt --addr mqtt://broker.emqx.io
当 setmqtt 成功后,配置会被保存到非易失性存储中,MQTT 客户端会自动重启。
Indicator 和 Home Assistant 必须能够访问同一个 MQTT 代理。如果它们位于不同的网络或 VLAN,请检查路由、防火墙规则以及代理监听设置。
5. 向 Home Assistant 添加 MQTT 实体
Home Assistant 需要与固件主题匹配的实体定义。打开 File editor,选择 configuration.yaml,并在顶层 mqtt: 键下添加以下代码块。
 |  |  |
不要替换整个 configuration.yaml。如果你已经有一个 mqtt: 部分,请将 sensor、switch 和 number 条目追加到该现有部分中。
MQTT 实体 YAML
mqtt:
  sensor:
    - unique_id: indicator_temperature
      name: "Indicator Temperature"
      state_topic: "indicator/sensor"
      suggested_display_precision: 1
      unit_of_measurement: "°C"
      value_template: "{{ value_json.temp }}"
    - unique_id: indicator_humidity
      name: "Indicator Humidity"
      state_topic: "indicator/sensor"
      unit_of_measurement: "%"
      value_template: "{{ value_json.humidity }}"
    - unique_id: indicator_co2
      name: "Indicator CO2"
      state_topic: "indicator/sensor"
      unit_of_measurement: "ppm"
      value_template: "{{ value_json.co2 }}"
    - unique_id: indicator_tvoc
      name: "Indicator tVOC"
      state_topic: "indicator/sensor"
      unit_of_measurement: ""
      value_template: "{{ value_json.tvoc }}"
  switch:
    - unique_id: indicator_switch1
      name: "Indicator Switch1"
      state_topic: "indicator/switch/state"
      command_topic: "indicator/switch/set"
      value_template: "{{ value_json.switch1 }}"
      payload_on: '{"switch1":1}'
      payload_off: '{"switch1":0}'
      state_on: 1
      state_off: 0
    - unique_id: indicator_switch2
      name: "Indicator Switch2"
      state_topic: "indicator/switch/state"
      command_topic: "indicator/switch/set"
      value_template: "{{ value_json.switch2 }}"
      payload_on: '{"switch2":1}'
      payload_off: '{"switch2":0}'
      state_on: 1
      state_off: 0
    - unique_id: indicator_switch3
      name: "Indicator Switch3"
      state_topic: "indicator/switch/state"
      command_topic: "indicator/switch/set"
      value_template: "{{ value_json.switch3 }}"
      payload_on: '{"switch3":1}'
      payload_off: '{"switch3":0}'
      state_on: 1
      state_off: 0
    - unique_id: indicator_switch4
      name: "Indicator Switch4"
      state_topic: "indicator/switch/state"
      command_topic: "indicator/switch/set"
      value_template: "{{ value_json.switch4 }}"
      payload_on: '{"switch4":1}'
      payload_off: '{"switch4":0}'
      state_on: 1
      state_off: 0
    - unique_id: indicator_switch6
      name: "Indicator Switch6"
      state_topic: "indicator/switch/state"
      command_topic: "indicator/switch/set"
      value_template: "{{ value_json.switch6 }}"
      payload_on: '{"switch6":1}'
      payload_off: '{"switch6":0}'
      state_on: 1
      state_off: 0
    - unique_id: indicator_switch7
      name: "Indicator Switch7"
      state_topic: "indicator/switch/state"
      command_topic: "indicator/switch/set"
      value_template: "{{ value_json.switch7 }}"
      payload_on: '{"switch7":1}'
      payload_off: '{"switch7":0}'
      state_on: 1
      state_off: 0
  number:
    - unique_id: indicator_switch5
      name: "Indicator Switch5"
      state_topic: "indicator/switch/state"
      command_topic: "indicator/switch/set"
      command_template: '{"switch5": {{ value }} }'
      value_template: "{{ value_json.switch5 }}"
    - unique_id: indicator_switch8
      name: "Indicator Switch8"
      state_topic: "indicator/switch/state"
      command_topic: "indicator/switch/set"
      command_template: '{"switch8": {{ value }} }'
      value_template: "{{ value_json.switch8 }}"
保存文件,然后前往 Developer Tools > YAML 并重新加载 YAML 配置。
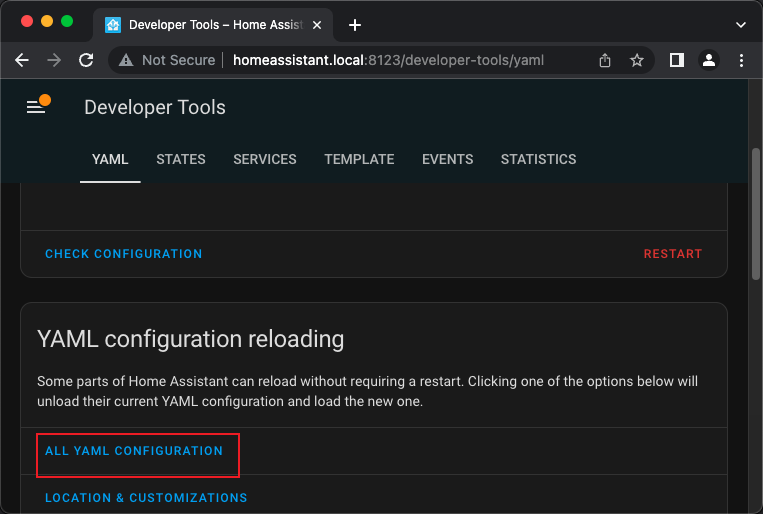
如果实体没有出现,请先使用 Check configuration。如果配置有效但实体仍未出现,请重启 Home Assistant,并确认 Indicator 正在向 indicator/sensor 发布数据。
6. 创建仪表盘
你可以将新实体添加到任意仪表盘。为了让 Indicator 独立显示,可以通过 Settings > Dashboards 创建一个专用仪表盘。
 |  |
打开该仪表盘,选择 Edit Dashboard,然后使用 Raw configuration editor。
 |  |
仪表盘 YAML
此 YAML 仅适用于 Lovelace 仪表盘的 Raw configuration editor。不要将其粘贴到 configuration.yaml 中。
views:
  - title: Indicator device
    icon: ''
    badges: []
    cards:
      - graph: line
        type: sensor
        detail: 1
        icon: mdi:molecule-co2
        unit: ppm
        entity: sensor.indicator_co2
      - graph: line
        type: sensor
        entity: sensor.indicator_temperature
        detail: 1
        icon: mdi:coolant-temperature
      - graph: line
        type: sensor
        detail: 1
        entity: sensor.indicator_humidity
      - graph: line
        type: sensor
        entity: sensor.indicator_tvoc
        detail: 1
        icon: mdi:air-filter
      - type: entities
        entities:
          - entity: switch.indicator_switch1
          - entity: switch.indicator_switch2
          - entity: switch.indicator_switch3
          - entity: switch.indicator_switch4
          - entity: number.indicator_switch5
          - entity: switch.indicator_switch6
          - entity: switch.indicator_switch7
          - entity: number.indicator_switch8
        title: Indicator control
        show_header_toggle: false
        state_color: true
保存仪表盘配置。
 |  |
现在你应该可以在 Home Assistant 中看到 Indicator 的传感器读数和控制项。

MQTT 协议参考
当你需要调试 MQTT 流量或构建自己的 Home Assistant 卡片时,请参考本节内容。
| 主题 | 示例负载 |
|---|---|
indicator/sensor | {"temp":"23.5","humidity":"45","co2":"450","tvoc":"100"} |
indicator/switch/set | {"switch1":1,"switch5":50} |
indicator/switch/state | {"switch1":1,"switch2":0} |
传感器键:
| 键 | 含义 |
|---|---|
temp | 温度 |
humidity | 相对湿度 |
co2 | CO2 浓度 |
tvoc | 总挥发性有机化合物 |
控制键:
| 键 | Home Assistant 实体类型 | 范围 |
|---|---|---|
switch1 到 switch4、switch6、switch7 | switch | 0 或 1 |
switch5、switch8 | number | 整数值 |
故障排查
| 现象 | 检查内容 |
|---|---|
| Home Assistant 未显示实体 | 确认 YAML 已添加在 mqtt: 下,然后重新加载 YAML 或重启 Home Assistant |
| 传感器数值一直为 unknown | 确认 Indicator 已连接到 Wi-Fi,并正在向 indicator/sensor 发布数据 |
| 控制无法更新 Indicator | 确认 Home Assistant 正在向 indicator/switch/set 发布数据,并且 Indicator 连接到同一个代理 |
| MQTT 登录失败 | 在 Indicator 上或使用 setmqtt 重新输入代理地址、用户名和密码 |
| 串口命令不清楚 | 在串口控制台中运行 mqtthelp |
面向开发者
固件采用双 MCU 设计:
| MCU | 角色 |
|---|---|
| ESP32-S3 | 显示、触摸、Wi-Fi、MQTT、Home Assistant 逻辑、设置和控制台 |
| RP2040 | 内置和 Grove 传感器采集,通过 UART 转发给 ESP32-S3 |
ESP32-S3 固件基于 ESP-IDF v5.4.x 和 LVGL 9 构建。运行时域按 model/view 切片组织:model 代码负责状态、NVS、MQTT 和传感器解析;view 代码负责 LVGL 对象和触摸屏回调。
有用的开发者命令:
python3 scripts/dev_check.py --skip-build
python3 scripts/dev_check.py
./dev build
PC 模拟器可以帮助你在无需烧录硬件的情况下迭代 UI 布局:
cmake -S sim -B sim/build && cmake --build sim/build -j4
./sim/build/sensecap_sim
资源
- sensecap-indicator-ha 固件仓库
- SenseCAP Indicator 用户指南
- Home Assistant 安装指南
- Home Assistant MQTT 集成
- ESP-IDF v5.4 入门指南
- SenseCAP Indicator SDK 和示例
技术支持
需要 SenseCAP Indicator 相关帮助?请访问 Seeed 官方 Discord 频道,或在 SenseCAP Indicator SDK GitHub discussions 中发起讨论。