如何在 Arduino 中使用 FreeRTOS 进行多任务处理
什么是 RTOS
当今嵌入式系统最重要的组件之一是 RTOS,也称为实时操作系统,它负责从任务调度到执行应用程序的所有工作。
RTOS 旨在提供可预测的执行模式。当处理必须满足系统的时间限制时,就会使用 RTOS。因此,与 GPOS(通用操作系统)相比,RTOS 通常重量轻、体积小,通常只提供在特定硬件上运行特定类型应用程序所需的功能。在某些情况下,开发人员可以修改现有的 RTOS,将其缩小到只提供特定应用程序所需的功能,和/或定制其功能或性能特征。
RTOS 如何工作
内核是操作系统的核心组件。像 Linux 这样的操作系统使用内核,允许用户看起来同时访问计算机。每个正在执行的程序都是操作系统控制下的一个任务(或线程)。如果操作系统能够以这种方式执行多个任务,就可以说它是多任务的。
- 多任务处理
传统处理器一次只能执行一个任务,但多任务操作系统可以通过在任务之间快速切换,使每个任务看起来同时执行。下图显示了三个任务的执行模式与时间的关系。
- 调度
调度器是内核中负责决定在任何特定时间执行哪个任务的部分。内核可以在任务的生命周期中多次暂停和恢复任务。
调度策略是调度器用来决定在任何时间点执行哪个任务的算法。(非实时)多用户系统策略可能会给每个任务分配处理器时间的"公平"比例。
除了被内核非自愿地暂停外,任务也可以选择暂停自己。如果它想要**延迟(睡眠)一段时间,或等待(阻塞)**资源可用(如串口)或事件(如按键)时,它会这样做。
参考:FreeRTOS 基础
什么是 FreeRTOS
FreeRTOS 是一类 RTOS,设计得足够小,可以在微控制器上运行——尽管它的使用不限于微控制器应用。FreeRTOS 包括一个内核和一套不断增长的软件库,适用于各个行业部门和应用。借助 FreeRTOS,您可以在基于微控制器的硬件上进行多任务处理!
为了兼容 Arduino,我们已经将 FreeRTOS 移植到 Arduino 框架中,这样您就能够轻松地在您喜爱的 Arduino 开发板上使用 FreeRTOS!
在 2017 年,Amazon 接管了 FreeRTOS 的管理权,这使得它在嵌入式世界中变得可靠和安全。
使用 Arduino 快速开始 FreeRTOS
安装 FreeRTOS Arduino 库
-
访问 Seeed_Arduino_FreeRTOS 仓库并将整个仓库下载到您的本地驱动器。
-
现在,可以将 Seeed_Arduino_FreeRTOS 库安装到 Arduino IDE 中。打开 Arduino IDE,点击
sketch->Include Library->Add .ZIP Library,然后选择您刚刚下载的Seeed_Arduino_FreeRTOS文件。

此库移植了最新的 FreeRTOS(10.2.1),允许您在 Arduino IDE 中创建 FreeRTOS 项目。
支持的开发板
Seeed_Arduino_FreeRTOS 支持 Seeed 的所有 SAMD 开发板:
- Wio Terminal
- Seeeduino XIAO
- Seeeduino Zero 系列:
- Seeeduino LoRaWAN
FreeRTOS Arduino 示例
FreeRTOS 通过为微控制器提供实时调度功能、任务间通信、定时和同步原语,可以变得非常强大。
为了让您轻松开始使用 FreeRTOS,这里提供了一些示例供参考。以下示例在 Wio Terminal 上构建和运行。
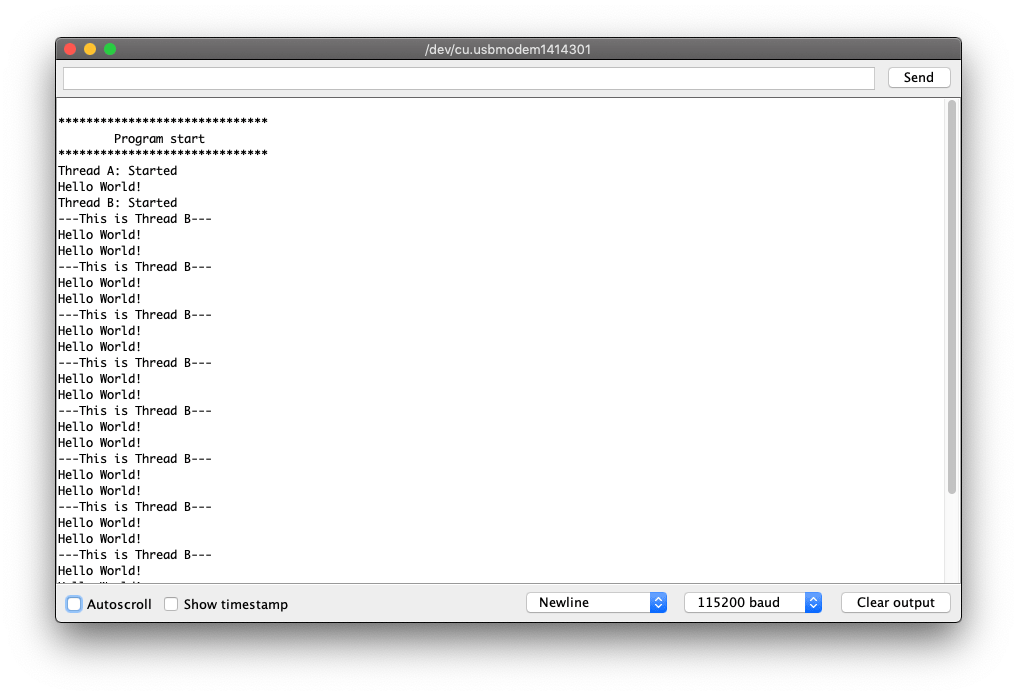
Hello World 示例
此示例简单地创建了两个线程,以不同的速率向串行监视器打印不同的字符串。
#include <Seeed_Arduino_FreeRTOS.h>

TaskHandle_t Handle_aTask;
TaskHandle_t Handle_bTask;

static void ThreadA(void* pvParameters) {
    Serial.println("Thread A: Started");

    while (1) {
        Serial.println("Hello World!");
        delay(1000);
    }
}

static void ThreadB(void* pvParameters) {
    Serial.println("Thread B: Started");

    for (int i = 0; i < 10; i++) {
        Serial.println("---This is Thread B---");
        delay(2000);
    }
    Serial.println("Thread B: Deleting");
    vTaskDelete(NULL);
}

void setup() {

    Serial.begin(115200);

    vNopDelayMS(1000); // prevents usb driver crash on startup, do not omit this
    while(!Serial);  // Wait for Serial terminal to open port before starting program

    Serial.println("");
    Serial.println("******************************");
    Serial.println("        Program start         ");
    Serial.println("******************************");

    // Create the threads that will be managed by the rtos
    // Sets the stack size and priority of each task
    // Also initializes a handler pointer to each task, which are important to communicate with and retrieve info from tasks
    xTaskCreate(ThreadA,     "Task A",       256, NULL, tskIDLE_PRIORITY + 2, &Handle_aTask);
    xTaskCreate(ThreadB,     "Task B",       256, NULL, tskIDLE_PRIORITY + 1, &Handle_bTask);

    // Start the RTOS, this function will never return and will schedule the tasks.
    vTaskStartScheduler();
}

void loop() {
    // NOTHING
}
闪烁示例
此示例同样创建两个线程并输出信号来点亮LED。一个是简单地闪烁LED,另一个是呼吸LED。
确保呼吸LED连接在PWM引脚上。
#include <Seeed_Arduino_FreeRTOS.h>

#define LEDPIN_1 PIN_WIRE_SCL // Wio Terminal Grove 端口的左侧
#define LEDPIN_2 D0 // Wio Terminal Grove 端口的右侧

TaskHandle_t Handle_aTask;
TaskHandle_t Handle_bTask;

// 闪烁LED
static void LED_1(void* pvParameters) {
    while (1) {
        digitalWrite(LEDPIN_1, HIGH);
        delay(1000);
        digitalWrite(LEDPIN_1, LOW);
        delay(1000);
    }
}

// 呼吸LED
static void LED_2(void* pvParameters) {
    int cnt = 5;
    while (1) {
        for (byte value = 0 ; value < 255; value+=cnt) {
            analogWrite(LEDPIN_2, value);
            delay(20);
        }
        delay(200);
        for (byte value = 255 ; value > 0; value-=cnt) {
            analogWrite(LEDPIN_2, value);
            delay(20);
        }
    }
}

void setup() {
    Serial.begin(115200);

    vNopDelayMS(1000); // 防止启动时usb驱动程序崩溃,请勿省略此项
//    while(!Serial);  // 在开始程序之前等待串口终端打开端口

    pinMode(LEDPIN_1, OUTPUT);
    pinMode(LEDPIN_2, OUTPUT);

    xTaskCreate(LED_1,     "Task A",       256, NULL, tskIDLE_PRIORITY + 2, &Handle_aTask);
    xTaskCreate(LED_2,     "Task B",       256, NULL, tskIDLE_PRIORITY + 1, &Handle_bTask);

    // 启动RTOS,此函数永远不会返回并将调度任务。
    vTaskStartScheduler();
}

void loop() {

}
LCD 示例
这个示例演示了在 Wio Terminal 中将 FreeRTOS 与其他 Arduino 库(如 LCD Sprites)结合使用。此示例在两个线程中创建两个精灵,以相反的方式计数。taskMonitor 是一个用于监控线程并打印每个线程堆栈信息的函数。
#include <Seeed_Arduino_FreeRTOS.h>
#include <TFT_eSPI.h>

TaskHandle_t Handle_aTask;
TaskHandle_t Handle_bTask;
TaskHandle_t Handle_monitorTask;

TFT_eSPI tft = TFT_eSPI();
TFT_eSprite img = TFT_eSprite(&tft);
TFT_eSprite img2 = TFT_eSprite(&tft);

static void LCD_TASK_1 (void* pvParameters) {
    Serial.println("线程 A: 已启动");
    img.createSprite(100, 100);
    img.fillSprite(tft.color565(229,58,64)); // 红色
    img.setTextSize(8);
    img.setTextColor(TFT_WHITE);
    for(int i = 0; i < 100; i++) {
        img.drawNumber(i, 10, 25);
        img.pushSprite(30, 70);
        img.fillSprite(tft.color565(229,58,64));
        delay(1000);
        if(i== 99) i = 0;
    }
}

static void LCD_TASK_2 (void* pvParameters) {
    Serial.println("线程 B: 已启动");
    img2.createSprite(100, 100);
    img2.fillSprite(tft.color565(48,179,222)); // 蓝色
    img2.setTextSize(8);
    img2.setTextColor(TFT_WHITE);
    for(int x = 99; x >= 0; x--) {
        img2.drawNumber(x, 10, 25);
        img2.pushSprite(190, 70);
        img2.fillSprite(tft.color565(48,179,222));
        delay(500);
        if(x== 0) x = 99;
    }
}

void taskMonitor(void* pvParameters) {
    int x;
    int measurement;

    Serial.println("任务监视器: 已启动");

    // 在永久退出之前运行此任务几次
    for (x = 0; x < 10; ++x) {

        Serial.println("");
        Serial.println("******************************");
        Serial.println("[堆栈剩余空闲字节数] ");

        measurement = uxTaskGetStackHighWaterMark(Handle_aTask);
        Serial.print("线程 A: ");
        Serial.println(measurement);

        measurement = uxTaskGetStackHighWaterMark(Handle_bTask);
        Serial.print("线程 B: ");
        Serial.println(measurement);

        measurement = uxTaskGetStackHighWaterMark(Handle_monitorTask);
        Serial.print("监视器堆栈: ");
        Serial.println(measurement);

        Serial.println("******************************");

        delay(10000); // 每10秒打印一次
    }

    // 删除自身。
    // 必须调用此函数,否则当到达结束括号并被调度时系统会崩溃。
    Serial.println("任务监视器: 正在删除");
    vTaskDelete(NULL);
}

void setup() {

    Serial.begin(115200);

    vNopDelayMS(1000); // 防止启动时usb驱动程序崩溃,请勿省略此项
    while (!Serial) ;  // 等待串口终端打开端口后再启动程序

    tft.begin();
    tft.setRotation(3);
    tft.fillScreen(tft.color565(9,7,7)); // 黑色背景
    tft.setTextColor(tft.color565(239,220,5)); // 黄色文本
    tft.setTextSize(2);
    tft.drawString("线程 A", 30, 50);
    tft.drawString("线程 B", 190, 50);

    Serial.println("");
    Serial.println("******************************");
    Serial.println("        程序启动         ");
    Serial.println("******************************");

    // 创建将由rtos管理的线程
    // 设置每个任务的堆栈大小和优先级
    // 同时初始化每个任务的处理程序指针,这对于与任务通信和从任务检索信息很重要
    xTaskCreate(LCD_TASK_1,     "任务 A",       256, NULL, tskIDLE_PRIORITY + 3, &Handle_aTask);
    xTaskCreate(LCD_TASK_2,     "任务 B",       256, NULL, tskIDLE_PRIORITY + 2, &Handle_bTask);
    xTaskCreate(taskMonitor, "任务监视器",    128, NULL, tskIDLE_PRIORITY + 1, &Handle_monitorTask);

    // 启动RTOS,此函数永远不会返回并将调度任务。
    vTaskStartScheduler();
}

void loop() {
    //无内容
}
FreeRTOS 在 Arduino 中的 Cpp 应用
此外,我们还提供了 Seeed_Arduino_ooFreeRTOS,这是一个封装了 FreeRTOS 功能的 C++ 包装器集合,它在 Arduino 框架下工作。
安装 FreeRTOS Cpp Arduino 库
-
访问 Seeed_Arduino_ooFreeRTOS 仓库,并将整个仓库下载到您的本地驱动器。
-
现在,可以将 Seeed_Arduino_ooFreeRTOS 库安装到 Arduino IDE 中。打开 Arduino IDE,点击
sketch->Include Library->Add .ZIP Library,然后选择您刚刚下载的Seeed_Arduino_ooFreeRTOS文件。
Cpp 中的闪烁示例
#include <Seeed_Arduino_ooFreeRTOS.h>
#include "thread.hpp"
#include "ticks.hpp"

using namespace cpp_freertos;

class BlinkThread : public Thread {

public:

  BlinkThread(int i, int delayInSeconds)
    : Thread( 256, 1),
      Id (i),
      DelayInSeconds(delayInSeconds)
  {
    Start();
  };

protected:

  virtual void Run() {
    while (true) {
      Serial.printf("Blink Therad: %d\n\r", Id);
      digitalWrite(LED_BUILTIN, HIGH);   // turn the LED on (HIGH is the voltage level)
      Delay(Ticks::SecondsToTicks(DelayInSeconds));
      digitalWrite(LED_BUILTIN, LOW);    // turn the LED off by making the voltage LOW
      Delay(Ticks::SecondsToTicks(DelayInSeconds));
    }
  };

private:
  int Id;
  int DelayInSeconds;
};


void setup (void)
{

  // start up the serial interface
  Serial.begin(115200);
  Serial.println("Testing FreeRTOS C++ wrappers");
  Serial.println("Simple Tasks");

  // initialize digital pin LED_BUILTIN as an output.
  pinMode(LED_BUILTIN, OUTPUT);

  static BlinkThread p1(1, 3);
  static BlinkThread p2(2, 5);

  Thread::StartScheduler();

  //
  //  We shouldn't ever get here unless someone calls
  //  Thread::EndScheduler()
  //
  Serial.println("Scheduler ended!");

}

void loop()
{
  // Empty. Things are done in Tasks.
}