高级 Wi-Fi 使用
本 wiki 介绍了 Wi-Fi 的一些高级库使用方法,如 HTTPClient、DNSServer 和 WebServer 库。通过实现这些库,您可以使用简单的 API 开发您的物联网项目。
请确保您已经按照 网络概述 更新了最新的固件和依赖库。

确保 RTL8720 固件版本 >= v2.0.2
HTTPClient 使用
HTTPClient 用于非常轻松地向 Web 服务器发出 HTTP GET、POST 和 PUT 请求。以下是一些帮助您入门的示例!
HTTP GET 示例
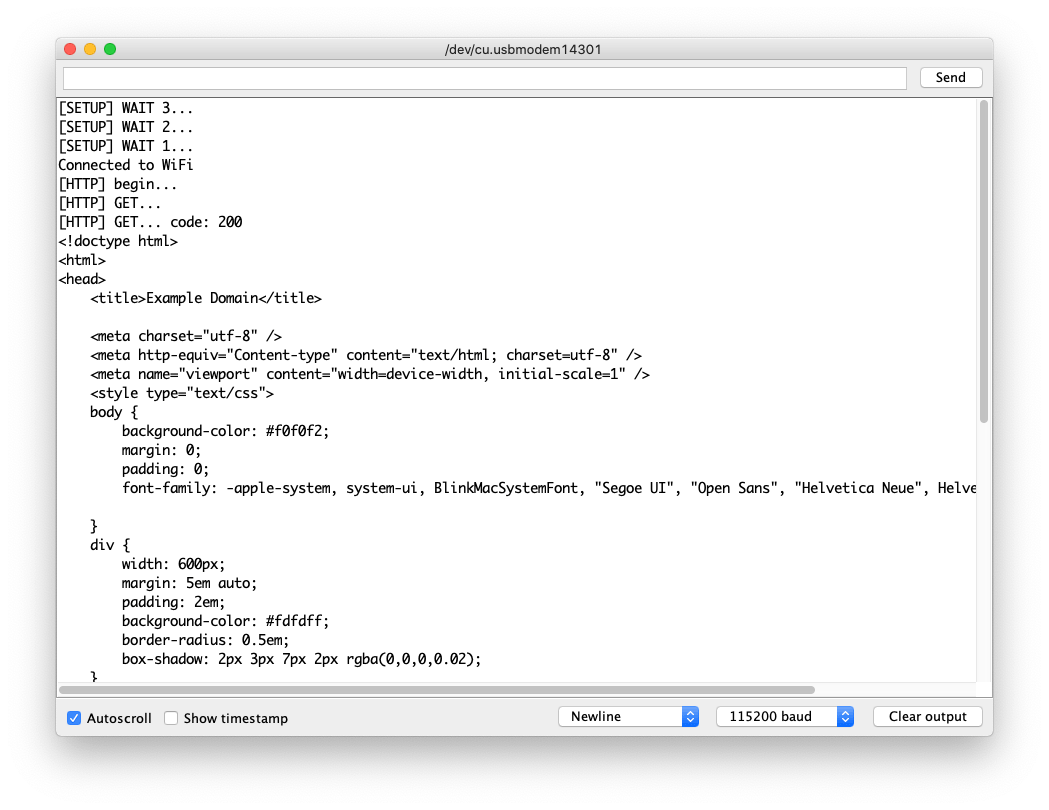
这是一个使用 HTTPClient 进行简单 HTTP 连接并将响应打印回串行监视器的示例。
-
将
yourNetwork和yourPassword更改为您的 WiFi ssid 和密码。 -
将代码上传到 Wio Terminal。
#include <rpcWiFi.h>
#include <HTTPClient.h>

const char* ssid = "yourNetwork";
const char* password =  "yourPassword";

void setup() {

  Serial.begin(115200);
  WiFi.begin(ssid, password);

  while (WiFi.status() != WL_CONNECTED) { //Check for the connection
    delay(500);
    Serial.println("Connecting..");
  }
  Serial.print("Connected to the WiFi network with IP: ");
  Serial.println(WiFi.localIP());
}

void loop() {
    // wait for WiFi connection
    if((WiFi.status() == WL_CONNECTED)) {
        HTTPClient http;
        Serial.print("[HTTP] begin...\n");
        // configure traged server and url
        http.begin("http://www.example.com/index.html"); //HTTP
        Serial.print("[HTTP] GET...\n");
        // start connection and send HTTP header
        int httpCode = http.GET();
        // httpCode will be negative on error
        if(httpCode > 0) {
            // HTTP header has been send and Server response header has been handled
            Serial.printf("[HTTP] GET... code: %d\n", httpCode);
            // file found at server
            if(httpCode == HTTP_CODE_OK) {
                String payload = http.getString();
                Serial.println(payload);
            }
        } else {
            Serial.printf("[HTTP] GET... failed, error: %s\n", http.errorToString(httpCode).c_str());
        }
        http.end();
    }
    delay(5000);
}
HTTPs GET 示例
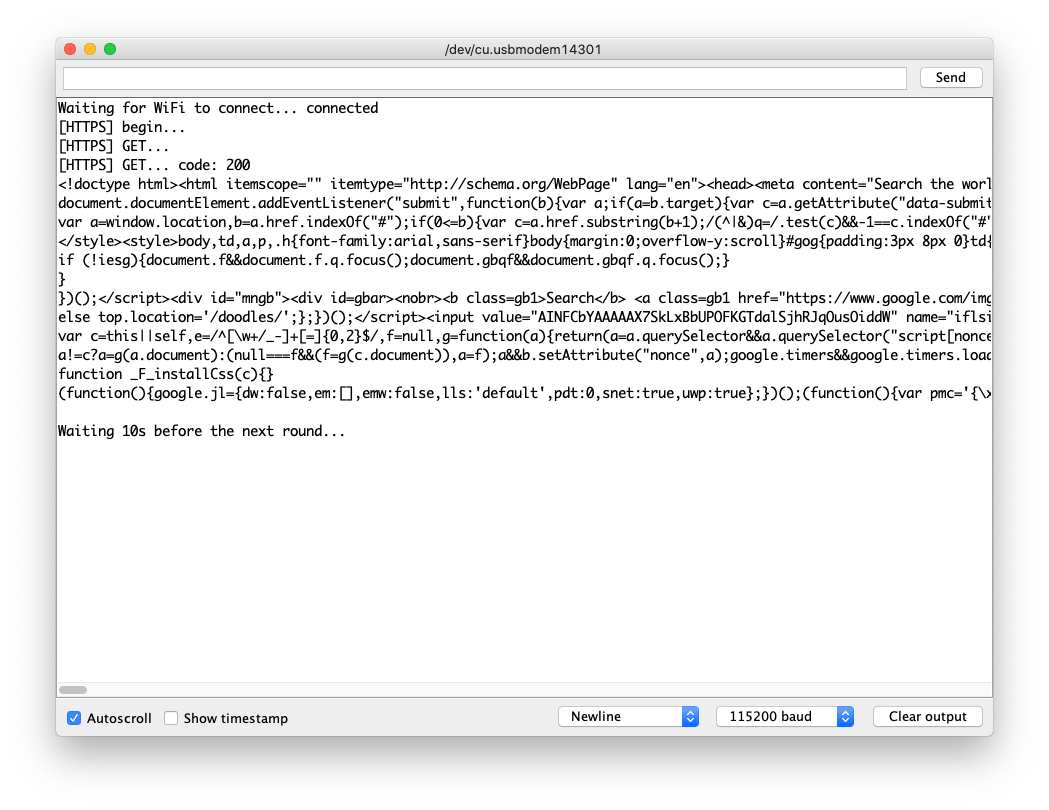
这是使用 HTTPClient 库的 HTTPs 连接。您可以参考此示例向您想要访问的网站发送 HTTPs GET 请求!
您可以按照此方法找到网站的根 CA。
-
将
yourNetwork和yourPassword更改为您的 WiFi ssid 和密码。 -
将代码上传到 Wio Terminal。
#include <rpcWiFi.h>
#include <HTTPClient.h>
#include <WiFiClientSecure.h>

const char* ssid = "yourNetwork";
const char* password =  "yourPassword";

const char* test_root_ca = \
                            "-----BEGIN CERTIFICATE-----\n"
                            "MIIESjCCAzKgAwIBAgINAeO0mqGNiqmBJWlQuDANBgkqhkiG9w0BAQsFADBMMSAw\n"
                            "HgYDVQQLExdHbG9iYWxTaWduIFJvb3QgQ0EgLSBSMjETMBEGA1UEChMKR2xvYmFs\n"
                            "U2lnbjETMBEGA1UEAxMKR2xvYmFsU2lnbjAeFw0xNzA2MTUwMDAwNDJaFw0yMTEy\n"
                            "MTUwMDAwNDJaMEIxCzAJBgNVBAYTAlVTMR4wHAYDVQQKExVHb29nbGUgVHJ1c3Qg\n"
                            "U2VydmljZXMxEzARBgNVBAMTCkdUUyBDQSAxTzEwggEiMA0GCSqGSIb3DQEBAQUA\n"
                            "A4IBDwAwggEKAoIBAQDQGM9F1IvN05zkQO9+tN1pIRvJzzyOTHW5DzEZhD2ePCnv\n"
                            "UA0Qk28FgICfKqC9EksC4T2fWBYk/jCfC3R3VZMdS/dN4ZKCEPZRrAzDsiKUDzRr\n"
                            "mBBJ5wudgzndIMYcLe/RGGFl5yODIKgjEv/SJH/UL+dEaltN11BmsK+eQmMF++Ac\n"
                            "xGNhr59qM/9il71I2dN8FGfcddwuaej4bXhp0LcQBbjxMcI7JP0aM3T4I+DsaxmK\n"
                            "FsbjzaTNC9uzpFlgOIg7rR25xoynUxv8vNmkq7zdPGHXkxWY7oG9j+JkRyBABk7X\n"
                            "rJfoucBZEqFJJSPk7XA0LKW0Y3z5oz2D0c1tJKwHAgMBAAGjggEzMIIBLzAOBgNV\n"
                            "HQ8BAf8EBAMCAYYwHQYDVR0lBBYwFAYIKwYBBQUHAwEGCCsGAQUFBwMCMBIGA1Ud\n"
                            "EwEB/wQIMAYBAf8CAQAwHQYDVR0OBBYEFJjR+G4Q68+b7GCfGJAboOt9Cf0rMB8G\n"
                            "A1UdIwQYMBaAFJviB1dnHB7AagbeWbSaLd/cGYYuMDUGCCsGAQUFBwEBBCkwJzAl\n"
                            "BggrBgEFBQcwAYYZaHR0cDovL29jc3AucGtpLmdvb2cvZ3NyMjAyBgNVHR8EKzAp\n"
                            "MCegJaAjhiFodHRwOi8vY3JsLnBraS5nb29nL2dzcjIvZ3NyMi5jcmwwPwYDVR0g\n"
                            "BDgwNjA0BgZngQwBAgIwKjAoBggrBgEFBQcCARYcaHR0cHM6Ly9wa2kuZ29vZy9y\n"
                            "ZXBvc2l0b3J5LzANBgkqhkiG9w0BAQsFAAOCAQEAGoA+Nnn78y6pRjd9XlQWNa7H\n"
                            "TgiZ/r3RNGkmUmYHPQq6Scti9PEajvwRT2iWTHQr02fesqOqBY2ETUwgZQ+lltoN\n"
                            "FvhsO9tvBCOIazpswWC9aJ9xju4tWDQH8NVU6YZZ/XteDSGU9YzJqPjY8q3MDxrz\n"
                            "mqepBCf5o8mw/wJ4a2G6xzUr6Fb6T8McDO22PLRL6u3M4Tzs3A2M1j6bykJYi8wW\n"
                            "IRdAvKLWZu/axBVbzYmqmwkm5zLSDW5nIAJbELCQCZwMH56t2Dvqofxs6BBcCFIZ\n"
                            "USpxu6x6td0V7SvJCCosirSmIatj/9dSSVDQibet8q/7UK4v4ZUN80atnZz1yg==\n"
                            "-----END CERTIFICATE-----\n";

WiFiClientSecure client;

void setup() {

  Serial.begin(115200);
  WiFi.begin(ssid, password);

  while (WiFi.status() != WL_CONNECTED) { //检查连接状态
    delay(500);
    Serial.println("连接中..");
  }
  Serial.print("已连接到WiFi网络,IP地址为: ");
  Serial.println(WiFi.localIP());
  client.setCACert(test_root_ca);
}

void loop() {
  if(&client) {
    {
      // 为HTTPClient https添加一个作用域块,确保在WiFiClientSecure *client之前销毁
      HTTPClient https;
      Serial.print("[HTTPS] 开始...\n");
      if (https.begin(client, "https://www.google.com/index.html")) {  // HTTPS
        Serial.print("[HTTPS] GET...\n");
        // 开始连接并发送HTTP头
        int httpCode = https.GET();
        // 出错时httpCode为负数
        if (httpCode > 0) {
          // HTTP头已发送,服务器响应头已处理
          Serial.printf("[HTTPS] GET... 代码: %d\n", httpCode);
          // 在服务器上找到文件
          if (httpCode == HTTP_CODE_OK || httpCode == HTTP_CODE_MOVED_PERMANENTLY) {
            String payload = https.getString();
            Serial.println(payload);
          }
        } else {
          Serial.printf("[HTTPS] GET... 失败,错误: %s\n", https.errorToString(httpCode).c_str());
        }
        https.end();
      } else {
        Serial.printf("[HTTPS] 无法连接\n");
      }
      // 结束额外的作用域块
    }
  } else {
    Serial.println("无法创建客户端");
  }
  Serial.println();
  Serial.println("等待10秒后进行下一轮...");
  delay(10000);
}
HTTP POST 示例
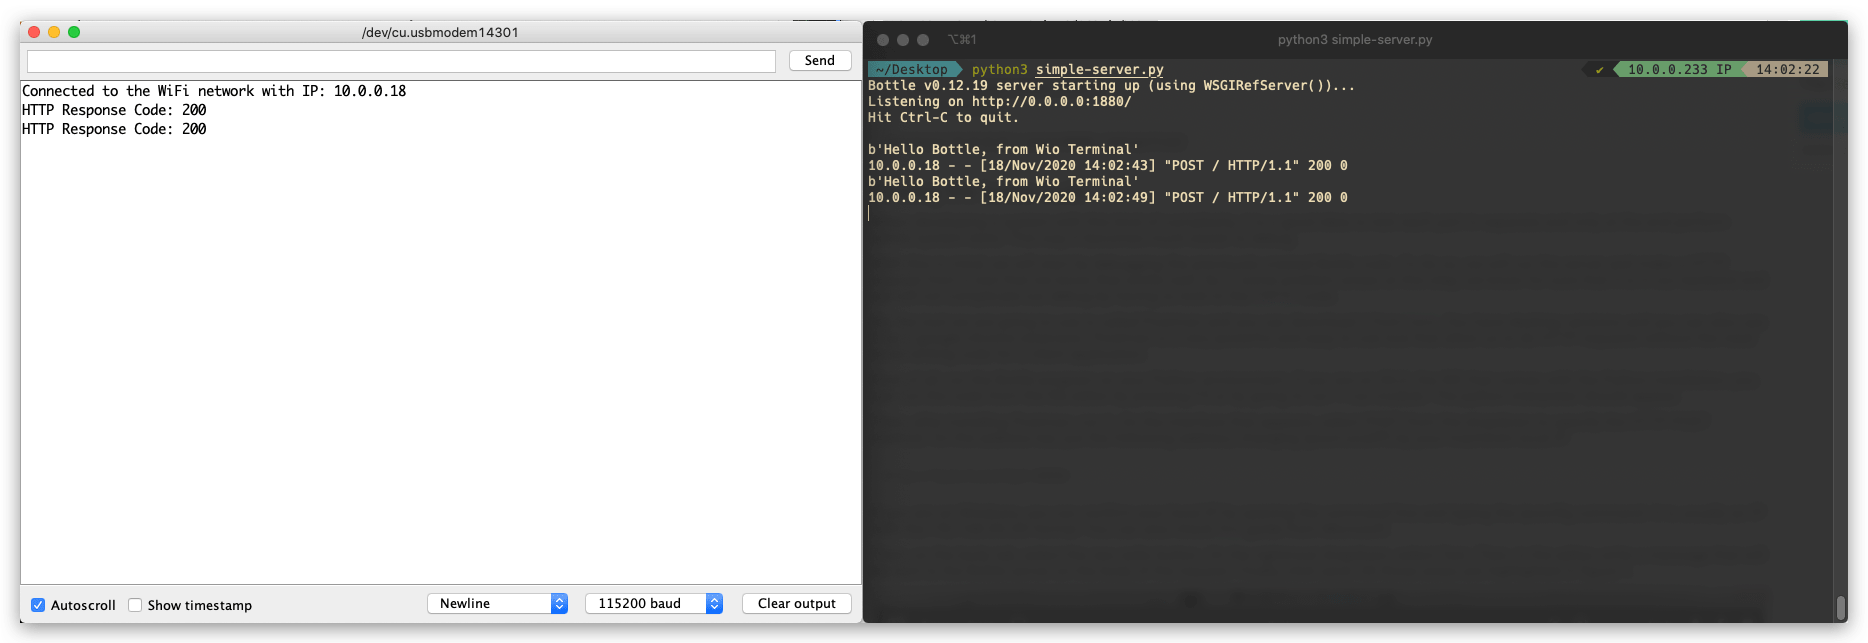
这是一个使用 Wio Terminal 的 HTTPClient 向 Web 服务器发送 HTTP POST 请求的示例。在此演示中,我们使用 Python 在 PC 上设置一个简单的 Web 服务器,该服务器可以接收和响应 HTTP 请求。
Python 服务器代码
首先,我们需要使用 pip 在 Python 中安装所需的 bottle 库。在终端中运行以下命令来安装 bottle:
pip install bottle
导入bottle后,复制以下代码并保存为**simple-server.py**。您也可以将端口更改为您喜欢的其他端口,但请确保这与Arduino端匹配。
from bottle import run, request, post

@post('/')
def index():
    data = request.body.read()
    print(data)

run(host='0.0.0.0', port=1880, debug=True)
Arduino 代码
-
将
yourNetwork和yourPassword更改为您的 WiFi ssid 和 password。 -
将代码上传到 Wio Terminal。
-
检查终端,您可以看到来自 Wio Terminal 的传入 HTTP 请求消息。
#include <rpcWiFi.h>
#include <HTTPClient.h>

const char* ssid = "yourNetwork";
const char* password =  "yourPassword";

// Change the following IP to your computer's IP running the server, make sure the Port also match
const char* yourLocalIp =  "http://10.0.0.233:1880/";

void setup() {

  Serial.begin(115200);
  WiFi.begin(ssid, password);

  while (WiFi.status() != WL_CONNECTED) { //Check for the connection
    delay(500);
    Serial.println("Connecting..");
  }
  Serial.print("Connected to the WiFi network with IP: ");
  Serial.println(WiFi.localIP());
}

void loop() {

 if(WiFi.status()== WL_CONNECTED){   //Check WiFi connection status

   HTTPClient http;

   http.begin(yourLocalIp);  //Specify destination for HTTP request
   http.addHeader("Content-Type", "text/plain");             //Specify content-type header

   int httpResponseCode = http.POST("Hello Bottle, from Wio Terminal");   //Send the actual POST request

   if(httpResponseCode>0){
    Serial.print("HTTP Response Code: ");
    Serial.println(httpResponseCode);   //Print return code
   }else{
    Serial.print("Error on sending request: ");
    Serial.println(httpResponseCode);
   }

   http.end();  //Free resources

 }else{
    Serial.println("Error in WiFi connection");
 }
  delay(5000);  //Send a request every 5 seconds
}
WebServer 使用方法
借助 WebServer 库,您可以在 Wio Terminal 上设置运行的 Web 服务器。通过使用连接到与 Wio Terminal 相同网络的任何计算机上运行的浏览器访问服务器,您可以从网页控制硬件、读取传感器的值等等!
简单的 HelloServer 示例
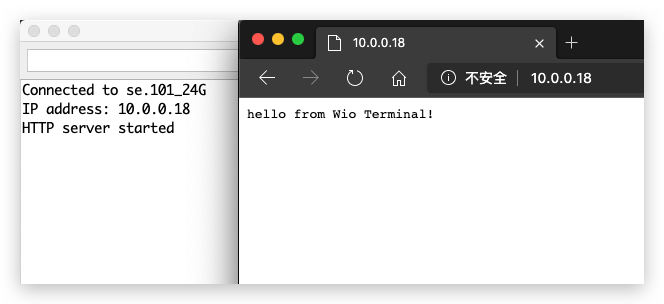
这将使用 Wio Terminal 在连接的网络上设置一个简单的 Web 服务器。
-
将
yourNetwork和yourPassword更改为您的 WiFi ssid 和密码。 -
将代码上传到 Wio Terminal。
-
通过使用浏览器从同一网络输入 Wio Terminal 的 IP 来访问 Web 服务器。
#include <rpcWiFi.h>
#include <WiFiClient.h>
#include <WebServer.h>

const char *ssid = "yourNetwork";
const char *password = "yourPassword";

WebServer server(80);

const int led = 13;

void handleRoot() {
  digitalWrite(led, 1);
  server.send(200, "text/plain", "hello from Wio Terminal!");
  digitalWrite(led, 0);
}

void handleNotFound() {
  digitalWrite(led, 1);
  String message = "File Not Found\n\n";
  message += "URI: ";
  message += server.uri();
  message += "\nMethod: ";
  message += (server.method() == HTTP_GET) ? "GET" : "POST";
  message += "\nArguments: ";
  message += server.args();
  message += "\n";
  for (uint8_t i = 0; i < server.args(); i++) {
    message += " " + server.argName(i) + ": " + server.arg(i) + "\n";
  }
  server.send(404, "text/plain", message);
  digitalWrite(led, 0);
}

void setup(void) {
  pinMode(led, OUTPUT);
  digitalWrite(led, 0);
  Serial.begin(115200);
  WiFi.mode(WIFI_STA);
  WiFi.begin(ssid, password);

  // Wait for connection
  while (WiFi.status() != WL_CONNECTED) {
    delay(500);
    Serial.print(".");
  }
  Serial.print("Connected to ");
  Serial.println(ssid);
  Serial.print("IP address: ");
  Serial.println(WiFi.localIP());

  server.on("/", handleRoot);

  server.on("/inline", []() {
    server.send(200, "text/plain", "this works as well");
  });

  server.onNotFound(handleNotFound);

  server.begin();
  Serial.println("HTTP server started");
}

void loop(void) {
  server.handleClient();
}
HTTP 身份验证 Web 服务器示例
此示例设置了一个需要身份验证过程的 Web 服务器,在某些情况下对于安全目的非常有用。
-
将
yourNetwork和yourPassword更改为您的 WiFi ssid 和密码。 -
将代码上传到 Wio Terminal。
-
通过浏览器从同一网络输入 Wio Terminal 的 IP 地址来访问 Web 服务器,并输入预设的用户名和密码。
#include <rpcWiFi.h>
#include <WebServer.h>

const char *ssid = "yourNetwork";
const char *password = "yourPassword";

WebServer server(80);

const char* www_username = "admin";
const char* www_password = "password";

void setup() {
  Serial.begin(115200);
  WiFi.mode(WIFI_STA);
  WiFi.begin(ssid, password);
  if (WiFi.waitForConnectResult() != WL_CONNECTED) {
    Serial.println("WiFi Connect Failed! Rebooting...");
    delay(1000);
    NVIC_SystemReset(); // Reset Wio Terminal
  }

  server.on("/", []() {
    if (!server.authenticate(www_username, www_password)) {
      return server.requestAuthentication();
    }
    server.send(200, "text/plain", "Login OK");
  });
  server.begin();

  Serial.print("Open http://");
  Serial.print(WiFi.localIP());
  Serial.println("/ in your browser to see it working");
}

void loop() {
  server.handleClient();
}
DNSServer 使用方法
我们讨论了 WebServer,我们使用 IP 地址 来访问它。但是如果你想通过输入域名(如 www.google.com)来访问它,那么你需要使用 DNSServer。
-
使用 DNSServer 必须在 AP 模式 下。
-
引入相应的库
#include <DNSServer.h>。 -
声明
DNSServer对象。 -
使用
start()方法启动 DNS 服务器。 -
使用
processNextRequest()方法处理来自客户端的请求。 -
将代码上传到 Wio Terminal 并将你的 PC 连接到
DNSServer exampleWi-Fi。 -
输入
www.wioterminal.com和www.wioterminal.com/p1。
#include <rpcWiFi.h>
#include <DNSServer.h>
#include <WebServer.h>

IPAddress local_IP(192, 168, 1, 1);
IPAddress gateway(192, 168, 1, 1);
IPAddress subnet(255, 255, 255, 0);

const byte DNS_PORT = 53;

DNSServer dnsServer;
WebServer webserver(80);

void handleRoot()
{
  webserver.send(200, "text/plain", "Root page accessed via domain name");
}

void handleP1()
{
  webserver.send(200, "text/plain", "Page 1 accessed via domain name");
}

void setup()
{
  WiFi.mode(WIFI_AP);
  WiFi.softAPConfig(local_IP, gateway, subnet);
  WiFi.softAP("DNSServer example");

  webserver.on("/", handleRoot);
  webserver.on("/p1", handleP1);

  dnsServer.start(DNS_PORT, "www.wioterminal.com", local_IP); //启动 DNS 服务,example.com 是注册的域名。
  webserver.begin();
}

void loop()
{
  dnsServer.processNextRequest();
  webserver.handleClient();
}
mDNS 使用
什么是多播 DNS(mDNS)?
多播 DNS (mDNS) 协议在不包含本地名称服务器的小型网络中将主机名解析为 IP 地址。多播 DNS 专为小型网络设计,旨在提高其用户友好性。其理念是用户可以在私有局域网中无缝连接设备。
安装 Seeed_Arduino_rpcmDNS
-
访问 Seeed_Arduino_rpcmDNS 仓库并将整个仓库下载到本地驱动器。
-
现在,可以将 Seeed_Arduino_rpcmDNS 库安装到 Arduino IDE 中。打开 Arduino IDE,点击
sketch->Include Library->Add .ZIP Library,然后选择刚刚下载的Seeed_Arduino_rpcmDNS文件。
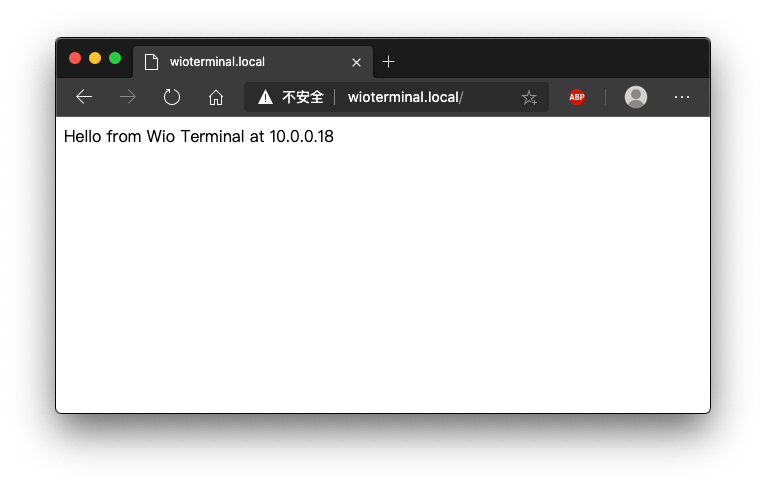
mDNS Web 服务器示例
这是一个在 Wio Terminal 上设置 mDNS web 服务器的示例,使连接到同一网络的其他设备可以在定义的站点浏览该 web 服务器。
-
将
yourNetwork和yourPassword更改为您的 WiFi ssid 和密码。 -
将代码上传到 Wio Terminal。
-
通过在同一网络中使用浏览器输入 http://WioTerminal.local/ 来访问 web 服务器,并输入预设的用户名和密码。
#include <rpcWiFi.h>
#include <RPCmDNS.h>
#include <WiFiClient.h>

const char* ssid     = "yourNetwork";
const char* password = "yourPassword";

// 端口80的TCP服务器将响应HTTP请求
WiFiServer server(80);

void setup(void)
{
    Serial.begin(115200);
    while(!Serial){
        ;
    }
    Serial.printf("设置开始 \r\n");
    // 连接到WiFi网络
    WiFi.begin(ssid, password);
    Serial.println("");

    // 等待连接
    while (WiFi.status() != WL_CONNECTED) {
        delay(500);
        Serial.print(".");
    }
    Serial.println("");
    Serial.print("已连接到 ");
    Serial.println(ssid);
    Serial.print("IP地址: ");
    Serial.println(WiFi.localIP());

    // 设置mDNS响应器:
    // - 第一个参数是域名,在这个例子中
    //   完全限定域名是 "esp8266.local"
    // - 第二个参数是要广播的IP地址
    //   我们发送WiFi网络上的IP地址
    if (!MDNS.begin("WioTerminal")) {
        Serial.println("设置MDNS响应器时出错!");
        while(1) {
            delay(1000);
        }
    }
    Serial.println("mDNS响应器已启动");

    // 启动TCP (HTTP) 服务器
    server.begin();
    Serial.println("TCP服务器已启动");

    // 向MDNS-SD添加服务
    MDNS.addService("http", "tcp", 80);

    Serial.printf("设置完成 \r\n");
}

void loop(void)
{
    // 检查是否有客户端连接
    WiFiClient client = server.available();
    if (!client) {
        return;
    }
    Serial.println("");
    Serial.println("新客户端");
    // 等待客户端数据变为可用
    while(client.connected() && !client.available()){
        delay(1);
    }
    // 读取HTTP请求的第一行
    String req = client.readStringUntil('\r');
    // HTTP请求的第一行看起来像 "GET /path HTTP/1.1"
    // 通过查找空格来检索 "/path" 部分
    int addr_start = req.indexOf(' ');
    int addr_end = req.indexOf(' ', addr_start + 1);
    if (addr_start == -1 || addr_end == -1) {
        Serial.print("无效请求: ");
        Serial.println(req);
        return;
    }
    req = req.substring(addr_start + 1, addr_end);
    Serial.print("请求: ");
    Serial.println(req);

    String s;
    if (req == "/")
    {
        IPAddress ip = WiFi.localIP();
        String ipStr = String(ip[0]) + '.' + String(ip[1]) + '.' + String(ip[2]) + '.' + String(ip[3]);
        s = "HTTP/1.1 200 OK\r\nContent-Type: text/html\r\n\r\n<!DOCTYPE HTML>\r\n<html>来自Wio Terminal的问候,地址: ";
        s += ipStr;
        s += "</html>\r\n\r\n";
        Serial.println("发送200");
    }
    else
    {
        s = "HTTP/1.1 404 Not Found\r\n\r\n";
        Serial.println("发送404");
    }
    client.print(s);

    client.stop();
    Serial.println("客户端处理完成");
}
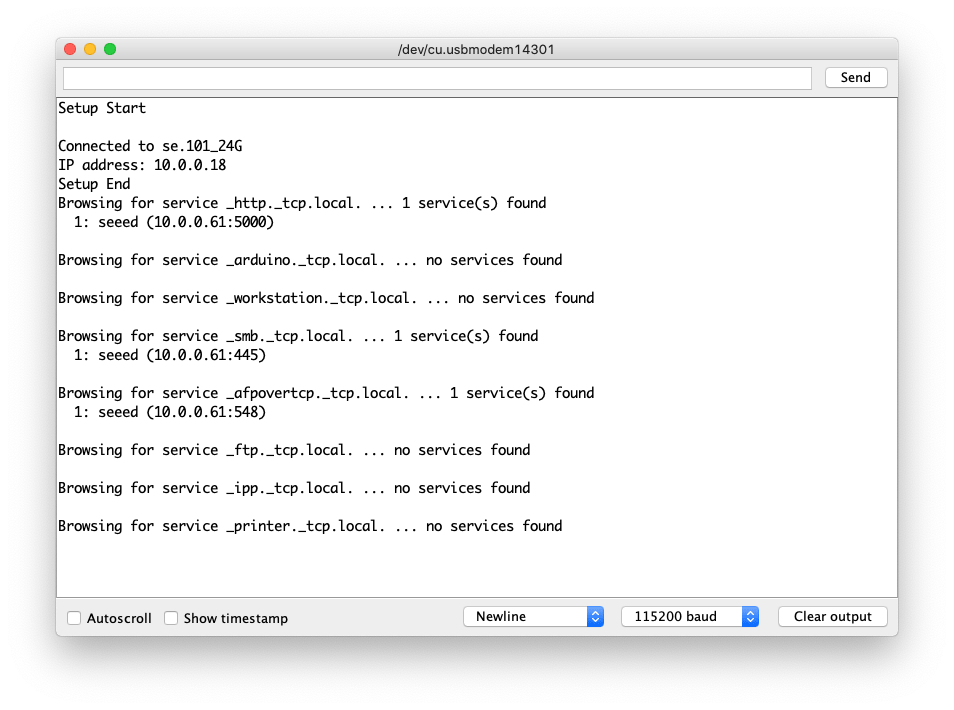
mDNS-SD 示例
这是一个 mDNS-SD(服务发现) 示例,允许您发现同一网络中的服务。
关于 基于DNS的服务发现
-
将
yourNetwork和yourPassword更改为您的WiFi ssid 和 密码。 -
将代码上传到 Wio Terminal。
#include <rpcWiFi.h>
#include <RPCmDNS.h>
#include <WiFiClient.h>

const char* ssid     = "yourNetwork";
const char* password = "yourPassword";

// 端口80的TCP服务器将响应HTTP请求
WiFiServer server(80);

void setup(void)
{
    Serial.begin(115200);
    while(!Serial){
        ;
    }
    Serial.printf("设置开始 \r\n");
    // 连接到WiFi网络
    WiFi.begin(ssid, password);
    Serial.println("");

    // 等待连接
    while (WiFi.status() != WL_CONNECTED) {
        delay(500);
        Serial.print(".");
    }
    Serial.println("");
    Serial.print("已连接到 ");
    Serial.println(ssid);
    Serial.print("IP地址: ");
    Serial.println(WiFi.localIP());

    // 设置mDNS响应器:
    // - 第一个参数是域名,在这个例子中
    //   完全限定域名是 "esp8266.local"
    // - 第二个参数是要广播的IP地址
    //   我们发送WiFi网络上的IP地址
    if (!MDNS.begin("WioTerminal")) {
        Serial.println("设置MDNS响应器时出错!");
        while(1) {
            delay(1000);
        }
    }
    Serial.println("mDNS响应器已启动");

    // 启动TCP (HTTP) 服务器
    server.begin();
    Serial.println("TCP服务器已启动");

    // 向MDNS-SD添加服务
    MDNS.addService("http", "tcp", 80);

    Serial.printf("设置完成 \r\n");
}

void loop(void)
{
    // 检查是否有客户端连接
    WiFiClient client = server.available();
    if (!client) {
        return;
    }
    Serial.println("");
    Serial.println("新客户端");
    // 等待客户端数据变为可用
    while(client.connected() && !client.available()){
        delay(1);
    }
    // 读取HTTP请求的第一行
    String req = client.readStringUntil('\r');
    // HTTP请求的第一行看起来像 "GET /path HTTP/1.1"
    // 通过查找空格来检索 "/path" 部分
    int addr_start = req.indexOf(' ');
    int addr_end = req.indexOf(' ', addr_start + 1);
    if (addr_start == -1 || addr_end == -1) {
        Serial.print("无效请求: ");
        Serial.println(req);
        return;
    }
    req = req.substring(addr_start + 1, addr_end);
    Serial.print("请求: ");
    Serial.println(req);

    String s;
    if (req == "/")
    {
        IPAddress ip = WiFi.localIP();
        String ipStr = String(ip[0]) + '.' + String(ip[1]) + '.' + String(ip[2]) + '.' + String(ip[3]);
        s = "HTTP/1.1 200 OK\r\nContent-Type: text/html\r\n\r\n<!DOCTYPE HTML>\r\n<html>来自Wio Terminal的问候,地址: ";
        s += ipStr;
        s += "</html>\r\n\r\n";
        Serial.println("发送200");
    }
    else
    {
        s = "HTTP/1.1 404 Not Found\r\n\r\n";
        Serial.println("发送404");
    }
    client.print(s);

    client.stop();
    Serial.println("客户端处理完成");
}
WiFiManager 使用方法
我们已经将知名的 WiFi Manager 移植到 Wio Terminal 平台,这样您就可以使用手机或其他设备为您的 Wio Terminal 配置 Wi-Fi 设置!
安装 Seeed_Arduino_rpcWiFiManager
-
访问 Seeed_Arduino_rpcWiFiManager 仓库,并将整个仓库下载到您的本地驱动器。
-
现在,可以将 Seeed_Arduino_rpcWiFiManager 库安装到 Arduino IDE 中。打开 Arduino IDE,点击
sketch->Include Library->Add .ZIP Library,然后选择您刚刚下载的Seeed_Arduino_rpcWiFiManager文件。
WiFiManager 自动连接示例
这个示例演示了自动连接功能。您可以使用这个示例为 Wio Terminal 设置 WiFi 配置。
-
将代码上传到 Wio Terminal。
-
如果 Wio Terminal 之前已连接过 WiFi,它将自动连接到相同的网络。如果无法连接到任何 WiFi,它将进入 AP 模式并发射一个 WiFi。使用您的手机连接到这个 WiFi 并输入 WiFi 设置。
#include <rpcWiFi.h>
#include <DNSServer.h>
#include <WebServer.h>
#include <WiFiManager.h>

void setup() {
    Serial.begin(115200);
    while(!Serial); // wait till Serial is opened

    WiFiManager wifiManager;
    // Uncomment the resetSettings() will wipe out the saved settings
    //wifiManager.resetSettings();

    //Fetches ssid and pass from RTL8720 and tries to connect
    //if it does not connect it starts an access point with the specified name
    //here  "AutoConnectAP"
    //and goes into a blocking loop awaiting configuration
    wifiManager.autoConnect("AutoConnectAP");
    //or use this for auto generated name ESP + ChipID
    //wifiManager.autoConnect();

    //if you get here you have connected to the WiFi
    Serial.println("connected...yeey :)");
    Serial.println(WiFi.localIP());
}

void loop() {
    // put your main code here, to run repeatedly:
}
技术支持与产品讨论
如果您有任何技术问题,请将问题提交到我们的论坛。 感谢您选择我们的产品!我们在这里为您提供不同的支持,以确保您使用我们产品的体验尽可能顺畅。我们提供多种沟通渠道,以满足不同的偏好和需求。