Wio Terminal 的以太网连接
本教程介绍如何在 Wio Terminal 上使用 ENC28J60 OVERLAYS HAT for Raspberry Pi 来实现稳定的网络连接。这是在 Wio Terminal 上使用树莓派 40 针扩展板的完美示例。
所需硬件
-
Wio Terminal 40 针 Pi HAT 适配板(尚未发布)
硬件连接
目前,如果您想测试软件,需要飞线连接。
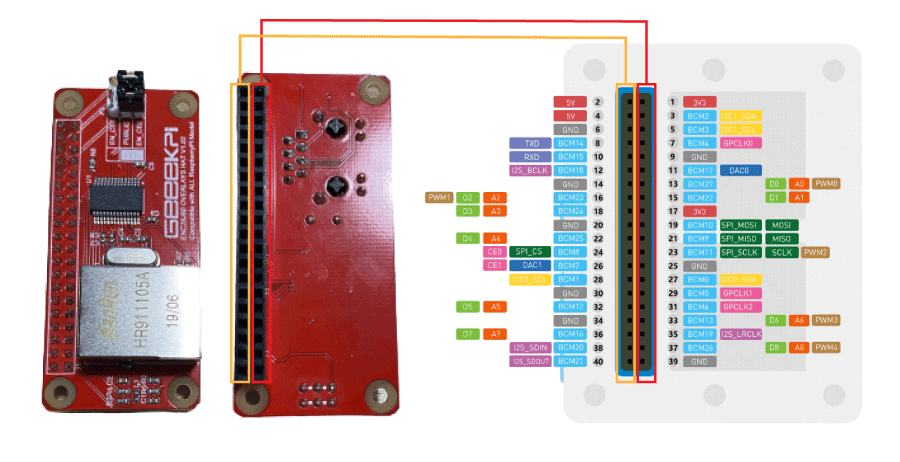
- 将以太网线插入 ENC28J60 Overlays Hat。
安装 UIPEthernet Arduino 库
-
访问 UIPEthernet 仓库,将整个仓库下载到本地驱动器。
-
现在可以将库安装到 Arduino IDE 中。打开 Arduino IDE,点击
sketch->Include Library->Add .ZIP Library,选择刚刚下载的UIPEthernet文件。

简单的 DHCP 示例
此示例简单地使用 DHCP 从网络主机自动获取网络配置。

示例代码
#include <UIPEthernet.h>

uint8_t mac[6] = {0x74,0x69,0x69,0x2D,0x30,0x31};

void setup() {
  // put your setup code here, to run once:
  Serial.begin(9600);
  while(!Serial);
  Serial.println(F("[testDHCP]"));

  Serial.print("MAC: ");
  for (byte i = 0; i < 6; ++i) {
    Serial.print(mac[i], HEX);
    if (i < 5)
      Serial.print(':');
  }
  Serial.println();

  if (Ethernet.begin(mac) != 1) {
     Serial.println("Failed to configure Ethernet using DHCP");
     while (true) {
        delay(1); // do nothing, no point running without Ethernet hardware
     }
  }

  Serial.print("My IP: ");
  Serial.println(Ethernet.localIP());
  Serial.print("Netmask: ");
  Serial.println(Ethernet.subnetMask());
  Serial.print("Gateway IP: ");
  Serial.println(Ethernet.gatewayIP());
  Serial.print("DNS: ");
  Serial.println(Ethernet.dnsServerIP());
}

void loop() {
  // put your main code here, to run repeatedly:
}
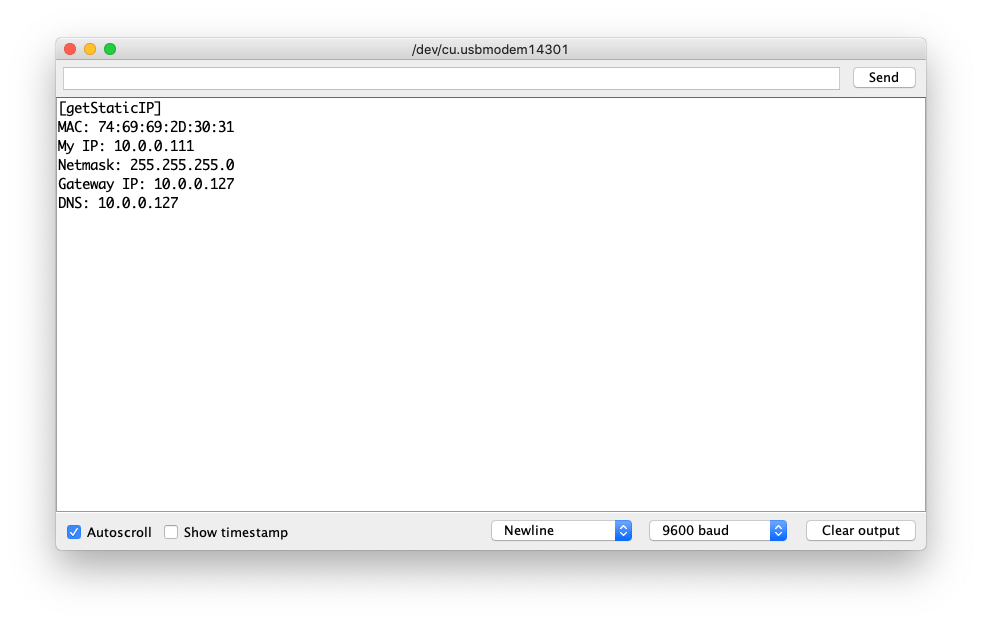
通过静态IP连接网络
除了DHCP之外,您可能还希望使用静态IP连接到网络主机以实现不同的目的。在此示例中,您可以通过设置静态IP、子网掩码、网关和DNS来配置如何手动连接到网络。
示例代码
当您需要将设备连接到特定的网关和DNS(即旁路模式路由器/网关)时,这可能非常有用
#include <UIPEthernet.h>

// 静态设置,根据您的网络更改以下内容
uint8_t mac[6] = {0x74,0x69,0x69,0x2D,0x30,0x31};
IPAddress myIP = {10,0,0,111};
IPAddress myMask = {255,255,255,0};
IPAddress myGatewayIP = {10,0,0,127};
IPAddress myDNS = {10,0,0,127};

void setup() {
  // 将您的设置代码放在这里,只运行一次:
  Serial.begin(9600);
  while(!Serial);
  Serial.println(F("[getStaticIP]"));

  Serial.print("MAC: ");
  for (byte i = 0; i < 6; ++i) {
    Serial.print(mac[i], HEX);
    if (i < 5)
      Serial.print(':');
  }
  Serial.println();

  Ethernet.begin(mac,myIP, myDNS, myGatewayIP, myMask);

  Serial.print("My IP: ");
  Serial.println(Ethernet.localIP());
  Serial.print("Netmask: ");
  Serial.println(Ethernet.subnetMask());
  Serial.print("Gateway IP: ");
  Serial.println(Ethernet.gatewayIP());
  Serial.print("DNS: ");
  Serial.println(Ethernet.dnsServerIP());
}

void loop() {
  // 将您的主要代码放在这里,重复运行:
}
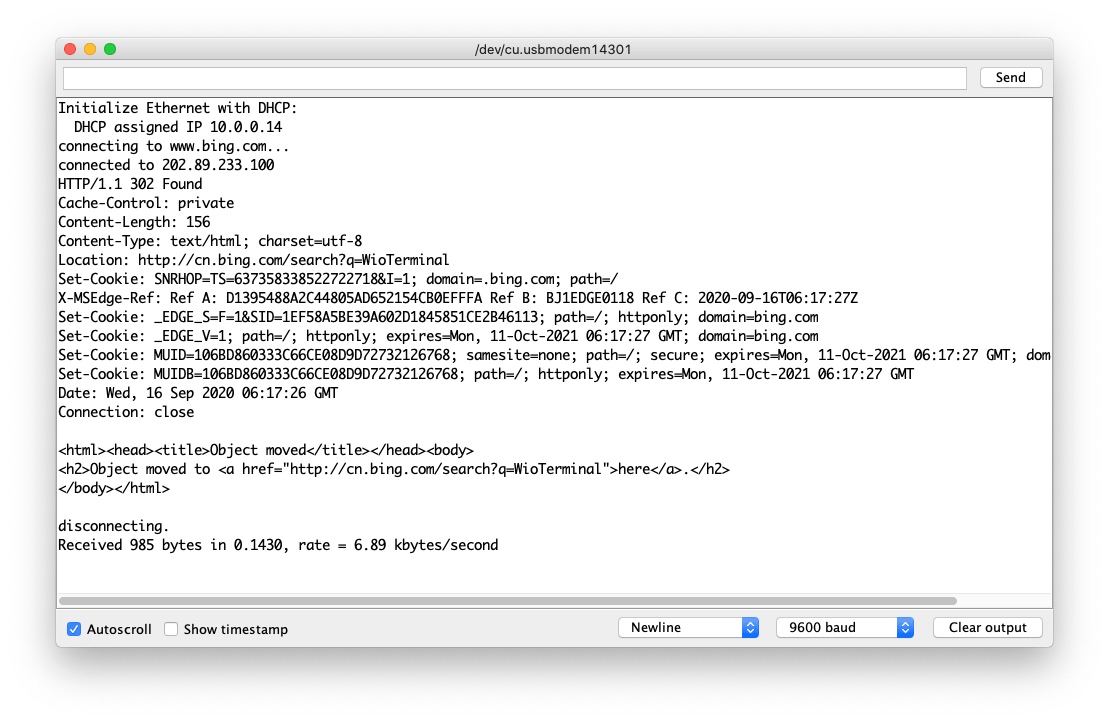
简单Web客户端
一旦我们通过以太网建立了网络连接,我们就可以将其用于TCP客户端。例如,从互联网获取数据(HTTP)或从同一网络中的服务器获取数据。
在这个示例中,它将首先使用DHCP进行设置,如果失败,则会使用静态IP进行分配。此示例连接到www.bing.com并打印到串行监视器。
示例代码
#include <UIPEthernet.h>

// 在下面为您的控制器输入一个MAC地址。
byte mac[] = { 0xDE, 0xAD, 0xBE, 0xEF, 0xFE, 0xED };

char server[] = "www.bing.com";

// 设置在DHCP分配失败时使用的静态IP地址
IPAddress myIP(10, 0, 0, 187);
IPAddress myMask = {255,255,255,0};
IPAddress myGatewayIP = {10,0,0,127};
IPAddress dnsIP(10, 0, 0, 127);

// 初始化以太网客户端库
// 使用您想要连接的服务器的IP地址和端口
// (端口80是HTTP的默认端口):
EthernetClient client;

// 用于测量速度的变量
unsigned long beginMicros, endMicros;
unsigned long byteCount = 0;
bool printWebData = true;  // 设置为false以获得更好的速度测量

void setup() {
  // 打开串行通信并等待端口打开:
  Serial.begin(9600);
  while (!Serial) {
    ; // 等待串行端口连接。仅原生USB端口需要
  }

  // 启动以太网连接:
  Serial.println("使用DHCP初始化以太网:");
  if (Ethernet.begin(mac) == 0) {
    Serial.println("使用DHCP配置以太网失败");
    // 检查以太网硬件是否存在
    if (Ethernet.hardwareStatus() == EthernetNoHardware) {
      Serial.println("未找到以太网扩展板。抱歉,没有硬件无法运行。:(");
      while (true) {
        delay(1); // 什么都不做,没有以太网硬件就没有运行的意义
      }
    }
    if (Ethernet.linkStatus() == LinkOFF) {
      Serial.println("以太网电缆未连接。");
    }
    // 尝试使用IP地址而不是DHCP进行配置:
    Ethernet.begin(mac,myIP, dnsIP, myGatewayIP, myMask);
  } else {
    Serial.print("  DHCP分配的IP ");
    Serial.println(Ethernet.localIP());
  }
  // 给以太网扩展板一秒钟时间初始化:
  delay(1000);
  Serial.print("正在连接到 ");
  Serial.print(server);
  Serial.println("...");

  // 如果您获得连接,通过串行端口报告:
  if (client.connect(server, 80)) {
    Serial.print("已连接到 ");
    Serial.println(client.remoteIP());
    // 发出HTTP请求:
    client.println("GET /search?q=WioTerminal HTTP/1.1");
    client.println("Host: www.bing.com");
    client.println("Connection: close");
    client.println();
  } else {
    // 如果您没有获得到服务器的连接:
    Serial.println("连接失败");
  }
  beginMicros = micros();
}

void loop() {
  // 如果有来自服务器的传入字节可用,
  // 读取它们并打印它们:
  int len = client.available();
  if (len > 0) {
    byte buffer[80];
    if (len > 80) len = 80;
    client.read(buffer, len);
    if (printWebData) {
      Serial.write(buffer, len); // 在串行监视器中显示(会使某些板子变慢)
    }
    byteCount = byteCount + len;
  }

  // 如果服务器断开连接,停止客户端:
  if (!client.connected()) {
    endMicros = micros();
    Serial.println();
    Serial.println("正在断开连接。");
    client.stop();
    Serial.print("接收了 ");
    Serial.print(byteCount);
    Serial.print(" 字节,用时 ");
    float seconds = (float)(endMicros - beginMicros) / 1000000.0;
    Serial.print(seconds, 4);
    float rate = (float)byteCount / seconds / 1000.0;
    Serial.print(",速率 = ");
    Serial.print(rate);
    Serial.print(" 千字节/秒");
    Serial.println();

    // 永远什么都不做:
    while (true) {
      delay(1);
    }
  }
}
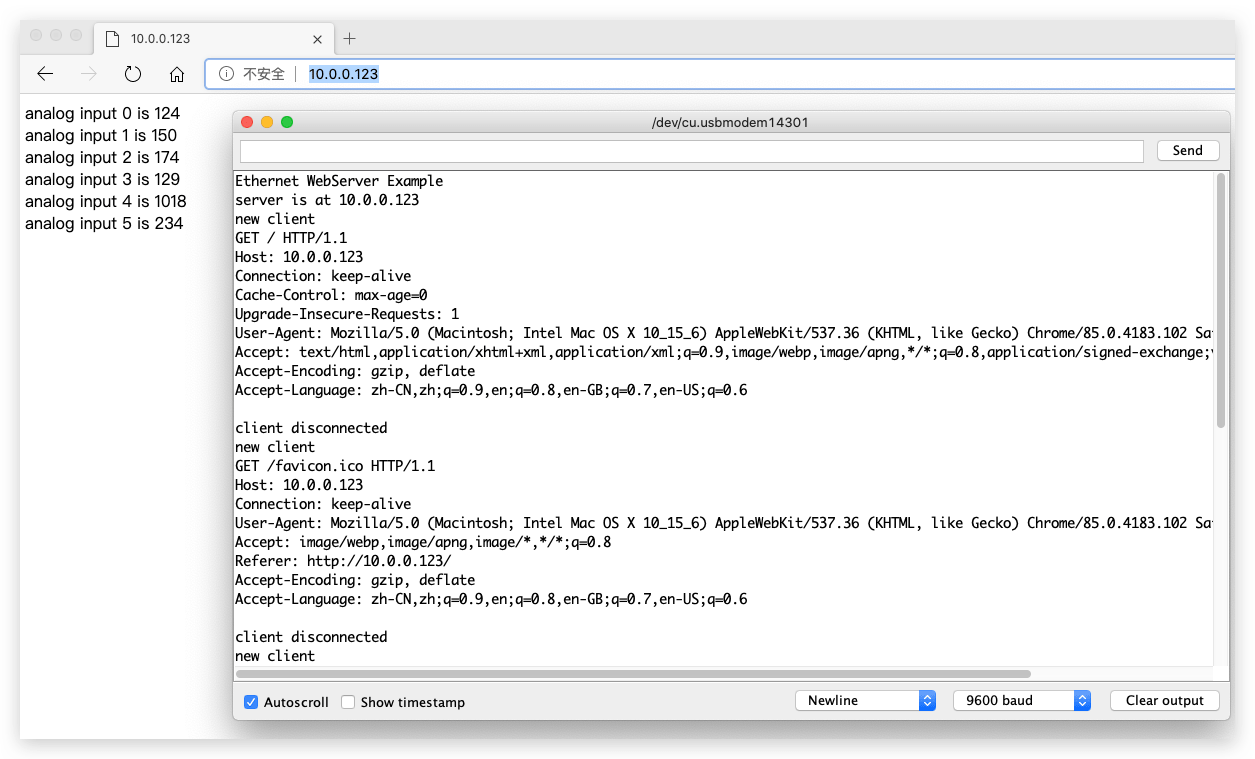
Web 服务器示例
另一方面,我们也可以将设置运行为 Web 服务器,并允许同一网络上的其他设备连接到它(即读取在 Wio Terminal 上观察到的传感器值)。这在某些情况下可能非常有用,因为以太网的稳定性比 Wi-Fi 好得多。
示例代码
此示例将自身配置为 Web 服务器,并设置一个简单的网页,打印出从 A0 到 A5 的值读数。您可以通过 IP 地址从连接在同一网络中的 PC 访问此页面。
#include <UIPEthernet.h>

// 在下面为您的控制器输入MAC地址和IP地址。
// IP地址将取决于您的本地网络:
byte mac[] = {
  0xDE, 0xAD, 0xBE, 0xEF, 0xFE, 0xED
};
IPAddress ip(10, 0, 0, 123);

// 初始化以太网服务器库
// 使用您想要使用的IP地址和端口
// (端口80是HTTP的默认端口):
EthernetServer server(80);

void setup() {
  // 打开串行通信并等待端口打开:
  Serial.begin(9600);
  while (!Serial) {
    ; // 等待串行端口连接。仅对原生USB端口需要
  }
  Serial.println("Ethernet WebServer Example");

  // 启动以太网连接和服务器:
  Ethernet.begin(mac, ip);

  // 检查以太网硬件是否存在
  if (Ethernet.hardwareStatus() == EthernetNoHardware) {
    Serial.println("Ethernet shield was not found.  Sorry, can't run without hardware. :(");
    while (true) {
      delay(1); // 什么都不做,没有以太网硬件就没有运行的意义
    }
  }
  if (Ethernet.linkStatus() == LinkOFF) {
    Serial.println("Ethernet cable is not connected.");
  }

  // 启动服务器
  server.begin();
  Serial.print("server is at ");
  Serial.println(Ethernet.localIP());
}

void loop() {
  // 监听传入的客户端
  EthernetClient client = server.available();
  if (client) {
    Serial.println("new client");
    // http请求以空行结束
    bool currentLineIsBlank = true;
    while (client.connected()) {
      if (client.available()) {
        char c = client.read();
        Serial.write(c);
        // 如果您已经到达行尾(收到换行符)
        // 并且该行为空,则http请求已结束,
        // 因此您可以发送回复
        if (c == '\n' && currentLineIsBlank) {
          // 发送标准http响应头
          client.println("HTTP/1.1 200 OK");
          client.println("Content-Type: text/html");
          client.println("Connection: close");  // 响应完成后连接将被关闭
          client.println("Refresh: 5");  // 每5秒自动刷新页面
          client.println();
          client.println("<!DOCTYPE HTML>");
          client.println("<html>");
          // 输出每个模拟输入引脚的值
          for (int analogChannel = 0; analogChannel < 6; analogChannel++) {
            int sensorReading = analogRead(analogChannel);
            client.print("analog input ");
            client.print(analogChannel);
            client.print(" is ");
            client.print(sensorReading);
            client.println("<br />");
          }
          client.println("</html>");
          break;
        }
        if (c == '\n') {
          // 您正在开始新的一行
          currentLineIsBlank = true;
        } else if (c != '\r') {
          // 您在当前行上获得了一个字符
          currentLineIsBlank = false;
        }
      }
    }
    // 给网络浏览器时间接收数据
    delay(1);
    // 关闭连接:
    client.stop();
    Serial.println("client disconnected");
  }
}
Web 服务器测试
这也提供了一个使用该设置的简单测试草图。
这是在 10 小时内 ping Web 服务器的截图。
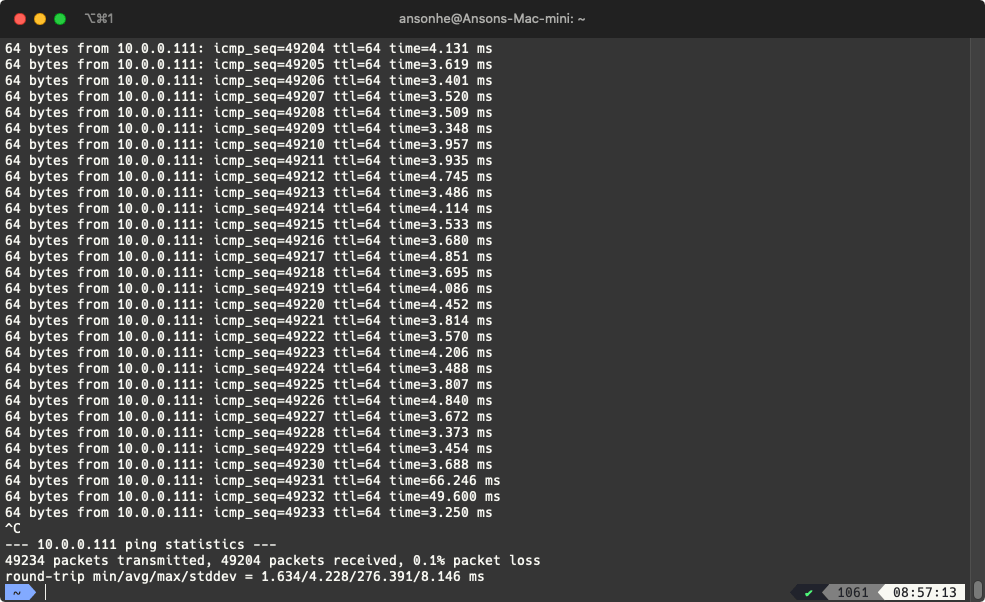
- 在同一网络下,使用您的计算机 ping 服务器的 IP:
#include <UIPEthernet.h>

// 静态 IP 设置
uint8_t mac[6] = {0x74,0x69,0x69,0x2D,0x30,0x31};
IPAddress myIP = {10,0,0,111};
EthernetServer server = EthernetServer(80);

void setup() {
  Serial.begin(9600);
  while(!Serial);
  Ethernet.begin(mac, myIP);
  server.begin();

  Serial.print("My IP: ");
  Serial.println(Ethernet.localIP());
  Serial.print("Netmask: ");
  Serial.println(Ethernet.subnetMask());
  Serial.print("Gateway IP: ");
  Serial.println(Ethernet.gatewayIP());
  Serial.print("DNS: ");
  Serial.println(Ethernet.dnsServerIP());
}

void loop() {
  // 获取客户端
  EthernetClient client = server.available();
  if(client && client.connected()) {
        // 执行操作(已省略,但基本上解析 HTTP 并响应,无其他处理)
        client.stop();
  }
}
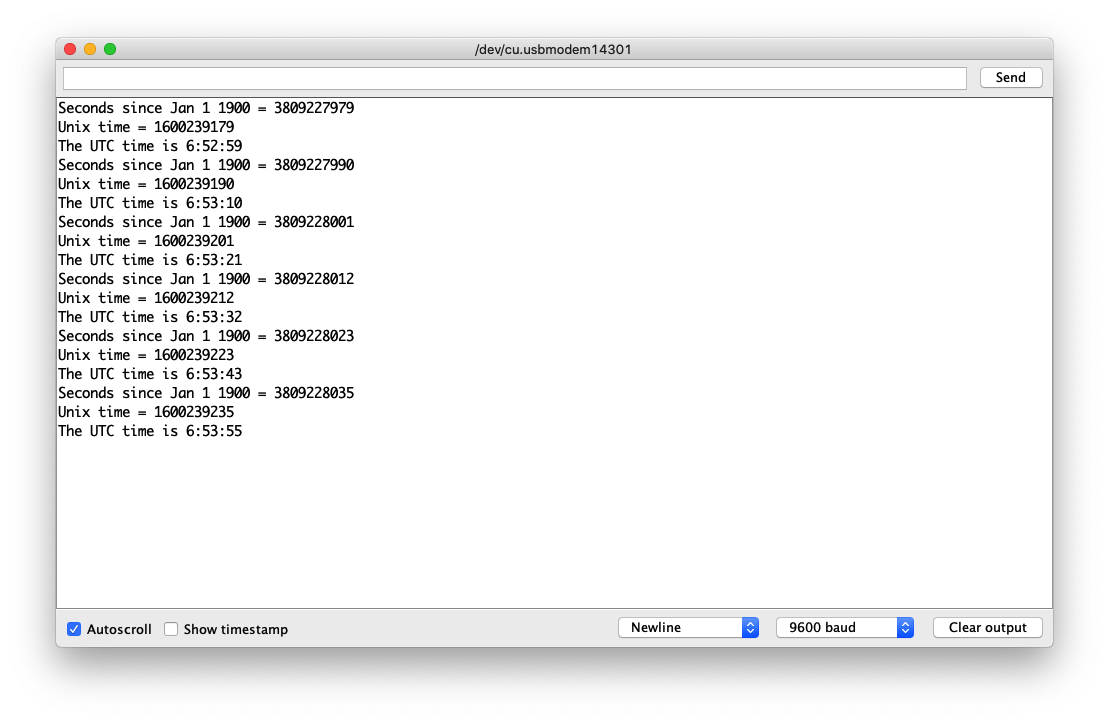
使用 UDP 进行 NTP 时间同步
在某些情况下,UDP 用于网络通信。NTP 就是一个完美的例子。这个示例简单地从 time.nist.gov NTP 服务器获取时间并打印到串口监视器。
示例代码
#include <UIPEthernet.h>

// 在下面为您的控制器输入一个MAC地址。
// 较新的以太网扩展板在扩展板上的贴纸上印有MAC地址
byte mac[] = {
  0xDE, 0xAD, 0xBE, 0xEF, 0xFE, 0xED
};

unsigned int localPort = 8888;       // 监听UDP数据包的本地端口

const char timeServer[] = "time.nist.gov"; // time.nist.gov NTP服务器

const int NTP_PACKET_SIZE = 48; // NTP时间戳位于消息的前48个字节中

byte packetBuffer[NTP_PACKET_SIZE]; //用于保存传入和传出数据包的缓冲区

// 一个UDP实例,让我们通过UDP发送和接收数据包
EthernetUDP Udp;

void setup() {
  // 打开串行通信并等待端口打开:
  Serial.begin(9600);
  while (!Serial) {
    ; // 等待串行端口连接。仅原生USB端口需要
  }

  // 启动以太网和UDP
  if (Ethernet.begin(mac) == 0) {
    Serial.println("使用DHCP配置以太网失败");
    // 检查是否存在以太网硬件
    if (Ethernet.hardwareStatus() == EthernetNoHardware) {
      Serial.println("未找到以太网扩展板。抱歉,没有硬件无法运行。:(");
    } else if (Ethernet.linkStatus() == LinkOFF) {
      Serial.println("以太网电缆未连接。");
    }
    // 继续下去没有意义,所以永远什么都不做:
    while (true) {
      delay(1);
    }
  }
  Udp.begin(localPort);
}

void loop() {
  sendNTPpacket(timeServer); // 向时间服务器发送NTP数据包

  // 等待查看是否有回复可用
  delay(1000);
  if (Udp.parsePacket()) {
    // 我们收到了一个数据包,从中读取数据
    Udp.read(packetBuffer, NTP_PACKET_SIZE); // 将数据包读入缓冲区

    // 时间戳从接收数据包的第40个字节开始,长度为四个字节,
    // 或两个字。首先,提取这两个字:

    unsigned long highWord = word(packetBuffer[40], packetBuffer[41]);
    unsigned long lowWord = word(packetBuffer[42], packetBuffer[43]);
    // 将四个字节(两个字)组合成一个长整数
    // 这是NTP时间(自1900年1月1日以来的秒数):
    unsigned long secsSince1900 = highWord << 16 | lowWord;
    Serial.print("自1900年1月1日以来的秒数 = ");
    Serial.println(secsSince1900);

    // 现在将NTP时间转换为日常时间:
    Serial.print("Unix时间 = ");
    // Unix时间从1970年1月1日开始。以秒为单位,那是2208988800:
    const unsigned long seventyYears = 2208988800UL;
    // 减去七十年:
    unsigned long epoch = secsSince1900 - seventyYears;
    // 打印Unix时间:
    Serial.println(epoch);

    // 打印小时、分钟和秒:
    Serial.print("UTC时间是 ");       // UTC是格林威治子午线(GMT)的时间
    Serial.print((epoch  % 86400L) / 3600); // 打印小时(86400等于每天的秒数)
    Serial.print(':');
    if (((epoch % 3600) / 60) < 10) {
      // 在每小时的前10分钟,我们需要一个前导'0'
      Serial.print('0');
    }
    Serial.print((epoch  % 3600) / 60); // 打印分钟(3600等于每分钟的秒数)
    Serial.print(':');
    if ((epoch % 60) < 10) {
      // 在每分钟的前10秒,我们需要一个前导'0'
      Serial.print('0');
    }
    Serial.println(epoch % 60); // 打印秒
  }
  // 再次询问时间前等待十秒
  delay(10000);
  Ethernet.maintain();
}

// 向给定地址的时间服务器发送NTP请求
void sendNTPpacket(const char * address) {
  // 将缓冲区中的所有字节设置为0
  memset(packetBuffer, 0, NTP_PACKET_SIZE);
  // 初始化形成NTP请求所需的值
  // (有关数据包的详细信息,请参见上面的URL)
  packetBuffer[0] = 0b11100011;   // LI, Version, Mode
  packetBuffer[1] = 0;     // Stratum,或时钟类型
  packetBuffer[2] = 6;     // 轮询间隔
  packetBuffer[3] = 0xEC;  // 对等时钟精度
  // 根延迟和根分散的8个零字节
  packetBuffer[12]  = 49;
  packetBuffer[13]  = 0x4E;
  packetBuffer[14]  = 49;
  packetBuffer[15]  = 52;

  // 所有NTP字段都已赋值,现在
  // 您可以发送请求时间戳的数据包:
  Udp.beginPacket(address, 123); // NTP请求发送到端口123
  Udp.write(packetBuffer, NTP_PACKET_SIZE);
  Udp.endPacket();
}
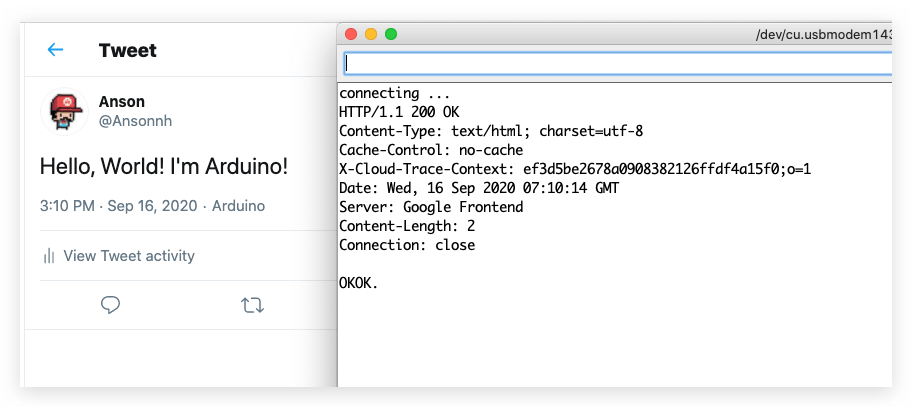
发送 Twitter 示例
这是一个使用 Wio Terminal 发送 twitter 的有趣示例。它使用 Arduino Tweet 库 来解决 HTTPs 直接连接的问题。
安装 Arduino Tweet 库
-
访问 Arduno-Twitter-library 仓库,并将整个仓库下载到您的本地驱动器。
-
现在,可以将库安装到 Arduino IDE 中。打开 Arduino IDE,点击
sketch->Include Library->Add .ZIP Library,然后选择您刚刚下载的Arduno-Twitter-library文件。
这是连接到 twitter 的变通方法,可能不安全,请自行承担风险。
获取令牌
点击 这里 获取使用 OAuth 发布消息的令牌。
请访问 http://arduino-tweet.appspot.com/ 获取更多参考信息。
示例代码
- 复制您从上面获得的令牌,并粘贴到 Arduino 草图中。
/*
 *  查看 http://arduino-tweet.appspot.com/ 获取更多参考信息
 */

#include <UIPEthernet.h>
#include <Twitter.h>

uint8_t mac[6] = {0x74,0x69,0x69,0x2D,0x30,0x31};

// 您的 Tweet 令牌(从 http://arduino-tweet.appspot.com/ 获取)
Twitter twitter("YOUR-TOKEN-HERE");

// 要发布的消息
char msg[] = "Hello, World! I'm Arduino!";

void setup()
{
  delay(1000);
  Ethernet.begin(mac);
  // 或者您可以使用 DHCP 进行自动 IP 地址配置。
  // Ethernet.begin(mac);
  Serial.begin(9600);
  while(!Serial);

  Serial.println("connecting ...");
  if (twitter.post(msg)) {
    // 指定 &Serial 将接收到的响应输出到 Serial。
    // 如果不需要输出,您可以省略参数,例如
    // int status = twitter.wait();
    int status = twitter.wait(&Serial);
    if (status == 200) {
      Serial.println("OK.");
    } else {
      Serial.print("failed : code ");
      Serial.println(status);
    }
  } else {
    Serial.println("connection failed.");
  }
}

void loop()
{
}