使用 Wio Terminal 为 Raspberry Pi 构建 HMI 显示器
在本教程中,我们将介绍如何使用 Wio Terminal 作为 Raspberry Pi、Nvidia Jetson Nano、BeagleBone 甚至 Odyssey X86J4105 的 HMI(人机界面)USB 显示器!这将 Wio Terminal 转变为 HMI USB 显示器,使其功能更加强大,可用于更多工业场景!
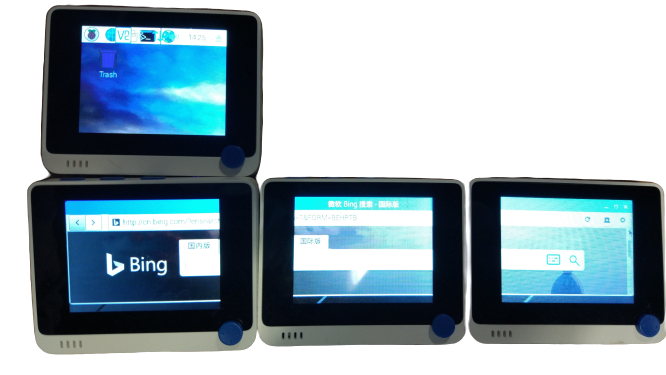
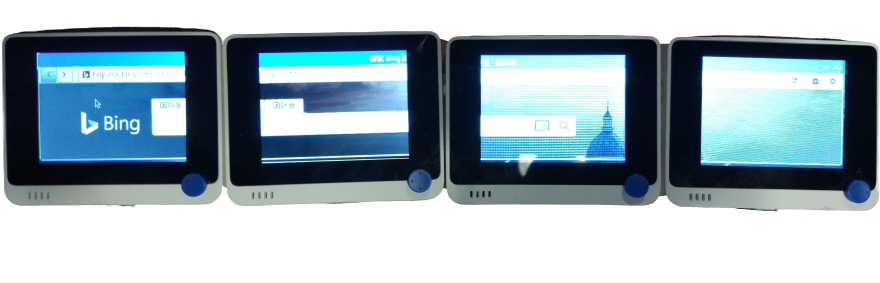
它可以支持多个 Wio Terminal 连接到主机设备。理论上,只要您有足够的 USB 端口,您可以连接任意数量的设备!在 Raspberry Pi 上,它可以支持多达 4 个 Wio Terminal(RPI 有 4 个 USB 端口)连接到它,在扩展模式和镜像模式下充当 HMI 显示器,请查看以下内容了解更多信息!
所需硬件
Wio Terminal 固件
首先,您需要通过 PC 将 Arduino 程序上传到您的 Wio Terminal。
- 在此处下载 Seeed_Arduino_USBDISP 库。
有两个示例,NullFunctional 和 USBDisplayAndMouseControl:
- 如果您希望 Wio Terminal 上有更高的屏幕刷新率,请将
NullFunctional上传到 Wio Terminal。 - 如果您希望 Wio Terminal 也充当 USB 鼠标,请将
USBDisplayAndMouseControl上传到 Wio Terminal。
uf2 方法
为了方便起见,我们还提供了上传 Wio Terminal 固件的 uf2 方法。只需从下面下载 uf2 文件。
-
下载 NullFunctional
uf2文件。 -
下载 USBDisplayAndMouseControl
uf2文件。
通过快速滑动电源开关两次进入引导加载程序模式。更多参考信息,请参见此处。
您的 PC 中应该会出现一个名为 Arduino 的外部驱动器。将下载的 uf2 文件拖到 Arduino 驱动器中。
主机设备固件
现在让我们在主机设备上设置显示驱动程序,这可以是 Raspberry Pi、Jetson Nano 甚至 Odyssey X86J4105:
Raspberry Pi
对于 Raspberry Pi,您首先需要从所有配置的源下载包信息:
sudo apt-get update
- 通过在终端中运行以下命令安装必要的软件包,如 内核头文件、内核、build-essential、dkms:
sudo apt-get install raspberrypi-kernel-headers raspberrypi-kernel build-essential dkms
- 重启树莓派:
sudo reboot
- 在树莓派上下载显示驱动:
cd ~
git clone https://github.com/Seeed-Studio/seeed-linux-usbdisp
- 制作并构建驱动程序:
cd ~/seeed-linux-usbdisp/drivers/linux-driver
make & sudo make install
sudo reboot
- 将配置文件移动到系统位置:
sudo cp ~/seeed-linux-usbdisp/drivers/linux-driver/xserver_conf/10-disp.conf /usr/share/X11/xorg.conf.d/
!!!Note 有不同的屏幕配置可供选择,默认是一个 Wio Terminal 作为一个屏幕。
- 重启服务:
sudo service lightdm restart
- 在终端中运行以下命令进行显示配置:
sudo raspi-config
- 一旦树莓派软件配置工具打开,导航到以下位置:
Display Options > Resolution
- 选择除"默认"之外的不同分辨率
例如:DMT 模式 82 1920x1080 60Hz 16:9
- 关闭树莓派:
sudo poweroff
-
将 Wio Terminal 连接到树莓派的 USB 端口
-
打开树莓派
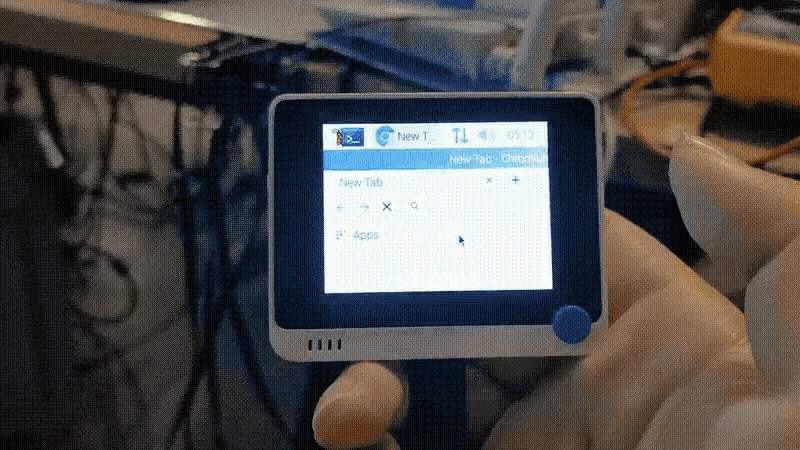
现在您应该可以看到 Wio Terminal 显示树莓派的桌面!如果您在 Wio Terminal 中加载了 USBDisplayAndMouseControl 固件,您甚至可以使用按钮和 5 向开关来控制树莓派的鼠标!
!!!Note 此版本的 USB 显示驱动程序不支持热插拔。
Jetson Nano、Beaglebone 和 Odyssey X86
对于 Nvidia Jetson Nano 和 Odyssey X86J4105(Ubuntu),按照以下步骤安装 linux 驱动程序,在终端中运行以下命令:
注意: 对于 Odyssey X86J4105,我们只测试了 ubuntu 和 debian 操作系统。其他 Linux 操作系统可能无法工作。
sudo apt install --reinstall linux-headers-$(uname -r)
- 下载显示驱动:
cd ~
git clone https://github.com/Seeed-Studio/seeed-linux-usbdisp
- 制作并构建驱动程序:
cd ~/seeed-linux-usbdisp/drivers/linux-driver
make & sudo make install
sudo reboot
- 将配置文件移动到系统位置:
sudo cp ~/seeed-linux-usbdisp/drivers/linux-driver/xserver_conf/10-disp.conf /usr/share/X11/xorg.conf.d/
- 重启服务:
sudo service lightdm restart
- 将 Wio Terminal 连接到设备的 USB 端口!
屏幕显示配置
如前所述,您可以将多个 Wio Terminal 连接到 Raspberry Pi,因此您可以通过编辑 10-disp.conf 文件来安排屏幕设置(屏幕位置)。我们提供了以下 3 种其他屏幕扩展设置。
屏幕设置 1
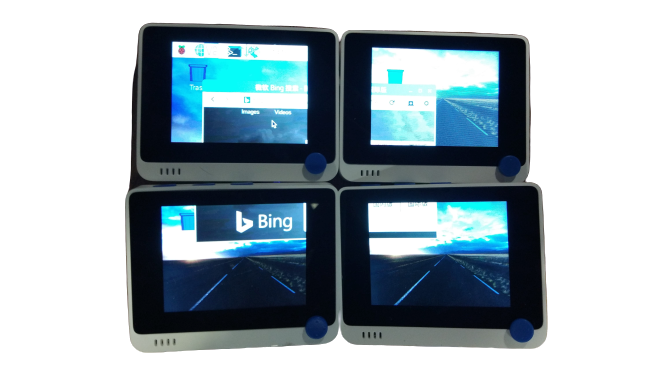
# 四屏扩展
# 模式: 1  2
#     : 3  4
这是 seeed-linux-usbdisp/drivers/linux-driver/xserver_conf/ 目录下的 10-disp-1.conf 文件,只需将此文件复制到 /usr/share/X11/xorg.conf.d/ 并命名为 10-disp.conf:
sudo cp ~/seeed-linux-usbdisp/drivers/linux-driver/xserver_conf/10-disp-1.conf /usr/share/X11/xorg.conf.d/10-disp.conf
屏幕设置 2
# 四屏扩展
# 模式: 1
#      : 2  3  4
这是 seeed-linux-usbdisp/drivers/linux-driver/xserver_conf/ 目录下的 10-disp-2.conf 文件。
屏幕设置 3
# 四屏扩展
# 模式: 1  2  3  4
这是 seeed-linux-usbdisp/drivers/linux-driver/xserver_conf/ 目录下的 10-disp-3.conf 文件。
屏幕设置 4
镜像模式:
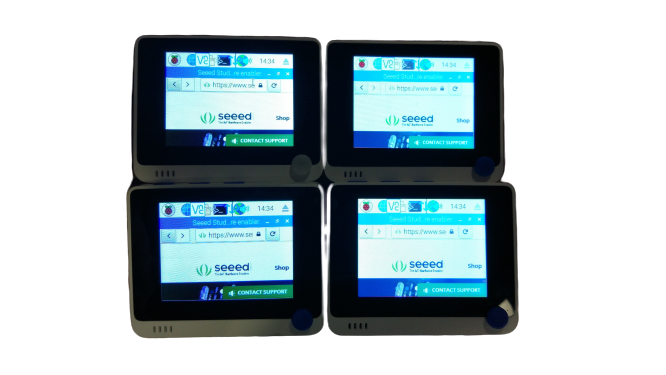
# 四屏克隆显示
这是 seeed-linux-usbdisp/drivers/linux-driver/xserver_conf/ 目录下的 10-disp-4.conf 文件。
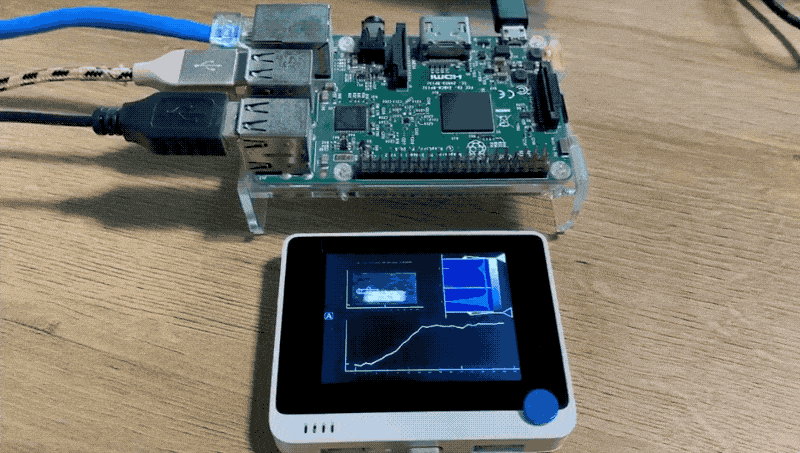
PtQtGraph 示例
此外,您可以使用 PyQtGraph 图形库轻松地为 Wio Terminal 绘制 GUI!
- 让我们首先安装 PyQtGraph 的依赖项:
sudo apt update
sudo apt install python3 python3-distutils python3-pyqt5 python3-pip python3-numpy -y
sudo pip3 install pyqtgraph
- 为屏幕导出宏:
export QT_QPA_PLATFORM=linuxfb:fb=/dev/fb1
注意: 其中 fb1 是第一个屏幕,fb2 是第二个屏幕,fb3 fb3 以此类推。您可以使用 echo $QT_QPA_PLATFORM 来检查宏。
- 复制以下 PyQtGraph 示例 python 文件并将其命名为
test.py:
# -*- coding: utf-8 -*-
"""
演示常见的图像分析工具。
这里演示的许多功能已经由 ImageView 小部件提供,
但这里我们展示了一种更低级的方法,可以对用户界面提供更精细的控制。
"""
import pyqtgraph as pg
from pyqtgraph.Qt import QtCore, QtGui
import numpy as np


# 将图像数据解释为行主序而不是列主序
pg.setConfigOptions(imageAxisOrder='row-major')

pg.mkQApp()
win = pg.GraphicsLayoutWidget()
win.setWindowTitle('pyqtgraph 示例:图像分析')

# 用于显示图像的绘图区域(ViewBox + 坐标轴)
p1 = win.addPlot(title="")

# 用于显示图像数据的项目
img = pg.ImageItem()
p1.addItem(img)

# 用于选择图像区域的自定义 ROI
roi = pg.ROI([-8, 14], [6, 5])
roi.addScaleHandle([0.5, 1], [0.5, 0.5])
roi.addScaleHandle([0, 0.5], [0.5, 0.5])
p1.addItem(roi)
roi.setZValue(10)  # 确保 ROI 绘制在图像上方

# 等值线绘制
iso = pg.IsocurveItem(level=0.8, pen='g')
iso.setParentItem(img)
iso.setZValue(5)

# 对比度/颜色控制
hist = pg.HistogramLUTItem()
hist.setImageItem(img)
win.addItem(hist)

# 用于设置等值线级别的可拖拽线
isoLine = pg.InfiniteLine(angle=0, movable=True, pen='g')
hist.vb.addItem(isoLine)
hist.vb.setMouseEnabled(y=False) # 使用户交互更容易一些
isoLine.setValue(0.8)
isoLine.setZValue(1000) # 将等值线置于对比度控制之上

# 另一个用于显示 ROI 数据的绘图区域
win.nextRow()
p2 = win.addPlot(colspan=2)
p2.setMaximumHeight(250)
win.resize(800, 800)
win.show()


# 生成图像数据
data = np.random.normal(size=(200, 100))
data[20:80, 20:80] += 2.
data = pg.gaussianFilter(data, (3, 3))
data += np.random.normal(size=(200, 100)) * 0.1
img.setImage(data)
hist.setLevels(data.min(), data.max())

# 从平滑数据构建等值线
iso.setData(pg.gaussianFilter(data, (2, 2)))

# 设置图像的位置和缩放
img.scale(0.2, 0.2)
img.translate(-50, 0)

# 缩放以适应图像
p1.autoRange()


# 处理用户交互的回调函数
def updatePlot():
    global img, roi, data, p2
    selected = roi.getArrayRegion(data, img)
    p2.plot(selected.mean(axis=0), clear=True)

roi.sigRegionChanged.connect(updatePlot)
updatePlot()

def updateIsocurve():
    global isoLine, iso
    iso.setLevel(isoLine.value())

isoLine.sigDragged.connect(updateIsocurve)

def imageHoverEvent(event):
    """显示鼠标光标下的位置、像素和值。
    """
    if event.isExit():
        p1.setTitle("")
        return
    pos = event.pos()
    i, j = pos.y(), pos.x()
    i = int(np.clip(i, 0, data.shape[0] - 1))
    j = int(np.clip(j, 0, data.shape[1] - 1))
    val = data[i, j]
    ppos = img.mapToParent(pos)
    x, y = ppos.x(), ppos.y()
    p1.setTitle("位置: (%0.1f, %0.1f)  像素: (%d, %d)  值: %g" % (x, y, i, j, val))

# 对图像进行猴子补丁以使用我们的自定义悬停函数。
# 这通常是不推荐的(你应该继承 ImageItem 类),
# 但对于像这样非常简单的用法是可行的。
img.hoverEvent = imageHoverEvent


## 启动 Qt 事件循环,除非在交互模式下运行或使用 pyside。
if __name__ == '__main__':
    import sys
    if (sys.flags.interactive != 1) or not hasattr(QtCore, 'PYQT_VERSION'):
        QtGui.QApplication.instance().exec_()
- 运行示例:
python3 test.py
- 您可能会遇到鼠标在 PyQtGraph 脚本中崩溃的问题,您可以简单地使用
sudo raspi-config->Boot options->Desktop/CLI->Console Autologin来禁用树莓派的桌面。
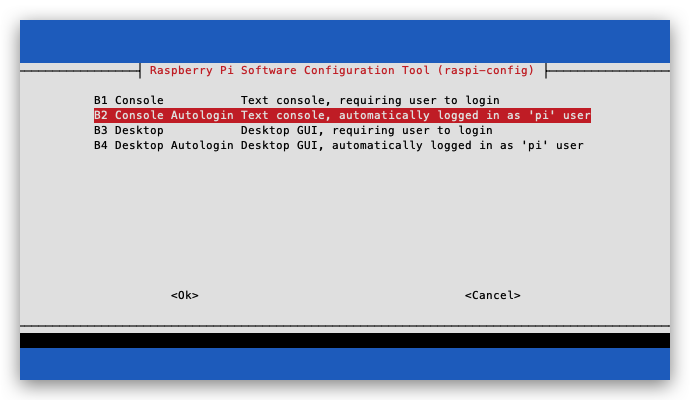
现在当您运行 PyQtGraph 脚本时,它工作得很好!
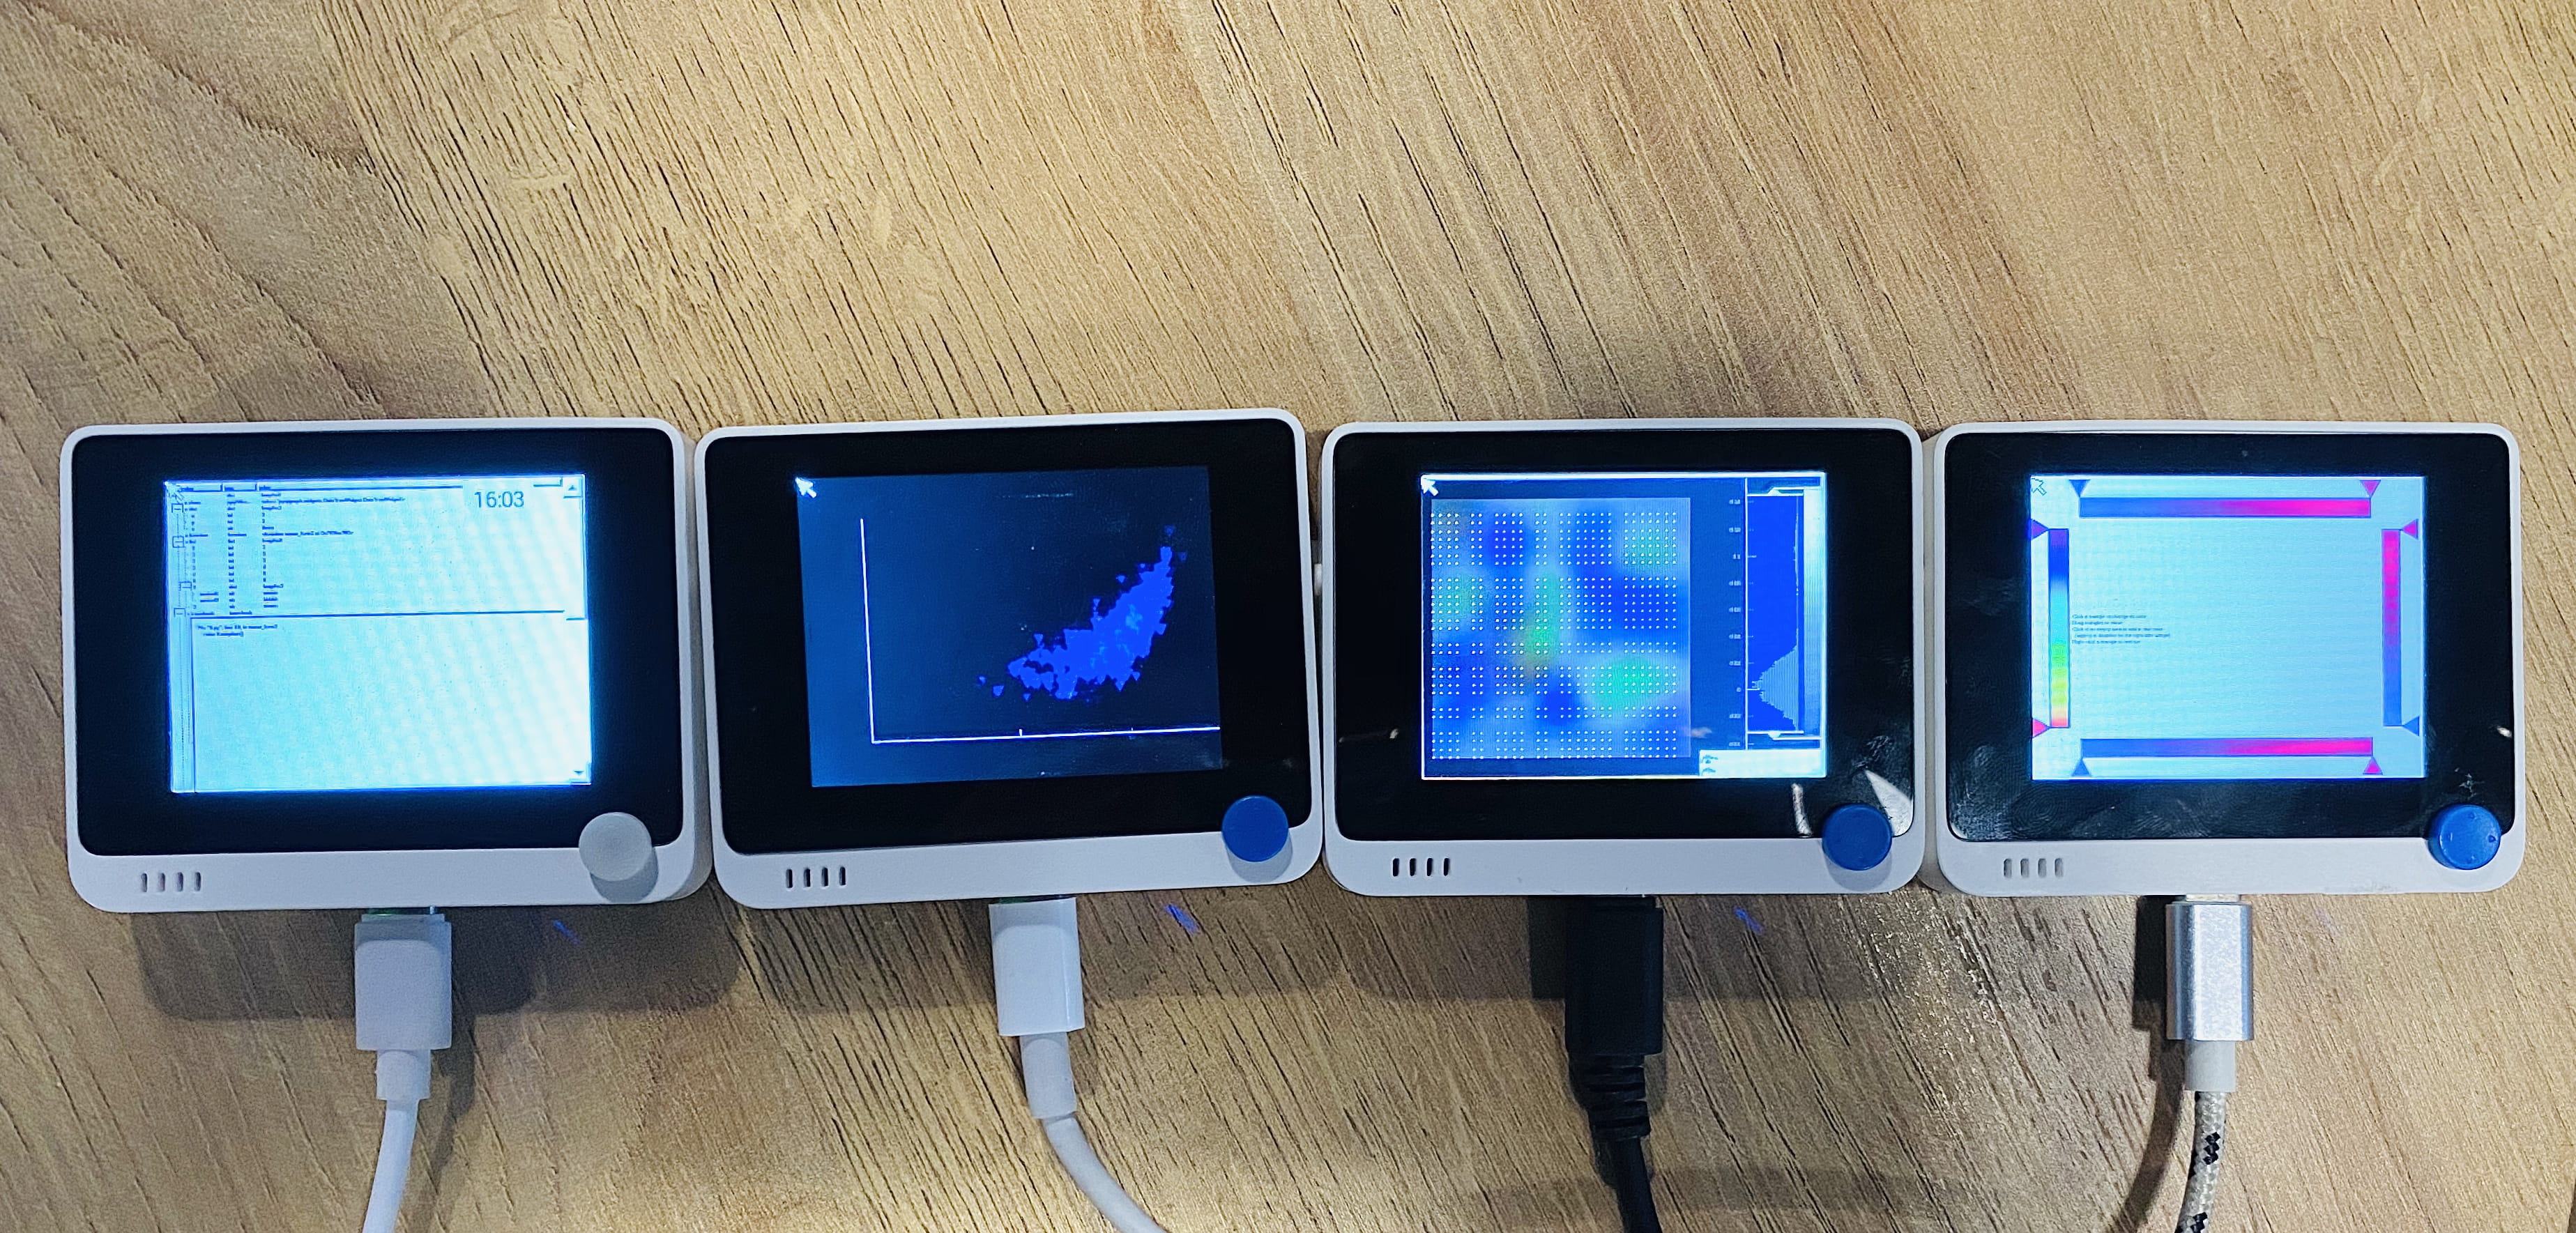
您可以在不同的屏幕上运行不同的 PyQtGraph 脚本,如下所示:
用户模式 SDK
这个 USB 显示驱动程序也可以在您的 PC 上工作。请查看**此 wiki**了解更多信息。
进一步开发
需要更大的屏幕?需要更高的分辨率?更高的刷新率?请联系 [email protected] 了解更多信息。
资源
常见问题
问: 当我将 Wio Terminal 连接到树莓派并打开树莓派时,Wio Terminal LCD 完全是白色的。
答: 在 Wio Terminal 仍然连接到树莓派的情况下,导航到:seeed-linux-usbdisp/drivers/linux-driver 并运行命令:make & sudo make install。之后运行:sudo reboot
技术支持与产品讨论
感谢您选择我们的产品!我们在这里为您提供不同的支持,以确保您使用我们产品的体验尽可能顺畅。我们提供多种沟通渠道,以满足不同的偏好和需求。