Wio Terminal Tensorflow Lite Micro 智能气象站与 BME280
在这个项目中,我们将使用 Wio Terminal 和 Tensorflow Lite for Microcontrollers 创建一个智能气象站,能够基于 BME280 环境传感器的本地数据预测未来 24 小时的天气和降水情况。
更多详细信息和视觉效果,请观看相应的视频!
您将学习如何应用模型优化技术,这不仅允许运行中等规模的卷积神经网络,还能同时运行这个时尚的 GUI 和 WiFi 连接,并且可以连续运行数天和数月!
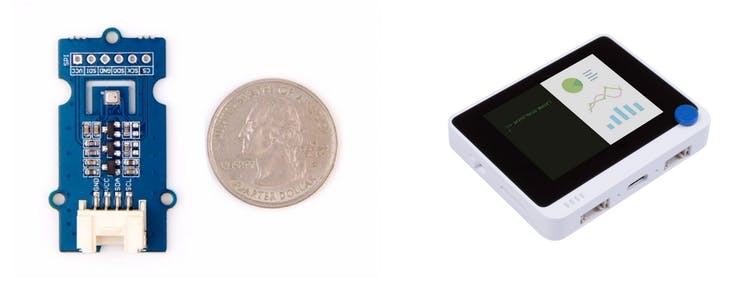
这是最终结果,您可以看到屏幕上显示了当前的温度、湿度和大气压力值,以及城市名称、预测的天气类型和预测的降水概率——在屏幕底部有一个日志输出字段,您可以轻松地重新用于显示极端天气信息或其他相关信息。虽然它看起来很好用,但您可以添加很多东西——例如上述的新闻/推文输出到屏幕上,或使用深度睡眠模式来节约能源并使其电池供电等等。
在这个项目中,我们将处理时间序列数据,就像我们之前多次做过的那样——这次唯一的大区别是天气预测的时间周期要大得多。我们将每小时进行一次测量,并对 24 小时的数据进行预测。此外,由于我们要预测未来 24 小时的平均天气类型,我们还将使用同一个模型预测未来 24 小时的降水概率。为了做到这一点,我们将利用 Keras 函数式 API 和多输出模型。
在多输出模型中,将有一个"主干",对两个输出都是通用的,然后"分支"到两个不同的输出。与使用两个独立模型相比,使用多输出模型的主要好处是用于预测天气类型和降水概率的数据和学习特征高度相关。
如果您在 Windows 上制作这个项目,首先需要做的是下载 Arduino IDE 的夜间版本,因为当前的稳定版本 1.18.3 无法编译具有大量库依赖关系的草图(问题是编译期间的链接器命令在 Windows 上超过了最大长度)。
其次,您需要确保在 Arduino IDE 中有 1.8.2 版本的 Seeed SAMD 板定义。
最后,由于我们使用卷积神经网络并使用 Keras API 构建它,它包含当前稳定版本的 Tensorflow Micro 不支持的操作。浏览 Github 上的 Tensorflow 问题,我发现有一个拉取请求将此操作(EXPAND_DIMS)添加到可用操作列表中,但在制作此视频时尚未合并到主分支。您可以 git clone Tensorflow 存储库,切换到 PR 分支,并通过在 Linux 机器上执行 ./tensorflow/lite/micro/tools/ci_build/test_arduino.sh 来编译 Arduino 库——生成的库可以在 tensorflow/lite/micro/tools/make/gen/arduino_x86_64/prj/tensorflow_lite.zip 中找到。或者,您可以从此项目的 Github 存储库下载已编译的库并将其放置在您的 Arduino 草图库文件夹中——只需确保一次只有一个 Tensorflow lite 库!
理解数据
当然,一切都从数据开始。对于本教程,我们将使用 Kaggle 上现成的天气数据集,历史小时天气数据 2012-2017。Seeed EDU 总部位于深圳,这是中国南方的一个城市——该城市在数据集中不存在,所以我们选择了一个位于相似纬度且同样具有亚热带气候的城市——迈阿密。
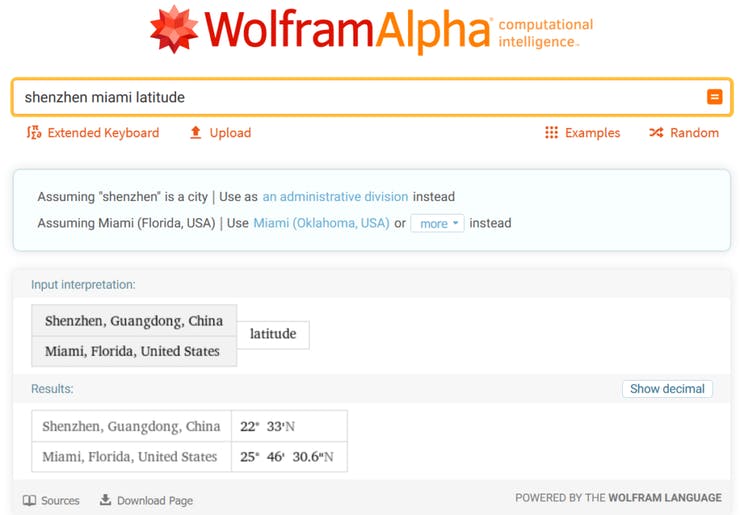
您需要选择一个至少与您居住地气候相似的城市——不言而喻,在迈阿密数据上训练然后在芝加哥冬季部署的模型不会输出正确的预测。
构建机器学习模型
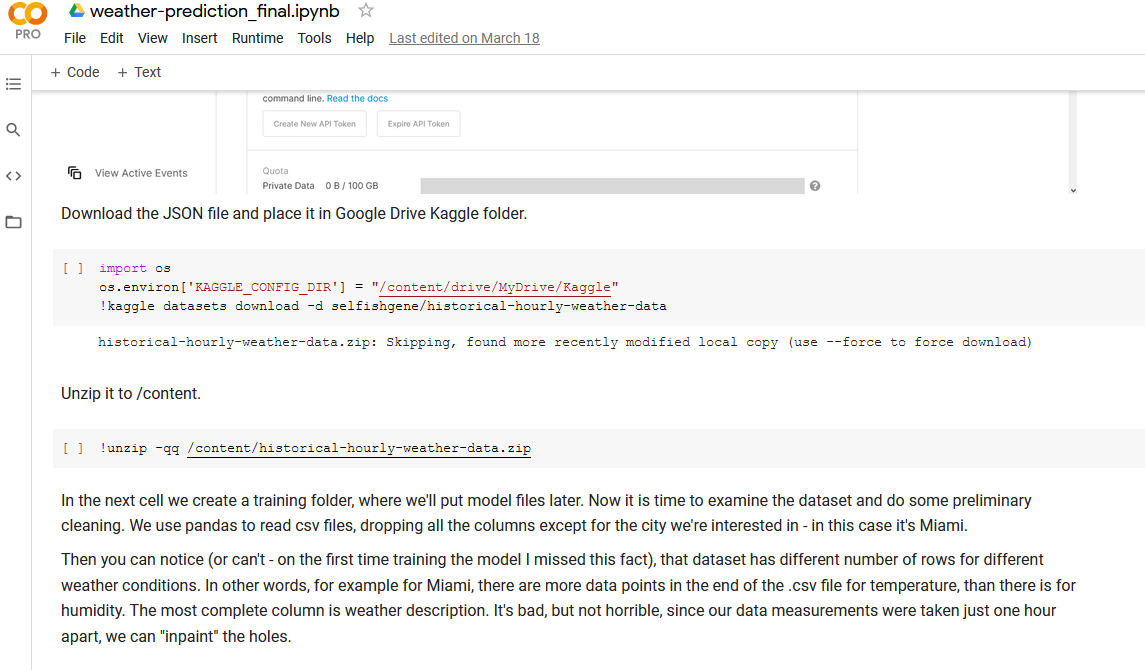
对于数据处理和模型训练步骤,让我们打开您可以在课程材料中找到的 Jupyter Notebook。运行此笔记本的最简单方法是将其上传到 Google Colab,因为它已经安装了所有软件包并准备运行。
或者您可以在本地执行笔记本——为此,首先通过运行以下命令在虚拟环境中安装所有必需的依赖项
pip install -r requirements.txt
在您之前创建的机器学习虚拟环境激活状态下。然后在同一环境中运行 jupyter notebook 命令,这将在您的默认浏览器中打开 notebook 服务器。 Jupyter Notebooks 是探索和展示数据的绝佳方式,因为它们允许在同一环境中同时包含文本和可执行代码。一般工作流程在 Notebook 文本部分中有详细说明。
部署到 Wio Terminal
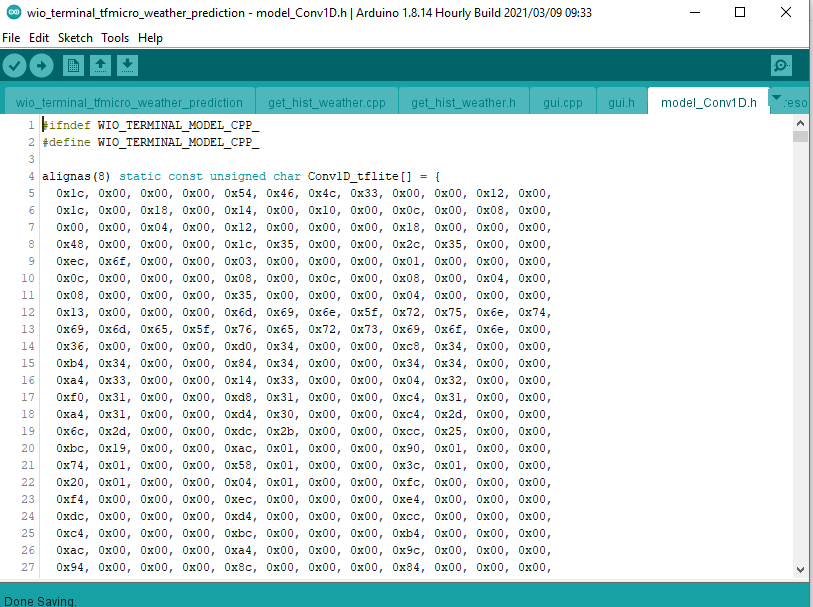
您在上一步中训练的模型已转换为字节数组,其中包含模型结构和权重,现在可以与 C++ 代码一起加载到 Wio Terminal 中。
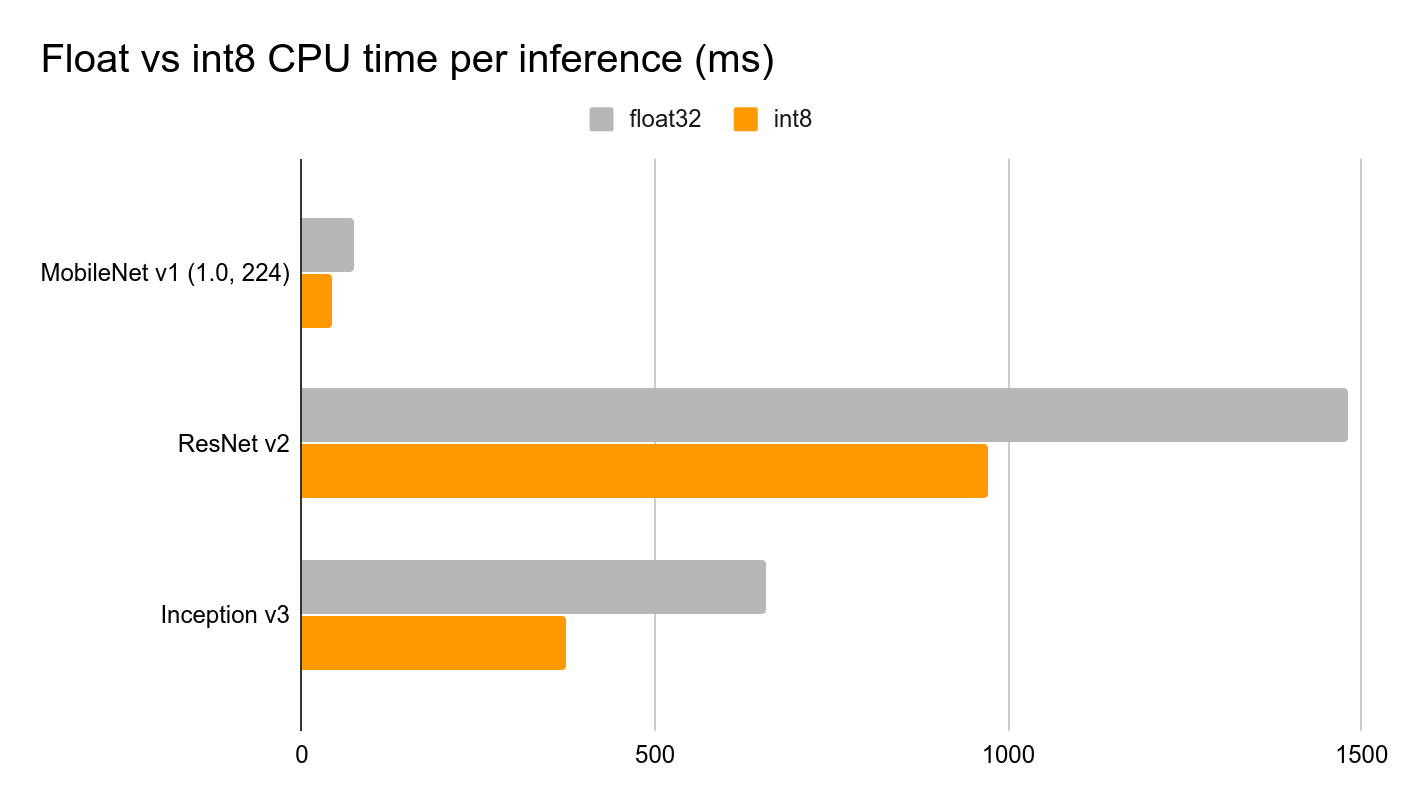
Tensorflow Lite for Microcontrollers 包含模型解释器,该解释器设计为精简且快速。解释器使用静态图排序和自定义(较少动态)内存分配器,以确保最小的加载、初始化和执行延迟。放置在输入缓冲区中的数据被馈送到模型图,然后在推理完成后,结果被放置在输出缓冲区中。 为了减小模型大小并缩短推理时间,我们执行两个重要的优化: • 执行全整数量化,将模型权重、输入和输出从浮点 32 位数字(每个占用 32 位内存)更改为整数 8 位数字(每个仅占用 8 位),从而将大小减少 4 倍。
• 使用 micro_mutable_op_resolver 并指定我们在神经网络中拥有的操作,仅使用运行模型所需的操作来编译我们的代码,而不是使用 all_ops_resolver,后者包含当前 Tensorflow Lite for Microcontrollers 解释器支持的所有操作。
模型训练完成后,创建一个空的草图并保存。然后将您训练的模型复制到草图文件夹中并重新打开草图。将模型变量名和模型长度更改为更短的名称。然后使用 wio_terminal_tfmicro_weather_prediction_static.ino 中的代码进行测试,您可以在课程材料中找到该代码。
让我们回顾一下 C++ 代码中的主要步骤 我们包含 Tensorflow 库的头文件和包含模型 flatbuffer 的文件
#include <TensorFlowLite.h>
//#include "tensorflow/lite/micro/micro_mutable_op_resolver.h"
#include "tensorflow/lite/micro/all_ops_resolver.h"
#include "tensorflow/lite/micro/micro_error_reporter.h"
#include "tensorflow/lite/micro/system_setup.h"
#include "tensorflow/lite/micro/micro_interpreter.h"
#include "tensorflow/lite/schema/schema_generated.h"
#include "model_Conv1D.h"
注意我如何注释掉了 micro_mutable_op_resolver.h 并启用了 all_ops_resolver.h - all_ops_resolver.h 头文件编译了 Tensorflow Micro 中当前存在的所有操作,便于测试,但一旦完成测试,最好切换到 micro_mutable_op_resolver.h 以节省设备内存 - 这确实会产生很大的差异。
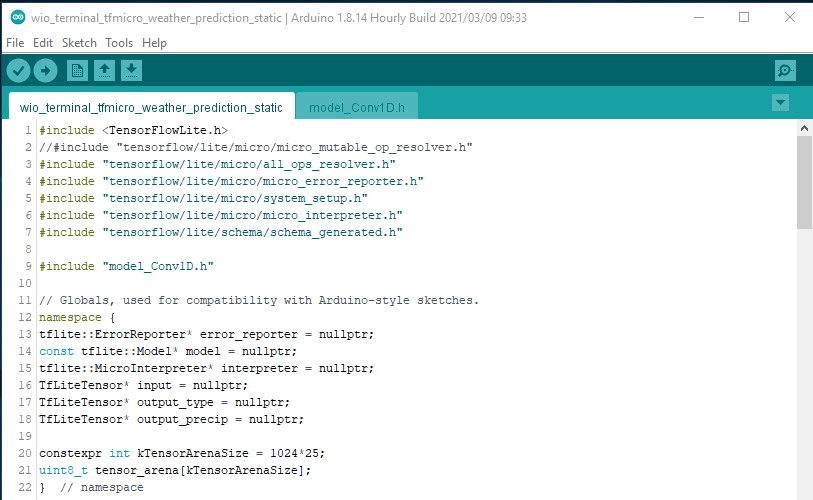
接下来我们定义错误报告器、模型、输入和输出张量以及解释器的指针。注意我们的模型有两个输出 - 一个用于降水量,另一个用于天气类型。我们还定义了张量竞技场,您可以将其视为一个草稿板,保存输入、输出和中间数组 - 所需的大小将取决于您使用的模型,可能需要通过实验来确定。
// Globals, used for compatibility with Arduino-style sketches.
namespace {
tflite::ErrorReporter* error_reporter = nullptr;
const tflite::Model* model = nullptr;
tflite::MicroInterpreter* interpreter = nullptr;
TfLiteTensor* input = nullptr;
TfLiteTensor* output_type = nullptr;
TfLiteTensor* output_precip = nullptr;
constexpr int kTensorArenaSize = 1024*25;
uint8_t tensor_arena[kTensorArenaSize];
}  // namespace
然后在设置函数中,还有更多的样板代码,比如实例化错误报告器、操作解析器、解释器、映射模型、分配张量,最后在分配后检查张量形状。这是代码在运行时可能抛出错误的时候,如果当前版本的 Tensorflow Micro 库不支持某些模型操作。如果你有不支持的操作,你可以更改模型架构或自己添加对操作符的支持,通常是从 Tensorflow Lite 移植。
void setup() {
Serial.begin(115200);
while (!Serial) {delay(10);}
// 设置日志记录。Google 风格是避免使用全局变量或静态变量,因为
// 生命周期不确定,但由于这个变量有一个简单的析构函数,所以没问题。
// NOLINTNEXTLINE(runtime-global-variables)
static tflite::MicroErrorReporter micro_error_reporter;
error_reporter = µ_error_reporter;
// 将模型映射到可用的数据结构中。这不涉及任何
// 复制或解析,这是一个非常轻量级的操作。
model = tflite::GetModel(Conv1D_tflite);
if (model->version() != TFLITE_SCHEMA_VERSION) {
TF_LITE_REPORT_ERROR(error_reporter,
"提供的模型架构版本是 %d,不等于 "
"支持的版本 %d。",
model->version(), TFLITE_SCHEMA_VERSION);
return;
}
// 这里引入了我们需要的所有操作实现。
// NOLINTNEXTLINE(runtime-global-variables)
//static tflite::MicroMutableOpResolver<1> resolver;
static tflite::AllOpsResolver resolver;
// 构建一个解释器来运行模型。
static tflite::MicroInterpreter static_interpreter(model, resolver, tensor_arena, kTensorArenaSize, error_reporter);
interpreter = &static_interpreter;
// 从 tensor_arena 为模型的张量分配内存。
TfLiteStatus allocate_status = interpreter->AllocateTensors();
if (allocate_status != kTfLiteOk) {
TF_LITE_REPORT_ERROR(error_reporter, "AllocateTensors() 失败");
return;
}
// 获取指向模型输入和输出张量的指针。
input = interpreter->input(0);
output_type = interpreter->output(1);
output_precip = interpreter->output(0);
Serial.println(input->dims->size);
Serial.println(input->dims->data[1]);
Serial.println(input->dims->data[2]);
Serial.println(input->type);
Serial.println(output_type->dims->size);
Serial.println(output_type->dims->data[1]);
Serial.println(output_type->type);
Serial.println(output_precip->dims->size);
Serial.println(output_precip->dims->data[1]);
Serial.println(output_precip->type);
}
最后在循环函数中,我们定义了一个用于量化 INT8 值的占位符和一个包含浮点值的数组,您可以从 Colab 笔记本中复制粘贴这些值,以便比较设备上的模型推理与 Colab 中的推理结果。
void loop() {
  int8_t x_quantized[72];
  float x[72] = {0, 0, 0, 0, 0, 0, 0, 0, 0, 0, 0, 0, 0, 0, 0, 0, 0, 0, 0, 0, 0, 0,
       0, 0, 0, 0, 0, 0, 0, 0, 0, 0, 0, 0, 0, 0, 0, 0, 0, 0, 0, 0, 0, 0,
       0, 0, 0, 0, 0, 0, 0, 0, 0, 0, 0, 0, 0, 0, 0, 0, 0, 0, 0, 0, 0, 0,
       0, 0, 0, 0, 0, 0};
我们在for循环中将浮点值量化为INT8,并逐个将它们放入输入张量中:
for (byte i = 0; i < 72; i = i + 1) {
        input->data.int8[i] = x[i] / input->params.scale + input->params.zero_point;
  }
然后由 Tensorflow Micro 解释器执行推理,如果没有报告错误,值将被放置在输出张量中。
// Run inference, and report any error
  TfLiteStatus invoke_status = interpreter->Invoke();

  if (invoke_status != kTfLiteOk) {
    TF_LITE_REPORT_ERROR(error_reporter, "Invoke failed");
    return;
  }
与输入类似,模型的输出也是量化的,所以我们需要执行反向操作,将其从 INT8 转换为浮点数。
// 从模型输出张量获取量化输出
  float y_type[4];
  // 将输出从整数反量化为浮点数
  int8_t y_precip_q = output_precip->data.int8[0];
  Serial.println(y_precip_q);
  float y_precip = (y_precip_q - output_precip->params.zero_point) * output_precip->params.scale;
  Serial.print("Precip: ");
  Serial.print(y_precip);
  Serial.print("\t");
  Serial.print("Type: ");
  for (byte i = 0; i < 4; i = i + 1) {
    y_type[i] = (output_type->data.int8[i] - output_type->params.zero_point) * output_type->params.scale;
    Serial.print(y_type[i]);
    Serial.print(" ");
  }
  Serial.print("\n");
}
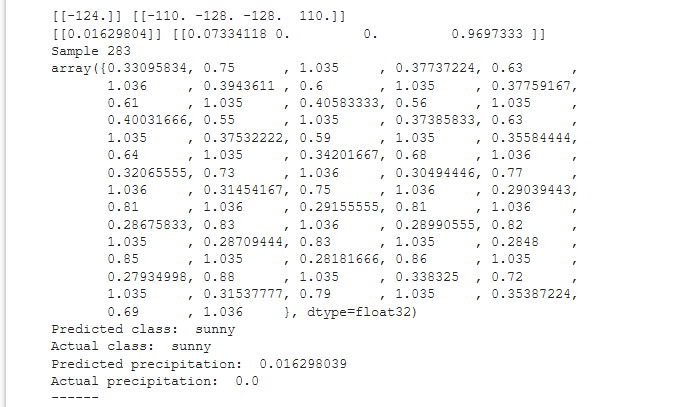
检查并比较相同数据点的值,对于在 Colab 笔记本中的量化 Tensorflow Lite 模型和在 Wio Terminal 上运行的 Tensorflow Micro 模型,它们应该是相同的。
LVGL 界面和 WiFi
现在下一步是将其从演示变成真正有用的项目。从课程材料中打开 wio_terminal_tfmicro_weather_prediction_static.ino 草图并查看其内容。

代码分为主草图、get_historical_data 和 GUI 部分。由于我们的模型需要过去 24 小时的数据,我们需要等待 24 小时才能执行第一次推理,这太长了——为了解决这个问题,我们从 openweathermap.com API 获取过去 24 小时的天气数据,可以在设备启动后立即执行第一次推理,然后用连接到 Wio Terminal I2C Grove 接口的 BME280 传感器的温度、湿度和压力值替换循环缓冲区中的值。对于 GUI,我们使用了 LVGL,一个小巧且多功能的图形库。

编译并上传代码,确保在上传前在草图中更改 WiFi 凭据、您的位置和 openweathermap.com API 密钥。上传后,设备将连接到互联网,获取您所在位置过去 24 小时的数据并执行第一次推理。然后它将等待 1 小时,然后从连接到 Wio Terminal 的 BME280 传感器获取值——如果没有连接传感器,程序将不会初始化。