Wi-Fi 连接
本文档介绍如何使用 Realtek RTL8720 核心在 Wio Terminal 上配置 Wi-Fi 连接。
确保您已经完成了网络概述,在 RTL8720 上更新了最新固件并下载了相关的 Arduino 库。
注意
以下示例已更新为使用 eRPC 结构框架固件,请更新到 eRPC 结构。只需将 AtWifi.h 替换为 rpcWiFi.h。
配置为站点 (STA) 模式
-
在 Arduino 中包含
rpcWifi.h库。 -
配置为 STA 模式:
WiFi.mode(WIFI_STA);
扫描 Wi-Fi 网络示例代码
此示例将配置自身为 Wi-Fi STA 模式,扫描并将所有可用网络打印到串口。
#include "rpcWiFi.h"

void setup() {
    Serial.begin(115200);
    while(!Serial); // 等待串口准备就绪
    delay(1000);

    // 将WiFi设置为站点模式,如果之前连接过AP则断开连接
    WiFi.mode(WIFI_STA);
    WiFi.disconnect();
    delay(100);

    Serial.println("Setup done");
}

void loop() {
    Serial.println("scan start");

    // WiFi.scanNetworks 将返回找到的网络数量
    int n = WiFi.scanNetworks();
    Serial.println("scan done");
    if (n == 0) {
        Serial.println("no networks found");
    } else {
        Serial.print(n);
        Serial.println(" networks found");
        for (int i = 0; i < n; ++i) {
            // 打印找到的每个网络的SSID和RSSI
            Serial.print(i + 1);
            Serial.print(": ");
            Serial.print(WiFi.SSID(i));
            Serial.print(" (");
            Serial.print(WiFi.RSSI(i));
            Serial.print(")");
            Serial.println((WiFi.encryptionType(i) == WIFI_AUTH_OPEN) ? " " : "*");
            delay(10);
        }
    }
    Serial.println("");

    // 再次扫描前等待一段时间
    delay(5000);
}
连接到指定网络示例代码
此示例连接到指定的 Wi-Fi 网络。将 ssid 和 password 更改为您的 Wi-Fi 网络。
#include "rpcWiFi.h"

const char* ssid = "yourNetworkName";
const char* password =  "yourNetworkPassword";

void setup() {
    Serial.begin(115200);
    while(!Serial); // 等待串口准备就绪

    // 将WiFi设置为站点模式,如果之前连接过AP则断开连接
    WiFi.mode(WIFI_STA);
    WiFi.disconnect();

    Serial.println("Connecting to WiFi..");
    WiFi.begin(ssid, password);

    while (WiFi.status() != WL_CONNECTED) {
        delay(500);
        Serial.println("Connecting to WiFi..");
        WiFi.begin(ssid, password);
    }
    Serial.println("Connected to the WiFi network");
    Serial.print("IP Address: ");
    Serial.println (WiFi.localIP()); // 打印出设备的IP地址
    }

void loop() {

}
WiFi Multi 示例代码
- 在 Arduino 中包含
rpcWiFi.h和WiFiMulti.h库。
此示例调用 WiFiMulti 类,您可以使用
wifiMulti.addAP("ssid", "password");
来添加多个 AP Wi-Fi 到列表中,wifiMulti.run() 将尝试连接到信号最好的 Wi-Fi。
注意: 根据您的 Wi-Fi 更改 SSID 和 Password。
#include "rpcWiFi.h"
#include <WiFiMulti.h>

WiFiMulti wifiMulti;

void setup() {
    Serial.begin(115200);
    while(!Serial); // Wait for Serial to be ready
    delay(1000);

    wifiMulti.addAP("ssid_from_AP_1", "your_password_for_AP_1");
    wifiMulti.addAP("ssid_from_AP_2", "your_password_for_AP_2");
    wifiMulti.addAP("ssid_from_AP_3", "your_password_for_AP_3");

    Serial.println("Connecting Wifi...");
    if (wifiMulti.run() == WL_CONNECTED) {
        Serial.println("");
        Serial.println("WiFi connected");
        Serial.println("IP address: ");
        Serial.println(WiFi.localIP());
    }
}

void loop() {
    if (wifiMulti.run() != WL_CONNECTED) {
        Serial.println("WiFi not connected!");
        delay(1000);
    }
}
Wi-Fi 客户端示例代码
此示例演示了 Wio Terminal 配置为 STA 模式,连接到特定的 AP Wi-Fi 并发送 HTTP GET 请求,然后从同一网络上的 Web 服务器接收 HTTP 响应。
-
将
ssid和password更改为您的 Wi-Fi。 -
将
host更改为 Web 服务器 IP 地址。
要简单测试此示例,您可以在 PC 上使用 Python 启动一个简单的 Web 服务器:
- 复制并保存以下内容到您的本地驱动器,并将其命名为
index.html。
<html>
<body>
Hello World!
</body>
</html>
- 在 Powershell/终端中,将目录切换到您刚刚保存
index.html的路径,并运行以下代码以使用 Python 启动一个简单的 Web 服务器:
对于 Python 3:
python3 -m http.server 80
对于 Python 2:
python -m SimpleHTTPServer 80
-
在Arduino代码中将
host更改为此PC的IP地址。同时,将Arduino代码中的ssid和password更改为与此PC连接的相同Wi-Fi。 -
将代码上传到Wio Terminal,检查串口监视器以观察结果。
#include <rpcWiFi.h>

const char* ssid = "yourNetworkName";
const char* password =  "yourNetworkPassword";

void setup() {
    Serial.begin(115200);
    while(!Serial); // 等待串口准备就绪
    delay(1000);

    // 将WiFi设置为站点模式,如果之前连接过AP则断开连接
    WiFi.mode(WIFI_STA);
    WiFi.disconnect();
    delay(2000);

    WiFi.begin(ssid, password);

    while (WiFi.status() != WL_CONNECTED) {
        delay(500);
        Serial.println("正在连接WiFi..");
    }
    Serial.println("已连接到WiFi网络");
    Serial.print("IP地址: ");
    Serial.println (WiFi.localIP()); // 打印出设备的IP地址
}


void loop() {
    const uint16_t port = 80; // 默认端口
    const char* host = "192.168.0.10";  // 目标服务器IP地址

    Serial.print("正在连接到 ");
    Serial.println(host);

    // 使用WiFiClient类创建TCP连接
    WiFiClient client;

    if (!client.connect(host, port)) {
        Serial.println("连接失败。");
        Serial.println("等待5秒后重试...");
        delay(5000);
        return;
    }

    // 这将向服务器发送请求
    //取消注释此行以向服务器发送任意字符串
    //client.print("Send this data to the server");
    //取消注释此行以向服务器发送基本文档请求
    client.print("GET /index.html HTTP/1.1\n\n"); // 发送HTTP GET请求

    int maxloops = 0;

    //等待服务器的回复变为可用
    while (!client.available() && maxloops < 1000) {
        maxloops++;
        delay(1); //延迟1毫秒
    }
    if (client.available() > 0) {
        //从服务器读取一行数据
        String line = client.readString(); // 从服务器响应中读取
        // 处理各种行结束符
        line.replace("\r\n", "\n");
        line.replace('\r', '\n');
        line.replace("\n", "\r\n");
        Serial.println(line);
    } else {
        Serial.println("client.available() 超时 ");
    }

    Serial.println("正在关闭连接。");
    client.stop();

    Serial.println("等待5秒后重新启动...");
    delay(5000);
}
Wi-Fi Https 连接示例代码
此示例演示了如何使用 Wio Terminal 建立 Https 连接。通过此方法,您可以连接到几乎所有网站并获取所需的数据。
- 将
ssid和password更改为您的 Wi-Fi 信息。
#include <rpcWiFi.h>
#include <WiFiClientSecure.h>

const char* ssid     = "yourNetworkName";     // 你的网络SSID
const char* password = "yourNetworkPassword"; // 你的网络密码

const char*  server = "www.example.com";  // 服务器URL
const char* test_root_ca = \
                            "-----BEGIN CERTIFICATE-----\n"
                            "MIIDrzCCApegAwIBAgIQCDvgVpBCRrGhdWrJWZHHSjANBgkqhkiG9w0BAQUFADBh\n"
                            "MQswCQYDVQQGEwJVUzEVMBMGA1UEChMMRGlnaUNlcnQgSW5jMRkwFwYDVQQLExB3\n"
                            "d3cuZGlnaWNlcnQuY29tMSAwHgYDVQQDExdEaWdpQ2VydCBHbG9iYWwgUm9vdCBD\n"
                            "QTAeFw0wNjExMTAwMDAwMDBaFw0zMTExMTAwMDAwMDBaMGExCzAJBgNVBAYTAlVT\n"
                            "MRUwEwYDVQQKEwxEaWdpQ2VydCBJbmMxGTAXBgNVBAsTEHd3dy5kaWdpY2VydC5j\n"
                            "b20xIDAeBgNVBAMTF0RpZ2lDZXJ0IEdsb2JhbCBSb290IENBMIIBIjANBgkqhkiG\n"
                            "9w0BAQEFAAOCAQ8AMIIBCgKCAQEA4jvhEXLeqKTTo1eqUKKPC3eQyaKl7hLOllsB\n"
                            "CSDMAZOnTjC3U/dDxGkAV53ijSLdhwZAAIEJzs4bg7/fzTtxRuLWZscFs3YnFo97\n"
                            "nh6Vfe63SKMI2tavegw5BmV/Sl0fvBf4q77uKNd0f3p4mVmFaG5cIzJLv07A6Fpt\n"
                            "43C/dxC//AH2hdmoRBBYMql1GNXRor5H4idq9Joz+EkIYIvUX7Q6hL+hqkpMfT7P\n"
                            "T19sdl6gSzeRntwi5m3OFBqOasv+zbMUZBfHWymeMr/y7vrTC0LUq7dBMtoM1O/4\n"
                            "gdW7jVg/tRvoSSiicNoxBN33shbyTApOB6jtSj1etX+jkMOvJwIDAQABo2MwYTAO\n"
                            "BgNVHQ8BAf8EBAMCAYYwDwYDVR0TAQH/BAUwAwEB/zAdBgNVHQ4EFgQUA95QNVbR\n"
                            "TLtm8KPiGxvDl7I90VUwHwYDVR0jBBgwFoAUA95QNVbRTLtm8KPiGxvDl7I90VUw\n"
                            "DQYJKoZIhvcNAQEFBQADggEBAMucN6pIExIK+t1EnE9SsPTfrgT1eXkIoyQY/Esr\n"
                            "hMAtudXH/vTBH1jLuG2cenTnmCmrEbXjcKChzUyImZOMkXDiqw8cvpOp/2PV5Adg\n"
                            "06O/nVsJ8dWO41P0jmP6P6fbtGbfYmbW0W5BjfIttep3Sp+dWOIrWcBAI+0tKIJF\n"
                            "PnlUkiaY4IBIqDfv8NZ5YBberOgOzW6sRBc4L0na4UU+Krk2U886UAb3LujEV0ls\n"
                            "YSEY1QSteDwsOoBrp+uvFRTp2InBuThs4pFsiv9kuXclVzDAGySj4dzp30d8tbQk\n"
                            "CAUw7C29C79Fv1C5qfPrmAESrciIxpg0X40KPMbp1ZWVbd4=\n"
                            "-----END CERTIFICATE-----\n";

// 如果需要,你可以使用x.509客户端证书
//const char* test_client_key = "";   //用于验证客户端
//const char* test_client_cert = "";  //用于验证客户端

WiFiClientSecure client;

void setup() {
    //初始化串口并等待端口打开:
    Serial.begin(115200);
    while(!Serial); // 等待串口准备就绪
    delay(1000);

    Serial.print("尝试连接到SSID: ");
    Serial.println(ssid);
    WiFi.begin(ssid, password);

    // 尝试连接到WiFi网络:
    while (WiFi.status() != WL_CONNECTED) {
        Serial.print(".");
        // 等待1秒后重试
        delay(1000);
    }
    Serial.print("已连接到 ");
    Serial.println(ssid);

    client.setCACert(test_root_ca);
    //client.setCertificate(test_client_key); // 用于客户端验证
    //client.setPrivateKey(test_client_cert); // 用于客户端验证

    Serial.println("\n开始连接到服务器...");
    if (!client.connect(server, 443)) {
        Serial.println("连接失败!");
    } else {
        Serial.println("已连接到服务器!");
        // 发起HTTP请求:
        client.println("GET https://www.example.com HTTP/1.0");
        client.println("Host: www.example.com");
        client.println("Connection: close");
        client.println();

        while (client.connected()) {
            String line = client.readStringUntil('\n');
            if (line == "\r") {
                Serial.println("已接收到头部信息");
                break;
            }
        }
        // 如果有来自服务器的传入字节可用
        // 读取并打印它们:
        while (client.available()) {
            char c = client.read();
            if (c == '\n') {
                Serial.write('\r');
            }
            Serial.write(c);
        }
        client.stop();
    }
}

void loop() {
    // 什么都不做
}
获取网站的根 CA
要获取网站的根 CA,您可以在终端(Linux Bash Shell)中运行以下命令:
openssl s_client -showcerts -verify 5 -connect www.example.com:443 < /dev/null
将 www.example.com 替换为所需网站的根 URL。
对于 Windows,您可以使用 Windows 子系统 Linux (WSL) 来运行相同的 Linux 命令。
注意: 确保您已安装依赖项:
sudo apt update
sudo apt install openssl
连接到 MQTT 服务器示例代码
此示例演示了如何使用 Wio Terminal 与 MQTT 服务器建立 MQTT 连接。通过此示例,您可以使用 Wio Terminal 订阅和发布消息到 MQTT 服务器。这里使用了一个免费的 MQTT 服务器:https://test.mosquitto.org/。
- 在此处下载并安装 Arduino MQTT 库。
#include "rpcWiFi.h"
#include <PubSubClient.h>

// 更新这些值以适合您的网络。
const char *ssid = "yourNetworkName";      // 您的网络SSID
const char *password = "yourNetworkPassword"; // 您的网络密码

const char *ID = "Wio-Terminal-Client";  // 我们设备的名称,必须是唯一的
const char *TOPIC = "WioTerminal";  // 要发布的主题
const char *subTopic = "inTopic";  // 要订阅的主题
const char *server = "test.mosquitto.org"; // 服务器URL


WiFiClient wifiClient;
PubSubClient client(wifiClient);

void callback(char* topic, byte* payload, unsigned int length) {
  Serial.print("消息到达 [");
  Serial.print(topic);
  Serial.print("] ");
  for (int i=0;i<length;i++) {
    Serial.print((char)payload[i]);
  }
  Serial.println();
}

void reconnect() {
  // 循环直到我们重新连接
  while (!client.connected())
  {
    Serial.print("尝试 MQTT 连接...");
    // 尝试连接
    if (client.connect(ID)) {
      Serial.println("已连接");
      // 一旦连接,发布一个公告...
      client.publish(TOPIC, "{\"message\": \"Wio Terminal is connected!\"}");
      Serial.println("成功发布连接消息!");
      // ... 并重新订阅
      client.subscribe(subTopic);
      Serial.print("已订阅到: ");
      Serial.println(subTopic);
    }
    else {
      Serial.print("失败,rc=");
      Serial.print(client.state());
      Serial.println(" 5秒后重试");
      // 重试前等待5秒
      delay(5000);
    }
  }
}

void setup()
{
  Serial.begin(115200);
  while (!Serial)
    ; // 等待串口准备就绪
  Serial.print("尝试连接到SSID: ");
  Serial.println(ssid);
  WiFi.begin(ssid, password);

  // 尝试连接到Wifi网络:
  while (WiFi.status() != WL_CONNECTED)
  {
    Serial.print(".");
    WiFi.begin(ssid, password);
    // 等待1秒重试
    delay(1000);
  }

  Serial.print("已连接到 ");
  Serial.println(ssid);
  delay(500);

  client.setServer(server, 1883);
  client.setCallback(callback);
}

void loop()
{
  if (!client.connected()) {
    reconnect();
  }
  client.loop();
}
连接到 MQTTs 服务器示例代码
此示例演示了使用 Wio Terminal 建立 MQTTs 连接。这里使用了一个免费的 MQTTs 服务器:https://test.mosquitto.org/ 并将加速度计数据发送到一个主题。
-
在此处下载并安装 Arduino MQTT 库。
-
按照 此 wiki 为 Wio Terminal 安装加速度计库。
-
Wio Terminal 将向
WioTerminal/IMU主题发布加速度计数据,并从inTopic主题订阅消息。
#include "rpcWiFi.h"
#include <PubSubClient.h>
#include <WiFiClientSecure.h>
#include"LIS3DHTR.h"

const char *ssid = "yourNetworkName";      // 你的网络SSID
const char *password = "yourNetworkPassword"; // 你的网络密码

const char *ID = "Wio-Terminal-Client";  // 我们设备的名称,必须是唯一的
const char *TOPIC = "WioTerminal/IMU";  // 要发布的主题
const char *subTopic = "inTopic";  // 要订阅的主题

const char *server = "test.mosquitto.org"; // 服务器URL
const char *test_root_ca =
"-----BEGIN CERTIFICATE-----\n"
"MIIEAzCCAuugAwIBAgIUBY1hlCGvdj4NhBXkZ/uLUZNILAwwDQYJKoZIhvcNAQEL\n"
"BQAwgZAxCzAJBgNVBAYTAkdCMRcwFQYDVQQIDA5Vbml0ZWQgS2luZ2RvbTEOMAwG\n"
"A1UEBwwFRGVyYnkxEjAQBgNVBAoMCU1vc3F1aXR0bzELMAkGA1UECwwCQ0ExFjAU\n"
"BgNVBAMMDW1vc3F1aXR0by5vcmcxHzAdBgkqhkiG9w0BCQEWEHJvZ2VyQGF0Y2hv\n"
"by5vcmcwHhcNMjAwNjA5MTEwNjM5WhcNMzAwNjA3MTEwNjM5WjCBkDELMAkGA1UE\n"
"BhMCR0IxFzAVBgNVBAgMDlVuaXRlZCBLaW5nZG9tMQ4wDAYDVQQHDAVEZXJieTES\n"
"MBAGA1UECgwJTW9zcXVpdHRvMQswCQYDVQQLDAJDQTEWMBQGA1UEAwwNbW9zcXVp\n"
"dHRvLm9yZzEfMB0GCSqGSIb3DQEJARYQcm9nZXJAYXRjaG9vLm9yZzCCASIwDQYJ\n"
"KoZIhvcNAQEBBQADggEPADCCAQoCggEBAME0HKmIzfTOwkKLT3THHe+ObdizamPg\n"
"UZmD64Tf3zJdNeYGYn4CEXbyP6fy3tWc8S2boW6dzrH8SdFf9uo320GJA9B7U1FW\n"
"Te3xda/Lm3JFfaHjkWw7jBwcauQZjpGINHapHRlpiCZsquAthOgxW9SgDgYlGzEA\n"
"s06pkEFiMw+qDfLo/sxFKB6vQlFekMeCymjLCbNwPJyqyhFmPWwio/PDMruBTzPH\n"
"3cioBnrJWKXc3OjXdLGFJOfj7pP0j/dr2LH72eSvv3PQQFl90CZPFhrCUcRHSSxo\n"
"E6yjGOdnz7f6PveLIB574kQORwt8ePn0yidrTC1ictikED3nHYhMUOUCAwEAAaNT\n"
"MFEwHQYDVR0OBBYEFPVV6xBUFPiGKDyo5V3+Hbh4N9YSMB8GA1UdIwQYMBaAFPVV\n"
"6xBUFPiGKDyo5V3+Hbh4N9YSMA8GA1UdEwEB/wQFMAMBAf8wDQYJKoZIhvcNAQEL\n"
"BQADggEBAGa9kS21N70ThM6/Hj9D7mbVxKLBjVWe2TPsGfbl3rEDfZ+OKRZ2j6AC\n"
"6r7jb4TZO3dzF2p6dgbrlU71Y/4K0TdzIjRj3cQ3KSm41JvUQ0hZ/c04iGDg/xWf\n"
"+pp58nfPAYwuerruPNWmlStWAXf0UTqRtg4hQDWBuUFDJTuWuuBvEXudz74eh/wK\n"
"sMwfu1HFvjy5Z0iMDU8PUDepjVolOCue9ashlS4EB5IECdSR2TItnAIiIwimx839\n"
"LdUdRudafMu5T5Xma182OC0/u/xRlEm+tvKGGmfFcN0piqVl8OrSPBgIlb+1IKJE\n"
"m/XriWr/Cq4h/JfB7NTsezVslgkBaoU=\n"
"-----END CERTIFICATE-----\n";

long lastMsg = 0;

LIS3DHTR<TwoWire> lis;
WiFiClientSecure wifiClient;
PubSubClient client(wifiClient);

void callback(char *topic, byte *payload, unsigned int length)
{
  Serial.print("消息到达 [");
  Serial.print(topic);
  Serial.print("] ");
  for (int i = 0; i < length; i++)
  {
    Serial.print((char)payload[i]);
  }
  Serial.println();
}

void reconnect()
{
  // 循环直到我们重新连接
  while (!client.connected())
  {
    Serial.print("尝试MQTT连接...");
    // 尝试连接
    if (client.connect(ID))
    {
      Serial.println("已连接");
      // 一旦连接,发布一个公告...
      client.publish(TOPIC, "{\"message\": \"Wio Terminal is connected!\"}");
      Serial.println("连接消息发布成功!");
      // ... 并重新订阅
      client.subscribe(subTopic);
      Serial.print("已订阅到: ");
      Serial.println(subTopic);
    }
    else
    {
      Serial.print("失败,rc=");
      Serial.print(client.state());
      Serial.println(" 5秒后重试");
      // 重试前等待5秒
      delay(5000);
    }
  }
}

void setup()
{
  //初始化串口并等待端口打开:
  Serial.begin(115200);
  while (!Serial)
    ; // 等待串口准备就绪
  delay(1000);

  lis.begin(Wire1);

  if (!lis) {
    Serial.println("错误");
    while(1);
  }
  lis.setOutputDataRate(LIS3DHTR_DATARATE_25HZ); //数据输出速率
  lis.setFullScaleRange(LIS3DHTR_RANGE_2G); //量程范围设置为2g

  Serial.print("尝试连接到SSID: ");
  Serial.println(ssid);
  WiFi.begin(ssid, password);

  // 尝试连接到Wifi网络:
  while (WiFi.status() != WL_CONNECTED)
  {
    Serial.print(".");
    WiFi.begin(ssid, password);
    // 等待1秒重试
    delay(1000);
  }
  Serial.print("已连接到 ");
  Serial.println(ssid);

  wifiClient.setCACert(test_root_ca);

  client.setServer(server, 8883);
  client.setCallback(callback);
}


void loop()
{
  if (!client.connected())
  {
    reconnect();
  }

  float x_values, y_values, z_values;

  // 发送数据
  long now = millis();
  if (now - lastMsg > 5000) {
    lastMsg = now;

  x_values = lis.getAccelerationX();
  y_values = lis.getAccelerationY();
  z_values = lis.getAccelerationZ();
  String data="{\"x-axis\": "+String(x_values)+","+"\"y-axis\": "+String(y_values)+","+"\"z-axis\": "+String(z_values)+"}";

  if (!client.publish(TOPIC, data.c_str())) {
    Serial.println("消息发送失败。");
  }
  Serial.printf("消息发送 [%s] ", TOPIC);
  Serial.println(data);
  }

  client.loop();
}
UDP 客户端示例代码

此示例连接到 Wi-Fi 并向运行在您 PC 上的 UDP 服务器发送 UDP 数据包。
注意: 确保您的 PC 和 Wio Terminal 在同一网络中!
Python UDP 服务器代码
-
将以下代码保存为
udp_server.py。 -
运行 python 脚本:
python udp_server.py。
# This python script listens on UDP port 3333
# for messages from the Wio Terminal board and prints them
import socket
import sys

try :
    s = socket.socket(socket.AF_INET, socket.SOCK_DGRAM)
    s.setsockopt(socket.SOL_SOCKET, socket.SO_REUSEADDR, 1)
except socket.error, msg :
    print 'Failed to create socket. Error Code : ' + str(msg[0]) + ' Message ' + msg[1]
    sys.exit()

try:
    s.bind(('', 3333))
except socket.error , msg:
    print 'Bind failed. Error: ' + str(msg[0]) + ': ' + msg[1]
    sys.exit()

print 'Server listening'

while 1:
    d = s.recvfrom(1024)
    data = d[0]

    if not data:
        break

    print data.strip()

s.close()
Arduino 代码
-
将
networkName和networkPswd更改为您的 Wi-Fi 设置。 -
将
udpAddress更改为您 PC 的 IP 地址,并确保运行 UDP 服务器的 PC 与 Wio Terminal 在同一网络中。 -
将代码上传到 Wio Terminal。
#include <rpcWiFi.h>
#include <WiFiUdp.h>

// WiFi network name and password:
const char * networkName = "your-ssid";
const char * networkPswd = "your-password";

//IP address to send UDP data to:
// either use the ip address of the server or
// a network broadcast address
const char * udpAddress = "192.168.0.255";
const int udpPort = 3333;

//Are we currently connected?
boolean connected = false;

//The udp library class
WiFiUDP udp;

void setup(){
  // Initilize hardware serial:
  Serial.begin(115200);

  //Connect to the WiFi network
  connectToWiFi(networkName, networkPswd);
}

void loop(){
  //only send data when connected
  if(connected){
    //Send a packet
    udp.beginPacket(udpAddress,udpPort);
    udp.printf("Seconds since boot: %lu", millis()/1000);
    udp.endPacket();
  }
  //Wait for 1 second
  delay(1000);
}

void connectToWiFi(const char * ssid, const char * pwd){
  Serial.println("Connecting to WiFi network: " + String(ssid));

  // delete old config
  WiFi.disconnect(true);
  //register event handler
  WiFi.onEvent(WiFiEvent);

  //Initiate connection
  WiFi.begin(ssid, pwd);

  Serial.println("Waiting for WIFI connection...");
}

//wifi event handler
void WiFiEvent(WiFiEvent_t event){
    switch(event) {
      case SYSTEM_EVENT_STA_GOT_IP:
          //When connected set
          Serial.print("WiFi connected! IP address: ");
          Serial.println(WiFi.localIP());
          //initializes the UDP state
          //This initializes the transfer buffer
          udp.begin(WiFi.localIP(),udpPort);
          connected = true;
          break;
      case SYSTEM_EVENT_STA_DISCONNECTED:
          Serial.println("WiFi lost connection");
          connected = false;
          break;
      default: break;
    }
}
Wi-Fi NTP 示例代码
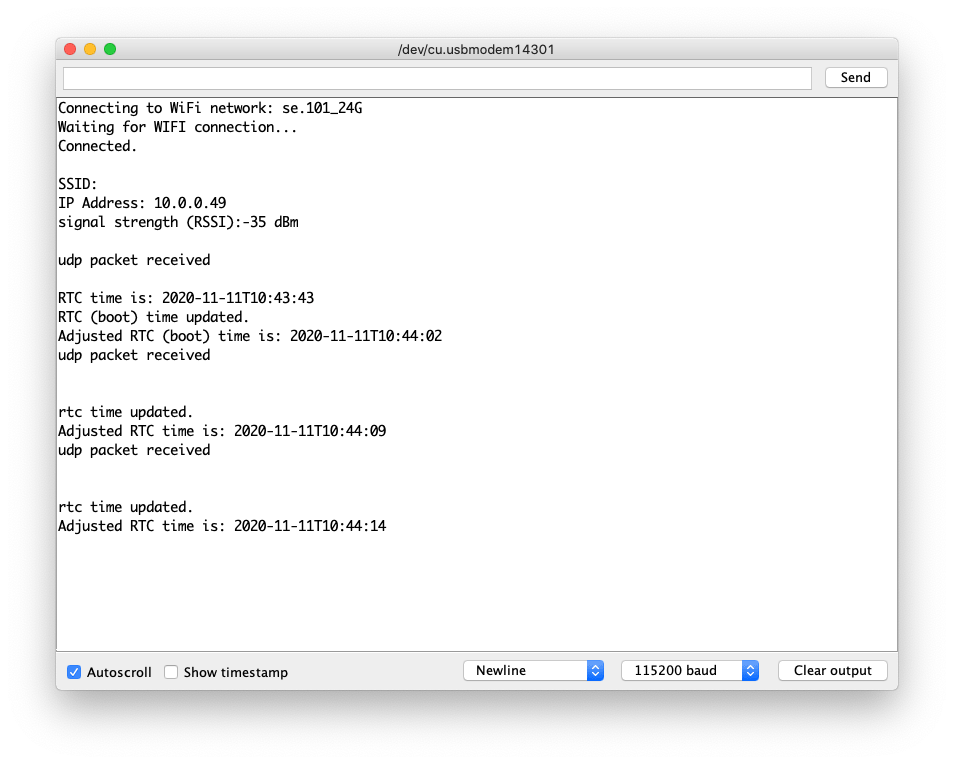
此示例使用 UDP 获取 NTP 时间,并使用 SAMD51 核心上的内置 RTC 来保持时间更新。
-
安装 Seeed_Arduino_RTC 库。
-
安装 millisDelay 库。
#include <rpcWiFi.h>
#include <millisDelay.h>
#include "RTC_SAMD51.h"

const char ssid[] = "yourNetworkName"; // 添加你需要的 ssid
const char password[] = "yourNetworkPassword"; // 添加你自己的网络密码

millisDelay updateDelay; // 更新延迟对象。用于 ntp 周期性更新。

unsigned int localPort = 2390;      // 监听 UDP 数据包的本地端口
char timeServer[] = "time.nist.gov"; // 外部 NTP 服务器,例如 time.nist.gov

const int NTP_PACKET_SIZE = 48; // NTP 时间戳在消息的前 48 字节中
byte packetBuffer[NTP_PACKET_SIZE]; // 用于保存传入和传出数据包的缓冲区

// 声明一个时间对象
DateTime now;

// 定义 WiFI 客户端
WiFiClient client;

// udp 库类
WiFiUDP udp;

// 本地时间
unsigned long devicetime;

RTC_SAMD51 rtc;

// 供 Adafuit RTClib 库使用
char daysOfTheWeek[7][12] = { "Sunday", "Monday", "Tuesday", "Wednesday", "Thursday", "Friday", "Saturday" };

void setup() {

    Serial.begin(115200);

    while (!Serial); // 等待串口连接。原生 USB 需要

    // 在 rtc 检查之前设置网络
    connectToWiFi(ssid, password);

    // 通过 NTP (udp) 调用时间服务器获取时间
    // getNTPtime 返回根据时区调整但不包含夏令时的纪元 UTC 时间
    // 时间
    devicetime = getNTPtime();

    // 检查 rtc 是否存在
    if (devicetime == 0) {
        Serial.println("从网络时间服务器获取时间失败。");
    }

    if (!rtc.begin()) {
        Serial.println("找不到 RTC");
        while (1) delay(10); // 停止运行
    }

    // 获取并打印当前 rtc 时间
    now = rtc.now();
    Serial.print("RTC 时间是: ");
    Serial.println(now.timestamp(DateTime::TIMESTAMP_FULL));

    // 使用 ntp 时间调整时间
    rtc.adjust(DateTime(devicetime));

    // 打印启动更新详情
    Serial.println("RTC (启动) 时间已更新。");
    // 获取并打印调整后的 rtc 时间
    now = rtc.now();
    Serial.print("调整后的 RTC (启动) 时间是: ");
    Serial.println(now.timestamp(DateTime::TIMESTAMP_FULL));

    // 根据需要启动 millisdelays 定时器,调整以适应要求
    updateDelay.start(1 * 60 * 60 * 1000); // 每小时通过 ntp 更新时间

}

void loop() {

    if (updateDelay.justFinished()) { // 12 小时循环
        // 重复定时器
        updateDelay.repeat(); // 重复

        // 更新 rtc 时间
        devicetime = getNTPtime();
        if (devicetime == 0) {
            Serial.println("从网络时间服务器获取时间失败。");
        }
        else {
            rtc.adjust(DateTime(devicetime));
            Serial.println("");
            Serial.println("rtc 时间已更新。");
            // 获取并打印调整后的 rtc 时间
            now = rtc.now();
            Serial.print("调整后的 RTC 时间是: ");
            Serial.println(now.timestamp(DateTime::TIMESTAMP_FULL));
        }
    }
}


void connectToWiFi(const char* ssid, const char* pwd) {
    Serial.println("连接到 WiFi 网络: " + String(ssid));

    // 删除旧配置
    WiFi.disconnect(true);

    Serial.println("等待 WIFI 连接...");

    // 启动连接
    WiFi.begin(ssid, pwd);

    while (WiFi.status() != WL_CONNECTED) {
        WiFi.begin(ssid, pwd);
        delay(500);
    }
    Serial.println("已连接。");
    printWifiStatus();

}

unsigned long getNTPtime() {

    // 模块返回一个无符号长整型时间值,作为自 1970 年 1 月 1 日以来的秒数
    // unix 时间,如果遇到问题则返回 0

    // 仅在连接时发送数据
    if (WiFi.status() == WL_CONNECTED) {
        // 初始化 UDP 状态
        // 这初始化传输缓冲区
        udp.begin(WiFi.localIP(), localPort);

        sendNTPpacket(timeServer); // 向时间服务器发送 NTP 数据包
        // 等待查看是否有回复可用
        delay(1000);

        if (udp.parsePacket()) {
            Serial.println("收到 udp 数据包");
            Serial.println("");
            // 我们收到了一个数据包,从中读取数据
            udp.read(packetBuffer, NTP_PACKET_SIZE); // 将数据包读入缓冲区

            // 时间戳从接收数据包的第 40 字节开始,长度为四个字节,
            // 或两个字。首先,提取两个字:

            unsigned long highWord = word(packetBuffer[40], packetBuffer[41]);
            unsigned long lowWord = word(packetBuffer[42], packetBuffer[43]);
            // 将四个字节(两个字)组合成一个长整数
            // 这是 NTP 时间(自 1900 年 1 月 1 日以来的秒数):
            unsigned long secsSince1900 = highWord << 16 | lowWord;
            // Unix 时间从 1970 年 1 月 1 日开始。以秒为单位,那是 2208988800:
            const unsigned long seventyYears = 2208988800UL;
            // 减去七十年:
            unsigned long epoch = secsSince1900 - seventyYears;

            // 根据时区偏移量调整时间,以秒为单位,相对于 UTC 的 +/-
            // WA 时间相对于 UTC 的偏移量是 +8 小时(28,800 秒)
            // + GMT 以东
            // - GMT 以西
            long tzOffset = 28800UL;

            // WA 本地时间
            unsigned long adjustedTime;
            return adjustedTime = epoch + tzOffset;
        }
        else {
            // 无法成功解析 udp 数据包
            // 清理 udp 连接
            udp.stop();
            return 0; // 零表示失败
        }
        // 不经常调用 ntp 时间,stop 释放资源
        udp.stop();
    }
    else {
        // 网络未连接
        return 0;
    }

}

// 向给定地址的时间服务器发送 NTP 请求
unsigned long sendNTPpacket(const char* address) {
    // 将缓冲区中的所有字节设置为 0
    for (int i = 0; i < NTP_PACKET_SIZE; ++i) {
        packetBuffer[i] = 0;
    }
    // 初始化形成 NTP 请求所需的值
    // (有关数据包的详细信息,请参见上面的 URL)
    packetBuffer[0] = 0b11100011;   // LI, Version, Mode
    packetBuffer[1] = 0;     // Stratum,或时钟类型
    packetBuffer[2] = 6;     // 轮询间隔
    packetBuffer[3] = 0xEC;  // 对等时钟精度
    // 根延迟和根分散的 8 个零字节
    packetBuffer[12] = 49;
    packetBuffer[13] = 0x4E;
    packetBuffer[14] = 49;
    packetBuffer[15] = 52;

    // 所有 NTP 字段都已赋值,现在
    // 你可以发送请求时间戳的数据包:
    udp.beginPacket(address, 123); // NTP 请求发送到端口 123
    udp.write(packetBuffer, NTP_PACKET_SIZE);
    udp.endPacket();
}

void printWifiStatus() {
    // 打印你连接的网络的 SSID:
    Serial.println("");
    Serial.print("SSID: ");
    Serial.println(WiFi.SSID());

    // 打印你的 WiFi 模块的 IP 地址:
    IPAddress ip = WiFi.localIP();
    Serial.print("IP 地址: ");
    Serial.println(ip);

    // 打印接收到的信号强度:
    long rssi = WiFi.RSSI();
    Serial.print("信号强度 (RSSI):");
    Serial.print(rssi);
    Serial.println(" dBm");
    Serial.println("");
}
配置 Wi-Fi 为接入点 (AP) 模式 / Web 服务器
-
在 Arduino 中包含
rpcWiFi.h、WiFiClient.h和WifiAP.h库。 -
配置 AP Wi-Fi
ssid和password。 -
在端口 80 上初始化 Wi-Fi 服务器:
WiFiServer server(80);
- 使用
ssid和password初始化 AP:
WiFi.softAP(ssid, password);
- 启动Web服务器:
server.begin();
配置为 AP 模式(简单 Web 服务器)示例代码
此示例将 Wio Terminal 配置为简单的 Web 服务器,允许您连接到其 AP 网络并根据 HTTP 响应控制硬件。
/*
    WiFiAccessPoint.ino 创建一个WiFi接入点并在其上提供Web服务器。

    步骤:
    1. 连接到接入点 "yourAp"
    2. 将您的Web浏览器指向 http://<This-AP-IP>/H 来打开LED或 http://<This-AP-IP>/L 来关闭LED
       (<This-AP-IP> 应该替换为在终端/串口中获得的IP,见注释1)
     或者
     在PuTTY终端上使用IP地址(见注释1)和80端口运行原始TCP "GET /H" 和 "GET /L"

    为arduino-esp32创建于2018年7月4日
    作者:Elochukwu Ifediora (fedy0)
*/

#include <rpcWiFi.h>
#include <WiFiClient.h>
#include <WiFiAP.h>

#define LED_BUILTIN 2   // 设置您连接测试LED的GPIO引脚
                        // 或者如果您的开发板有内置LED,请注释掉这一行

// 将这些设置为您所需的凭据。
const char* ssid = "yourAP";
const char* password = "yourPassword";

WiFiServer server(80);


void setup() {
    pinMode(LED_BUILTIN, OUTPUT);

    Serial.begin(115200);
    while(!Serial); // 等待串口准备就绪
    delay(1000);
    Serial.println();
    Serial.println("正在配置接入点...");

    // 如果您希望AP开放,可以删除密码参数。
    WiFi.softAP(ssid, password);
    IPAddress myIP = WiFi.softAPIP();
    /*
     * 注释 1
     * 记录此IP,将被客户端(如Web浏览器)使用
     */
    Serial.print("AP IP地址: ");
    Serial.println(myIP);
    server.begin();

    Serial.println("服务器已启动");
}

void loop() {
    WiFiClient client = server.available();   // 监听传入的客户端

    if (client) {                             // 如果您获得一个客户端,
        Serial.println("新客户端。");           // 在串口打印一条消息
        String currentLine = "";                // 创建一个字符串来保存来自客户端的传入数据
        while (client.connected()) {            // 当客户端连接时循环
            if (client.available()) {             // 如果有字节可从客户端读取,
                char c = client.read();             // 读取一个字节,然后
                Serial.write(c);                    // 在串口监视器中打印出来
                if (c == '\n') {                    // 如果字节是换行符

                    // 如果当前行为空,您得到了连续两个换行符。
                    // 这是客户端HTTP请求的结束,所以发送响应:
                    if (currentLine.length() == 0) {
                        // HTTP头总是以响应代码开始(例如 HTTP/1.1 200 OK)
                        // 和内容类型,以便客户端知道接下来是什么,然后是空行:
                        client.println("HTTP/1.1 200 OK");
                        client.println("Content-type:text/html");
                        client.println();

                        // HTTP响应的内容跟在头部之后:
                        client.print("点击<a href=\"/H\">这里</a>打开LED。<br>");
                        client.print("点击<a href=\"/L\">这里</a>关闭LED。<br>");

                        // HTTP响应以另一个空行结束:
                        client.println();
                        // 跳出while循环:
                        break;
                    } else {    // 如果您得到一个换行符,则清除currentLine:
                        currentLine = "";
                    }
                } else if (c != '\r') {  // 如果您得到除回车符之外的任何其他字符,
                    currentLine += c;      // 将其添加到currentLine的末尾
                }

                // 检查客户端请求是否为 "GET /H" 或 "GET /L":
                if (currentLine.endsWith("GET /H")) {
                    digitalWrite(LED_BUILTIN, HIGH);               // GET /H 打开LED
                }
                if (currentLine.endsWith("GET /L")) {
                    digitalWrite(LED_BUILTIN, LOW);                // GET /L 关闭LED
                }
            }
        }
        // 关闭连接:
        client.stop();
        Serial.println("客户端已断开连接。");
    }
}
常见问题
- 在 Arduino 代码中检查 RTL8720 固件版本?
#include "rpcWiFi.h"

void setup() {
    Serial.begin(115200);
    while(!Serial); // 等待打开串口监视器
    Serial.printf("RTL8720 Firmware Version: %s", rpc_system_version());
}

void loop() {
}
技术支持与产品讨论
感谢您选择我们的产品!我们在这里为您提供不同的支持,以确保您使用我们产品的体验尽可能顺畅。我们提供多种沟通渠道,以满足不同的偏好和需求。