蓝牙使用方法(Seeed nrf52 mbed-enabled 开发板库)
Seeed Studio XIAO nRF52840 和 Seeed Studio XIAO nRF52840 Sense 都支持蓝牙连接。本教程将介绍基础蓝牙功能,并提供一个与 24GHz 呼吸睡眠检测模块配合使用的演示,使用"Seeed nrf52 mbed-enabled 开发板库"。
入门指南
所需硬件
- 1 x Seeed Studio XIAO nRF52840 或 Seeed Studio XIAO nRF52840 Sense
- 1 x 具有蓝牙连接功能的智能手机/PC
- 1 x USB Type-C 数据线
所需软件
Arduino 库概述
如果这是您第一次使用 Arduino,我们强烈建议您参考 Arduino 入门指南。
要使用 Seeed Studio XIAO nRF52840 的蓝牙功能,我们需要使用官方的 Arduino BLE 库。
如果您想应用 24GHz 睡眠呼吸雷达的演示,您可能还需要下载支持的库。
功能
有关 ArduinoBLE 代码库的功能和使用介绍,请参考 Arduino 官网。
有关 Seeed 24GHz 睡眠呼吸雷达 BLE 代码库的功能和使用介绍,请参考 Wiki。
安装
- 方法一(此方法适用于上述两个代码库。)
由于您已经下载了 zip 库文件,请打开您的 Arduino IDE,点击 Sketch > Include Library > Add .ZIP Library。选择您刚刚下载的 zip 文件,如果库安装正确,您将在通知窗口中看到 Library added to your libraries。这意味着库已成功安装。

- 方法二(仅可安装 ArduinoBLE 库。)
库管理器从 Arduino IDE 1.5 及更高版本(1.6.x)开始添加。它位于"Sketch"菜单下的"Include Library"、"Manage Libraries..."中。
当您打开库管理器时,您会发现一个可以一键安装的大型库列表。要为您的产品找到库,请搜索产品名称或关键词,如"k type"或"digitizer",您想要的库应该会显示出来。点击所需的库,"Install"按钮将出现。点击该按钮,库应该会自动安装。安装完成后,关闭库管理器。
应用示例
现在我们已经安装了库并了解了基本功能,让我们为 Seeed Studio XIAO nRF52840 运行一些示例,看看它的表现如何。
步骤 1. 启动 Arduino 应用程序。
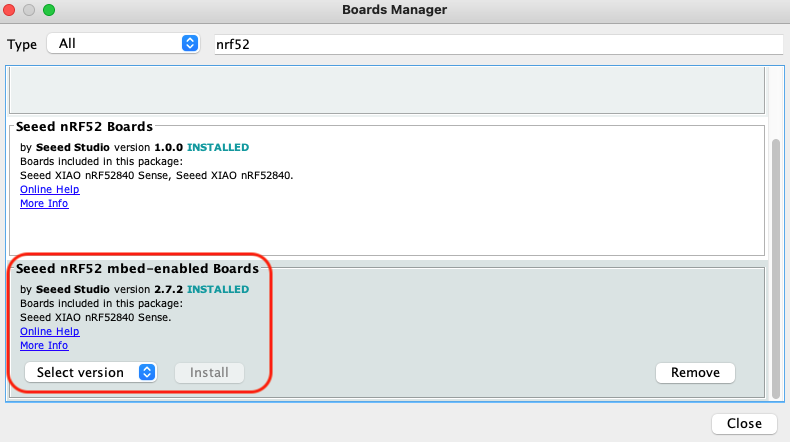
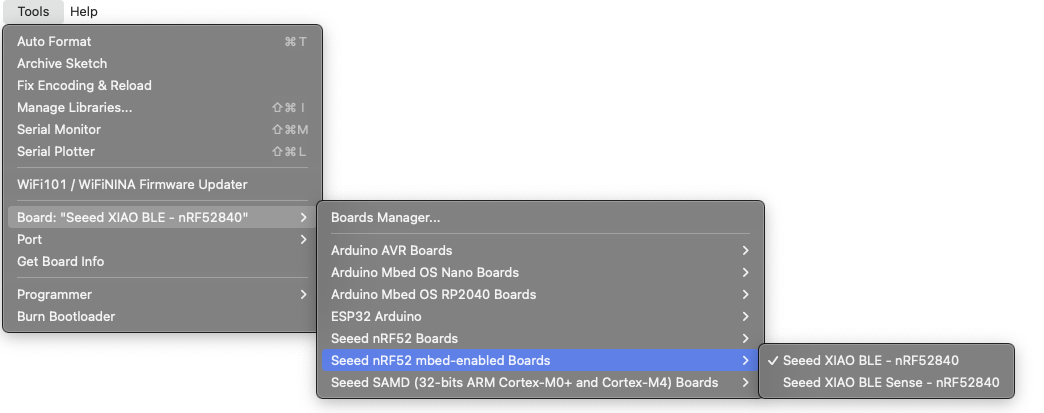
步骤 2. 选择您的开发板型号并将其添加到 Arduino IDE 中。这里我们使用 "Seeed nrf52 mbed-enabled Boards Library"。
有关开发板库的安装,请参考此教程完成安装。
演示 1 使用智能手机控制内置 LED
在这个示例中,我们将使用蓝牙连接 Seeed Studio XIAO nF52840 (Sense) 和智能手机,并从手机发送消息来开启/关闭 Seeed Studio XIAO nRF52840 (Sense) 上的内置红色 LED。
请将下面的代码粘贴到 Arduino IDE 中并上传到 Seeed Studio XIAO nRF52840。
#include <ArduinoBLE.h>

BLEService ledService("19B10000-E8F2-537E-4F6C-D104768A1214"); // Bluetooth® Low Energy LED Service

// Bluetooth® Low Energy LED Switch Characteristic - custom 128-bit UUID, read and writable by central
BLEByteCharacteristic switchCharacteristic("19B10001-E8F2-537E-4F6C-D104768A1214", BLERead | BLEWrite);

const int ledPin = LED_BUILTIN; // pin to use for the LED

void setup() {
  Serial.begin(9600);
  while (!Serial);

  // set LED pin to output mode
  pinMode(ledPin, OUTPUT);

  // begin initialization
  if (!BLE.begin()) {
    Serial.println("starting Bluetooth® Low Energy module failed!");

    while (1);
  }

  // set advertised local name and service UUID:
  BLE.setLocalName("LED");
  BLE.setAdvertisedService(ledService);

  // add the characteristic to the service
  ledService.addCharacteristic(switchCharacteristic);

  // add service
  BLE.addService(ledService);

  // set the initial value for the characeristic:
  switchCharacteristic.writeValue(0);

  // start advertising
  BLE.advertise();

  Serial.println("BLE LED Peripheral");
}

void loop() {
  // listen for Bluetooth® Low Energy peripherals to connect:
  BLEDevice central = BLE.central();

  // if a central is connected to peripheral:
  if (central) {
    Serial.print("Connected to central: ");
    // print the central's MAC address:
    Serial.println(central.address());

    // while the central is still connected to peripheral:
  while (central.connected()) {
        if (switchCharacteristic.written()) {
          if (switchCharacteristic.value()) {
            Serial.println("LED on");
            digitalWrite(ledPin, LOW); // changed from HIGH to LOW
          } else {
            Serial.println(F("LED off"));
            digitalWrite(ledPin, HIGH); // changed from LOW to HIGH
          }
        }
      }

    // when the central disconnects, print it out:
    Serial.print(F("Disconnected from central: "));
    Serial.println(central.address());
  }
}
这个例子的实现关键在于以下段落。
  while (central.connected()) {
        if (switchCharacteristic.written()) {
          if (switchCharacteristic.value()) {
            Serial.println("LED on");
            digitalWrite(ledPin, LOW); // changed from HIGH to LOW
          } else {
            Serial.println(F("LED off"));
            digitalWrite(ledPin, HIGH); // changed from LOW to HIGH
          }
        }
      }
这段代码的目的是在Seeed Studio XIAO nRF52840被蓝牙设备连接时central.connected()并从蓝牙设备接收内容时switchCharacteristic.written()进行判断。如果判断值非零switchCharacteristic.value(),则灯亮,如果判断值为0则灯灭。
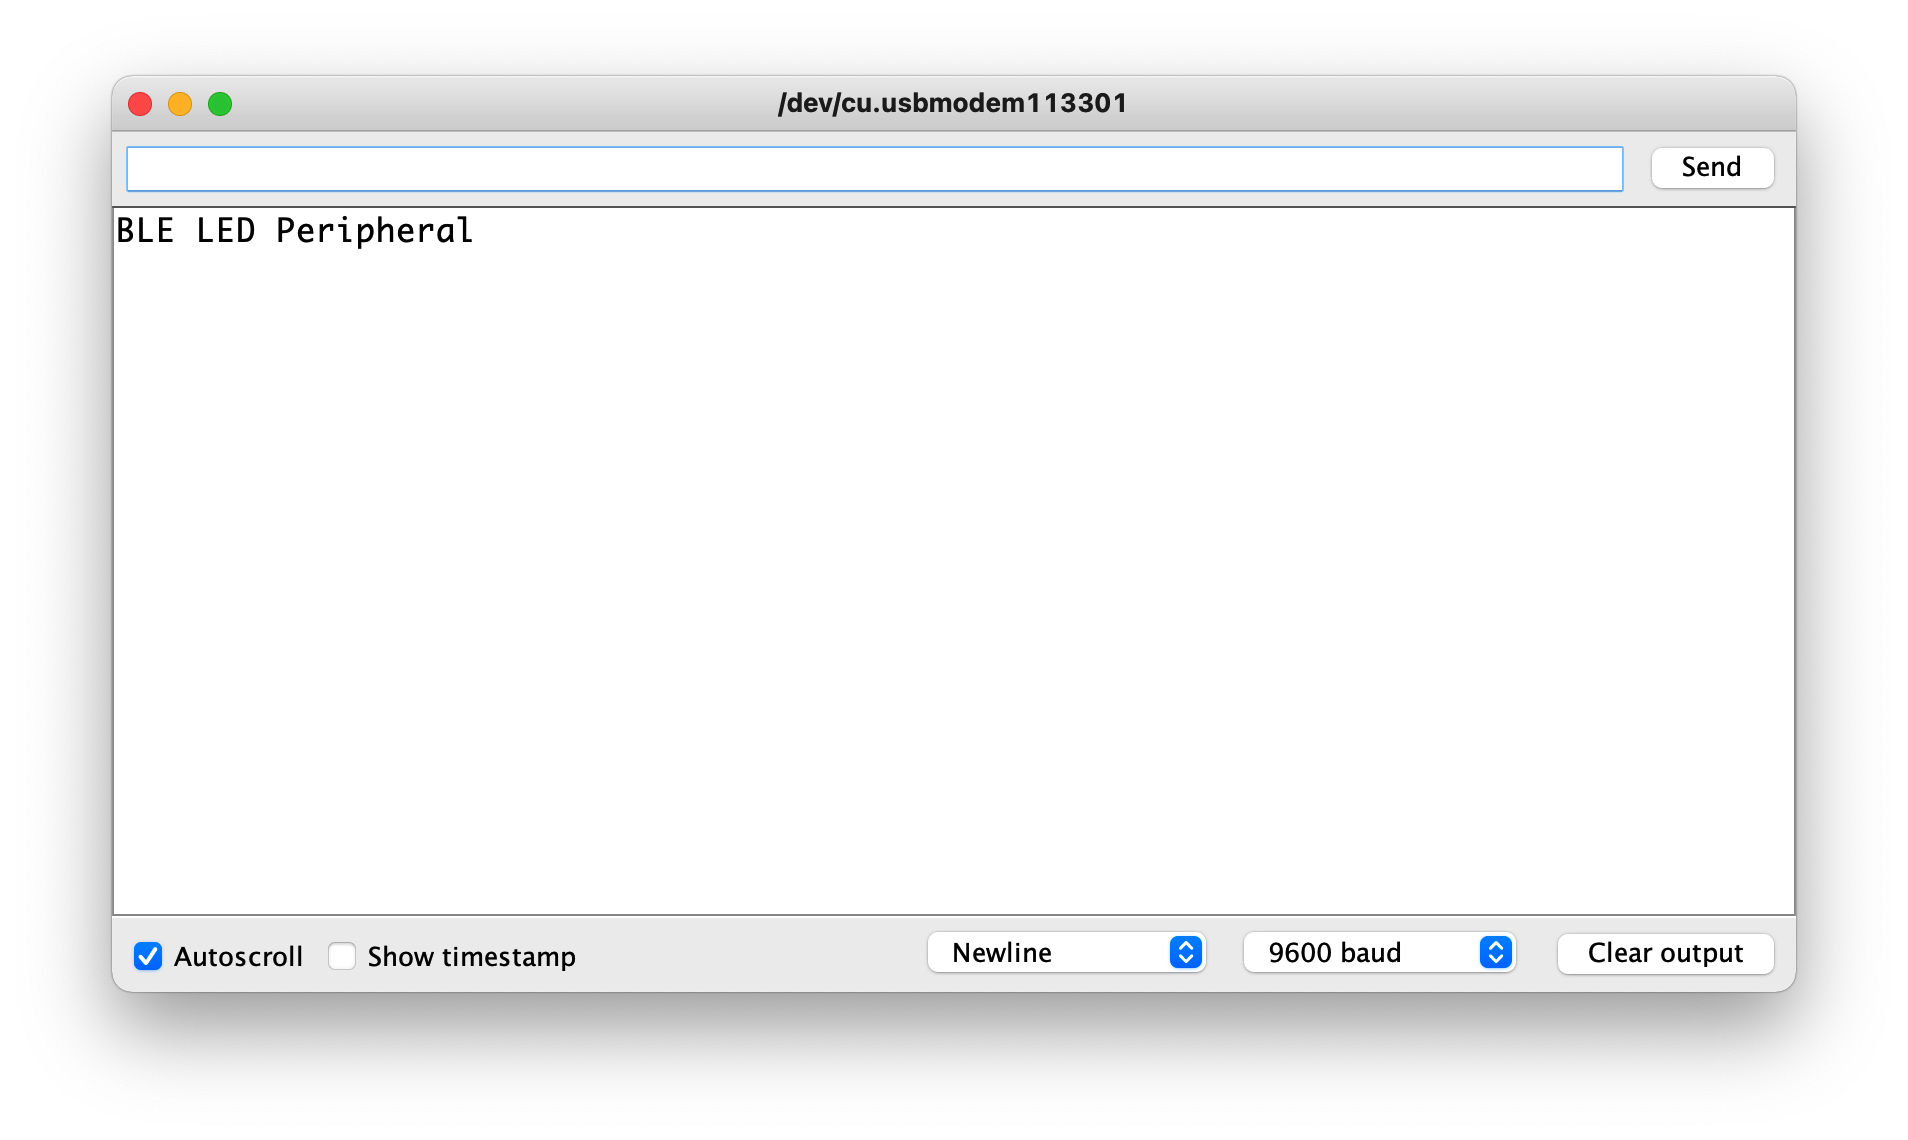
将串口监视器打开到9600波特率,LED应该会亮或灭。输出应该类似下面的图像。
此时,可以通过手机应用程序使用蓝牙完成对Seeed Studio XIAO nRF52840灯光的控制,如下所述。
| iPhone | Android | 描述 |
|---|---|---|
 |  | 打开软件,搜索名为LED的蓝牙设备并点击连接。某些设备可能显示为Arduino。 |
 |  | 进入Seeed Studio XIAO nRF52840蓝牙界面,点击设备显示设备详情。 |
 |  | 填入要发送给Seeed Studio XIAO nRF52840的数据,发送1打开灯,发送0关闭灯。 |
 |  | 回到蓝牙控制界面,可以看到数值已经改变,Seeed Studio XIAO nRF52840红灯亮起(或熄灭)。 |
 | ||
演示 2 使用 XIAO BLE 通过 BLE 获取 24GHz 睡眠检测模块数据
在这个示例中,我们将描述如何获取传感器的数值,并通过 Seeed Studio XIAO nRF52840 将传感器检测到的数据信息通过蓝牙发送到移动设备。
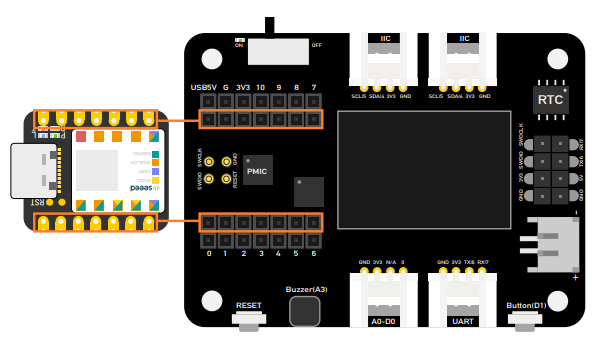
按照下图连接 Seeed Studio XIAO nRF52840 开发板和 24GHz 呼吸睡眠检测模块。更多信息,您可以点击这里。

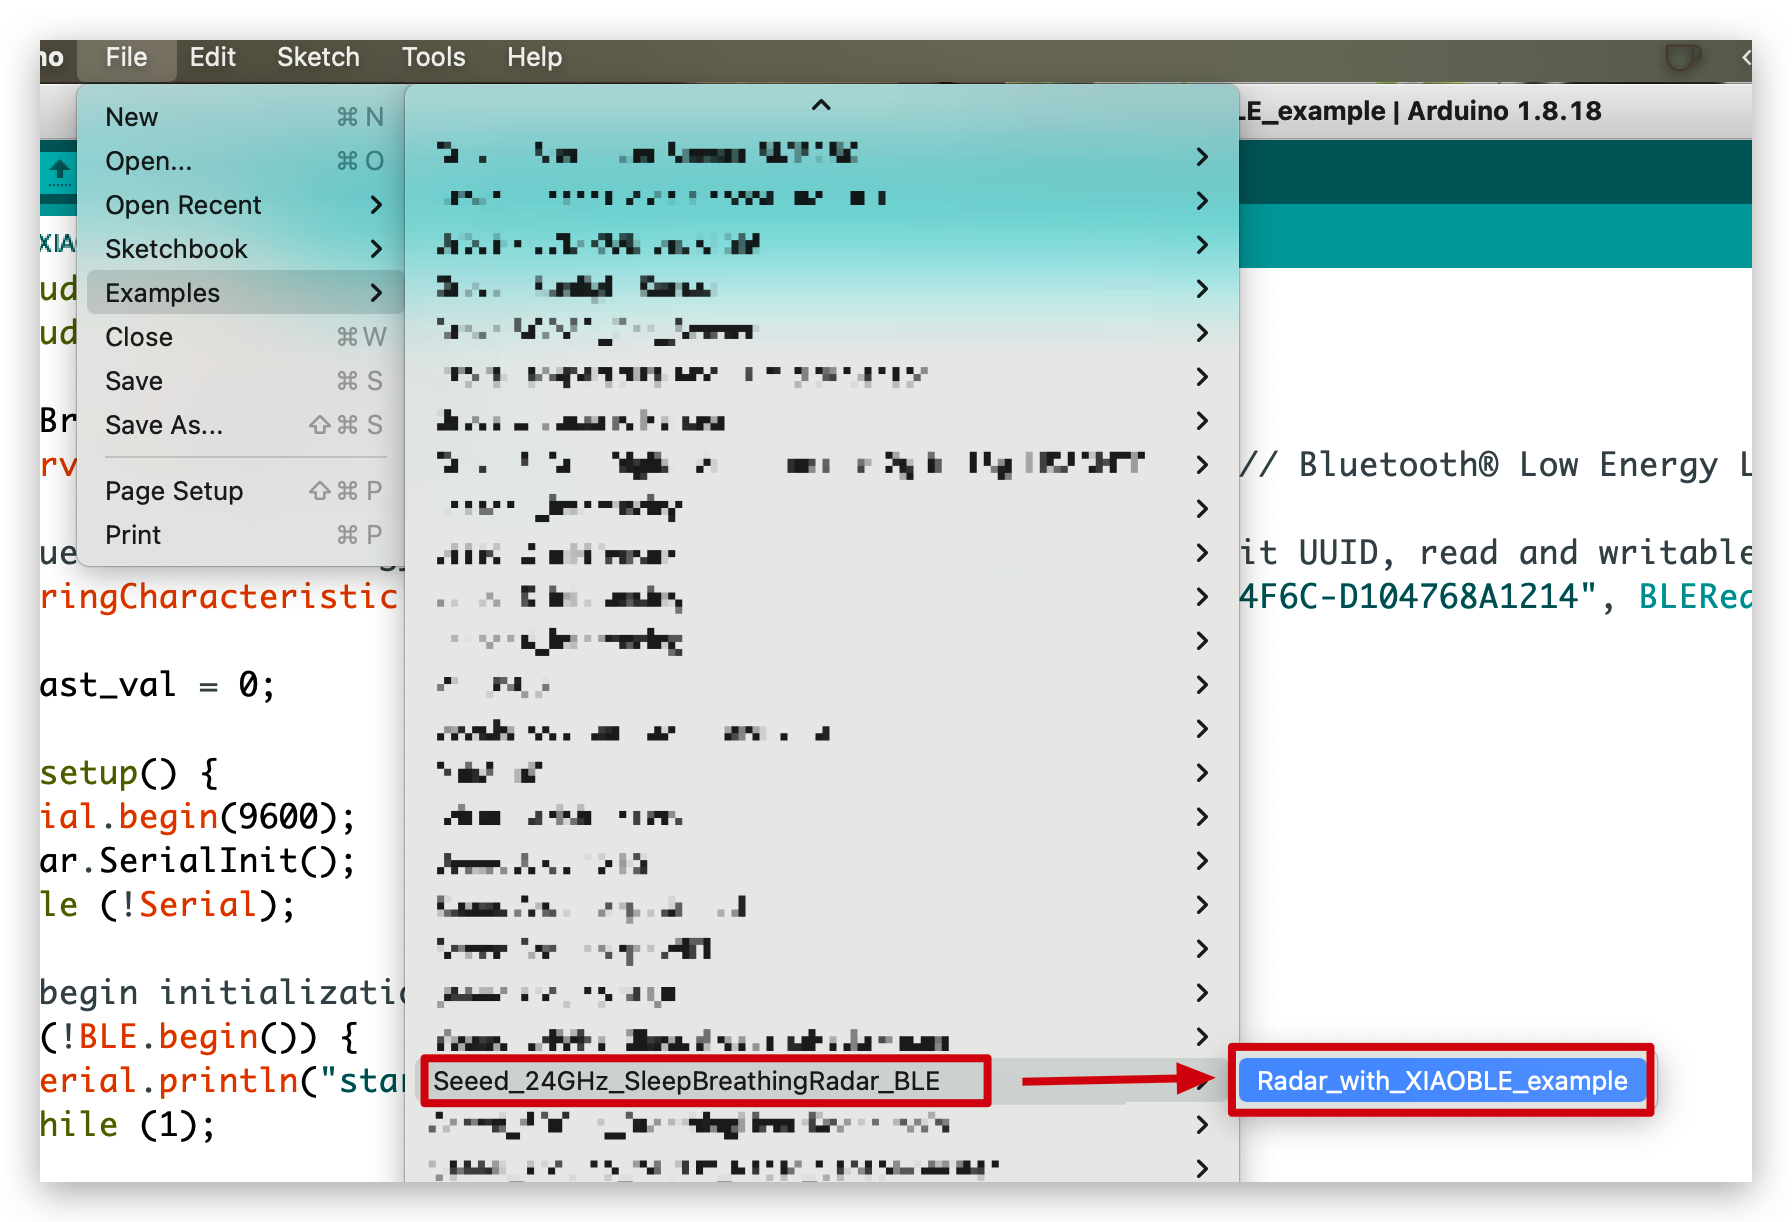
请在库中打开示例代码并将其上传到 Seeed Studio XIAO nRF52840。
//Radar_with_XIAOBLE_example
#include <ArduinoBLE.h>
#include <sleepbreathingradarBLE.h>
SleepBreathingRadarBLE radar;
BLEService radarService("19B10000-E8F2-537E-4F6C-D104768A1214"); // Bluetooth® Low Energy LED Service
// Bluetooth® Low Energy LED Switch Characteristic - custom 128-bit UUID, read and writable by central
BLEStringCharacteristic switchCharacteristic("19B10001-E8F2-537E-4F6C-D104768A1214", BLERead | BLENotify, 20);
int last_val = 0;
void setup() {
Serial.begin(9600);
radar.SerialInit();
while (!Serial);
// begin initialization
if (!BLE.begin()) {
Serial.println("starting Seeed Studio XIAO nRF52840 with 60GHz radar sensor demo failed!");
while (1);
}
// set advertised local name and service UUID:
BLE.setLocalName("Seeed Studio XIAO nRF52840");
BLE.setAdvertisedService(radarService);
// add the characteristic to the service
radarService.addCharacteristic(switchCharacteristic);
// add service
BLE.addService(radarService);
// start advertising
BLE.advertise();
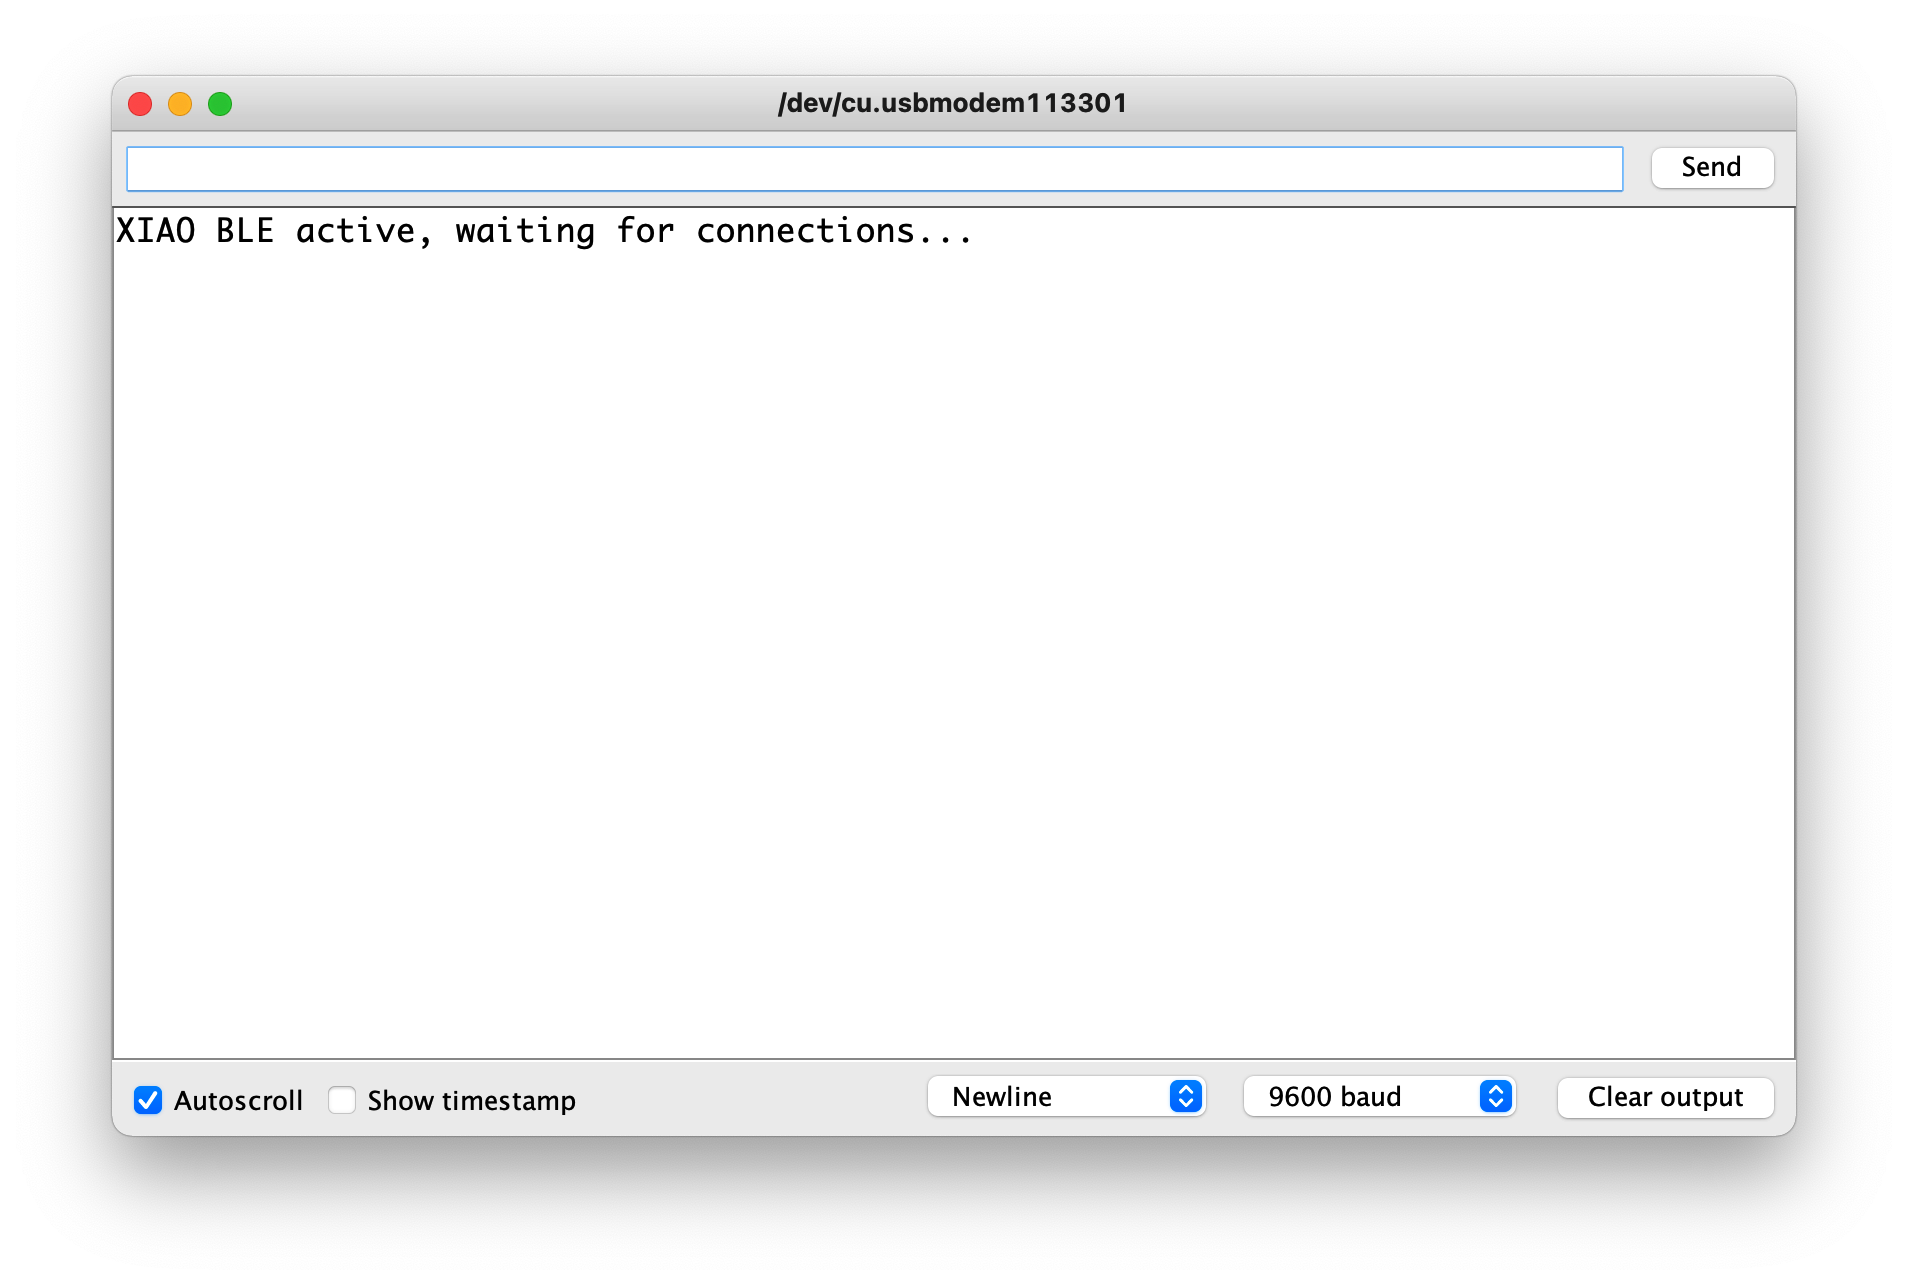
Serial.println("Seeed Studio XIAO nRF52840 active, waiting for connections...");
}
void loop() {
// listen for Bluetooth® Low Energy peripherals to connect:
BLEDevice central = BLE.central();
// if a central is connected to peripheral:
if (central) {
Serial.print("Connected to central: ");
// print the central's MAC address:
Serial.println(central.address());
// while the central is still connected to peripheral:
while (central.connected()){
radar.recvRadarBytes(); //Receive radar data and start processing
if (radar.newData == true) { //The data is received and transferred to the new list dataMsg[]
byte dataMsg[radar.dataLen+3] = {0x00};
dataMsg[0] = 0x53; //Add the header frame as the first element of the array
for (byte n = 0; n < radar.dataLen; n++)dataMsg[n+1] = radar.Msg[n]; //Frame-by-frame transfer
dataMsg[radar.dataLen+1] = 0x54;
dataMsg[radar.dataLen+2] = 0x43;
radar.newData = false; //A complete set of data frames is saved
int new_val = radar.Sleep_inf(dataMsg); //Use radar built-in algorithm to output human motion status
if(new_val != last_val){
radar.OutputAssignment(new_val);
switchCharacteristic.setValue(radar.str);
last_val = new_val;
}
}
}
// when the central disconnects, print it out:
Serial.print(F("Disconnected from central: "));
Serial.println(central.address());
}
}
在这个示例中,向移动设备发送数据的函数是 setValue()。如果您想要实时显示数据,需要在下面的代码中添加 BLENotify。最后一个参数 20 表示您可以发送的数据的最大长度。
BLEStringCharacteristic switchCharacteristic("19B10001-E8F2-537E-4F6C-D104768A1214", BLERead | BLENotify, 20);
将串口监视器打开并设置波特率为9600,应该会显示传感器与其指向物体之间的距离,单位包括毫米和英尺。输出应该类似于下图所示。
接下来,我们可以按照以下步骤获取通过蓝牙发送的实时数据。
| iPhone | Android | 描述 |
|---|---|---|
|  | 打开软件,搜索名为Seeed Studio XIAO nRF52840的蓝牙设备并点击连接。某些设备可能显示为Arduino。 |
| = | | 进入Seeed Studio XIAO nRF52840蓝牙界面,点击设备以显示设备详细信息。 |
 |  | 打开软件的实时更新数据功能。 |
 |  | 接下来,每当雷达检测到睡眠消息时,都会通过Seeed Studio XIAO nRF52840的蓝牙发送到手机。 |
 | ||
演示 3 两个 XIAO nRF52840 通过蓝牙通信控制 LED
在这个示例中,我们将使用两个 XIAO nRF52840,利用它们的蓝牙功能进行通信。其中一个 XIAO 作为主机,连接到 XIAO 扩展板,通过扩展板的按钮发送控制命令。另一个 XIAO 作为从机。
在开始之前,请准备好以下物品。
 |  |
| Seeed Studio XIAO 扩展板 | 2 x Seeed XIAO BLE nRF52840 Sense |
请选择其中一个 XIAO nRF52840,它不需要连接任何设备,直接上传下面的程序。
#include <ArduinoBLE.h>

BLEService ledService("19B10000-E8F2-537E-4F6C-D104768A1214"); // Bluetooth® Low Energy LED Service

// Bluetooth® Low Energy LED Switch Characteristic - custom 128-bit UUID, read and writable by central
BLEByteCharacteristic switchCharacteristic("19B10001-E8F2-537E-4F6C-D104768A1214", BLERead | BLEWrite);

const int ledPin = LED_BUILTIN; // pin to use for the LED

void setup() {
  Serial.begin(9600);
  while (!Serial);

  // set LED pin to output mode
  pinMode(ledPin, OUTPUT);

  // begin initialization
  if (!BLE.begin()) {
    Serial.println("starting Bluetooth® Low Energy module failed!");

    while (1);
  }

  // set advertised local name and service UUID:
  BLE.setLocalName("XIAO");
  BLE.setAdvertisedService(ledService);

  // add the characteristic to the service
  ledService.addCharacteristic(switchCharacteristic);

  // add service
  BLE.addService(ledService);

  // set the initial value for the characeristic:
  switchCharacteristic.writeValue(0);

  // start advertising
  BLE.advertise();

  // print address
  Serial.print("Address: ");
  Serial.println(BLE.address());

  Serial.println("XIAO nRF52840 Peripheral");
}

void loop() {
  // listen for Bluetooth® Low Energy peripherals to connect:
  BLEDevice central = BLE.central();

  // if a central is connected to peripheral:
  if (central) {
    Serial.print("Connected to central: ");
    // print the central's MAC address:
    Serial.println(central.address());

    // while the central is still connected to peripheral:
    while (central.connected()) {
      // if the remote device wrote to the characteristic,
      // use the value to control the LED:
      if (switchCharacteristic.written()) {
        if (switchCharacteristic.value()) {   // any value other than 0
          Serial.println("LED on");
          digitalWrite(ledPin, HIGH);         // will turn the LED on
        } else {                              // a 0 value
          Serial.println(F("LED off"));
          digitalWrite(ledPin, LOW);          // will turn the LED off
        }
      }
    }

    // when the central disconnects, print it out:
    Serial.print(F("Disconnected from central: "));
    Serial.println(central.address());
  }
}
这个程序的主要目的是让 XIAO 成为一个名为"XIAO"的蓝牙设备,可以被其他蓝牙设备搜索和连接。连接后,您可以通过发送 0 或 1 来控制 XIAO 上的 LED,分别用于关闭或打开它们。
将 Seeed Studio XIAO nRF52840 放在扩展板上。
为此,连接了扩展板的 XIAO 需要上传以下程序。
#include <ArduinoBLE.h>
#include <U8x8lib.h>
#include <Wire.h>

// variables for button
const int buttonPin = D1;
int oldButtonState = LOW;

void setup() {
  Serial.begin(9600);
  while (!Serial);

  // configure the button pin as input
  pinMode(buttonPin, INPUT_PULLUP);

  // initialize the Bluetooth® Low Energy hardware
  BLE.begin();

  Serial.println("Bluetooth® Low Energy Central - LED control");

  // start scanning for peripherals
  BLE.scanForName("XIAO");
}

void loop() {
  // check if a peripheral has been discovered
  BLEDevice peripheral = BLE.available();
  if (peripheral) {
    // discovered a peripheral, print out address, local name, and advertised service
    Serial.print("Found ");
    Serial.print(peripheral.address());
    Serial.print(" '");
    Serial.print(peripheral.localName());
    Serial.print("' ");
    Serial.print(peripheral.advertisedServiceUuid());
    Serial.println();

    if (peripheral.localName() != "XIAO") {
      return;
    }

    // stop scanning
    BLE.stopScan();

    system_control(peripheral);

    // peripheral disconnected, start scanning again
    BLE.scanForName("XIAO");
  }
  delay(100);
}

void system_control(BLEDevice peripheral) {
  // connect to the peripheral
  Serial.println("Connecting ...");

  if (peripheral.connect()) {
    Serial.println("Connected");
  } else {
    Serial.println("Failed to connect!");
    return;
  }

  // discover peripheral attributes
  Serial.println("Discovering attributes ...");
  if (peripheral.discoverAttributes()) {
    Serial.println("Attributes discovered");
  } else {
    Serial.println("Attribute discovery failed!");
    peripheral.disconnect();
    return;
  }

  // retrieve the LED characteristic
  BLECharacteristic ledCharacteristic = peripheral.characteristic("19b10001-e8f2-537e-4f6c-d104768a1214");

  if (!ledCharacteristic) {
    Serial.println("Peripheral does not have LED characteristic!");
    peripheral.disconnect();
    return;
  } else if (!ledCharacteristic.canWrite()) {
    Serial.println("Peripheral does not have a writable LED characteristic!");
    peripheral.disconnect();
    return;
  }

  while (peripheral.connected()) {
    // while the peripheral is connected
    // read the button pin
    int buttonState = digitalRead(buttonPin);

    if (oldButtonState != buttonState) {
      // button changed
      oldButtonState = buttonState;

      if (buttonState) {
        Serial.println("button pressed");

        // button is pressed, write 0x01 to turn the LED on
        ledCharacteristic.writeValue((byte)0x01);
      } else {
        Serial.println("button released");

        // button is released, write 0x00 to turn the LED off
        ledCharacteristic.writeValue((byte)0x00);
      }
    }
  }

  Serial.println("Peripheral disconnected");
}
一旦您上传了程序,打开串口监视器,程序将开始搜索附近本地名称为"XIAO"的蓝牙设备并连接到它(您需要等待1到3分钟)。
一旦串口监视器中显示成功连接消息,您就可以通过扩展板的按键D1控制另一个XIAO nRF52840 LED的开关。
当然,如果您没有扩展板,您也可以使用自己的按钮或其他设备。
更多内容?
如果您想尝试更多示例,可以导航到 File > Examples > INCOMPATIBLE > ArduinoBLE 并查看 ArduinoBLE 下的所有示例
技术支持与产品讨论
感谢您选择我们的产品!我们在这里为您提供不同的支持,以确保您使用我们产品的体验尽可能顺畅。我们提供多种沟通渠道,以满足不同的偏好和需求。