使用 MicroPython 的 XIAO ESP32C3 Wi-Fi 追踪器
本 wiki 已更新:https://wiki.seeedstudio.com/xiao_esp32c3_with_micropython/
在本教程中,我将简要概述如何使用 XIAO ESP32C3 与 Micropython。此外,我将探索 Wi-Fi 信号强度追踪器的实际应用,这在建立高速、高质量家庭网络时非常有价值。 因此,通过遵循 Wi-Fi 追踪器的指导,我们可以有效优化 Wi-Fi 信号增强器的放置,确保最佳信号覆盖。
硬件准备
我在这里使用 Seeed Studio XIAO ESP32C3 和 XIAO 扩展板作为硬件。


软件准备
| Thonny IDE | Esptool |
|---|---|
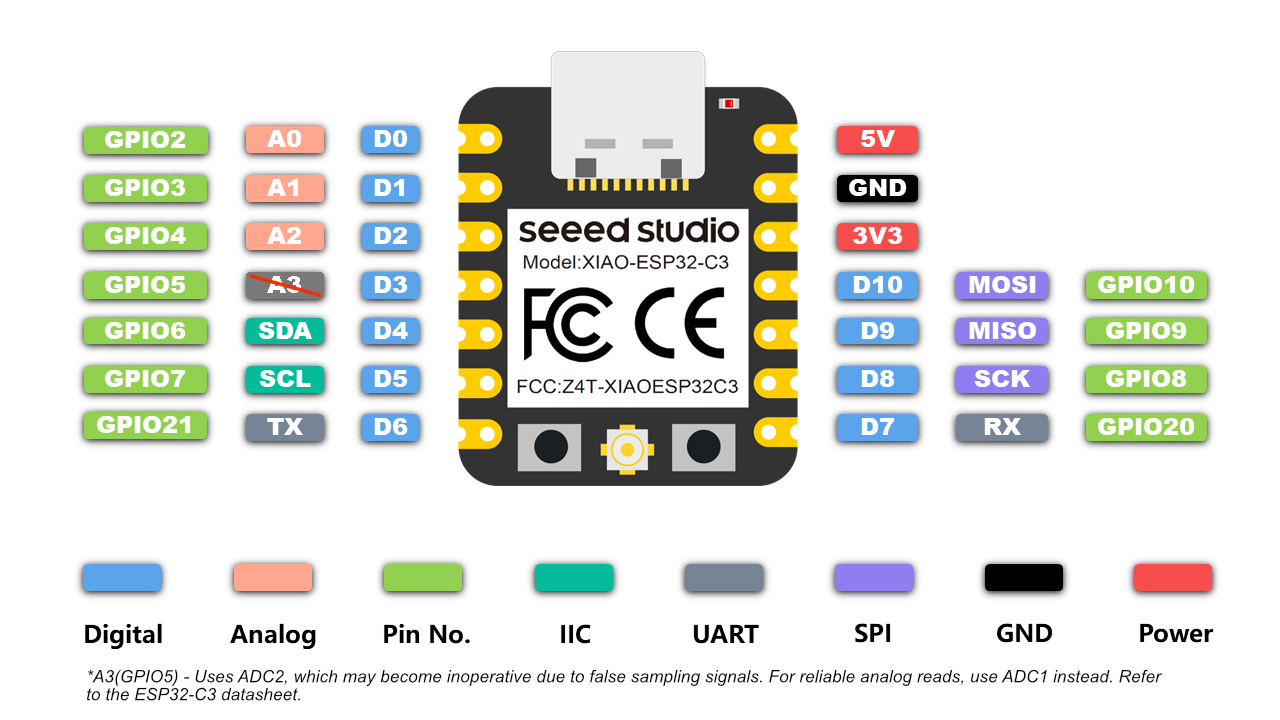
在使用之前,我需要说明这里使用的软件/固件是为 ESP32C3 芯片设计的。因此,当您尝试使用引脚时,请确保使用通用输入/输出引脚而不是板上的引脚标识。
例如,当您尝试使用左侧第一行的引脚时,请确保使用 GPIO2 而不是 A0 或 D0。
入门指南
需要两个步骤("PC 上的 Micropython 配置"和"XIAO ESP32C3 上的 Micropython 设置")才能让 XIAO ESP32C3 真正能够通过 MicroPython 进行编程。
设置完成后,您可以逐步复制每个演示中的代码来完成操作。
PC 上的 Micropython 配置
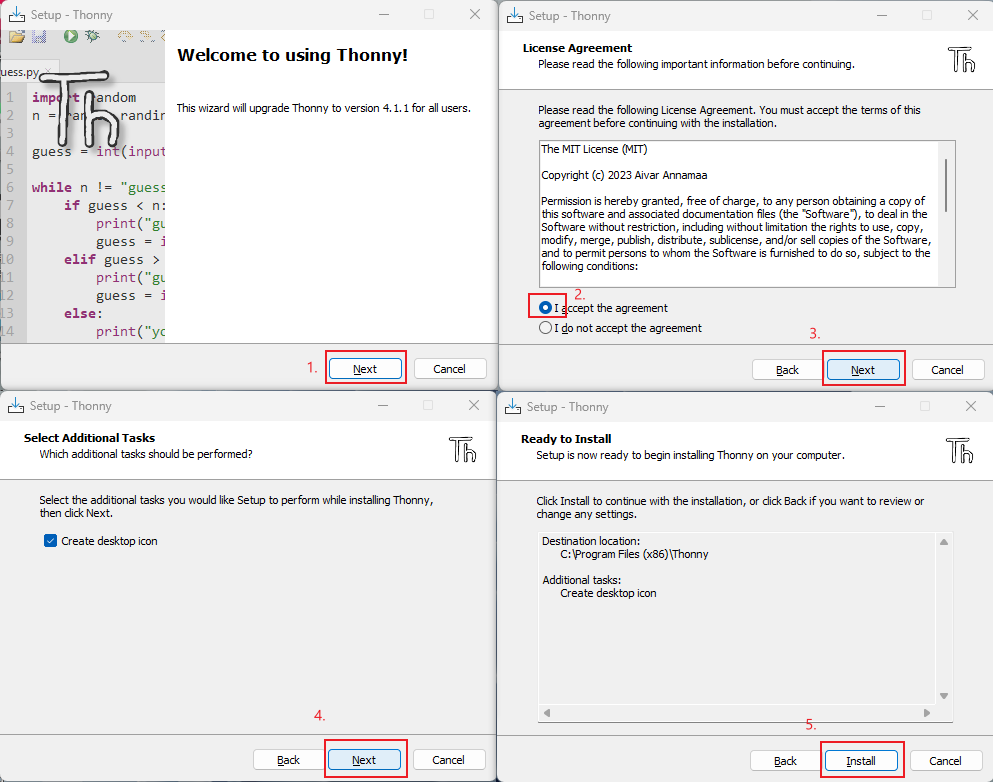
安装 Thonny IDE(Windows)
请按照图片中的步骤操作
使用 esptool 更新固件
- 打开您自己的文件位置
git clone https://github.com/espressif/esptool.git
- 下载最新的固件(本教程使用 v1.20.0 (2023-04-26) .bin)
https://micropython.org/download/esp32c3/
- 将最新的固件放在此文件位置,并在CMD中打开文件
your own file location\esptool-master\esptool
- 在 CMD 中输入以下命令来烧录固件(烧录前需进入引导程序模式)
esptool.exe --chip esp32c3 --port COM10 --baud 921600 --before default_reset --after hard_reset --no-stub write_flash --flash_mode dio --flash_freq 80m 0x0 esp32c3-usb-20230426-v1.20.0.bin
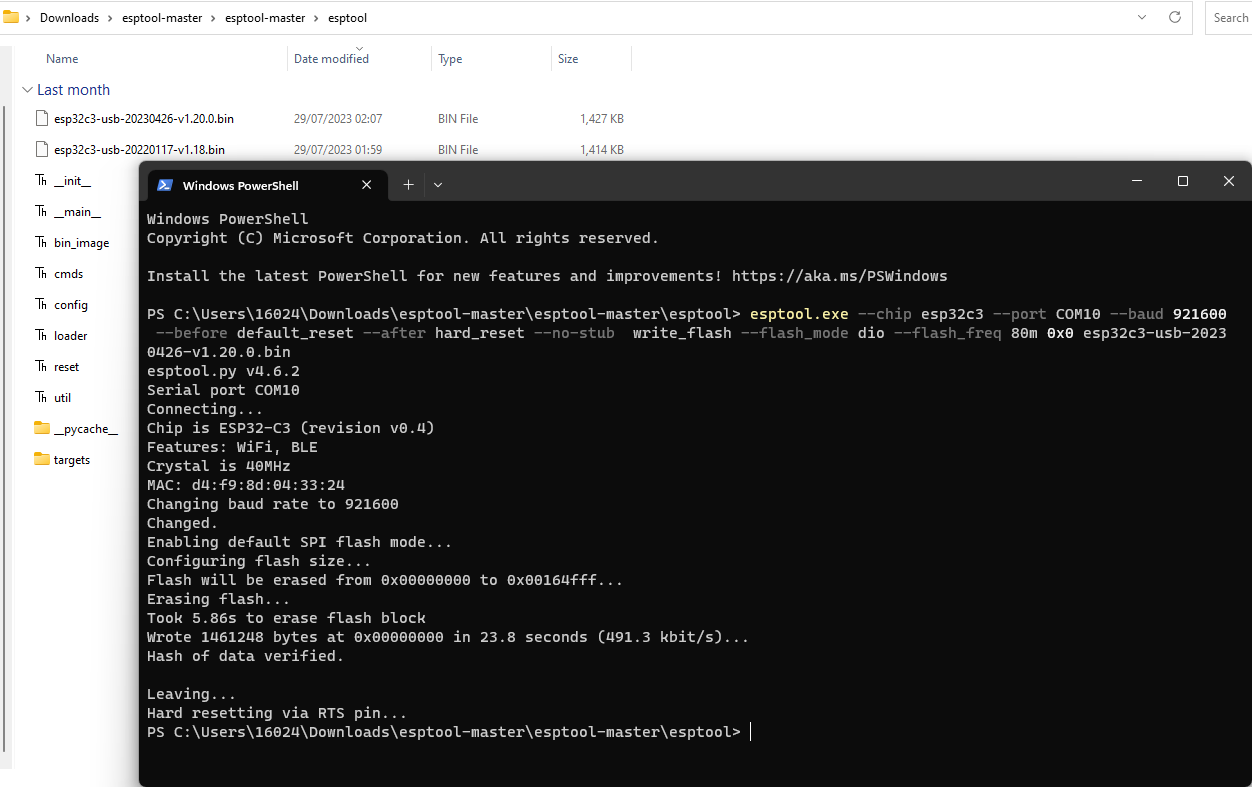
如果您使用 Linux,请将 "esptool.exe" 更改为 "esptool.py"。将 "COM10" 更改为您自己的串口。将 "esp32c3-usb-20230426-v1.20.0.bin" 更改为您下载的最新固件名称。
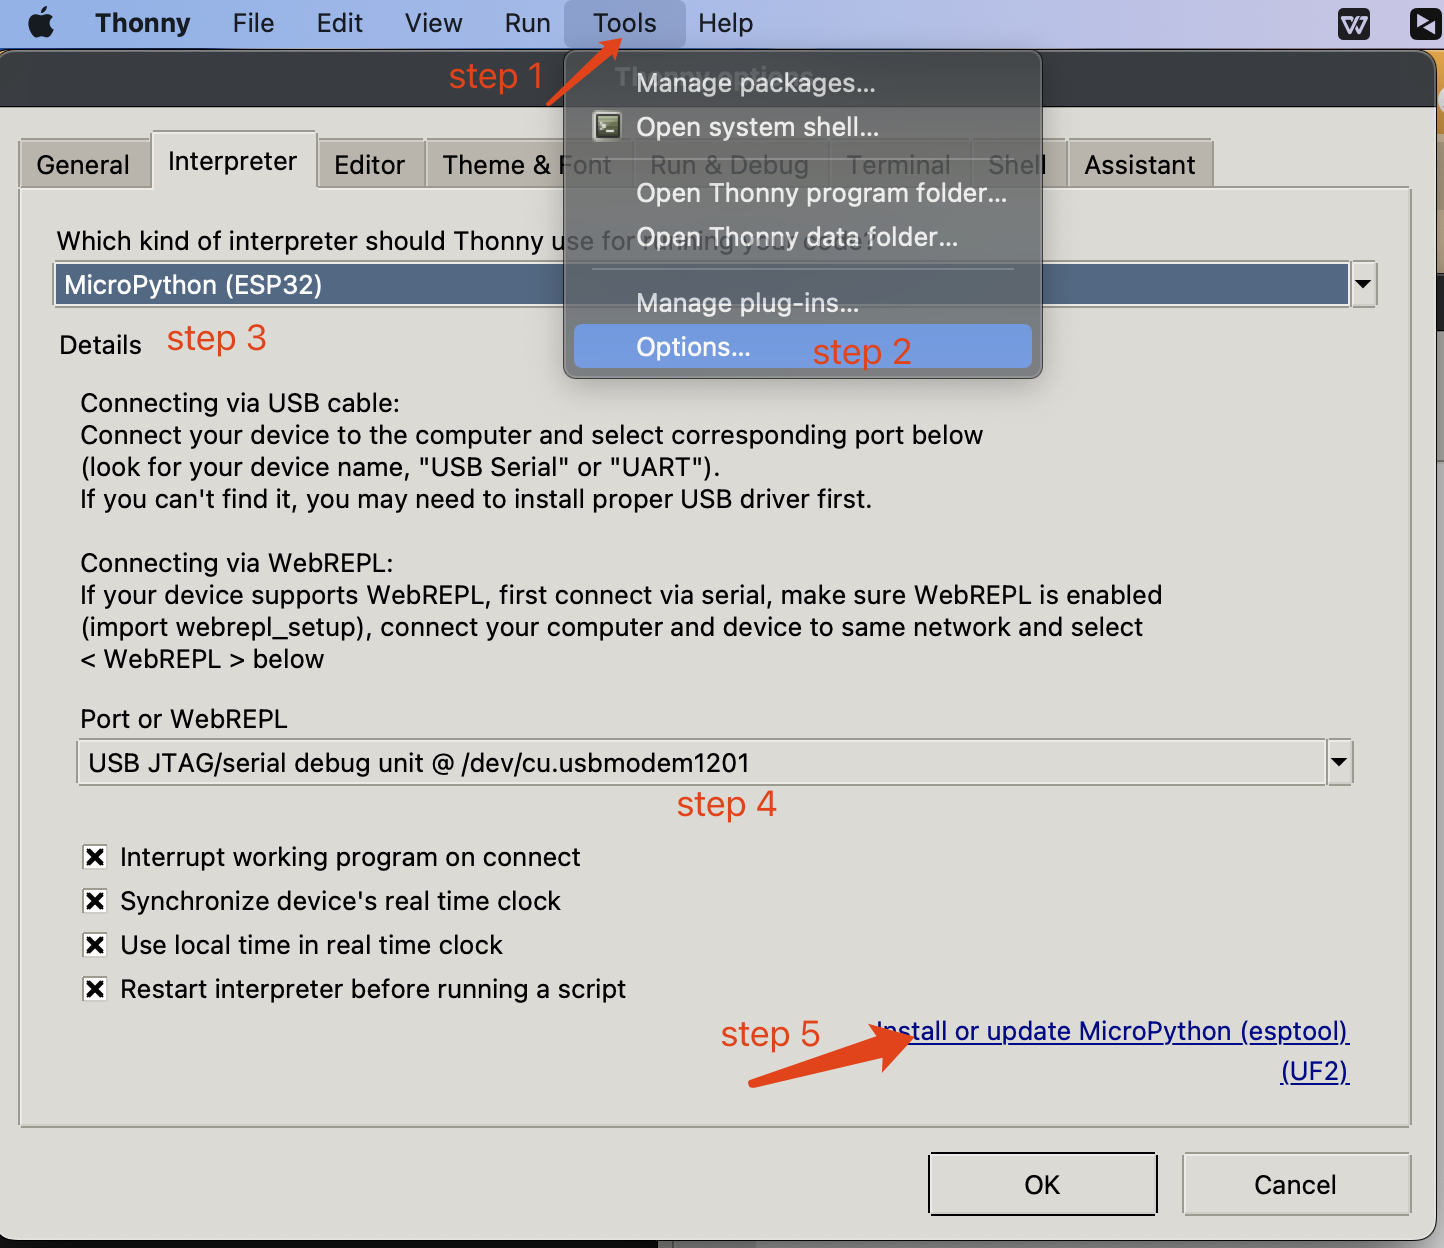
在 XIAO ESP32C3 上设置 Micropython
-
插入您的 XIAO ESP32C3,打开 Thonny 并点击右下角配置解释器
-
选择解释器 - Micropython (ESP32) 和端口 >>> 点击确定
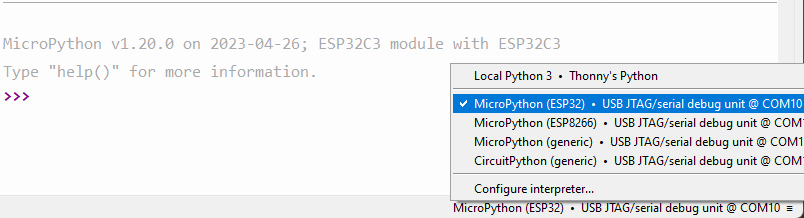
注意:如果一切顺利,您将在 shell 中看到输出
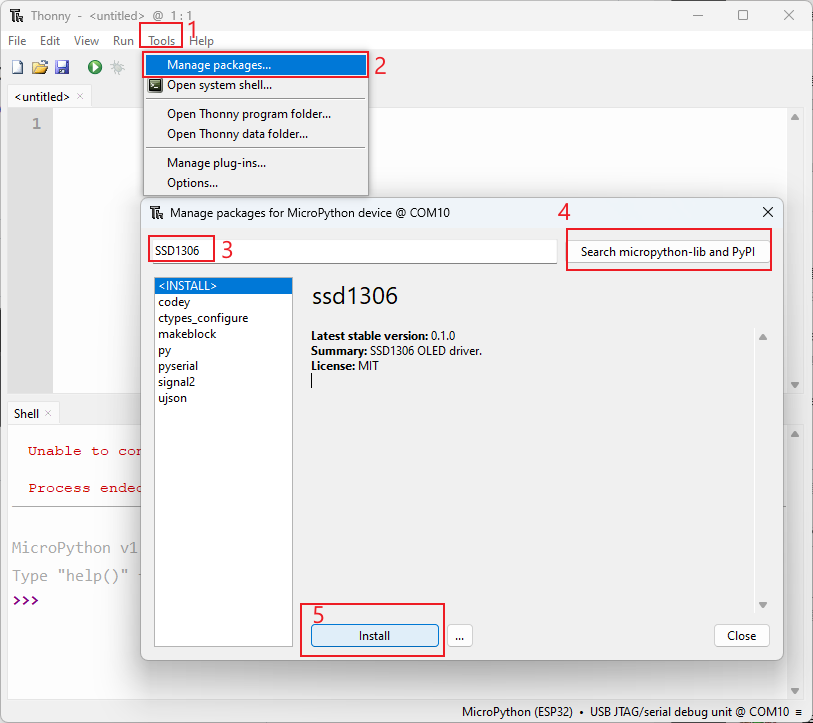
安装所需的库
点击 "Tools" >>> 点击 "Management Packages" >>> 输入库的名称 >>> 点击 "Search micropython-lib and PyPl"
运行脚本并将其烧录到开发板
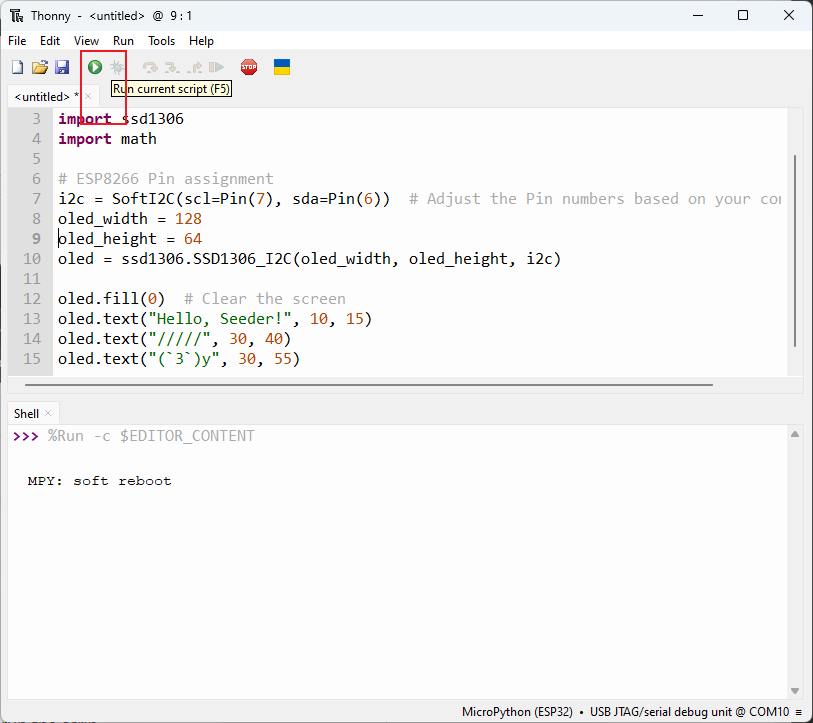
- 完成编码后,点击绿色按钮运行脚本
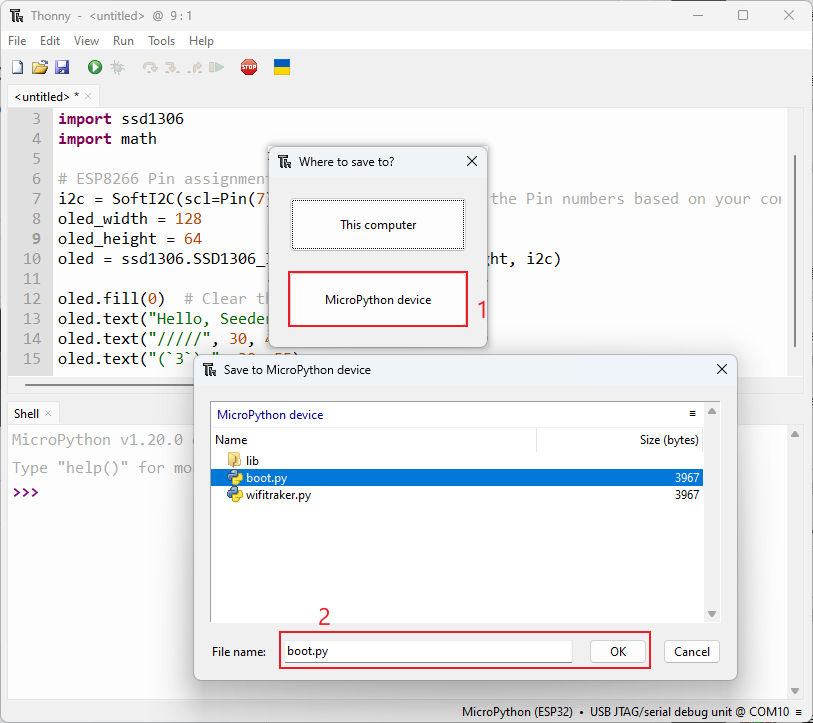
- 通过将文件保存到开发板为 "boot.py" 来将代码烧录到开发板
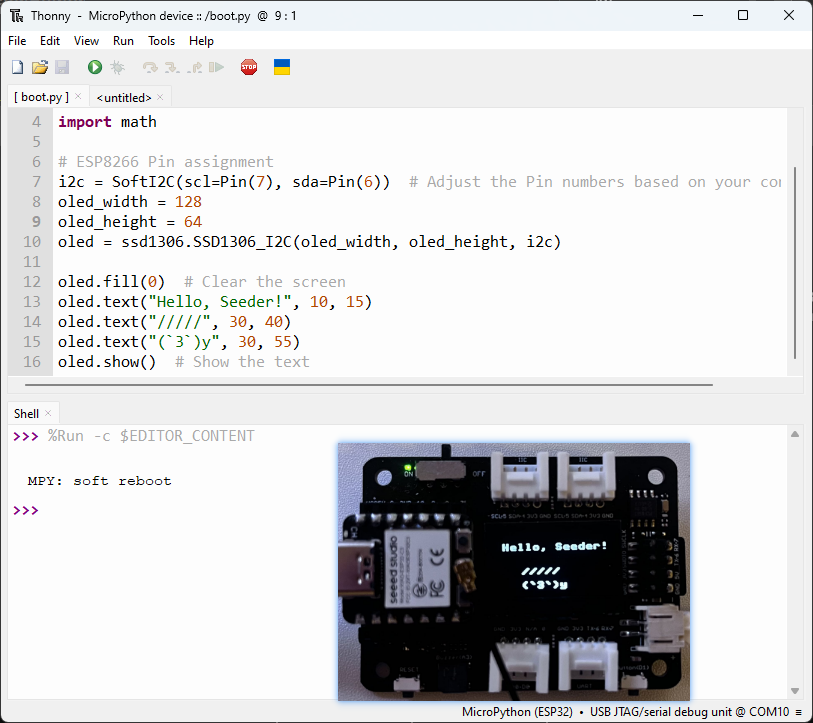
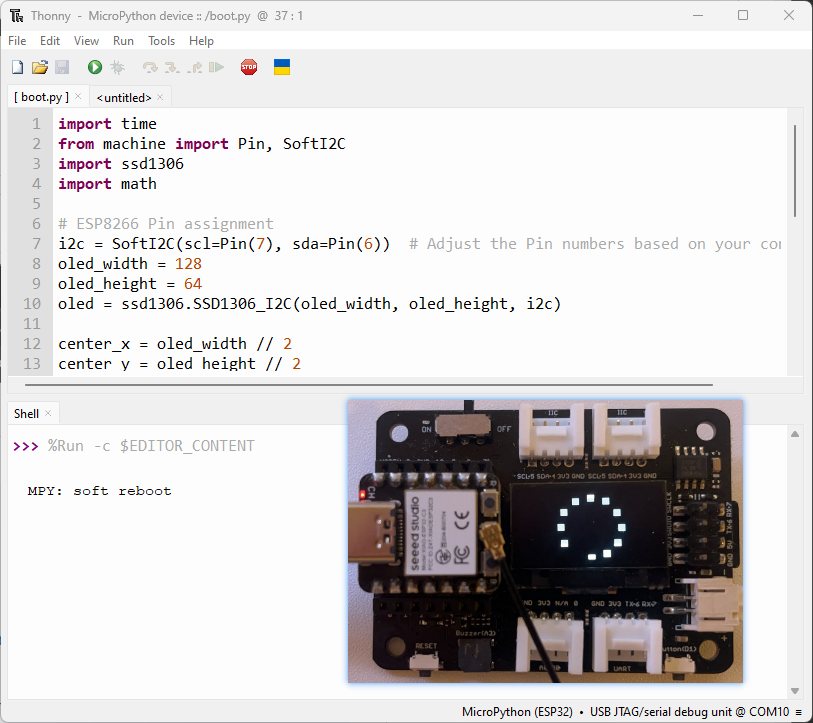
演示 1:点亮 OLED 屏幕
1. Hello Seeder
import time
from machine import Pin, SoftI2C
import ssd1306
import math

# ESP8266 Pin assignment
i2c = SoftI2C(scl=Pin(7), sda=Pin(6))  # Adjust the Pin numbers based on your connections
oled_width = 128
oled_height = 64
oled = ssd1306.SSD1306_I2C(oled_width, oled_height, i2c)

oled.fill(0)  # Clear the screen
oled.text("Hello, Seeder!", 10, 15)
oled.text("/////", 30, 40)
oled.text("(`3`)y", 30, 55)
oled.show()  # Show the text
2. 加载动态效果
import time
from machine import Pin, SoftI2C
import ssd1306
import math

# ESP8266 Pin assignment
i2c = SoftI2C(scl=Pin(7), sda=Pin(6))  # Adjust the Pin numbers based on your connections
oled_width = 128
oled_height = 64
oled = ssd1306.SSD1306_I2C(oled_width, oled_height, i2c)

center_x = oled_width // 2
center_y = oled_height // 2
square_size = 6  # Size of each square
num_squares = 12  # Number of squares
angle_increment = 2 * math.pi / num_squares

while True:
    oled.fill(0)  # Clear the screen

    for i in range(num_squares):
        angle = i * angle_increment
        x = int(center_x + (center_x - square_size-30) * math.cos(angle))
        y = int(center_y + (center_x - square_size-30) * math.sin(angle))

        # Draw all squares
        for j in range(num_squares):
            angle_j = j * angle_increment
            x_j = int(center_x + (center_x - square_size-30) * math.cos(angle_j))
            y_j = int(center_y + (center_x - square_size-30) * math.sin(angle_j))

            oled.fill_rect(x_j, y_j, square_size, square_size, 1)  # Draw the square

        oled.fill_rect(x, y, square_size, square_size, 0)  # Erase the current square
        oled.show()
        time.sleep_ms(100)  # Pause before next iteration
Demo 2: Light a Buzzer
1. Sound
import time
from time import sleep
import machine
from machine import Pin, SoftI2C


# Buzzer settings

buzzer_pin = machine.Pin(5, machine.Pin.OUT)
buzzer = machine.PWM(buzzer_pin)
buzzer.freq(1047)

# Buzzer working

while True:

    buzzer.duty(10)
    time.sleep(1)
    buzzer.duty(0)
    time.sleep(1)
2. Play the Song "He's a pirate"
import machine
import time

# Buzzer settings
buzzer_pin = machine.Pin(5, machine.Pin.OUT)
buzzer = machine.PWM(buzzer_pin)
buzzer.freq(1047)

# Defining frequency of each music note
NOTE_C4 = 262
NOTE_D4 = 294
NOTE_E4 = 330
NOTE_F4 = 349
NOTE_G4 = 392
NOTE_A4 = 440
NOTE_B4 = 494
NOTE_C5 = 523
NOTE_D5 = 587
NOTE_E5 = 659
NOTE_F5 = 698
NOTE_G5 = 784
NOTE_A5 = 880
NOTE_B5 = 988

# Music notes of the song, 0 is a rest/pulse
notes = [
    NOTE_E4, NOTE_G4, NOTE_A4, NOTE_A4, 0,
    NOTE_A4, NOTE_B4, NOTE_C5, NOTE_C5, 0,
    NOTE_C5, NOTE_D5, NOTE_B4, NOTE_B4, 0,
    NOTE_A4, NOTE_G4, NOTE_A4, 0,

    NOTE_E4, NOTE_G4, NOTE_A4, NOTE_A4, 0,
    NOTE_A4, NOTE_B4, NOTE_C5, NOTE_C5, 0,
    NOTE_C5, NOTE_D5, NOTE_B4, NOTE_B4, 0,
    NOTE_A4, NOTE_G4, NOTE_A4, 0,

    NOTE_E4, NOTE_G4, NOTE_A4, NOTE_A4, 0,
    NOTE_A4, NOTE_C5, NOTE_D5, NOTE_D5, 0,
    NOTE_D5, NOTE_E5, NOTE_F5, NOTE_F5, 0,
    NOTE_E5, NOTE_D5, NOTE_E5, NOTE_A4, 0,

    NOTE_A4, NOTE_B4, NOTE_C5, NOTE_C5, 0,
    NOTE_D5, NOTE_E5, NOTE_A4, 0,
    NOTE_A4, NOTE_C5, NOTE_B4, NOTE_B4, 0,
    NOTE_C5, NOTE_A4, NOTE_B4, 0,

    NOTE_A4, NOTE_A4,
    #Repeat of first part
    NOTE_A4, NOTE_B4, NOTE_C5, NOTE_C5, 0,
    NOTE_C5, NOTE_D5, NOTE_B4, NOTE_B4, 0,
    NOTE_A4, NOTE_G4, NOTE_A4, 0,

    NOTE_E4, NOTE_G4, NOTE_A4, NOTE_A4, 0,
    NOTE_A4, NOTE_B4, NOTE_C5, NOTE_C5, 0,
    NOTE_C5, NOTE_D5, NOTE_B4, NOTE_B4, 0,
    NOTE_A4, NOTE_G4, NOTE_A4, 0,

    NOTE_E4, NOTE_G4, NOTE_A4, NOTE_A4, 0,
    NOTE_A4, NOTE_C5, NOTE_D5, NOTE_D5, 0,
    NOTE_D5, NOTE_E5, NOTE_F5, NOTE_F5, 0,
    NOTE_E5, NOTE_D5, NOTE_E5, NOTE_A4, 0,

    NOTE_A4, NOTE_B4, NOTE_C5, NOTE_C5, 0,
    NOTE_D5, NOTE_E5, NOTE_A4, 0,
    NOTE_A4, NOTE_C5, NOTE_B4, NOTE_B4, 0,
    NOTE_C5, NOTE_A4, NOTE_B4, 0,
    #End of Repeat

    NOTE_E5, 0, 0, NOTE_F5, 0, 0,
    NOTE_E5, NOTE_E5, 0, NOTE_G5, 0, NOTE_E5, NOTE_D5, 0, 0,
    NOTE_D5, 0, 0, NOTE_C5, 0, 0,
    NOTE_B4, NOTE_C5, 0, NOTE_B4, 0, NOTE_A4,

    NOTE_E5, 0, 0, NOTE_F5, 0, 0,
    NOTE_E5, NOTE_E5, 0, NOTE_G5, 0, NOTE_E5, NOTE_D5, 0, 0,
    NOTE_D5, 0, 0, NOTE_C5, 0, 0,
    NOTE_B4, NOTE_C5, 0, NOTE_B4, 0, NOTE_A4
]

# Durations (in ms) of each music note of the song
# Quarter Note is 250 ms when songSpeed = 1.0
durations = [
    125, 125, 250, 125, 125,
    125, 125, 250, 125, 125,
    125, 125, 250, 125, 125,
    125, 125, 375, 125,

    125, 125, 250, 125, 125,
    125, 125, 250, 125, 125,
    125, 125, 250, 125, 125,
    125, 125, 375, 125,

    125, 125, 250, 125, 125,
    125, 125, 250, 125, 125,
    125, 125, 250, 125, 125,
    125, 125, 125, 250, 125,

    125, 125, 250, 125, 125,
    250, 125, 250, 125,
    125, 125, 250, 125, 125,
    125, 125, 375, 375,

    250, 125,
    #Rpeat of First Part
    125, 125, 250, 125, 125,
    125, 125, 250, 125, 125,
    125, 125, 375, 125,

    125, 125, 250, 125, 125,
    125, 125, 250, 125, 125,
    125, 125, 250, 125, 125,
    125, 125, 375, 125,

    125, 125, 250, 125, 125,
    125, 125, 250, 125, 125,
    125, 125, 250, 125, 125,
    125, 125, 125, 250, 125,

    125, 125, 250, 125, 125,
    250, 125, 250, 125,
    125, 125, 250, 125, 125,
    125, 125, 375, 375,
    #End of Repeat

    250, 125, 375, 250, 125, 375,
    125, 125, 125, 125, 125, 125, 125, 125, 375,
    250, 125, 375, 250, 125, 375,
    125, 125, 125, 125, 125, 500,

    250, 125, 375, 250, 125, 375,
    125, 125, 125, 125, 125, 125, 125, 125, 375,
    250, 125, 375, 250, 125, 375,
    125, 125, 125, 125, 125, 500
]

def play_song():
    total_notes = len(notes)
    for i in range(total_notes):
        current_note = notes[i]
        wait = durations[i]
        if current_note != 0:
            buzzer.duty(512)  # Set duty cycle for sound
            buzzer.freq(current_note)  # Set frequency of the note
        else:
            buzzer.duty(0)  # Turn off the sound
        time.sleep_ms(wait)
        buzzer.duty(0)  # Turn off the sound
while True:
    # Play the song
    play_song()
演示 3:连接到 Wi-Fi
1. 连接到 Wi-Fi

import network
import urequests
import utime as time

# Network settings
wifi_ssid = "Your Own SSID"
wifi_password = "Your Own Password"

def scan_and_connect():
    station = network.WLAN(network.STA_IF)
    station.active(True)

    print("Scanning for WiFi networks, please wait...")
    for ssid, bssid, channel, RSSI, authmode, hidden in station.scan():
        print("* {:s}".format(ssid))
        print("   - Channel: {}".format(channel))
        print("   - RSSI: {}".format(RSSI))
        print("   - BSSID: {:02x}:{:02x}:{:02x}:{:02x}:{:02x}:{:02x}".format(*bssid))
        print()

    while not station.isconnected():
        print("Connecting...")
        station.connect(wifi_ssid, wifi_password)
        time.sleep(10)

    print("Connected!")
    print("My IP Address:", station.ifconfig()[0])


# Execute the functions
scan_and_connect()
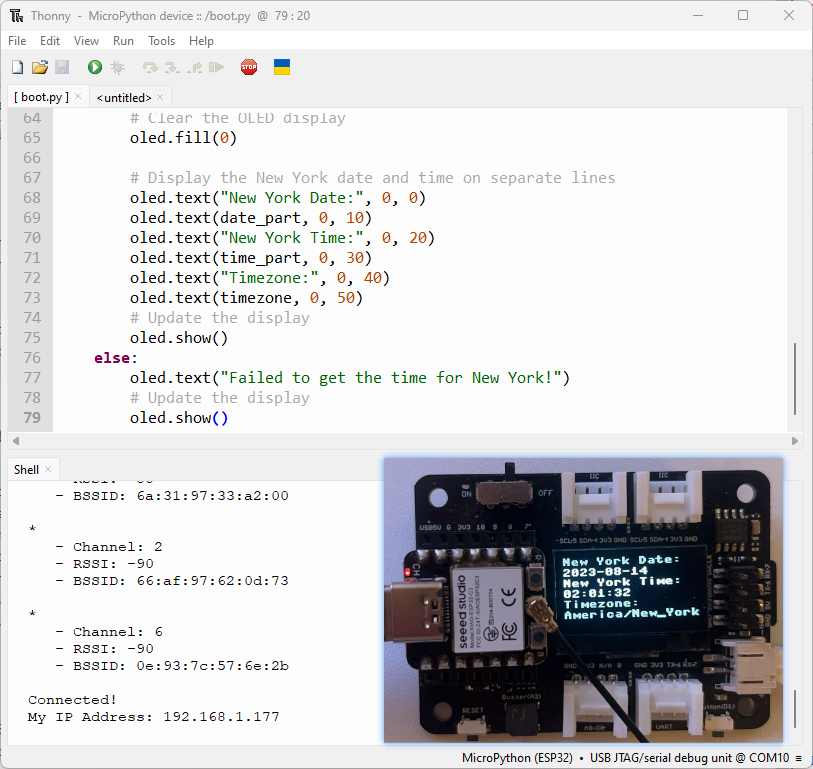
2. 在线请求纽约时间
from machine import Pin, SoftI2C
import ssd1306
from time import sleep
import time
import network
import urequests
import ujson

# ESP32 Pin assignment
# i2c = SoftI2C(scl=Pin(22), sda=Pin(21))

# ESP8266 Pin assignment
i2c = SoftI2C(scl=Pin(7), sda=Pin(6))  # Adjust the Pin numbers based on your connections

oled_width = 128
oled_height = 64
oled = ssd1306.SSD1306_I2C(oled_width, oled_height, i2c)

station = network.WLAN(network.STA_IF)
station.active(True)

# Network settings
wifi_ssid = "Your wifi ssid"
wifi_password = "Your wifi password"
url = "http://worldtimeapi.org/api/timezone/America/New_York"

print("Scanning for WiFi networks, please wait...")
authmodes = ['Open', 'WEP', 'WPA-PSK' 'WPA2-PSK4', 'WPA/WPA2-PSK']
for (ssid, bssid, channel, RSSI, authmode, hidden) in station.scan():
    print("* {:s}".format(ssid))
    print("   - Channel: {}".format(channel))
    print("   - RSSI: {}".format(RSSI))
    print("   - BSSID: {:02x}:{:02x}:{:02x}:{:02x}:{:02x}:{:02x}".format(*bssid))
    print()

# Continually try to connect to WiFi access point
while not station.isconnected():
    # Try to connect to WiFi access point
    print("Connecting...")
    station.connect(wifi_ssid, wifi_password)
    time.sleep(10)

# Display connection details
print("Connected!")
print("My IP Address:", station.ifconfig()[0])


while True:
    # Perform HTTP GET request on a non-SSL web
    response = urequests.get(url)
    # Check if the request was successful
    if response.status_code == 200:
        # Parse the JSON response
        data = ujson.loads(response.text)
        # Extract the "datetime" field for New York
        ny_datetime = data["datetime"]
        # Split the date and time components
        date_part, time_part = ny_datetime.split("T")
        # Get only the first two decimal places of the time
        time_part = time_part[:8]
        # Get the timezone
        timezone = data["timezone"]

        # Clear the OLED display
        oled.fill(0)

        # Display the New York date and time on separate lines
        oled.text("New York Date:", 0, 0)
        oled.text(date_part, 0, 10)
        oled.text("New York Time:", 0, 20)
        oled.text(time_part, 0, 30)
        oled.text("Timezone:", 0, 40)
        oled.text(timezone, 0, 50)
        # Update the display
        oled.show()
    else:
        oled.text("Failed to get the time for New York!")
        # Update the display
        oled.show()
最终项目:Wi-fi 信号强度追踪器
这是本项目的主要任务。通过这段代码,您可以使用如此简单的设备在家中追踪您的 wifi 信号。
import network
import time
from time import sleep
import machine
from machine import Pin, SoftI2C
import ssd1306
import math

# ESP32C3 Pin assignment
i2c = SoftI2C(scl=Pin(7), sda=Pin(6))  # Adjust the Pin numbers based on your connections
oled_width = 128
oled_height = 64
oled = ssd1306.SSD1306_I2C(oled_width, oled_height, i2c)

# Network settings
wifi_ssid = "Your Own SSID"
wifi_password = "Your Own Password"
machine.freq(160000000)  # Set CPU frequency to 160 MHz (ESP8266 specific)
oled.text("Starting up...", 0, 0)
oled.show()

station = network.WLAN(network.STA_IF)
station.active(True)
station.connect(wifi_ssid, wifi_password)
time.sleep(1)

while not station.isconnected():
    time.sleep(1)

oled.fill(0)
oled.text("Connecting to", 0, 0)
oled.text(wifi_ssid, 0, 20)
oled.show()
time.sleep(2)

oled.fill(0)
ip_address = station.ifconfig()[0]  # Get the IP address
oled.text("Connected! ", 0, 0)
oled.text("IP Address:", 0, 20)
oled.text(ip_address, 0, 40)
oled.show()
time.sleep(2)

# Buzzer settings
buzzer_pin = machine.Pin(5, machine.Pin.OUT)
buzzer = machine.PWM(buzzer_pin)
buzzer.freq(1047)
buzzer.duty(0)

center_x = oled_width // 2
center_y = oled_height // 2
square_size = 6  # Size of each square
num_squares = 12  # Number of squares
angle_increment = 2 * math.pi / num_squares

x_pos = [12, 38, 64, 90]
statuses = ["poor", "normal", "good", "excellent"]

def calculate_block_count(rssi):
    # Determine the number of blocks based on RSSI values
    if -80 <= rssi < -60:
        return 1
    elif -60 <= rssi < -40:
        return 2
    elif -40 <= rssi < -20:
        return 3
    elif -20 <= rssi <= 10:
        return 4

def draw_blocks(count):
    for i in range(count):
        y_pos = 50 - calculate_block_height(i)
        oled.fill_rect(x_pos[i], y_pos, 24, calculate_block_height(i), 1)
    for i in range(count, 4):  # Clear unused area
        y_pos = 50 - calculate_block_height(i)
        oled.fill_rect(x_pos[i], y_pos, 24, calculate_block_height(i), 0)

def calculate_block_height(index):
    return 10 * (index + 1)

loop_count = 0  # Initialize loop count

while loop_count < 2:  # Execute the loop 24 times
    oled.fill(0)  # Clear the screen

    for i in range(num_squares):
        angle = i * angle_increment
        x = int(center_x + (center_x - square_size-30) * math.cos(angle))
        y = int(center_y + (center_x - square_size-30) * math.sin(angle))

        # Draw all squares
        for j in range(num_squares):
            angle_j = j * angle_increment
            x_j = int(center_x + (center_x - square_size-30) * math.cos(angle_j))
            y_j = int(center_y + (center_x - square_size-30) * math.sin(angle_j))

            oled.fill_rect(x_j, y_j, square_size, square_size, 1)  # Draw the square

        oled.fill_rect(x, y, square_size, square_size, 0)  # Erase the current square
        oled.show()
        time.sleep_ms(100)  # Pause before next iteration

    loop_count += 1  # Increase loop count

oled.fill(0)  # Clear the screen after finishing the loops
oled.show()

while True:
    oled.fill(0)
    station = network.WLAN(network.STA_IF)
    time.sleep(0.1)
    rssi = station.status('rssi')
    rssi_duty = 160 + 2 * int(rssi)
    rssi_duty_2 = int(rssi_duty / 2)
    rssi_abs = abs(int(rssi)) / 100

    block_count = calculate_block_count(rssi)
    status = statuses[block_count - 1]  # Get the status text based on block count

    draw_blocks(block_count)

    oled.text(status, 11, 56)

    oled.text("RSSI:", 0, 0)
    oled.text(str(rssi), 40, 0)
    # Update the display
    oled.show()

    buzzer.duty(rssi_duty)
    time.sleep(rssi_abs)
    buzzer.duty(0)
    time.sleep(rssi_abs)
    buzzer.duty(rssi_duty_2)
    time.sleep(rssi_abs)
    buzzer.duty(0)
    time.sleep(rssi_abs)
更多信息
- 您也可以使用 Thonny 集成的 esptool 将固件刷入 XIAO ESP32C3,该工具支持 MAC OS。
✨ 贡献者项目
- 本项目由 Seeed Studio 贡献者项目支持。
- 感谢 Zachary 的努力,您的工作将会被展示。
技术支持与产品讨论
感谢您选择我们的产品!我们在这里为您提供不同的支持,以确保您使用我们产品的体验尽可能顺畅。我们提供多种沟通渠道,以满足不同的偏好和需求。