基于 reServer Jetson 的 AI NVR
介绍
随着人工智能技术的进步,传统视频监控系统正在向更智能化的方向发展。AI NVR(网络视频录像机)将人工智能与视频监控技术相结合,不仅能够录制视频,还能实时分析、识别和处理视频内容。这提高了安全监控的效率和准确性。本文将介绍如何使用 NVIDIA Jetson 平台实现 AI NVR。
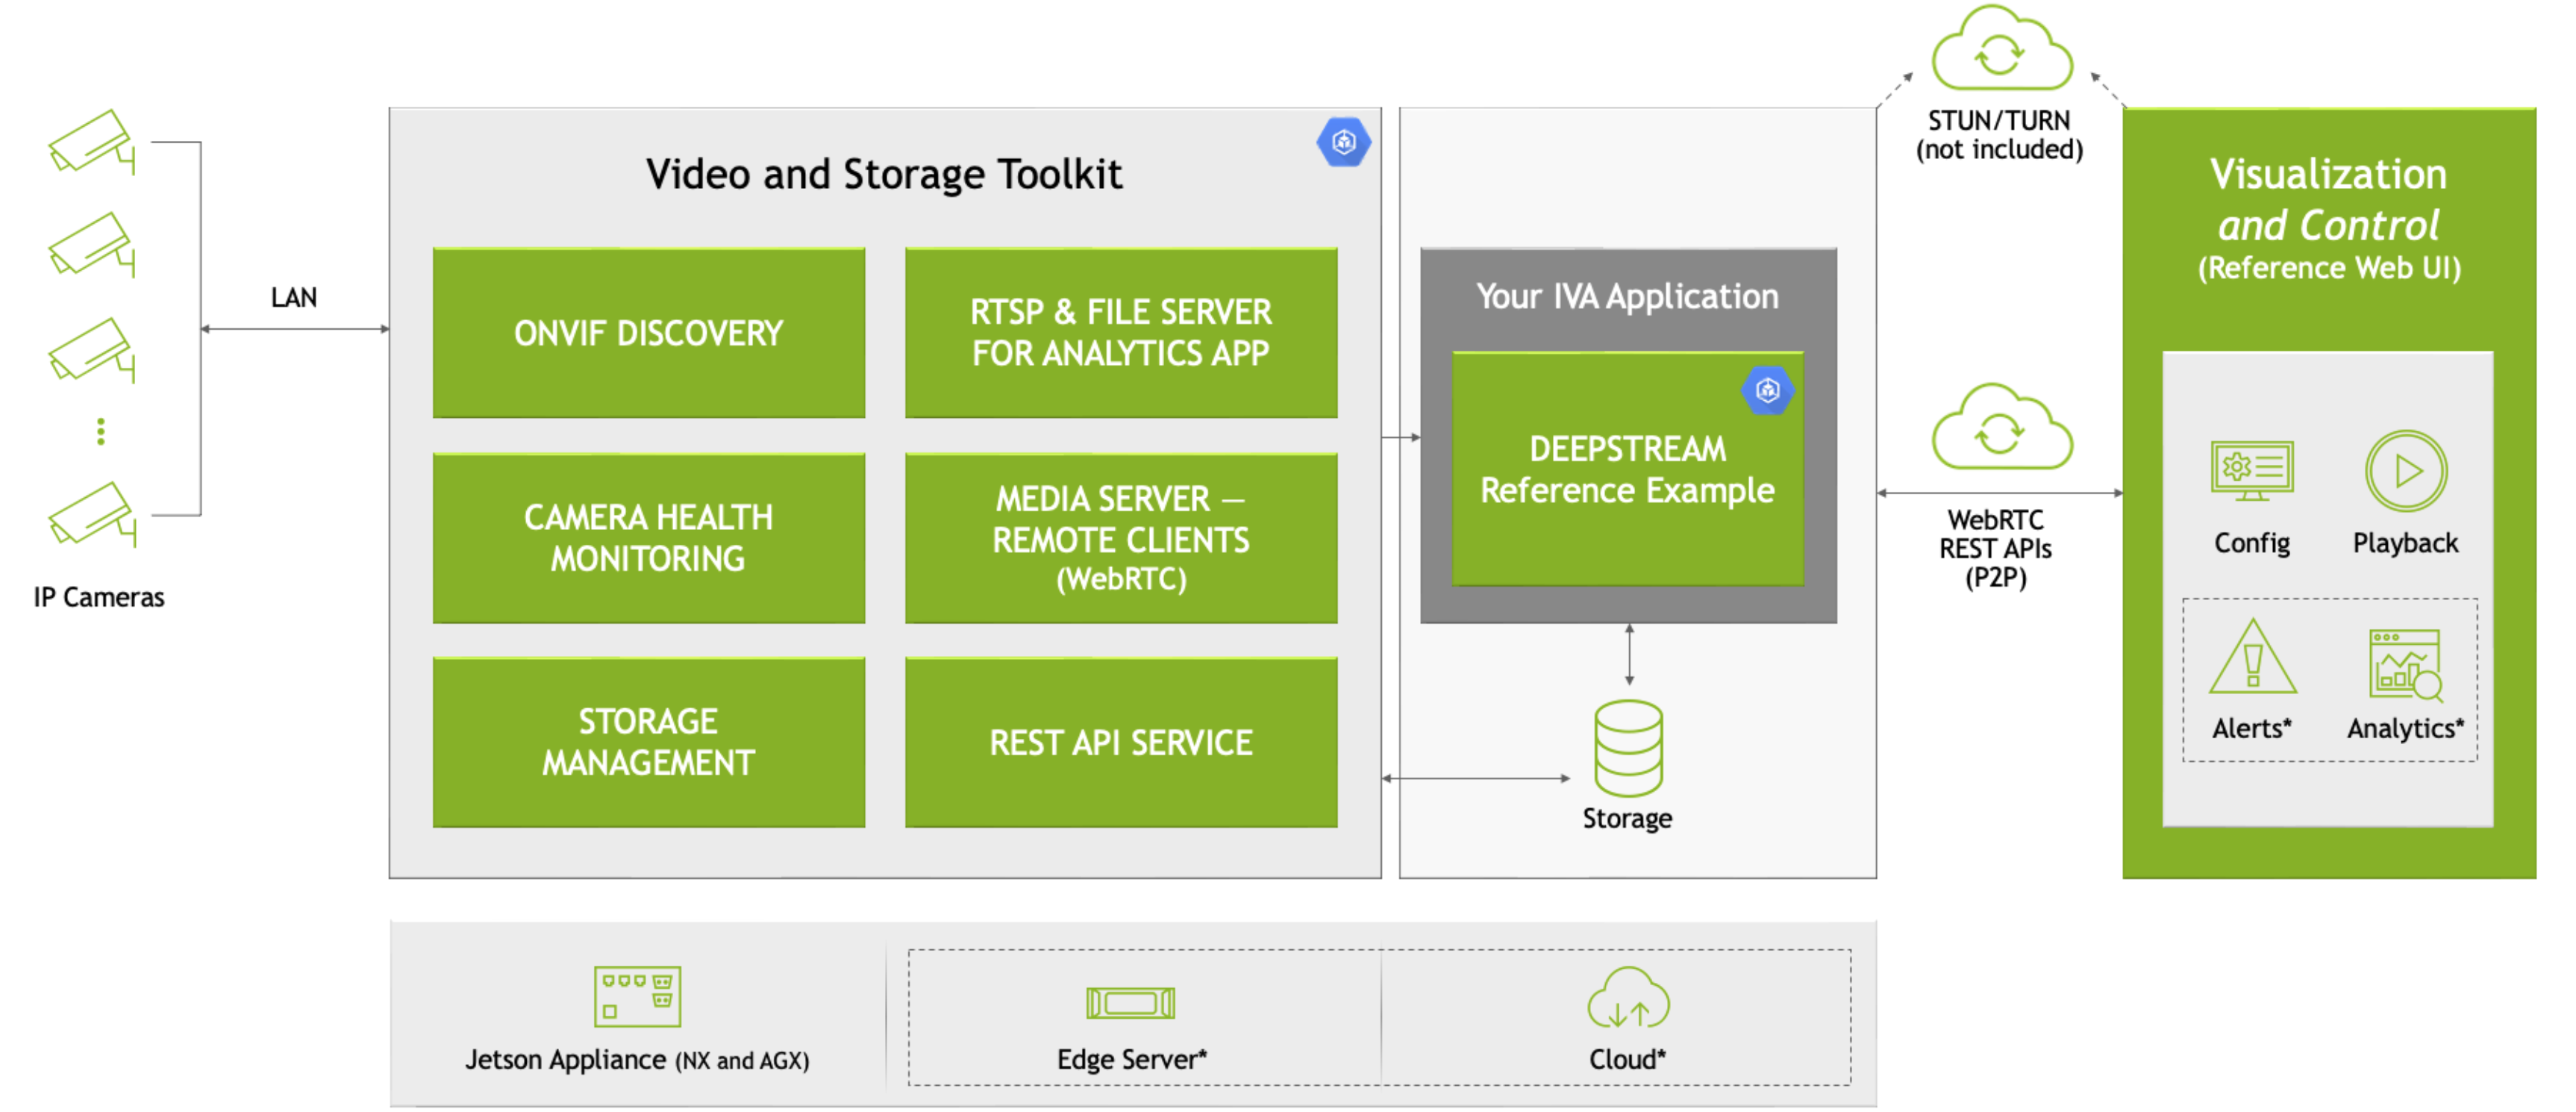
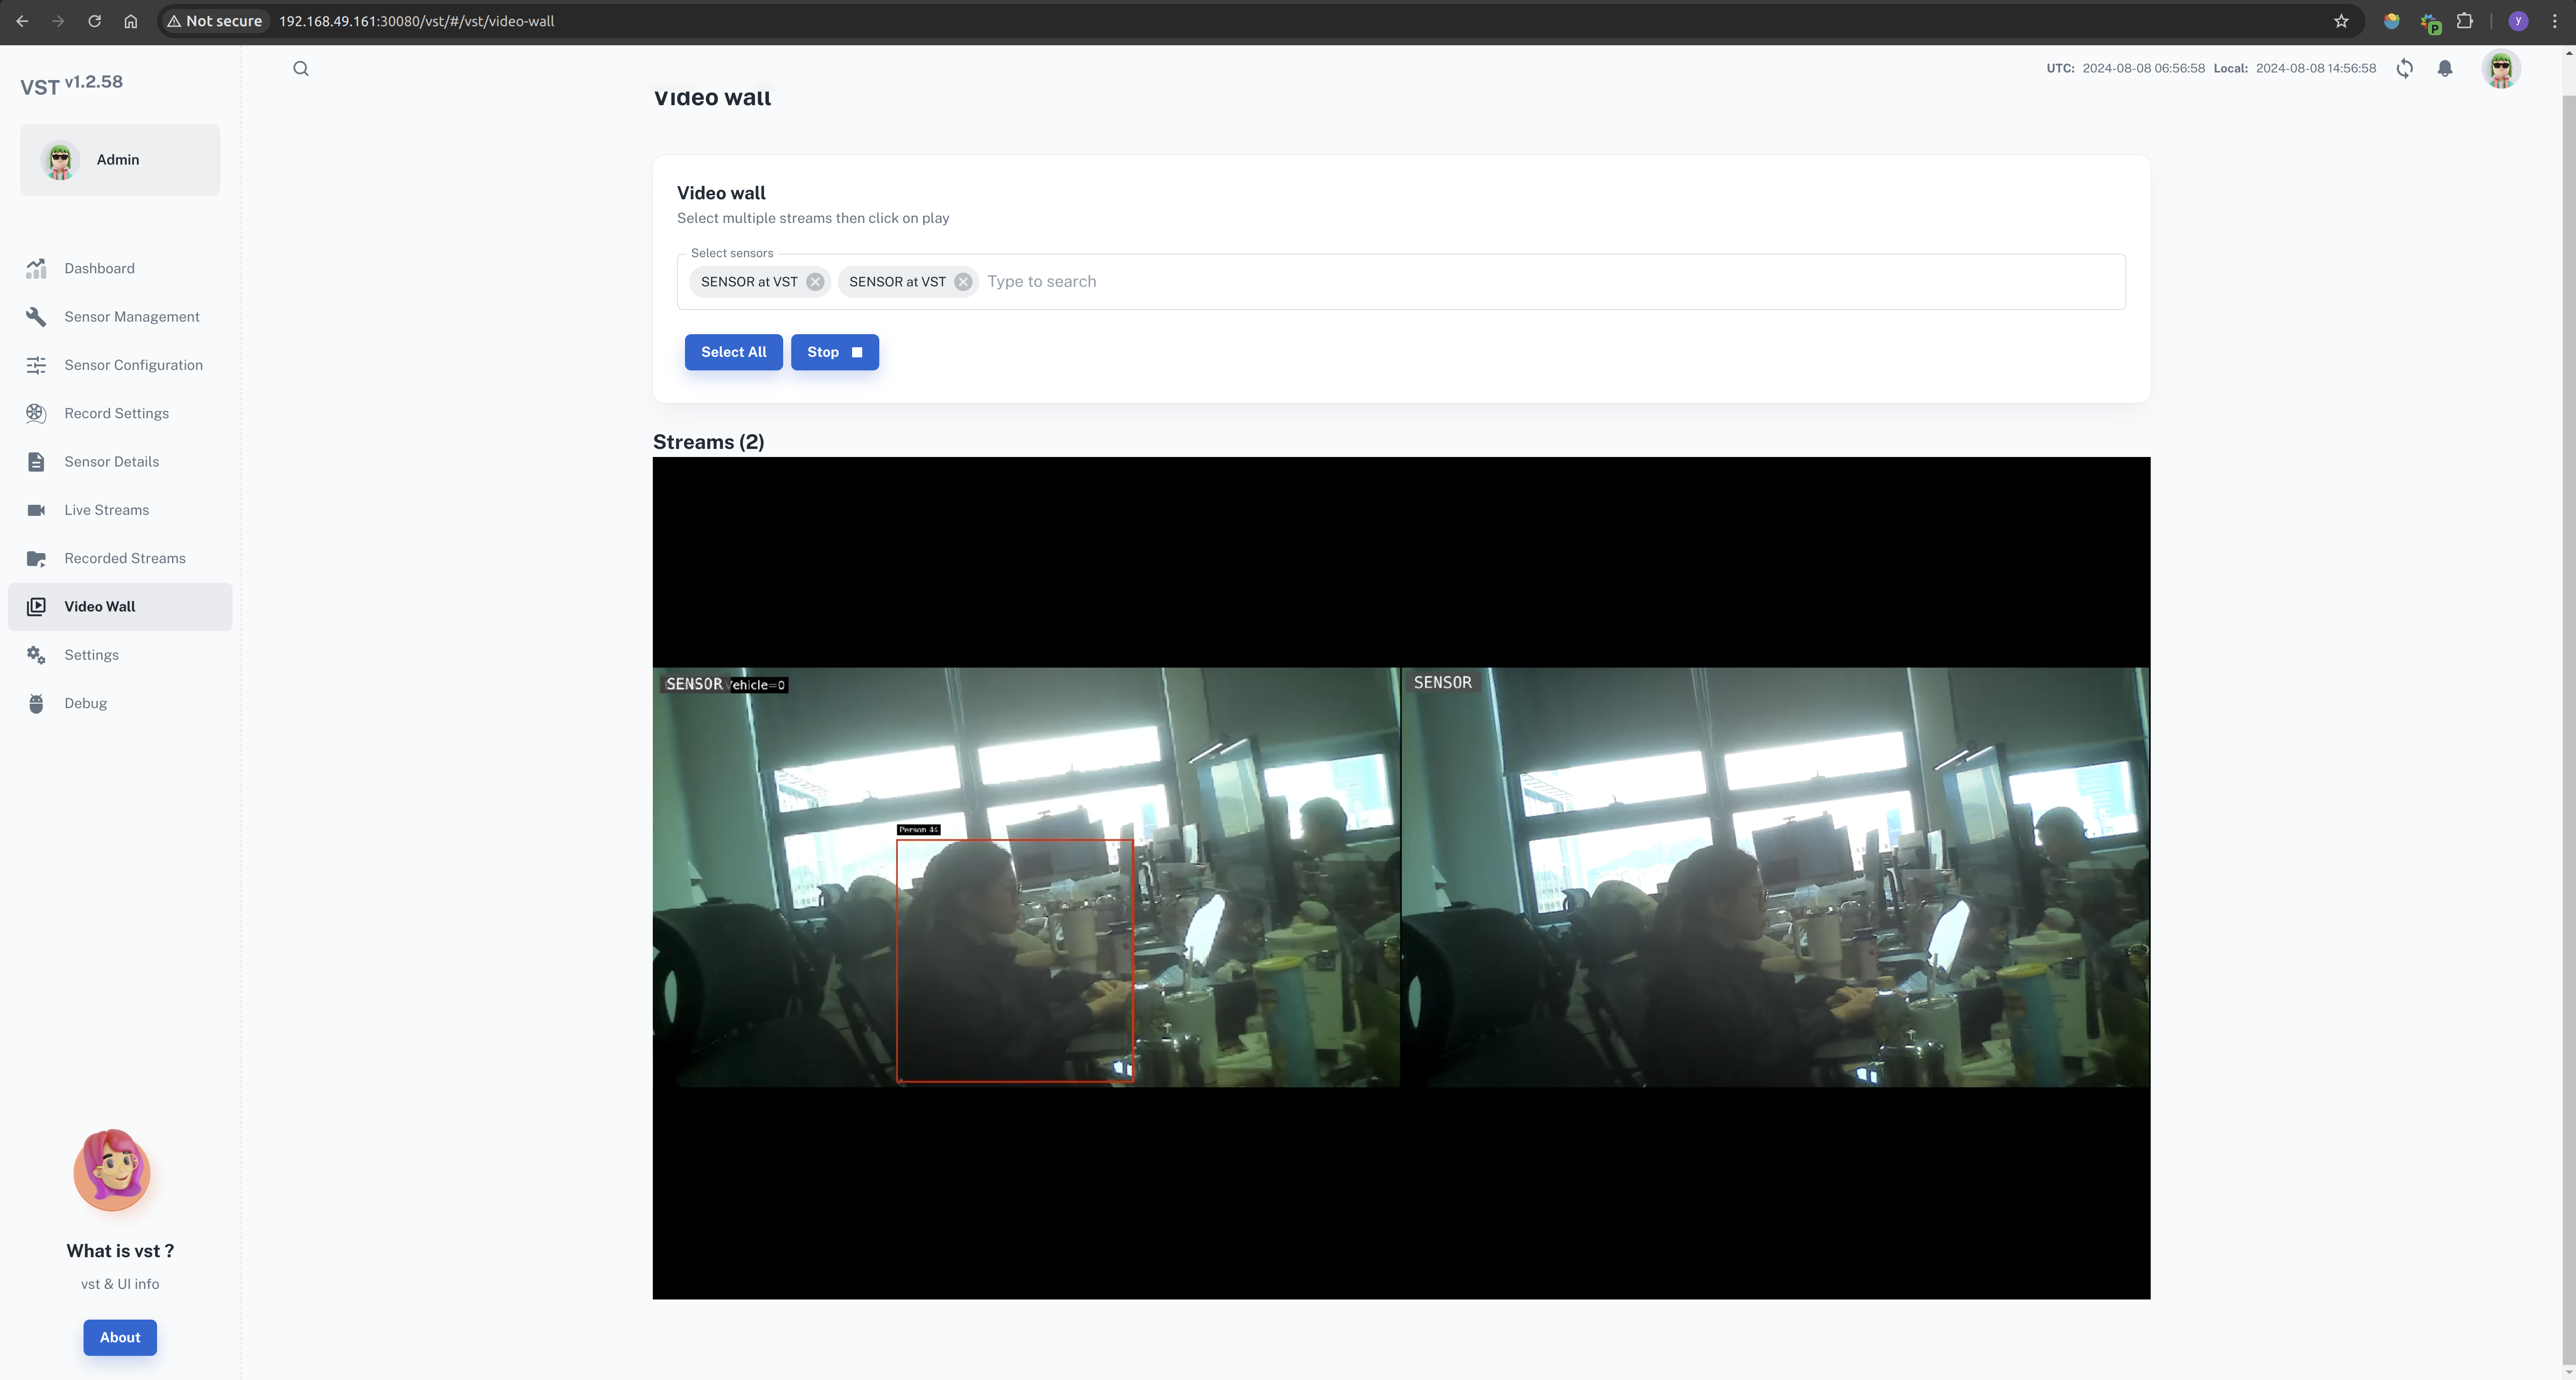
在本 wiki 中,我们将使用 Nvidia VST 和来自 Jetson Platform Service 的其他微服务,在 Jetson 设备上快速部署本地 AI NVR。 在这里,我们使用 VST 添加摄像头,采用 DeepStream 行人检测模型来检测对象,并在 VST 视频墙上显示检测结果以及原始视频流。
什么是 AI NVR?
AI NVR 是一种集成了视频录制和人工智能分析功能的设备。与传统 NVR 不同,AI NVR 可以自动识别视频画面中的关键事件,如入侵或物体丢失,甚至可以根据预定义的规则触发警报。这种智能化水平依赖于强大的计算能力和深度学习算法。
为什么选择 reServer(NVIDIA Jetson)平台?
NVIDIA Jetson 是一个高性能、低功耗的嵌入式计算平台,非常适合 AI 和深度学习应用。Jetson 平台配备了 NVIDIA GPU,可以加速深度学习推理过程,并支持广泛的 AI 工具和框架,如 TensorFlow 和 PyTorch。
reServer 是基于 Nvidia Jetson 平台的边缘计算设备。它具有紧凑的设计、被动散热、5x RJ45 千兆以太网(带 PoE)、2x 2.5" HDD/SSD 驱动器托架,以及丰富的工业接口,使其成为边缘 AI 物联网设备的理想选择。
先决条件
- Jetson Orin 设备(安装了 jetpack 6.0 操作系统)。
- IP 摄像头。
在本 wiki 中,我们将使用 reServer Industrial J4012 完成以下任务,但您也可以尝试使用其他 Jetson 设备。
我们可以按照此 wiki 中的说明将最新的 JetPack 6.0 系统刷入 reServer。

入门指南
硬件连接
- 将 Jetson 设备连接到网络、鼠标、键盘和显示器。
- 将 IP 摄像头连接到网络。
当然,您也可以通过本地网络的 SSH 远程访问 Jetson 设备。
步骤1. 安装 nvidia-jetson-services
打开 Jetson 设备的终端并输入:
sudo apt update
sudo apt install nvidia-jetson-services
然后我们可以发现在 /opt/nvidia/jetson/services/ 中有许多微服务。

步骤2. 修改入口配置
在 /opt/nvidia/jetson/services/ingress/config/ 目录中,创建一个名为 ai-nvr-nginx.conf 的新文件并填入:
# specify you service discovery config here

location /emdx/ {
    rewrite ^/emdx/?(.*)$ /$1 break;
    proxy_set_header Host $host;
    proxy_set_header X-Real-IP $remote_addr;
    proxy_set_header X-Forwarded-For $proxy_add_x_forwarded_for;
    access_log /var/log/nginx/access.log timed_combined;
    proxy_pass http://emdx_api;
}

location /ws-emdx/ {
    rewrite ^/ws-emdx/?(.*)$ /$1 break;
    proxy_set_header Host $host;
    proxy_pass http://emdx_websocket;
    proxy_http_version 1.1;
    proxy_set_header Upgrade $http_upgrade;
    proxy_set_header Connection "upgrade";
}
步骤 3. 修改 NVR 数据存储位置(可选)
打开文件 /opt/nvidia/jetson/services/vst/config/vst_storage.json 并根据需要更改目录。
{
    "data_path": "/home/seeed/VST/storage/data/",
    "video_path": "/home/seeed/VST/storage/video/",
    "total_video_storage_size_MB": 10000
}
步骤 4. 启动 VST 服务
VST 服务依赖于其他服务,因此需要一起启动所有依赖服务。
sudo systemctl start jetson-redis
sudo systemctl start jetson-ingress
sudo systemctl start jetson-vst
微服务启动后,将创建相应的 Docker 容器。

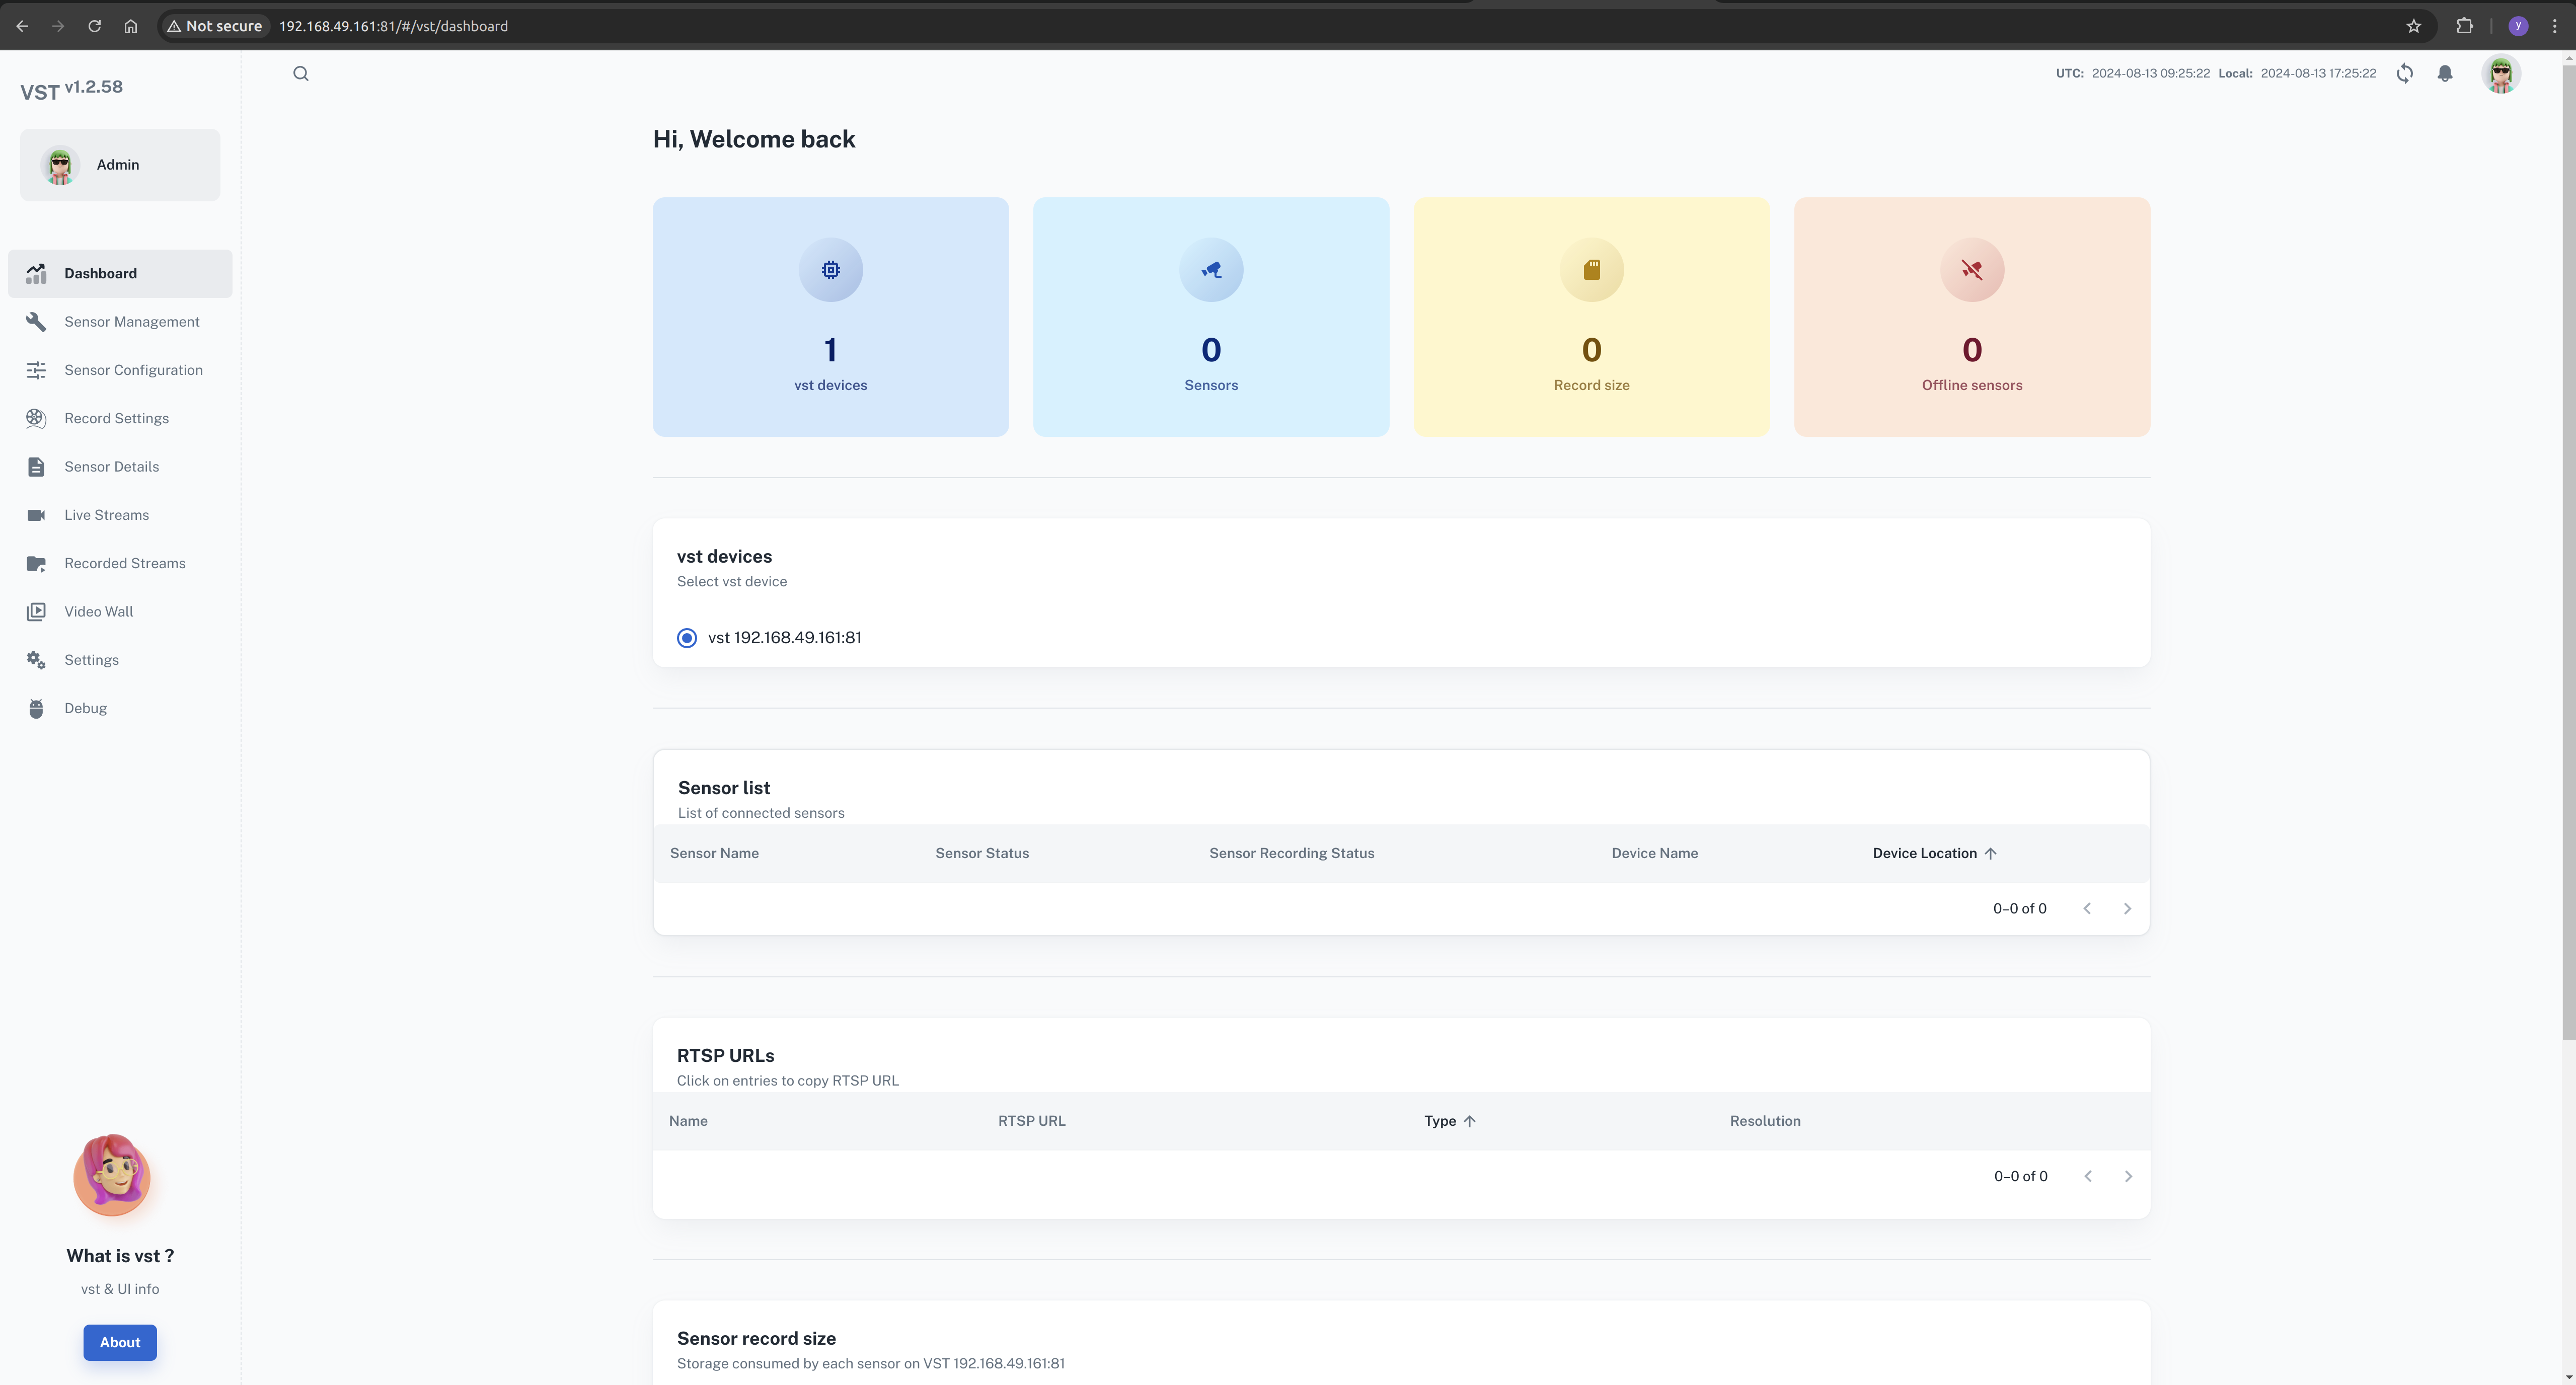
现在,我们可以在浏览器中打开 VST web UI。
在本地网络中,打开浏览器并输入:http://<ip-of-jetson>:81/
步骤5. 下载 AI NVR 配置文件
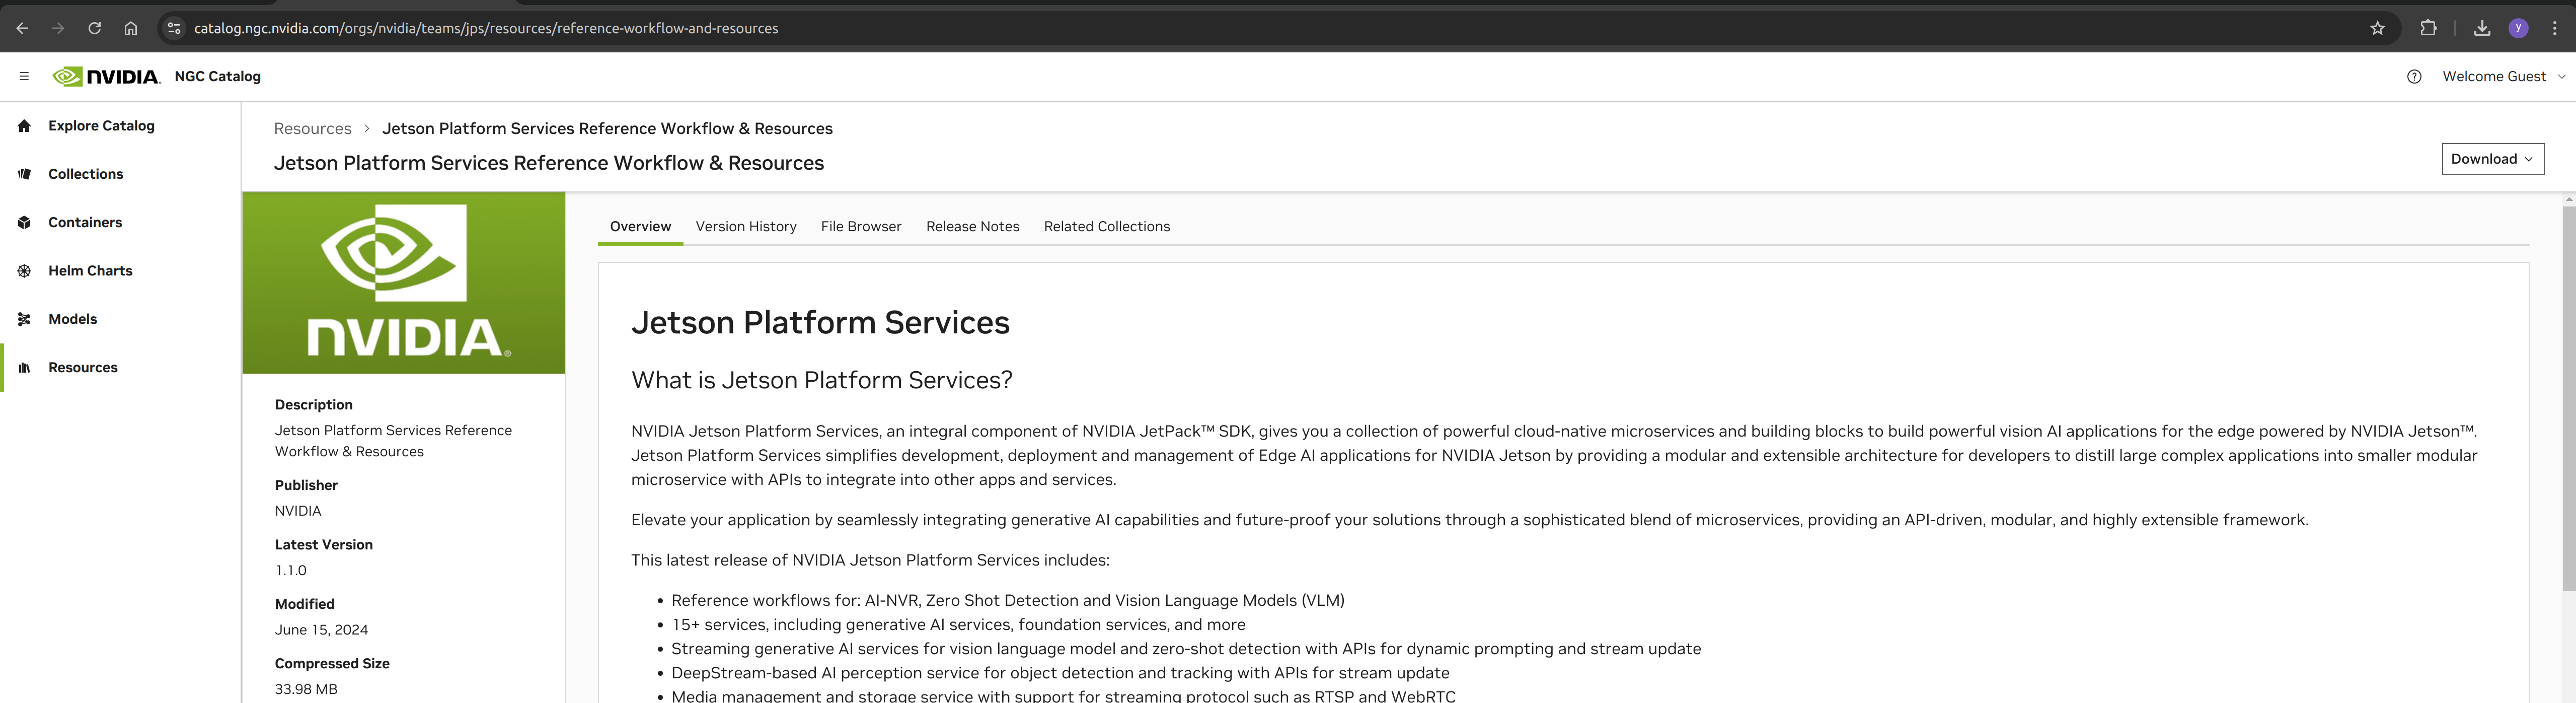
打开浏览器并转到下载页面。
Download(右上角) --> Browser(直接下载)
cd <path-of-download>
unzip files.zip
cd files
tar -xvf ai_nvr-1.1.0.tar.gz
cd ai_nvr
步骤6. 修改 DeepStream 配置文件
我们希望能够实时查看模型的推理结果,因此需要修改 DeepStream 的输入方法。在这里,我们可以将其配置为以 RTSP 方式输出。
找到此配置文件并更新其内容。
<path-of-ai_nvr>/config/deepstream/pn26/service-maker/ds-config-0_nx16.yaml
ds-config-0_nx16.yaml
################################################################################
# SPDX-FileCopyrightText: Copyright (c) 2024 NVIDIA CORPORATION & AFFILIATES. All rights reserved.
# SPDX-License-Identifier: MIT
#
# Permission is hereby granted, free of charge, to any person obtaining a
# copy of this software and associated documentation files (the "Software"),
# to deal in the Software without restriction, including without limitation
# the rights to use, copy, modify, merge, publish, distribute, sublicense,
# and/or sell copies of the Software, and to permit persons to whom the
# Software is furnished to do so, subject to the following conditions:
#
# The above copyright notice and this permission notice shall be included in
# all copies or substantial portions of the Software.
#
# THE SOFTWARE IS PROVIDED "AS IS", WITHOUT WARRANTY OF ANY KIND, EXPRESS OR
# IMPLIED, INCLUDING BUT NOT LIMITED TO THE WARRANTIES OF MERCHANTABILITY,
# FITNESS FOR A PARTICULAR PURPOSE AND NONINFRINGEMENT. IN NO EVENT SHALL
# THE AUTHORS OR COPYRIGHT HOLDERS BE LIABLE FOR ANY CLAIM, DAMAGES OR OTHER
# LIABILITY, WHETHER IN AN ACTION OF CONTRACT, TORT OR OTHERWISE, ARISING
# FROM, OUT OF OR IN CONNECTION WITH THE SOFTWARE OR THE USE OR OTHER
# DEALINGS IN THE SOFTWARE.
################################################################################

deepstream:
  nodes:
  - type: nvinfer
    # name of the primary inference must be 'pgie' for test app to route streams here
    name: pgie
    properties:
      config-file-path: "/ds-config-files/pn26/config_infer_primary_RN34_PN26_960x544_dla0_orin_unprune_nx.txt"
      model-engine-file: "/pn26-files/dla0_pn26_jp6_halfmem_bs4.engine"
      unique-id: 1
      # be sure to rename model-engine-file whenever batch-size is changed
      batch-size: 4
  - type: nvtracker
    name: tracker
    properties:
      ll-config-file: "/ds-config-files/pn26/config_tracker_NvDCF_PNv2.6_Interval_1_PVA.yml;/ds-config-files/pn26/config_tracker_NvDCF_PNv2.6_Interval_1_PVA.yml"
      ll-lib-file: "/opt/nvidia/deepstream/deepstream/lib/libnvds_nvmultiobjecttracker.so"
      sub-batches: "2:2"
      tracker-width: 960
      tracker-height: 544
  - type: nvmsgconv
    name: msgconv
    properties:
      payload-type: 1
  - type: nvmsgbroker
    name: msgbroker
    properties:
      config: "/ds-config-files/pn26/cfg_redis.txt"
      proto-lib: "/opt/nvidia/deepstream/deepstream/lib/libnvds_redis_proto.so"
      conn-str: "localhost;6379;test"
      topic: "test"
      sync: false
      async: false
  - type: queue
    name: checkpoint
  - type: nvmultistreamtiler
    name: tiler
    properties:
      width: 1280
      height: 720
  - type: nvdsosd
    name: osd
  - type: nvvideoconvert
    name: converter
  - type: tee
    name: tee
  - type: queue
    name: queue_tracker
  - type: queue
    name: queue_tee
  - type: queue
    name: queue_tiler
  - type: queue
    name: queue_msgconv
  - type: queue
    name: queue_converter
  - type: queue
    name: queue_osd
  - type: queue
    name: queue_sink
  - type: queue
    name: queue_msgbroker
  - type: nvvideoconvert
    name: converter1
  - type: nvrtspoutsinkbin
    name: sink
    properties:
      rtsp-port: 8555
      sync: false
  - type: sample_video_probe.sample_video_probe
    name: osd_counter
    properties:
      font-size: 15
  edges:
    pgie: [queue_tracker, osd_counter]
    queue_tracker: tracker
    tracker: queue_tee
    queue_tee: tee
    tee: [queue_tiler, queue_msgconv]
    queue_tiler: tiler
    tiler: queue_converter
    queue_converter: converter
    converter: queue_osd
    queue_osd: osd
    osd: queue_sink
    queue_sink: converter1
    converter1: sink
    queue_msgconv: msgconv
    msgconv: queue_msgbroker
    queue_msgbroker: msgbroker
请注意您的 Jetson 设备型号。在这种情况下,使用的是 Orin Nx 16GB 模块。如果您使用的是不同型号,请找到相应的配置文件并进行必要的修改。
在 compose 文件的 SDR 下添加 WDM_WL_NAME_IGNORE_REGEX 环境变量。 在这里,我的 Jetson 设备是 reServer J4012,搭载 Orin Nx 16GB,所以我需要编辑这个 compose 文件:
<path-of-ai_nvr>/compose_nx16.yaml
...
WDM_CONSUMER_GRP_ID: sdr-deepstream-cg
WDM_CLUSTER_CONTAINER_NAMES: '["deepstream", "vst"]'
WDM_WL_NAME_IGNORE_REGEX: ".*deepstream.*"
...
步骤7. 启动AI NVR应用程序
在Jetson终端中,输入相应的命令来启动AI NVR应用程序。
cd <path-of-download>/files/ai_nvr

# Orin AGX:
# sudo docker compose -f compose_agx.yaml up -d --force-recreate
# Orin NX16:
sudo docker compose -f compose_nx16.yaml up -d --force-recreate
# Orin NX8:
# sudo docker compose -f compose_nx8.yaml up -d --force-recreate
# Orin Nano:
# sudo docker compose -f compose_nano.yaml up -d --force-recreate
在启动过程中,应用程序将创建额外的 Docker 容器,例如 DeepStream。

步骤8. 通过 Web UI 配置本地 AI NVR
此时,我们已经成功在 Jetson 设备上安装并启动了 AI NVR 应用程序。 下一步是通过 Web UI 配置摄像头。
在本地网络中,打开浏览器并输入:http://<jetson的IP地址>:30080/vst/
手动配置 IP 摄像头和 Deepstream 输出视频流。
Sensor Management --> Add device manually --> Submit
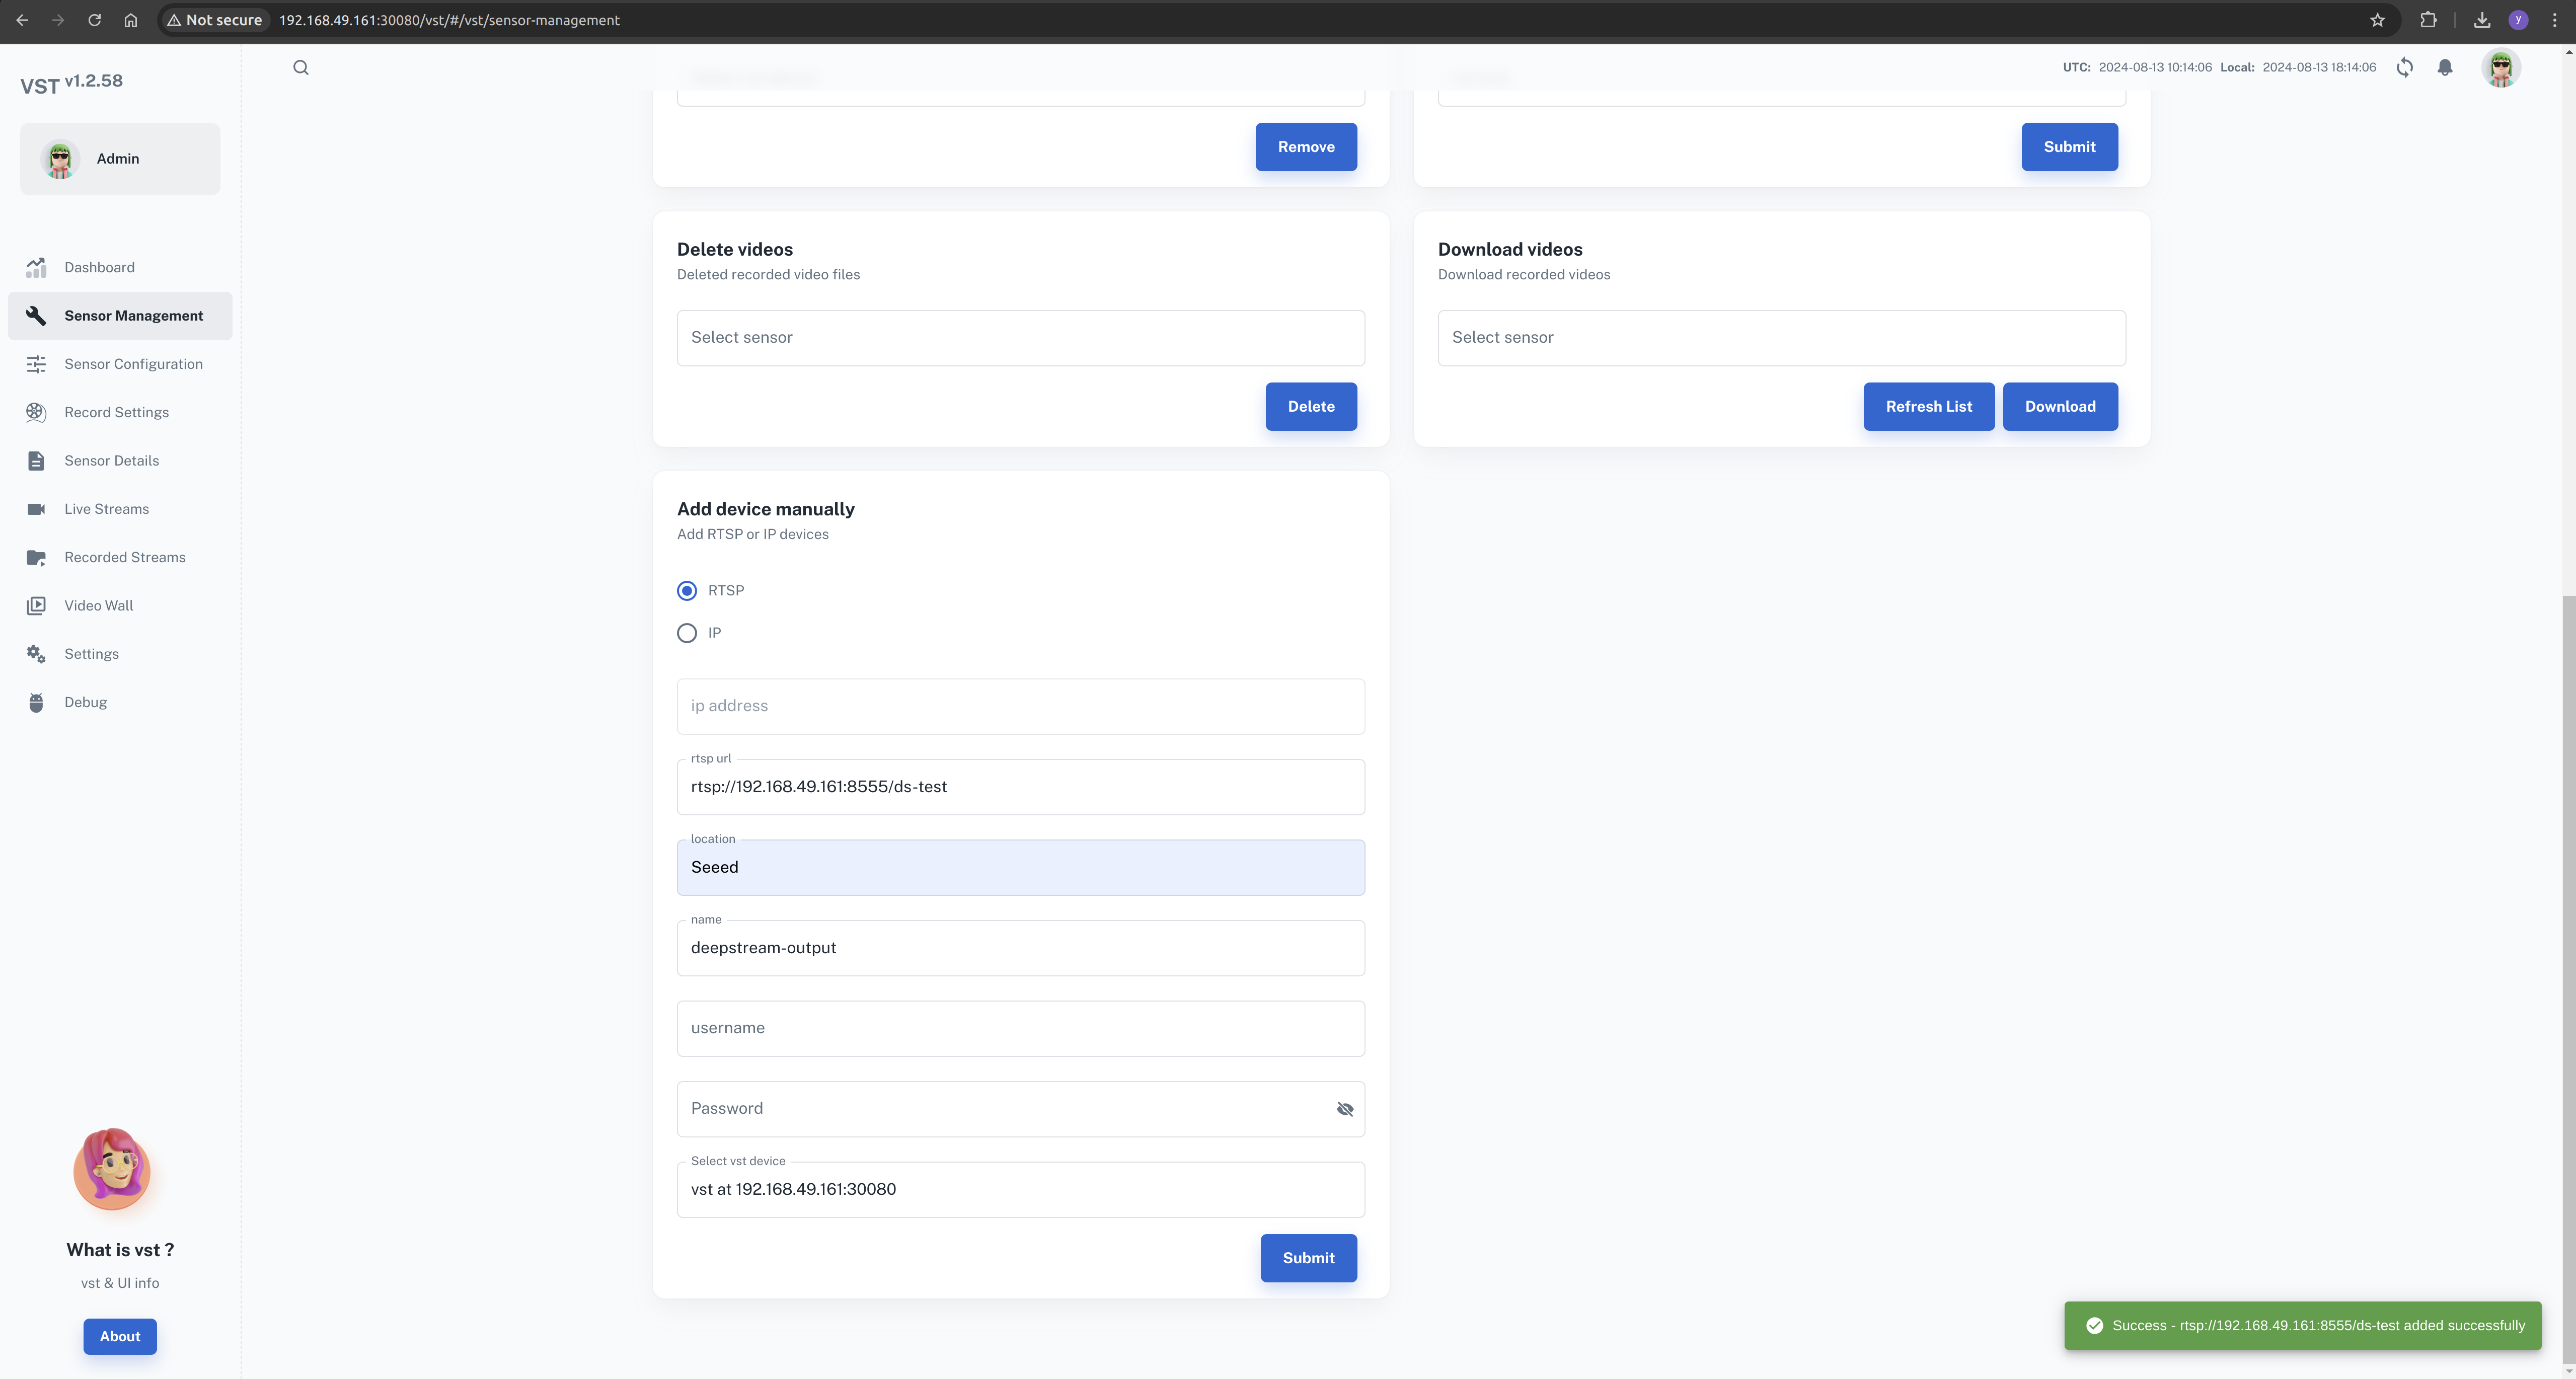
在这里,我们需要输入有效的摄像头地址或 RTSP 流路径。
DeepStream 输出流是 rtsp://192.168.49.161:8555/ds-test。
这取决于 DeepStream 配置文件,可以根据您的需要进行修改。
配置 deepstream 输出流时,我们需要在摄像头名称中添加 deepstream 字段
配置成功后,您可以在视频墙上查看所有的视频源。
Video Wall --> Select All --> Start
关闭 ai-nvr 应用程序
在 Jetson 终端中,输入相应的命令来关闭 AI NVR 应用程序。
cd <path-of-download>/files/ai_nvr

# Orin AGX:
# sudo docker compose -f compose_agx.yaml down --remove-orphans

# Orin NX16:
sudo docker compose -f compose_nx16.yaml down --remove-orphans

# Orin NX8:
# sudo docker compose -f compose_nx8.yaml down --remove-orphans

# Orin Nano:
# sudo docker compose -f compose_nano.yaml down --remove-orphans
可以使用以下命令停止服务:
sudo systemctl stop <service-name>
such as:
sudo systemctl stop jetson-redis
sudo systemctl stop jetson-ingress
sudo systemctl stop jetson-vst
参考资料
- https://developer.nvidia.com/embedded/jetpack/jetson-platform-services-get-started
- https://docs.nvidia.com/jetson/jps/moj-overview.html
技术支持与产品讨论
感谢您选择我们的产品!我们在这里为您提供不同的支持,以确保您使用我们产品的体验尽可能顺畅。我们提供多种沟通渠道,以满足不同的偏好和需求。