在 Jetson AGX Orin 上部署 Depth Anything V3

介绍
Depth Anything V3 可以从单张 RGB 图像估计深度,因此机器人只需一颗摄像头,就能在没有双目相机或深度传感器的情况下获得稠密深度图。在 Jetson AGX Orin 上,模型会被转换为 TensorRT 引擎,并在 ROS 2 话题上发布深度信息,下游的检测器或规划器即可使用。下面的章节将完成 CUDA 和 ROS 2 的配置、将 ONNX 转换为 TensorRT 引擎,并在摄像头和视频输入上运行推理。

前置条件
- reComputer Mini J501 载板(Jetson AGX Orin),已安装 JetPack 6.2
- USB 摄像头
- 已安装 ROS2 Humble 环境
技术亮点
-
高质量单目深度估计:Depth Anything V3 能从单张 RGB 图像生成精确的深度图,无需专用深度传感器或双目相机系统。
-
针对边缘部署优化:该模型专为 Jetson AGX Orin 等边缘设备上的高效推理而设计,并通过 TensorRT 优化以获得最大性能。
-
实时处理能力:能够实时处理高分辨率图像,适用于自主导航、避障以及机器人操作等任务。
-
ROS2 集成:提供原生 ROS2 Humble 支持,可发布深度图和点云,便于无缝集成到机器人系统中。
-
灵活的输入支持:支持多种输入源,包括 USB 摄像头、ROS 图像话题以及预录制的视频流。
环境配置
步骤 1. 安装依赖
sudo apt update
sudo apt install -y \
    build-essential \
    cmake \
    git \
    libopencv-dev \
    python3-pip \
    python3-colcon-common-extensions \
    v4l-utils
步骤 2. 安装 Python 依赖
pip3 install numpy opencv-python
步骤 3. 配置 CUDA 环境变量
# Add CUDA environment variables to .bashrc
echo '
# CUDA Environment
export CUDA_HOME=/usr/local/cuda
export PATH=$CUDA_HOME/bin:$PATH
export LD_LIBRARY_PATH=$CUDA_HOME/lib64:$LD_LIBRARY_PATH
export CUDACXX=$CUDA_HOME/bin/nvcc
' >> ~/.bashrc

# Reload shell configuration
source ~/.bashrc

# Verify CUDA installation
nvcc --version

步骤 4. 安装 ROS2 USB 摄像头包
# Install USB camera driver for ROS2
sudo apt install -y ros-humble-usb-cam

# Install additional ROS2 dependencies
sudo apt install -y ros-humble-cv-bridge
sudo apt install -y ros-humble-image-transport
sudo apt install -y ros-humble-image-geometry
sudo apt install -y ros-humble-cv-bridge ros-humble-image-transport ros-humble-rviz2
步骤 5. 配置 Depth Anything V3 ROS2 环境
# Clone the repository
git clone https://github.com/zibochen6/ros2-depth-anything-v3-trt.git

# Navigate to the project directory
cd ros2-depth-anything-v3-trt
步骤 6. 构建 ROS2 包
# Build the depth_anything_v3 package with Release configuration
colcon build --packages-select depth_anything_v3 --cmake-args -DCMAKE_BUILD_TYPE=Release

# Source the workspace
source install/setup.bash
步骤 7. 生成 TensorRT 引擎
在生成引擎文件之前,你需要预先下载 Depth Anything V3 的 .onnx 模型,并将其放置在 ros2-depth-anything-v3-trt/onnx 目录下。
# Make the engine generation script executable
chmod +x generate_engines.sh

# Generate TensorRT engines from ONNX models
./generate_engines.sh onnx
在生成 .engine 文件期间请耐心等待。转换完成后,会在 onnx 目录下生成如下两个文件。

运行深度估计
使用摄像头进行深度估计
步骤 1. 连接 USB 摄像头
将 USB 摄像头连接到 Jetson AGX Orin 设备上。通过以下方式确认摄像头已被识别:
# Check if USB camera is detected
ls /dev/video*
预期输出:
/dev/video0 /dev/video1
步骤 2. 摄像头标定
v4l2_camera 包充当 Linux Video4Linux2 (V4L2) API 与 ROS 2 话题之间的桥梁,发布图像和相机信息消息,便于在标定流程中使用。
安装摄像头标定包:
# Install Camera Calibration Package
sudo apt install ros-humble-camera-calibration

# v4l2_camera is the official ROS2 maintained node that can directly publish USB camera images
sudo apt install ros-${ROS_DISTRO}-v4l2-camera
启动摄像头节点:
# Launch camera node
ros2 run v4l2_camera v4l2_camera_node \
  --ros-args \
  -p image_size:=[640,480] \
  -p pixel_format:=YUYV
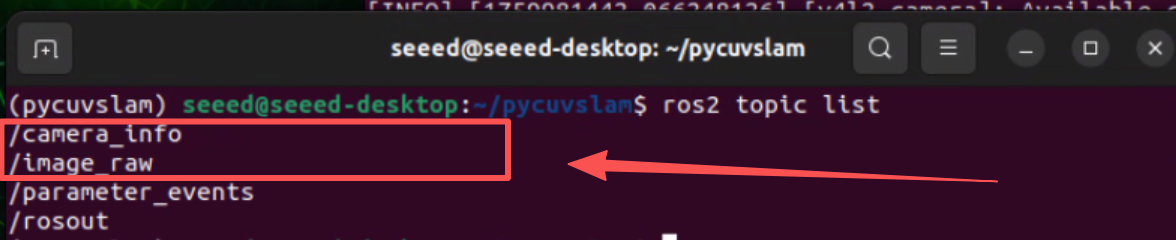
默认发布的话题为:
/image_raw- 原始摄像头图像/camera- 摄像头信息
运行摄像头标定:
# In another terminal
ros2 run camera_calibration cameracalibrator \
  --size 8x6 \
  --square 0.025 \
  --fisheye-recompute-extrinsicsts \
  --fisheye-fix-skew \
  --ros-args --remap image:=/image_raw --remap camera:=/v4l2_camera
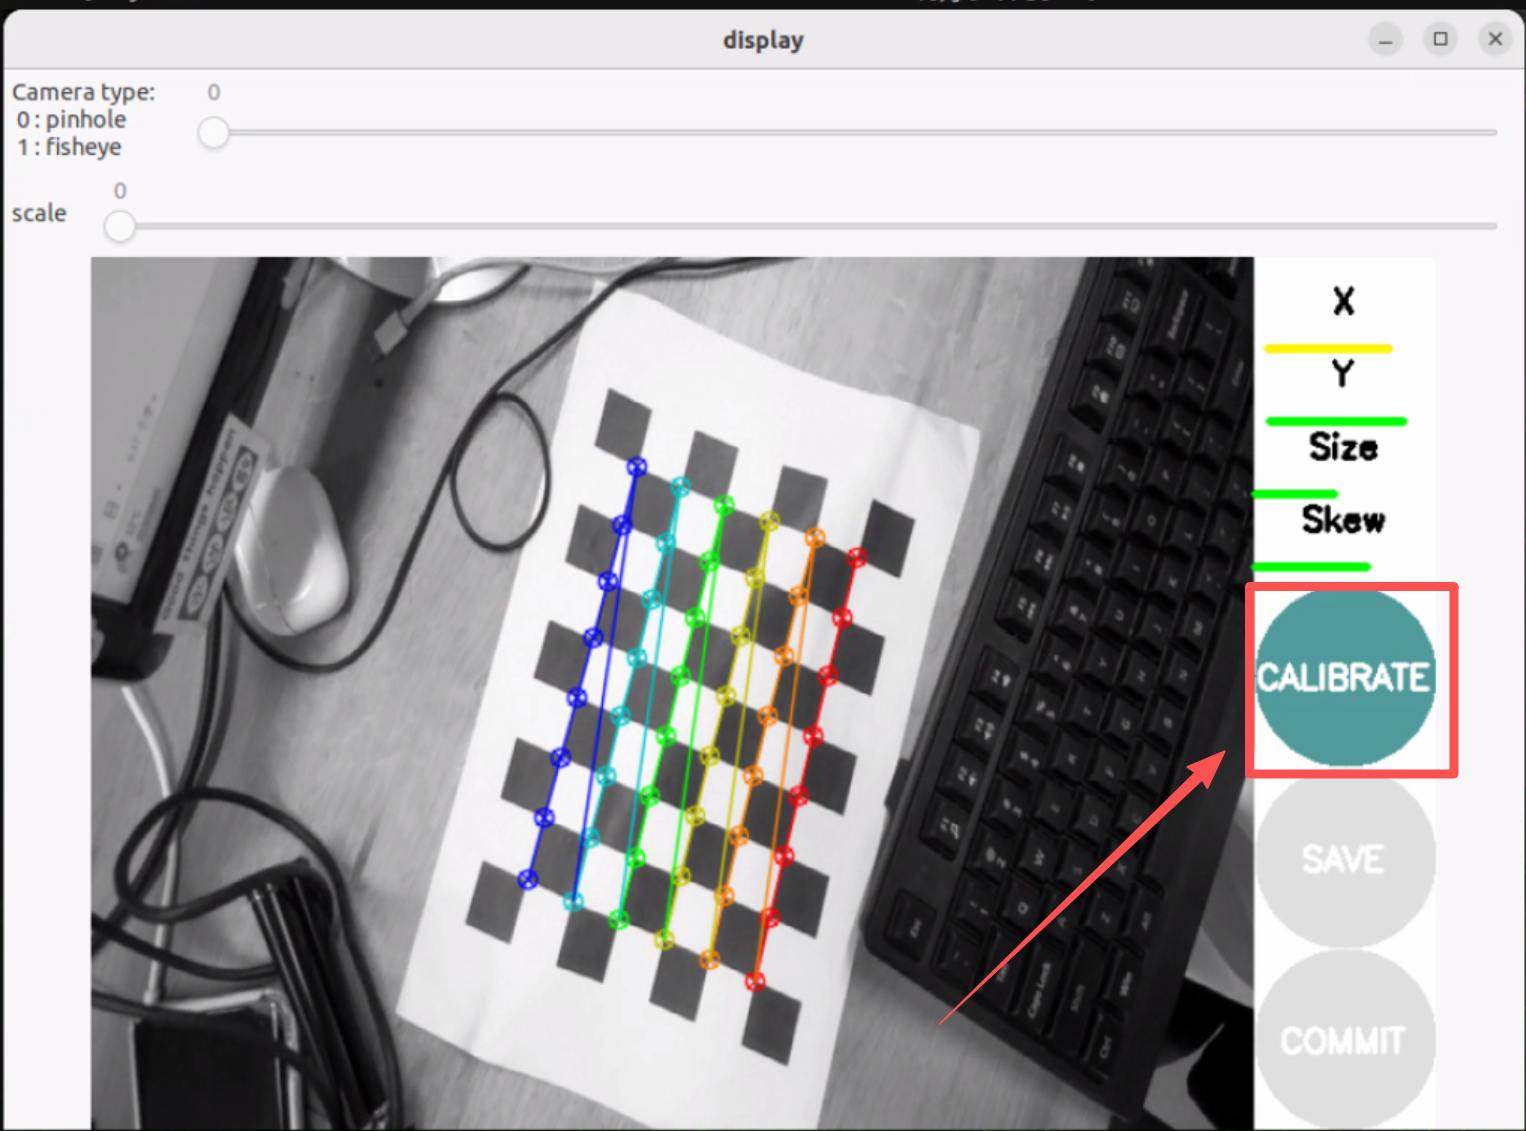
--size 8x6表示棋盘格内角点数量(8×6 = 48 个内角点,对应 9×7 网格)--square 0.025表示每个方格的边长为 0.025 米(25mm)- 移动摄像头,从不同角度采集图像,直到
CALIBRATE按钮高亮
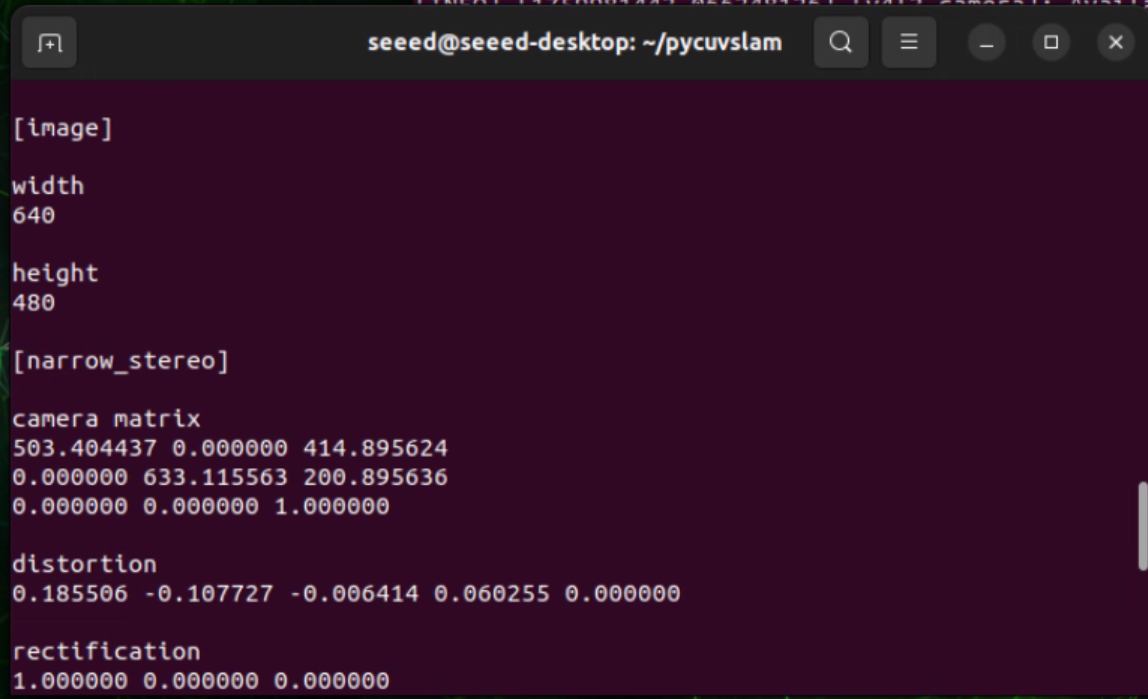
标定成功后,你将在终端中获得类似如下的相机参数:
你可以参考这篇 wiki进行摄像头标定。
将标定得到的参数写入 camera_info_example.yaml 文件。
步骤 3. 启动 USB 摄像头节点
将标定参数保存到 camera_info_example.yaml 文件中,以校正 GMSL 摄像头的鱼眼畸变。然后运行以下命令进行实时深度估计:
#Start the script for camera depth estimation
CAMERA_INFO_FILE=camera_info_example.yaml ENABLE_UNDISTORTION=1 ./run_camera_depth.sh
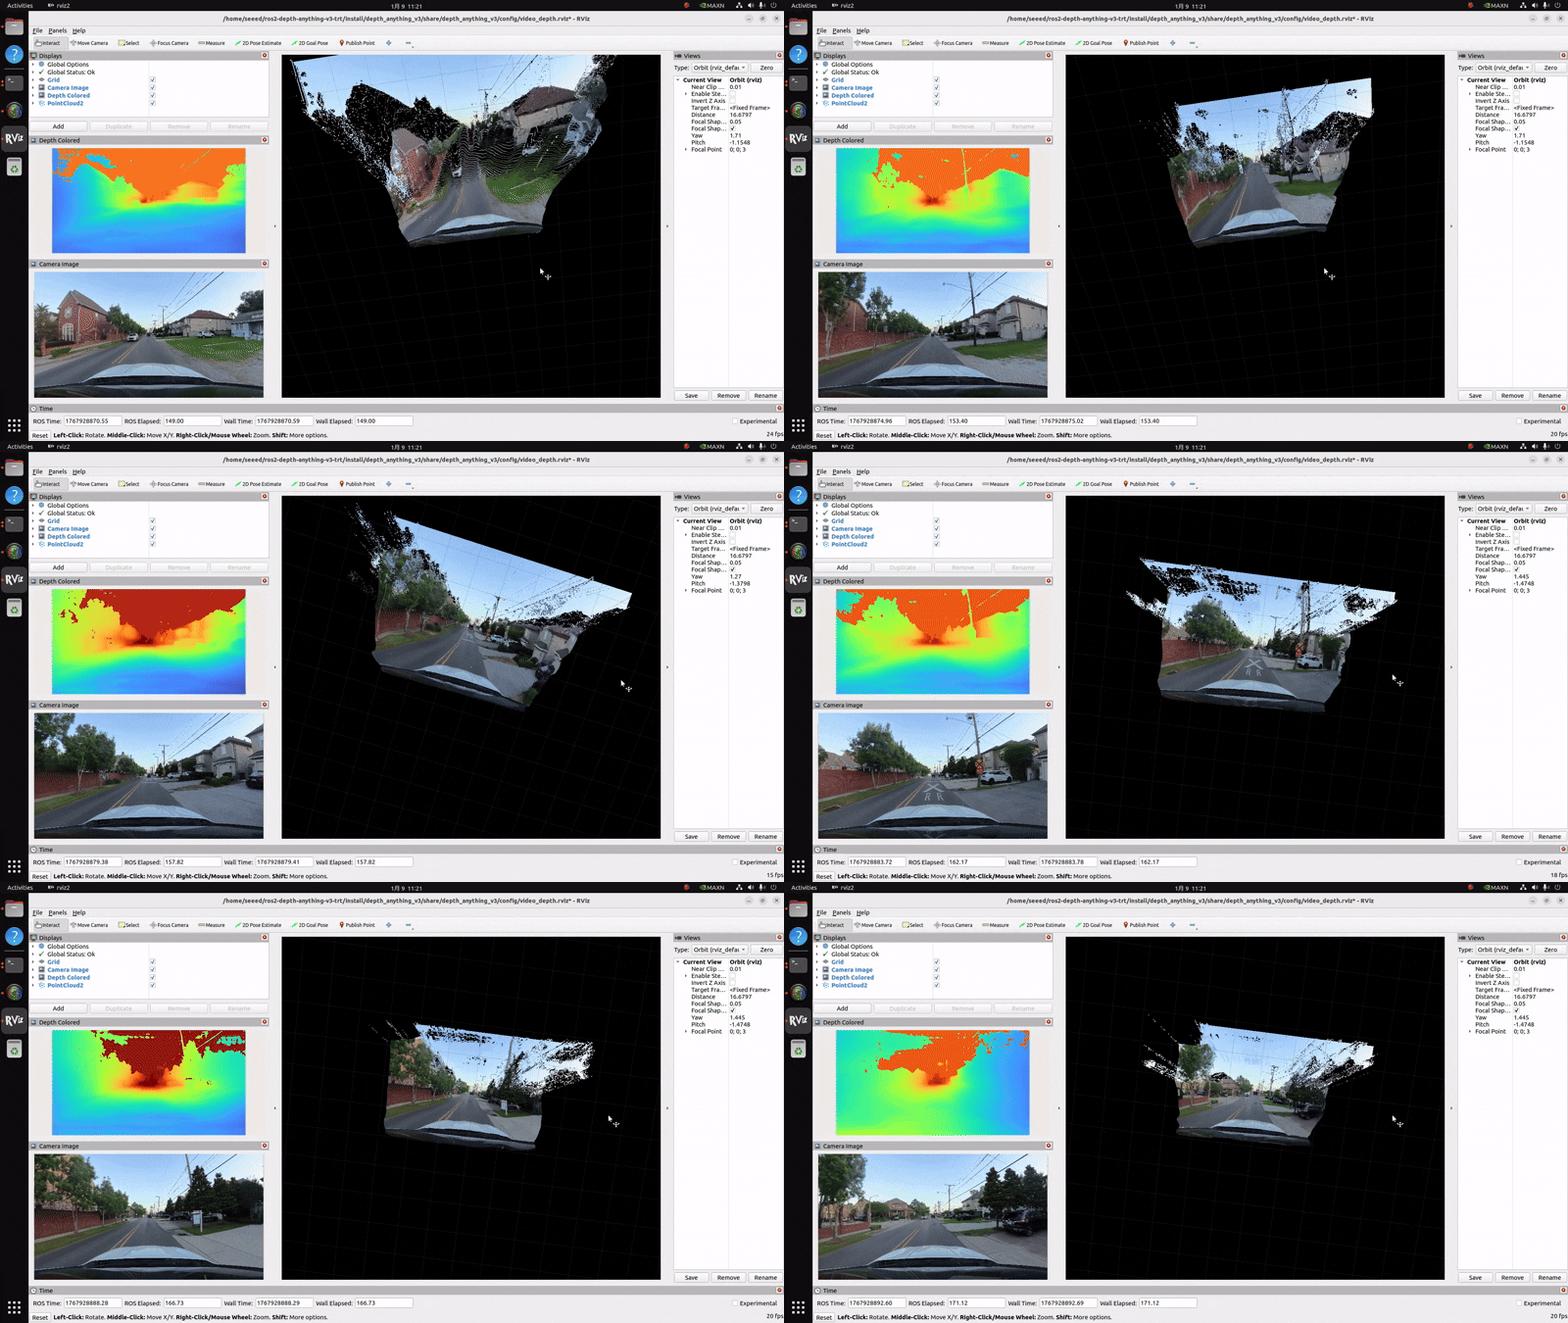
使用视频进行深度估计
步骤 1. 准备视频文件
准备一个用于深度估计的视频文件。
步骤 2. 启动视频深度估计节点
#Start the script for video depth estimation
./run_video_depth.sh
参考资料
常见问题
本教程面向哪个 JetPack 版本? Jetson AGX Orin 上的 JetPack 6.2,搭配 reComputer Mini J501 载板以及 ROS 2 Humble。TensorRT 引擎是在设备上生成的,因此如果 JetPack 版本不同,需要基于 ONNX 模型重新生成引擎。
我需要深度相机或双目相机吗? 不需要。Depth Anything V3 能从单帧 RGB 图像预测深度,因此一颗 USB 摄像头就足够了。由于深度来自外观而不是实际测量信号,在将其输入规划器之前,请先用已知尺寸的物体检查一下绝对尺度。
ONNX 模型应该放在哪里?
将 .onnx 文件放在 ros2-depth-anything-v3-trt/onnx 中,并运行 ./generate_engines.sh onnx。转换完成后,该目录中会出现两个 .engine 文件。
深度图在画面边缘看起来有些扭曲,该改什么?
那是镜头畸变。运行 camera_calibrator,将生成的内参写入 camera_info_example.yaml,然后使用 CAMERA_INFO_FILE=camera_info_example.yaml ENABLE_UNDISTORTION=1 启动。
它可以处理录制好的视频而不是实时相机吗?
可以。./run_video_depth.sh 会在视频文件上运行相同的引擎,这是在把相机安装到机器人上之前检查输出质量的更快方式。
相关资源
- 在 reComputer 上使用 PyCuVSLAM 进行相机标定
- 将 Orbbec 深度相机与 YOLOv11 配对进行距离测量
- 在 Jetson 上实现高效多任务视觉推理引擎
- reComputer Mini J501 产品页面
- ROS 2 Depth Anything V3 TensorRT 仓库
技术支持与产品讨论
感谢您选择我们的产品!我们将为您提供多种支持,确保您在使用我们产品的过程中尽可能顺畅。我们提供多种沟通渠道,以满足不同的偏好和需求。