Edgeimpulse
Edge Impulse
Edge Impulse 是边缘设备机器学习的领先开发平台,对开发者免费,并受到全球企业的信赖。
- 通过 Edge Impulse,软件开发者、工程师和领域专家可以在边缘设备上使用机器学习解决实际问题,无需博士学位或高级嵌入式工程技能。从入门到生产中的 MLOps,Edge Impulse 在从 MCU 到 CPU 的各种硬件上提供最高的效率和速度。
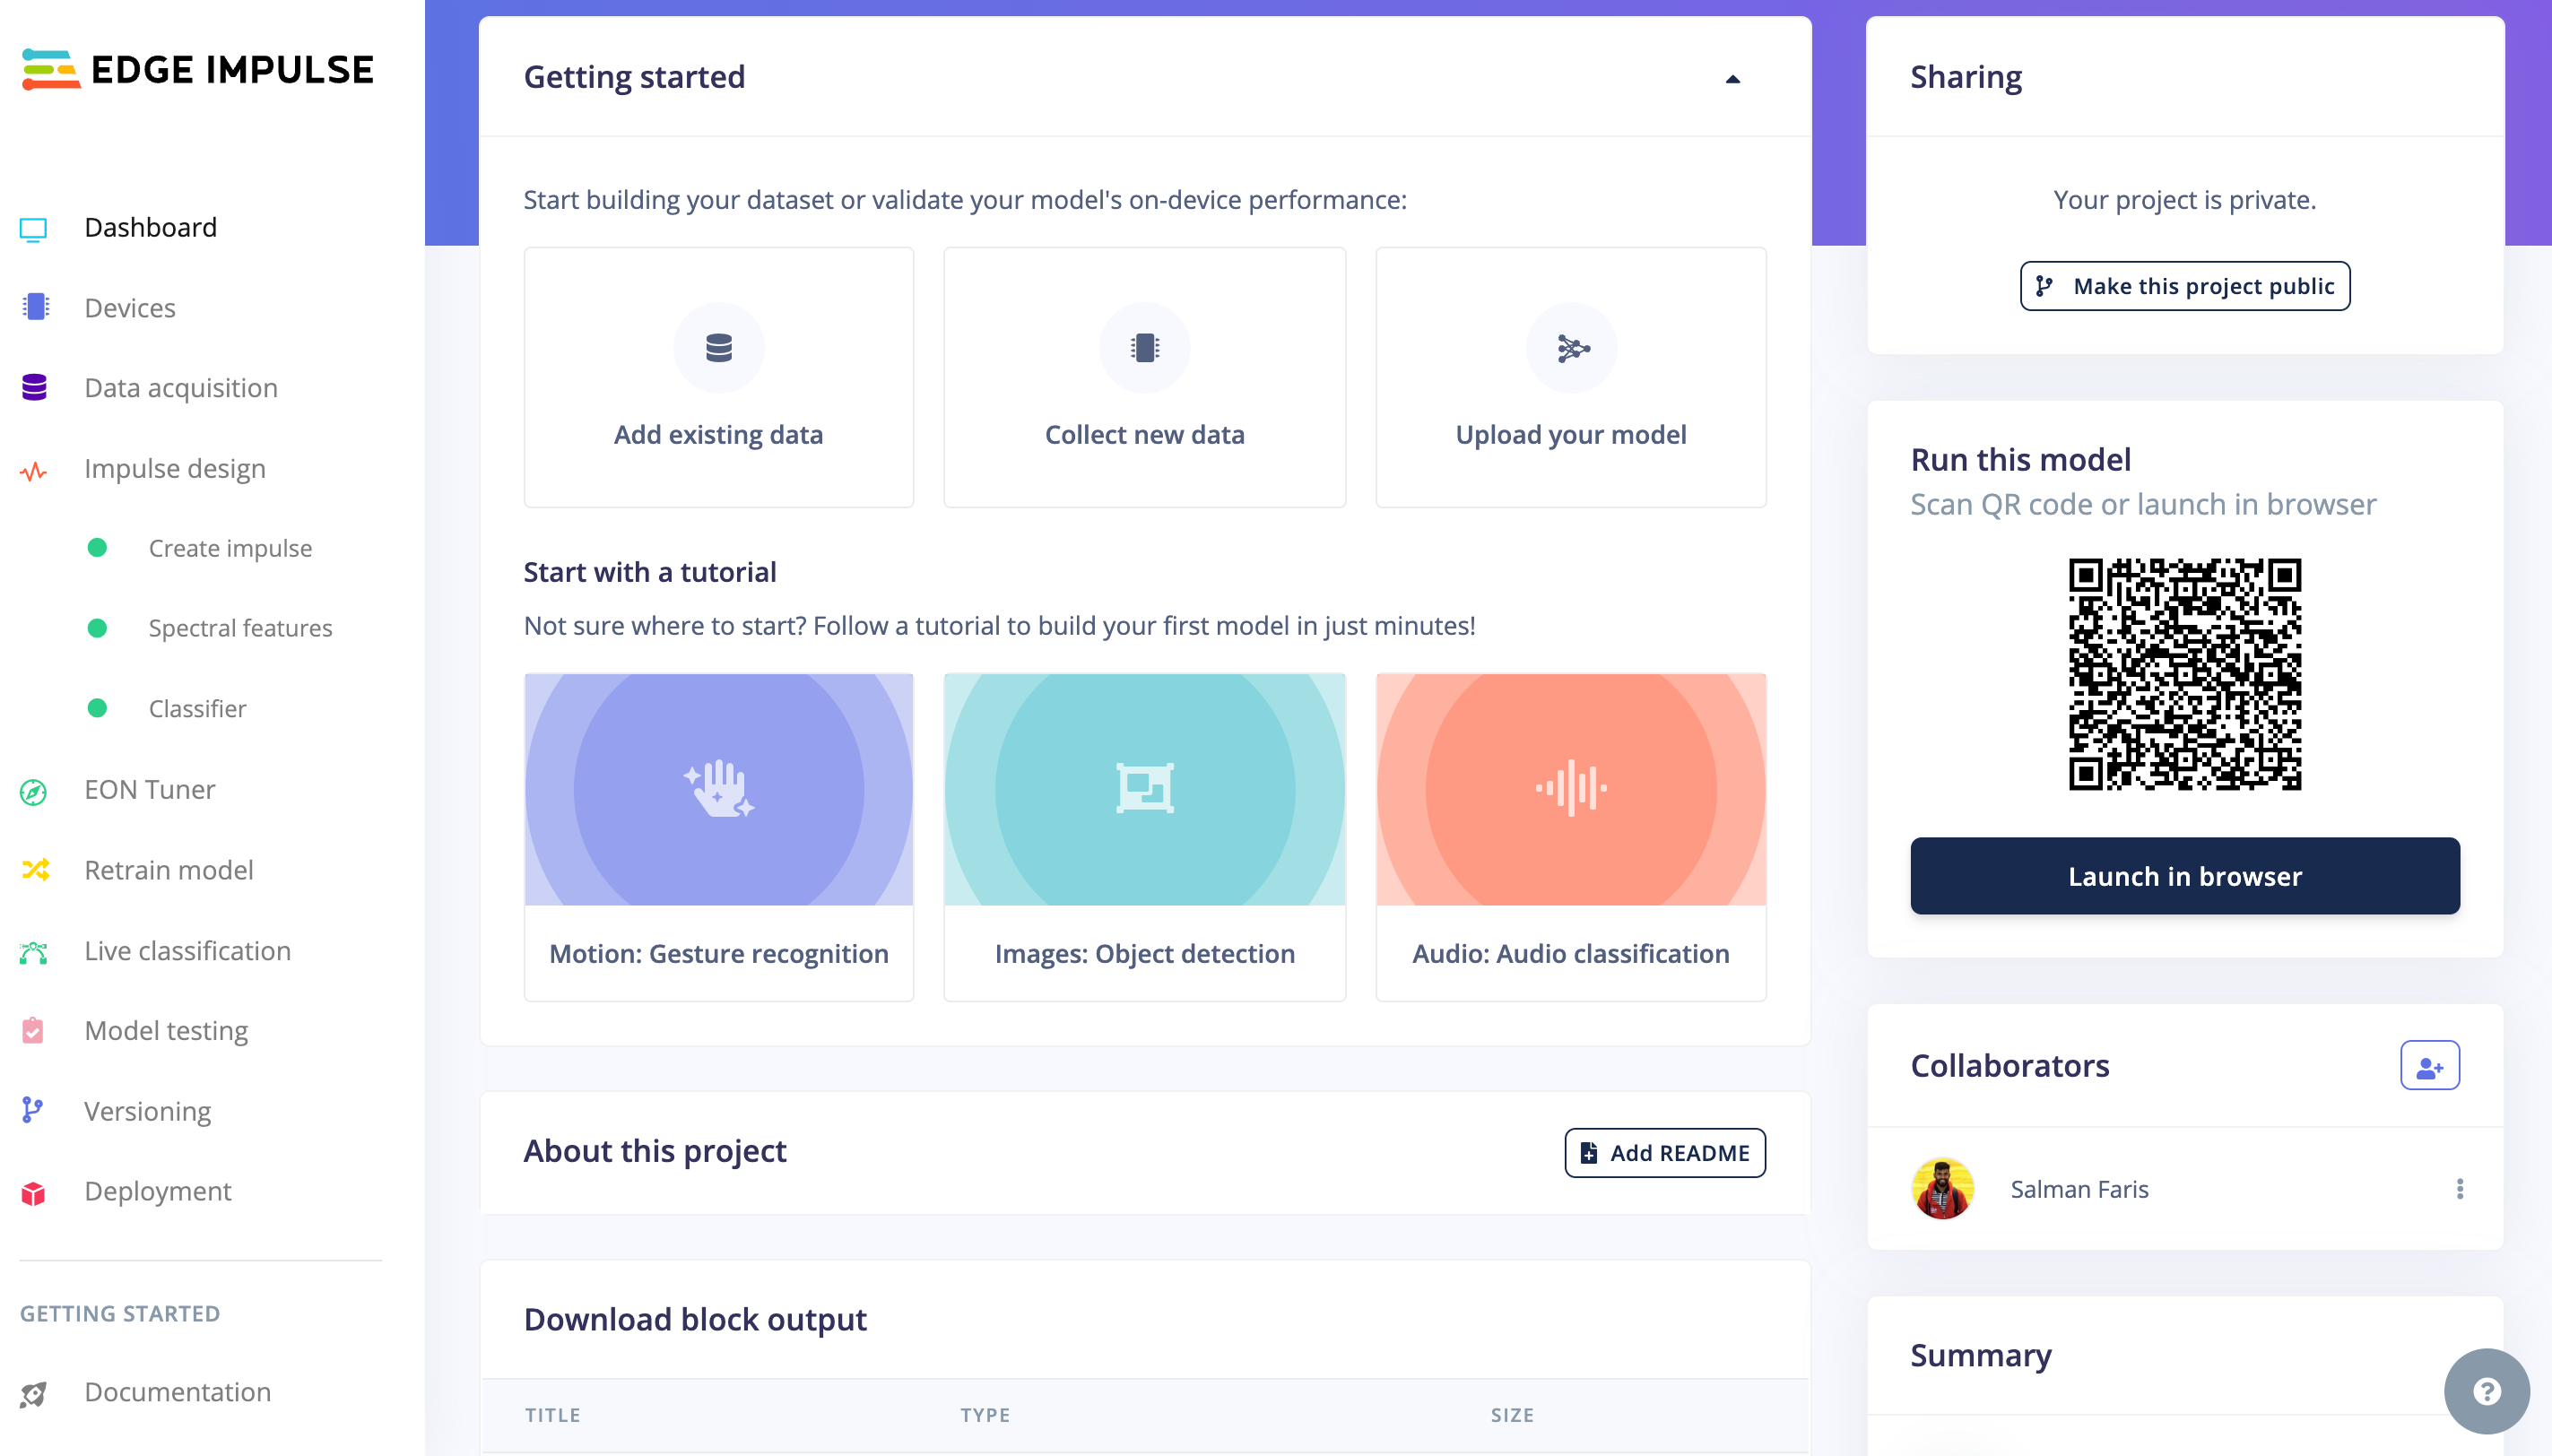
通过 EdgeImpulse 我们可以
- 直接从设备收集数据集
- 从其他来源收集数据集,如 .zip 文件、通过 API 或其他第三方云端摄取
- 创建测试和训练数据并将它们放入不同的标签中
- 训练我们的模型
- 能够选择合适的机器学习算法 - EI 基于我们的数据集提供推荐的机器学习算法
- 将其部署到我们的硬件上
- 具有版本控制的 TinyML 项目协作
- 以及更多帮助您构建 tinyML 应用程序的功能。
快速实践体验
在学习 Edge Impulse 的完整过程之前,我们提供了完整的预生成 Arduino 库,您可以通过直接将这个 Arduino 程序从草图刷写到 XIAO ESP32S3 Sense 来查看结果。
在 Arduino 上设置 XIAO ESPS3 Sense
在开始使用 Edge impulse 库之前,我们需要在 Arduino IDE 上设置 XIAO ESPS3,请查看这里的指南
编译并上传 Blink 示例
// the setup function runs once when you press reset or power the board
void setup() {
  // initialize digital pin LED_BUILTIN as an output.
  pinMode(LED_BUILTIN, OUTPUT);
}

// the loop function runs over and over again forever
void loop() {
  digitalWrite(LED_BUILTIN, HIGH);  // turn the LED on (HIGH is the voltage level)
  delay(1000);                      // wait for a second
  digitalWrite(LED_BUILTIN, LOW);   // turn the LED off by making the voltage LOW
  delay(1000);                      // wait for a second
}
确保在上传前选择正确的开发板和正确的端口。
待办事项
- 在 Arduino IDE 上安装 XIAO ESPS3 开发板
- 在 XIAO ESPS3 上编译并上传 Blink 示例
可用的 Edge Impulse 库
我们也在并行推进,制作一些已经验证并编辑过的 Edge Impulse 导出的 Arduino 库,这些库可以直接与 XIAO ESP32S3 Sense 配合使用。当我们使用这些库时,我们在程序中有更多的控制权,可以做出决策。
如何使用 Edge Impulse Arduino 库
这就像一个通用的 arduino 库,我们需要先在 Arduino IDE 上安装它,然后使用示例代码来运行演示。
语音关键词识别(Yes & No)Arduino 库
演示
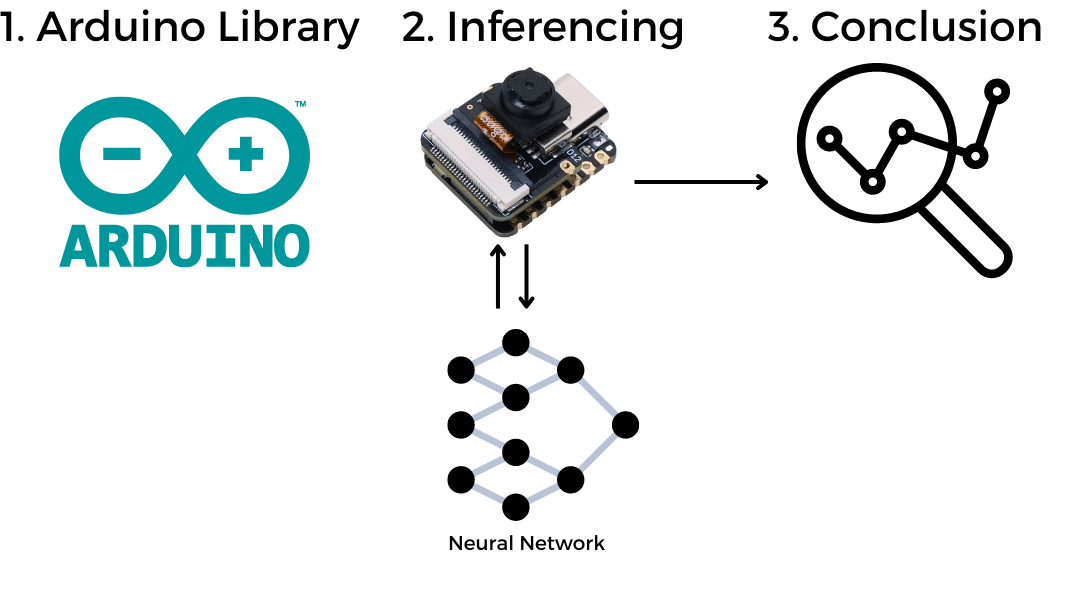
工作原理
/src/img/KWS_Diagram.png)
步骤 1. 下载 KWS 演示库
下载语音关键词识别(Yes & No)Arduino 库库作为 .Zip 文件。
步骤 2. 将 ZIP 库添加到 Arduino IDE
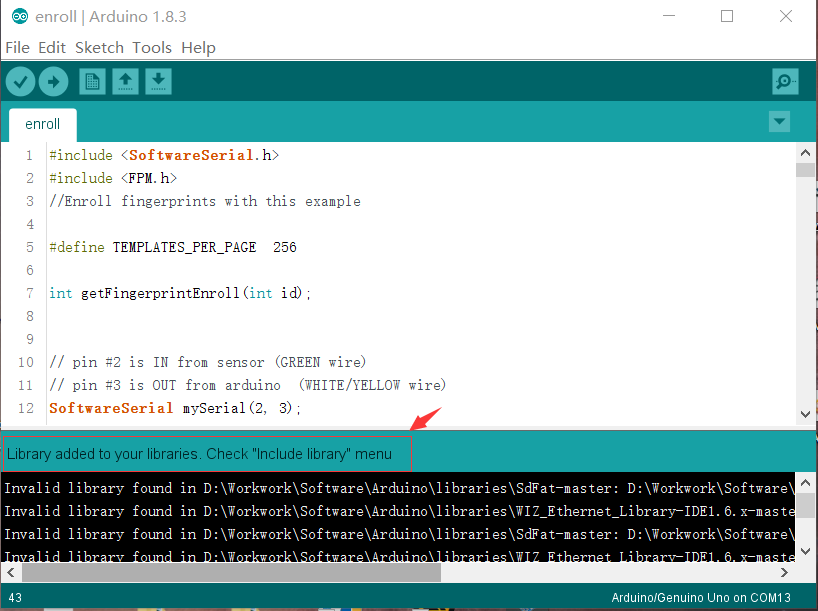
由于您已经下载了 zip 库,打开您的 Arduino IDE,点击 Sketch > Include Library > Add .ZIP Library。

选择您刚刚下载的 zip 文件,如果库安装正确,您将在通知窗口中看到 Library added to your libraries。这意味着库已成功安装。
步骤 3. 运行推理代码
/* Edge Impulse Arduino examples
* Copyright (c) 2022 EdgeImpulse Inc.
*
* Permission is hereby granted, free of charge, to any person obtaining a copy
* of this software and associated documentation files (the "Software"), to deal
* in the Software without restriction, including without limitation the rights
* to use, copy, modify, merge, publish, distribute, sublicense, and/or sell
* copies of the Software, and to permit persons to whom the Software is
* furnished to do so, subject to the following conditions:
*
* The above copyright notice and this permission notice shall be included in
* all copies or substantial portions of the Software.
*
* THE SOFTWARE IS PROVIDED "AS IS", WITHOUT WARRANTY OF ANY KIND, EXPRESS OR
* IMPLIED, INCLUDING BUT NOT LIMITED TO THE WARRANTIES OF MERCHANTABILITY,
* FITNESS FOR A PARTICULAR PURPOSE AND NONINFRINGEMENT. IN NO EVENT SHALL THE
* AUTHORS OR COPYRIGHT HOLDERS BE LIABLE FOR ANY CLAIM, DAMAGES OR OTHER
* LIABILITY, WHETHER IN AN ACTION OF CONTRACT, TORT OR OTHERWISE, ARISING FROM,
* OUT OF OR IN CONNECTION WITH THE SOFTWARE OR THE USE OR OTHER DEALINGS IN THE
* SOFTWARE.
*
* This code was adapted by Marcelo Rovai to run on a XIAO ESP32S3
* 29May23
* Modified by Salman Faris
* 14Aug23
*
*/
// If your target is limited in memory remove this macro to save 10K RAM
#define EIDSP_QUANTIZE_FILTERBANK 0
/*
** NOTE: If you run into TFLite arena allocation issue.
**
** This may be due to may dynamic memory fragmentation.
** Try defining "-DEI_CLASSIFIER_ALLOCATION_STATIC" in boards.local.txt (create
** if it doesn't exist) and copy this file to
** `<ARDUINO_CORE_INSTALL_PATH>/arduino/hardware/<mbed_core>/<core_version>/`.
**
** See
** (https://support.arduino.cc/hc/en-us/articles/360012076960-Where-are-the-installed-cores-located-)
** to find where Arduino installs cores on your machine.
**
** If the problem persists then there's not enough memory for this model and application.
*/
/* Includes ---------------------------------------------------------------- */
#include <XIAO_esp32S3_YesNo_inferencing.h>
#include <I2S.h>
#define SAMPLE_RATE 16000U
#define SAMPLE_BITS 16
/** Audio buffers, pointers and selectors */
typedef struct {
int16_t *buffer;
uint8_t buf_ready;
uint32_t buf_count;
uint32_t n_samples;
} inference_t;
static inference_t inference;
static const uint32_t sample_buffer_size = 2048;
static signed short sampleBuffer[sample_buffer_size];
static bool debug_nn = false; // Set this to true to see e.g. features generated from the raw signal
static bool record_status = true;
/**
* @brief Arduino setup function
*/
void setup() {
// put your setup code here, to run once:
Serial.begin(115200);
pinMode(LED_BUILTIN, OUTPUT);
// comment out the below line to cancel the wait for USB connection (needed for native USB)
while (!Serial)
;
Serial.println("Edge Impulse Inferencing Demo");
I2S.setAllPins(-1, 42, 41, -1, -1);
if (!I2S.begin(PDM_MONO_MODE, SAMPLE_RATE, SAMPLE_BITS)) {
Serial.println("Failed to initialize I2S!");
while (1)
;
}
// summary of inferencing settings (from model_metadata.h)
ei_printf("Inferencing settings:\n");
ei_printf("\tInterval: ");
ei_printf_float((float)EI_CLASSIFIER_INTERVAL_MS);
ei_printf(" ms.\n");
ei_printf("\tFrame size: %d\n", EI_CLASSIFIER_DSP_INPUT_FRAME_SIZE);
ei_printf("\tSample length: %d ms.\n", EI_CLASSIFIER_RAW_SAMPLE_COUNT / 16);
ei_printf("\tNo. of classes: %d\n", sizeof(ei_classifier_inferencing_categories) / sizeof(ei_classifier_inferencing_categories[0]));
ei_printf("\nStarting continious inference in 2 seconds...\n");
ei_sleep(2000);
if (microphone_inference_start(EI_CLASSIFIER_RAW_SAMPLE_COUNT) == false) {
ei_printf("ERR: Could not allocate audio buffer (size %d), this could be due to the window length of your model\r\n", EI_CLASSIFIER_RAW_SAMPLE_COUNT);
return;
}
ei_printf("Recording...\n");
}
/**
* @brief Arduino main function. Runs the inferencing loop.
*/
void loop() {
bool m = microphone_inference_record();
if (!m) {
ei_printf("ERR: Failed to record audio...\n");
return;
}
signal_t signal;
signal.total_length = EI_CLASSIFIER_RAW_SAMPLE_COUNT;
signal.get_data = µphone_audio_signal_get_data;
ei_impulse_result_t result = { 0 };
EI_IMPULSE_ERROR r = run_classifier(&signal, &result, debug_nn);
if (r != EI_IMPULSE_OK) {
ei_printf("ERR: Failed to run classifier (%d)\n", r);
return;
}
int pred_index = 0; // Initialize pred_index
float pred_value = 0; // Initialize pred_value
 // print the predictions
  ei_printf("Predictions ");
  ei_printf("(DSP: %d ms., Classification: %d ms., Anomaly: %d ms.)",
            result.timing.dsp, result.timing.classification, result.timing.anomaly);
  ei_printf(": \n");
  for (size_t ix = 0; ix < EI_CLASSIFIER_LABEL_COUNT; ix++) {
    ei_printf("    %s: ", result.classification[ix].label);
    ei_printf_float(result.classification[ix].value);
    ei_printf("\n");

    if (result.classification[ix].value > pred_value) {
      pred_index = ix;
      pred_value = result.classification[ix].value;
    }
  }

    // Display inference result
    if ((pred_index == 0 && (pred_value > 0.8))) {
      digitalWrite(LED_BUILTIN, HIGH);  //Turn on
    } else if ((pred_index == 2) && (pred_value > 0.8)) {
      digitalWrite(LED_BUILTIN, LOW);  //Turn off
    } else {
      //nothing to do.
    }
#if EI_CLASSIFIER_HAS_ANOMALY == 1
ei_printf(" anomaly score: ");
ei_printf_float(result.anomaly);
ei_printf("\n");
#endif
}
static void audio_inference_callback(uint32_t n_bytes) {
for (int i = 0; i < n_bytes >> 1; i++) {
inference.buffer[inference.buf_count++] = sampleBuffer[i];
if (inference.buf_count >= inference.n_samples) {
inference.buf_count = 0;
inference.buf_ready = 1;
}
}
}
static void capture_samples(void *arg) {
const int32_t i2s_bytes_to_read = (uint32_t)arg;
size_t bytes_read = i2s_bytes_to_read;
while (record_status) {
/* read data at once from i2s */
esp_i2s::i2s_read(esp_i2s::I2S_NUM_0, (void *)sampleBuffer, i2s_bytes_to_read, &bytes_read, 100);
if (bytes_read <= 0) {
ei_printf("Error in I2S read : %d", bytes_read);
} else {
if (bytes_read < i2s_bytes_to_read) {
ei_printf("Partial I2S read");
}
// scale the data (otherwise the sound is too quiet)
for (int x = 0; x < i2s_bytes_to_read / 2; x++) {
sampleBuffer[x] = (int16_t)(sampleBuffer[x]) * 8;
}
if (record_status) {
audio_inference_callback(i2s_bytes_to_read);
} else {
break;
}
}
}
vTaskDelete(NULL);
}
/**
* @brief Init inferencing struct and setup/start PDM
*
* @param[in] n_samples The n samples
*
* @return { description_of_the_return_value }
*/
static bool microphone_inference_start(uint32_t n_samples) {
inference.buffer = (int16_t *)malloc(n_samples * sizeof(int16_t));
if (inference.buffer == NULL) {
return false;
}
inference.buf_count = 0;
inference.n_samples = n_samples;
inference.buf_ready = 0;
// if (i2s_init(EI_CLASSIFIER_FREQUENCY)) {
// ei_printf("Failed to start I2S!");
// }
ei_sleep(100);
record_status = true;
xTaskCreate(capture_samples, "CaptureSamples", 1024 * 32, (void *)sample_buffer_size, 10, NULL);
return true;
}
/**
* @brief Wait on new data
*
* @return True when finished
*/
static bool microphone_inference_record(void) {
bool ret = true;
while (inference.buf_ready == 0) {
delay(10);
}
inference.buf_ready = 0;
return ret;
}
/**
* Get raw audio signal data
*/
static int microphone_audio_signal_get_data(size_t offset, size_t length, float *out_ptr) {
numpy::int16_to_float(&inference.buffer[offset], out_ptr, length);
return 0;
}
/**
* @brief Stop PDM and release buffers
*/
static void microphone_inference_end(void) {
free(sampleBuffer);
ei_free(inference.buffer);
}
#if !defined(EI_CLASSIFIER_SENSOR) || EI_CLASSIFIER_SENSOR != EI_CLASSIFIER_SENSOR_MICROPHONE
#error "Invalid model for current sensor."
#endif
复制上述代码或从这里下载,然后将代码上传到XIAO。
// print the predictions
ei_printf("Predictions ");
ei_printf("(DSP: %d ms., Classification: %d ms., Anomaly: %d ms.)",
result.timing.dsp, result.timing.classification, result.timing.anomaly);
ei_printf(": \n");
for (size_t ix = 0; ix < EI_CLASSIFIER_LABEL_COUNT; ix++) {
ei_printf(" %s: ", result.classification[ix].label);
ei_printf_float(result.classification[ix].value);
ei_printf("\n");
if (result.classification[ix].value > pred_value) {
pred_index = ix;
pred_value = result.classification[ix].value;
}
}
// Display inference result
if ((pred_index == 0 && (pred_value > 0.8))) {
digitalWrite(LED_BUILTIN, HIGH); //Turn on
} else if ((pred_index == 2) && (pred_value > 0.8)) {
digitalWrite(LED_BUILTIN, LOW); //Turn off
} else {
//nothing to do.
}
在上面的代码中,我们可以看到在哪里做出了打开 LED 和关闭 LED 的决定。我们也可以在这里放置其他逻辑,让 KWS 来控制我们的项目。
水果识别(苹果、香蕉、葡萄)Arduino 库
步骤 1. 下载水果识别库
下载水果识别(苹果、香蕉、葡萄)Arduino 库库文件(.Zip 格式)。
步骤 2. 将 ZIP 库添加到 Arduino IDE
由于您已经下载了 zip 库文件,请打开您的 Arduino IDE,点击 Sketch > Include Library > Add .ZIP Library。
选择您刚刚下载的 zip 文件,如果库安装正确,您将在通知窗口中看到"Library added to your libraries"。这意味着库已成功安装。
步骤 3. 运行示例代码
您可以在 Files -> Examples -> xiao-esp323-fruits-classify_inferencing -> XIAO-ESP32S3-Sense 下找到示例代码
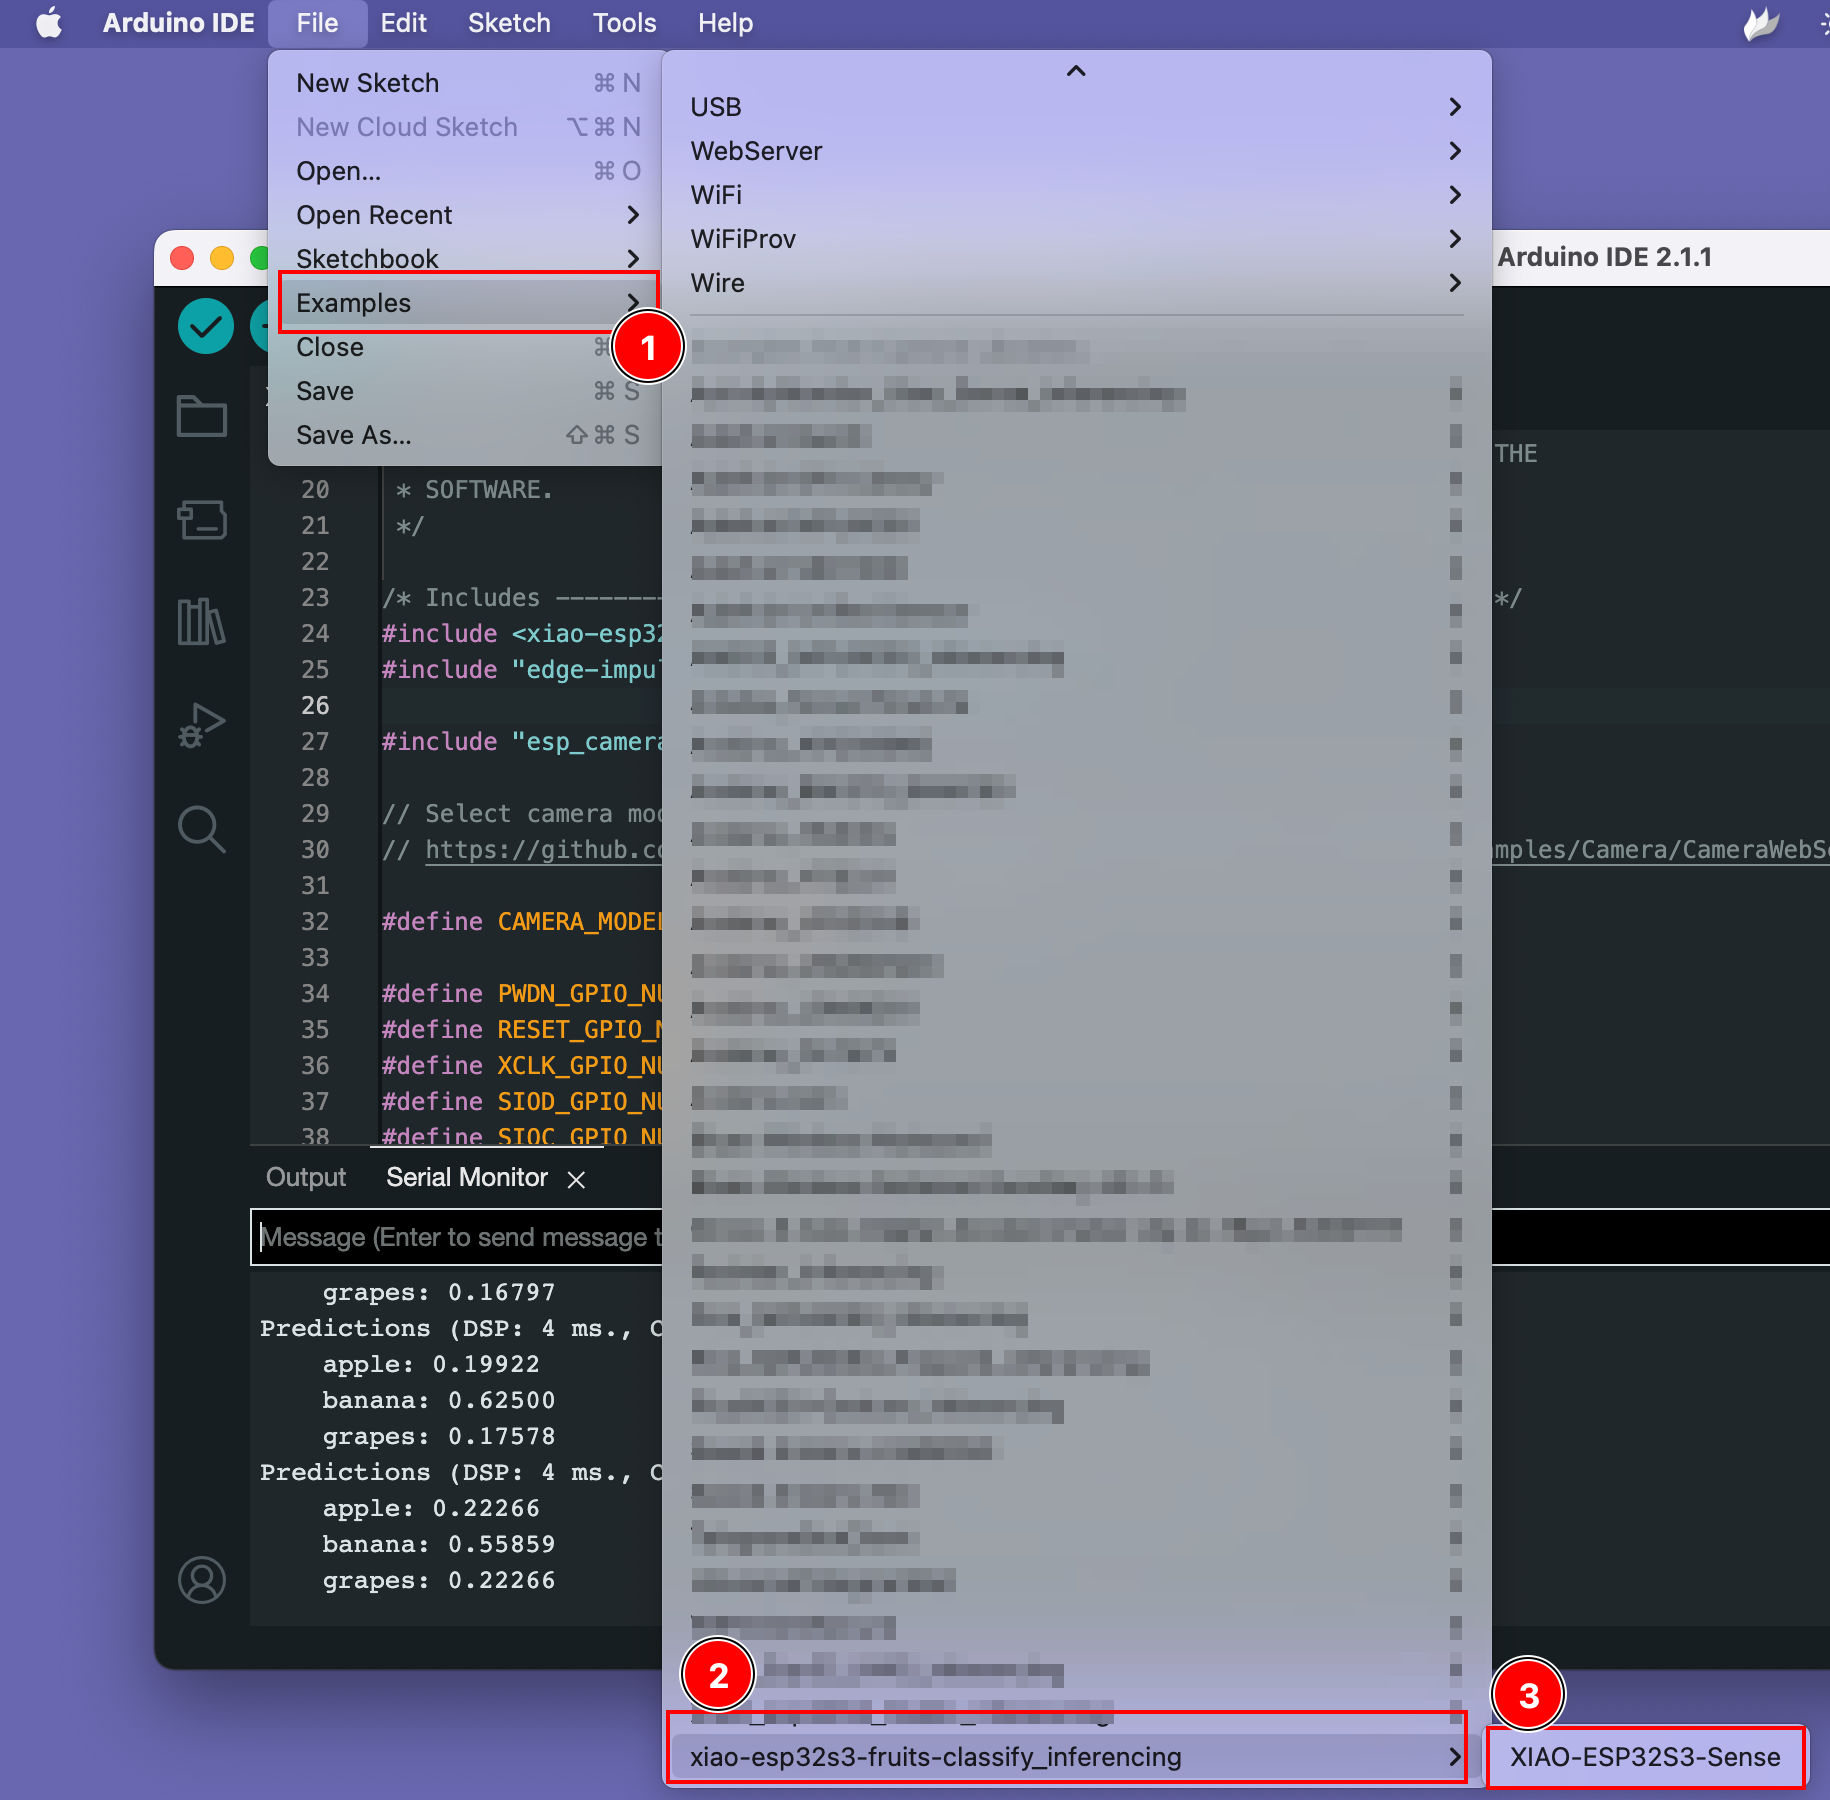
试用演示
从这里打开数据集示例页面并打开水果图像,然后将 XIAO ESP32S3 摄像头对准水果图像,在屏幕上查看结果。
待办事项
- 在 Arduino 上安装 XIAO ESPS3
- 编译和上传
- 安装 KWS Arduino 库并运行示例。
- 安装图像识别库并运行示例。
资源
- [GITHUB] SenseCraft模型助手模型
- [GITHUB] 项目Github
- [EDGE-IMPULSE] edge impulse KWS演示
- [EDGE-IMPULSE] edge impulse水果分类演示