Grove - ADC for Load Cell (HX711)
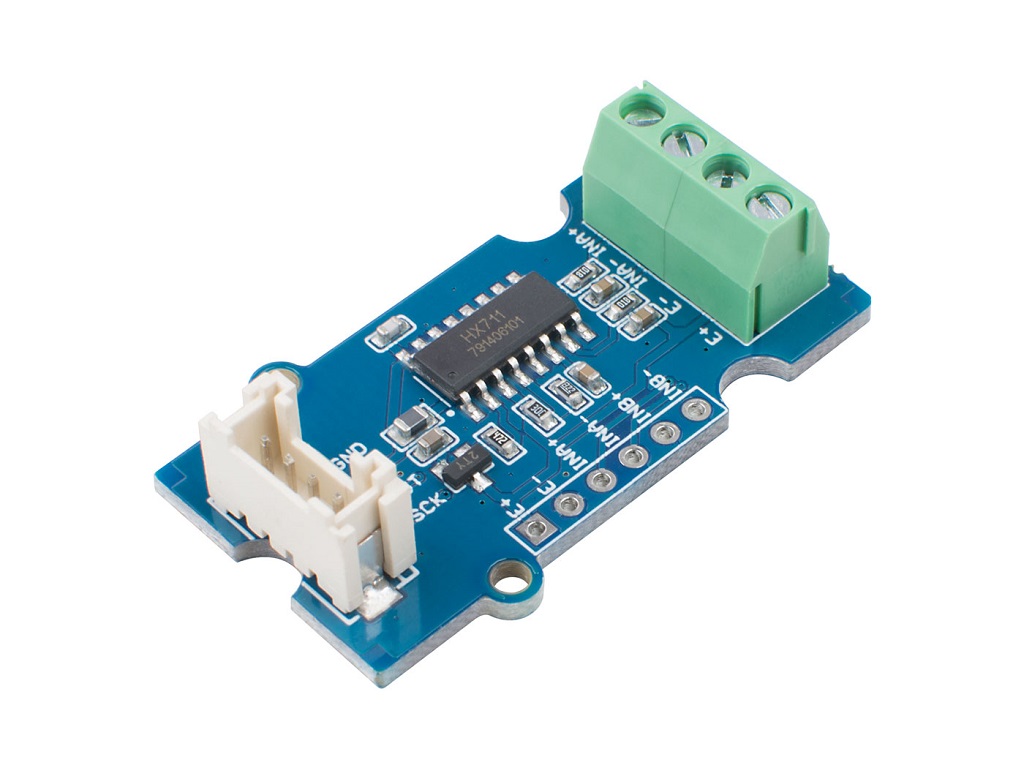
Grove - ADC for Load Cell (HX711) 是一个专为称重传感器设计的 24 位 A/D 转换器。它包含一个片上低噪声可编程放大器,可选增益为 32、64 和 128。HX711 芯片集成了稳压电源、片上时钟振荡器和其他外围电路,具有高集成度、快速响应和强抗干扰能力的优点。
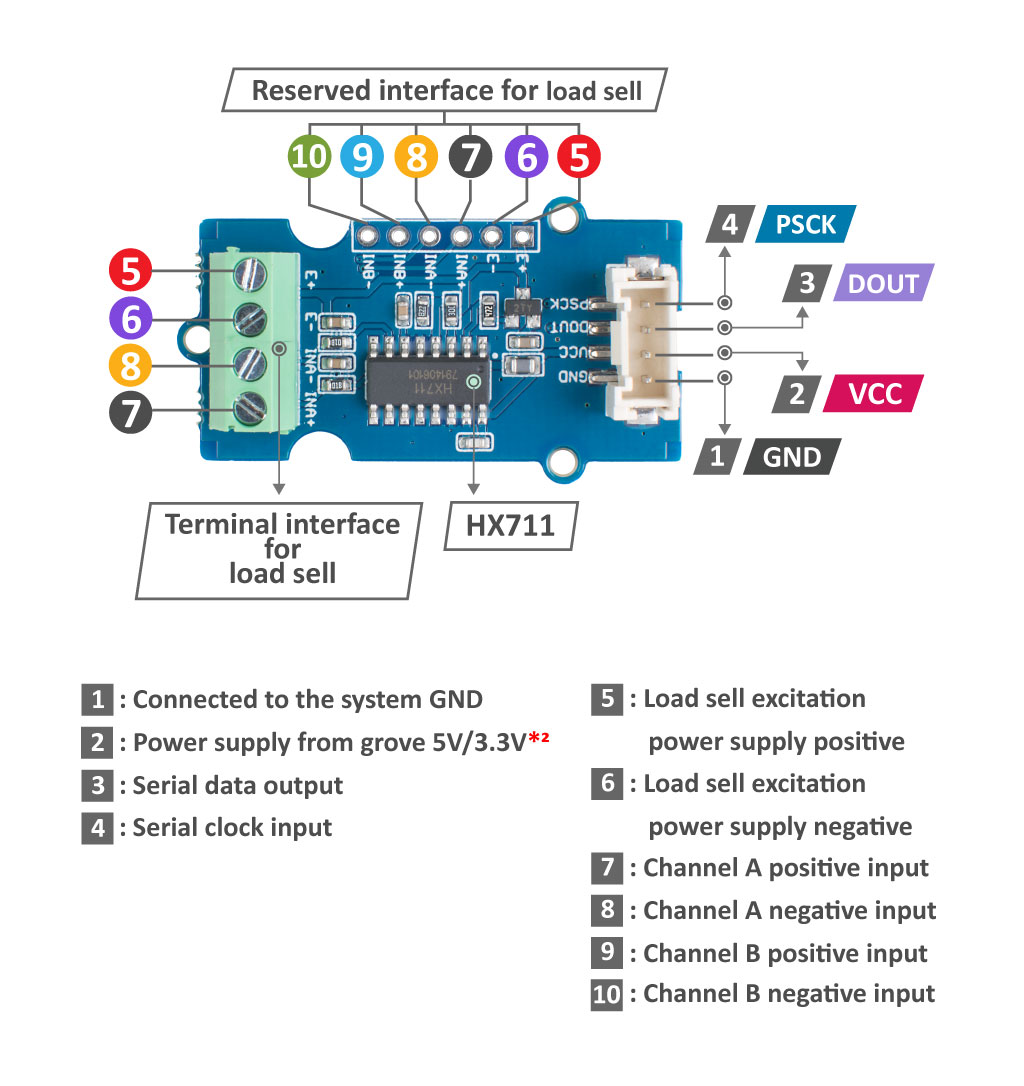
通过 Grove 连接器和 4 针螺丝端子,连接称重传感器和微控制器变得非常简单,无需焊接。您只需几个简单步骤就可以构建自己的 Arduino 称重传感器系统。
规格参数
| 项目 | 数值 |
|---|---|
| 电池 | 不包含 |
| 工作电压 | 2.6V--5.5V |
| 工作电流 | 小于 1.5A |
| 检测精度 | 24 位 |
| 输出数据速率 | 10SPS 或 80SPS |
| 可选增益 | 通道 B 为 32 / 通道 A 为 64 和 128 |
应用场景
- 电子秤
- 计价秤
- 电子台秤
- 数字秤
- 邮包秤
硬件概述
支持的平台
| Arduino | Raspberry Pi | |||
|---|---|---|---|---|
上述提到的支持平台表示该模块的软件或理论兼容性。在大多数情况下,我们只为 Arduino 平台提供软件库或代码示例。无法为所有可能的 MCU 平台提供软件库/演示代码。因此,用户必须编写自己的软件库。
开始使用
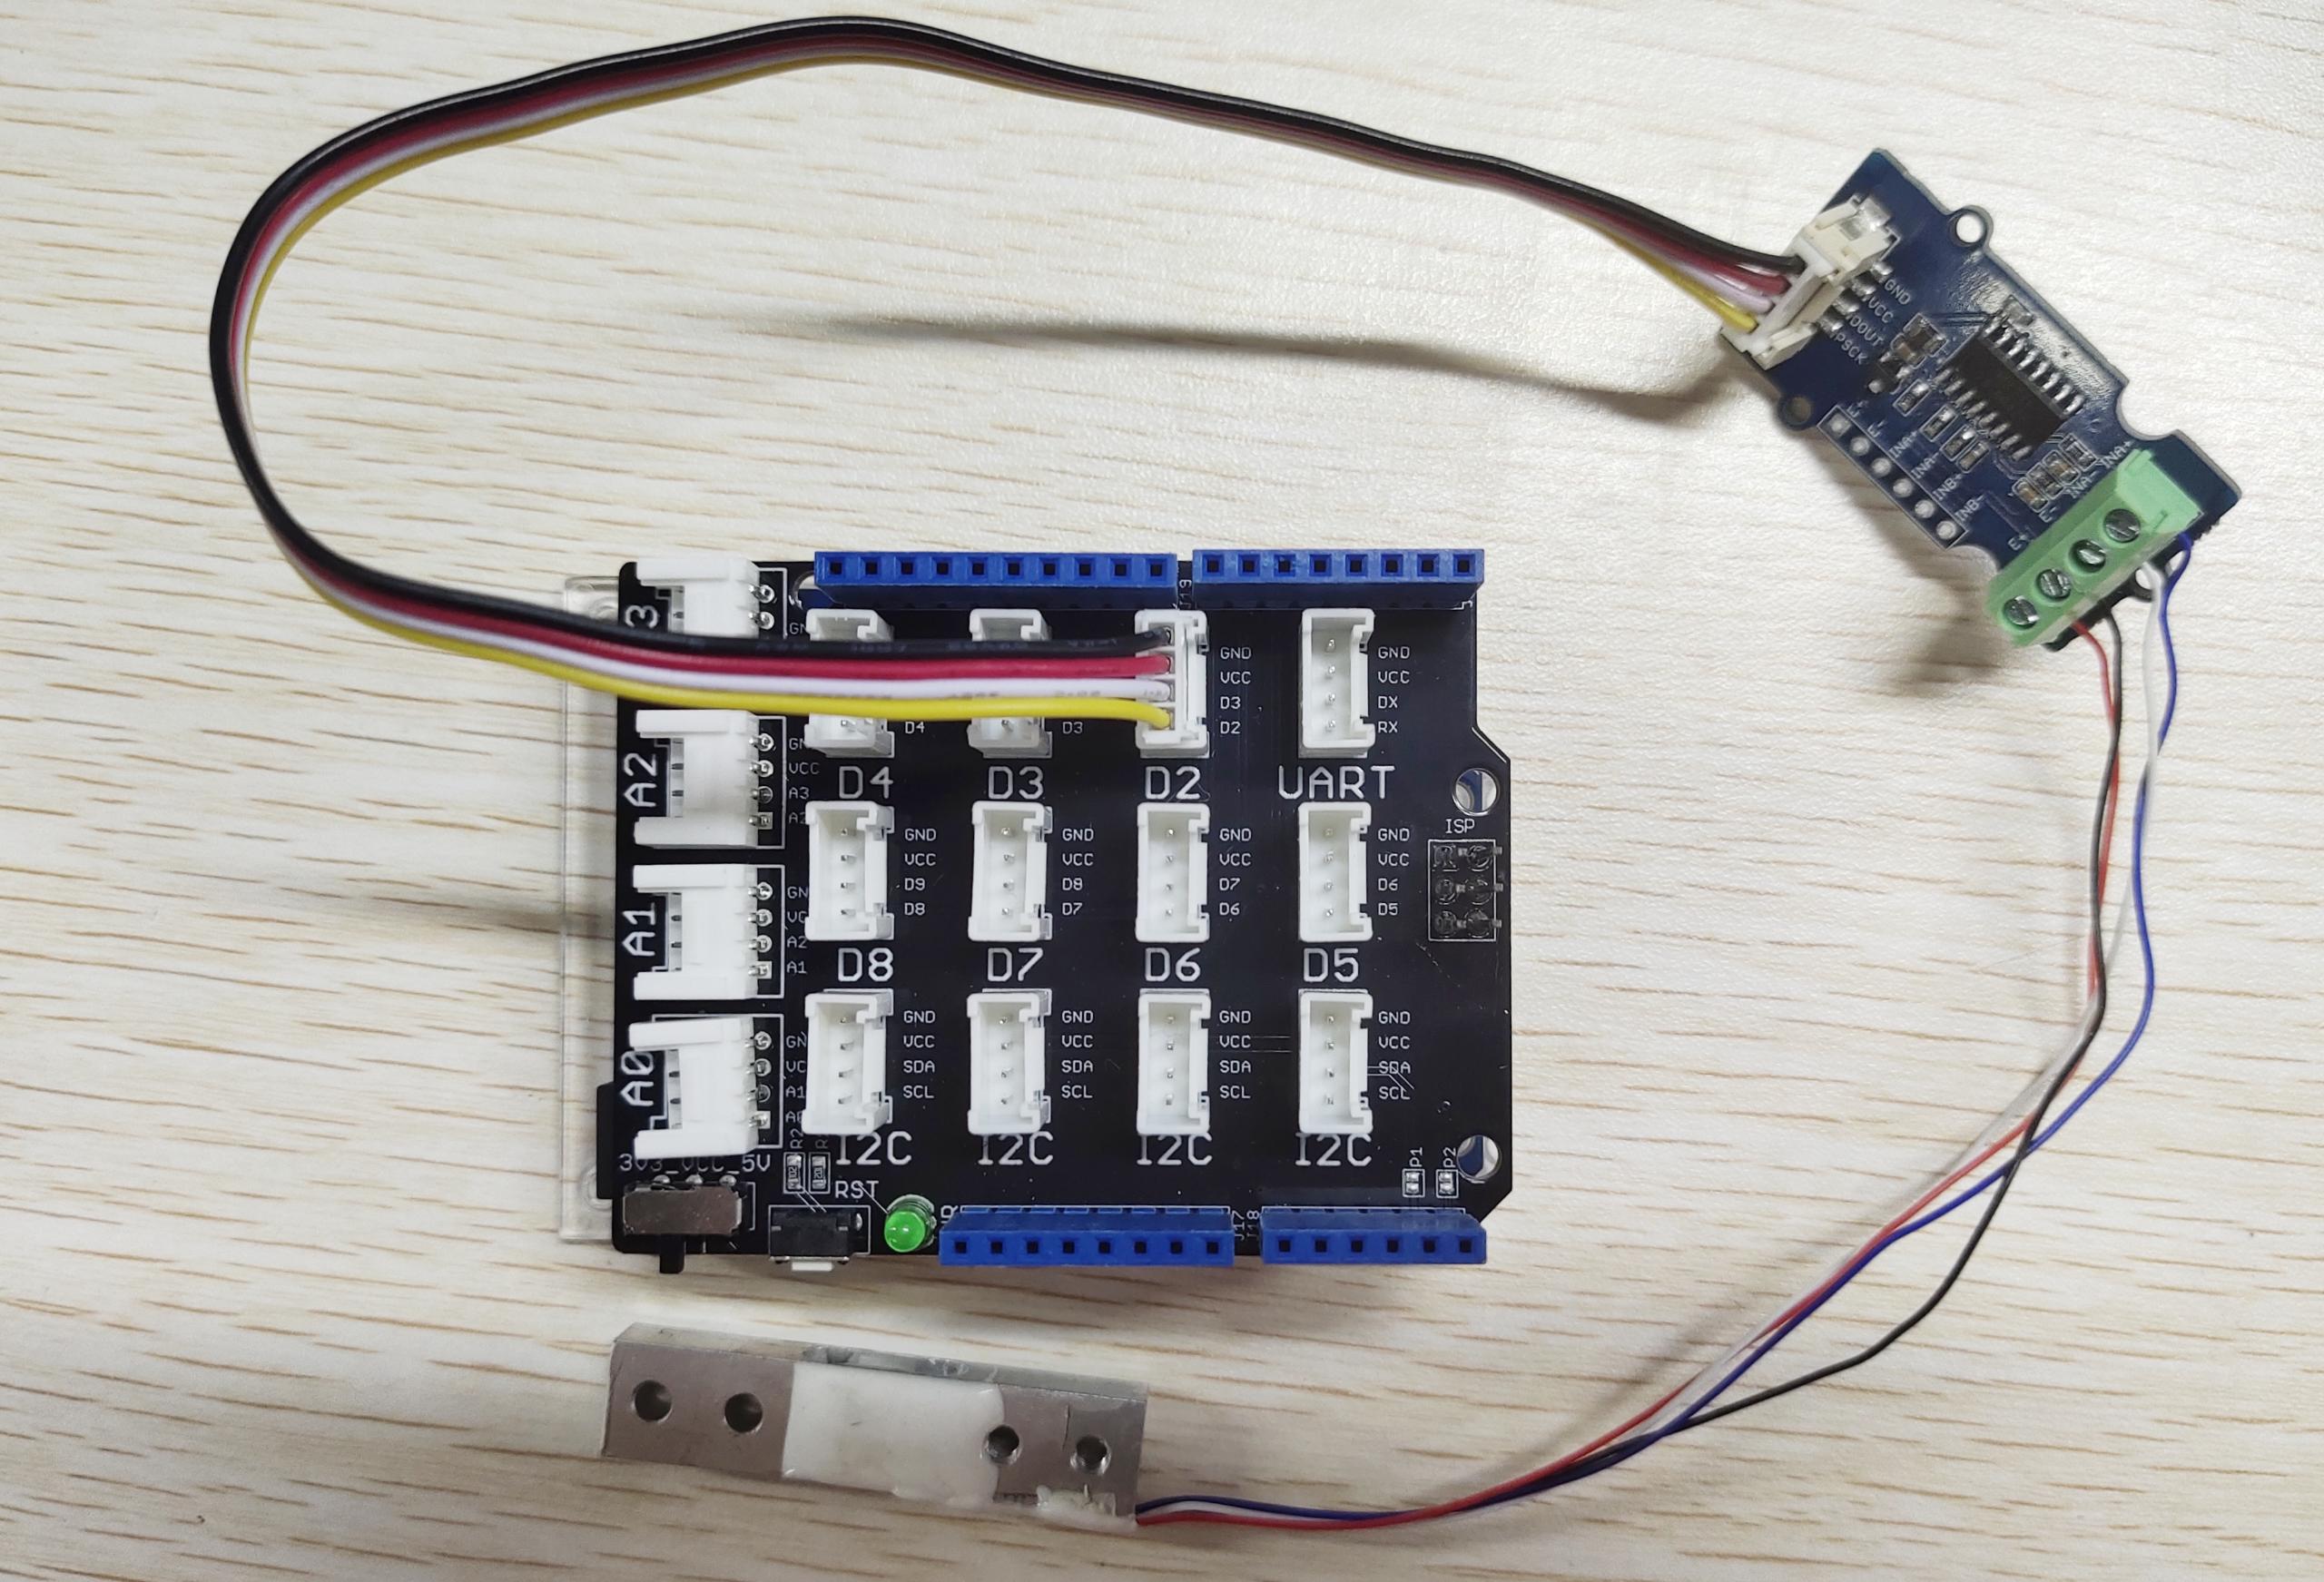
在这一部分,我们将使用 Arduino UNO R4 WiFi 作为控制器,展示如何使用 Grove - ADC for Load Cell (HX711) 和 Weight Sensor (Load Cell) 0-500g 制作一个重量测量模块。
硬件准备
步骤 1. 材料准备
| Arduino UNO R4 WIFi | Grove - ADC for Load Cell (HX711) | Weight Sensor (Load Cell) 0-500g |
|---|---|---|
 | |  |
- 重量传感器在负载小于150g时输出0V,它不能直接测量负载。因此建议使用200g的负载来避免测量盲区。将200g重量的模拟数据读取为无负载(0g),将700g重量的模拟数据读取为满负载(500g)。
- ADC for Load Cell (HX711) 默认使用通道A,如果您想使用其他通道,需要您自己焊接。
Grove - ADC for Load Cell (HX711) 也适用于我们的XIAO开发板。
| Seeed Studio XIAO SAMD21 | Seeed Studio XIAO RP2040 | Seeed Studio XIAO nRF52840 (Sense) | Seeed Studio XIAO ESP32C3 | Seeed Studio XIAO ESP32S3 (Sense) |
|---|---|---|---|---|
 |  |  |  |  |
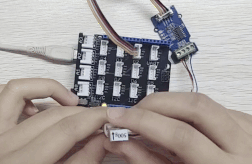
步骤 2. 硬件连接
将Grove手势传感器连接到Arduino UNO R4 WiFi的IIC端口,通过USB线将Arduino连接到PC,Grove - ADC for Load Cell (HX711)和Weight Sensor (Load Cell) 0-500g之间的连接如下所示:
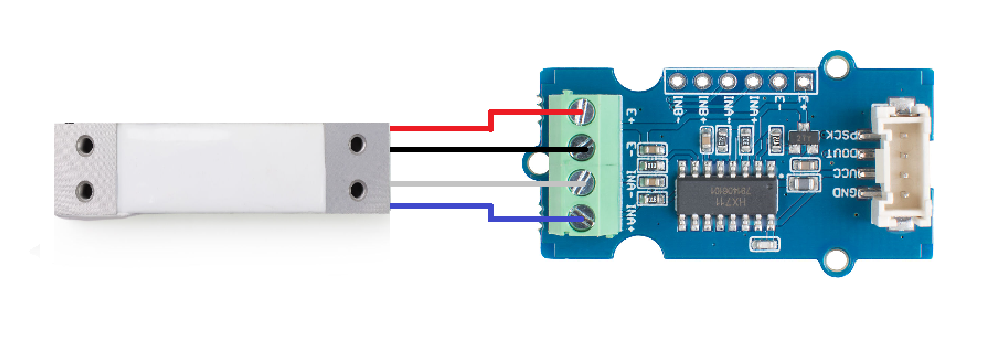
| Grove - ADC for Load Cell (HX711) | Weight Sensor (Load Cell) 0-500 |
|---|---|
| E+ | 红色 |
| E- | 黑色 |
| INA- | 白色 |
| INA+ | 绿色/蓝色 |
使用Grove Base Shield,您可以直接将HX711模块连接到Arduino UNO R4 WiFi,如下所示。
软件准备
推荐的编程工具是 Arduino IDE,您需要为 XIAO 配置 Arduino 环境并添加板载包。
如果这是您第一次使用 Arduino,我们强烈建议您参考 Arduino 入门指南。
步骤 1. 启动 Arduino 应用程序。
步骤 2. 选择您的开发板型号并将其添加到 Arduino IDE 中。
-
如果您想在后续教程中使用 Seeed Studio XIAO SAMD21,请参考 此教程 完成添加。
-
如果您想在后续教程中使用 Seeed Studio XIAO RP2040,请参考 此教程 完成添加。
-
如果您想在后续教程中使用 Seeed Studio XIAO nRF52840,请参考 此教程 完成添加。
-
如果您想在后续教程中使用 Seeed Studio XIAO ESP32C3,请参考 此教程 完成添加。
-
如果您想在后续教程中使用 Seeed Studio XIAO ESP32S3,请参考 此教程 完成添加。
-
如果您想在后续教程中使用 Seeeduino V4.3,请参考 此教程 完成添加。
-
如果您想在后续教程中使用 Arduino UNO R4 WiFi,请点击 工具-> 开发板-> 开发板管理器...,在搜索框中输入关键词 "UNO R4 WiFi" 并安装最新版本(或您想要使用的版本)。
HX711 Arduino 库概述
功能
在开始开发代码之前,让我们先了解一下可用的函数。
-
void begin(byte dout, byte pd_sck, byte gain )—— 使用数据输出引脚、时钟输入引脚和增益因子初始化库。通过传递适当的增益来选择通道,库默认值为 "128"(通道 A)。- 输入参数:
- byte dout: 作为 dout(转换为 byte)传递的 HX711 电路接线。
- byte pd_sck: 作为 pd_sck(转换为 byte)传递的 HX711 电路接线。
- byte gain = 128:
- 增益因子为 64 或 128 时,选择通道 A。
- 增益因子为 32 时,选择通道 B。
- 输入参数:
-
bool is_ready()—— 检查 HX711 是否就绪。根据数据手册:当输出数据未准备好检索时,数字输出引脚 DOUT 为高电平。串行时钟输入 PD_SCK 应为低电平。当 DOUT 变为低电平时,表示数据已准备好检索。 -
void wait_ready(unsigned long delay_ms = 0);—— 等待芯片准备就绪。 -
bool wait_ready_retry(int retries = 3, unsigned long delay_ms = 0)—— 通过指定次数的重试等待芯片准备就绪。 -
bool wait_ready_timeout(unsigned long timeout = 1000, unsigned long delay_ms = 0)—— 等待芯片准备就绪直到超时。 -
void set_gain(byte gain = 128)—— 设置增益因子;仅在调用 read() 后生效。- 输入参数:
- byte gain = 128: 通道 A 可以设置为 128 或 64 增益;通道 B 具有固定的 32 增益。
- 输入参数:
-
long read()—— 等待芯片准备就绪并返回读数 -
long read_average(byte times = 10)—— 返回平均读数。- 输入参数:
- byte times = 10: times = 读取次数。
- 输入参数:
-
double get_value(byte times = 1)—— 返回 (read_average() - OFFSET),即当前值减去皮重。- 输入参数:
- byte times = 1: times = 读取次数。
- 输入参数:
-
float get_units(byte times = 1)—— 返回 get_value() 除以 SCALE,即原始值除以通过校准获得的值。- 输入参数:
- byte times = 1: times = 读取次数。
- 输入参数:
-
void tare(byte times = 10)—— 设置皮重的 OFFSET 值。- 输入参数:
- byte times = 10: times = 读取皮重值的次数。
- 输入参数:
-
void set_scale(float scale = 1.f)—— 设置 SCALE 值;此值用于将原始数据转换为"人类可读"数据(测量单位) -
float get_scale()—— 获取当前 SCALE -
void set_offset(long offset = 0)—— 设置 OFFSET,从实际读数中减去的值(皮重) -
long get_offset()—— 获取当前 OFFSET -
void power_down()—— 将芯片置于掉电模式 -
void power_up()—— 在掉电模式后唤醒芯片
安装
由于您已经下载了zip库文件,请打开您的Arduino IDE,点击Sketch > Include Library > Add .ZIP Library。选择您刚刚下载的zip文件,如果库安装正确,您将在通知窗口中看到Library added to your libraries。这意味着库已成功安装。

示例演示
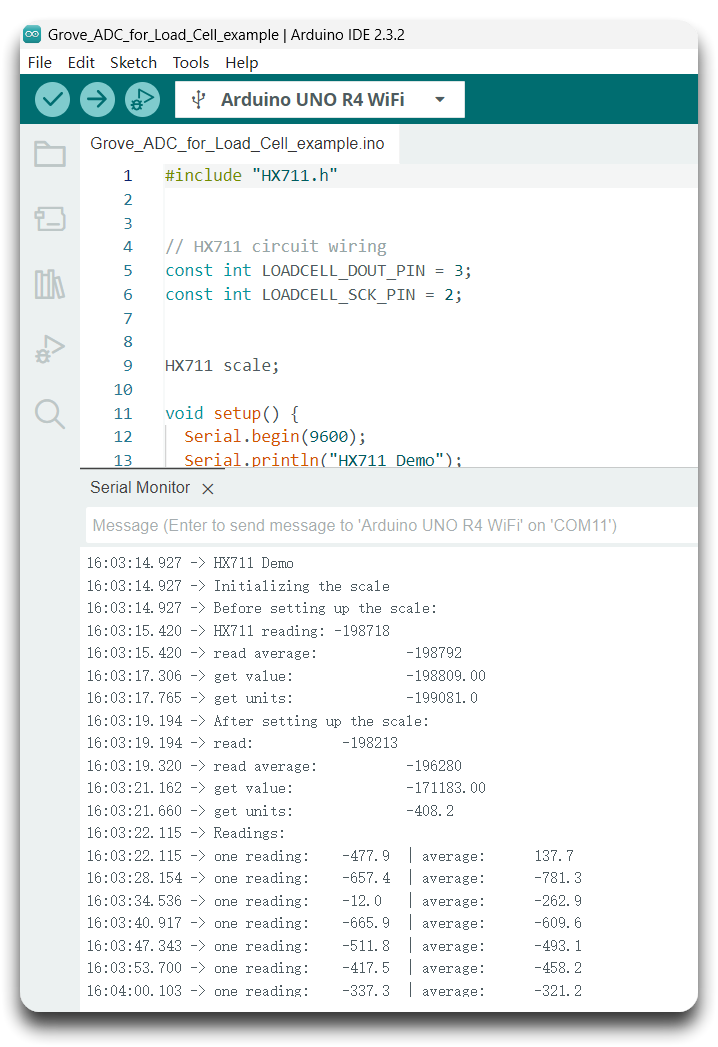
步骤 1. 在Grove - ADC for Load Cell (HX711)测量之前,PD_SCK应该被拉低以使其准备工作,并且称重传感器应该被校准。Grove_ADC_for_Load_Cell_(HX711)示例代码如下:
#include "HX711.h"

// HX711 circuit wiring
const int LOADCELL_DOUT_PIN = 3;  //Set your I2C pin
const int LOADCELL_SCK_PIN = 2;


HX711 scale;

void setup() {
  Serial.begin(9600);
  Serial.println("HX711 Demo");

  Serial.println("Initializing the scale");

  // Initialize library with data output pin, clock input pin and gain factor.
  // Channel selection is made by passing the appropriate gain:
  // - With a gain factor of 64 or 128, channel A is selected
  // - With a gain factor of 32, channel B is selected
  // By omitting the gain factor parameter, the library
  // default "128" (Channel A) is used here.

  scale.begin(LOADCELL_DOUT_PIN, LOADCELL_SCK_PIN);

  Serial.println("Before setting up the scale:");
    if (scale.wait_ready_timeout(1000)) {
    long reading = scale.read();
    Serial.print("HX711 reading: ");
    Serial.println(reading);
  } else {
    Serial.println("HX711 not found.");
  }	  // print a raw reading from the ADC

  Serial.print("read average: \t\t");
  Serial.println(scale.read_average(20));  	// print the average of 20 readings from the ADC

  Serial.print("get value: \t\t");
  Serial.println(scale.get_value(5));		// print the average of 5 readings from the ADC minus the tare weight (not set yet)

  Serial.print("get units: \t\t");
  Serial.println(scale.get_units(5), 1);	// print the average of 5 readings from the ADC minus tare weight (not set) divided
						// by the SCALE parameter (not set yet)

  scale.set_scale(2280.f);                      // this value is obtained by calibrating the scale with known weights; see the README for details
  scale.tare();				        // reset the scale to 0

  Serial.println("After setting up the scale:");

  Serial.print("read: \t\t");
  Serial.println(scale.read());                 // print a raw reading from the ADC

  Serial.print("read average: \t\t");
  Serial.println(scale.read_average(20));       // print the average of 20 readings from the ADC

  Serial.print("get value: \t\t");
  Serial.println(scale.get_value(5));		// print the average of 5 readings from the ADC minus the tare weight, set with tare()

  Serial.print("get units: \t\t");
  Serial.println(scale.get_units(5), 1);        // print the average of 5 readings from the ADC minus tare weight, divided
						// by the SCALE parameter set with set_scale

  Serial.println("Readings:");
}

void loop() {
  Serial.print("one reading:\t");
  Serial.print(scale.get_units(), 1);
  Serial.print("\t| average:\t");
  Serial.println(scale.get_units(10), 1);

  scale.power_down();			        // put the ADC in sleep mode
  delay(5000);
  scale.power_up();
}
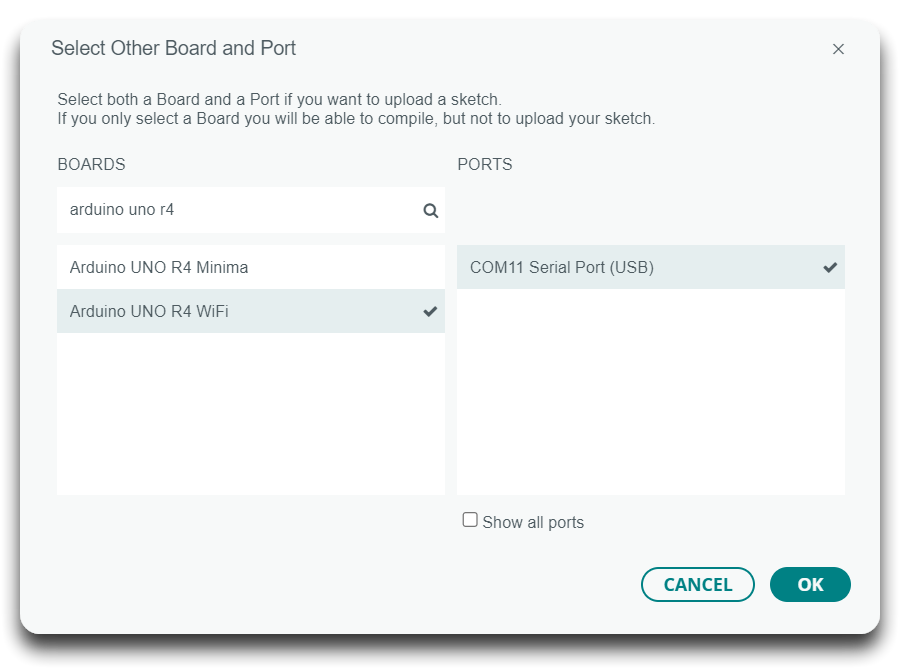
步骤 2. 请点击开发板选择下拉菜单,然后点击"Select other board and port..."。
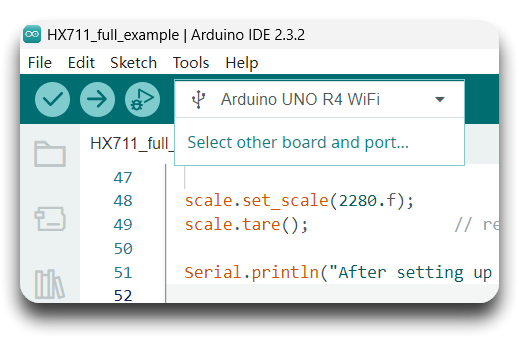
步骤 3. 然后搜索并选择"Arduino UNO R4 WiFi"。
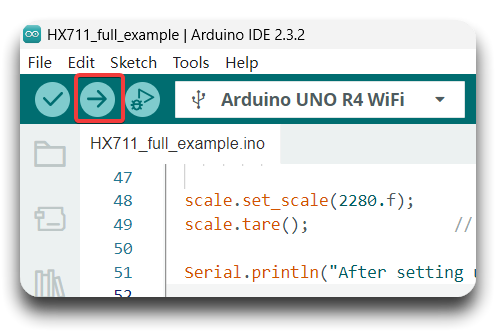
步骤 4. 请点击"upload"将固件烧录到Arduino。
步骤 5. 通过点击Tool-> Serial Monitor打开Arduino IDE的串口监视器。当您看到串口打印"After setting up the scale:"时,等待几秒钟并对重量传感器(称重传感器)0-500g施加力。
步骤 6. 结果应该如下所示。
资源
[PDF]INA125 数据手册
[PDF]HX711-数据手册
[ZIP]Grove - 称重传感器ADC (HX711)-原理图文件
技术支持与产品讨论
感谢您选择我们的产品!我们在这里为您提供不同的支持,以确保您使用我们产品的体验尽可能顺畅。我们提供多种沟通渠道,以满足不同的偏好和需求。