高擎电机控制完整指南
高擎电机控制基线,支持 Python、C++、Rust 和 Arduino 实现
![]()
![]()
![]()
📋 目录

🎯 项目概述
什么是高扭矩电机?
高扭矩电机是专为机器人应用设计的无刷直流电机系统,支持 CAN 总线通信,适用于:
- 🤖 人形机器人 - 关节控制
- 🦾 机械臂 - 精密定位
- 🚗 移动机器人 - 轮驱动
- ⚙️ 自动化设备 - 伺服控制
支持的电机型号
| 型号 | 扭矩 | 最大速度 | 减速比 | 应用 |
|---|---|---|---|---|
| 5046_20 | 17 Nm | 50 rad/s | 20:1 | 通用关节 |
| 4538_19 | 17 Nm | 44 rad/s | 19:1 | 轻量级关节 |
| 5047_36 | 60 Nm | 50 rad/s | 36:1 | 重载应用 |
| 5047_09 | 17 Nm | 33 rad/s | 9:1 | 高速应用 |
核心特性
- ✅ CAN 总线通信 - 支持多电机并联
- ✅ 高精度控制 - 位置/速度/扭矩三环控制
- ✅ 实时反馈 - 状态监控和数据采集
- ✅ 安全保护 - 过流/过压/过温保护
- ✅ 多语言 SDK - Python/C++/Rust/Arduino 支持
🔧 硬件准备
所需硬件清单
- 高扭矩电机 - 至少 1 个
- CAN 适配器 - USB 转 CAN 或 PCIe CAN 卡
- CAN 线缆 - 双绞线屏蔽电缆
- 120Ω 终端电阻 - 总线两端各一个
- 电源 - 24V 或 48V 直流电源
- 开发主机 - Linux 系统(推荐 Ubuntu 20.04+)
硬件连接图
[Linux Host] ←USB→ [CAN Adapter] ←CAN_H/CAN_L→ [Motor1]
                                            ↓
                                    [120Ω Resistor]
                                            ↓
                                          [Motor2]
连接步骤
- 连接 CAN 适配器 到主机 USB 端口
- 连接 CAN 总线:
- CAN_H ←→ CAN_H(所有设备)
- CAN_L ←→ CAN_L(所有设备)
- GND ←→ GND(共地连接)
- 安装终端电阻:
- 在总线两端各安装一个 120Ω 电阻
- 如果只有 2 个设备,每个设备安装一个
- 连接电机电源:
- 红线:+24V/+48V
- 黑线:GND
- 黄线:CAN_H
- 绿线:CAN_L
💻 软件环境搭建
系统要求
- 操作系统:Ubuntu 18.04+ / CentOS 7+ / Debian 10+
- 内核版本:Linux 4.15+(SocketCAN 支持)
- 架构:x86_64 / ARM64
通用依赖安装
# Update system packages
sudo apt update && sudo apt upgrade -y

# Install basic tools
sudo apt install -y build-essential git cmake make

# Install CAN tools
sudo apt install -y can-utils

# Install Python development environment
sudo apt install -y python3 python3-pip python3-dev

# Install Rust (if needed)
curl --proto '=https' --tlsv1.2 -sSf https://sh.rustup.rs | sh
source ~/.cargo/env
克隆项目
# Clone official SDK
git clone https://github.com/Seeed-Projects/HighTorque_Control ~/HighTorque_Control
pushd ~/HighTorque_Control

# Check project structure
ls -la
# Should see: python/ cpp/ rust/ arduino/ directories
🌐 CAN 总线配置
1. 加载 CAN 内核模块
# Check if modules are loaded
lsmod | grep can

# If not loaded, load manually
sudo modprobe can
sudo modprobe can_raw
sudo modprobe can_dev
2. 配置 CAN 接口
# Shut down interface (if already open)
sudo ip link set can0 down

# Configure CAN interface parameters
sudo ip link set can0 type can bitrate 1000000 restart-ms 100

# Start interface
sudo ip link set can0 up

# Check interface status
ip -details link show can0
3. 验证 CAN 通信
# Terminal 1: Monitor CAN messages
candump can0

# Terminal 2: Send test message
cansend can0 123#DEADBEEF

# If you see messages, configuration is successful
4. 设置开机自启
# Create configuration file
sudo tee /etc/network/interfaces.d/can0 << EOF
auto can0
iface can0 inet manual
    pre-up ip link set can0 type can bitrate 1000000 restart-ms 100
    up ip link set can0 up
    down ip link set can0 down
EOF

# Make configuration effective
sudo systemctl restart networking
故障排除
# Check interface permissions
sudo usermod -a -G dialout $USER
# Log out and log back in for effect

# Check device permissions
ls -la /dev/can*
# If no devices, check if driver is loaded correctly

# Check baud rate setting
ip -details link show can0 | grep bitrate
🐍 Python 完整使用指南
1. 环境准备
cd python

# Install Python dependencies
pip install -r requirements.txt

# Manual dependency installation (if requirements.txt doesn't exist)
pip install python-can==4.3.1 numpy matplotlib
2. 电机扫描 - 发现连接的电机
# Basic scan (scan IDs 1-14)
python3 can_motor_scanner.py

# Specify scan range
python3 can_motor_scanner.py --start 1 --end 10

# Specify CAN channel
python3 can_motor_scanner.py --channel can0

# Detailed information mode
python3 can_motor_scanner.py --detailed

# Continuous monitoring mode (monitor for 30 seconds)
python3 can_motor_scanner.py --monitor 30

# Test single motor communication
python3 can_motor_scanner.py --test 1

# Save scan report
python3 can_motor_scanner.py --save scan_report.txt
预期输出:
Initializing can0 @ 1000000bps...
✅ CAN interface connected successfully
==================================================
Starting motor ID scan (range: 1-14)...
Timeout: 0.05s per motor
Press Ctrl+C to stop at any time
==================================================
Scanning ID  1... ✅ [Response] Found motor ID: 1 (CAN ID: 0x8001)
Scanning ID  2... No response
Scanning ID  3... ✅ [Response] Found motor ID: 3 (CAN ID: 0x8003)
...
==================================================
✅ Scan completed, online motor list: [1, 3]
Total: 2 motors
3. 速度控制 - 控制电机转速
# Basic speed control (control motor ID=1)
python3 velocity_acceleration_control.py --motor_id 1

# Specify CAN channel
python3 velocity_acceleration_control.py --motor_id 1 --channel can0

# Specify baud rate
python3 velocity_acceleration_control.py --motor_id 1 --bitrate 1000000
交互式控制示例:
Motor 1 started! Use control commands:
- Speed: +number (e.g.: +5.0, -2.5)
- Acceleration: anumber (e.g.: a10.0)
- Stop: stop
- Query status: status
- Exit: quit

> +5.0        # Set forward 5.0 rad/s
> a8.0        # Set acceleration 8.0 rad/s²
> stop        # Smart stop
> status      # Query current status
> quit        # Exit program
4. 位置控制 - 控制电机角度
# Interactive position control
python3 angle_stream_control.py --motor_id 1 --mode interactive

# Sine wave test
python3 angle_stream_control.py --motor_id 1 --mode sine --amplitude 1.57 --frequency 0.5

# Step test
python3 angle_stream_control.py --motor_id 1 --mode step --target 1.57

# Multi-position test
python3 angle_stream_control.py --motor_id 1 --mode multi
交互式控制示例:
Motor 1 connected and enabled!
Use control commands:
- Position: pvalue (radians, e.g.: p1.57, p-0.5)
- Torque: tvalue (Nm, e.g.: t2.0, t-1.5)
- Stop: stop
- Exit: quit

> p1.57       # Rotate to 90 degree position
> t2.0        # Set 2Nm torque
> stop        # Stop motor
> quit        # Exit program
5. Python 代码示例
电机扫描代码
#!/usr/bin/env python3
from can_motor_scanner import LivelyMotorScanner

def main():
    # Create scanner
    scanner = LivelyMotorScanner(channel='can0', bitrate=1000000)

    # Connect CAN bus
    if not scanner.connect():
        print("CAN connection failed!")
        return

    try:
        # Scan motors
        found_motors = scanner.scan_range(start_id=1, end_id=14)

        if found_motors:
            print(f"Found motors: {found_motors}")

            # Get detailed information
            for motor_id in found_motors:
                info = scanner.get_motor_info(motor_id)
                if info:
                    print(f"Motor{motor_id}: Mode={info.get('mode_name', 'Unknown')}")
        else:
            print("No motors found")

    finally:
        scanner.disconnect()

if __name__ == "__main__":
    main()
速度控制代码
#!/usr/bin/env python3
from velocity_acceleration_control import MotorVelAccController

def main():
    # Create controller
    controller = MotorVelAccController(channel='can0', motor_id=1)

    # Connect and enable motor
    if not controller.connect():
        print("Connection failed!")
        return

    controller.enable_motor()
    controller.start_control()

    try:
        # Set speed and acceleration
        controller.set_velocity(5.0)  # 5 rad/s
        controller.set_acceleration(10.0)  # 10 rad/s²

        # Run for 10 seconds
        import time
        time.sleep(10)

        # Smart stop
        controller.emergency_stop()

    finally:
        controller.disable_motor()
        controller.disconnect()

if __name__ == "__main__":
    main()
⚡ C++ 完整使用指南
1. 环境准备
cd cpp

# Compile all programs
make clean
make

# Or compile single program
make can_motor_scanner
make velocity_acceleration_control
make angle_stream_control
2. 电机扫描
# Scan motor IDs 1-5
./can_motor_scanner 1 5

# Scan all possible IDs
./can_motor_scanner 1 14
预期输出:
Initializing CAN0 @ 1000000bps...
✅ CAN interface connected successfully
Starting motor ID scan (1-5)...
Scanning ID 1... ✅ Found motor ID: 1 (CAN ID: 0x8001)
Scanning ID 2... No response
Scanning ID 3... ✅ Found motor ID: 3 (CAN ID: 0x8003)
Scanning ID 4... No response
Scanning ID 5... No response
Scan completed! Online motors: [1, 3]
3. 速度控制
# Control motor ID=1
./velocity_acceleration_control 1

# Control specified ID motor
./velocity_acceleration_control 3
控制命令:
+number- 设置正向速度-number- 设置反向速度anumber- 设置加速度stop- 智能停止quit- 退出程序
4. 位置控制
# Interactive mode
./angle_stream_control 1 interactive

# Sine wave mode
./angle_stream_control 1 sine

# Step mode
./angle_stream_control 1 step

# Multi-position mode
./angle_stream_control 1 multi
5. C++ 代码示例
电机扫描代码
#include "can_motor_scanner.h"

int main() {
    // Create scanner
    LivelyMotorScanner scanner("can0", 1000000);

    // Connect CAN bus
    if (!scanner.connect()) {
        std::cerr << "CAN connection failed!" << std::endl;
        return 1;
    }

    // Scan motors
    std::vector<int> found_motors = scanner.scan_range(1, 14);

    if (!found_motors.empty()) {
        std::cout << "Found motors: ";
        for (int id : found_motors) {
            std::cout << id << " ";
        }
        std::cout << std::endl;
    } else {
        std::cout << "No motors found" << std::endl;
    }

    scanner.disconnect();
    return 0;
}
编译并运行:
g++ -o scan_example scan_example.cpp -lcan
./scan_example
🦀 Rust 完整使用指南
1. 环境准备
cd rust

# Check if Rust is installed
rustc --version

# Compile release version
cargo build --release

# Or use Makefile
make
2. 电机扫描
# Scan specified range
./target/release/can_motor_scanner --start-id 1 --end-id 5

# Complete scan
./target/release/can_motor_scanner --start-id 1 --end-id 14

# Specify CAN channel
./target/release/can_motor_scanner --channel can0 --start-id 1 --end-id 5
3. 速度控制
# Basic speed control
./target/release/velocity_acceleration_control --motor-id 1

# Specify channel
./target/release/velocity_acceleration_control --motor-id 1 --channel can0
4. 位置控制
# Interactive mode
./target/release/angle_stream_control --motor-id 1 interactive

# Sine wave mode
./target/release/angle_stream_control --motor-id 1 sine --amplitude 1.57

# Step mode
./target/release/angle_stream_control --motor-id 1 step --target 1.57
5. Rust 代码示例
电机扫描代码
use livelybot_motor_sdk::{LivelyMotorController, CanFrame};

fn main() -> Result<(), Box<dyn std::error::Error>> {
    // Create controller
    let mut controller = LivelyMotorController::new("can0")?;

    // Connect CAN bus
    controller.connect()?;

    // Scan motors
    let mut found_motors = Vec::new();

    for motor_id in 1..=14 {
        if controller.ping_motor(motor_id)? {
            println!("✅ Found motor ID: {}", motor_id);
            found_motors.push(motor_id);
        } else {
            println!("❌ Motor ID: {} No response", motor_id);
        }
    }

    println!("Scan completed, found {} motors", found_motors.len());

    Ok(())
}
编译并运行:
# Save as scan_example.rs
rustc --extern livelybot_motor_sdk=target/release/liblivelybot_motor_sdk.rlib scan_example.rs
./scan_example
📡 协议详细说明
CAN 帧格式
- 帧类型:扩展帧(29 位 ID)
- 波特率:1Mbps
- 数据长度:8 字节
- 字节序:大端序
核心协议命令
1. 电机扫描(Ping)命令
CAN ID: 0x8000 | motor_id
Data: [0x11, 0x00, 0x50, 0x50, 0x50, 0x50, 0x50, 0x50]
0x8000:高位表示需要回复motor_id:电机 ID(1-127)0x11:读取命令0x00:地址(读取电机模式)
2. 速度控制命令(0xAD)
CAN ID: 0x00AD
Data: [PosL, PosH, VelL, VelH, AccL, AccH, 0x50, 0x50]
PosL/PosH:位置目标(16 位,FACTOR_POS=10000.0)VelL/VelH:速度目标(16 位,FACTOR_VEL=4000.0)AccL/AccH:加速度目标(16 位,FACTOR_ACC=1000.0)0x50:填充字节
3. 位置控制命令(0x90)
CAN ID: 0x0090
Data: [PosL, PosH, VelL, VelH, TqeL, TqeH, 0x50, 0x50]
PosL/PosH:位置目标(16 位,FACTOR_POS=10000.0)VelL/VelH:速度限制(16 位,FACTOR_VEL=4000.0)TqeL/TqeH:扭矩限制(16 位,FACTOR_TQE=200.0)
协议系数
| 参数 | 值 | 描述 | 示例 |
|---|---|---|---|
| FACTOR_POS | 10000.0 | 位置转换系数 | 1.57 rad → 15700 |
| FACTOR_VEL | 4000.0 | 速度转换系数 | 5.0 rad/s → 20000 |
| FACTOR_ACC | 1000.0 | 加速度转换系数 | 10.0 rad/s² → 10000 |
| FACTOR_TQE | 200.0 | 扭矩转换系数 | 2.0 Nm → 400 |
| MAGIC_POS | -32768 | 速度模式标志 | 特殊位置值 |
数据转换示例
位置转换
# Radians → Protocol value
position_rad = 1.57  # 90 degrees
protocol_value = int(position_rad * FACTOR_POS)  # 15700

# Protocol value → Radians
protocol_value = 15700
position_rad = protocol_value / FACTOR_POS  # 1.57
速度转换
# rad/s → Protocol value
velocity_rps = 5.0
protocol_value = int(velocity_rps * FACTOR_VEL)  # 20000

# Protocol value → rad/s
protocol_value = 20000
velocity_rps = protocol_value / FACTOR_VEL  # 5.0
🔧 故障排除
常见问题及解决方案
1. CAN 接口无法启动
# Error message
Error: Cannot find device can0

# Solution
sudo modprobe can
sudo modprobe can_raw
sudo ip link set can0 type can bitrate 1000000
sudo ip link set can0 up
2. 权限不足
# Error message
Operation not permitted

# Solution 1: Add user to dialout group
sudo usermod -a -G dialout $USER
# Re-login for effect

# Solution 2: Run with sudo
sudo python3 can_motor_scanner.py
3. 无法扫描到电机
# Check hardware connection
1. Confirm 120Ω termination resistor is installed
2. Check if CAN_H/CAN_L wiring is correct
3. Confirm motor power supply is normal
4. Check if baud rate setting matches

# Verify connection with candump
candump can0
# Manually rotate motor, should see feedback messages
4. 通信不稳定
# Check signal quality
candump can0 -tA
# View error frame count

# Adjust sampling point
sudo ip link set can0 down
sudo ip link set can0 type can bitrate 1000000 sample-point 0.875
sudo ip link set can0 up
5. 编译错误
# Python dependency issues
pip install --upgrade pip
pip install -r requirements.txt

# C++ compilation errors
sudo apt install build-essential
sudo apt install libcan-dev

# Rust compilation errors
rustup update
cargo clean && cargo build --release
调试技巧
1. 使用 Wireshark 进行 CAN 通信分析
# Install wireshark
sudo apt install wireshark

# Start packet capture
sudo wireshark -i can0
2. 实时电机状态监控
# Python continuous monitoring
python3 can_motor_scanner.py --monitor 60

# C++ real-time viewing
./can_motor_scanner 1 14 | grep "Found motor"
3. 协议分析
# Send raw CAN commands
import can
bus = can.interface.Bus(channel='can0', interface='socketcan')
msg = can.Message(arbitration_id=0x8001, data=[0x11, 0x00, 0x50, 0x50, 0x50, 0x50, 0x50, 0x50])
bus.send(msg)
使用reComputer Mini Jetson Orin控制电机
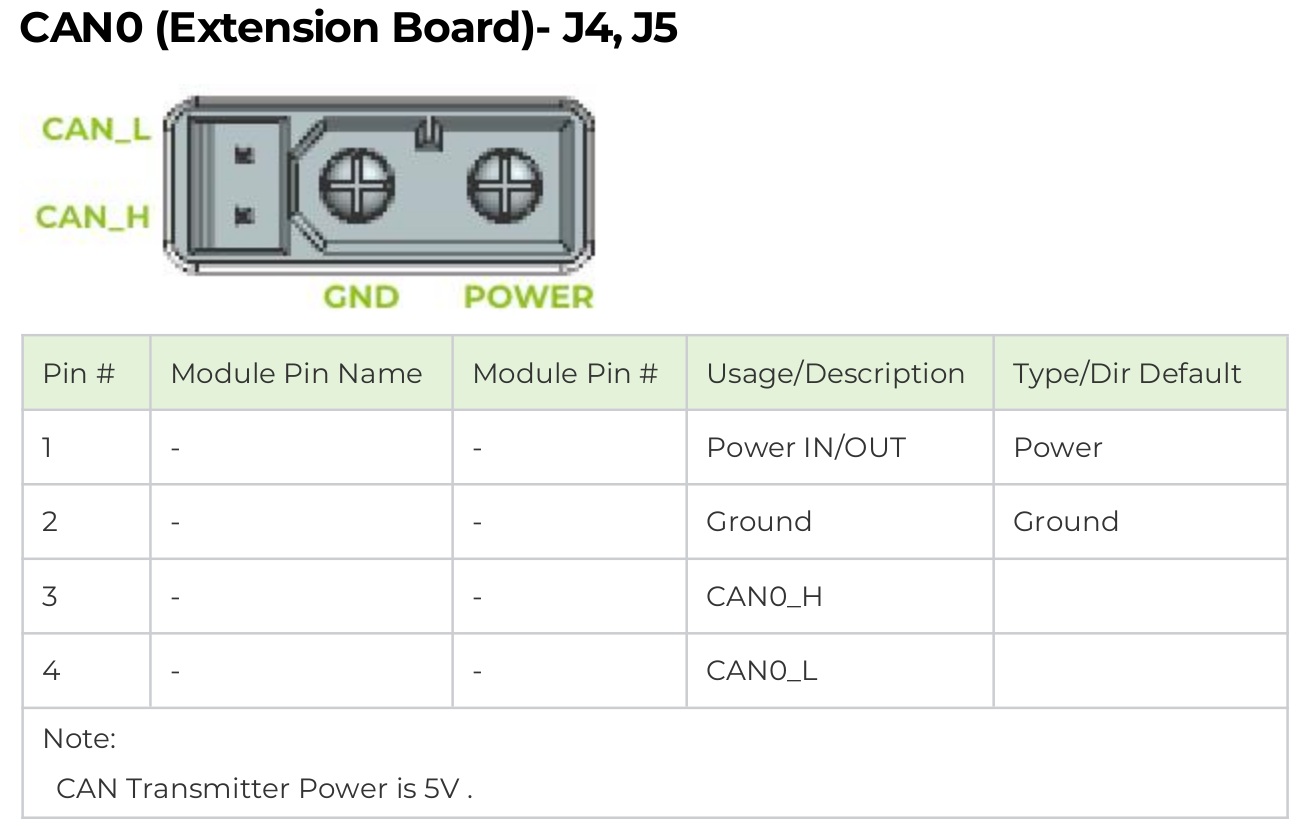
目前市场上电机最常用的CAN通信接口采用XT30(2+2)和JST连接器。我们的reComputer Mini Jetson Orin和reComputer Robotics设备配备了双XT30(2+2)端口和基于JST的CAN接口,提供无缝兼容性。
reComputer Mini:

reComputer Robotics

有关CAN使用的更多细节,可参考此wiki。
启用CAN接口
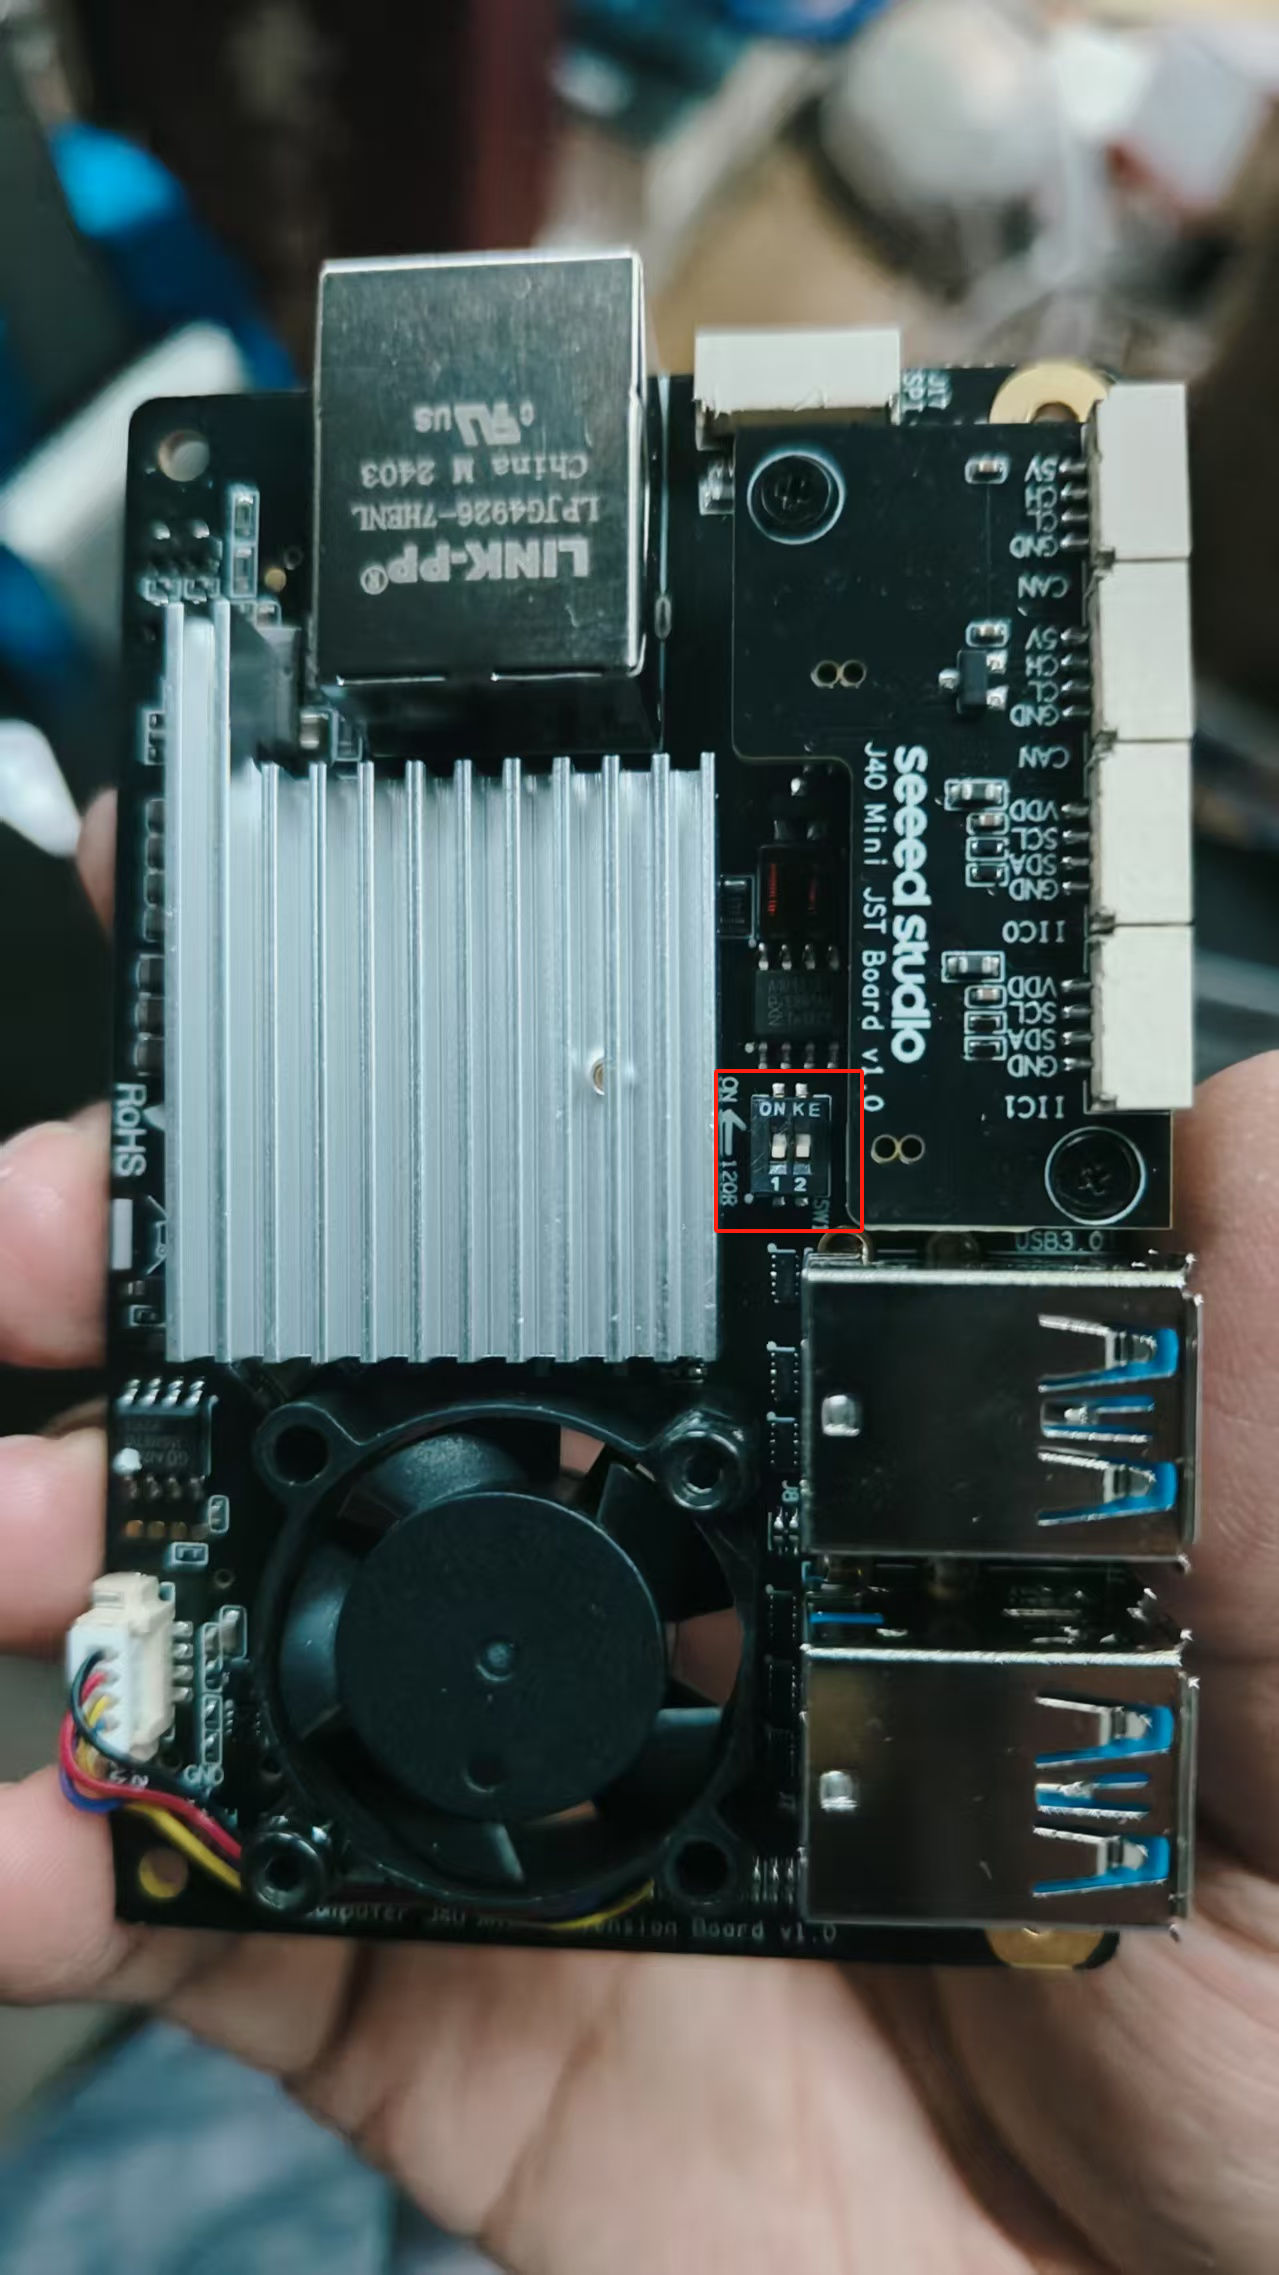
步骤1: 使用CAN0和CAN1前,请移除底盖并将两个120Ω终端电阻拨至ON位置
步骤2: 通过XT30(2+2)接口将电机直接连接到reComputer Mini的CAN0
tip
reComputer Mini的CAN接口H/L引脚与电机的H/L相反,因此需要反转XT30 2+2线束中的H/L连接

danger
此电源方案仅适用于单电机学习测试。多电机使用时请设计独立电源板,将Jetson电源与电机电源隔离,避免大电流直接通过Jetson
启用Jetson CAN通信
打开终端输入以下命令拉高GPIO引脚激活CAN0:
gpioset --mode=wait 0 43=0
若使用JST接口的CAN1,则拉高106引脚
gpioset --mode=wait 0 106=0
保持此终端开启,新建终端配置CAN0
sudo modprobe mttcan
sudo ip link set can0 type can bitrate 1000000
sudo ip link set can0 up
Python控制
- 安装Python环境
pip install python-can numpy
- 创建脚本目录
mkdir -p ~/hightorque/scripts
- 创建hightorque_motor.py文件
cd ~/hightorque/scripts
touch hightorque_motor.py
将以下代码复制到hightorque_motor.py
hightorque_motor.py
import can
import numpy as np
from time import sleep
from enum import IntEnum

class MotorType(IntEnum):
    """电机型号枚举"""
    HT5046 = 0  # 5046电机
    HT4538 = 1  # 4538电机
    HT5047_36 = 2  # 5047/6056双极36减速比
    HT5047_9 = 3  # 5047单极9减速比

class ControlMode(IntEnum):
    """控制模式枚举"""
    NORMAL = 0  # 普通模式
    TORQUE = 1  # 力矩模式
    COOPERATIVE = 2  # 协同控制模式

class Motor:
    def __init__(self, motor_type: MotorType, slave_id: int, master_id: int):
        """
        初始化电机对象
        :param motor_type: 电机型号
        :param slave_id: 从机ID
        :param master_id: 主机ID
        """
        self.motor_type = motor_type
        self.slave_id = slave_id
        self.master_id = master_id
        self.position = 0
        self.velocity = 0
        self.torque = 0
        self.temperature = 0

        # 根据电机型号设置扭矩转换参数
        if motor_type == MotorType.HT5046:
            self.torque_k = 0.005397
            self.torque_d = -0.455107
        elif motor_type == MotorType.HT4538:
            self.torque_k = 0.004587
            self.torque_d = -0.290788
        elif motor_type == MotorType.HT5047_36:
            self.torque_k = 0.004563
            self.torque_d = -0.493257
        elif motor_type == MotorType.HT5047_9:
            self.torque_k = 0.005332
            self.torque_d = -0.072956

    def update_status(self, position: float, velocity: float, torque: float, temperature: float):
        """更新电机状态"""
        self.position = position
        self.velocity = velocity
        self.torque = torque
        self.temperature = temperature

class MotorControl:
    def __init__(self, channel: str, bitrate: int = 1000000):
        """
        初始化电机控制器
        :param channel: CAN通道
        :param bitrate: CAN波特率
        """
        self.bus = can.interface.Bus(channel=channel, bustype='socketcan', bitrate=bitrate)
        self.motors = {}

    def add_motor(self, motor: Motor):
        """添加电机到控制器"""
        self.motors[motor.slave_id] = motor

    def __send_data(self, motor_id: int, data: bytes):
        """
        发送CAN数据
        :param motor_id: 电机ID
        :param data: 要发送的数据
        """
        msg = can.Message(
            arbitration_id=0x8000 | motor_id,
            data=data,
            is_extended_id=True
        )
        self.bus.send(msg)

    def enable(self, motor: Motor):
        """使能电机"""
        data = bytes([0x01, 0x00, 0x01])
        self.__send_data(motor.slave_id, data)
        sleep(0.1)

    def disable(self, motor: Motor):
        """失能电机"""
        data = bytes([0x01, 0x00, 0x00])
        self.__send_data(motor.slave_id, data)
        sleep(0.1)

    def set_zero_position(self, motor: Motor):
        """设置电机零位"""
        data = bytes([0x40, 0x01, 0x04, 0x64, 0x20, 0x63, 0x0a])
        self.__send_data(motor.slave_id, data)
        sleep(1.0)  # 等待1秒
        self.save_settings(motor)

    def save_settings(self, motor: Motor):
        """保存电机设置到flash"""
        data = bytes([0x05, 0xb3, 0x02, 0x00, 0x00])
        self.__send_data(motor.slave_id, data)

    def control_position(self, motor: Motor, position: float, torque: float):
        """
        位置控制
        :param motor: 电机对象
        :param position: 目标位置(单位: 0.0001圈)
        :param torque: 力矩限制
        """
        pos_bytes = int(position).to_bytes(2, 'little')
        tqe_bytes = int(torque).to_bytes(2, 'little')
        data = bytes([0x07, 0x07]) + pos_bytes + bytes([0x80, 0x00]) + tqe_bytes
        self.__send_data(motor.slave_id, data)

    def control_velocity(self, motor: Motor, velocity: float, torque: float):
        """
        速度控制
        :param motor: 电机对象
        :param velocity: 目标速度(单位: 0.00025转/秒)
        :param torque: 力矩限制
        """
        vel_bytes = int(velocity).to_bytes(2, 'little')
        tqe_bytes = int(torque).to_bytes(2, 'little')
        data = bytes([0x07, 0x07, 0x00, 0x80]) + vel_bytes + tqe_bytes
        self.__send_data(motor.slave_id, data)

    def control_torque(self, motor: Motor, torque: float):
        """
        力矩控制
        :param motor: 电机对象
        :param torque: 目标力矩
        """
        tqe_bytes = int(torque).to_bytes(2, 'little')
        data = bytes([0x05, 0x13]) + tqe_bytes
        self.__send_data(motor.slave_id, data)

    def control_cooperative(self, motor: Motor, position: float, velocity: float, torque: float):
        """
        协同控制(位置、速度、力矩同时控制)
        :param motor: 电机对象
        :param position: 目标位置(单位: 0.0001圈)
        :param velocity: 目标速度(单位: 0.00025转/秒)
        :param torque: 力矩限制
        """
        vel_bytes = int(velocity).to_bytes(2, 'little')
        tqe_bytes = int(torque).to_bytes(2, 'little')
        pos_bytes = int(position).to_bytes(2, 'little')
        data = bytes([0x07, 0x35]) + vel_bytes + tqe_bytes + pos_bytes
        self.__send_data(motor.slave_id, data)

    def read_motor_status(self, motor: Motor):
        """读取电机状态"""
        data = bytes([0x17, 0x01])
        self.__send_data(motor.slave_id, data)
        sleep(0.01)  # 等待接收数据

        # 接收并解析数据
        msg = self.bus.recv(timeout=0.1)
        if msg and msg.arbitration_id == (0x8000 | motor.slave_id):
            data = msg.data
            if len(data) >= 8 and data[0] == 0x27:
                position = int.from_bytes(data[2:4], 'little')
                velocity = int.from_bytes(data[4:6], 'little')
                torque = int.from_bytes(data[6:8], 'little')
                motor.update_status(position, velocity, torque, 0)

    def periodic_read_status(self, motor: Motor, period_ms: int):
        """
        设置周期性读取电机状态
        :param motor: 电机对象
        :param period_ms: 周期(毫秒)
        """
        period_bytes = int(period_ms).to_bytes(2, 'little')
        data = bytes([0x05, 0xb4, 0x02, 0x00]) + period_bytes
        self.__send_data(motor.slave_id, data)

    def close(self):
        """关闭CAN总线"""
        self.bus.shutdown()
- 创建hightorque_test.py文件
将以下代码复制到hightorque_test.py
hightorque_test.py
#!/usr/bin/env python3
# -*- coding: utf-8 -*-

import time
import math
import numpy as np
from hightorque_motor import Motor, MotorControl, MotorType

# 配置参数
NUM_MOTORS = 2  # 控制电机数量
CAN_INTERFACE = "can0"  # CAN接口名称
CAN_BITRATE = 1000000  # CAN波特率
MOTOR_TYPE = MotorType.HT5047_36  # 电机类型

# 正弦波参数
FREQUENCY = 0.1  # 频率 (Hz)
AMPLITUDE = 2500  # 幅度 (0.0001圈)
OFFSET = 2500    # 偏移量,确保位置始终为正
DURATION = 60.0  # 运行时间 (s)

def main():
    # 创建电机控制对象
    controller = MotorControl(channel=CAN_INTERFACE, bitrate=CAN_BITRATE)

    try:
        # 创建并添加电机
        motors = []
        for i in range(NUM_MOTORS):
            motor = Motor(MOTOR_TYPE, slave_id=i+1, master_id=0)
            controller.add_motor(motor)
            motors.append(motor)

            # 使能电机
            print(f"使能电机 {i+1}...")
            controller.enable(motor)
            time.sleep(1)  # 等待电机使能完成

            # 设置零位
            print(f"设置电机 {i+1} 零位...")
            controller.set_zero_position(motor)
            time.sleep(1)

            # 保存设置到flash
            print(f"保存电机 {i+1} 设置...")
            controller.save_settings(motor)
            time.sleep(1)

            # 读取初始状态
            controller.read_motor_status(motor)
            print(f"电机 {i+1} 初始状态:")
            print(f"位置: {motor.position * 0.0001:.4f}圈")
            print(f"速度: {motor.velocity * 0.00025:.4f}转/秒")
            print(f"力矩: {motor.torque * motor.torque_k + motor.torque_d:.4f}Nm")

        # 开始正弦波位置控制
        print("\n开始正弦波位置控制...")
        start_time = time.time()
        while time.time() - start_time < DURATION:
            current_time = time.time() - start_time

            # 计算正弦波位置,加上偏移量确保始终为正
            position = AMPLITUDE * math.sin(2 * math.pi * FREQUENCY * current_time) + OFFSET

            # 控制所有电机
            for motor in motors:
                # 使用位置控制模式,设置最大力矩为1000
                controller.control_position(motor, position=int(position), torque=1000)

            # 控制频率
            time.sleep(0.001)  # 1kHz控制频率

    except KeyboardInterrupt:
        print("\n程序被用户中断")
    finally:
        # 失能所有电机
        for motor in motors:
            print(f"失能电机 {motor.slave_id}...")
            controller.disable(motor)

        # 关闭CAN总线
        controller.close()
        print("CAN总线已关闭")

if __name__ == "__main__":
    main()
- 运行hightorque_test.py
python hightorque_test.py
推荐使用场景
- Python:快速原型开发、算法验证、教学实验
- C++:生产环境、高性能要求、实时控制系统
- Rust:生产环境、内存安全要求、长期维护项目
选择合适的语言
- 初学者:Python - 简单易用,快速上手
- 产品开发:C++ - 高性能,实时控制
- 长期项目:Rust - 内存安全,现代语言特性
资源
- 📧 电机官方网站:https://hightorquerobotics.com/
- 🐛 项目问题反馈:https://github.com/Seeed-Projects/HighTorque_Control/issue
- 🐛 电机官方接口:https://github.com/HighTorque-Robotics/livelybot_hardware_sdk/
技术支持与产品讨论
感谢您选择我们的产品!我们在这里为您提供不同的支持,以确保您使用我们产品的体验尽可能顺畅。我们提供多种沟通渠道,以满足不同的偏好和需求。