如何在 Jetson 和 EtherCAT 设备之间建立通信
EtherCAT(用于控制自动化技术的以太网) 是一种基于 IEEE 802.3 以太网标准 的开源、高性能实时工业以太网现场总线协议。它采用 主从架构 运行,以其在工业自动化环境中的卓越速度、精度和灵活性而闻名
本文档使用 recomputer robotics J401 作为 EtherCAT 主站,使用 MyActuator X4 作为 从站,演示如何在 Jetson 和 EtherCAT 设备之间建立通信。


1. 硬件连接
作为 EtherCAT 主站,Jetson 通常使用其 以太网接口 连接到 EtherCAT 从设备。

由于许多从设备不提供标准以太网端口,通常需要适配器将以太网连接转换为 4 针接口(Tx+、Tx–、Rx+、Rx–)。
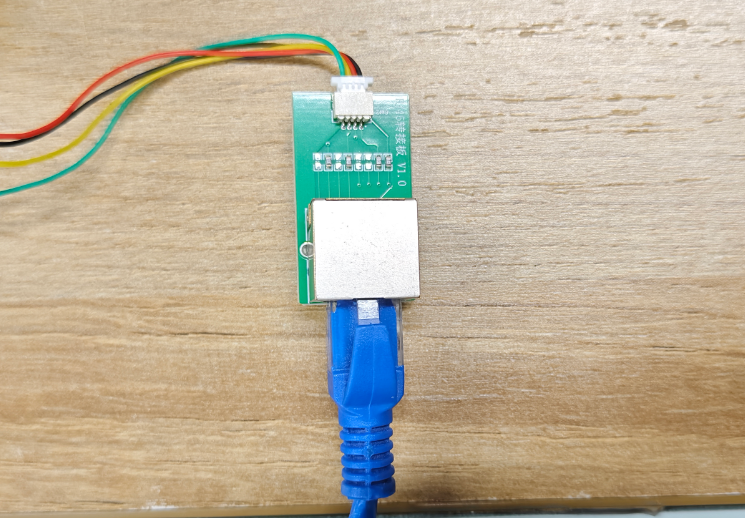
建立物理 EtherCAT 连接后,大多数从设备仍需要额外的外部电源。
2. 安装 EtherCAT 驱动程序
本节以 L4T 36.4.3(对应 JetPack 6.2 BSP)为例,展示如何在 Jetson 中安装 EtherCAT 驱动程序。
安装构建 EtherCAT 驱动程序所需的依赖项:
sudo apt update
sudo apt install build-essential cmake libtool autoconf automake
拉取 EtherCAT 驱动程序源代码,然后编译并安装:
git clone https://gitlab.com/etherlab.org/ethercat.git
cd ethercat

./bootstrap # to create the configure script, if downloaded from the repo

./configure --sysconfdir=/etc
make all modules
sudo make modules_install install
sudo depmod -a
要验证驱动程序是否已成功安装,请运行以下命令。
您应该看到两个内核模块 ec_master 和 ec_generic:
sudo lsmod | grep "ec_"

3. EtherCAT 配置
安装 EtherCAT 驱动程序后,需要进行几项配置以激活主站和从设备之间的通信。
首先,编辑 /etc/ethercat.conf 的配置文件:
sudo vim /etc/ethercat.conf
根据连接到 Jetson 的以太网接口名称修改 /etc/ethercat.conf 中的两个参数:
MASTER0_DEVICE="eno1"  # Replace eno1 with the Ethernet interface used for EtherCAT
DEVICE_MODULES="generic"
将 eno1 替换为用于 EtherCAT 的以太网接口。您可以使用 ifconfig 命令检查接口名称。
重启 EtherCAT 服务后,您应该在 /dev 目录中看到 EtherCAT 主设备:
sudo systemctl restart ethercat
ls /de/EtherCAT*

(可选)如果未找到 /dev/EtherCAT,请尝试手动加载内核模块:
sudo modprobe ec_master devices="eno1"  # Replace eno1 with the Ethernet interface used for EtherCAT
sudo modprobe ec_generic
sudo systemctl restart ethercat
将 eno1 替换为用于 EtherCAT 的以太网接口。
(可选)有时用于 EtherCAT 的以太网接口可能被 NetworkManager 占用。您可以使用以下命令释放它:
sudo nmcli dev set eno1 managed no  # Replace eno1 with the Ethernet interface used for EtherCAT
sudo nmcli dev set eno1 managed on  # Replace eno1 with the Ethernet interface used for EtherCAT
将 eno1 替换为用于 EtherCAT 的以太网接口。
4. 测试 Jetson 和 EtherCAT 从站之间的通信
确认 EtherCAT 主节点在 Jetson 上正确初始化且硬件连接正确建立后,您可以在终端中测试 Jetson 和 EtherCAT 设备之间的通信。
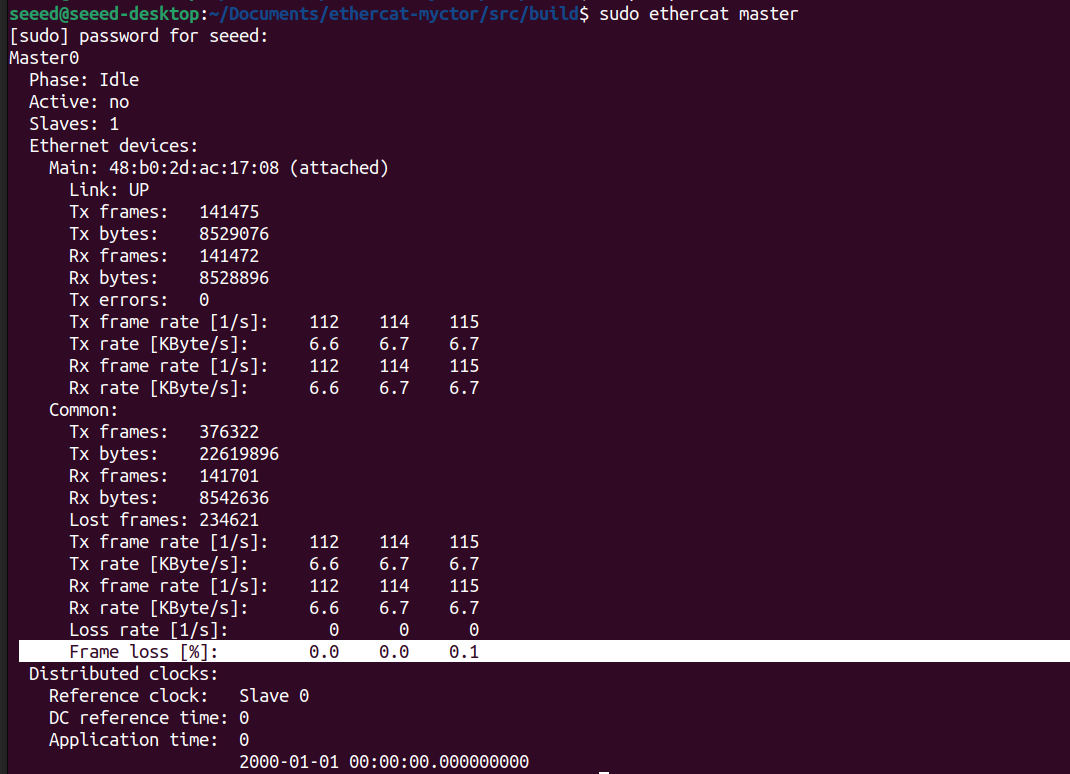
扫描 EtherCAT 设备并测试数据传输,检查丢包率是否在正常范围内:
sudo ethercat rescan
sudo ethercat master
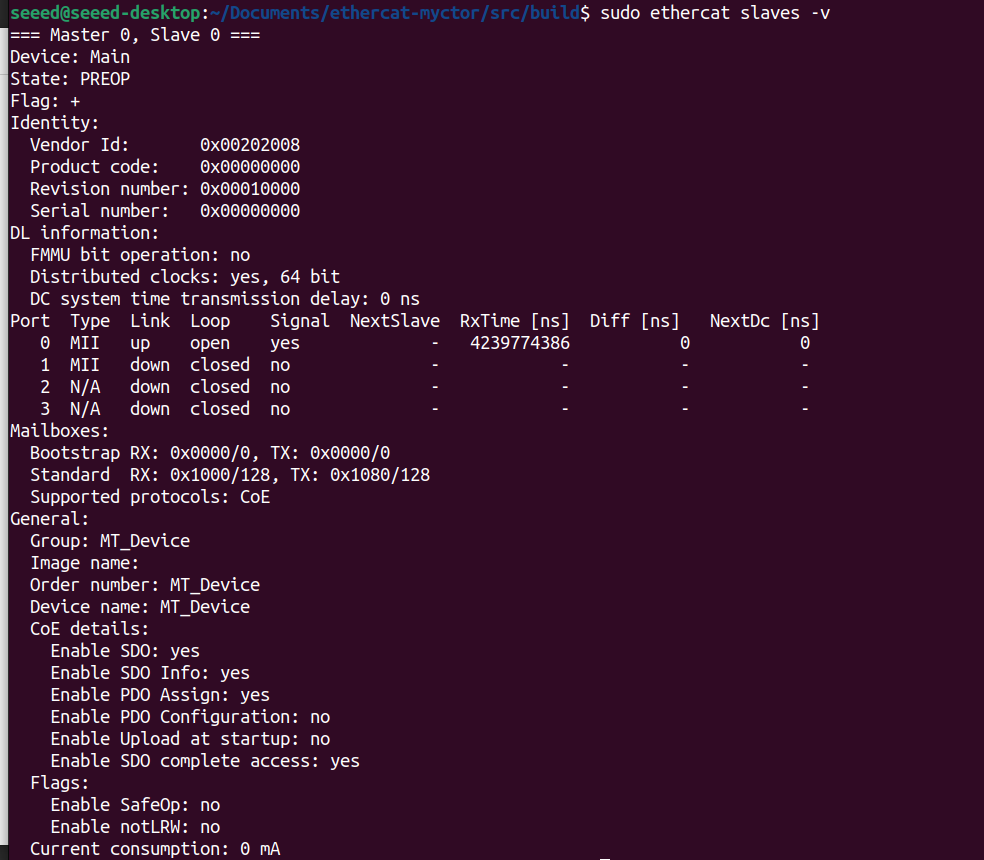
列出总线上的所有 EtherCAT 设备:
sudo ethercat rescan
sudo ethercat slaves -v
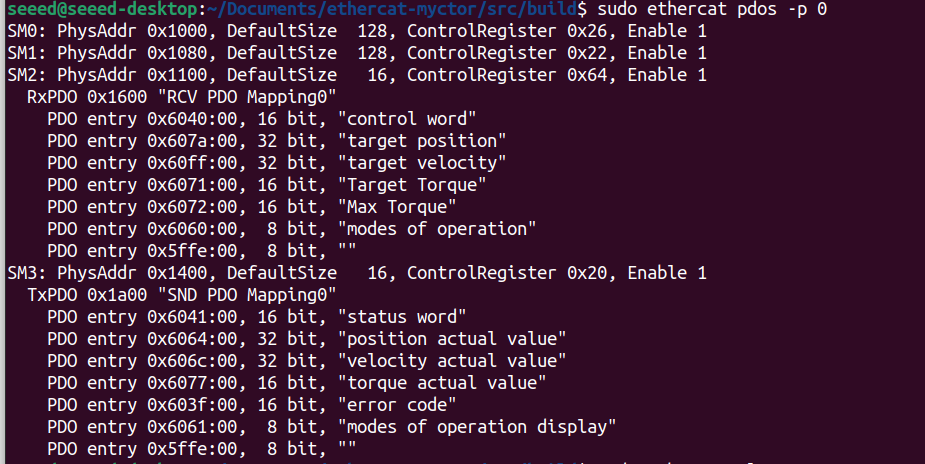
查看索引为 0 的 EtherCAT 设备的问题:
sudo ethercat rescan
sudo ethercat pdos -p 0 #0 to n
-p 后的参数可以是从 0 到 n 的任何值。
5. 示例 – 在 Jetson 上控制 EtherCAT 电机(MyActuator X4)
基于前面章节的配置和验证步骤,您现在应该能够使用 Jetson 设备控制 EtherCAT 电机。
在本节中,我们以 MyActuator X4 为例,演示如何从 Jetson 控制 EtherCAT 电机。
本节仅供参考。每个 EtherCAT 电机使用不同的通信协议,因此您需要根据特定设备使用的协议调整示例。
此示例提供了控制 MyActuator X4 EtherCAT 电机的示例代码。从 GitHub 下载并编译:
git clone https://github.com/jjjadand/ethercat-myctor.git
cd src/build
cmake ..
make
该示例基于 EtherCAT-Master 实现,程序流程图如下所示:
程序流程图
                     ┌──────────────────────────────────────┐
                     │        1. Master Initialization        │
                     ├──────────────────────────────────────┤
                     │ ecrt_request_master()                 │
                     │ ecrt_master_create_domain()           │
                     │ ecrt_master_slave_config()            │
                     │ Configure Distributed Clock (DC)      │
                     │ Register PDO entries (RxPDO/TxPDO)    │
                     │ ecrt_master_activate()                │
                     │ Get domain memory pointer             │
                     └──────────────────────────────────────┘
                                      │
                                      ▼
                     ┌──────────────────────────────────────┐
                     │      2. PREOP  →  SAFEOP Transition   │
                     ├──────────────────────────────────────┤
                     │ Slave boots in PREOP                 │
                     │ Master exchanges SDO if needed       │
                     │ (optional: set 0x6060 = CSP)         │
                     │ DC start time prepared               │
                     └──────────────────────────────────────┘
                                      │
                                      ▼
                     ┌──────────────────────────────────────┐
                     │      3. SAFEOP → OP Transition       │
                     ├──────────────────────────────────────┤
                     │ Domain becomes active (WKC > 0)      │
                     │ Application loop starts running      │
                     │ Master supplies application time     │
                     │ Master synchronizes DC clocks        │
                     │ Slave goes OP (operational)          │
                     └──────────────────────────────────────┘
                                      │
                                      ▼
                     ┌──────────────────────────────────────┐
                     │        4. CiA-402 State Machine       │
                     ├──────────────────────────────────────┤
                     │ Write ControlWord = 0x0006 (Shutdown)│
                     │ Wait READY_TO_SWITCH_ON              │
                     │ Write ControlWord = 0x0007 (SwitchOn)│
                     │ Wait SWITCHED_ON                     │
                     │ Write ControlWord = 0x000F (EnableOp)│
                     │ Wait OPERATION_ENABLED               │
                     └──────────────────────────────────────┘
                                      │
                                      ▼
                     ┌──────────────────────────────────────┐
                     │     5. Enter CSP Motion Operation     │
                     ├──────────────────────────────────────┤
                     │ Write Mode of Operation (0x6060=8)   │
                     │ Read Actual Position (0x6064)        │
                     │ Initialize Target Position (607A)    │
                     └──────────────────────────────────────┘
                                      │
                                      ▼
                     ┌──────────────────────────────────────┐
                     │     6. Real-Time Cyclic Operation     │
                     ├──────────────────────────────────────┤
                     │ loop at 1 kHz (or higher):           │
                     │   - Sleep until next cycle           │
                     │   - ecrt_master_application_time()   │
                     │   - ecrt_master_sync_reference_clock │
                     │   - ecrt_master_sync_slave_clocks    │
                     │   - Receive / process domain         │
                     │   - Generate new target position     │
                     │   - Write ControlWord = 0x000F       │
                     │   - Write OperationMode = 8 (CSP)     │
                     │   - Write new TargetPosition         │
                     │   - Queue & send domain              │
                     └──────────────────────────────────────┘
                                      │
                                      ▼
                     ┌──────────────────────────────────────┐
                     │     7. Monitoring & Fault Handling    │
                     ├──────────────────────────────────────┤
                     │ Read status word (0x6041) each cycle │
                     │ Detect faults (bit3)                 │
                     │ Detect target reached (0x0400)       │
                     │ Optionally read torque/velocity      │
                     │ Execute FAULT RESET if needed        │
                     └──────────────────────────────────────┘
                                      │
                                      ▼
                     ┌──────────────────────────────────────┐
                     │             8. Shutdown               │
                     ├──────────────────────────────────────┤
                     │ Stop real-time thread               │
                     │ Write ControlWord=0 (disable)       │
                     │ Release EtherCAT master             │
                     └──────────────────────────────────────┘
在没有实时内核的 Jetson 上控制 EtherCAT 电机时,建议锁定 CPU 频率以确保与 EtherCAT 设备的稳定同步。
编译示例后,在终端中运行以下命令:
sudo jetson_clocks # lock CPU frequency for stability
sudo ./ethercat_master
执行程序后,等待约两秒钟——电机将开始循环运动。
资源
技术支持与产品讨论
感谢您选择我们的产品!我们在这里为您提供不同的支持,以确保您使用我们产品的体验尽可能顺畅。我们提供多种沟通渠道,以满足不同的偏好和需求。