为 reComputer Jetson 安装 Pytorch
本 wiki 演示了如何在您的 reComputer 上安装 NVIDIA 优化的 PyTorch,匹配您的 JetPack 版本。还介绍了如何使用虚拟环境(conda)来管理多个 PyTorch 版本以进行开发和部署。
前提条件
- 已安装 JetPack 的 reComputer
- 互联网连接
为 reComputer 安装 PyTorch
在这里,我们将介绍如何在 Jetpack 5 和 Jetpack 6 这两个常用版本中安装支持 CUDA 的 PyTorch。
- JP5.1.3
- JP6.2
- 其他版本
在 reComputer 中,Jetpack 5 的常用版本是 5.1.3。在这里,我们将使用它来介绍如何安装 PyTorch。
步骤 1. 更新系统并安装依赖项:
sudo apt-get -y update
sudo apt-get install -y python3-pip libopenblas-dev
步骤 2. 下载官方 PyTorch wheel(示例:适用于 JetPack 5.1.3、Python 3.8 的 torch-2.1.0):
wget https://developer.download.nvidia.com/compute/redist/jp/v512/pytorch/torch-2.1.0a0+41361538.nv23.06-cp38-cp38-linux_aarch64.whl
pip install torch-2.1.0a0+41361538.nv23.06-cp38-cp38-linux_aarch64.whl
如果您需要支持 Jetpack 5.1.3 的更新版本的 torch,请从这里下载编译好的 wheel 文件(torch-2.2 for python3.8)。
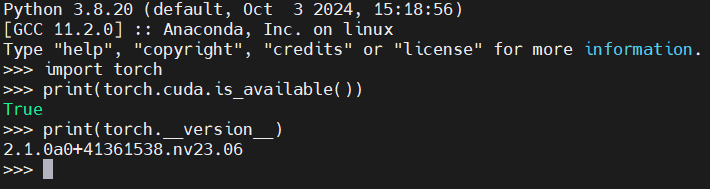
步骤 3. 验证安装:
import torch
print(torch.cuda.is_available())
print(torch.__version__)
在 reComputer 中,Jetpack 6 的常用版本是 6.2。这里,我们将使用它来介绍如何安装 PyTorch。
步骤 1. 更新系统并安装依赖项:
sudo apt-get -y update
sudo apt-get install -y python3-pip libopenblas-dev
步骤 2. 从这里安装 cuSPARSELt(PyTorch 24.06+ 版本需要):
cuSPARSELt 是 NVIDIA 开发的高性能 CUDA 库,专门用于稀疏矩阵乘法。它主要用于加速稀疏权重下的矩阵乘法运算,这在大模型推理和稀疏神经网络中很常见。在新版本的 PyTorch(PyTorch 24.06+)中,它会自动调用 cusparselt 来提高稀疏模型的推理速度,特别是在像 Jetson 这样的嵌入式 GPU 上,可以显著提升效率。
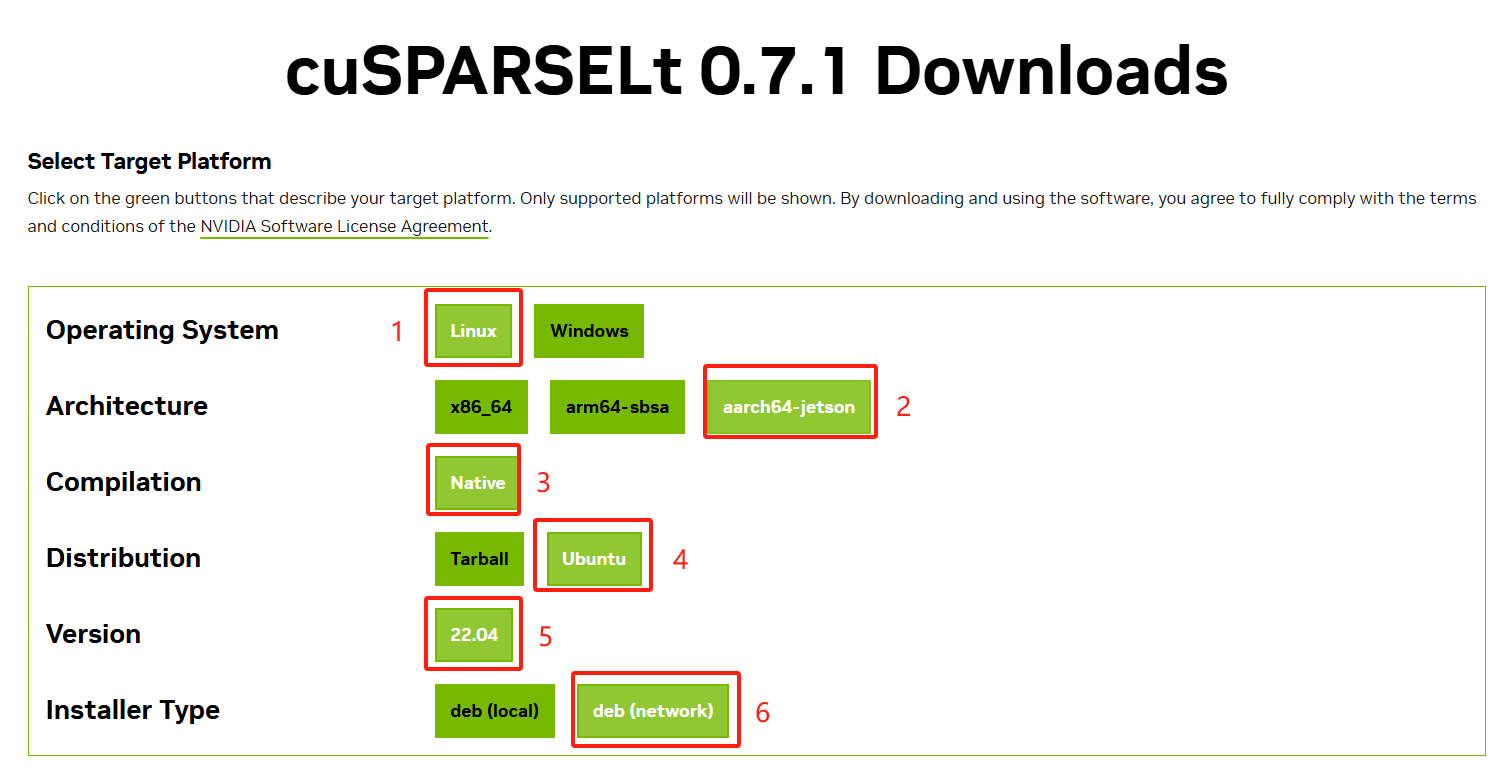
步骤 3. 根据上图所示选择的版本,您将获得以下安装命令:
wget https://developer.download.nvidia.com/compute/cusparselt/0.7.1/local_installers/cusparselt-local-tegra-repo-ubuntu2204-0.7.1_1.0-1_arm64.deb
sudo dpkg -i cusparselt-local-tegra-repo-ubuntu2204-0.7.1_1.0-1_arm64.deb
sudo cp /var/cusparselt-local-tegra-repo-ubuntu2204-0.7.1/cusparselt-*-keyring.gpg /usr/share/keyrings/
sudo apt-get update
sudo apt-get -y install libcusparselt0 libcusparselt-dev
步骤 4. 下载并安装 PyTorch(示例:适用于 JetPack 6.2、Python 3.10 的 torch-2.5.0):
wget https://developer.download.nvidia.cn/compute/redist/jp/v61/pytorch/torch-2.5.0a0+872d972e41.nv24.08.17622132-cp310-cp310-linux_aarch64.whl
pip install torch-2.5.0a0+872d972e41.nv24.08.17622132-cp310-cp310-linux_aarch64.whl
如果您需要支持 Jetpack 6.2 的更新版本的 torch,请从这里下载编译好的 wheel 文件(torch-2.7 for python3.10)。
步骤 5. 验证安装:
import torch
print(torch.cuda.is_available())

步骤 1. 更新系统并安装依赖项:
sudo apt-get -y update
sudo apt-get install -y python3-pip libopenblas-dev
这里是 NVIDIA 官方提供的支持 CUDA 的 PyTorch 编译轮文件。
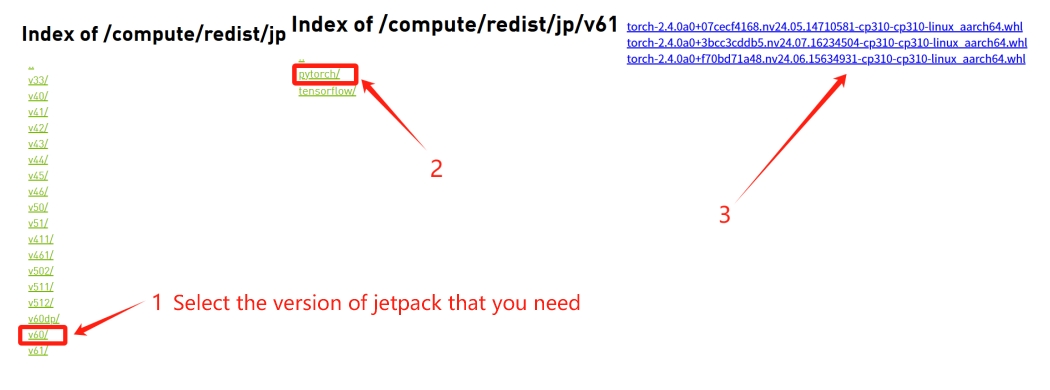
步骤 2. 根据您的 JetPack 版本和 Python 版本下载相应的轮文件。
# Download the wheel file
wget https://developer.download.nvidia.cn/compute/redist/jp/v60/pytorch/torch-2.4.0a0+f70bd71a48.nv24.06.15634931-cp310-cp310-linux_aarch64.whl
# Install the wheel file
pip install torch-2.4.0a0+f70bd71a48.nv24.06.15634931-cp310-cp310-linux_aarch64.whl
步骤 3. 验证安装:
import torch
print(torch.cuda.is_available())
使用 Conda 管理多个 PyTorch 版本
Miniconda 是 Conda 包管理器的轻量级安装程序,提供了一个最小化环境来快速创建和管理 Python 环境和包。
步骤 1. 安装 Miniconda:
wget https://repo.anaconda.com/miniconda/Miniconda3-latest-Linux-aarch64.sh
bash Miniconda3-latest-Linux-aarch64.sh
- 按照说明操作并输入"yes"同意条款。
- 安装路径建议使用默认设置,例如 ~/miniconda3。
- 最后,提示是否自动添加到 .bashrc。建议输入"yes"。
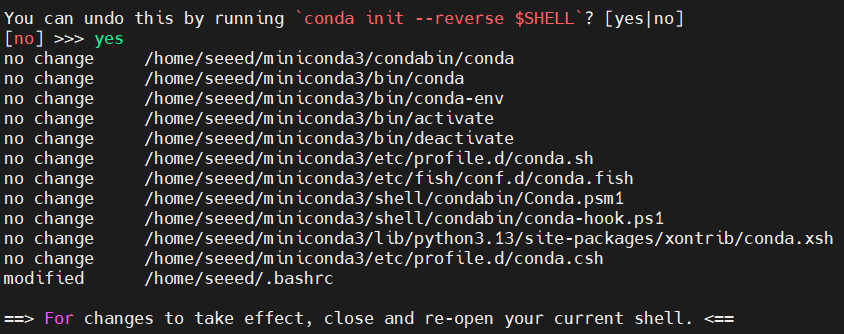
步骤 2. 初始化和配置 conda:
source ~/.bashrc
# Verify if conda is functioning properly
conda --version
# Disable automatic entry into the conda base environment
conda config --set auto_activate_base false
# Close and reopen the terminal. By default, it will not enter the base environment.
步骤 3. 创建一个新环境并安装特定的 PyTorch wheel:
conda create -n torch_2.0 python=3.8
conda activate torch_2.0
步骤 4. 下载并安装 PyTorch wheel 文件,如前面章节所示。
更多详细信息,请参阅 NVIDIA PyTorch 安装指南
资源
技术支持与产品讨论
感谢您选择我们的产品!我们在这里为您提供不同的支持,以确保您使用我们产品的体验尽可能顺畅。我们提供多种沟通渠道,以满足不同的偏好和需求。