Matter开发框架概述
本文是Seeed Studio XIAO ESP32开发Matter系列的第四个教程。如果您还没有阅读之前的教程,我们建议您先阅读它们,以检查您的设备是否已按要求配置。
通过我们的综合教程,踏上Matter开发世界的启发之旅。通过经典灯光示例的视角,我们将阐明构成Matter开发基础的基本概念和知识。从集群和属性到命令等等,本教程将为您提供自信地导航Matter框架的工具。准备好开启您的Matter开发技能,让我们深入连接设备的精彩世界!
教程大纲
在本节中,我们将重点关注ESP-Matter中提供的light示例,它详细描述了Matter开发框架中集群、属性和命令的基本概念。通过阅读本文,您将能够更好地理解Matter开发框架的结构和认知。
理解灯光示例
首先,让我们看看ESP-Matter环境中的文件目录及其作用。
- esp-matter/
   - components/
      - esp_matter
      - esp_matter_bridge
      - esp_matter_console
      - esp_matter_controller
      - esp_matter_rainmaker
      - esp_matter_thread_br
   - connectedhomeip/
   - device_hal/
      - button_driver
      - device
      - led_driver
   - docs/
   - examples/
   - tools/
      - mfg_tool
   CMakeLists.txt
   RELEASE_NOTES.md
   export.sh
   install.sh
   requirements.txt
   ...
esp-matter:这是整个 Matter 开发框架的根目录。
components:此目录包含各种组件,是 Matter 框架的核心。
- esp_matter:这是 Matter 协议栈在 ESP32 上的实现,包括数据模型、应用层逻辑等。
- esp_matter_bridge:此组件负责将 ESP 设备桥接到其他非 ESP 设备,实现互操作性。
- esp_matter_console:这是一个基于 REPL 的交互式控制台,用于调试和控制 Matter 设备。
- esp_matter_controller:此组件实现了 Matter 控制器的功能,能够控制其他 Matter 设备。
- esp_matter_rainmaker:此组件与乐鑫的 RainMaker 云平台集成,实现云端控制。
- esp_matter_thread_br:此组件实现了 Thread 边界路由器功能,用于创建 Thread 网络。
connectedhomeip:这是 Matter 协议栈的上游开源项目,ESP Matter 从中同步代码。
device_hal:此目录包含硬件抽象层驱动程序。
- button_driver:按钮驱动程序。
- device:设备抽象,定义通用设备接口。
- led_driver:LED 驱动程序。
docs:这是存储 ESP-Matter 开发文档和 API 参考手册的地方。
examples:各种示例代码,演示如何使用 Matter 框架进行开发。
tools:包含各种开发工具脚本。
- mfg_tool:用于生成制造商证书的工具。
CMakeLists.txt:CMake 构建脚本,定义项目的编译规则。
RELEASE_NOTES.md:发布说明,记录每个版本的变更。
export.sh:导出脚本,用于导出 Matter 相关的环境变量。
install.sh:安装脚本,用于安装 Matter 开发所需的依赖项和工具链。
requirements.txt:Python 依赖项列表,指定运行 Matter 开发框架所需的 Python 库。
这种目录结构体现了 Matter 开发框架的模块化设计理念。核心协议栈、硬件抽象、应用组件、辅助工具等各部分各司其职,同时有机结合,为开发者提供了完整的 Matter 开发环境。
以 examples/light 为例,ESP-Matter 提供的示例结构如下:
- light/
   - main/
      - CMakeLists.txt
      - app_driver.cpp
      - app_main.cpp
      - app_priv.h
      - idf_components.yml
   CMakeLists.txt
   README.md
   partitions.csv
   sdkconfig.defaults
   ...
-
main: 这个子目录包含主应用程序代码和配置文件。
- CMakeLists.txt: 主应用程序的 CMake 构建脚本。
- app_driver.cpp: 灯光应用程序的驱动代码。
- app_main.cpp: 灯光应用程序的主入口点。
- app_priv.h: 包含灯光应用程序私有声明的头文件。
- idf_components.yml: 灯光应用程序中使用的 ESP-IDF 组件的配置文件。
-
CMakeLists.txt: 灯光示例的顶级 CMake 构建脚本。
-
README.md: 提供灯光示例信息和说明的自述文件。
-
partitions.csv: 定义灯光示例分区表的文件。
-
sdkconfig.defaults: 灯光示例的默认配置设置。
设备初始化
接下来,我们深入灯光的代码,通过代码分析和理论相结合的方式加深对 Matter 开发过程的理解。以下代码位于 manin/app_main.cpp。
app_driver_handle_t light_handle = app_driver_light_init();
app_driver_handle_t button_handle = app_driver_button_init();
app_reset_button_register(button_handle);
app_driver_handle_t light_handle = app_driver_light_init();:这行代码初始化灯光驱动程序并返回灯光驱动程序实例的句柄。
app_driver_handle_t button_handle = app_driver_button_init();:与灯光初始化类似,这行代码初始化按钮驱动程序。
app_reset_button_register(button_handle);:这行代码为特定功能注册按钮,用于处理重置操作。
以 app_driver_light_init() 函数为例,以下程序初始化所有灯泡,但只使用第一个(设置为默认颜色和亮度值)。这也是示例程序只能使用一个灯泡的原因。
// app_driver.cpp
app_driver_handle_t app_driver_light_init()
{
#if CONFIG_BSP_LEDS_NUM > 0
    /* Initialize led */
    led_indicator_handle_t leds[CONFIG_BSP_LEDS_NUM];
    ESP_ERROR_CHECK(bsp_led_indicator_create(leds, NULL, CONFIG_BSP_LEDS_NUM));
    led_indicator_set_hsv(leds[0], SET_HSV(DEFAULT_HUE, DEFAULT_SATURATION, DEFAULT_BRIGHTNESS));

    return (app_driver_handle_t)leds[0];
#else
    return NULL;
#endif
}
创建 Matter 节点
Matter 设备配置主线代码的下一步是创建一个 Matter 节点。代码如下:
node::config_t node_config;

// node handle can be used to add/modify other endpoints.
node_t *node = node::create(&node_config, app_attribute_update_cb, app_identification_cb);
ABORT_APP_ON_FAILURE(node != nullptr, ESP_LOGE(TAG, "Failed to create Matter node"));
Matter 数据模型是在 Matter 生态系统中表示和组织数据的标准化方式。它为设备、属性和交互定义了通用语言和结构,实现了 Matter 兼容设备之间的互操作性和无缝通信。
以下图表显示了如何在 Matter 数据模型中表示这一点的简化视图。
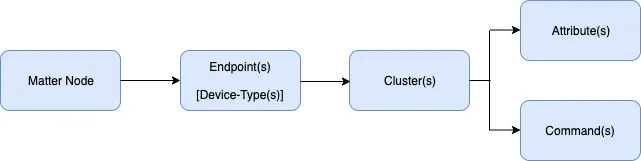
Matter 节点: Matter 节点表示 Matter 生态系统中的物理设备或逻辑实体。它是 Matter 数据模型的顶级组件。每个 Matter 节点都有唯一标识符,可以包含一个或多个端点。
- Matter 节点表示 Matter 生态系统中的物理设备。
- 它就像一个可以包含多个端点(房间)的房子。
- 每个 Matter 节点都有自己的唯一标识符,用于在网络中进行识别和寻址。
设置端点的属性
一旦创建了 Matter 节点,就需要为端点的属性设置默认值。
extended_color_light::config_t light_config;
light_config.on_off.on_off = DEFAULT_POWER;
light_config.on_off.lighting.start_up_on_off = nullptr;
light_config.level_control.current_level = DEFAULT_BRIGHTNESS;
light_config.level_control.lighting.start_up_current_level = DEFAULT_BRIGHTNESS;
light_config.color_control.color_mode = (uint8_t)ColorControl::ColorMode::kColorTemperature;
light_config.color_control.enhanced_color_mode = (uint8_t)ColorControl::ColorMode::kColorTemperature;
light_config.color_control.color_temperature.startup_color_temperature_mireds = nullptr;
-
light_config.on_off.on_off = DEFAULT_POWER;- 将端点的初始开/关状态设置为
DEFAULT_POWER。 DEFAULT_POWER是一个预定义常量,表示默认电源状态(例如,true表示开,false表示关)。
- 将端点的初始开/关状态设置为
-
light_config.on_off.lighting.start_up_on_off = nullptr;- 将端点的启动开/关状态设置为
nullptr。 - 当设备重启或电源循环时,如果此值为
nullptr,表示使用最后的开/关状态。 - 如果设置为非
nullptr值,则表示使用指定的开/关状态。
- 将端点的启动开/关状态设置为
-
light_config.level_control.current_level = DEFAULT_BRIGHTNESS;- 将端点的初始亮度级别设置为
DEFAULT_BRIGHTNESS(64)。 DEFAULT_BRIGHTNESS是一个预定义常量,表示默认亮度级别(例如,0 到 254 之间的值)。
- 将端点的初始亮度级别设置为
-
light_config.level_control.lighting.start_up_current_level = DEFAULT_BRIGHTNESS;- 将端点的启动亮度级别设置为
DEFAULT_BRIGHTNESS(64)。 - 当设备重启或电源循环时,如果此值为非
nullptr,表示使用指定的亮度级别。 - 如果设置为
nullptr,则表示使用最后的亮度级别。
- 将端点的启动亮度级别设置为
-
light_config.color_control.color_mode = (uint8_t)ColorControl::ColorMode::kColorTemperature;- 将端点的颜色模式设置为
ColorControl::ColorMode::kColorTemperature。 - 这意味着端点使用色温模式,其中灯光的颜色通过调整色温来控制。
(uint8_t)是一个类型转换,将枚举值转换为无符号 8 位整数。
- 将端点的颜色模式设置为
-
light_config.color_control.enhanced_color_mode = (uint8_t)ColorControl::ColorMode::kColorTemperature;- 将端点的增强颜色模式设置为
ColorControl::ColorMode::kColorTemperature。 - 增强颜色模式提供更多的颜色控制选项,但这里也设置为色温模式。
- 将端点的增强颜色模式设置为
-
light_config.color_control.color_temperature.startup_color_temperature_mireds = nullptr;- 将端点的启动色温设置为
nullptr。 - 当设备重启或电源循环时,如果此值为
nullptr,表示使用最后的色温设置。 - 如果设置为非
nullptr值,则表示使用指定的色温值。
- 将端点的启动色温设置为
Matter 中的属性就像设备的属性或特征。它们存储有关设备状态的信息,例如设备是开启还是关闭、亮度级别或色温。这些属性被组织成称为集群的组,这些集群与设备的特定功能相关。
属性使不同设备和应用程序能够更轻松地通信和无缝协作。通过拥有表示和访问设备属性的标准方式,Matter 简化了智能家居系统的开发,并确保来自各种品牌的设备能够高效地相互交互。
esp_matter_endpoint.h 是 ESP Matter SDK 中的一个重要头文件,它定义了与端点相关的常量、数据类型和函数。在 Matter 中,端点表示设备的逻辑接口,每个端点包含一组属性和命令,用于描述和控制设备的特定功能。
namespace extended_color_light {
typedef struct config {
    cluster::descriptor::config_t descriptor;
    cluster::identify::config_t identify;
    cluster::groups::config_t groups;
    cluster::scenes_management::config_t scenes_management;
    cluster::on_off::config_t on_off;
    cluster::level_control::config_t level_control;
    cluster::color_control::config_t color_control;
} config_t;

uint32_t get_device_type_id();
uint8_t get_device_type_version();
endpoint_t *create(node_t *node, config_t *config, uint8_t flags, void *priv_data);
esp_err_t add(endpoint_t *endpoint, config_t *config);
} /* extended_color_light */
创建端点和自动匹配集群
在上面,我们首先提到了在 Matter 中很重要的两个术语,端点和集群。
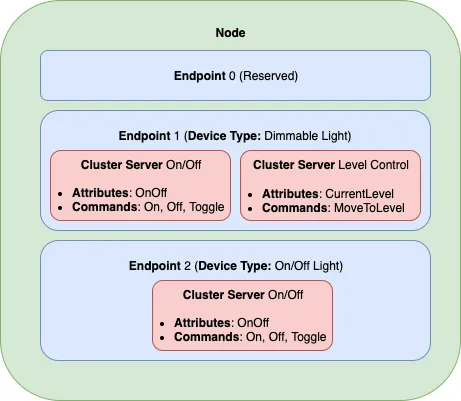
端点 [设备类型]: 端点是 Matter 节点内特定功能或服务的逻辑表示。它封装了与特定设备类型相关的一组能力和行为。一个 Matter 节点可以有多个端点,每个端点代表不同的设备类型。设备类型定义了端点的特定特征和功能。Matter 定义了一组标准设备类型,如灯泡、恒温器、门锁等。每种设备类型都有唯一的标识符和与之关联的预定义集群、属性和命令集。
- 端点是 Matter 节点内的逻辑组件,代表设备的特定功能或服务。
- 就像房子里的房间一样,每个端点都有自己专门的用途,如卧室、厨房或客厅。
- 每个端点都与特定的设备类型相关联,如灯泡、恒温器或门锁。
- 一个 Matter 节点可以有多个端点,每个端点代表不同的设备类型和功能。
集群: 集群是端点内相关属性和命令的逻辑分组。它们代表设备的特定功能或特性。集群提供了一种组织和分类端点能力的方式。例如,"开/关集群"包含与设备开关相关的属性和命令,而"电平控制集群"处理控制设备亮度或电平的功能。
- 集群是端点内的逻辑分组,包含相关的属性和命令。
- 它就像房间里的家具或设备,如灯具、电视或空调,每个都有自己的属性和操作。
- 每个集群代表设备的特定功能或特性。
- 例如,"开/关集群"包含与设备开关状态相关的属性和命令,而"电平控制集群"包含用于调节设备亮度或电平的属性和命令。
- 一个端点可以有多个集群,每个集群负责不同的功能。
总结来说,一个 Matter 节点就像一座房子,包含多个端点(房间)。每个端点就像一个房间,代表设备的特定功能或服务。集群就像每个房间里的家具或设备,包含用于控制和交互的相关属性和命令。
这种分层组织允许设备清楚地描述其功能和特征,使应用程序和其他设备更容易与它们交互和控制。通过标准化设备类型、集群、属性和命令,Matter 实现了不同制造商设备之间的互操作性和兼容性。
在代码中,设置属性后,最终通过以下代码片段创建端点。它会自动匹配设置属性的集群。
endpoint_t *endpoint = extended_color_light::create(node, &light_config, ENDPOINT_FLAG_NONE, light_handle);
ABORT_APP_ON_FAILURE(endpoint != nullptr, ESP_LOGE(TAG, "Failed to create extended color light endpoint"));
如何实现自动匹配聚类?让我们以设置属性的代码片段为例。
light_config.level_control.lighting.start_up_current_level = DEFAULT_BRIGHTNESS;
light_config.level_control 是在端点(esp_matter_endpoint.h)中定义的属性。而 light_config.level_control.lighting 是在集群(esp_matter_cluster)中定义的属性。通过这种设置,系统可以自动匹配属性对应的集群,无需开发者手动设置。
使用默认值首次设置 Matter 设备
一旦配置了上述属性、集群和端点,我们就可以开始启动 Matter 设备。启动的步骤和方法如下。
light_endpoint_id = endpoint::get_id(endpoint);
ESP_LOGI(TAG, "Light created with endpoint_id %d", light_endpoint_id);

/* Matter start */
err = esp_matter::start(app_event_cb);
ABORT_APP_ON_FAILURE(err == ESP_OK, ESP_LOGE(TAG, "Failed to start Matter, err:%d", err));

/* Starting driver with default values 使用默认值启动驱动程序 */
app_driver_light_set_defaults(light_endpoint_id);
如您所见,设置默认值的函数是 app_driver_light_set_defaults(),我们需要传入一个端点 ID 作为参数。我们需要关注如何获取某个簇、某个属性的值,以及如何设置默认的簇、属性值。秘诀在 app_driver.cpp 中展示。
esp_err_t err = ESP_OK;
void *priv_data = endpoint::get_priv_data(endpoint_id);
led_indicator_handle_t handle = (led_indicator_handle_t)priv_data;
node_t *node = node::get();
endpoint_t *endpoint = endpoint::get(node, endpoint_id);
cluster_t *cluster = NULL;
attribute_t *attribute = NULL;
esp_matter_attr_val_t val = esp_matter_invalid(NULL);

/* Setting brightness */
cluster = cluster::get(endpoint, LevelControl::Id);
attribute = attribute::get(cluster, LevelControl::Attributes::CurrentLevel::Id);
attribute::get_val(attribute, &val);
err |= app_driver_light_set_brightness(handle, &val);
-
获取集群:
- 要获取集群,您首先需要使用
endpoint::get(node, endpoint_id)函数获取端点的指针,其中node是节点的指针,endpoint_id是端点的 ID。 - 获得端点指针后,您可以使用
cluster::get(endpoint, LevelControl::Id)函数获取所需集群的指针,指定端点和集群 ID(在这种情况下是LevelControl::Id)。
- 要获取集群,您首先需要使用
-
获取特定属性:
- 获得集群指针后,您可以使用
attribute::get(cluster, LevelControl::Attributes::CurrentLevel::Id)函数获取该集群内特定属性的指针。 - 在此示例中,我们从
LevelControl集群检索CurrentLevel属性。
- 获得集群指针后,您可以使用
-
检索属性的值:
- 要检索属性的当前值,您需要声明一个
esp_matter_attr_val_t类型的变量来存储属性值。 - 在代码片段中,变量
val使用esp_matter_invalid(NULL)进行初始化。 - 然后,您可以使用
attribute::get_val(attribute, &val)函数获取属性的当前值并将其存储在val变量中。
- 要检索属性的当前值,您需要声明一个
-
设置灯光的亮度:
- 要设置灯光的亮度,您需要有与端点关联的 LED 指示器的句柄。
- 在代码片段中,通过将私有数据指针(
priv_data)转换为适当的类型(led_indicator_handle_t)来获取 LED 指示器句柄。 - 最后,您可以调用
app_driver_light_set_brightness(handle, &val)函数来设置 LED 指示器的亮度。 handle参数是 LED 指示器句柄,&val是指向包含所需亮度值的esp_matter_attr_val_t变量的指针。
以下是步骤摘要:
- 使用
endpoint::get(node, endpoint_id)获取端点指针。 - 使用
cluster::get(endpoint, LevelControl::Id)获取集群指针。 - 使用
attribute::get(cluster, LevelControl::Attributes::CurrentLevel::Id)获取属性指针。 - 使用
attribute::get_val(attribute, &val)检索属性的当前值。 - 使用
app_driver_light_set_brightness(handle, &val)设置灯光的亮度,其中handle是与端点关联的 LED 指示器句柄。
通过遵循这些步骤,您可以获取集群和属性的必要指针,检索属性的当前值,并相应地设置灯光的亮度。
数据更新和延迟持久化
在 app_driver.cpp 的代码中,属性的值通过使用 app_driver_attribute_update() 函数进行更新。
if (endpoint_id == light_endpoint_id) {
   led_indicator_handle_t handle = (led_indicator_handle_t)driver_handle;
   if (cluster_id == OnOff::Id) {
      if (attribute_id == OnOff::Attributes::OnOff::Id) {
            err = app_driver_light_set_power(handle, val);
      }
   } else if (cluster_id == LevelControl::Id) {
      if (attribute_id == LevelControl::Attributes::CurrentLevel::Id) {
            err = app_driver_light_set_brightness(handle, val);
      }
   } else if (cluster_id == ColorControl::Id) {
      if (attribute_id == ColorControl::Attributes::CurrentHue::Id) {
            err = app_driver_light_set_hue(handle, val);
      } else if (attribute_id == ColorControl::Attributes::CurrentSaturation::Id) {
            err = app_driver_light_set_saturation(handle, val);
      } else if (attribute_id == ColorControl::Attributes::ColorTemperatureMireds::Id) {
            err = app_driver_light_set_temperature(handle, val);
      }
   }
}
这个代码片段定义了一个名为 app_driver_attribute_update 的函数,该函数接受多个参数,包括驱动句柄(driver_handle)、端点ID(endpoint_id)、簇ID(cluster_id)、属性ID(attribute_id)和指向属性值的指针(val)。
该函数的目的是根据接收到的数据更新灯光端点的属性值。它遵循特定的逻辑来确定需要更新灯光端点的哪个属性。
以下是数据更新逻辑的逐步分解:
-
函数首先检查
endpoint_id是否与light_endpoint_id匹配。这确保更新是针对灯光端点的。 -
如果
endpoint_id匹配,函数将driver_handle转换为适当的类型(led_indicator_handle_t),以获取与灯光端点关联的LED指示器的句柄。 -
然后函数检查
cluster_id以确定属性属于哪个簇。它支持三个簇:OnOff、LevelControl和ColorControl。 -
根据
cluster_id,函数进一步检查attribute_id以识别该簇内的特定属性。 -
基于
cluster_id和attribute_id,函数调用相应的设置器函数来更新属性值:- 如果
cluster_id是OnOff::Id且attribute_id是OnOff::Attributes::OnOff::Id,它调用app_driver_light_set_power(handle, val)来设置灯光的电源状态。 - 如果
cluster_id是LevelControl::Id且attribute_id是LevelControl::Attributes::CurrentLevel::Id,它调用app_driver_light_set_brightness(handle, val)来设置灯光的亮度级别。 - 如果
cluster_id是ColorControl::Id,它进一步检查attribute_id:- 如果
attribute_id是ColorControl::Attributes::CurrentHue::Id,它调用app_driver_light_set_hue(handle, val)来设置灯光的色调。 - 如果
attribute_id是ColorControl::Attributes::CurrentSaturation::Id,它调用app_driver_light_set_saturation(handle, val)来设置灯光的饱和度。 - 如果
attribute_id是ColorControl::Attributes::ColorTemperatureMireds::Id,它调用app_driver_light_set_temperature(handle, val)来设置灯光的色温。
- 如果
- 如果
总的来说,这个函数作为更新灯光端点属性值的中心点。它接收必要的信息(端点ID、簇ID、属性ID和属性值),并根据簇和属性ID将更新分派给适当的设置器函数。
通过以这种方式组织逻辑,代码变得更加模块化且更易于维护。它允许通过单个函数更新灯光端点的不同属性(电源状态、亮度、色调、饱和度、色温),简化了基于接收数据更新灯光特性的过程。
但并非所有属性都会实时更新。将那些可能频繁变化的属性标记为延迟持久化的代码可以提高性能,同时减少对非易失性存储器的写入次数并延长设备的使用寿命。
/* Mark deferred persistence for some attributes that might be changed rapidly */
cluster_t *level_control_cluster = cluster::get(endpoint, LevelControl::Id);
attribute_t *current_level_attribute = attribute::get(level_control_cluster, LevelControl::Attributes::CurrentLevel::Id);
attribute::set_deferred_persistence(current_level_attribute);

cluster_t *color_control_cluster = cluster::get(endpoint, ColorControl::Id);
attribute_t *current_x_attribute = attribute::get(color_control_cluster, ColorControl::Attributes::CurrentX::Id);
attribute::set_deferred_persistence(current_x_attribute);
定义您自己的数据模型
本节演示如何创建在 Matter 规范中定义的标准端点、集群、属性和命令。
端点
可以通过编辑示例的 app_main.cpp 中创建的端点/设备类型来自定义设备。示例:
- on_off_light:
   on_off_light::config_t light_config;
   endpoint_t *endpoint = on_off_light::create(node, &light_config, ENDPOINT_FLAG_NONE);
- temperature_sensor:
    esp_matter::endpoint::temperature_sensor::config_t temperature_sensor_config;
    endpoint_t *endpoint = temperature_sensor::create(node, &temperature_sensor_config, ENDPOINT_FLAG_NONE, NULL);
- fan:
   fan::config_t fan_config;
   endpoint_t *endpoint = fan::create(node, &fan_config, ENDPOINT_FLAG_NONE);
- door_lock:
   door_lock::config_t door_lock_config;
   endpoint_t *endpoint = door_lock::create(node, &door_lock_config, ENDPOINT_FLAG_NONE);
- window_covering_device:
   window_covering_device::config_t window_covering_device_config(static_cast<uint8_t>(chip::app::Clusters::WindowCovering::EndProductType::kTiltOnlyInteriorBlind));
   endpoint_t *endpoint = window_covering_device::create(node, &window_covering_config, ENDPOINT_FLAG_NONE);
window_covering_device config_t 结构包含一个构造函数,允许指定与默认类型不同的终端产品类型,默认类型是"卷帘"。
一旦 config_t 实例被实例化,其终端产品类型就无法修改。
- 泵
   pump::config_t pump_config(1, 10, 20);
   endpoint_t *endpoint = pump::create(node, &pump_config, ENDPOINT_FLAG_NONE);
pump config_t 结构包含一个构造函数,允许指定最大压力、最大速度和最大流量值。如果未设置这些值,默认情况下它们将被设置为 null。
一旦 config_t 实例被实例化,这三个值就无法修改。
集群
还可以向端点添加其他集群。示例:
- on_off:
   on_off::config_t on_off_config;
   cluster_t *cluster = on_off::create(endpoint, &on_off_config, CLUSTER_FLAG_SERVER, on_off::feature::lighting::get_id());
- temperature_measurement:
   temperature_measurement::config_t temperature_measurement_config;
   cluster_t *cluster = temperature_measurement::create(endpoint, &temperature_measurement_config, CLUSTER_FLAG_SERVER);
- window_covering:
   window_covering::config_t window_covering_config(static_cast<uint8_t>(chip::app::Clusters::WindowCovering::EndProductType::kTiltOnlyInteriorBlind));
   cluster_t *cluster = window_covering::create(endpoint, &window_covering_config, CLUSTER_FLAG_SERVER);
window_covering config_t 结构包含一个构造函数,允许指定与默认类型不同的终端产品类型,默认类型是"卷帘"。
一旦 config_t 实例被实例化,其终端产品类型就无法修改。
- pump_configuration_and_control:
   pump_configuration_and_control::config_t pump_configuration_and_control_config(1, 10, 20);
   cluster_t *cluster = pump_configuration_and_control::create(endpoint, &pump_configuration_and_control_config, CLUSTER_FLAG_SERVER);
pump_configuration_and_control config_t 结构包含一个构造函数,允许指定最大压力、最大速度和最大流量值。如果未设置这些值,默认情况下它们将被设置为 null。
一旦 config_t 实例被实例化,这三个值就无法修改。
属性和命令
还可以向集群添加其他属性和命令。 示例:
- 属性:on_off:
   bool default_on_off = true;
   attribute_t *attribute = on_off::attribute::create_on_off(cluster, default_on_off);
- attribute: cluster_revision:
   uint16_t default_cluster_revision = 1;
   attribute_t *attribute = global::attribute::create_cluster_revision(cluster, default_cluster_revision);
- command: toggle:
command_t *command = on_off::command::create_toggle(cluster);
- command: move_to_level:
command_t *command = level_control::command::create_move_to_level(cluster);
特性
也可以添加适用于集群的可选特性。
- feature: taglist: 描述符集群:
   cluster_t* cluster = cluster::get(endpoint, Descriptor::Id);
   descriptor::feature::taglist::add(cluster);
添加自定义数据模型字段
本节演示如何创建自定义端点、集群、属性和命令,这些不在 Matter 规范中定义,可以特定于供应商。
端点
可以创建非标准端点,无需任何集群。
- 端点创建:
endpoint_t *endpoint = endpoint::create(node, ENDPOINT_FLAG_NONE);
集群
也可以创建非标准/自定义集群:
- 集群创建:
   uint32_t custom_cluster_id = 0x131bfc00;
   cluster_t *cluster = cluster::create(endpoint, custom_cluster_id, CLUSTER_FLAG_SERVER);
Attributes and Commands
还可以在任何集群上创建非标准/自定义属性:
- Attribute create:
   uint32_t custom_attribute_id = 0x0;
   uint16_t default_value = 100;
   attribute_t *attribute = attribute::create(cluster, custom_attribute_id, ATTRIBUTE_FLAG_NONE, esp_matter_uint16(default_value);
- Command create:
   static esp_err_t command_callback(const ConcreteCommandPath &command_path, TLVReader &tlv_data, void
   *opaque_ptr)
   {
      ESP_LOGI(TAG, "Custom command callback");
      return ESP_OK;
   }

   uint32_t custom_command_id = 0x0;
   command_t *command = command::create(cluster, custom_command_id, COMMAND_FLAG_ACCEPTED, command_callback);
Matter 数据模型以分层方式组织这些组件。一个 Matter 节点包含一个或多个端点,每个端点代表一个特定的设备类型。每个端点由多个集群组成,这些集群将相关的属性和命令分组。属性存储集群的状态和配置,而命令用于与设备交互和控制设备。
通过以这种方式构建数据模型,Matter 实现了不同制造商设备之间的互操作性和标准化。开发人员可以使用定义的设备类型、集群、属性和命令来创建能够无缝控制和与 Matter 兼容设备通信的应用程序。
Matter 数据模型为设备提供了一种通用语言和框架来描述其功能并相互交互,从而实现更统一和一致的智能家居体验。
技术支持与产品讨论
感谢您选择我们的产品!我们在这里为您提供不同的支持,以确保您使用我们产品的体验尽可能顺畅。我们提供多种沟通渠道,以满足不同的偏好和需求。