基于Jetson AGX Orin的多GMSL摄像头实时目标检测和3D重建
本wiki将使用reServer Industrial J501载板配合GMSL扩展板来介绍如何在多摄像头系统中部署实时目标检测和3D重建。
| NVIDIA Jetson AGX Orin模块 | reServer Industrial J501载板 | reServer Industrial J501-GMSL扩展板 |
|---|---|---|
 |  |  |
前提条件
- NVIDIA Jetson AGX Orin 模块 32GB/64GB
- 已刷入最新的 JetPack 6.2 SDK(支持 GMSL 扩展板)
- reServer Industrial J501 载板
- reServer Industrial J501-GMSL 扩展板
- GMSL 摄像头
GMSL 摄像头配置
硬件连接

为了获取 GMSL 摄像头的输入,我们需要首先配置串行器和解串器的格式。将它们添加到系统启动脚本中,以便每次系统启动时都能自动配置。
步骤 1. 创建配置脚本:
touch media-setup.sh
步骤 2. 将以下内容粘贴到 media-setup.sh 中:
#!/bin/bash
# Set Serializer & Deserializer Formats
media-ctl -d /dev/media0 --set-v4l2 '"ser_0_ch_0":1[fmt:YUYV8_1X16/1920x1536]'
media-ctl -d /dev/media0 --set-v4l2 '"ser_1_ch_1":1[fmt:YUYV8_1X16/1920x1536]'
media-ctl -d /dev/media0 --set-v4l2 '"ser_2_ch_2":1[fmt:YUYV8_1X16/1920x1536]'
media-ctl -d /dev/media0 --set-v4l2 '"ser_3_ch_3":1[fmt:YUYV8_1X16/1920x1536]'
media-ctl -d /dev/media0 --set-v4l2 '"ser_4_ch_0":1[fmt:YUYV8_1X16/1920x1536]'
media-ctl -d /dev/media0 --set-v4l2 '"ser_5_ch_1":1[fmt:YUYV8_1X16/1920x1536]'
media-ctl -d /dev/media0 --set-v4l2 '"ser_6_ch_2":1[fmt:YUYV8_1X16/1920x1536]'
media-ctl -d /dev/media0 --set-v4l2 '"ser_7_ch_3":1[fmt:YUYV8_1X16/1920x1536]'

media-ctl -d /dev/media0 --set-v4l2 '"des_0_ch_0":0[fmt:YUYV8_1X16/1920x1536]'
media-ctl -d /dev/media0 --set-v4l2 '"des_0_ch_1":0[fmt:YUYV8_1X16/1920x1536]'
media-ctl -d /dev/media0 --set-v4l2 '"des_0_ch_2":0[fmt:YUYV8_1X16/1920x1536]'
media-ctl -d /dev/media0 --set-v4l2 '"des_0_ch_3":0[fmt:YUYV8_1X16/1920x1536]'
media-ctl -d /dev/media0 --set-v4l2 '"des_1_ch_0":0[fmt:YUYV8_1X16/1920x1536]'
media-ctl -d /dev/media0 --set-v4l2 '"des_1_ch_1":0[fmt:YUYV8_1X16/1920x1536]'
media-ctl -d /dev/media0 --set-v4l2 '"des_1_ch_2":0[fmt:YUYV8_1X16/1920x1536]'
media-ctl -d /dev/media0 --set-v4l2 '"des_1_ch_3":0[fmt:YUYV8_1X16/1920x1536]'
步骤 3. 为 media-setup.sh 添加执行权限:
chmod +x media-setup.sh
步骤 4. 创建一个 systemd 服务:
sudo vim /etc/systemd/system/mediactl-init.service

# Add the following content:
[Unit]
Description=Set media-ctl formats at boot
After=multi-user.target

[Service]
Type=oneshot
ExecStart=/usr/local/bin/media-setup.sh
RemainAfterExit=true

[Install]
WantedBy=multi-user.target
步骤 5. 保存并退出后,启用该服务:
sudo systemctl daemon-reexec
sudo systemctl daemon-reload
sudo systemctl enable mediactl-init.service
sudo systemctl start mediactl-init.service
步骤 5. 重启设备并检查服务是否正在运行:
sudo systemctl status mediactl-init.service

#Use the following command to quickly start the camera and open a window to display the video stream:
gst-launch-1.0 v4l2src device=/dev/video0  ! xvimagesink -ev
gst-launch-1.0 v4l2src device=/dev/video1  ! xvimagesink -ev
gst-launch-1.0 v4l2src device=/dev/video2  ! xvimagesink -ev
gst-launch-1.0 v4l2src device=/dev/video3  ! xvimagesink -ev
gst-launch-1.0 v4l2src device=/dev/video4  ! xvimagesink -ev
gst-launch-1.0 v4l2src device=/dev/video5  ! xvimagesink -ev
gst-launch-1.0 v4l2src device=/dev/video6  ! xvimagesink -ev
gst-launch-1.0 v4l2src device=/dev/video7  ! xvimagesink -ev

我们的 GMSL 扩展板支持多达 8 个摄像头视频输入,并提供小于 1ms 的 PTP 时间戳精度,以确保 8 个视频数据流的同步。
快速部署 YOLO11 进行八个摄像头的实时目标检测
YOLOv11 是 Ultralytics 发布的实时目标检测模型,在速度、精度和效率之间提供了强大的平衡。YOLOv11 采用改进的架构和训练策略设计,在性能和部署灵活性方面都优于以前的版本。它特别适合边缘设备、自主系统和工业 AI 应用,支持检测、分割和跟踪等任务,具有高可靠性。
安装 YOLO11 并运行多摄像头目标检测
步骤 1. 下载并安装必要的软件包:
以下软件包是为带有 CUDA 12.6 的 JetPack 6.2 构建的。
onnxruntime_gpu-1.22.0-cp310-cp310-linux_aarch64.whl
torch-2.7.0-cp310-cp310-linux_aarch64.whl
torchvision-0.22.0-cp310-cp310-linux_aarch64.whl
#Install the packages using pip:
sudo apt update
sudo apt install python3-pip -y
pip install -U pip
pip install onnxruntime_gpu-1.22.0-cp310-cp310-linux_aarch64.whl
pip install torch-2.7.0-cp310-cp310-linux_aarch64.whl
pip install torchvision-0.22.0-cp310-cp310-linux_aarch64.whl
pip install ultralytics
Export the TensorRT model:
yolo export model=./models/yolo11n.pt format=engine device=0 half=True dynamic=True
yolo export model=./models/yolo11n-seg.pt format=engine device=0 half=True dynamic=True
yolo export model=./models/yolo11n-pose.pt format=engine device=0 half=True dynamic=True
运行以下 Python 脚本可以快速在八个摄像头上执行目标检测:
detect.py
import cv2
import time
import threading
import numpy as np
import torch
from ultralytics import YOLO

device = 'cuda' if torch.cuda.is_available() else 'cpu'
print(f"Using device: {device}")
model_detect = YOLO('./models/yolo11n.engine',task="detect")
model_seg = YOLO('./models/yolo11n-seg.engine',task="segment")
model_pose = YOLO('./models/yolo11n-pose.engine',task="pose")

camera_num = 8
frame_width, frame_height = 320, 240
frames = [np.zeros((frame_height, frame_width, 3), dtype=np.uint8) for _ in range(camera_num)]
locks = [threading.Lock() for _ in range(camera_num)]
running = True

def capture_thread(index):
    cap = cv2.VideoCapture(index)
    p_time = time.time()
    while running:
        detect_way = model_detect
        ret, frame = cap.read()
        frame_resized = cv2.resize(frame, (frame_width, frame_height))
        if index == 4 or index == 5:
            detect_way = model_seg
        if index ==6 or index == 7:
            detect_way = model_pose
        annotated = frame_resized.copy()
        results = detect_way.predict(
        source=frame_resized,
        device=device,
        verbose=False,
        stream=False,
        imgsz=640,
        conf=0.25
        )
        for r in results:
            annotated = r.plot()
        current_time = time.time()
        fps = 1 / (current_time - p_time)
        p_time = current_time
        cv2.putText(annotated, f"FPS: {fps:.2f}", (10, 25),
                        cv2.FONT_HERSHEY_SIMPLEX, 0.5, (0, 255, 255), 1, cv2.LINE_AA)

        with locks[index]:
            frames[index] = annotated

    cap.release()

def main():
    global running

    threads = []
    for i in range(camera_num):
        t = threading.Thread(target=capture_thread, args=(i,))
        t.start()
        threads.append(t)

    try:
        while True:
            frame_copy = []
            for i in range(camera_num):
                with locks[i]:
                    frame_copy.append(frames[i].copy())
            row1 = cv2.hconcat(frame_copy[:4])
            row2 = cv2.hconcat(frame_copy[4:8])
            result = cv2.vconcat([row1, row2])
            cv2.imshow("Multi-Camera", result)

            if cv2.waitKey(1) & 0xFF == ord('q'):
                break

    finally:
        running = False
        for t in threads:
            t.join()
        cv2.destroyAllWindows()

if __name__ == "__main__":
    main()
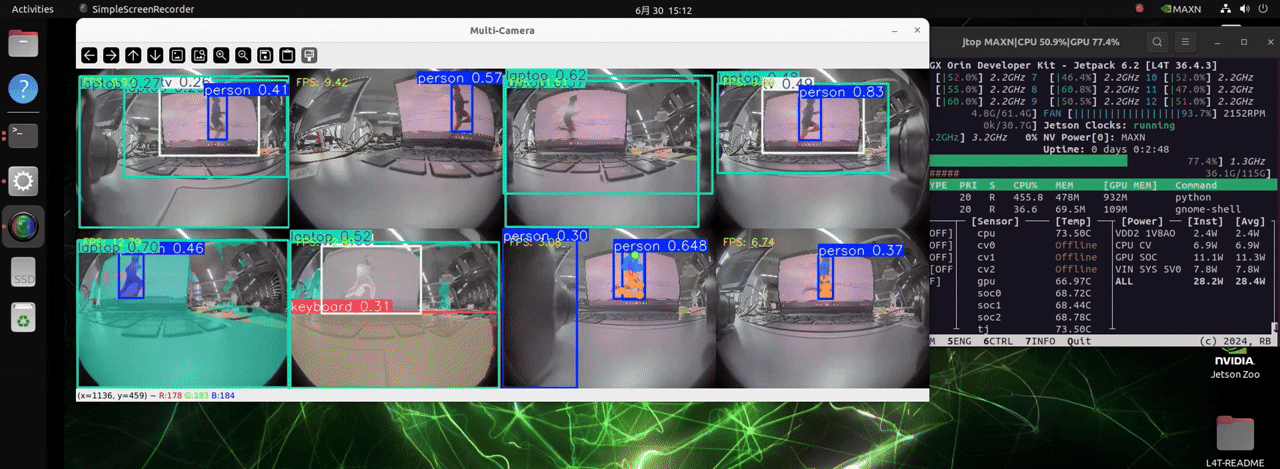
J501 配备了 NVIDIA AGX Orin 模块,拥有极高的计算能力。它可以处理多达 8 个摄像头,并加载三种不同检测任务的模型,实现实时目标检测。
快速部署 VGGT 进行 3D 重建
VGGT 是一个专为复杂环境中的 3D 理解和推理而设计的视觉语言模型。它结合多视角图像和语言输入来生成详细的 3D 场景表示,并回答关于环境的空间或语义问题。基于 transformer 架构构建,VGGT 在视觉定位、3D 目标定位和语言引导导航等任务中表现出色,使其非常适合机器人和具身 AI 应用。
安装 VGGT 环境并使用多摄像头运行 3D 重建
git clone https://github.com/facebookresearch/vggt.git
cd vggt
pip install -r requirements.txt
pip install -r requirements_demo.txt
运行以下脚本在八个摄像头上快速执行3D重建:
demo.py
import os
import glob
import time
import threading
import argparse
from typing import List, Optional

import numpy as np
import torch
from tqdm.auto import tqdm
import viser
import viser.transforms as viser_tf
import cv2
from PIL import Image
from defisheye import Defisheye

try:
    import onnxruntime
except ImportError:
    print("onnxruntime not found. Sky segmentation may not work.")

from visual_util import segment_sky, download_file_from_url
from vggt.models.vggt import VGGT
from vggt.utils.load_fn import load_and_preprocess_images
from vggt.utils.geometry import closed_form_inverse_se3, unproject_depth_map_to_point_map
from vggt.utils.pose_enc import pose_encoding_to_extri_intri


def viser_wrapper(
    pred_dict: dict,
    port: int = 8080,
    init_conf_threshold: float = 50.0,  # represents percentage (e.g., 50 means filter lowest 50%)
    use_point_map: bool = False,
    background_mode: bool = False,
    mask_sky: bool = False,
    image_folder: str = None,
):
    """
    Visualize predicted 3D points and camera poses with viser.

    Args:
        pred_dict (dict):
            {
                "images": (S, 3, H, W)   - Input images,
                "world_points": (S, H, W, 3),
                "world_points_conf": (S, H, W),
                "depth": (S, H, W, 1),
                "depth_conf": (S, H, W),
                "extrinsic": (S, 3, 4),
                "intrinsic": (S, 3, 3),
            }
        port (int): Port number for the viser server.
        init_conf_threshold (float): Initial percentage of low-confidence points to filter out.
        use_point_map (bool): Whether to visualize world_points or use depth-based points.
        background_mode (bool): Whether to run the server in background thread.
        mask_sky (bool): Whether to apply sky segmentation to filter out sky points.
        image_folder (str): Path to the folder containing input images.
    """
    print(f"Starting viser server on port {port}")

    server = viser.ViserServer(host="0.0.0.0", port=port)
    server.gui.configure_theme(titlebar_content=None, control_layout="collapsible")

    # Unpack prediction dict
    images = pred_dict["images"]  # (S, 3, H, W)
    world_points_map = pred_dict["world_points"]  # (S, H, W, 3)
    conf_map = pred_dict["world_points_conf"]  # (S, H, W)

    depth_map = pred_dict["depth"]  # (S, H, W, 1)
    depth_conf = pred_dict["depth_conf"]  # (S, H, W)

    extrinsics_cam = pred_dict["extrinsic"]  # (S, 3, 4)
    intrinsics_cam = pred_dict["intrinsic"]  # (S, 3, 3)

    # Compute world points from depth if not using the precomputed point map
    if not use_point_map:
        world_points = unproject_depth_map_to_point_map(depth_map, extrinsics_cam, intrinsics_cam)
        conf = depth_conf
    else:
        world_points = world_points_map
        conf = conf_map

    # Apply sky segmentation if enabled
    if mask_sky and image_folder is not None:
        conf = apply_sky_segmentation(conf, image_folder)

    # Convert images from (S, 3, H, W) to (S, H, W, 3)
    # Then flatten everything for the point cloud
    colors = images.transpose(0, 2, 3, 1)  # now (S, H, W, 3)
    S, H, W, _ = world_points.shape

    # Flatten
    points = world_points.reshape(-1, 3)
    colors_flat = (colors.reshape(-1, 3) * 255).astype(np.uint8)
    conf_flat = conf.reshape(-1)

    cam_to_world_mat = closed_form_inverse_se3(extrinsics_cam)  # shape (S, 4, 4) typically
    # For convenience, we store only (3,4) portion
    cam_to_world = cam_to_world_mat[:, :3, :]

    # Compute scene center and recenter
    scene_center = np.mean(points, axis=0)
    points_centered = points - scene_center
    cam_to_world[..., -1] -= scene_center

    # Store frame indices so we can filter by frame
    frame_indices = np.repeat(np.arange(S), H * W)

    # Build the viser GUI
    gui_show_frames = server.gui.add_checkbox("Show Cameras", initial_value=True)

    # Now the slider represents percentage of points to filter out
    gui_points_conf = server.gui.add_slider(
        "Confidence Percent", min=0, max=100, step=0.1, initial_value=init_conf_threshold
    )

    gui_frame_selector = server.gui.add_dropdown(
        "Show Points from Frames", options=["All"] + [str(i) for i in range(S)], initial_value="All"
    )

    # Create the main point cloud handle
    # Compute the threshold value as the given percentile
    init_threshold_val = np.percentile(conf_flat, init_conf_threshold)
    init_conf_mask = (conf_flat >= init_threshold_val) & (conf_flat > 0.1)
    point_cloud = server.scene.add_point_cloud(
        name="viser_pcd",
        points=points_centered[init_conf_mask],
        colors=colors_flat[init_conf_mask],
        point_size=0.001,
        point_shape="circle",
    )

    # We will store references to frames & frustums so we can toggle visibility
    frames: List[viser.FrameHandle] = []
    frustums: List[viser.CameraFrustumHandle] = []

    def visualize_frames(extrinsics: np.ndarray, images_: np.ndarray) -> None:
        """
        Add camera frames and frustums to the scene.
        extrinsics: (S, 3, 4)
        images_:    (S, 3, H, W)
        """
        # Clear any existing frames or frustums
        for f in frames:
            f.remove()
        frames.clear()
        for fr in frustums:
            fr.remove()
        frustums.clear()

        # Optionally attach a callback that sets the viewpoint to the chosen camera
        def attach_callback(frustum: viser.CameraFrustumHandle, frame: viser.FrameHandle) -> None:
            @frustum.on_click
            def _(_) -> None:
                for client in server.get_clients().values():
                    client.camera.wxyz = frame.wxyz
                    client.camera.position = frame.position

        img_ids = range(S)
        for img_id in tqdm(img_ids):
            cam2world_3x4 = extrinsics[img_id]
            T_world_camera = viser_tf.SE3.from_matrix(cam2world_3x4)

            # Add a small frame axis
            frame_axis = server.scene.add_frame(
                f"frame_{img_id}",
                wxyz=T_world_camera.rotation().wxyz,
                position=T_world_camera.translation(),
                axes_length=0.05,
                axes_radius=0.002,
                origin_radius=0.002,
            )
            frames.append(frame_axis)

            # Convert the image for the frustum
            img = images_[img_id]  # shape (3, H, W)
            img = (img.transpose(1, 2, 0) * 255).astype(np.uint8)
            h, w = img.shape[:2]

            # If you want correct FOV from intrinsics, do something like:
            # fx = intrinsics_cam[img_id, 0, 0]
            # fov = 2 * np.arctan2(h/2, fx)
            # For demonstration, we pick a simple approximate FOV:
            fy = 1.1 * h
            fov = 2 * np.arctan2(h / 2, fy)

            # Add the frustum
            frustum_cam = server.scene.add_camera_frustum(
                f"frame_{img_id}/frustum", fov=fov, aspect=w / h, scale=0.05, image=img, line_width=1.0
            )
            frustums.append(frustum_cam)
            attach_callback(frustum_cam, frame_axis)

    def update_point_cloud() -> None:
        """Update the point cloud based on current GUI selections."""
        # Here we compute the threshold value based on the current percentage
        current_percentage = gui_points_conf.value
        threshold_val = np.percentile(conf_flat, current_percentage)

        print(f"Threshold absolute value: {threshold_val}, percentage: {current_percentage}%")

        conf_mask = (conf_flat >= threshold_val) & (conf_flat > 1e-5)

        if gui_frame_selector.value == "All":
            frame_mask = np.ones_like(conf_mask, dtype=bool)
        else:
            selected_idx = int(gui_frame_selector.value)
            frame_mask = frame_indices == selected_idx

        combined_mask = conf_mask & frame_mask
        point_cloud.points = points_centered[combined_mask]
        point_cloud.colors = colors_flat[combined_mask]

    @gui_points_conf.on_update
    def _(_) -> None:
        update_point_cloud()

    @gui_frame_selector.on_update
    def _(_) -> None:
        update_point_cloud()

    @gui_show_frames.on_update
    def _(_) -> None:
        """Toggle visibility of camera frames and frustums."""
        for f in frames:
            f.visible = gui_show_frames.value
        for fr in frustums:
            fr.visible = gui_show_frames.value

    # Add the camera frames to the scene
    visualize_frames(cam_to_world, images)

    print("Starting viser server...")
    # If background_mode is True, spawn a daemon thread so the main thread can continue.
    if background_mode:

        def server_loop():
            while True:
                time.sleep(0.001)

        thread = threading.Thread(target=server_loop, daemon=True)
        thread.start()
    else:
        while True:
            time.sleep(0.01)

    return server


# Helper functions for sky segmentation


def apply_sky_segmentation(conf: np.ndarray, image_folder: str) -> np.ndarray:
    """
    Apply sky segmentation to confidence scores.

    Args:
        conf (np.ndarray): Confidence scores with shape (S, H, W)
        image_folder (str): Path to the folder containing input images

    Returns:
        np.ndarray: Updated confidence scores with sky regions masked out
    """
    S, H, W = conf.shape
    sky_masks_dir = image_folder.rstrip("/") + "_sky_masks"
    os.makedirs(sky_masks_dir, exist_ok=True)

    # Download skyseg.onnx if it doesn't exist
    if not os.path.exists("skyseg.onnx"):
        print("Downloading skyseg.onnx...")
        download_file_from_url("https://huggingface.co/JianyuanWang/skyseg/resolve/main/skyseg.onnx", "skyseg.onnx")

    skyseg_session = onnxruntime.InferenceSession("skyseg.onnx")
    image_files = sorted(glob.glob(os.path.join(image_folder, "*")))
    sky_mask_list = []

    print("Generating sky masks...")
    for i, image_path in enumerate(tqdm(image_files[:S])):  # Limit to the number of images in the batch
        image_name = os.path.basename(image_path)
        mask_filepath = os.path.join(sky_masks_dir, image_name)

        if os.path.exists(mask_filepath):
            sky_mask = cv2.imread(mask_filepath, cv2.IMREAD_GRAYSCALE)
        else:
            sky_mask = segment_sky(image_path, skyseg_session, mask_filepath)

        # Resize mask to match H×W if needed
        if sky_mask.shape[0] != H or sky_mask.shape[1] != W:
            sky_mask = cv2.resize(sky_mask, (W, H))

        sky_mask_list.append(sky_mask)

    # Convert list to numpy array with shape S×H×W
    sky_mask_array = np.array(sky_mask_list)
    # Apply sky mask to confidence scores
    sky_mask_binary = (sky_mask_array > 0.1).astype(np.float32)
    conf = conf * sky_mask_binary

    print("Sky segmentation applied successfully")
    return conf


parser = argparse.ArgumentParser(description="VGGT demo with viser for 3D visualization")
parser.add_argument(
    "--image_folder", type=str, default="examples/kitchen/images/", help="Path to folder containing images"
)
parser.add_argument("--use_point_map", action="store_true", help="Use point map instead of depth-based points")
parser.add_argument("--background_mode", action="store_true", help="Run the viser server in background mode")
parser.add_argument("--port", type=int, default=8080, help="Port number for the viser server")
parser.add_argument(
    "--conf_threshold", type=float, default=25.0, help="Initial percentage of low-confidence points to filter out"
)
parser.add_argument("--mask_sky", action="store_true", help="Apply sky segmentation to filter out sky points")


def main():
    """
    Main function for the VGGT demo with viser for 3D visualization.

    This function:
    1. Loads the VGGT model
    2. Processes input images from the specified folder
    3. Runs inference to generate 3D points and camera poses
    4. Optionally applies sky segmentation to filter out sky points
    5. Visualizes the results using viser

    Command-line arguments:
    --image_folder: Path to folder containing input images
    --use_point_map: Use point map instead of depth-based points
    --background_mode: Run the viser server in background mode
    --port: Port number for the viser server
    --conf_threshold: Initial percentage of low-confidence points to filter out
    --mask_sky: Apply sky segmentation to filter out sky points
    """
    args = parser.parse_args()
    device = "cuda" if torch.cuda.is_available() else "cpu"
    print(f"Using device: {device}")

    print("Initializing and loading VGGT model...")
    # model = VGGT.from_pretrained("facebook/VGGT-1B")

    model = VGGT()
    _URL = "https://huggingface.co/facebook/VGGT-1B/resolve/main/model.pt"
    model.load_state_dict(torch.hub.load_state_dict_from_url(_URL))

    model.eval()
    model = model.to(device)
    width=640
    height=480
    images = []
    camera_num = 8
    caps = [cv2.VideoCapture(i) for i in range(camera_num)]
    for cap in caps:
        ret, img = cap.read()
        img = cv2.resize(img, (width, height))
        obj = Defisheye(img)
        img = obj.convert(outfile=None)
        img = cv2.cvtColor(img, cv2.COLOR_BGR2RGB)
        img = Image.fromarray(img)
        images.append(img)
    images_tensor = load_and_preprocess_images(images).to(device)

    images = load_and_preprocess_images(images).to(device)
    print(f"Preprocessed images shape: {images.shape}")

    print("Running inference...")
    dtype = torch.bfloat16 if torch.cuda.get_device_capability()[0] >= 8 else torch.float16

    with torch.no_grad():
        with torch.cuda.amp.autocast(dtype=dtype):
            predictions = model(images)

    print("Converting pose encoding to extrinsic and intrinsic matrices...")
    extrinsic, intrinsic = pose_encoding_to_extri_intri(predictions["pose_enc"], images.shape[-2:])
    predictions["extrinsic"] = extrinsic
    predictions["intrinsic"] = intrinsic

    print("Processing model outputs...")
    for key in predictions.keys():
        if isinstance(predictions[key], torch.Tensor):
            predictions[key] = predictions[key].cpu().numpy().squeeze(0)  # remove batch dimension and convert to numpy

    if args.use_point_map:
        print("Visualizing 3D points from point map")
    else:
        print("Visualizing 3D points by unprojecting depth map by cameras")

    if args.mask_sky:
        print("Sky segmentation enabled - will filter out sky points")

    print("Starting viser visualization...")

    viser_server = viser_wrapper(
        predictions,
        port=args.port,
        init_conf_threshold=args.conf_threshold,
        use_point_map=args.use_point_map,
        background_mode=args.background_mode,
        mask_sky=args.mask_sky,
        image_folder=args.image_folder,
    )
    print("Visualization complete")


if __name__ == "__main__":
    main()
运行这个 Python 脚本并打开浏览器访问 viser 服务器。vggt 模型的加载时间可能会稍长一些,请耐心等待。
如果您在远程服务器上运行此脚本,请将 localhost 替换为服务器的 IP 地址。
http://localhost:8080

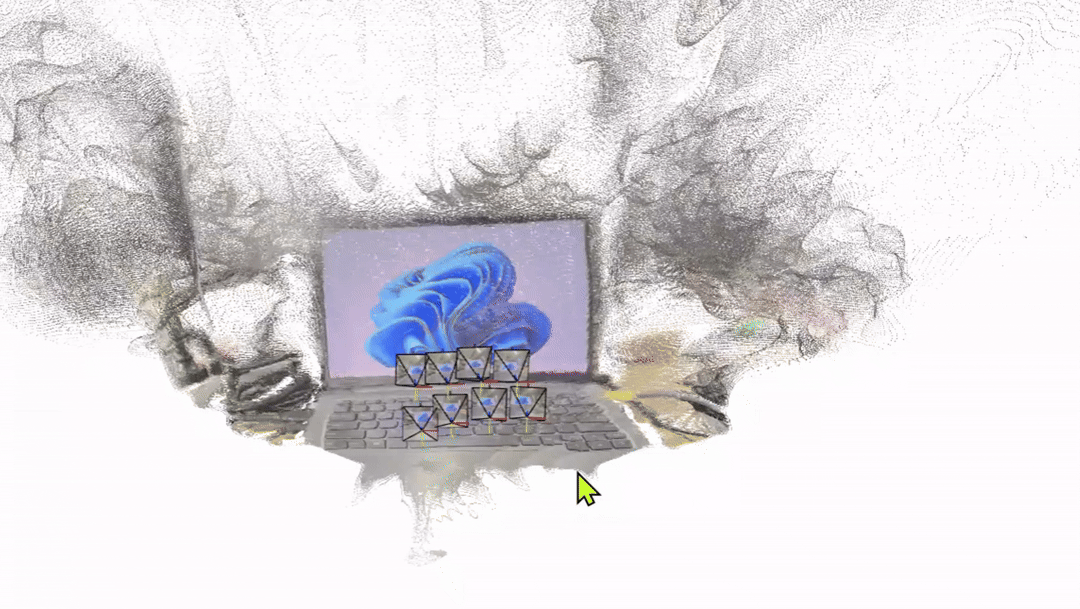
由于我们使用的是鱼眼相机,畸变严重,畸变校正后的图像质量较差,这会影响最终的 3D 建模结果。如果您使用畸变较小且图像质量更高的相机,效果会有所改善。
资源
技术支持与产品讨论
感谢您选择我们的产品!我们在这里为您提供不同的支持,以确保您使用我们产品的体验尽可能顺畅。我们提供多种沟通渠道,以满足不同的偏好和需求。