reComputer for Jetson 内存扩展
reComputer for Jetson 出售时配备 16 GB eMMC,并预装了 ubuntu 18.04 LTS 和 NVIDIA JetPack 4.6,因此剩余的可用用户空间约为 2 GB,这对在某些项目中使用 reComputer 进行训练和部署构成了重大障碍。本教程将基于这种情况介绍不同型号 reComputer 的扩展过程,并帮助开发者通过将系统转移到外部存储设备来扩展系统。
容量扩展基础原理
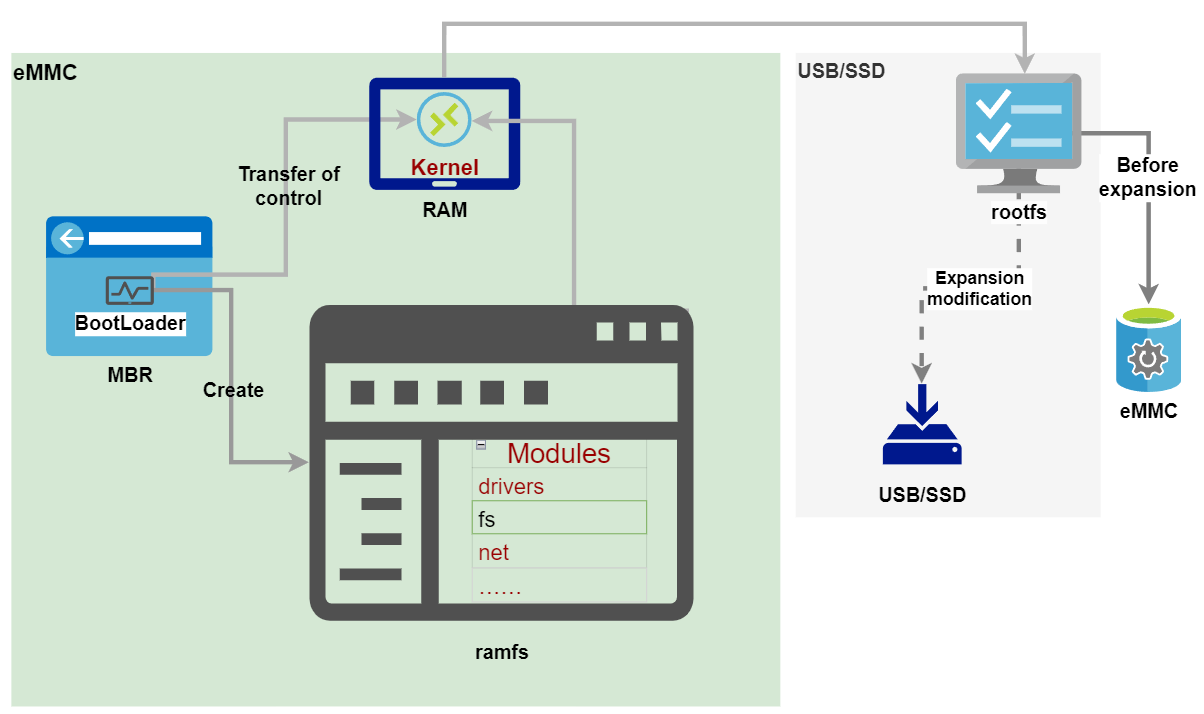
安装系统的磁盘上的第一个扇区称为主引导记录 (MBR),它包含有关 BootLoader、分区表和固定标识符 55AA 的信息。在 Linux 的启动过程中,BootLoader 和 内核 经历两个重要阶段。
阶段 1: BootLoader 初始化 (initrd) 一个临时根文件系统 (ramfs)。ramfs 包含启动时必需的驱动程序、文件系统 (fs)、网络 (net) 等配置程序。之后,BootLoader 的控制权转移给内核,使内核能够取出这些程序,将它们移动到内存 (RAM) 中并运行它们以加载各种功能模块。
阶段 2: 内核使用 ramfs 加载必要模块后,它释放系统并配置真正的根文件系统 (rootfs) 挂载到真正的根目录。
- 在上述两个阶段中,我们不需要修改内核使用 ramfs 加载功能模块的部分(阶段 1),因此即使 reComputer 已经扩展,它仍然需要使用 eMMC。
- 我们需要修改的是第二阶段,即将根文件系统挂载到外部内存,从而实现扩展。
容量扩展注意事项
-
通过外部存储进行扩展的主要原理是将 rootfs 设置在外部存储设备上。
-
这种扩展方法将修改 Linux 内核级系统文件,您可能会遇到一些不容易解决的问题。在按照本教程完成扩展时,您应该使用新的 reComputer 和新的存储设备,不要尝试在设备上存储有价值的文件。如果一切都不按预期工作,您可能需要重新格式化存储设备甚至 reComputer,作为最终保留选项,如果可能的话,我们将提供通过串口帮助您恢复备份的服务,但您需要对任何数据丢失负责。
-
此扩展过程不需要重新编译内核,与网上其他早期可用的扩展方法相比,节省了约 40 分钟的安装时间。
通过载板上的 M.2 插槽和 SSD 进行扩展
SSD,也称为固态硬盘,通常用作笔记本电脑、台式机等的主要存储设备。凭借其高可靠性和快速的数据读写速度,它是 reComputer 扩展的最佳选择。下表列出了目前可用于 SSD 扩展解决方案的 reComputer 系列产品。reComputer J1010 不支持 SSD 扩展的主要原因是载板没有配备合适的 M.2 插槽。
| 产品 | reComputer J1020 | reComputer J2011 | reComputer J2012 | reComputer J2021 |
|---|---|---|---|---|
| SKU | 110061361 | 110061363 | 110061401 | 110061381 |
| 侧视图 |  | | | |
| 配备模块 | Jetson Nano 4G | Jetson Xavier NX 8GB | Jetson Xavier NX 16GB | Jetson Xavier NX 8GB |
| 运行载板 | Jetson A206 | Jetson A206 | Jetson A206 | J202 |
软件和硬件要求
使用 SSD 进行扩展解决方案需要满足以下条件,这些是扩展成功验证的基本要求。
| 软件和硬件要求 | |
|---|---|
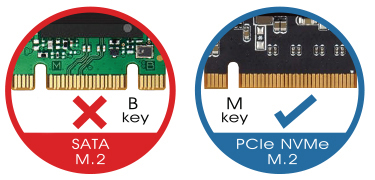
| reComputer for Jetson | JetPack 版本 4.4 ~ 4.6 载板必须包含 M.2 M-Key 插槽 |
| SSD | SSD 需要是第四代扩展文件系统 (Ext4) M.2 M-Key 接口,支持 NVMe 协议 推荐容量 ≤ 512 GB |
!!!注意 更新的 JetPack 版本尚未经过扩展测试,因此无法保证扩展的稳定性或成功率,请仔细遵循本教程。
SSD 需要是 M.2 M-Key 接口,否则将无法匹配载板上的接口。
非扩展第四代文件系统(Ext4)的存储设备无法完成扩展操作。
扩展步骤
步骤 1. 安装 SSD
按照硬件说明中的步骤为 reComputer 安装 SSD。
步骤 2. 准备 SSD
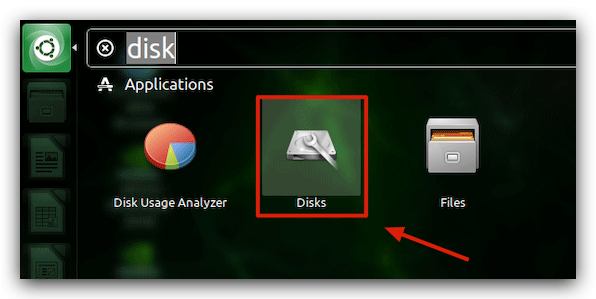
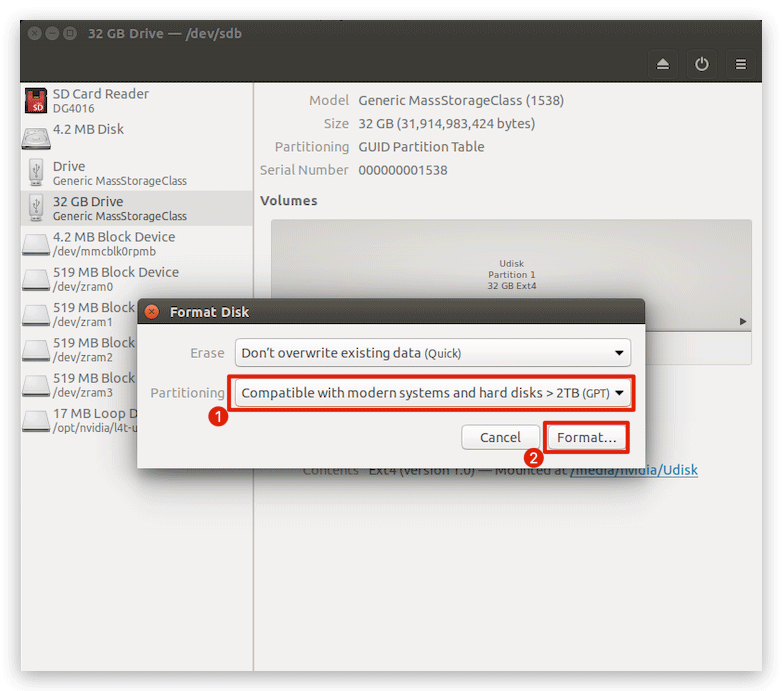
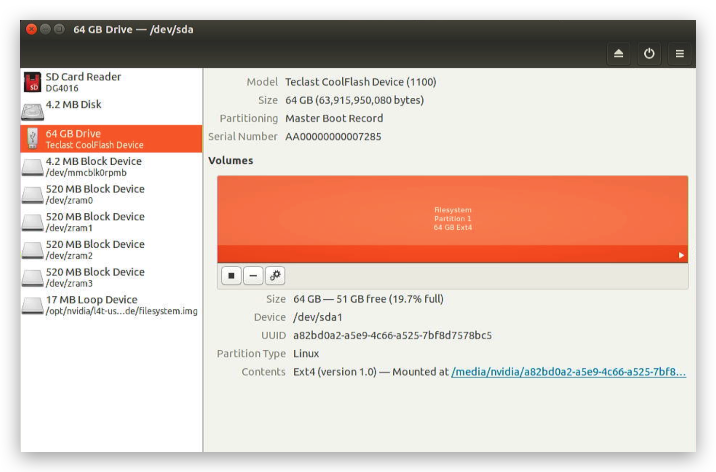
使用快捷键 Ctrl+F 或点击左上角的 Ubuntu 图标搜索 Disks 并打开 Ubuntu 18.04 自带的磁盘工具。
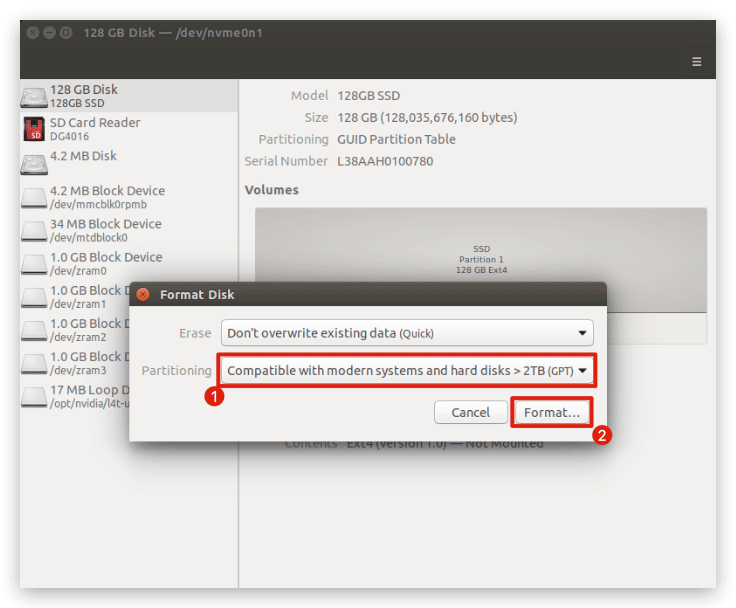
在左侧选择您的 SSD,然后在菜单栏右上角选择 Format Disk。
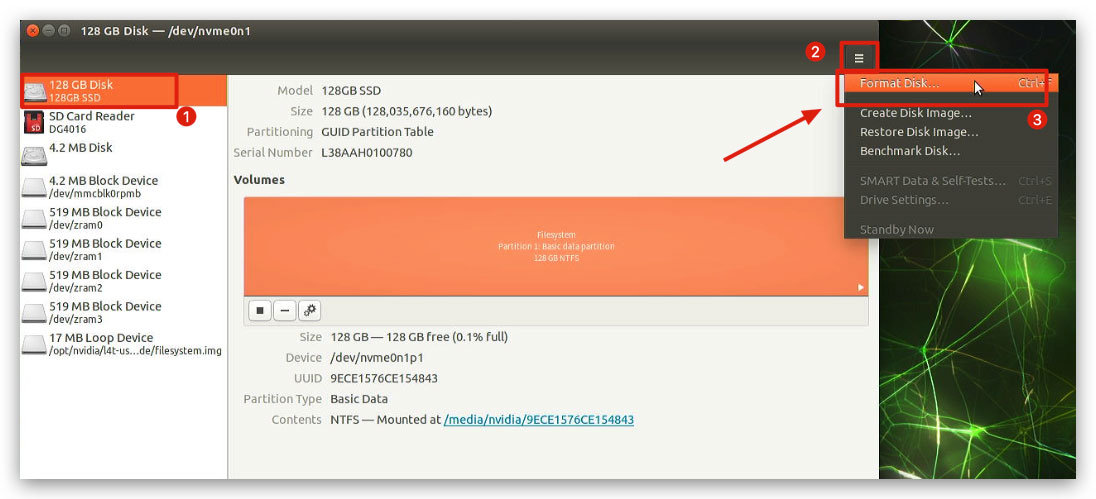
将您的 SSD 格式化为 GPT 格式。将出现一个弹出窗口要求您确认并输入用户密码。
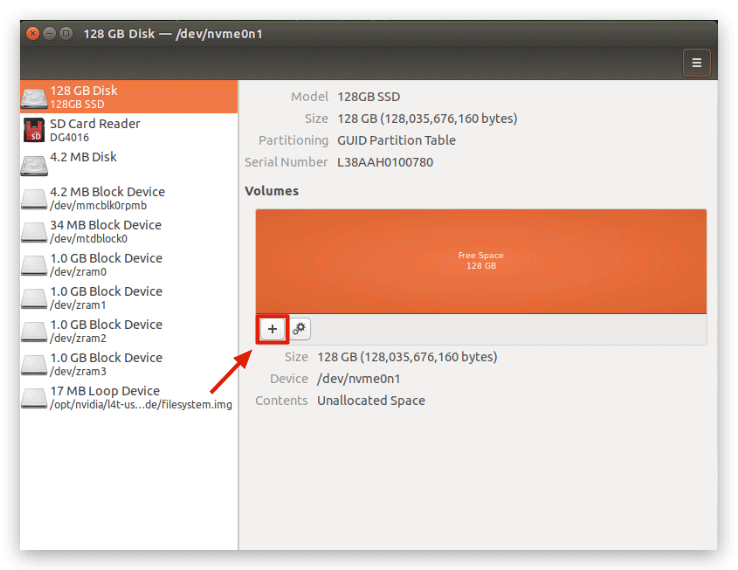
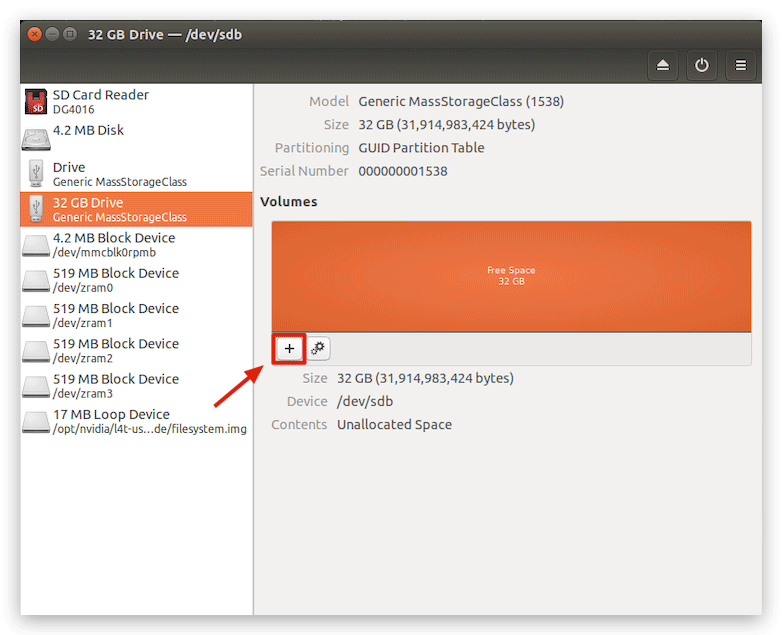
然后,我们点击中间的 + 来添加磁盘字符。
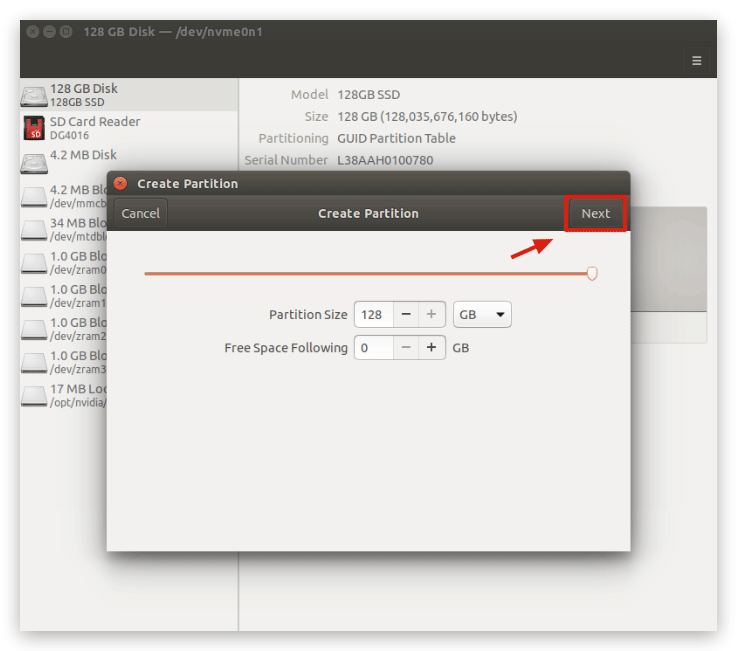
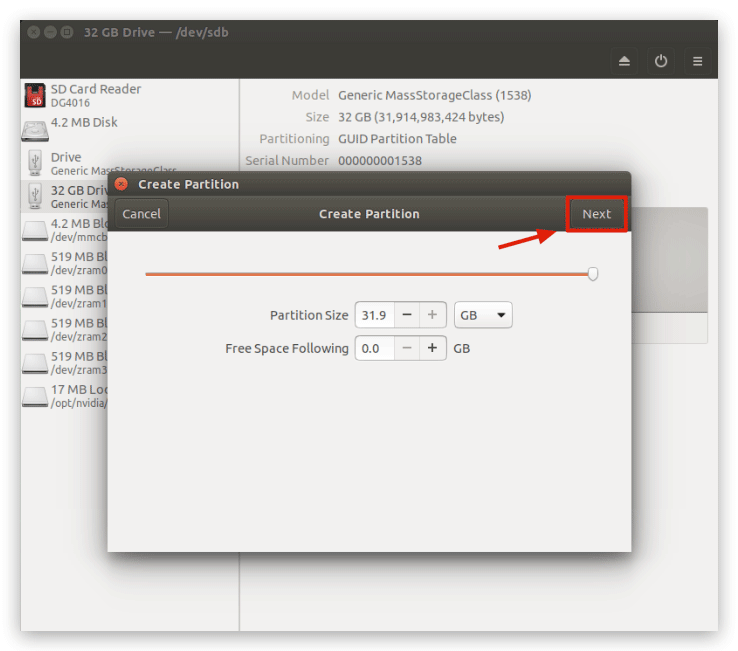
点击"Next"。
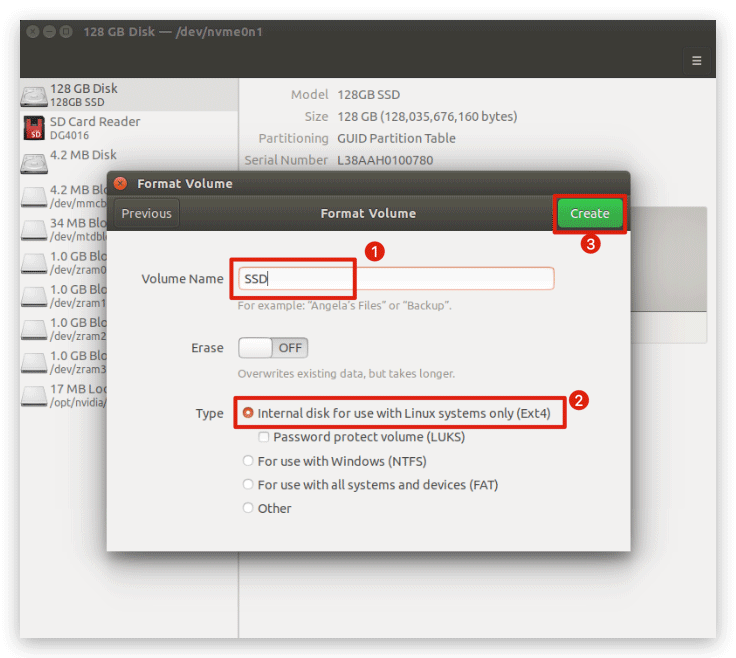
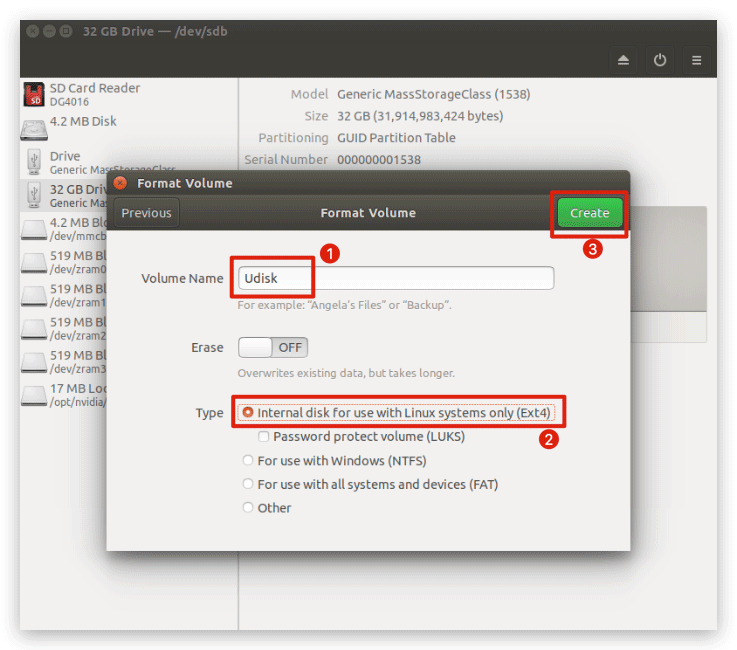
请为您的 SSD 命名,在类型中选择 Ext4 并点击"Create"。此时我们已经根据扩展要求完成了 SSD 的准备工作。
步骤 3. 将根目录构建到 SSD
使用 git 命令下载我们需要在 reComputer 上使用的脚本文件。
git clone https://github.com/limengdu/rootOnNVMe.git
cd rootOnNVMe/
然后执行以下命令将文件从 eMMC 中的根目录构建到 SSD,此步骤的等待时间取决于您使用的根目录的大小。
./copy-rootfs-ssd.sh
步骤 4. 配置环境并完成扩展
执行以下命令完成 rootfs 的配置。
./setup-service.sh
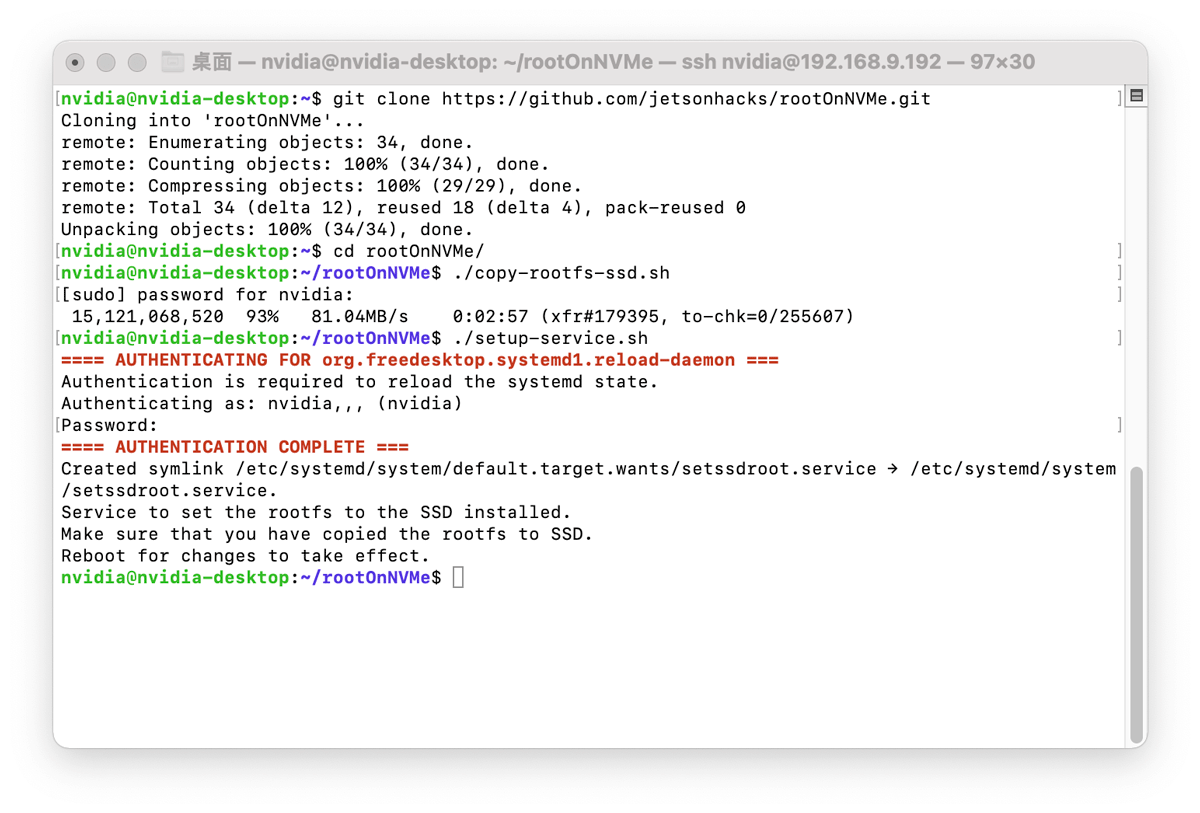
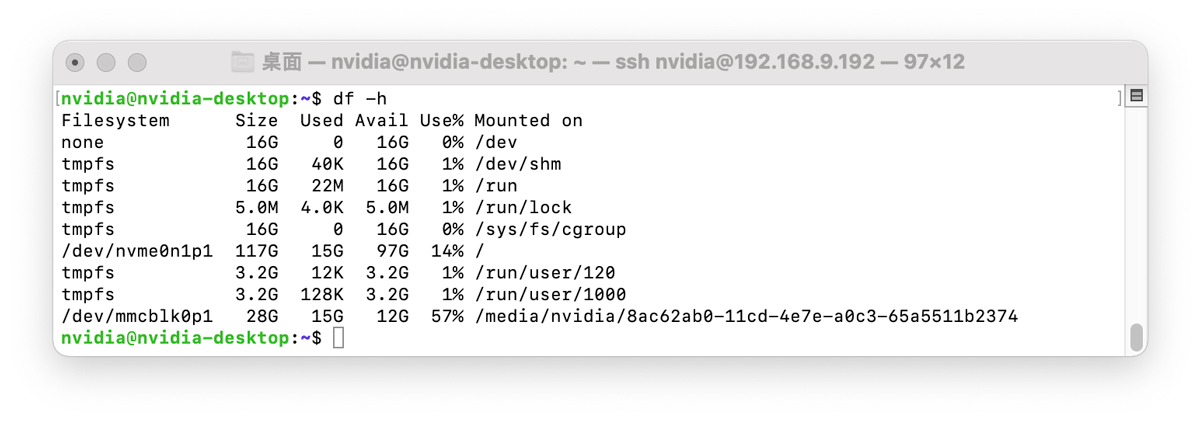
当您重启 reComputer 时,您会看到 eMMC 已经成为主界面上的外部存储设备,并且您会看到系统占用空间已经减少,因此扩容成功了。
!!!Attention
脚本文件中的默认 SSD 路径是 /dev/nvme0n1p1,这也是 reComputer 默认分配的路径。如果您使用命令 sudo fdisk -l 发现您的 SSD 路径与此不匹配,请将 rootOnNVMe 中的文件 copy-rootfs-ssd.sh、data/setssdroot.service 和 data/setssdroot.sh 中所有 /dev/nvme0n1p1 的路径更改为您的 SSD 所在的路径。
上述扩容不会从 eMMC 中删除原始根目录内容。如果您不想从 SSD 启动,您可以移除 SSD,系统仍将从 eMMC 启动。
通过 USB 存储设备进行容量扩展
USB 存储设备,如 USB 闪存驱动器和移动硬盘,在生活的各个领域被广泛用作外部存储,USB 扩展也适用于 reComputer。下表列出了目前可用于 USB 扩展解决方案的 reComputer 产品。
| 产品 | reComputer J1010 |
|---|---|
| SKU | 110061362 |
| 侧视图 |  |
| 配备模块 | Jetson Nano 4G |
| 运行载板 | J1010 载板 |
通过USB存储设备进行扩展相比通过SSD扩展的最大优势是USB设备的高度便利性和移除的简便性。 然而,即使使用高速USB 3.2接口,数据传输速率也远低于标准PCIe总线,因此SSD扩展方法在稳定性、可靠性和数据传输速度方面更胜一筹。
软件和硬件要求
使用USB的扩展解决方案需要满足以下条件,这是验证扩展能够成功完成的基本要求。
| 软件和硬件要求 | |
|---|---|
| reComputer for Jetson | JetPack 版本 4.4 ~ 4.6 配备的模块需要是Jetson Nano |
| USB存储设备 | USB存储设备需要是第四代扩展文件系统(Ext4) USB存储设备供电电流 ≤ 0.5 A |
!!!注意 更新的 JetPack 版本尚未经过扩展测试,因此无法保证扩展的稳定性或成功率,请仔细遵循本教程。
大容量 USB 存储设备需要 reComputer 正确供电以维持正常运行,不建议使用容量超过 512 GB 的 USB 存储设备。电源供应不足可能导致 reComputer 断电。
除 Jetson Nano 以外的其他模块目前不支持使用此方法进行扩展。
非扩展第四代文件系统 (Ext4) 的存储设备无法完成扩展操作。
扩展步骤
步骤 1. 准备必要的文档
使用 git 命令将我们需要使用的脚本文件下载到 reComputer。
git clone https://github.com/limengdu/bootFromUSB.git
cd bootFromUSB
步骤 2. 准备 USB 存储设备
将 USB 存储设备连接到 reComputer,并通过快捷键 Ctrl+F 或点击左上角的 Ubuntu 图标搜索 Disks 来打开 Ubuntu 18.04 自带的磁盘工具。
在左侧选择您的 USB 存储设备,然后在右上角菜单栏下选择 Format Disk。
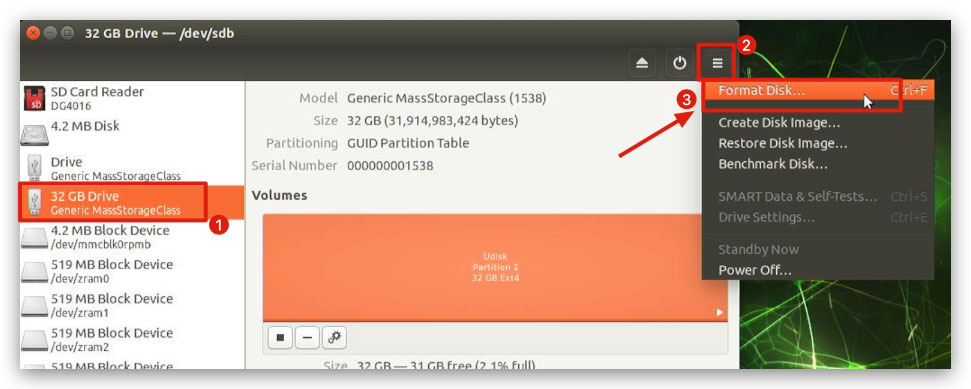
将您的 USB 存储设备格式化为 GPT 格式。将出现一个弹出窗口要求您确认并输入用户密码。
然后,我们点击中间的 + 来添加磁盘字符。
点击"Next"。
请为您的 USB 存储设备命名,在类型中选择 Ext4 并点击"Create"。此时我们已经根据扩展要求完成了 USB 存储设备的准备工作。
步骤 3. 挂载 USB 存储设备
根据 步骤 2 准备的 USB 存储设备在磁盘软件中可以看到是未挂载状态。
!!!Note 如果您发现 USB 设备在格式化后已自动挂载,请跳过此步骤。
我们使用以下命令来挂载 USB 设备。
mkdir /media/USB/
sudo mount <USB Device Path> /media/USB/
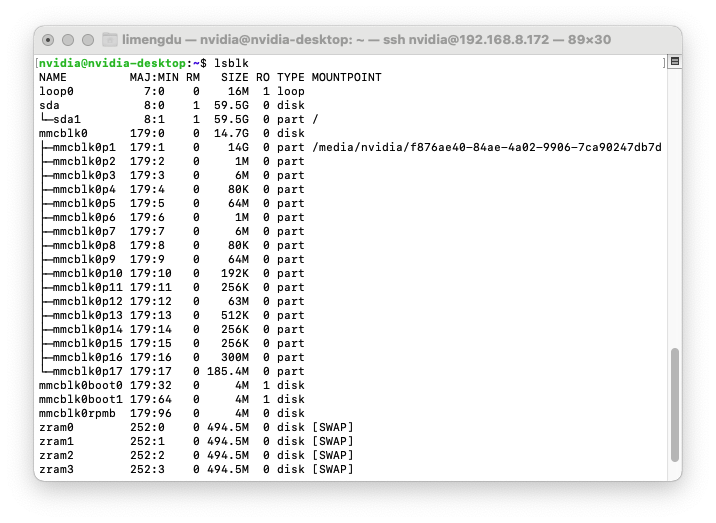
其中 <USB Device Path> 指的是 USB 存储设备的路径,这个参数可以在磁盘软件的设备中看到,或者可以用命令 sudo fdisk -l 查询。例如,对于我的 USB 设备,我可以用以下命令将 /dev/sda1 挂载到 /media/USB/。
sudo mount /dev/sda1 /media/USB/
使用以下命令检查设备的挂载位置。
sudo findmnt -rno TARGET <USB Device Path>
对于我的 USB 设备,我需要使用的命令是:
sudo findmnt -rno TARGET /dev/sda1
步骤 4. 将系统复制到 USB 存储设备
copyRootToUSB.sh 脚本将整个 eMMC 系统的内容复制到 USB 存储设备。当然,USB 存储设备应该具有比 eMMC 更多的存储空间。
使用的命令如下。
usage: ./copyRootToUSB.sh [OPTIONS]
-d | --directory     Directory path to parent of kernel

-v | --volume_label  Label of Volume to lookup

-p | --path          Device Path to USB drive (e.g. /dev/sda1)

-h | --help  This message
一般来说,对于常规扩展需求,我们只需在参数 [OPTIONS] 中选择 -p,然后需要添加 USB 设备的路径(例如 /dev/sda1),这是我们在步骤 3中获得的。例如,对于我的 USB 设备,我需要使用的完整命令是:
./copyRootToUSB.sh -p /dev/sda1
此命令执行所需的时间取决于存储在您的 eMMC 上的文件大小。
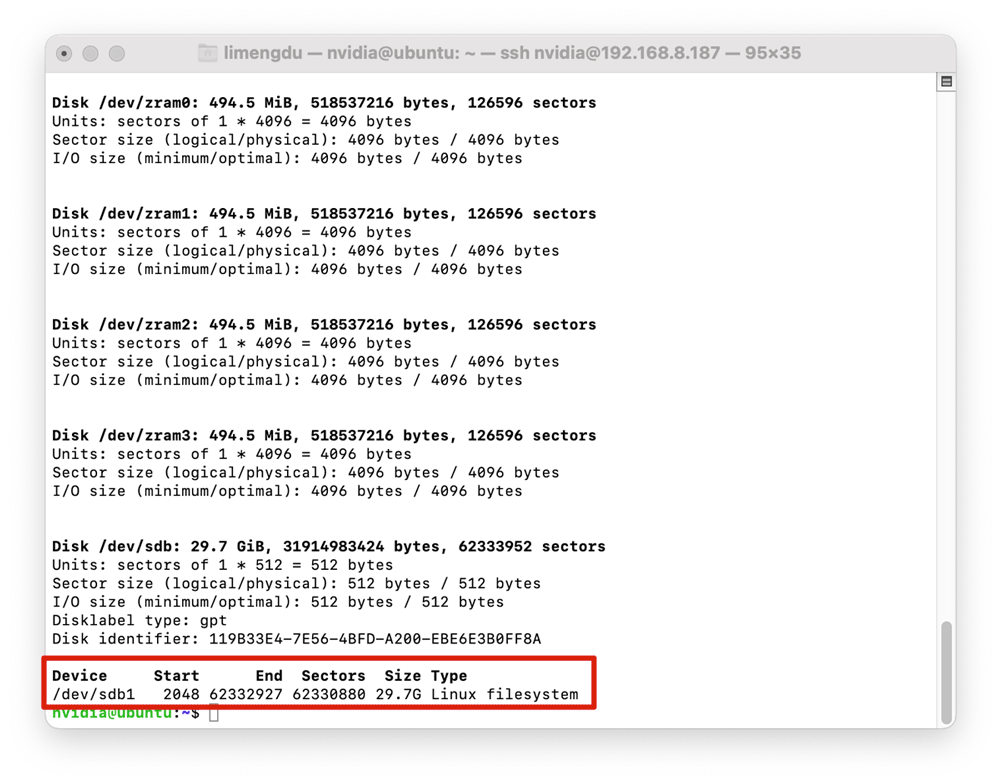
步骤 5. 查询 USB 设备的 UUID
为了确保无误,我们需要查找 USB 设备的 UUID。
./partUUID.sh
此命令的默认路径是 sda1 (/dev/sda1),但您也可以确定其他 USB 设备的 UUID。使用 -d 标志指定 /dev/。例如,对于我的 USB 设备,它将是:
$ ./partUUID.sh -d sdb1

UUID of Disk: /dev/sdb1
e34d67bb-83bb-4fc5-b9a4-a1388d2b2be5
Sample for /boot/extlinux/extlinux.conf entry:
APPEND ${cbootargs} root=UUID=e34d67bb-83bb-4fc5-b9a4-a1388d2b2be5 rootwait rootfstype=ext4
!!!注意 如果返回的 UUID 在格式和长度上与上面的示例不同,那么设备可能没有格式化为 Ext4,请从步骤 2重新开始!
步骤 6. 修改启动配置以完成扩展
我们需要首先备份启动配置文件。
sudo cp /boot/extlinux/extlinux.conf /boot/extlinux/extlinux.conf.bak
这一步是USB设备扩展操作中最重要和最危险的步骤。编辑/boot/extlinux/extlinux.conf文件和/media/nvidia/boot/extlinux/extlinux.conf,然后添加一个条目指向新的rootfs,位置是USB设备的路径,填入下面参数<path>中。路径信息在步骤3中获得。
$ sudo vi /boot/extlinux/extlinux.conf
$ sudo vi /media/nvidia/boot/extlinux/extlinux.conf

LABEL primary
      MENU LABEL primary kernel
      LINUX /boot/Image
      INITRD /boot/initrd
      APPEND ${cbootargs} quiet root=<path> rw rootwait rootfstype=ext4 console=ttyS0,115200n8 console=tty0 fbcon=map:0 net.ifnames=0 sdhci_tegra.en_boot_part_access=1
对于我正在使用的USB存储设备,修改后的 /boot/extlinux/extlinux.conf 文件和 /media/nvidia/boot/extlinux/extlinux.conf 内容如下:
TIMEOUT 30
DEFAULT primary

MENU TITLE L4T boot options

LABEL primary
      MENU LABEL primary kernel
      LINUX /boot/Image
      INITRD /boot/initrd
      APPEND ${cbootargs} quiet root=/dev/sda1 rw rootwait rootfstype=ext4 console=ttyS0,115200n8 console=tty0 fbcon=map:0 net.ifnames=0 sdhci_tegra.en_boot_part_access=1
#      APPEND ${cbootargs} quiet root=/dev/mmcblk0p1 rw rootwait rootfstype=ext4 console=ttyS0,115200n8 console=tty0 fbcon=map:0 net.ifnames=0 sdhci_tegra.en_boot_part_access=1

# When testing a custom kernel, it is recommended that you create a backup of
# the original kernel and add a new entry to this file so that the device can
# fallback to the original kernel. To do this:
#
# 1, Make a backup of the original kernel
#      sudo cp /boot/Image /boot/Image.backup
#
# 2, Copy your custom kernel into /boot/Image
#
# 3, Uncomment below menu setting lines for the original kernel
#
# 4, Reboot

# LABEL backup
#    MENU LABEL backup kernel
#    LINUX /boot/Image.backup
#    INITRD /boot/initrd
#    APPEND ${cbootargs}
保存文件并重启 reComputer,系统根目录将切换到 USB 存储设备,扩容完成。
通过串口控制台恢复系统备份
当您的系统由于错误或其他原因无法正常启动时(常见情况是启动时 Nvidia 图标不断重复出现),那么您在扩容过程中制作的备份将发挥重要作用。我们理解您此刻的焦虑,但请耐心按照以下步骤让 reComputer 进入串口控制台,我们将操作 U-boot 来恢复您的备份。
材料准备
| 材料准备 | 描述 |
|---|---|
 | Ubuntu 主机 x1 |
 | 无法访问系统的 reComputer Jetson x1 |
 | UART 转 USB 模块 x1 |
 | 母对母杜邦线 x3 |
访问串口控制台的步骤
步骤 1. 将 UART 转 USB 模块连接到 reComputer
根据下表中的接线说明将 reComputer 连接到 UART 转 USB 模块。
 | ||
| reComputer | UART 转 USB 模块 | |
| GND | --> | GND |
| UART TXD | --> | RX |
| UART RXD | --> | TX |
!!!Tip reComputer 和 UART 转 USB 模块之间的 VCC 接口不需要连接。
连接线缆后,reComputer 暂时不需要上电,请先将其放置一旁。
请断开扩展的外部存储器。
步骤 2. 在 Ubuntu 主机上安装并启动 minicom
如果您的 Ubuntu 主机没有安装 minicom,您可以使用以下命令在计算机上安装 minicom。
sudo apt-get install minicom
等待安装完成后,输入命令启动 minicom。
sudo minicom

步骤 3. 准备配置 minicom
在 minicom 菜单栏中,我们打开串口并对其进行配置,以便通过 minicom 获取 reComputer 启动信息。在菜单栏中,按键盘 o 键进入配置界面。使用键盘上下箭头键控制光标移动到 Serial port setup。

步骤 4. 将 reComputer 连接到 Ubuntu 主机
此时,我们创建一个新的命令行窗口,并在窗口中输入命令来监控新设备的接入。
dmesg --follow
此时我们将为 reComputer 通电,并通过 USB 端口将 UART 转 USB 模块与连接到 Ubuntu 主机的 reComputer 连接。命令行窗口将显示新连接设备的名称,我们需要找到以 tty 开头的片段并记录下来。

步骤 5. U-boot 操作
返回 minicom 并将步骤 4 中获得的设备名称填入 Serial Device。同时,检查波特率是否配置为 115200。

修改后,按回车保存。选择 Save setup as dfl 并退出 minicom 界面。

重新输入命令 sudo minicom,进入 minicom 后,我们将在窗口中看到 reComputer 启动信息。

我们可以通过使用返回的信息来排查 reComputer 启动失败的原因,并通过使用命令 help 来查看 U-boot 系统下所有可用的命令。了解如何使用这些命令对于解决问题是必要的,但当然这可能会很困难。
Tegra210 (P3450-0000) # help
?         - alias for 'help'
base      - print or set address offset
bdinfo    - print Board Info structure
blkcache  - block cache diagnostics and control
boot      - boot default, i.e., run 'bootcmd'
bootd     - boot default, i.e., run 'bootcmd'
bootefi   - Boots an EFI payload from memory
bootelf   - Boot from an ELF image in memory
booti     - boot Linux kernel 'Image' format from memory
bootm     - boot application image from memory
bootp     - boot image via network using BOOTP/TFTP protocol
bootvx    - Boot vxWorks from an ELF image
cmp       - memory compare
coninfo   - print console devices and information
cp        - memory copy
crc32     - checksum calculation
dcache    - enable or disable data cache
dfu       - Device Firmware Upgrade
dhcp      - boot image via network using DHCP/TFTP protocol
dm        - Driver model low level access
echo      - echo args to console
editenv   - edit environment variable
enterrcm  - reset Tegra and enter USB Recovery Mode
env       - environment handling commands
exit      - exit script
ext2load  - load binary file from a Ext2 filesystem
ext2ls    - list files in a directory (default /)
ext4load  - load binary file from a Ext4 filesystem
ext4ls    - list files in a directory (default /)
ext4size  - determine a file's size
ext4write - create a file in the root directory
false     - do nothing, unsuccessfully
fatinfo   - print information about filesystem
fatload   - load binary file from a dos filesystem
fatls     - list files in a directory (default /)
fatmkdir  - create a directory
fatrm     - delete a file
fatsize   - determine a file's size
fatwrite  - write file into a dos filesystem
fdt       - flattened device tree utility commands
fstype    - Look up a filesystem type
go        - start application at address 'addr'
gpio      - query and control gpio pins
gzwrite   - unzip and write memory to block device
help      - print command description/usage
i2c       - I2C sub-system
icache    - enable or disable instruction cache
imxtract  - extract a part of a multi-image
itest     - return true/false on integer compare
ln        - Create a symbolic link
load      - load binary file from a filesystem
loadb     - load binary file over serial line (kermit mode)
loads     - load S-Record file over serial line
loadx     - load binary file over serial line (xmodem mode)
loady     - load binary file over serial line (ymodem mode)
loop      - infinite loop on address range
ls        - list files in a directory (default /)
lzmadec   - lzma uncompress a memory region
md        - memory display
mii       - MII utility commands
mm        - memory modify (auto-incrementing address)
mmc       - MMC sub system
mmcinfo   - display MMC info
mw        - memory write (fill)
nm        - memory modify (constant address)
nvme      - NVM Express sub-system
part      - disk partition related commands
pci       - list and access PCI Configuration Space
ping      - send ICMP ECHO_REQUEST to network host
printenv  - print environment variables
pxe       - commands to get and boot from pxe files
reset     - Perform RESET of the CPU
run       - run commands in an environment variable
save      - save file to a filesystem
saveenv   - save environment variables to persistent storage
setenv    - set environment variables
sf        - SPI flash sub-system
showvar   - print local hushshell variables
size      - determine a file's size
sleep     - delay execution for some time
source    - run script from memory
sspi      - SPI utility command
sysboot   - command to get and boot from syslinux files
test      - minimal test like /bin/sh
tftpboot  - boot image via network using TFTP protocol
true      - do nothing, successfully
ums       - Use the UMS [USB Mass Storage]
unzip     - unzip a memory region
usb       - USB sub-system
usbboot   - boot from USB device
version   - print monitor, compiler and linker version
技术支持与产品讨论
感谢您选择我们的产品!我们在这里为您提供不同的支持,确保您使用我们产品的体验尽可能顺畅。我们提供多种沟通渠道,以满足不同的偏好和需求。