开始使用 reTerminal 和 Pi 摄像头配合 OpenCV
介绍
在本教程中,我们将指导您完成使用全新安装的 Raspberry Pi OS Bullseye 或 BookWorm OS 设置 reTerminal 的过程。我们的目标是与 PiCam 进行交互,并使用 OpenCV 库执行图像处理和深度学习活动。
OpenCV
OpenCV(开源计算机视觉库):OpenCV 是一个功能强大的开源计算机视觉库,专为实时计算机视觉任务而设计。它提供了一套全面的工具和函数,使开发人员能够处理图像和视频,为图像处理、物体检测、人脸识别等任务提供解决方案。OpenCV 在学术界和工业界都得到广泛应用,支持多种编程语言,使其成为跨不同平台的计算机视觉应用的多功能选择。其灵活性和丰富的文档使其成为任何参与计算机视觉开发的人员的宝贵资源。
开始使用
在开始这个项目之前,您可能需要按照此处描述的方式提前准备硬件和软件。
硬件准备


软件准备
我们建议从官方网站安装 Bullseye 版本或 Bookworm 版本的 Raspberry Pi 64 位操作系统。如果您希望安装新的 Raspbian 操作系统,请按照此指南中概述的步骤进行操作
安装 OpenCV
如果您使用的是 Bullseye OS,可以跳过详细的安装过程;我们为您提供了一个快捷方式。请按照以下简化步骤操作:
- 步骤 1 首先,像这样将此 Git 仓库克隆到您的 Raspberry Pi 上
git clone https://github.com/Seeed-Studio/Seeed_Python_ReTerminal
- 步骤 2 接下来,使用我们的脚本轻松安装所需的 Python 包并下载 EfficientDet-Lite 模型。导航到此文件夹。
cd Seeed_Python_ReTerminal/samples/Opencv_and_piCam/ObjectDetection
- 步骤 3 该脚本会安装所需的依赖项并下载本系列教程所需的 TFLite 模型。
sh setup.sh
如果您使用的是 Bookworm OS,请按照以下步骤操作:
- 步骤 1 在终端中执行以下命令进行安装
sudo apt-get install libopencv-dev python3-opencv
- 步骤 2 接下来,将此 Git 仓库克隆到您的树莓派中
git clone https://github.com/Seeed-Studio/Seeed_Python_ReTerminal
获取视频流
在新的终端窗口中,进入 Opencv_and_piCam 目录
cd Seeed_Python_ReTerminal/samples/Opencv_and_piCam
在本教程中,我们将从在 reTerminal 上使用 PiCam 和 OpenCV 的"Hello World"程序开始。您可以在我们克隆的仓库中找到 captureimages.py 文件。我们将探索实时视频流,如果您按下"q"键,视频流将优雅地停止。您甚至可以使用 Thonny IDE 来运行 Python 脚本。
python captureimages.py
您将看到如下的视频流。
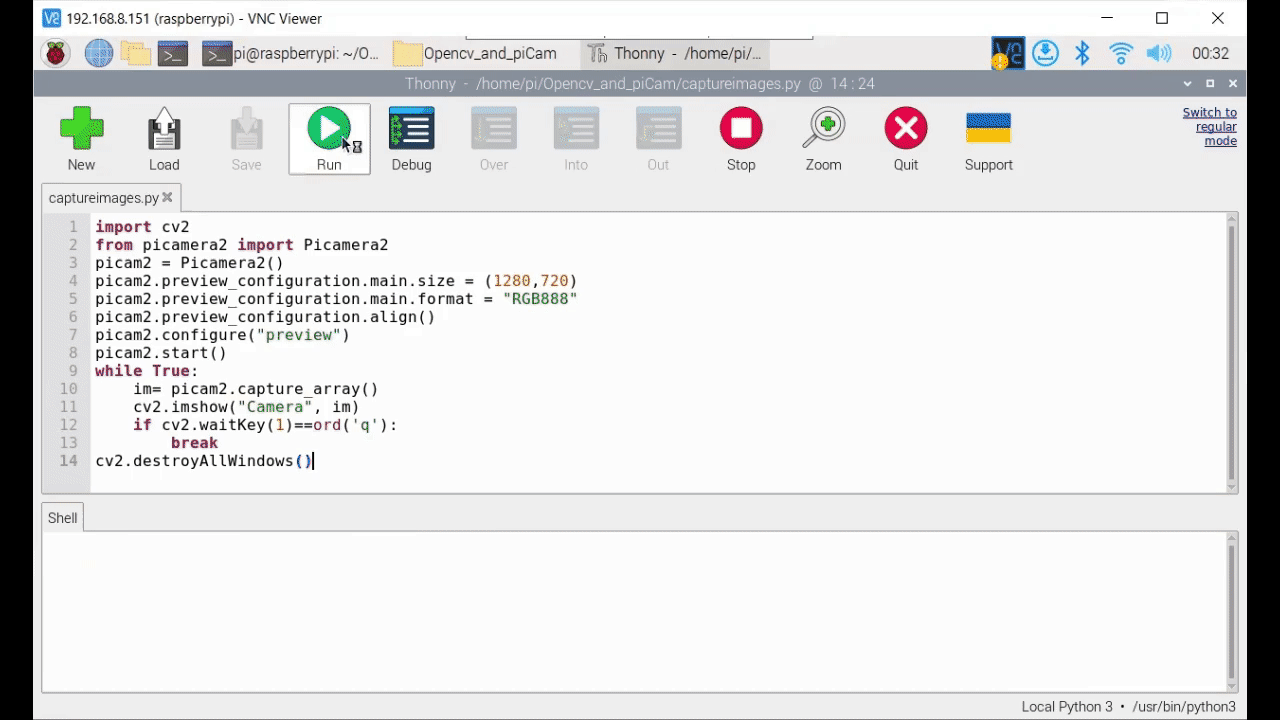
根据您的参考,我们将为您提供完整的代码片段以便使用。
import cv2
from picamera2 import Picamera2
picam2 = Picamera2()
picam2.preview_configuration.main.size = (1280,720)
picam2.preview_configuration.main.format = "RGB888"
picam2.preview_configuration.align()
picam2.configure("preview")
picam2.start()
while True:
    im= picam2.capture_array()
    cv2.imshow("Camera", im)
    if cv2.waitKey(1)==ord('q'):
        break
cv2.destroyAllWindows()
拍摄照片并保存
在这里,我们将使用 ReTerminal 上的 PiCam 和 OpenCV 来拍摄静态图像。在我们克隆的仓库中找到 saveimage.py 文件。我们将流式传输实时视频,如果您按下 's',将会拍摄一张照片。您甚至可以使用 Thonny IDE 来运行 Python 脚本。
python saveimage.py
您将在同一目录中找到一张捕获的图像。

根据您的参考,我们将为您提供完整的代码片段以便使用。
import cv2
from picamera2 import Picamera2

picam2 = Picamera2()
picam2.preview_configuration.main.size = (1280, 720)
picam2.preview_configuration.main.format = "RGB888"
picam2.preview_configuration.align()
picam2.configure("preview")
picam2.start()

try:
    while True:
        im = picam2.capture_array()
        cv2.imshow("Camera", im)

        # Save an image when a key is pressed (e.g., 's')
        key = cv2.waitKey(1)
        if key == ord('s'):
            # Save the image using OpenCV
            cv2.imwrite("captured_image.jpg", im)
            print("Image saved!")

        # Exit the loop when 'q' is pressed
        elif key == ord('q'):
            break

finally:
    # Release resources
    cv2.destroyAllWindows()
    picam2.stop()
    picam2.close()
技术支持
感谢您选择我们的产品!我们在这里为您提供不同的支持,以确保您使用我们产品的体验尽可能顺畅。我们提供多种沟通渠道,以满足不同的偏好和需求。