使用TensorFlow Lite进行关键词识别
介绍
本项目演示如何在ReSpeaker 2-Mics Pi HAT v2上使用TensorFlow Lite进行关键词识别。关键词识别允许从音频输入中实时检测预定义的单词,可用于语音控制设备和交互式系统等应用。我们将指导您完成训练TensorFlow Lite模型、在ReSpeaker HAT上部署模型以及本地运行语音识别的步骤。
硬件和软件要求
- 硬件:带有ReSpeaker 2-Mics Pi HAT v2的树莓派
- 软件:TensorFlow Lite、Google Colab、Python和支持库
应用场景
关键词识别可应用于:
- 智能家居设备
- 语音控制机器人
- 交互式信息亭
什么是TensorFlow Lite?
TensorFlow Lite是专为移动和嵌入式设备设计的轻量级TensorFlow版本。它能够以低延迟和小二进制文件大小实现机器学习推理,非常适合在树莓派等边缘设备上运行模型。
训练并获取TensorFlow Lite模型
数据集
我们将使用语音命令数据集的子集进行训练。该数据集包含人们说不同单词的WAV音频文件,由Google收集并在CC BY许可证下发布。数据集可从此处下载。有关数据集的更多信息,请参考此指南。
为什么使用Google Colab?
Google Colab是一个基于云的Jupyter笔记本运行平台。它提供免费的GPU资源访问,是训练机器学习模型的绝佳选择,无需本地计算能力。
步骤
现在我们将使用Google Colab笔记本执行数据训练并生成.tflite格式的TensorFlow Lite模型。
-
步骤1. 打开此Python笔记本
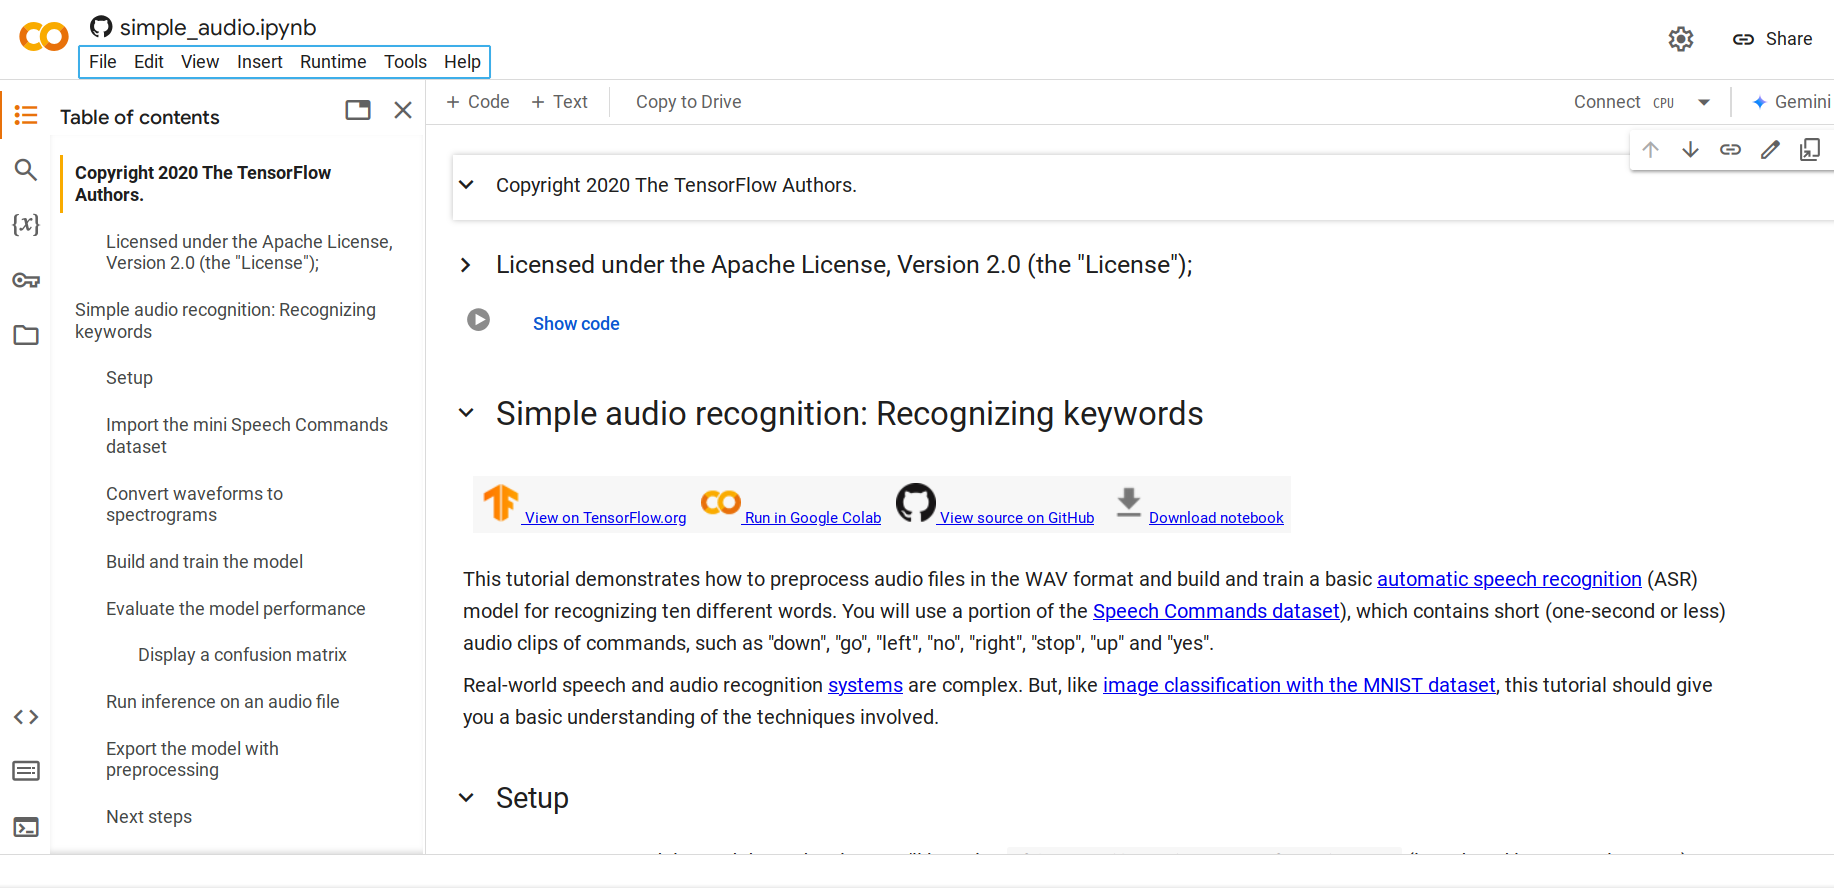
默认情况下,它将加载迷你语音命令数据集,这是语音命令数据集的较小版本。原始数据集包含超过105,000个WAV(波形)音频文件格式的音频文件,记录了人们说35个不同单词的声音。这些数据由Google收集并在CC BY许可证下发布。
-
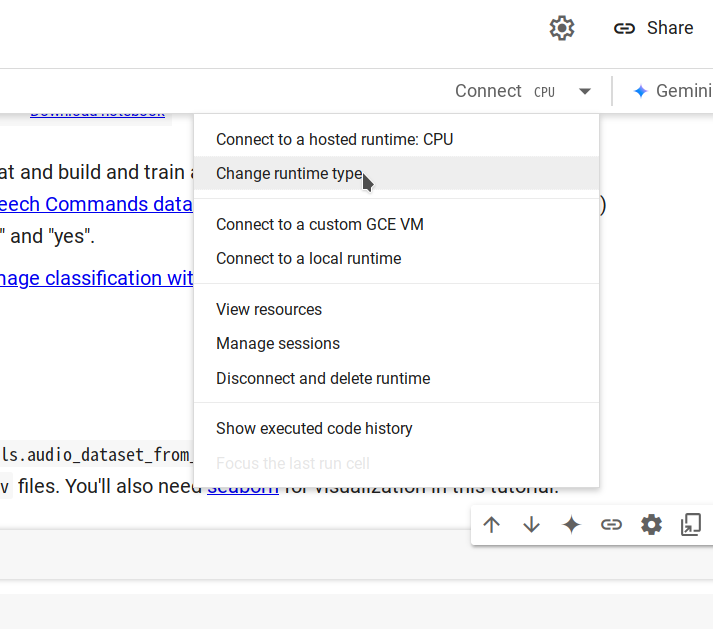
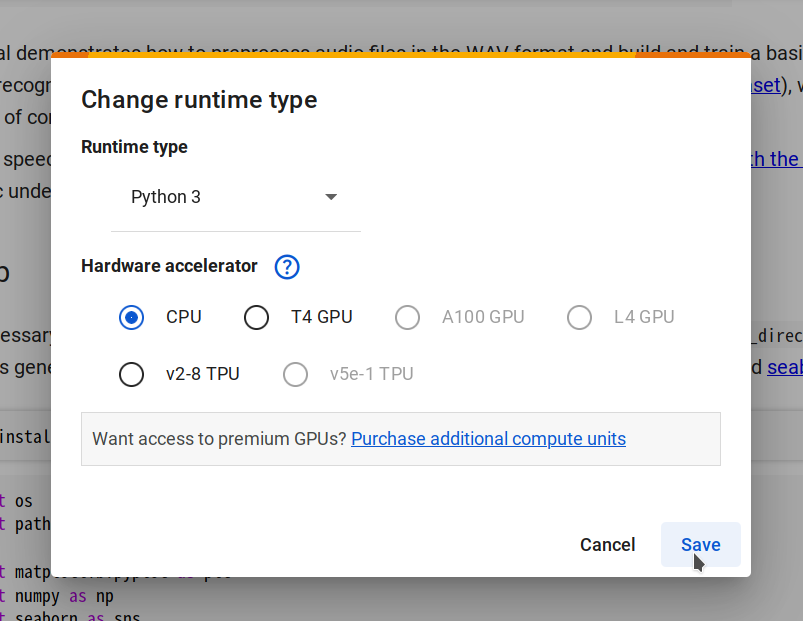
步骤2. 通过选择Changing runtime type -> CPU -> Save连接到新的运行时,然后点击Connect。
-
步骤3. 导航到
Runtime > Run all运行所有代码单元。此过程大约需要10分钟完成。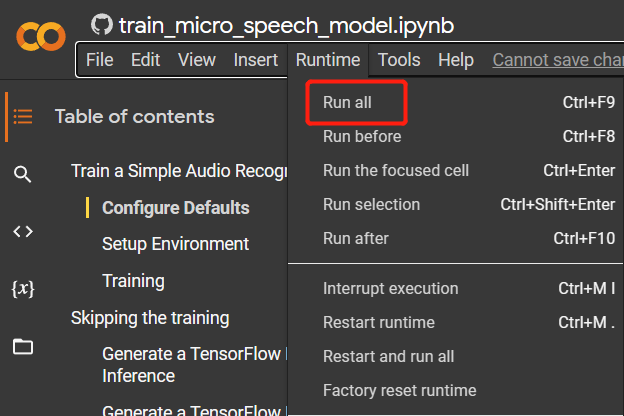
-
步骤4. 所有代码单元执行完成后,添加一个新单元并运行以下代码来生成
.tflite模型文件。converter = tf.lite.TFLiteConverter.from_keras_model(model)
tflite_model = converter.convert()
with open('model.tflite', 'wb') as f:
f.write(tflite_model)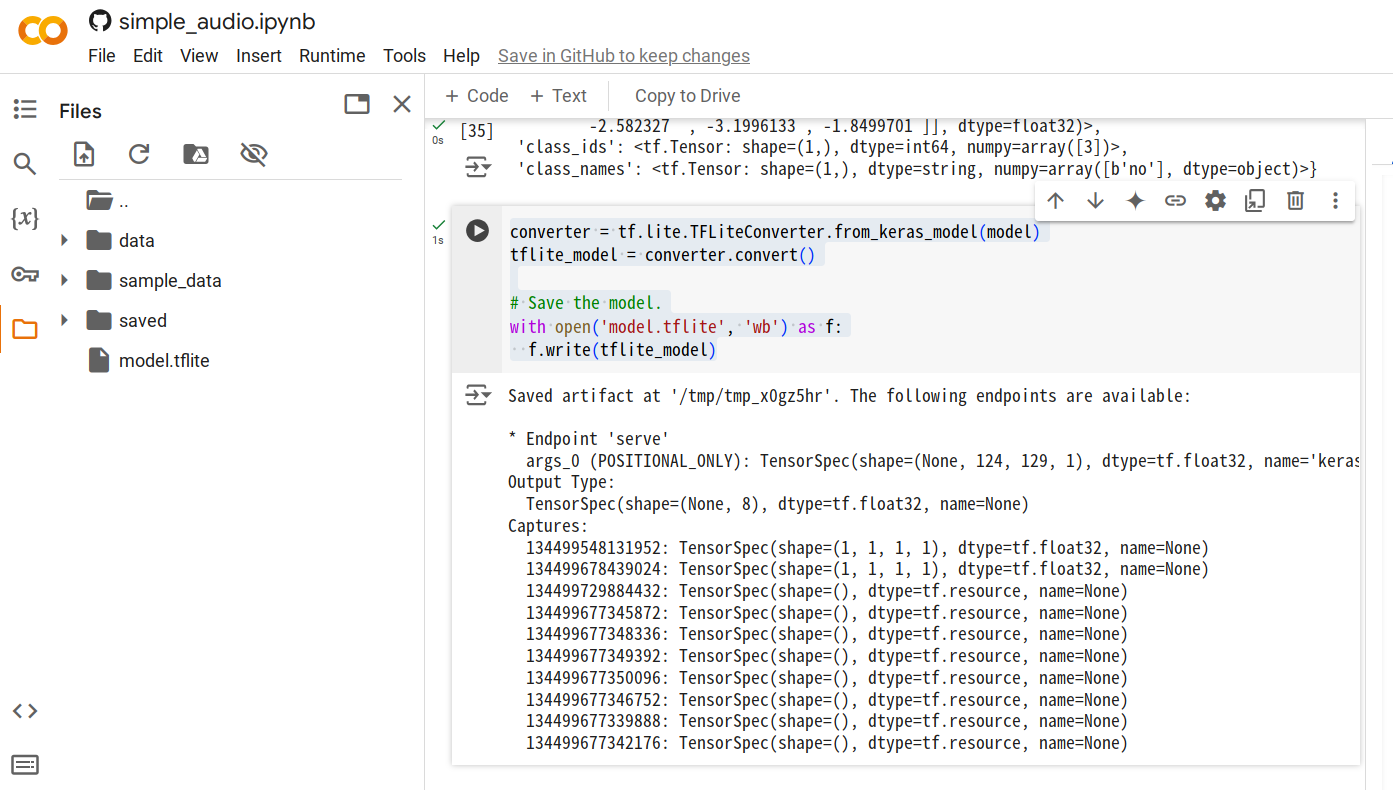
-
步骤5. 右键点击生成的
model.tflite文件并选择Download将文件保存到您的计算机。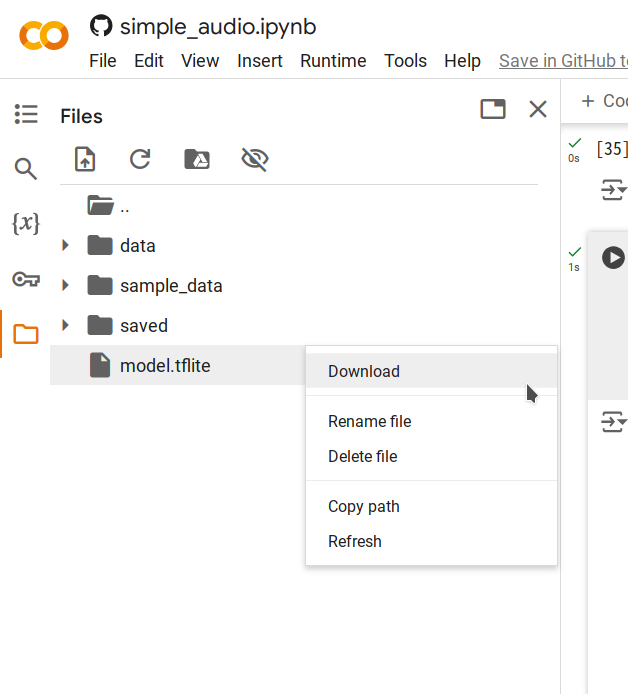
本地推理
运行推理脚本
脚本 inference.py 执行以下步骤:
- 加载训练好的 TensorFlow Lite 模型。
- 将输入音频处理成适合推理的频谱图。
- 运行推理并输出检测到的关键词以及每个标签的置信度分数。
运行步骤
-
将
model.tflite模型文件上传到您的 Pi,在此示例中,我们将其放在~/speech_recognition/model.tflite。 -
将以下脚本保存为
~/speech_recognition/inference.py:import numpy as np
from scipy import signal
from tflite_runtime.interpreter import Interpreter
import soundfile as sf
MODEL_PATH = 'model.tflite'
LABELS = ['no', 'yes', 'down', 'go', 'left', 'up', 'right', 'stop']
def get_spectrogram(waveform, expected_time_steps=124, expected_freq_bins=129):
_, _, Zxx = signal.stft(
waveform,
fs=16000,
nperseg=255,
noverlap=124,
nfft=256
)
spectrogram = np.abs(Zxx)
if spectrogram.shape[0] != expected_freq_bins:
spectrogram = np.pad(spectrogram, ((
0, expected_freq_bins - spectrogram.shape[0]), (0, 0)), mode='constant')
if spectrogram.shape[1] != expected_time_steps:
spectrogram = np.pad(spectrogram, ((
0, 0), (0, expected_time_steps - spectrogram.shape[1])), mode='constant')
if spectrogram.shape != (expected_freq_bins, expected_time_steps):
raise ValueError(
f"Invalid spectrogram shape. Got {spectrogram.shape}, expected ({expected_freq_bins}, {expected_time_steps})."
)
spectrogram = np.transpose(spectrogram)
return spectrogram
def preprocess_audio(file_path):
waveform, sample_rate = sf.read(file_path)
if sample_rate != 16000:
raise ValueError("Expected sample rate is 16 kHz")
if len(waveform.shape) > 1:
waveform = waveform[:, 0]
spectrogram = get_spectrogram(waveform)
spectrogram = spectrogram[..., np.newaxis]
spectrogram = spectrogram[np.newaxis, ...]
return spectrogram
def run_inference(file_path):
spectrogram = preprocess_audio(file_path)
interpreter = Interpreter(MODEL_PATH)
interpreter.allocate_tensors()
input_details = interpreter.get_input_details()
output_details = interpreter.get_output_details()
input_shape = input_details[0]['shape']
if spectrogram.shape != tuple(input_shape):
raise ValueError(
f"Expected input shape {input_shape}, got {spectrogram.shape}"
)
interpreter.set_tensor(
input_details[0]['index'], spectrogram.astype(np.float32))
interpreter.invoke()
output_data = interpreter.get_tensor(output_details[0]['index'])[0]
prediction = np.argmax(output_data)
confidence = np.exp(output_data) / \
np.sum(np.exp(output_data))
print(f"command: {LABELS[prediction].upper()}")
for label, conf in zip(LABELS, confidence):
print(f"{label}: {conf:.2%}")
if __name__ == "__main__":
audio_file_path = 'test_audio.wav'
run_inference(audio_file_path) -
使用以下命令录制声音,可用的关键词有:
no、yes、down、go、left、up、right、stop。$ arecord -D "plughw:2,0" -f S16_LE -r 16000 -d 1 -t wav ~/speech_recognition/test_audio.wav -
执行脚本:
$ python3 inference.py
INFO: Created TensorFlow Lite XNNPACK delegate for CPU.
command: YES
no: 8.74%
yes: 21.10%
down: 5.85%
go: 14.57%
left: 11.02%
up: 8.25%
right: 10.53%
stop: 19.94%
解释结果
脚本输出检测到的命令(例如 YES)和所有标签的置信度分数。这提供了对模型预测的洞察,并允许您评估其性能。
技术支持与产品讨论
感谢您选择我们的产品!我们在这里为您提供不同的支持,确保您使用我们产品的体验尽可能顺畅。我们提供多种沟通渠道,以满足不同的偏好和需求。