基于 Edge Impulse 的 TinyML 语音识别
概述
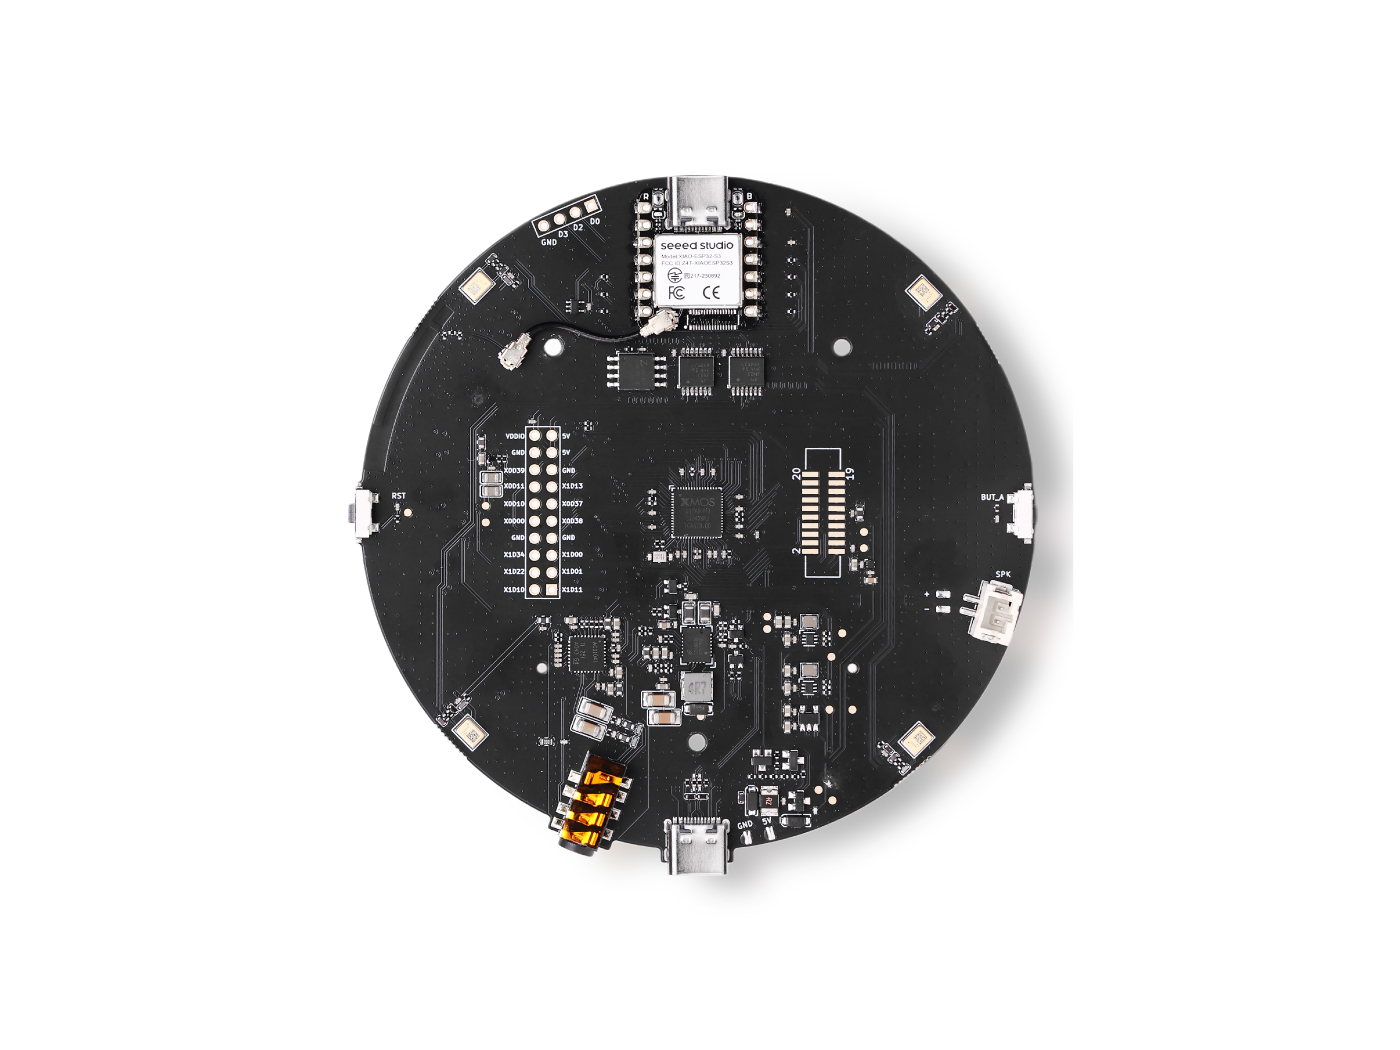
通过基于 TinyML 的关键词识别(KWS)系统,利用实时语音命令检测解锁免提控制功能。通过结合高性能的 ReSpeaker XVF3800 麦克风阵列、高效的 XIAO ESP32S3 和 Edge Impulse 平台,我们为紧凑、低功耗设备带来了语音识别功能。训练、部署和监听——您的设备随时准备响应您的下一个命令!
所需硬件
数据收集
为 ReSpeaker XVF3800 配合 XIAO ESP32S3 安装 USB 固件
要开始音频数据收集,请确保您的 ReSpeaker 已刷入 USB 固件,使其能够作为 USB 麦克风工作。
设置 Python 环境
然后您需要在笔记本电脑或 PC 上创建 python 环境来收集语音数据。这里我们将创建 respeaker-env
python -m venv respeaker-env
source respeaker-env/bin/activate
Install Required Libraries:
pip install sounddevice scipy numpy
查找 ReSpeaker 设备 ID
为了从正确的麦克风输入录音,我们需要识别 ReSpeaker 麦克风的设备索引。
import sounddevice as sd

devices = sd.query_devices()
for i, device in enumerate(devices):
    print(f"Device {i}: {device['name']} (input channels: {device['max_input_channels']})")
查找与 ReSpeaker 对应的设备名称(通常命名为 ReSpeaker XVF3800 USB 4-Mic Array 之类的名称),并记下索引号(例如,设备 2)。
录制音频样本
以下脚本将允许您录制带标签的音频样本,按人员和命令/关键词进行组织。
import os
import sounddevice as sd
from scipy.io.wavfile import write

# === Settings ===
SAMPLERATE = 16000
CHANNELS = 1  # Mono input
DURATION = 10  # seconds
DEVICE_INDEX = 2  # Replace with correct device index

def record_audio(filename, samplerate=SAMPLERATE, channels=CHANNELS, duration=DURATION, device=DEVICE_INDEX):
    print(f"Recording '{filename}' for {duration} seconds...")
    recording = sd.rec(int(duration * samplerate),
                       samplerate=samplerate,
                       channels=channels,
                       dtype='int32',
                       device=device)
    sd.wait()
    write(filename, samplerate, recording)
    print(f"Saved: {filename}")

def get_next_filename(directory, label):
    existing = [f for f in os.listdir(directory) if f.startswith(label) and f.endswith('.wav')]
    index = len(existing) + 1
    return os.path.join(directory, f"{label}.{index}.wav")

def collect_samples():
    while True:
        sample_name = input("Enter sample name (e.g., PersonA): ").strip()
        if not sample_name:
            print("Sample name cannot be empty.")
            continue

        sample_dir = os.path.join(os.getcwd(), sample_name)
        os.makedirs(sample_dir, exist_ok=True)
        print(f"Directory created: {sample_dir}")

        while True:
            label = input("Enter sound/voice to record (e.g., yes, no): ").strip()
            if not label:
                print("Label cannot be empty.")
                continue

            while True:
                filename = get_next_filename(sample_dir, label)
                record_audio(filename)

                cont = input("Record another sample for this label? (yes/no): ").strip().lower()
                if cont != 'yes':
                    break

            next_label = input("Do you want to record a different label? (yes/no): ").strip().lower()
            if next_label != 'yes':
                break

        next_sample = input("Do you want to create a new sample? (yes/no): ").strip().lower()
        if next_sample != 'yes':
            print("Audio collection completed.")
            break

if __name__ == "__main__":
    collect_samples()
Folder Structure Example
/PersonA
    ├── red.1.wav
    ├── red.2.wav
    ├── blue.1.wav
    └── blue.2.wav
/PersonB
    ├── red.1.wav
    └── green.1.wav
每个人的文件夹包含标记的 .wav 文件,这些文件稍后将上传到 Edge Impulse 进行模型训练。
在 Edge Impulse 中上传和准备音频数据
使用 ReSpeaker XVF3800 收集原始音频样本并按标签组织后,下一步是在 Edge Impulse Studio 中上传和处理它们,以训练您的关键词识别模型。
在 Edge Impulse 中创建新项目
-
前往 Edge Impulse 并登录(如果您是新用户请注册)。
-
点击"Create new project"。
-
为您的项目提供一个名称(例如,"Voice Command KWS")
上传现有音频样本
要上传您收集的数据:
- 1.导航到 Data Acquisition 选项卡。
- 2.点击 "Upload existing data"(右上角)。
- 3.选择并上传您的 .wav 文件所在文件夹
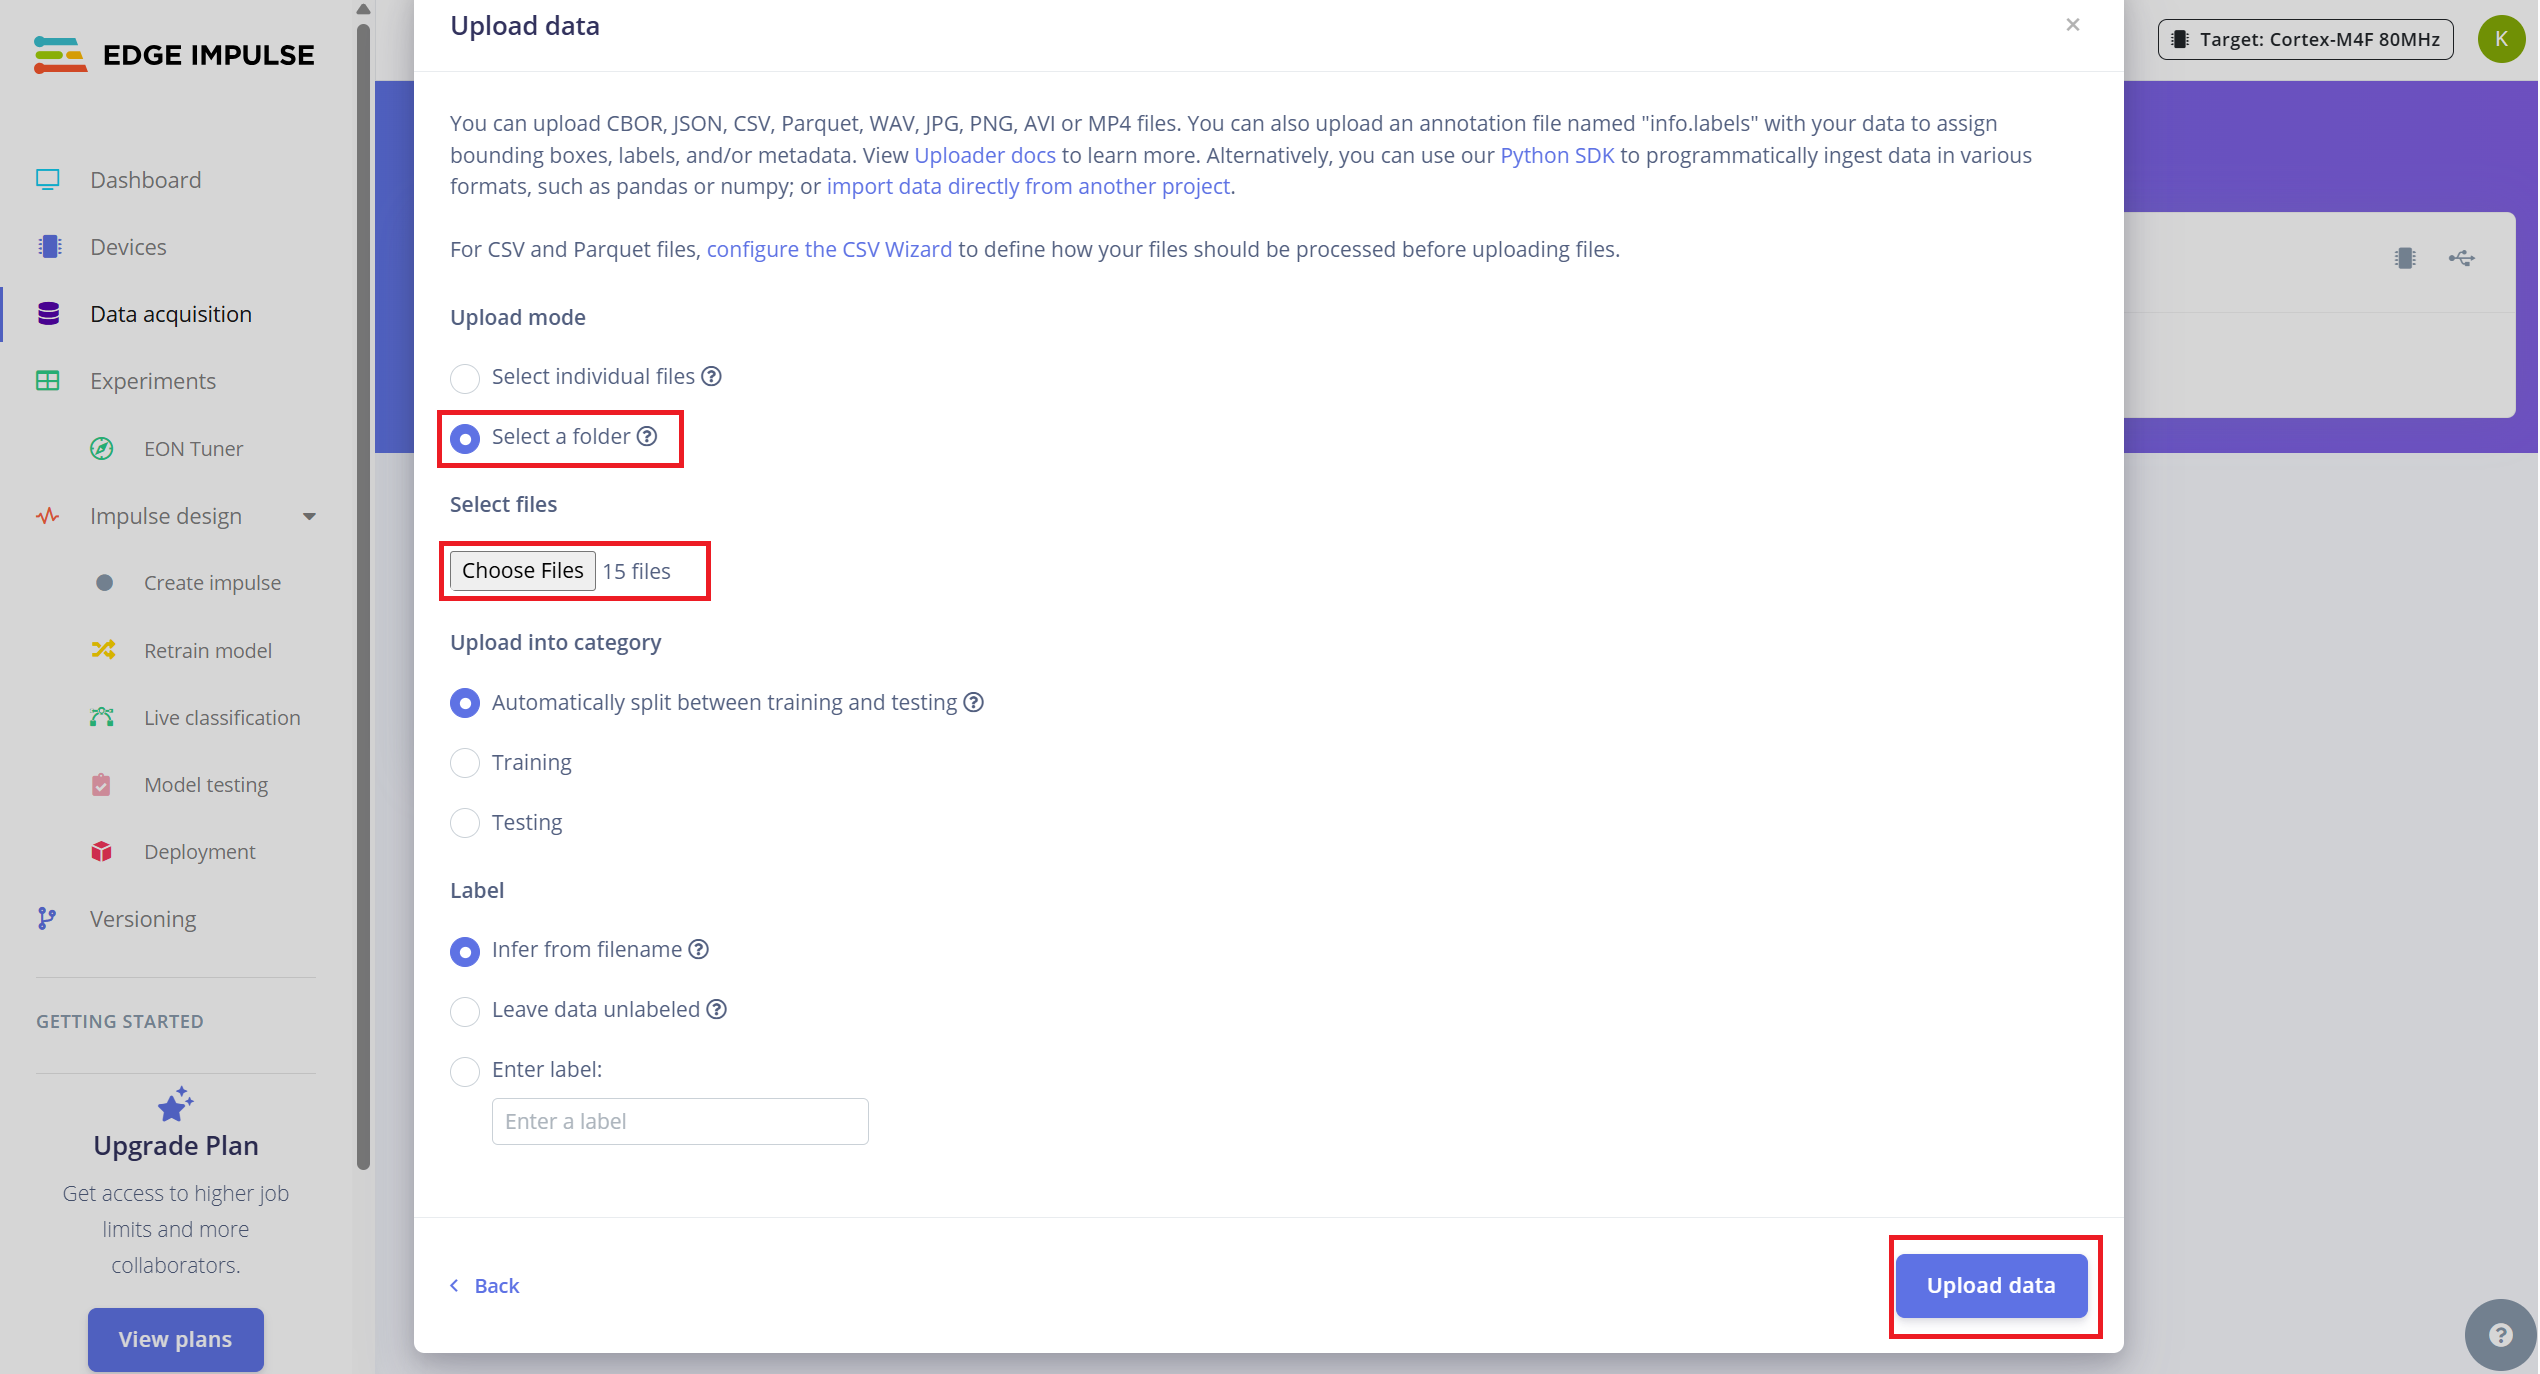
- 4.启用自动将数据分割为训练和测试的选项(Edge Impulse 推荐约 80/20 分割)。
将 10 秒音频分割为 1 秒样本
Edge Impulse 在关键词识别方面最适合使用 1 秒音频片段。由于原始样本是以 10 秒片段录制的,您需要将每个片段分割为多个 1 秒样本。
按照以下步骤操作:
- 1.上传后,前往 Data Acquisition 页面。
- 2.找到一个样本(例如,yes.1.wav)并点击样本旁边的三个点(…)。
- 3.从菜单中选择"Split sample"。
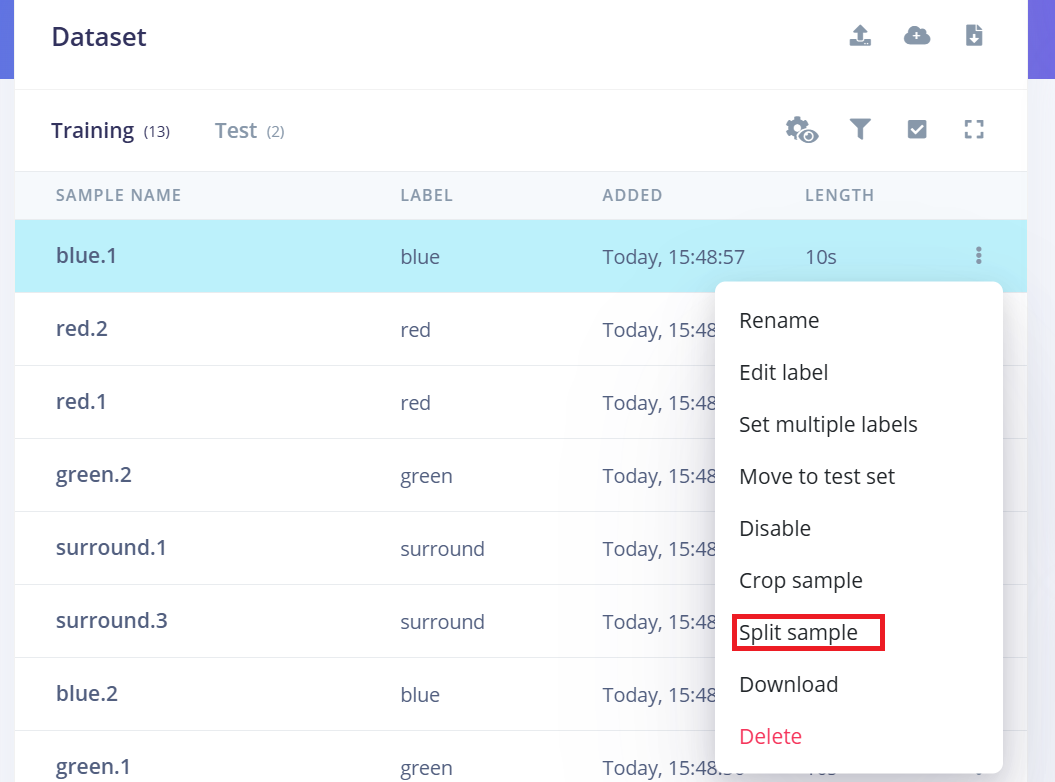
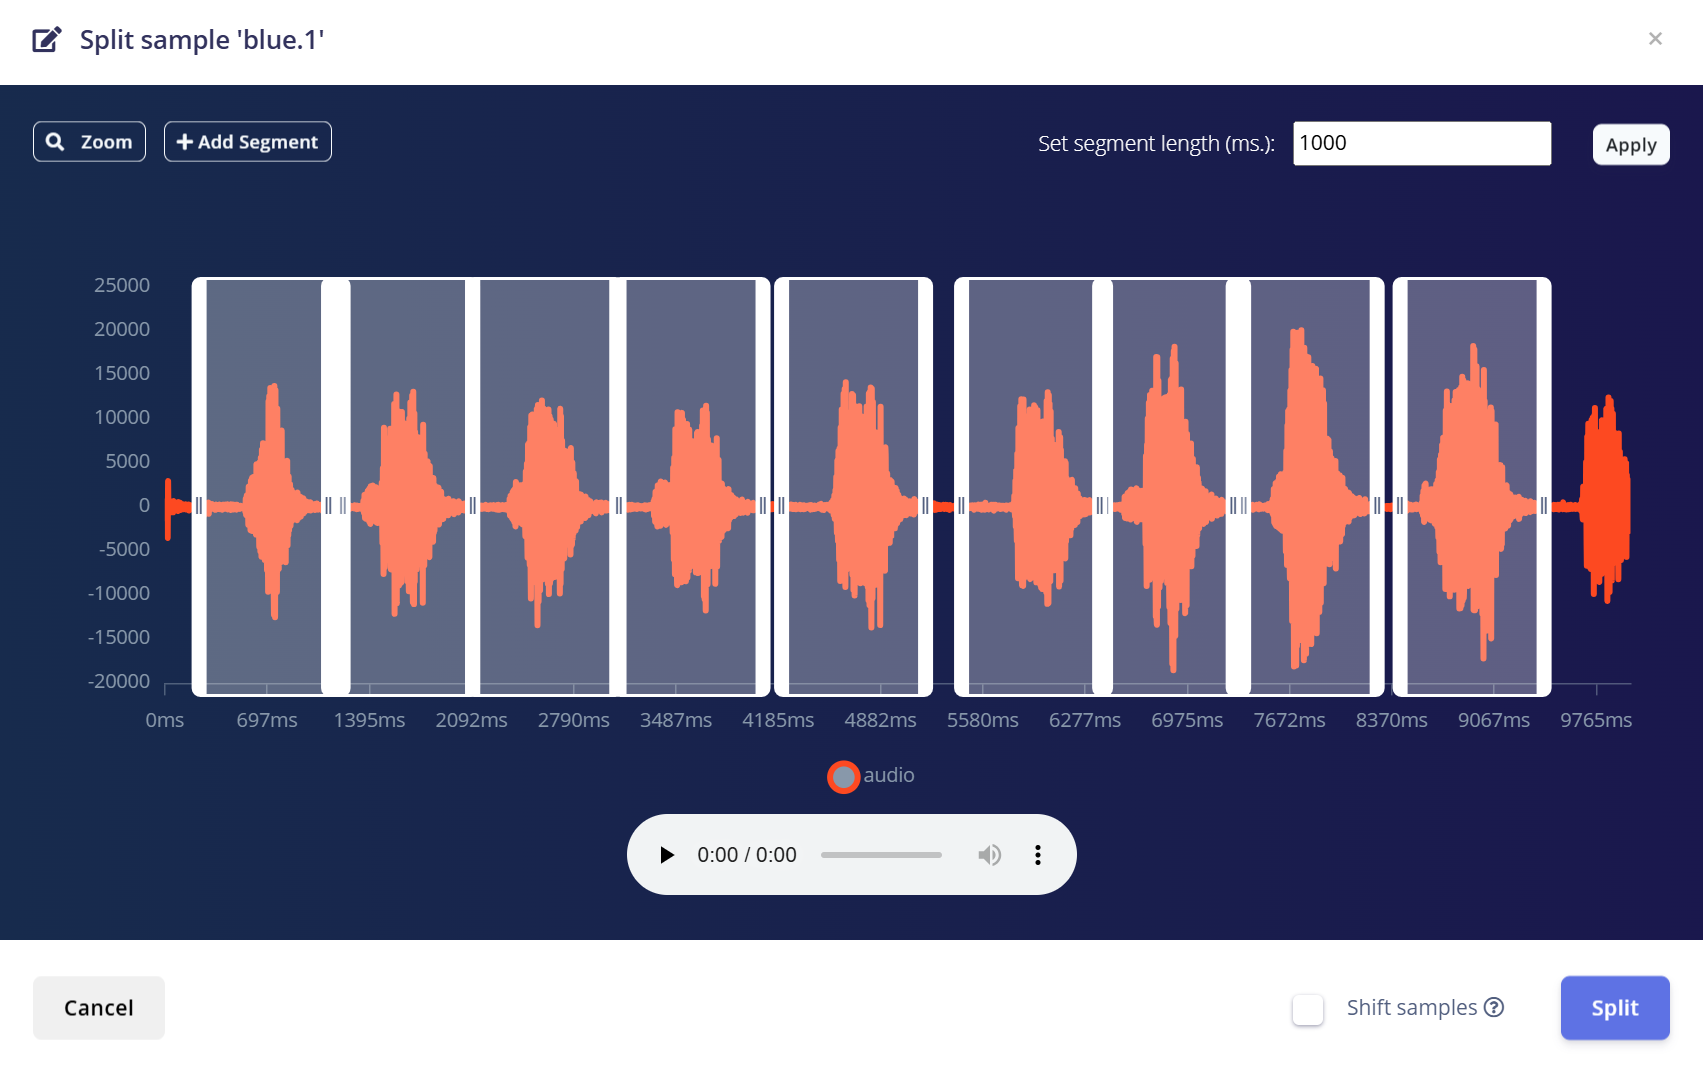
- 4.使用工具将波形分割为 1 秒片段。
- a.您可以拖动调整片段或根据需要添加/删除它们。
- 5.点击 Save and Split。
对训练和测试中所有类别的每个 10 秒样本重复此过程。
这确保您的数据集格式正确并针对训练高精度模型进行了优化。
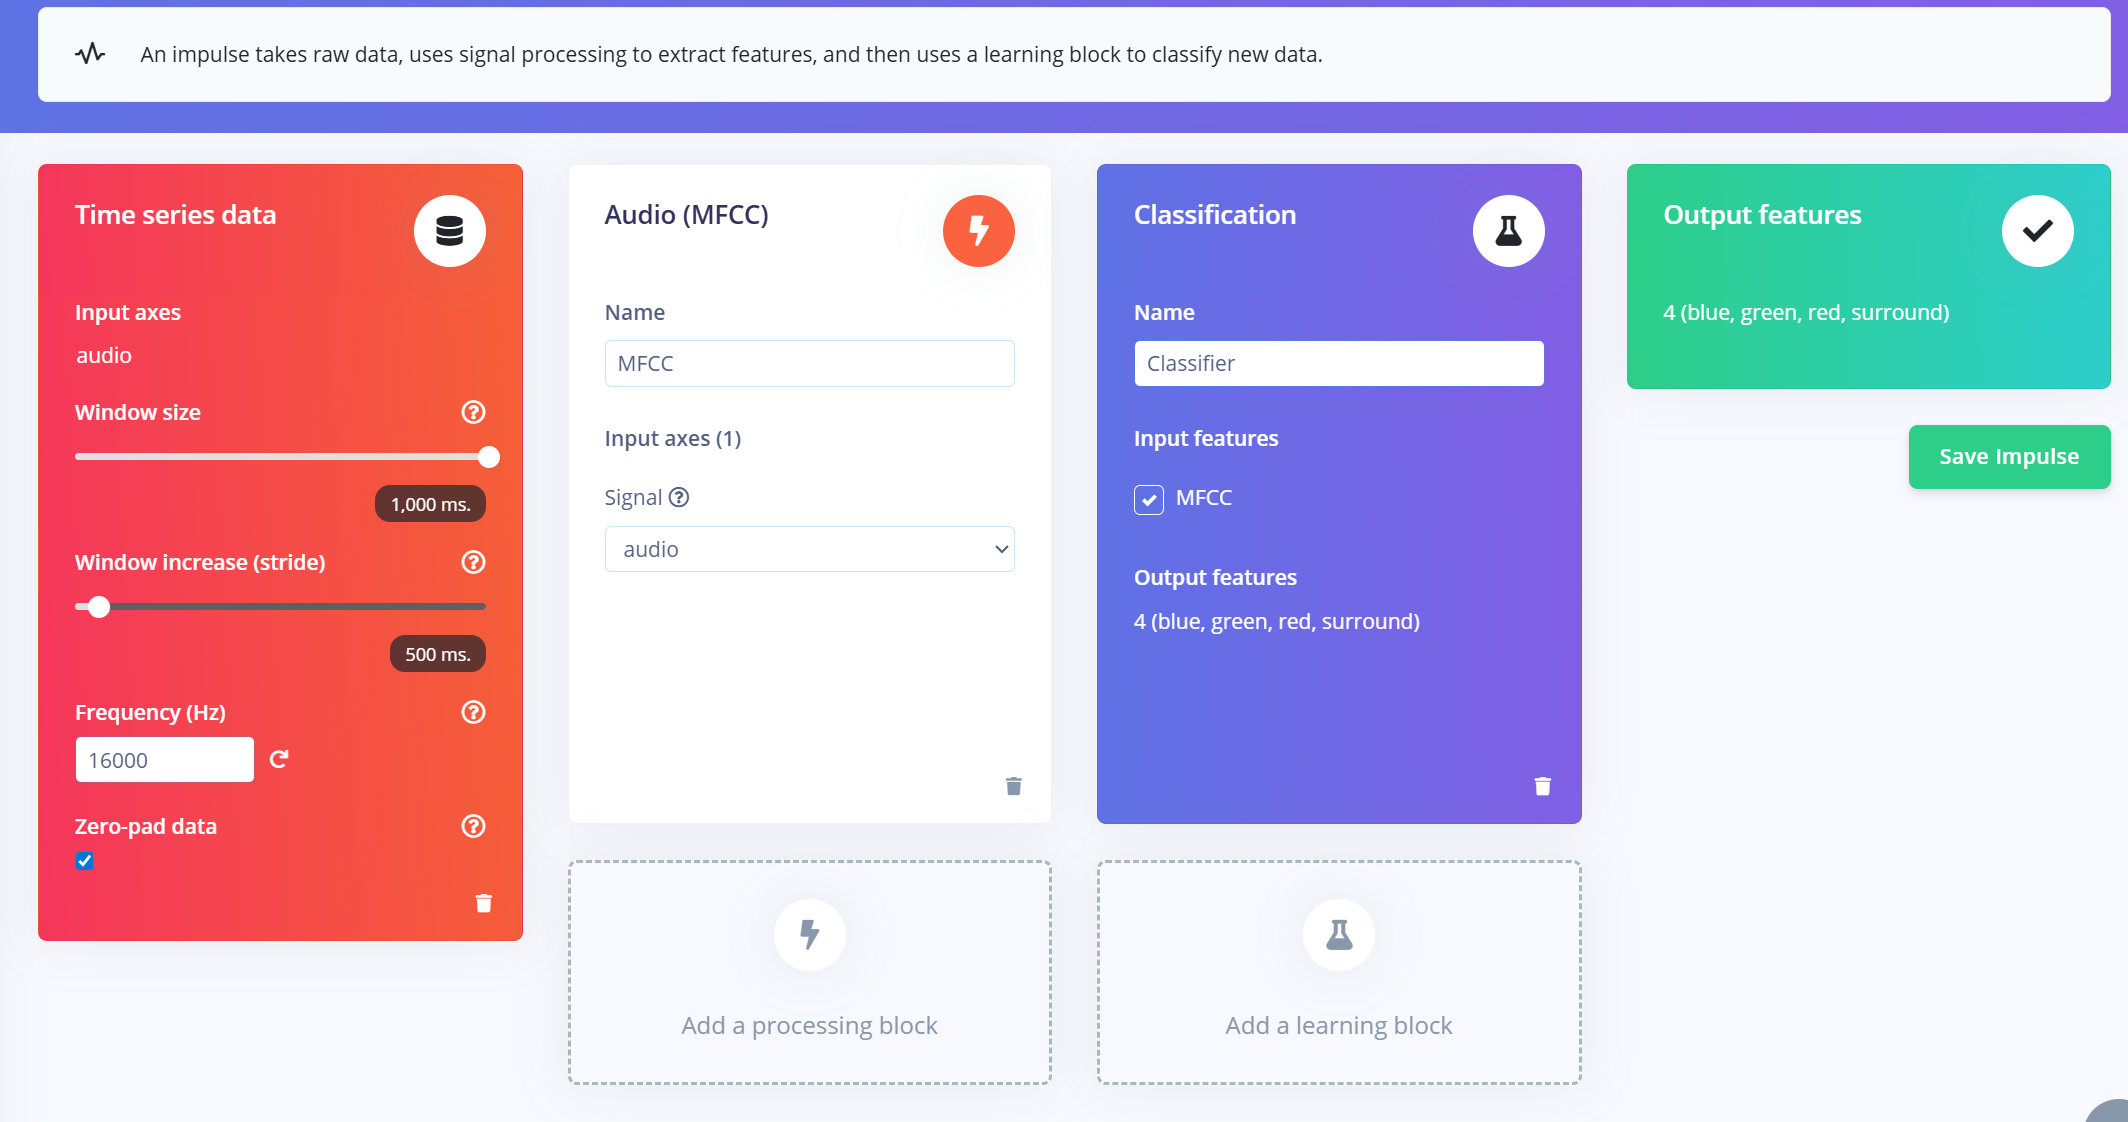
创建 Impulse(预处理/模型定义)
Edge Impulse 中的 impulse 定义了将原始数据转换为训练好的机器学习模型的端到端管道。它包括信号处理、特征提取和用于分类的学习块。
创建 Impulse
- 1.导航到您的 Edge Impulse 项目中的 "Impulse Design" 选项卡。
- 2.点击 "Create Impulse"。
- 3.配置输入窗口:
- a.Window size:1000 ms(1 秒)
- b.Window increase:500 ms(重叠窗口以增强数据)
- c.启用"Zero-pad data":这确保较短的片段(例如 800ms)用零填充,在样本分割期间应用噪声修剪时特别有用。
添加 MFCC 特征提取器
创建 impulse 窗口后:
- 1.点击 "Add a processing block" 并选择 MFCC (Mel Frequency Cepstral Coefficients)。
- a.MFCC 是一种广泛使用的方法,用于将音频信号转换为表示语音频率模式的 2D 特征。
- b.这些特征非常适合基于语音的识别模型。
- 2.设置 MFCC 参数(默认值适用于大多数情况):
- a.输出形状:13 x 49 x 1
- b.这将您的音频片段转换为用于分类的"图像"。
添加学习块
- 1.点击 "Add a learning block" 并选择 "Classification (Keras)"。
- 2.这创建了一个自定义的卷积神经网络 (CNN),它将对 MFCC 特征执行图像分类。
- 3.您现在可以继续到 NN Classifier 选项卡来自定义和训练您的模型。
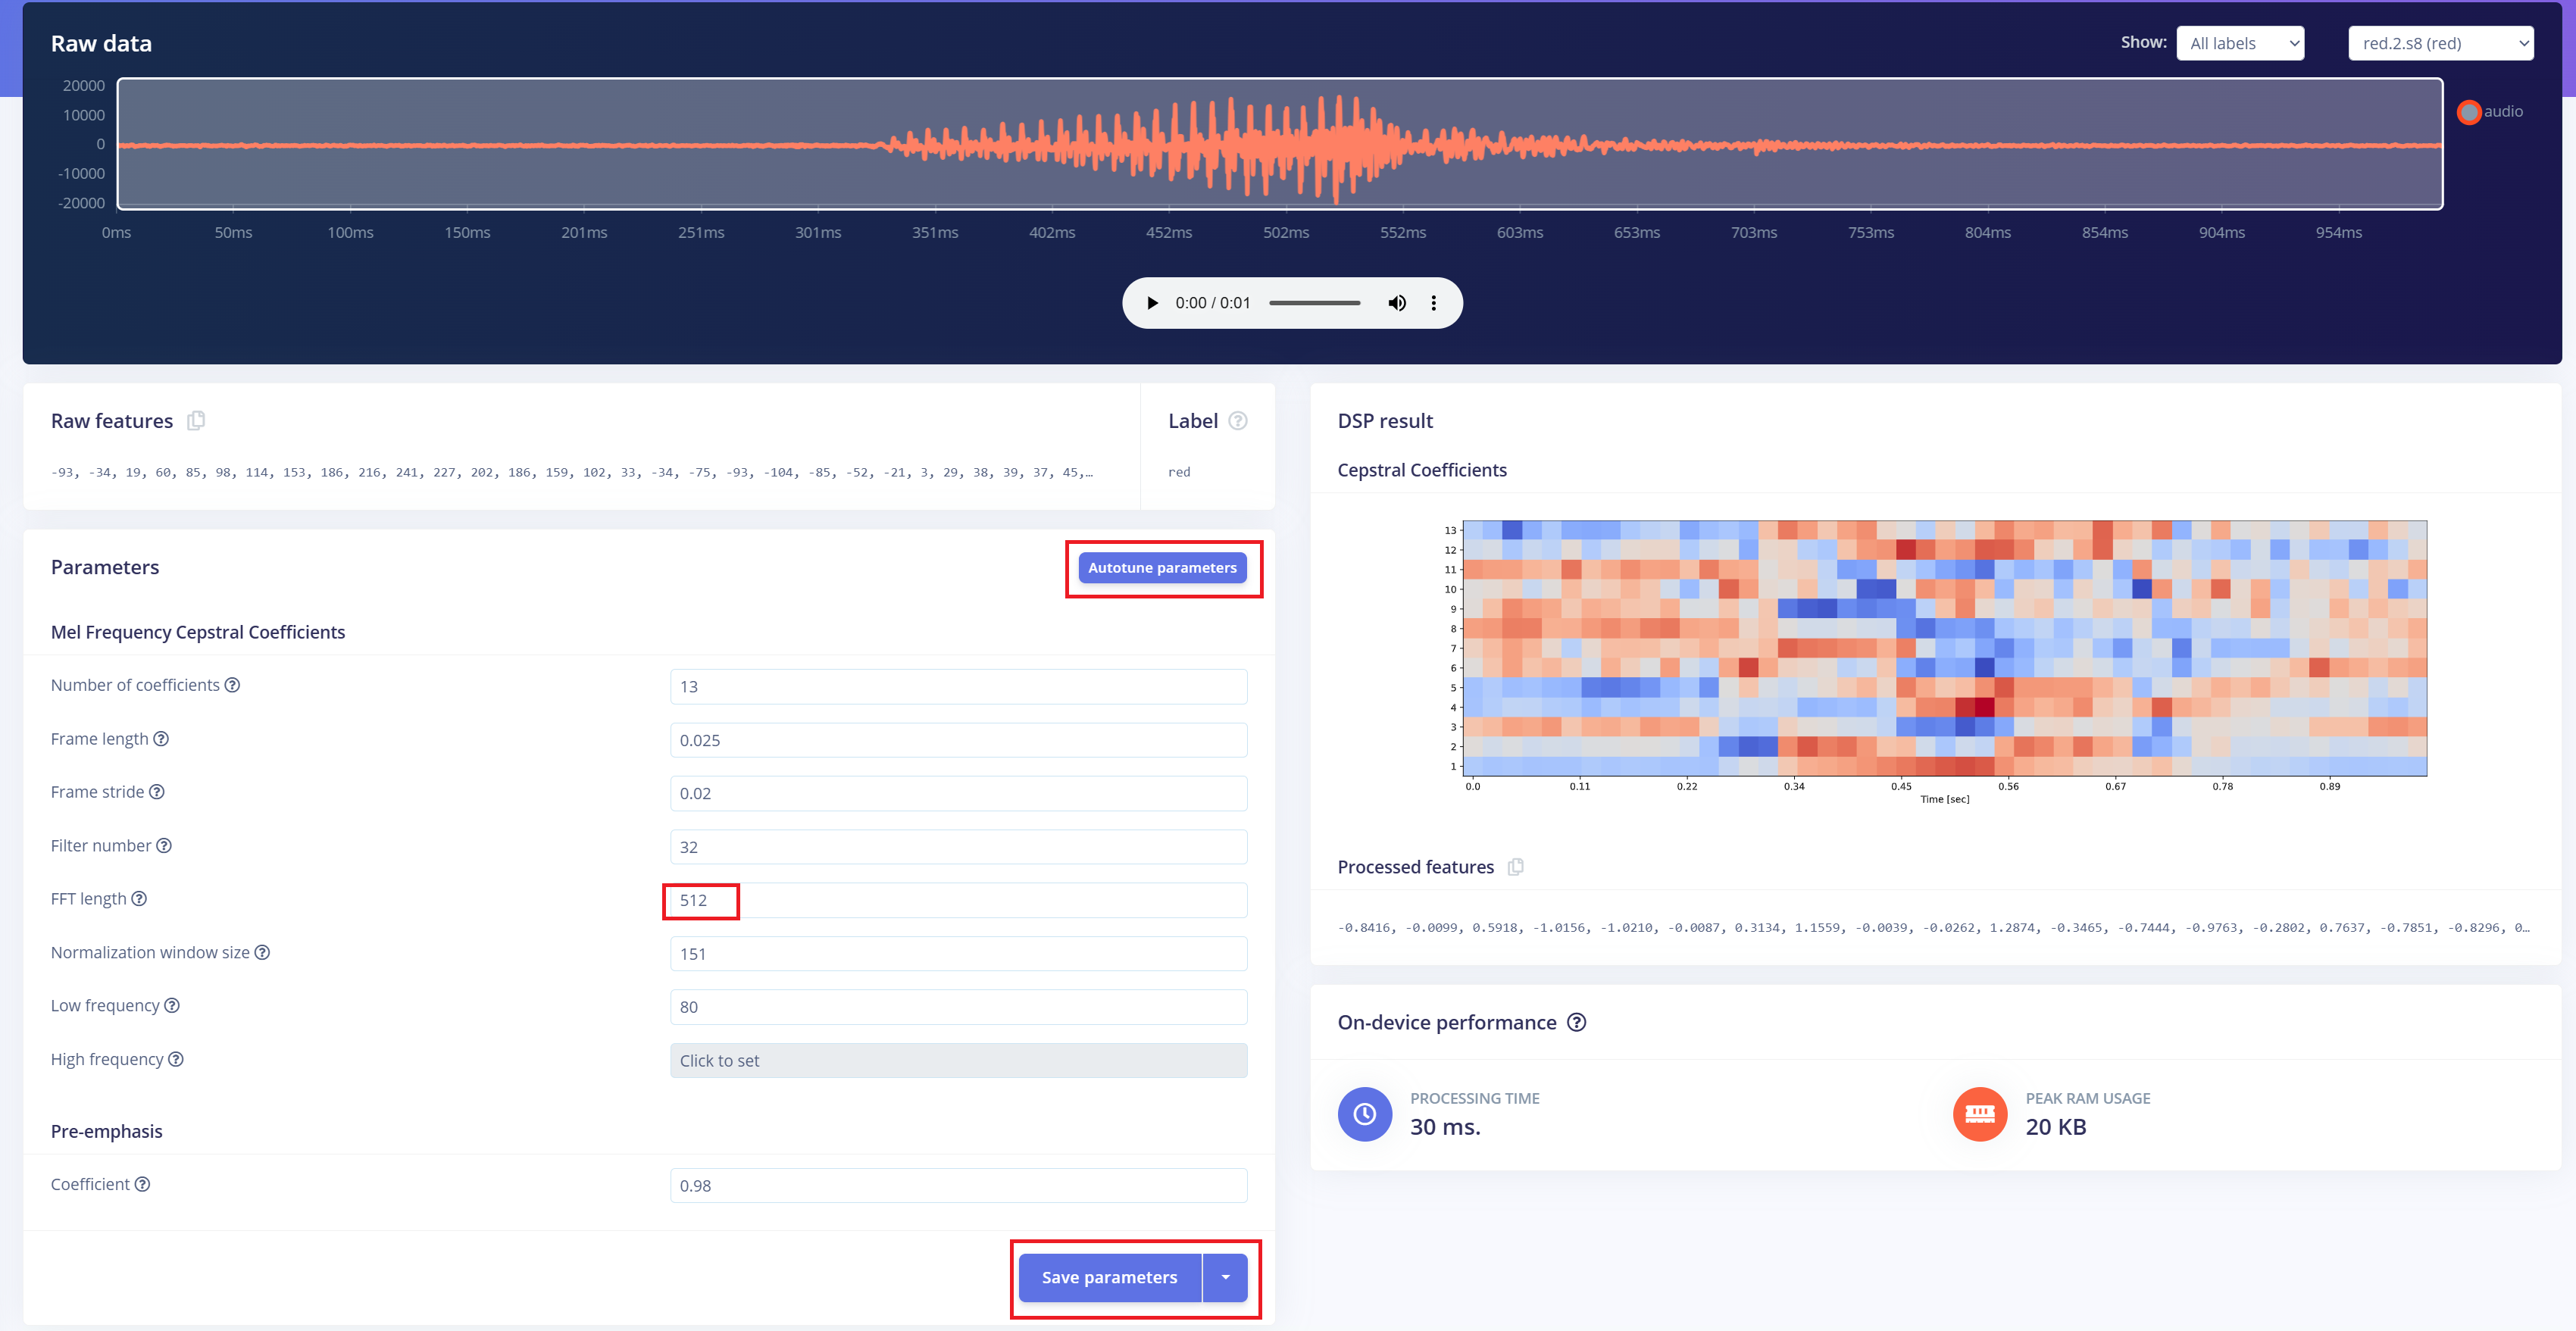
预处理 (MFCC)
下一步是从录制的音频生成频谱图图像,这些图像将用于模型训练。我们可以使用默认的DSP参数,或者像我们这种情况一样,利用DSP自动调优功能来自动优化参数以获得更好的性能。
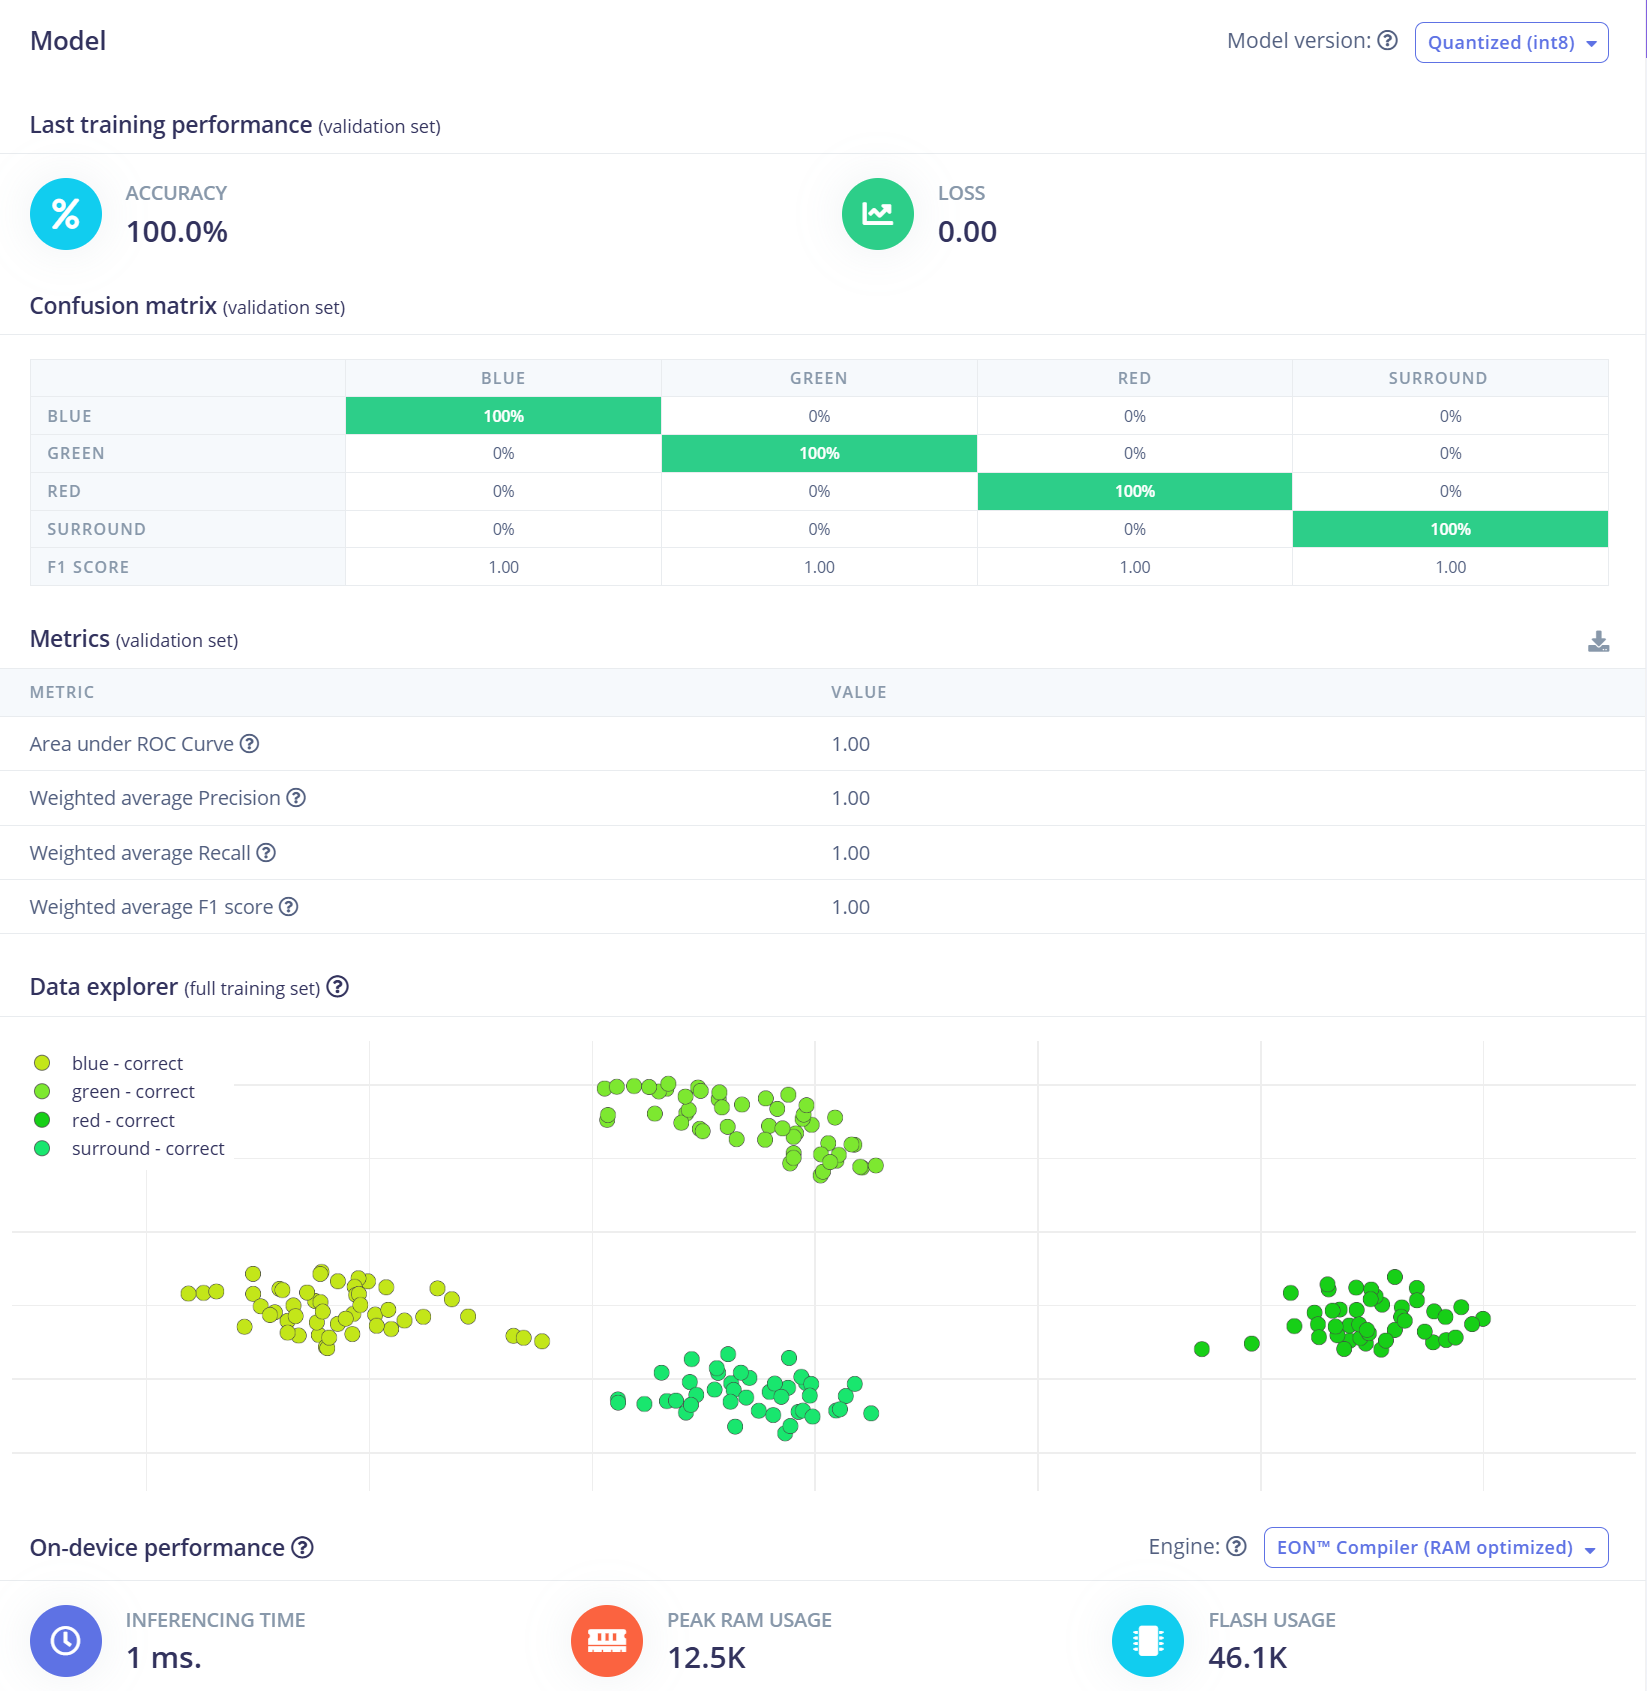
构建机器学习模型
对于这个项目,我们将使用卷积神经网络(CNN)模型。该架构包含两个Conv1D + MaxPooling层,分别具有8个和16个滤波器,然后是一个0.25的Dropout层。在展平后,最终的密集层包含四个神经元——每个类别一个。 我们将使用0.005的学习率在100个epoch上训练模型。为了提高泛化能力和鲁棒性,将应用数据增强技术,如背景噪声。初始结果很有希望。
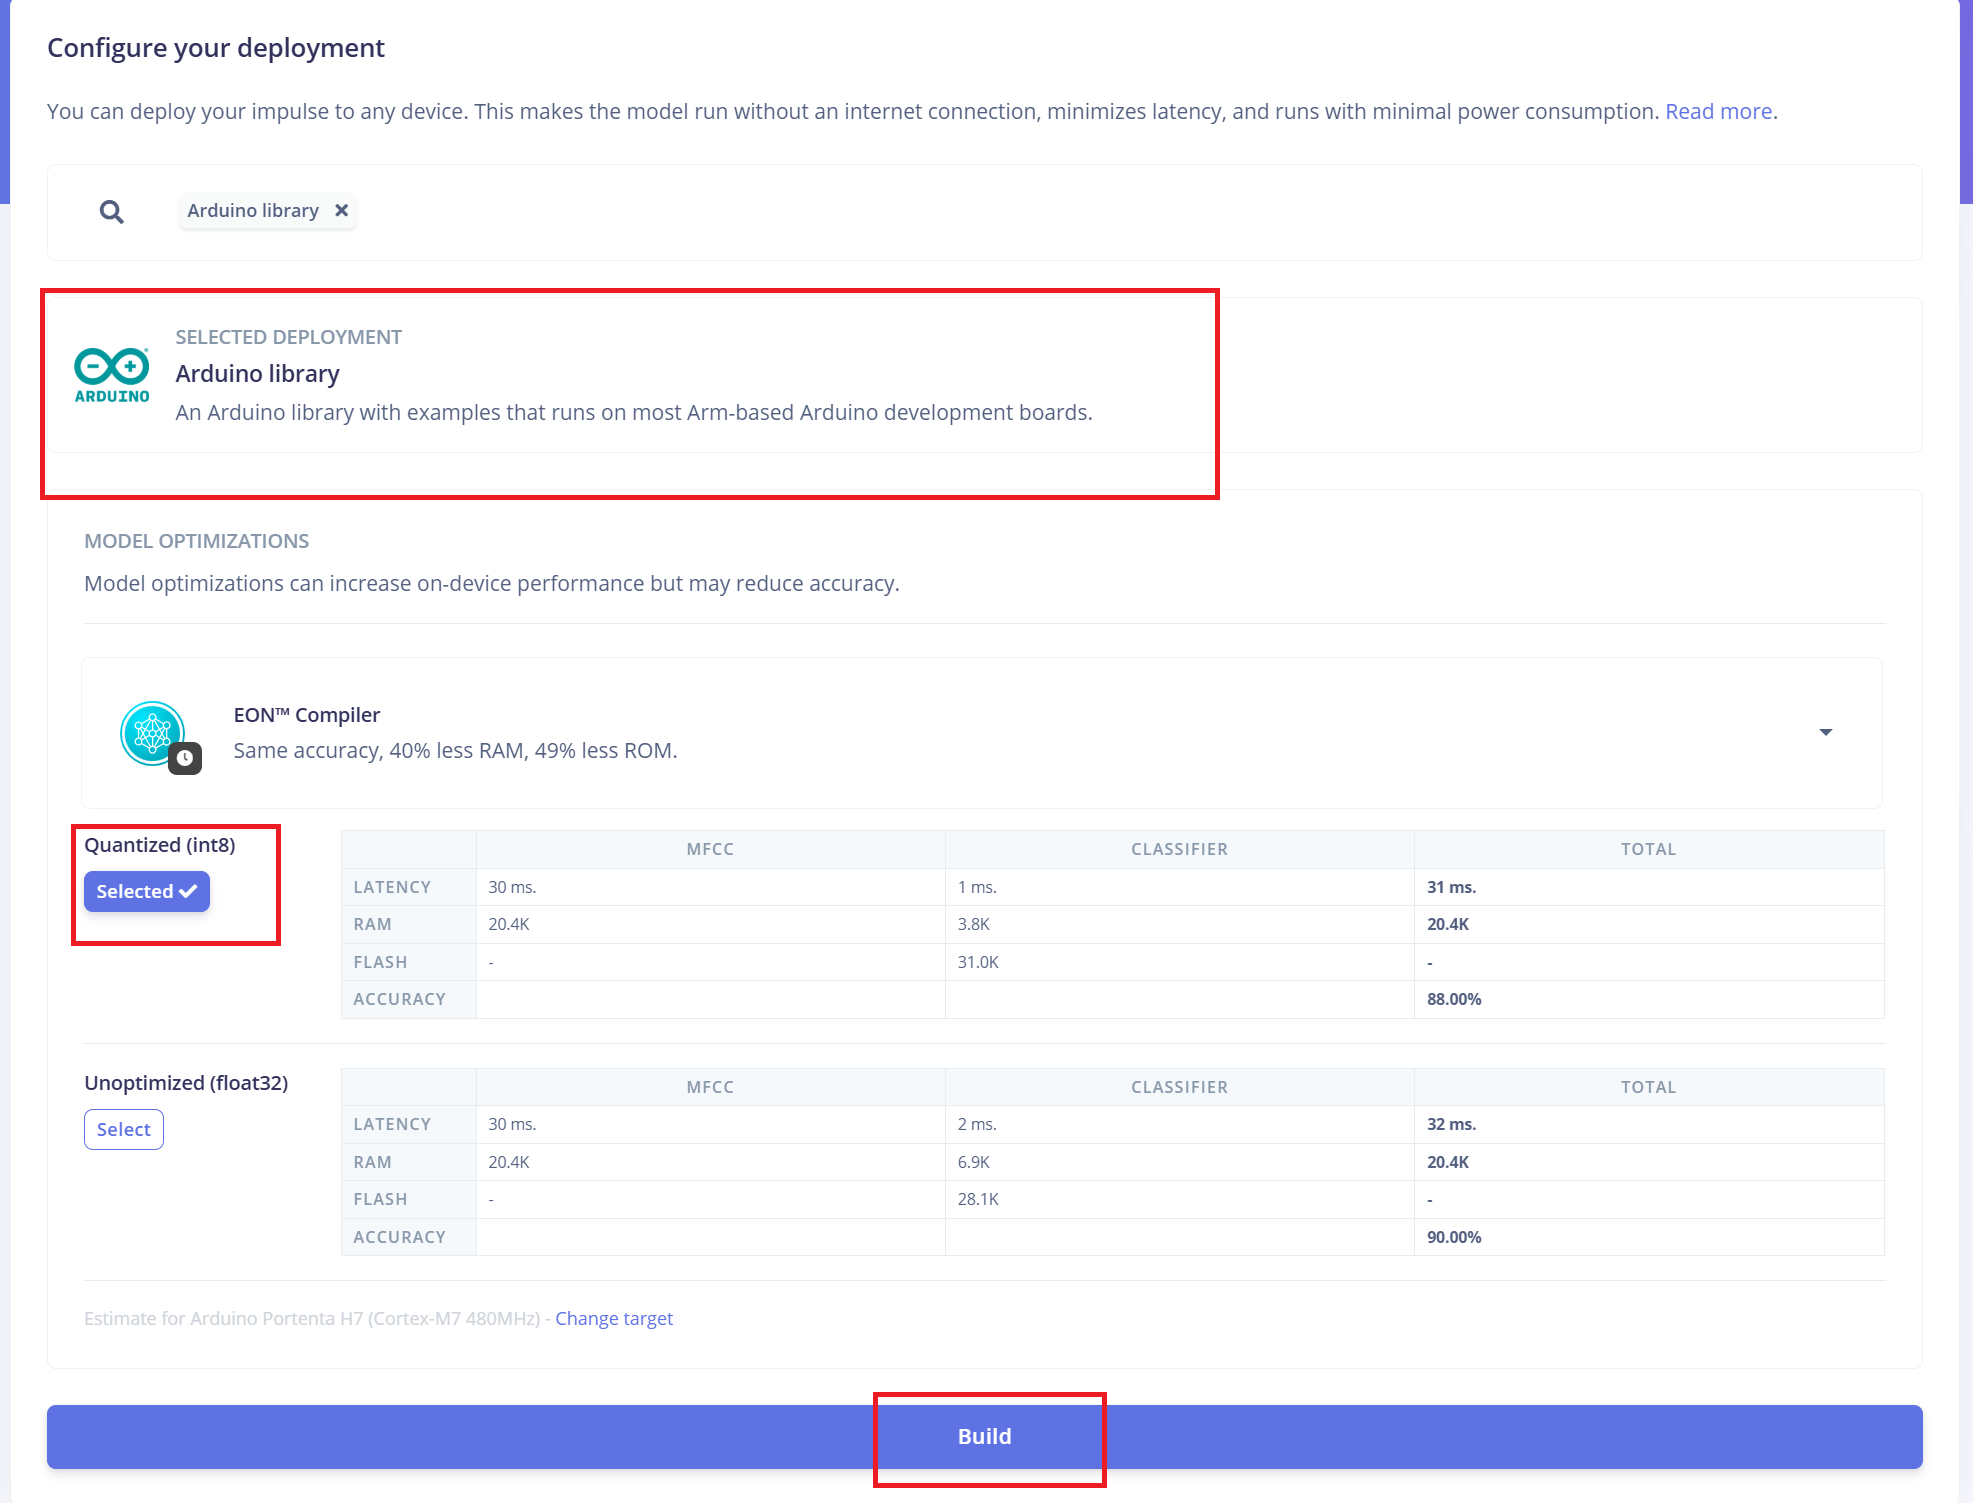
部署到ReSpeaker XVF3800与XIAO ESP32 S3
Edge Impulse将自动将所有必要的库、预处理函数和训练好的模型打包成可下载的包。 继续操作:
- 1.选择**"Arduino Library"**作为部署选项。
- 2.在底部,选择**"Quantized (Int8)"**格式。
- 3.点击**"Build"**生成库。
下载完成后:
- 4.打开Arduino IDE,进入Sketch菜单。
- 5.选择**"Include Library"** > "Add .ZIP Library..."
- 6.选择从Edge Impulse下载的.zip文件,将其添加到您的Arduino项目中。
将固件切换到I2S模式
在上传Arduino代码之前,您必须将ReSpeaker XVF3800固件切换到I2S模式,以启用通过I2C协议的通信。 固件安装指南
Arduino代码集成
Edge Impulse提供的Arduino代码需要进行一些修改,以确保与ReSpeaker XVF3800和XIAO ESP32S3硬件的兼容性:根据您的设置更新GPIO引脚定义、I2S采样率和其他硬件特定参数。
#define EIDSP_QUANTIZE_FILTERBANK 0
#include <Kasun9603-project-1_inferencing.h> // Change with your one
#include "driver/i2s.h"
#include "freertos/FreeRTOS.h"
#include "freertos/task.h"
// ==== AUDIO CONFIG ====
#define I2S_PORT I2S_NUM_0
#define I2S_WS 7 // L/R clock
#define I2S_SD 43 // Serial Data In
#define I2S_SCK 8 // Bit Clock
#define SAMPLE_RATE 16000
#define I2S_SAMPLE_BITS 32
#define SAMPLE_BUFFER_SIZE 2048
// ==== INFERENCE STATE ====
typedef struct {
int16_t *buffer;
uint8_t buf_ready;
uint32_t buf_count;
uint32_t n_samples;
} inference_t;
static inference_t inference;
static int32_t i2s_samples[SAMPLE_BUFFER_SIZE];
static bool record_status = true;
static bool debug_nn = false;
// ==== FUNCTION DECLARATIONS ====
static bool microphone_inference_start(uint32_t n_samples);
static bool microphone_inference_record(void);
static int microphone_audio_signal_get_data(size_t offset, size_t length, float *out_ptr);
static void audio_inference_callback(uint32_t n_bytes);
static void capture_samples(void *arg);
static int i2s_init();
static void i2s_deinit();
void setup() {
Serial.begin(115200);
while (!Serial);
ei_printf("XVF3800 Keyword Spotting Inference Start\n");
ei_printf("Model info:\n");
ei_printf("\tFrame size: %d\n", EI_CLASSIFIER_DSP_INPUT_FRAME_SIZE);
ei_printf("\tSample length: %d ms\n", EI_CLASSIFIER_RAW_SAMPLE_COUNT / (SAMPLE_RATE / 1000));
ei_printf("\tInterval: %.2f ms\n", EI_CLASSIFIER_INTERVAL_MS);
if (!microphone_inference_start(EI_CLASSIFIER_RAW_SAMPLE_COUNT)) {
ei_printf("ERR: Audio buffer allocation failed.\n");
return;
}
ei_printf("Listening...\n");
}
void loop() {
if (!microphone_inference_record()) {
ei_printf("ERR: Failed to record audio.\n");
return;
}
signal_t signal;
signal.total_length = EI_CLASSIFIER_RAW_SAMPLE_COUNT;
signal.get_data = µphone_audio_signal_get_data;
ei_impulse_result_t result = {0};
EI_IMPULSE_ERROR r = run_classifier(&signal, &result, debug_nn);
if (r != EI_IMPULSE_OK) {
ei_printf("ERR: Failed to run classifier (%d)\n", r);
return;
}
ei_printf("Predictions:\n");
for (size_t ix = 0; ix < EI_CLASSIFIER_LABEL_COUNT; ix++) {
ei_printf(" %s: ", result.classification[ix].label);
ei_printf_float(result.classification[ix].value);
ei_printf("\n");
}
#if EI_CLASSIFIER_HAS_ANOMALY == 1
ei_printf(" Anomaly score: ");
ei_printf_float(result.anomaly);
ei_printf("\n");
#endif
}
// ==== INFERENCE AND AUDIO HANDLING ====
static void audio_inference_callback(uint32_t n_bytes) {
for (uint32_t i = 0; i < n_bytes / sizeof(int32_t); i++) {
int16_t val = i2s_samples[i] >> 16; // Convert from 32-bit signed to 16-bit
inference.buffer[inference.buf_count++] = val;
if (inference.buf_count >= inference.n_samples) {
inference.buf_ready = 1;
inference.buf_count = 0;
}
}
}
static void capture_samples(void *arg) {
size_t bytes_read;
while (record_status) {
i2s_read(I2S_PORT, (char *)i2s_samples, SAMPLE_BUFFER_SIZE * sizeof(int32_t), &bytes_read, portMAX_DELAY);
if (bytes_read > 0) {
audio_inference_callback(bytes_read);
} else {
ei_printf("ERR: I2S read failed\n");
}
}
vTaskDelete(NULL);
}
static bool microphone_inference_start(uint32_t n_samples) {
inference.buffer = (int16_t *)malloc(n_samples * sizeof(int16_t));
if (!inference.buffer) return false;
inference.buf_count = 0;
inference.n_samples = n_samples;
inference.buf_ready = 0;
if (i2s_init() != 0) {
ei_printf("ERR: I2S init failed\n");
return false;
}
xTaskCreate(capture_samples, "CaptureSamples", 4096, NULL, 1, NULL);
return true;
}
static bool microphone_inference_record(void) {
while (!inference.buf_ready) {
delay(10);
}
inference.buf_ready = 0;
return true;
}
static int microphone_audio_signal_get_data(size_t offset, size_t length, float *out_ptr) {
numpy::int16_to_float(&inference.buffer[offset], out_ptr, length);
return 0;
}
static int i2s_init() {
i2s_config_t i2s_config = {
.mode = (i2s_mode_t)(I2S_MODE_MASTER | I2S_MODE_RX),
.sample_rate = SAMPLE_RATE,
.bits_per_sample = (i2s_bits_per_sample_t)I2S_SAMPLE_BITS,
.channel_format = I2S_CHANNEL_FMT_ONLY_LEFT,
.communication_format = I2S_COMM_FORMAT_I2S,
.intr_alloc_flags = ESP_INTR_FLAG_LEVEL1,
.dma_buf_count = 8,
.dma_buf_len = 512,
.use_apll = false,
.tx_desc_auto_clear = false,
.fixed_mclk = 0
};
i2s_pin_config_t pin_config = {
.bck_io_num = I2S_SCK,
.ws_io_num = I2S_WS,
.data_out_num = -1,
.data_in_num = I2S_SD
};
esp_err_t err;
err = i2s_driver_install(I2S_PORT, &i2s_config, 0, NULL);
if (err != ESP_OK) return err;
err = i2s_set_pin(I2S_PORT, &pin_config);
if (err != ESP_OK) return err;
err = i2s_zero_dma_buffer(I2S_PORT);
return err;
}
static void i2s_deinit() {
i2s_driver_uninstall(I2S_PORT);
}
技术支持与产品讨论
感谢您选择我们的产品!我们在这里为您提供不同的支持,确保您使用我们产品的体验尽可能顺畅。我们提供多种沟通渠道,以满足不同的偏好和需求。