使用 Edge Impulse 与 reSpeaker XVF3800 实现 TinyML 语音识别
概述
通过 TinyML 驱动的关键词检测(KWS)系统,实现实时语音命令检测与免手操作控制。将高性能的 ReSpeaker XVF3800 麦克风阵列与高效的 XIAO ESP32S3 以及 Edge Impulse 平台相结合,我们为小型、低功耗设备带来了语音识别能力。训练、部署并开始聆听——你的设备时刻准备响应你的下一条指令!
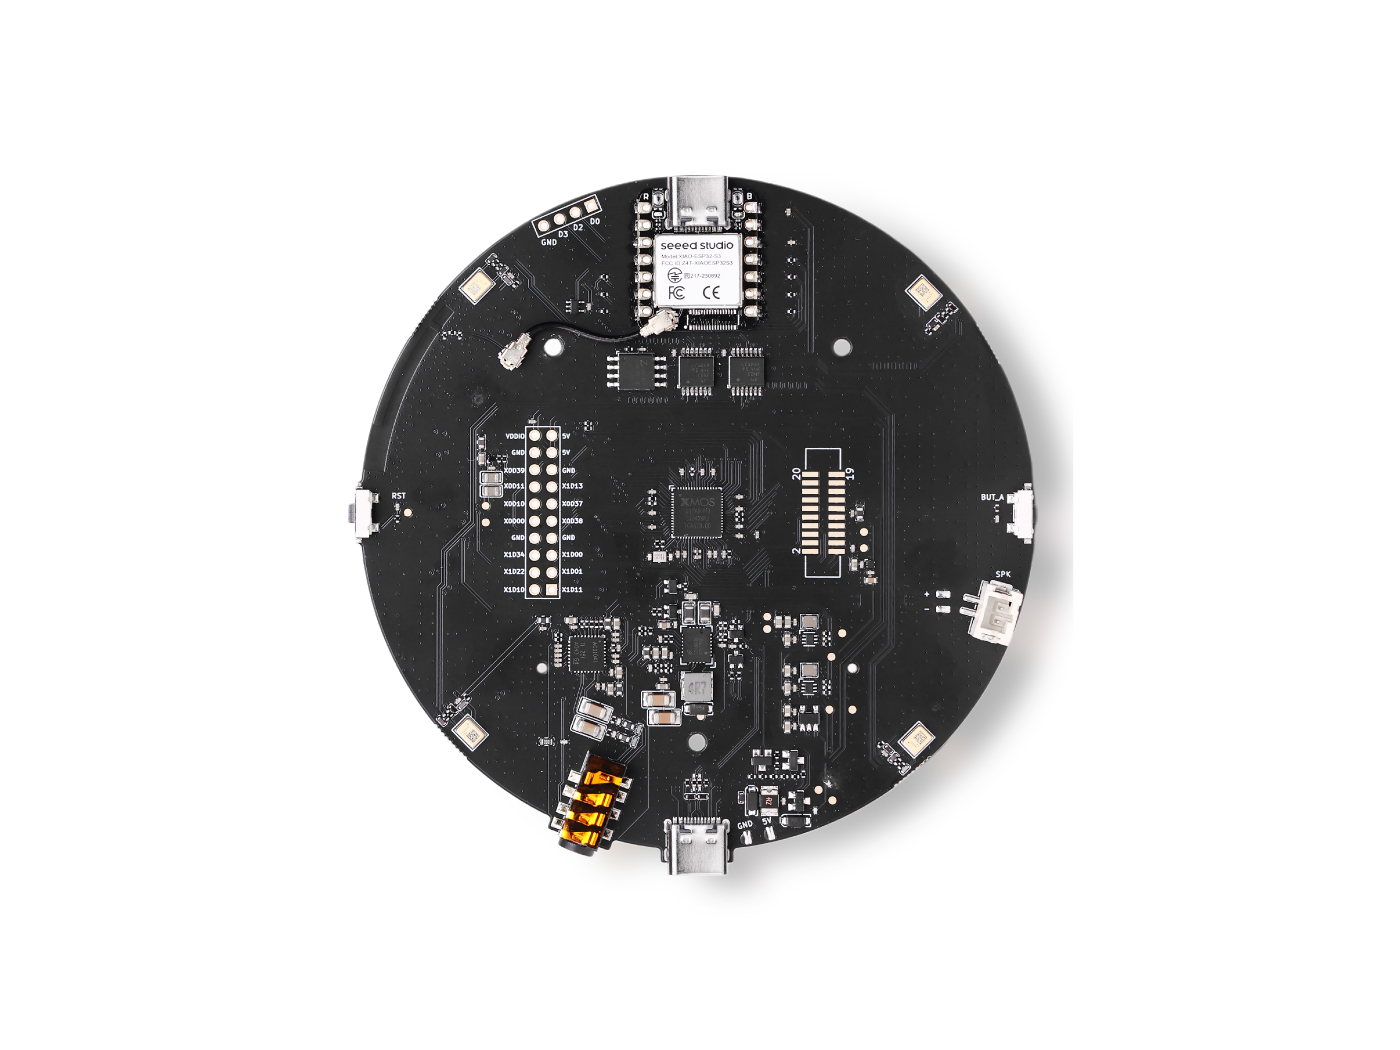
所需硬件
数据采集
为带有 XIAO ESP32S3 的 ReSpeaker XVF3800 安装 USB 固件
在开始音频数据采集之前,请确保你的 ReSpeaker 已经烧录了 USB 固件,使其能够作为 USB 麦克风工作。
配置 Python 环境
然后你需要在笔记本电脑或台式机上搭建 python 环境以采集语音数据。这里我们将创建 respeaker-env
python -m venv respeaker-env
source respeaker-env/bin/activate
安装所需库:
pip install sounddevice scipy numpy
查找 ReSpeaker 设备 ID
为了从正确的麦克风输入进行录音,我们需要识别 ReSpeaker 麦克风的设备索引。
import sounddevice as sd

devices = sd.query_devices()
for i, device in enumerate(devices):
    print(f"Device {i}: {device['name']} (input channels: {device['max_input_channels']})")
查找与 ReSpeaker 对应的设备名称(通常类似 ReSpeaker XVF3800 USB 4-Mic Array),并记下其索引号(例如 Device 2)。
录制音频样本
下面的脚本可以帮助你录制带标签的音频样本,并按人员和命令/关键词进行组织。
import os
import sounddevice as sd
from scipy.io.wavfile import write

# === Settings ===
SAMPLERATE = 16000
CHANNELS = 1  # Mono input
DURATION = 10  # seconds
DEVICE_INDEX = 2  # Replace with correct device index

def record_audio(filename, samplerate=SAMPLERATE, channels=CHANNELS, duration=DURATION, device=DEVICE_INDEX):
    print(f"Recording '{filename}' for {duration} seconds...")
    recording = sd.rec(int(duration * samplerate),
                       samplerate=samplerate,
                       channels=channels,
                       dtype='int32',
                       device=device)
    sd.wait()
    write(filename, samplerate, recording)
    print(f"Saved: {filename}")

def get_next_filename(directory, label):
    existing = [f for f in os.listdir(directory) if f.startswith(label) and f.endswith('.wav')]
    index = len(existing) + 1
    return os.path.join(directory, f"{label}.{index}.wav")

def collect_samples():
    while True:
        sample_name = input("Enter sample name (e.g., PersonA): ").strip()
        if not sample_name:
            print("Sample name cannot be empty.")
            continue

        sample_dir = os.path.join(os.getcwd(), sample_name)
        os.makedirs(sample_dir, exist_ok=True)
        print(f"Directory created: {sample_dir}")

        while True:
            label = input("Enter sound/voice to record (e.g., yes, no): ").strip()
            if not label:
                print("Label cannot be empty.")
                continue

            while True:
                filename = get_next_filename(sample_dir, label)
                record_audio(filename)

                cont = input("Record another sample for this label? (yes/no): ").strip().lower()
                if cont != 'yes':
                    break

            next_label = input("Do you want to record a different label? (yes/no): ").strip().lower()
            if next_label != 'yes':
                break

        next_sample = input("Do you want to create a new sample? (yes/no): ").strip().lower()
        if next_sample != 'yes':
            print("Audio collection completed.")
            break

if __name__ == "__main__":
    collect_samples()
文件夹结构示例
/PersonA
    ├── red.1.wav
    ├── red.2.wav
    ├── blue.1.wav
    └── blue.2.wav
/PersonB
    ├── red.1.wav
    └── green.1.wav
每个人的文件夹中都包含带标签的 .wav 文件,这些文件稍后将被上传到 Edge Impulse 进行模型训练。
在 Edge Impulse 中上传和准备音频数据
使用 ReSpeaker XVF3800 采集原始音频样本并按标签进行整理后,下一步是在 Edge Impulse Studio 中上传和处理这些数据,以训练你的关键词检测模型。
在 Edge Impulse 中创建新项目
-
访问 Edge Impulse 并登录(如果你是新用户,请先注册)。
-
点击 "Create new project"。
-
为你的项目命名(例如:"Voice Command KWS")
上传已有音频样本
要上传你采集的数据:
- 1.导航到 Data Acquisition 选项卡。
- 2.点击右上角的 "Upload existing data"。
- 3.选择并上传包含 .wav 文件的文件夹
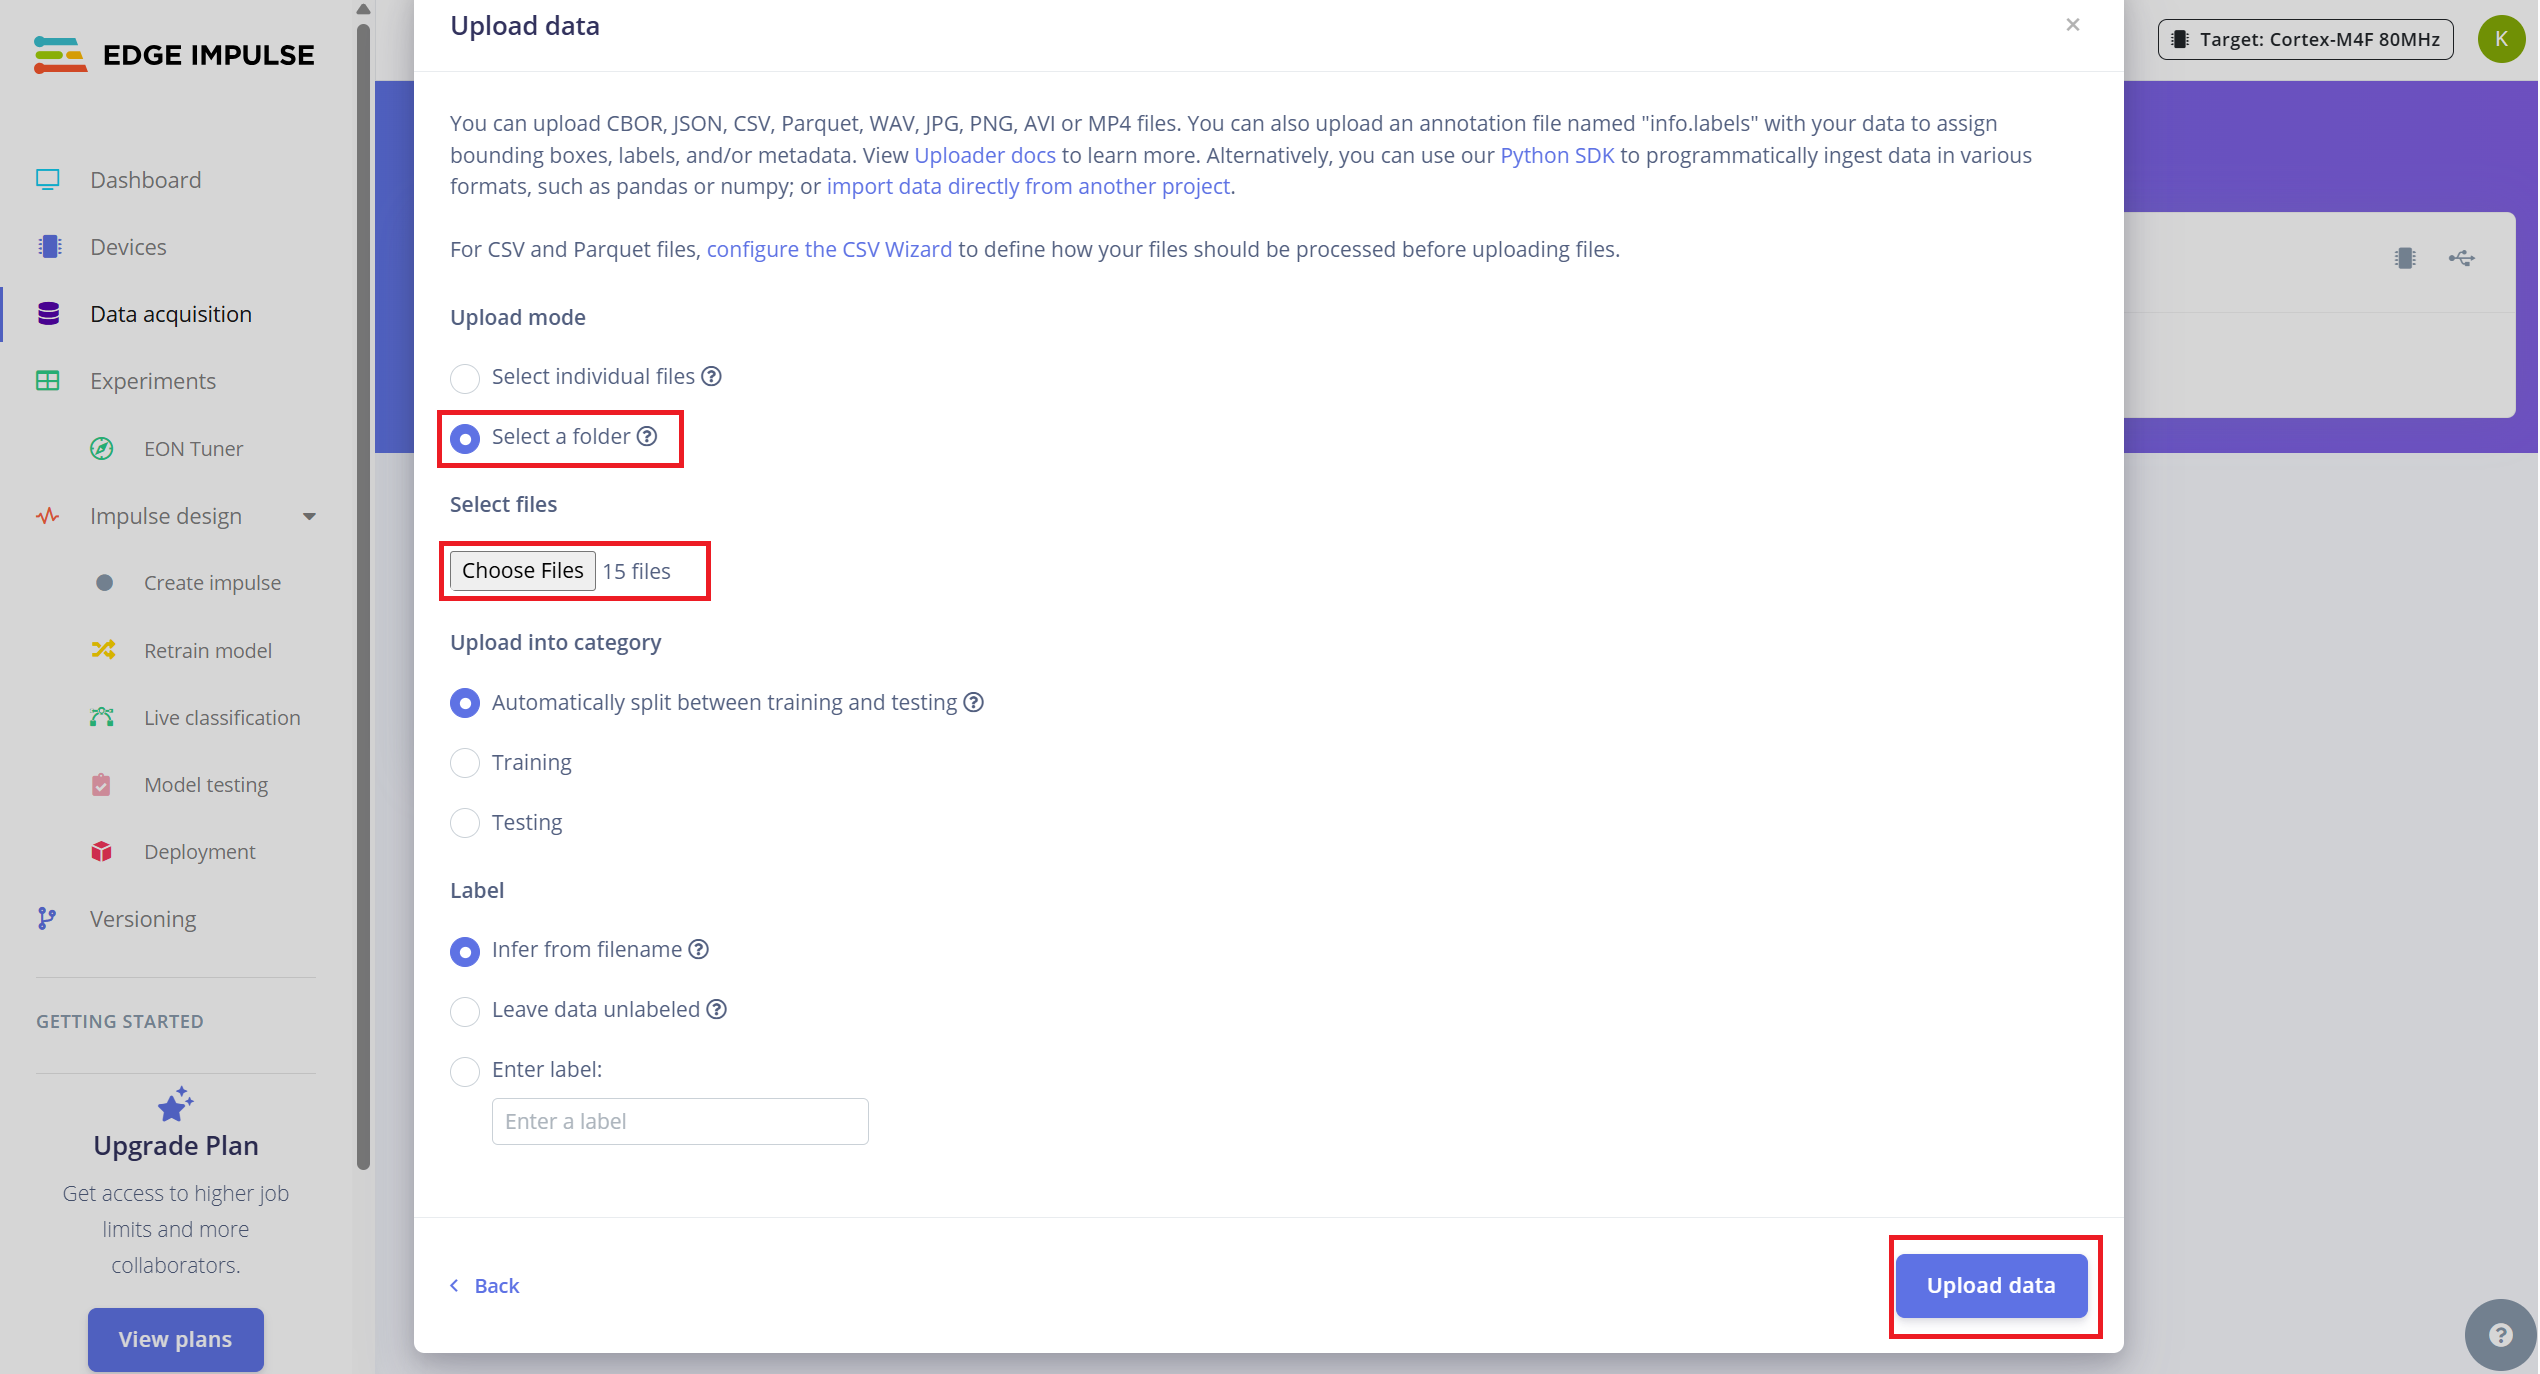
- 4.启用自动将数据划分为训练集和测试集的选项(Edge Impulse 推荐约 80/20 划分)。
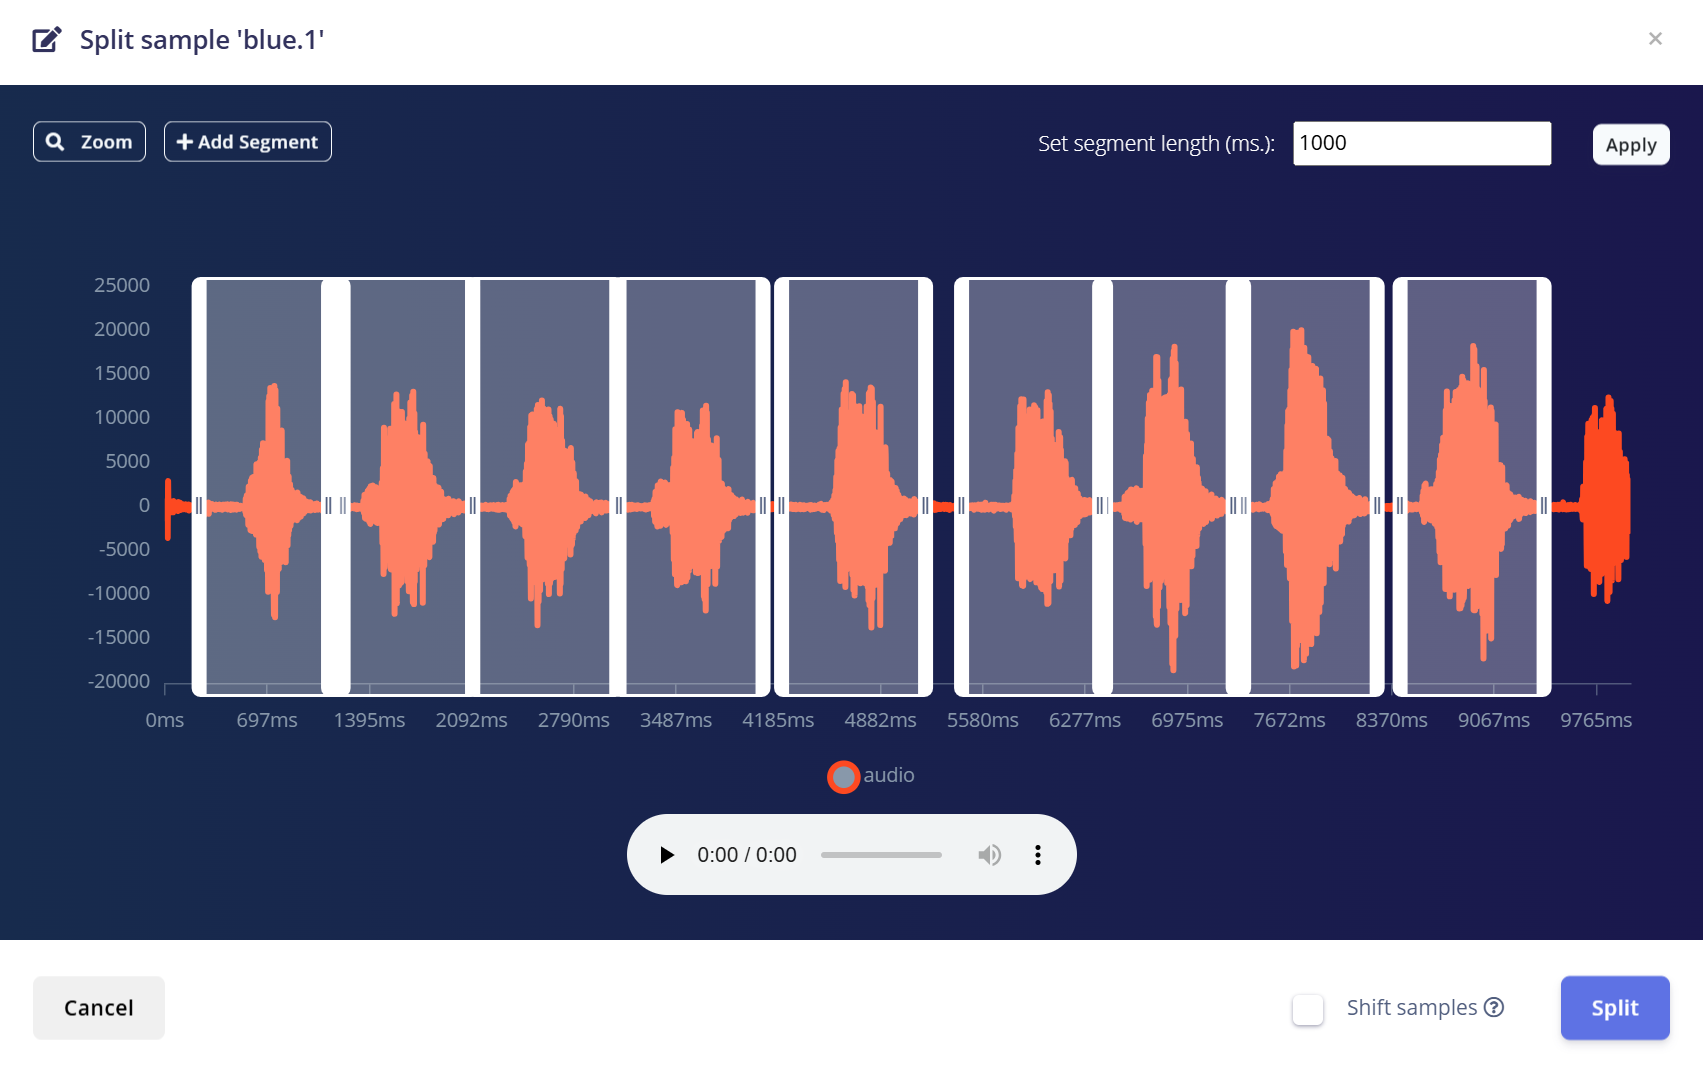
将 10 秒音频拆分为 1 秒样本
Edge Impulse 在处理关键词检测时,使用 1 秒音频片段效果最佳。由于原始样本是以 10 秒为单位录制的,你需要将每个样本拆分为多个 1 秒样本。
请按以下步骤操作:
- 1.上传完成后,进入 Data Acquisition 页面。
- 2.找到一个样本(例如 yes.1.wav),点击该样本旁边的三个 点 (…)。
- 3.在菜单中选择 "Split sample"。
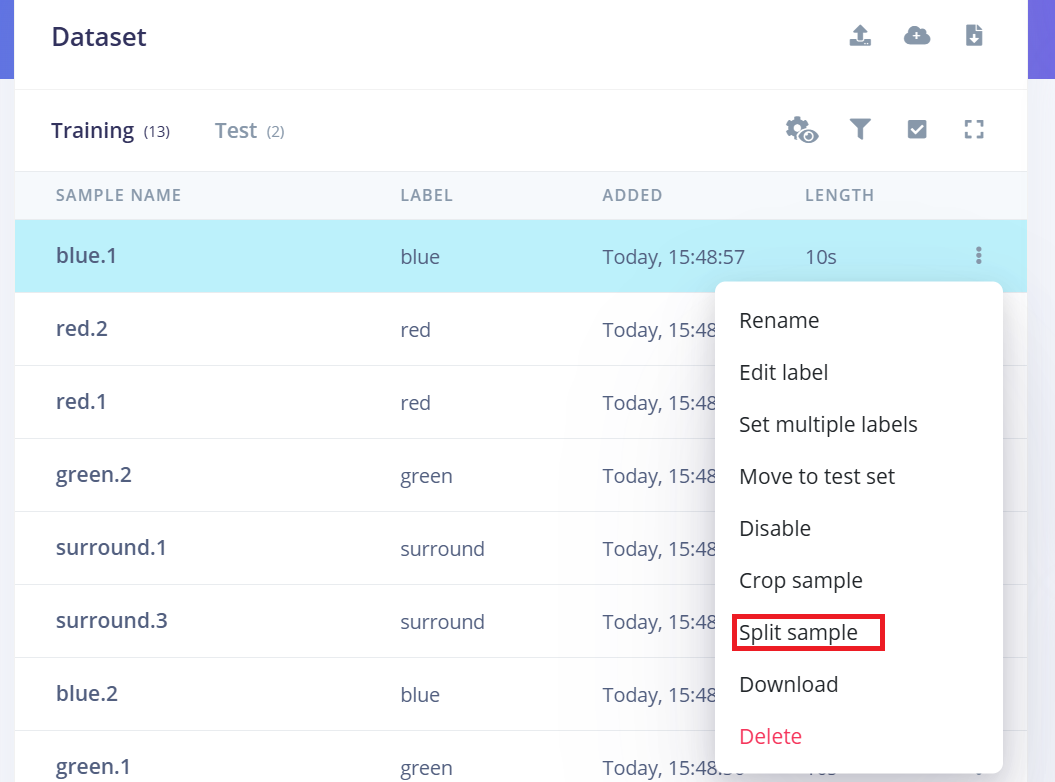
- 4.使用工具将波形拆分为 1 秒片段。
- a.你可以拖动以调整片段,或根据需要添加/删除片段。
- 5.点击 Save and Split。
对所有类别中每一个 10 秒样本(包括训练集和测试集)重复上述过程。
这样可以确保你的数据集格式正确,并针对训练高精度模型进行了优化。
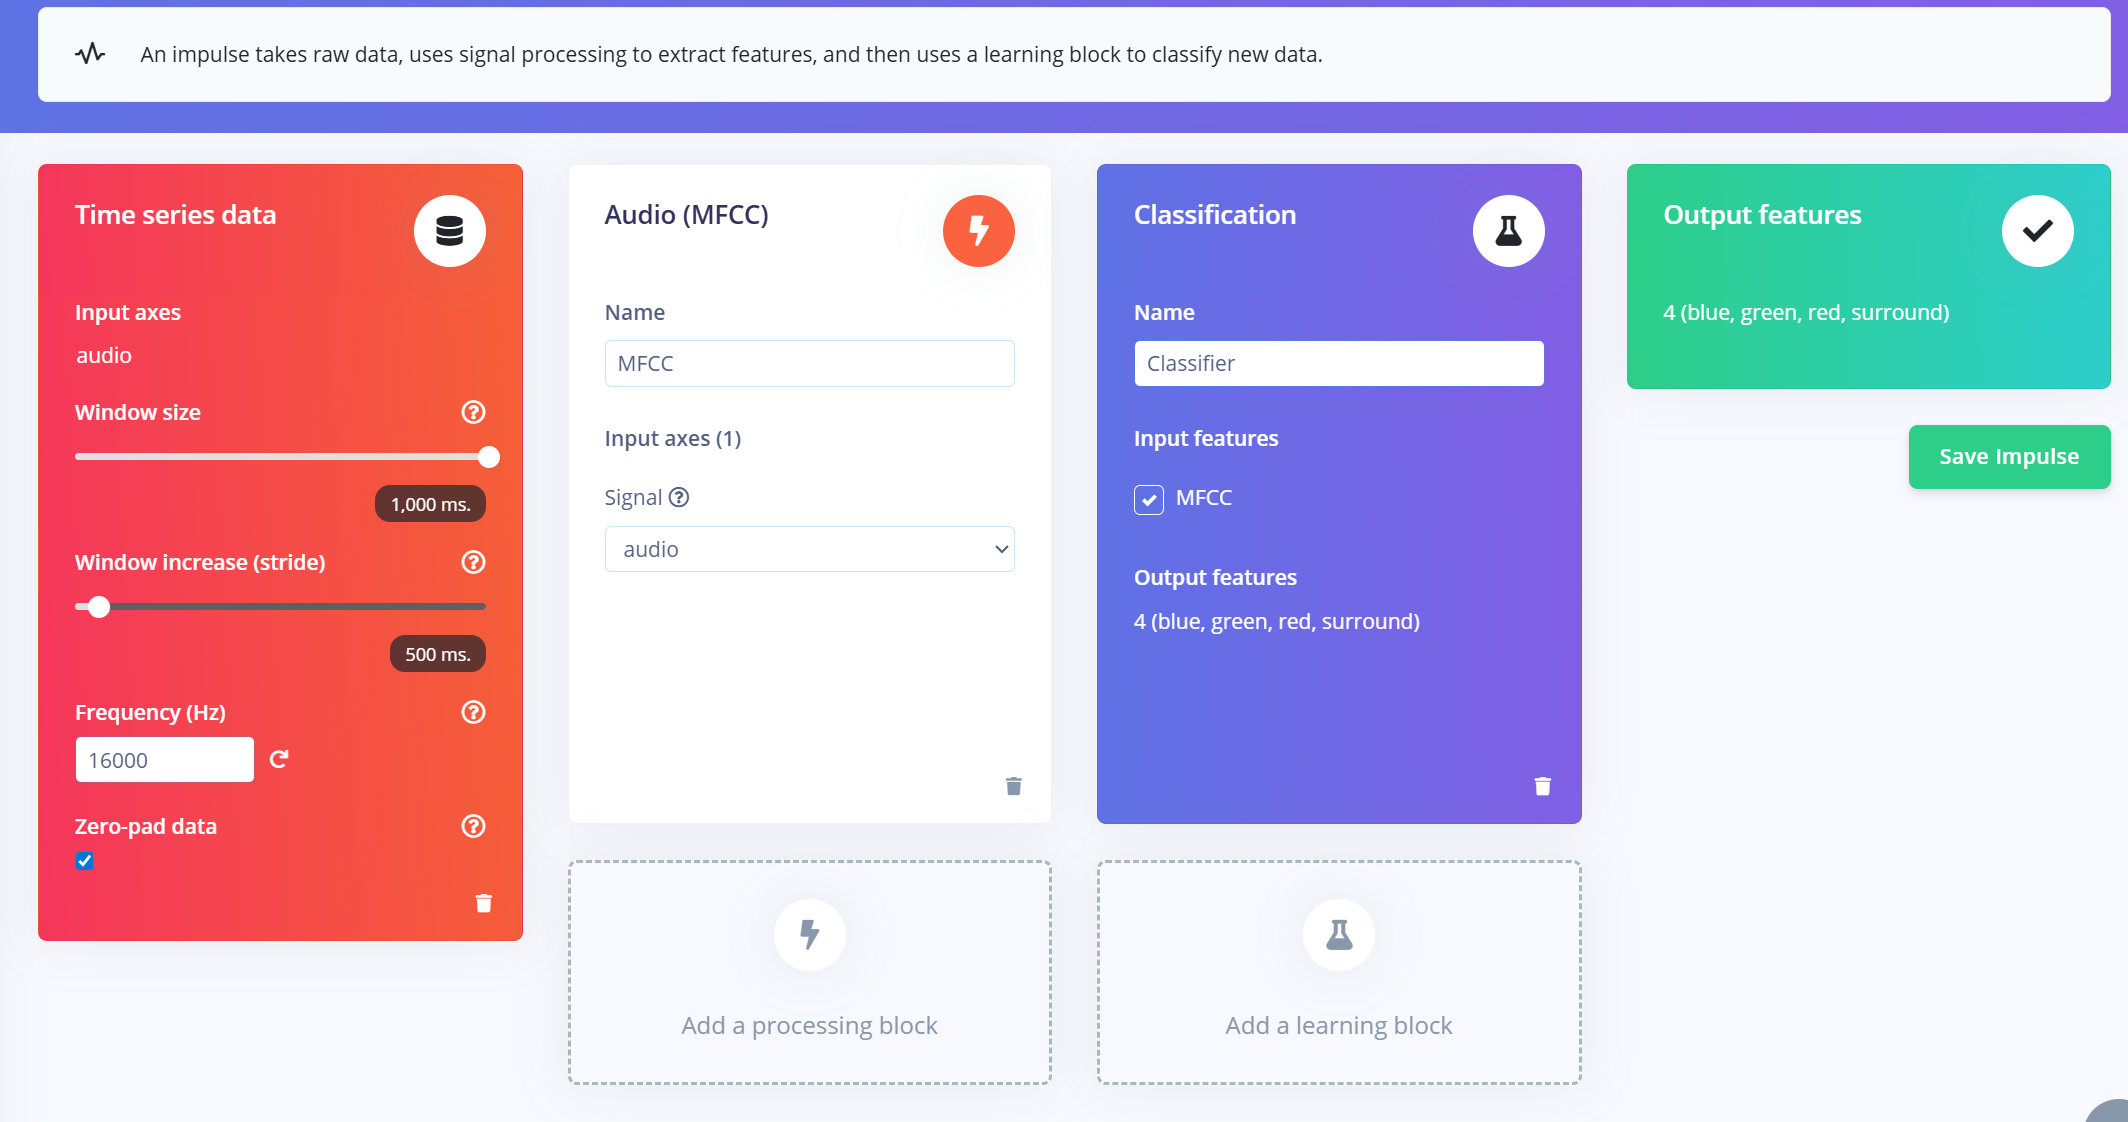
创建 Impulse(预处理 / 模型定义)
在 Edge Impulse 中,impulse 定义了将原始数据转换为已训练机器学习模型的端到端流程。它包括 信号处理、特征提取,以及用于分类的 学习模块。
创建 Impulse
- 1.在 Edge Impulse 项目中导航到 "Impulse Design" 选项卡。
- 2.点击 “Create Impulse”。
- 3.配置输入窗口:
- a.Window size:1000 ms(1 秒)
- b.Window increase:500 ms(通过重叠窗口增强数据)
- c.启用 "Zero-pad data":这可以确保较短的片段(例如 800ms)用零填充,在样本拆分时启用噪声裁剪时尤其有用。
添加 MFCC 特征提取器
创建好 impulse 窗口后:
- 1.点击 “Add a processing block” 并选择 MFCC (Mel Frequency Cepstral Coefficients)。
- a.MFCC 是一种广泛使用的方法,用于将音频信号转换为表示语音频率模式的二维特征。
- b.这些特征非常适合用于基于语音的识别模型。
- 2.设置 MFCC 参数(默认设置在大多数情况下都表现良好):
- a.Output shape:13 x 49 x 1
- b.这会将你的音频片段转换为用于分类的“图像”。
添加学习模块
- 1.点击 “Add a learning block” 并选择 “Classification (Keras)”。
- 2.这将创建一个自定义的 卷积神经网络(CNN),用于对 MFCC 特征进行 图像分类。
- 3.现在你可以进入 NN Classifier 选项卡,自定义并训练你的模型。
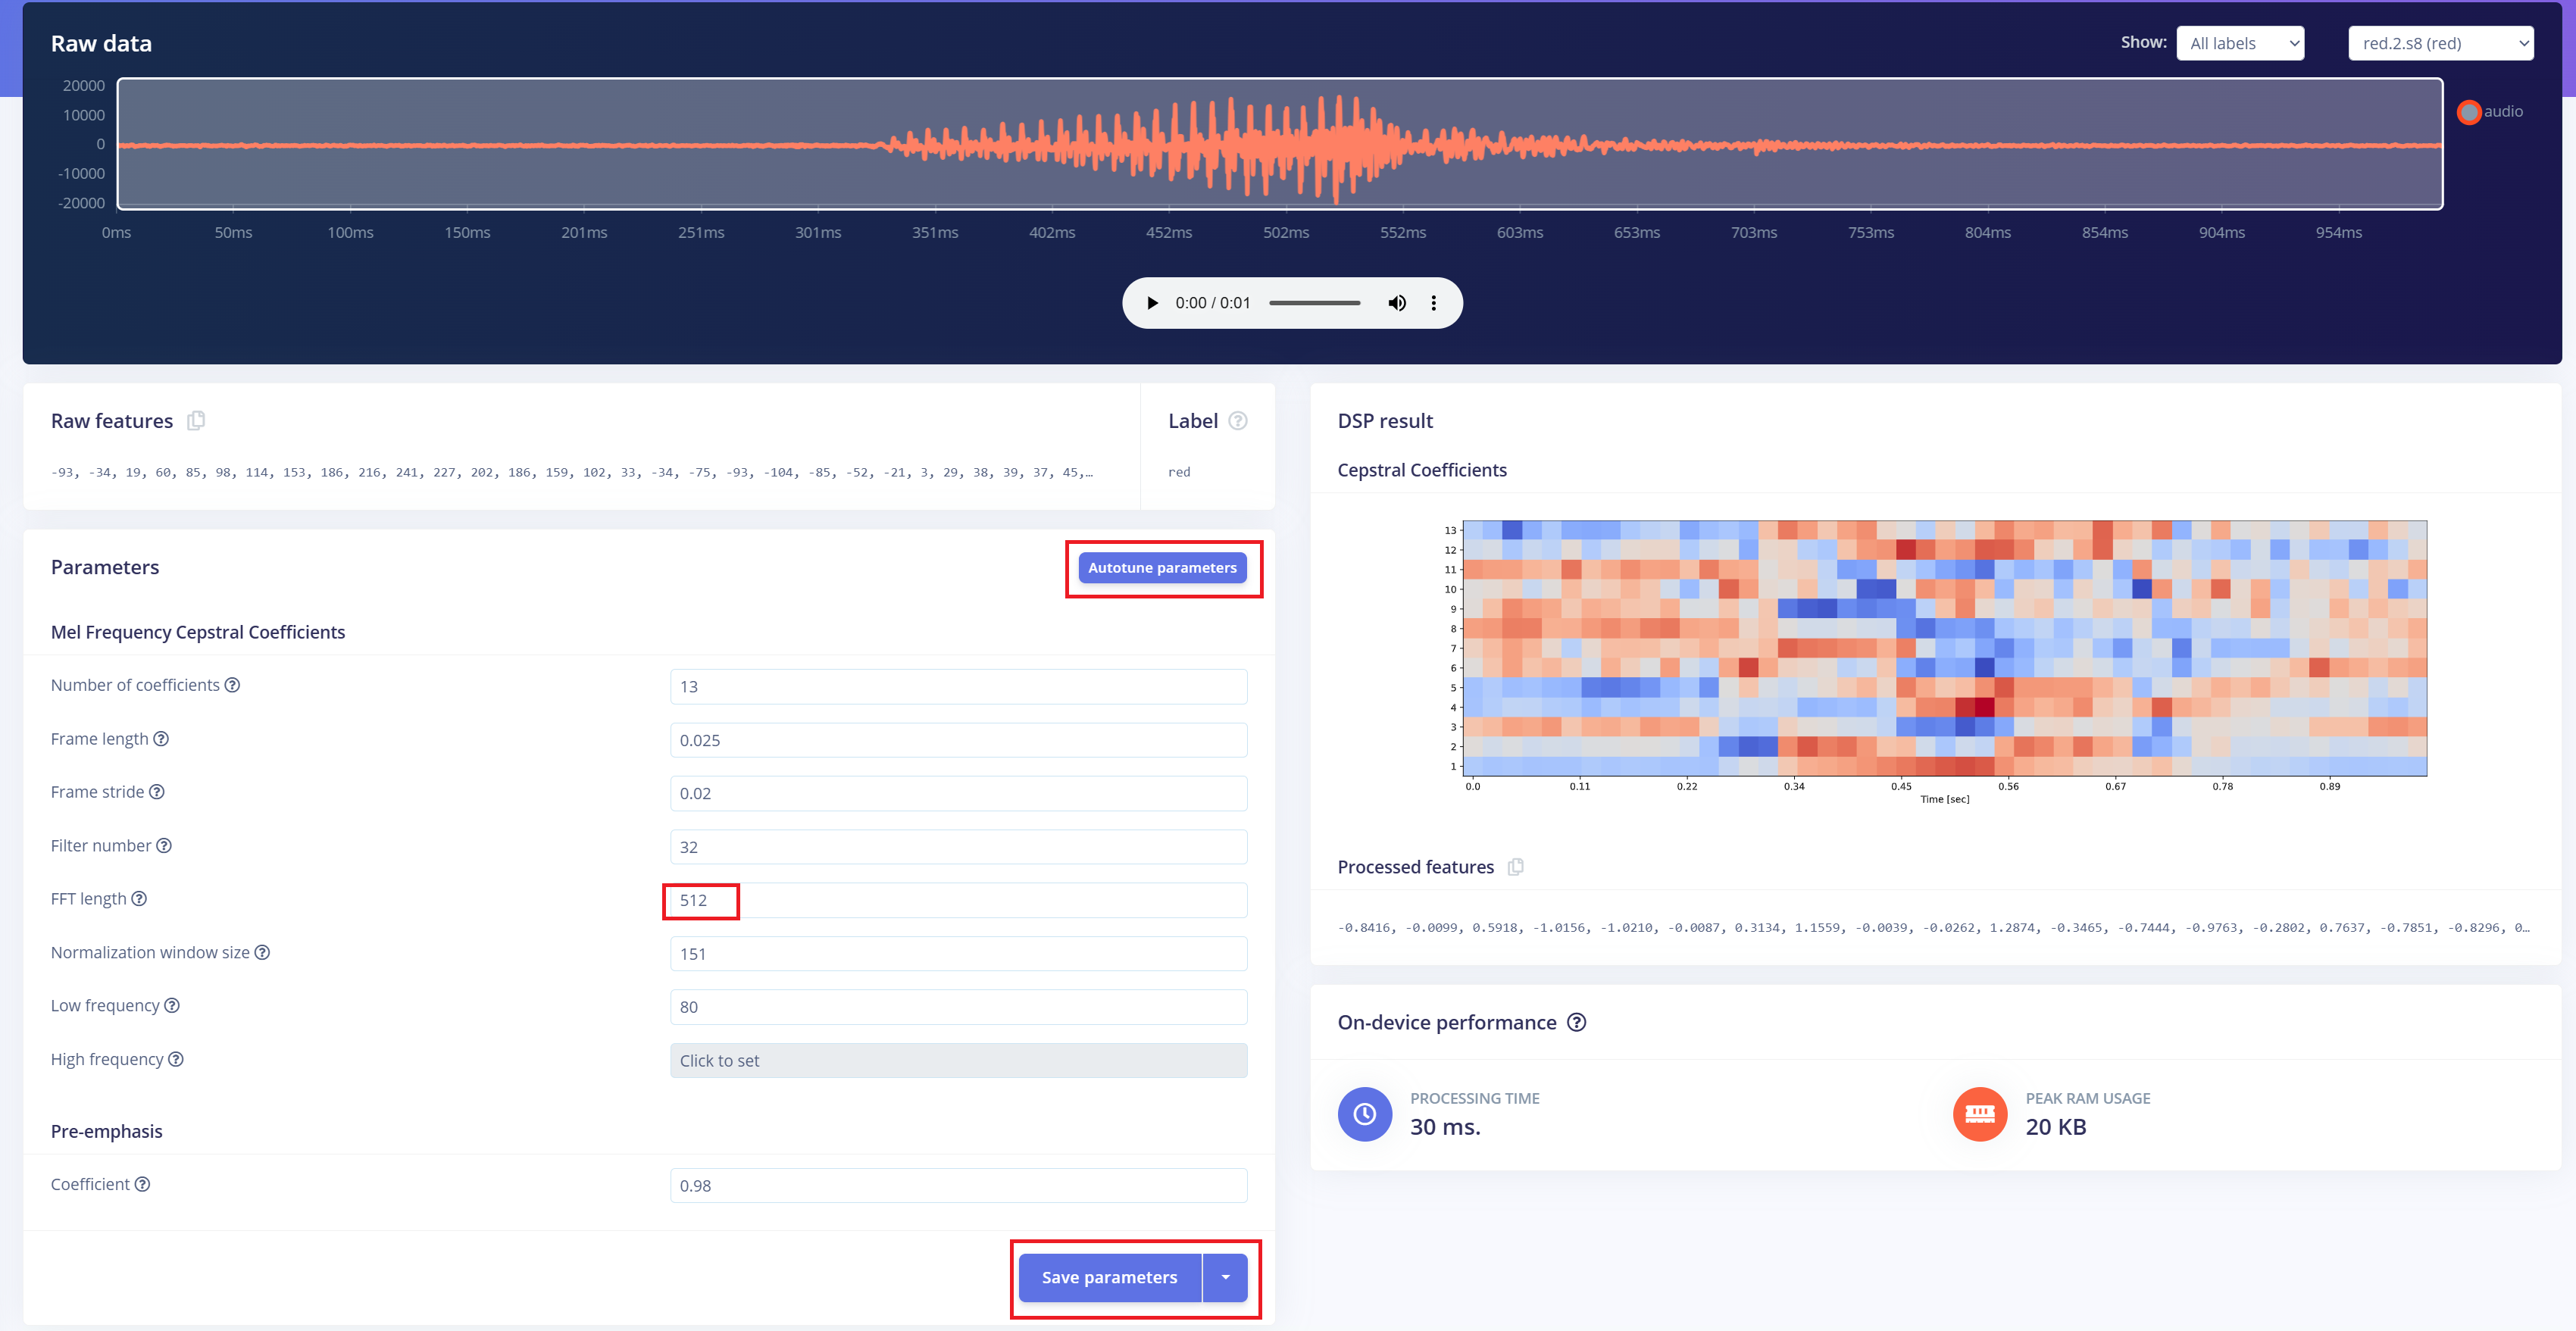
预处理(MFCC)
下一步是从录制的音频中生成频谱图图像,这些图像将用于模型训练。我们可以使用默认的 DSP 参数,或者像本项目一样,利用 DSP Autotune 功能自动优化参数,以获得更好的性能。
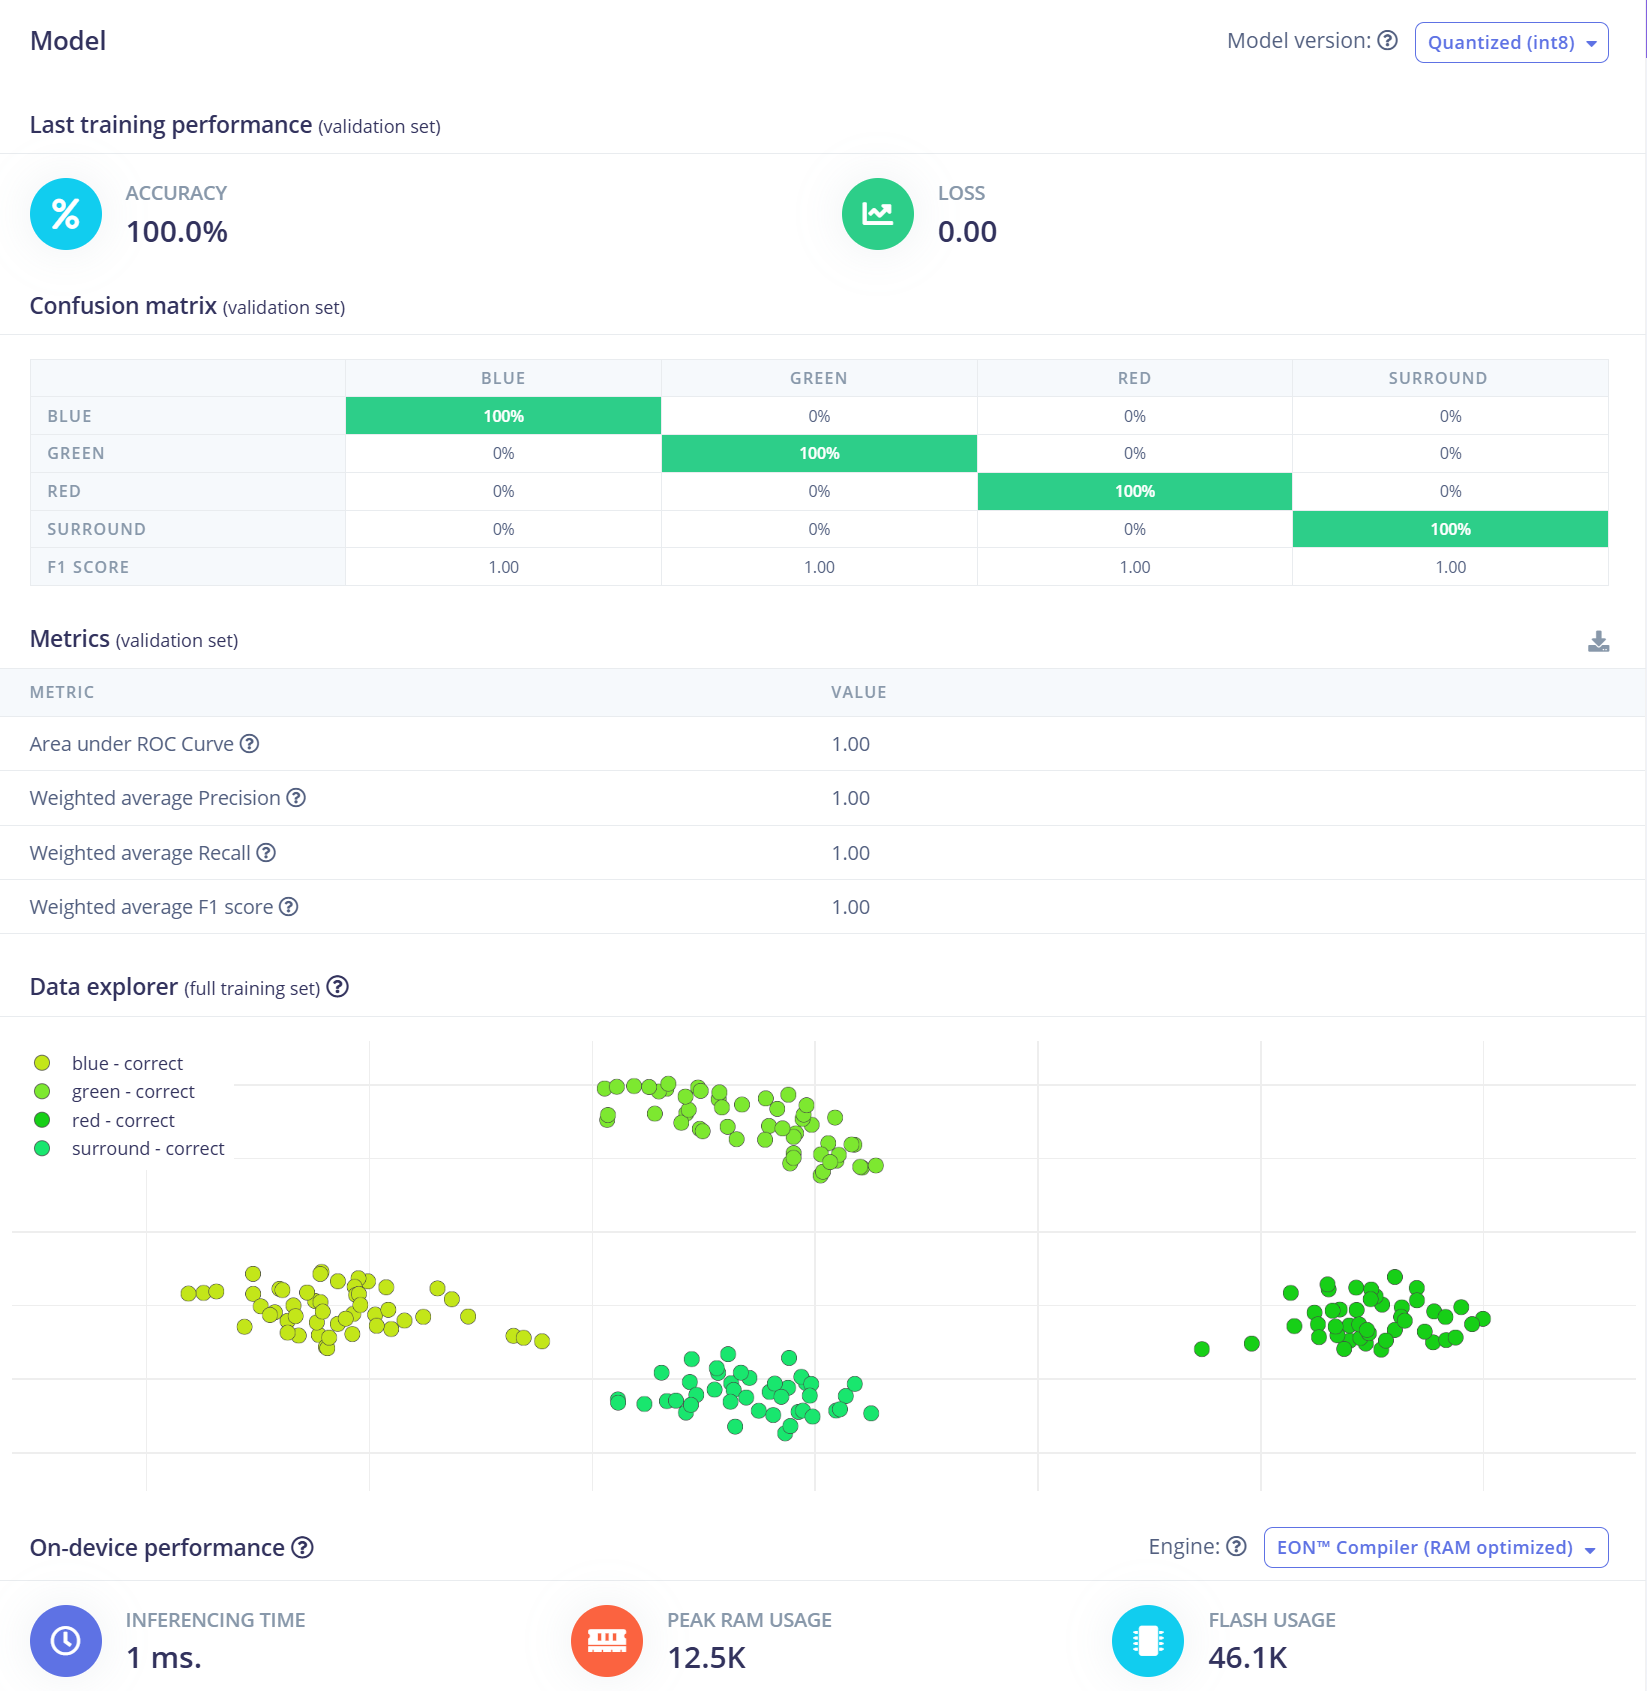
构建机器学习模型
在本项目中,我们将使用卷积神经网络(CNN)模型。其结构由两个 Conv1D + MaxPooling 层组成,分别具有 8 和 16 个滤波器,之后是一个 0.25 的 Dropout 层。展平(Flatten)后,最终的全连接层包含四个神经元——每个类别对应一个神经元。 我们将使用 0.005 的学习率训练 100 个 epoch。为了提升泛化能力和鲁棒性,将应用背景噪声等数据增强技术。初步结果非常有前景。
部署到搭载 XIAO ESP32 S3 的 ReSpeaker XVF3800
Edge Impulse 将自动把所有必要的库、预处理函数和训练好的模型打包成一个可下载的包。 继续操作:
- 1.选择 "Arduino Library" 作为部署选项。
- 2.在底部选择 "Quantized (Int8)" 格式。
- 3.点击 "Build" 生成库。
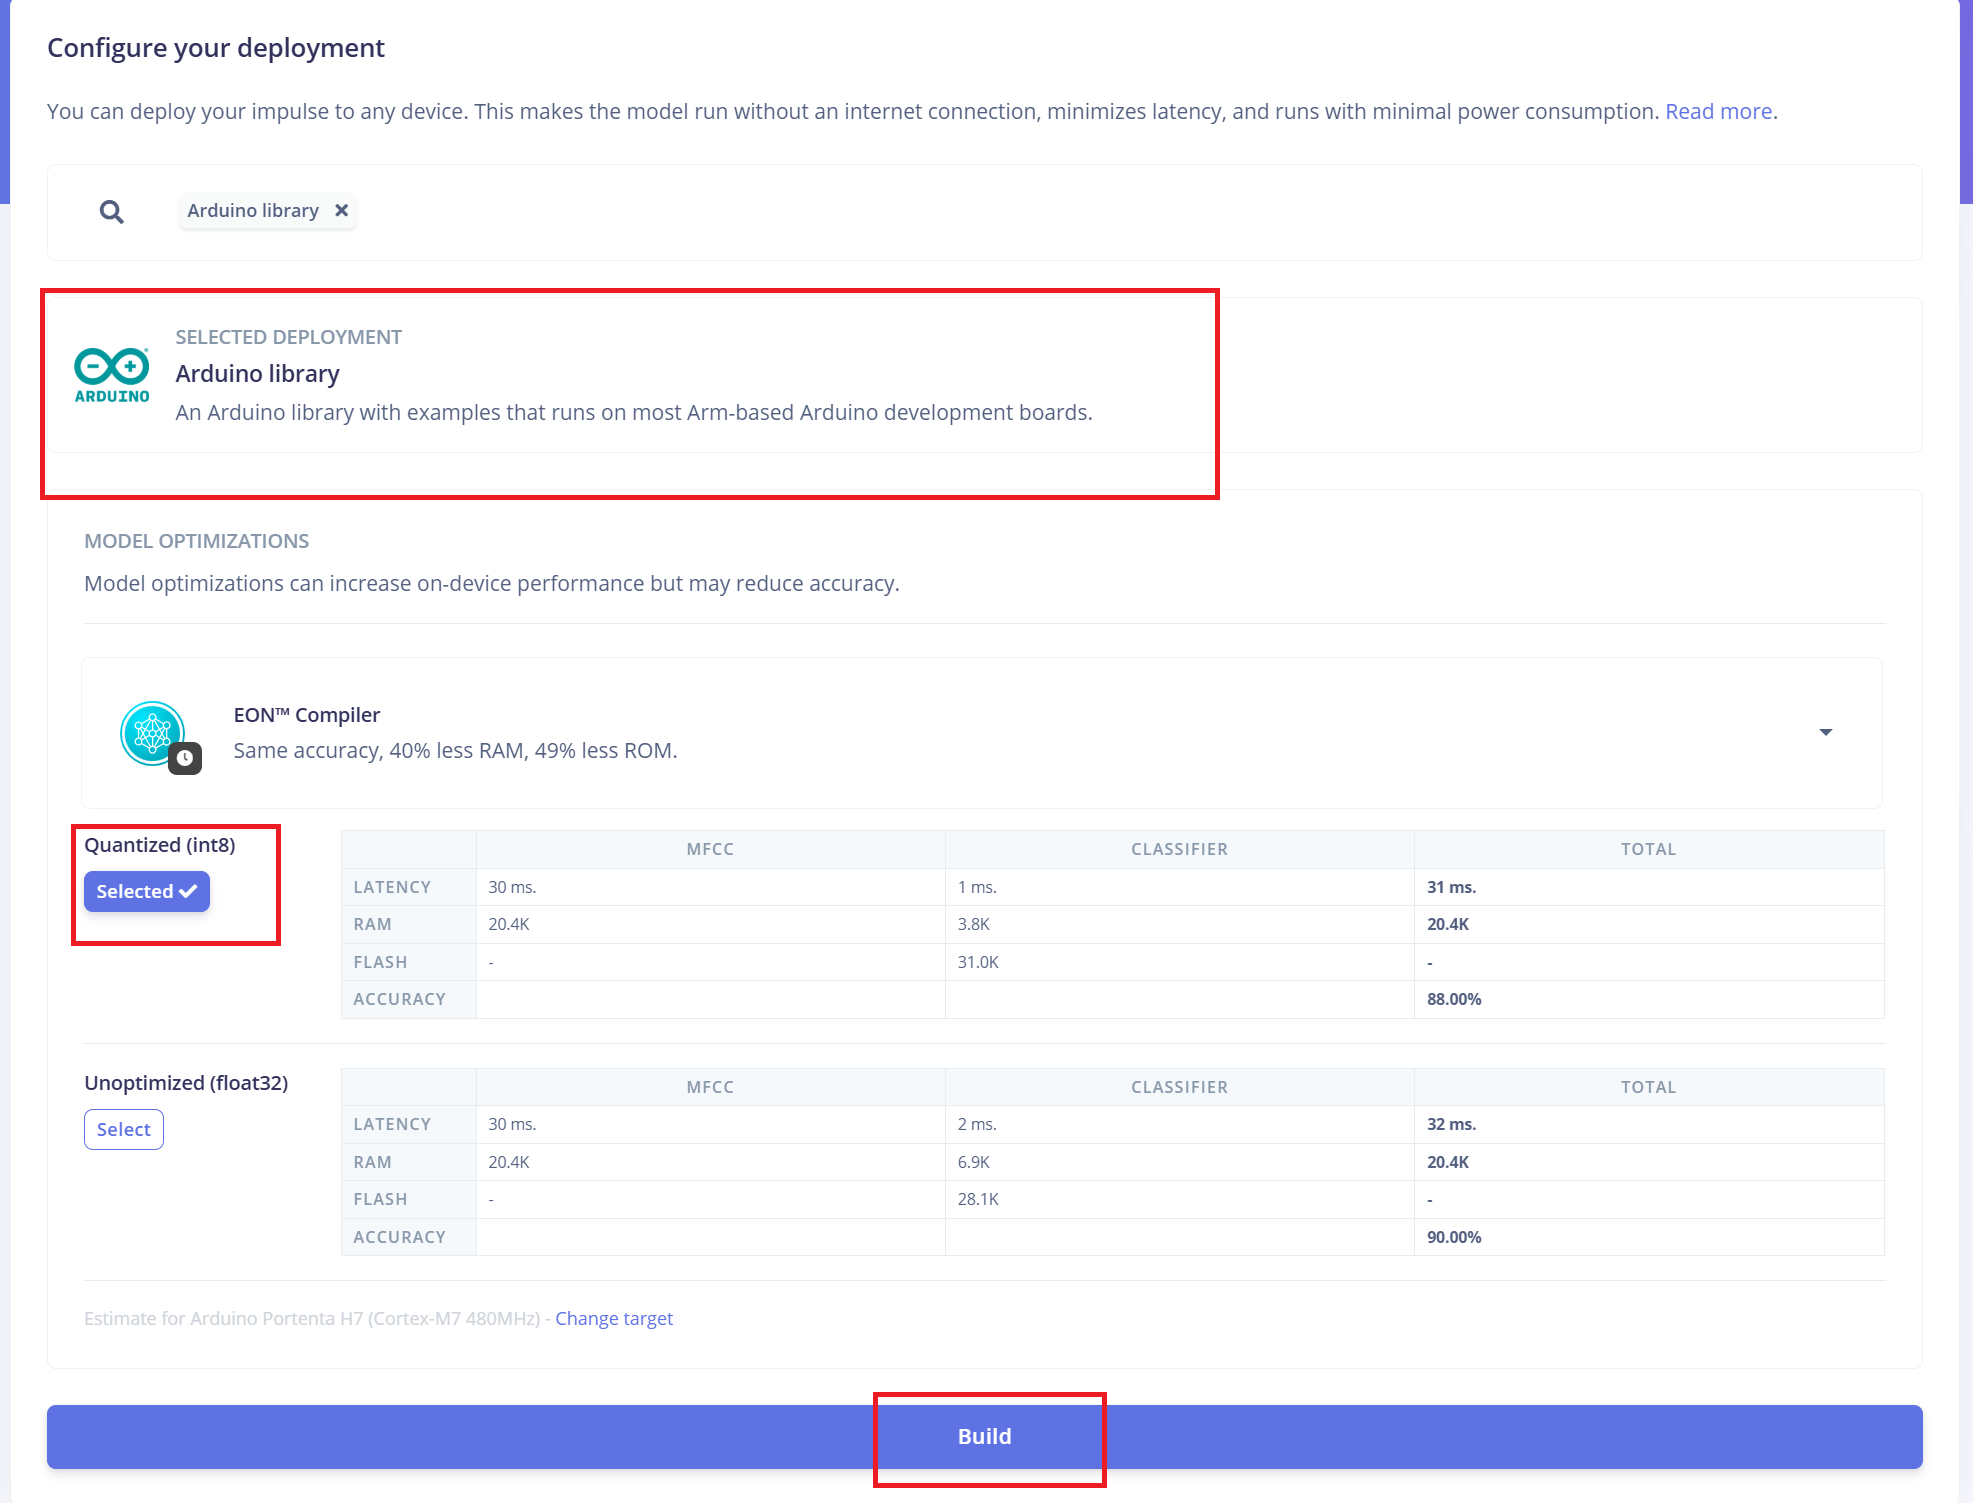
下载完成后:
- 4.打开 Arduino IDE,进入 Sketch 菜单。
- 5.选择 "Include Library" > "Add .ZIP Library..."
- 6.选择从 Edge Impulse 下载的 .zip 文件,将其添加到你的 Arduino 项目中。
将固件切换到 I2S 模式
在上传 Arduino 代码之前,你必须将 ReSpeaker XVF3800 固件切换到 I2S 模式,以启用通过 I2C 协议进行通信。 Firmware Installation Guide
Arduino 代码集成
Edge Impulse 提供的 Arduino 代码需要进行一些修改,以确保与 ReSpeaker XVF3800 和 XIAO ESP32S3 硬件兼容:根据你的设置更新 GPIO 引脚定义、I2S 采样率 以及其他与硬件相关的参数。
#define EIDSP_QUANTIZE_FILTERBANK 0
#include <Kasun9603-project-1_inferencing.h> // Change with your one
#include "driver/i2s.h"
#include "freertos/FreeRTOS.h"
#include "freertos/task.h"
// ==== AUDIO CONFIG ====
#define I2S_PORT I2S_NUM_0
#define I2S_WS 7 // L/R clock
#define I2S_SD 43 // Serial Data In
#define I2S_SCK 8 // Bit Clock
#define SAMPLE_RATE 16000
#define I2S_SAMPLE_BITS 32
#define SAMPLE_BUFFER_SIZE 2048
// ==== INFERENCE STATE ====
typedef struct {
int16_t *buffer;
uint8_t buf_ready;
uint32_t buf_count;
uint32_t n_samples;
} inference_t;
static inference_t inference;
static int32_t i2s_samples[SAMPLE_BUFFER_SIZE];
static bool record_status = true;
static bool debug_nn = false;
// ==== FUNCTION DECLARATIONS ====
static bool microphone_inference_start(uint32_t n_samples);
static bool microphone_inference_record(void);
static int microphone_audio_signal_get_data(size_t offset, size_t length, float *out_ptr);
static void audio_inference_callback(uint32_t n_bytes);
static void capture_samples(void *arg);
static int i2s_init();
static void i2s_deinit();
void setup() {
Serial.begin(115200);
while (!Serial);
ei_printf("XVF3800 Keyword Spotting Inference Start\n");
ei_printf("Model info:\n");
ei_printf("\tFrame size: %d\n", EI_CLASSIFIER_DSP_INPUT_FRAME_SIZE);
ei_printf("\tSample length: %d ms\n", EI_CLASSIFIER_RAW_SAMPLE_COUNT / (SAMPLE_RATE / 1000));
ei_printf("\tInterval: %.2f ms\n", EI_CLASSIFIER_INTERVAL_MS);
if (!microphone_inference_start(EI_CLASSIFIER_RAW_SAMPLE_COUNT)) {
ei_printf("ERR: Audio buffer allocation failed.\n");
return;
}
ei_printf("Listening...\n");
}
void loop() {
if (!microphone_inference_record()) {
ei_printf("ERR: Failed to record audio.\n");
return;
}
signal_t signal;
signal.total_length = EI_CLASSIFIER_RAW_SAMPLE_COUNT;
signal.get_data = µphone_audio_signal_get_data;
ei_impulse_result_t result = {0};
EI_IMPULSE_ERROR r = run_classifier(&signal, &result, debug_nn);
if (r != EI_IMPULSE_OK) {
ei_printf("ERR: Failed to run classifier (%d)\n", r);
return;
}
ei_printf("Predictions:\n");
for (size_t ix = 0; ix < EI_CLASSIFIER_LABEL_COUNT; ix++) {
ei_printf(" %s: ", result.classification[ix].label);
ei_printf_float(result.classification[ix].value);
ei_printf("\n");
}
#if EI_CLASSIFIER_HAS_ANOMALY == 1
ei_printf(" Anomaly score: ");
ei_printf_float(result.anomaly);
ei_printf("\n");
#endif
}
// ==== INFERENCE AND AUDIO HANDLING ====
static void audio_inference_callback(uint32_t n_bytes) {
for (uint32_t i = 0; i < n_bytes / sizeof(int32_t); i++) {
int16_t val = i2s_samples[i] >> 16; // Convert from 32-bit signed to 16-bit
inference.buffer[inference.buf_count++] = val;
if (inference.buf_count >= inference.n_samples) {
inference.buf_ready = 1;
inference.buf_count = 0;
}
}
}
static void capture_samples(void *arg) {
size_t bytes_read;
while (record_status) {
i2s_read(I2S_PORT, (char *)i2s_samples, SAMPLE_BUFFER_SIZE * sizeof(int32_t), &bytes_read, portMAX_DELAY);
if (bytes_read > 0) {
audio_inference_callback(bytes_read);
} else {
ei_printf("ERR: I2S read failed\n");
}
}
vTaskDelete(NULL);
}
static bool microphone_inference_start(uint32_t n_samples) {
inference.buffer = (int16_t *)malloc(n_samples * sizeof(int16_t));
if (!inference.buffer) return false;
inference.buf_count = 0;
inference.n_samples = n_samples;
inference.buf_ready = 0;
if (i2s_init() != 0) {
ei_printf("ERR: I2S init failed\n");
return false;
}
xTaskCreate(capture_samples, "CaptureSamples", 4096, NULL, 1, NULL);
return true;
}
static bool microphone_inference_record(void) {
while (!inference.buf_ready) {
delay(10);
}
inference.buf_ready = 0;
return true;
}
static int microphone_audio_signal_get_data(size_t offset, size_t length, float *out_ptr) {
numpy::int16_to_float(&inference.buffer[offset], out_ptr, length);
return 0;
}
static int i2s_init() {
i2s_config_t i2s_config = {
.mode = (i2s_mode_t)(I2S_MODE_MASTER | I2S_MODE_RX),
.sample_rate = SAMPLE_RATE,
.bits_per_sample = (i2s_bits_per_sample_t)I2S_SAMPLE_BITS,
.channel_format = I2S_CHANNEL_FMT_ONLY_LEFT,
.communication_format = I2S_COMM_FORMAT_I2S,
.intr_alloc_flags = ESP_INTR_FLAG_LEVEL1,
.dma_buf_count = 8,
.dma_buf_len = 512,
.use_apll = false,
.tx_desc_auto_clear = false,
.fixed_mclk = 0
};
i2s_pin_config_t pin_config = {
.bck_io_num = I2S_SCK,
.ws_io_num = I2S_WS,
.data_out_num = -1,
.data_in_num = I2S_SD
};
esp_err_t err;
err = i2s_driver_install(I2S_PORT, &i2s_config, 0, NULL);
if (err != ESP_OK) return err;
err = i2s_set_pin(I2S_PORT, &pin_config);
if (err != ESP_OK) return err;
err = i2s_zero_dma_buffer(I2S_PORT);
return err;
}
static void i2s_deinit() {
i2s_driver_uninstall(I2S_PORT);
}
技术支持与产品讨论
感谢你选择我们的产品!我们将为你提供多种支持,确保你在使用我们产品的过程中尽可能顺利。我们提供多种沟通渠道,以满足不同的偏好和需求。