通过 Zigbee 将 Seeed Studio IoT 按钮连接到 Home Assistant
在本教程中,我们将向您展示如何使用 Zigbee 将 Seeed Studio IoT 按钮连接到 Home Assistant。Seeed Studio IoT 按钮配备了内置的 ESP32-C6 芯片,具有 Zigbee 功能,使其成为智能家居的多功能设备。您将学习如何刷写 Zigbee 固件、将其与 Home Assistant 配对,甚至通过 Arduino 开发自定义按钮的行为。
所需材料

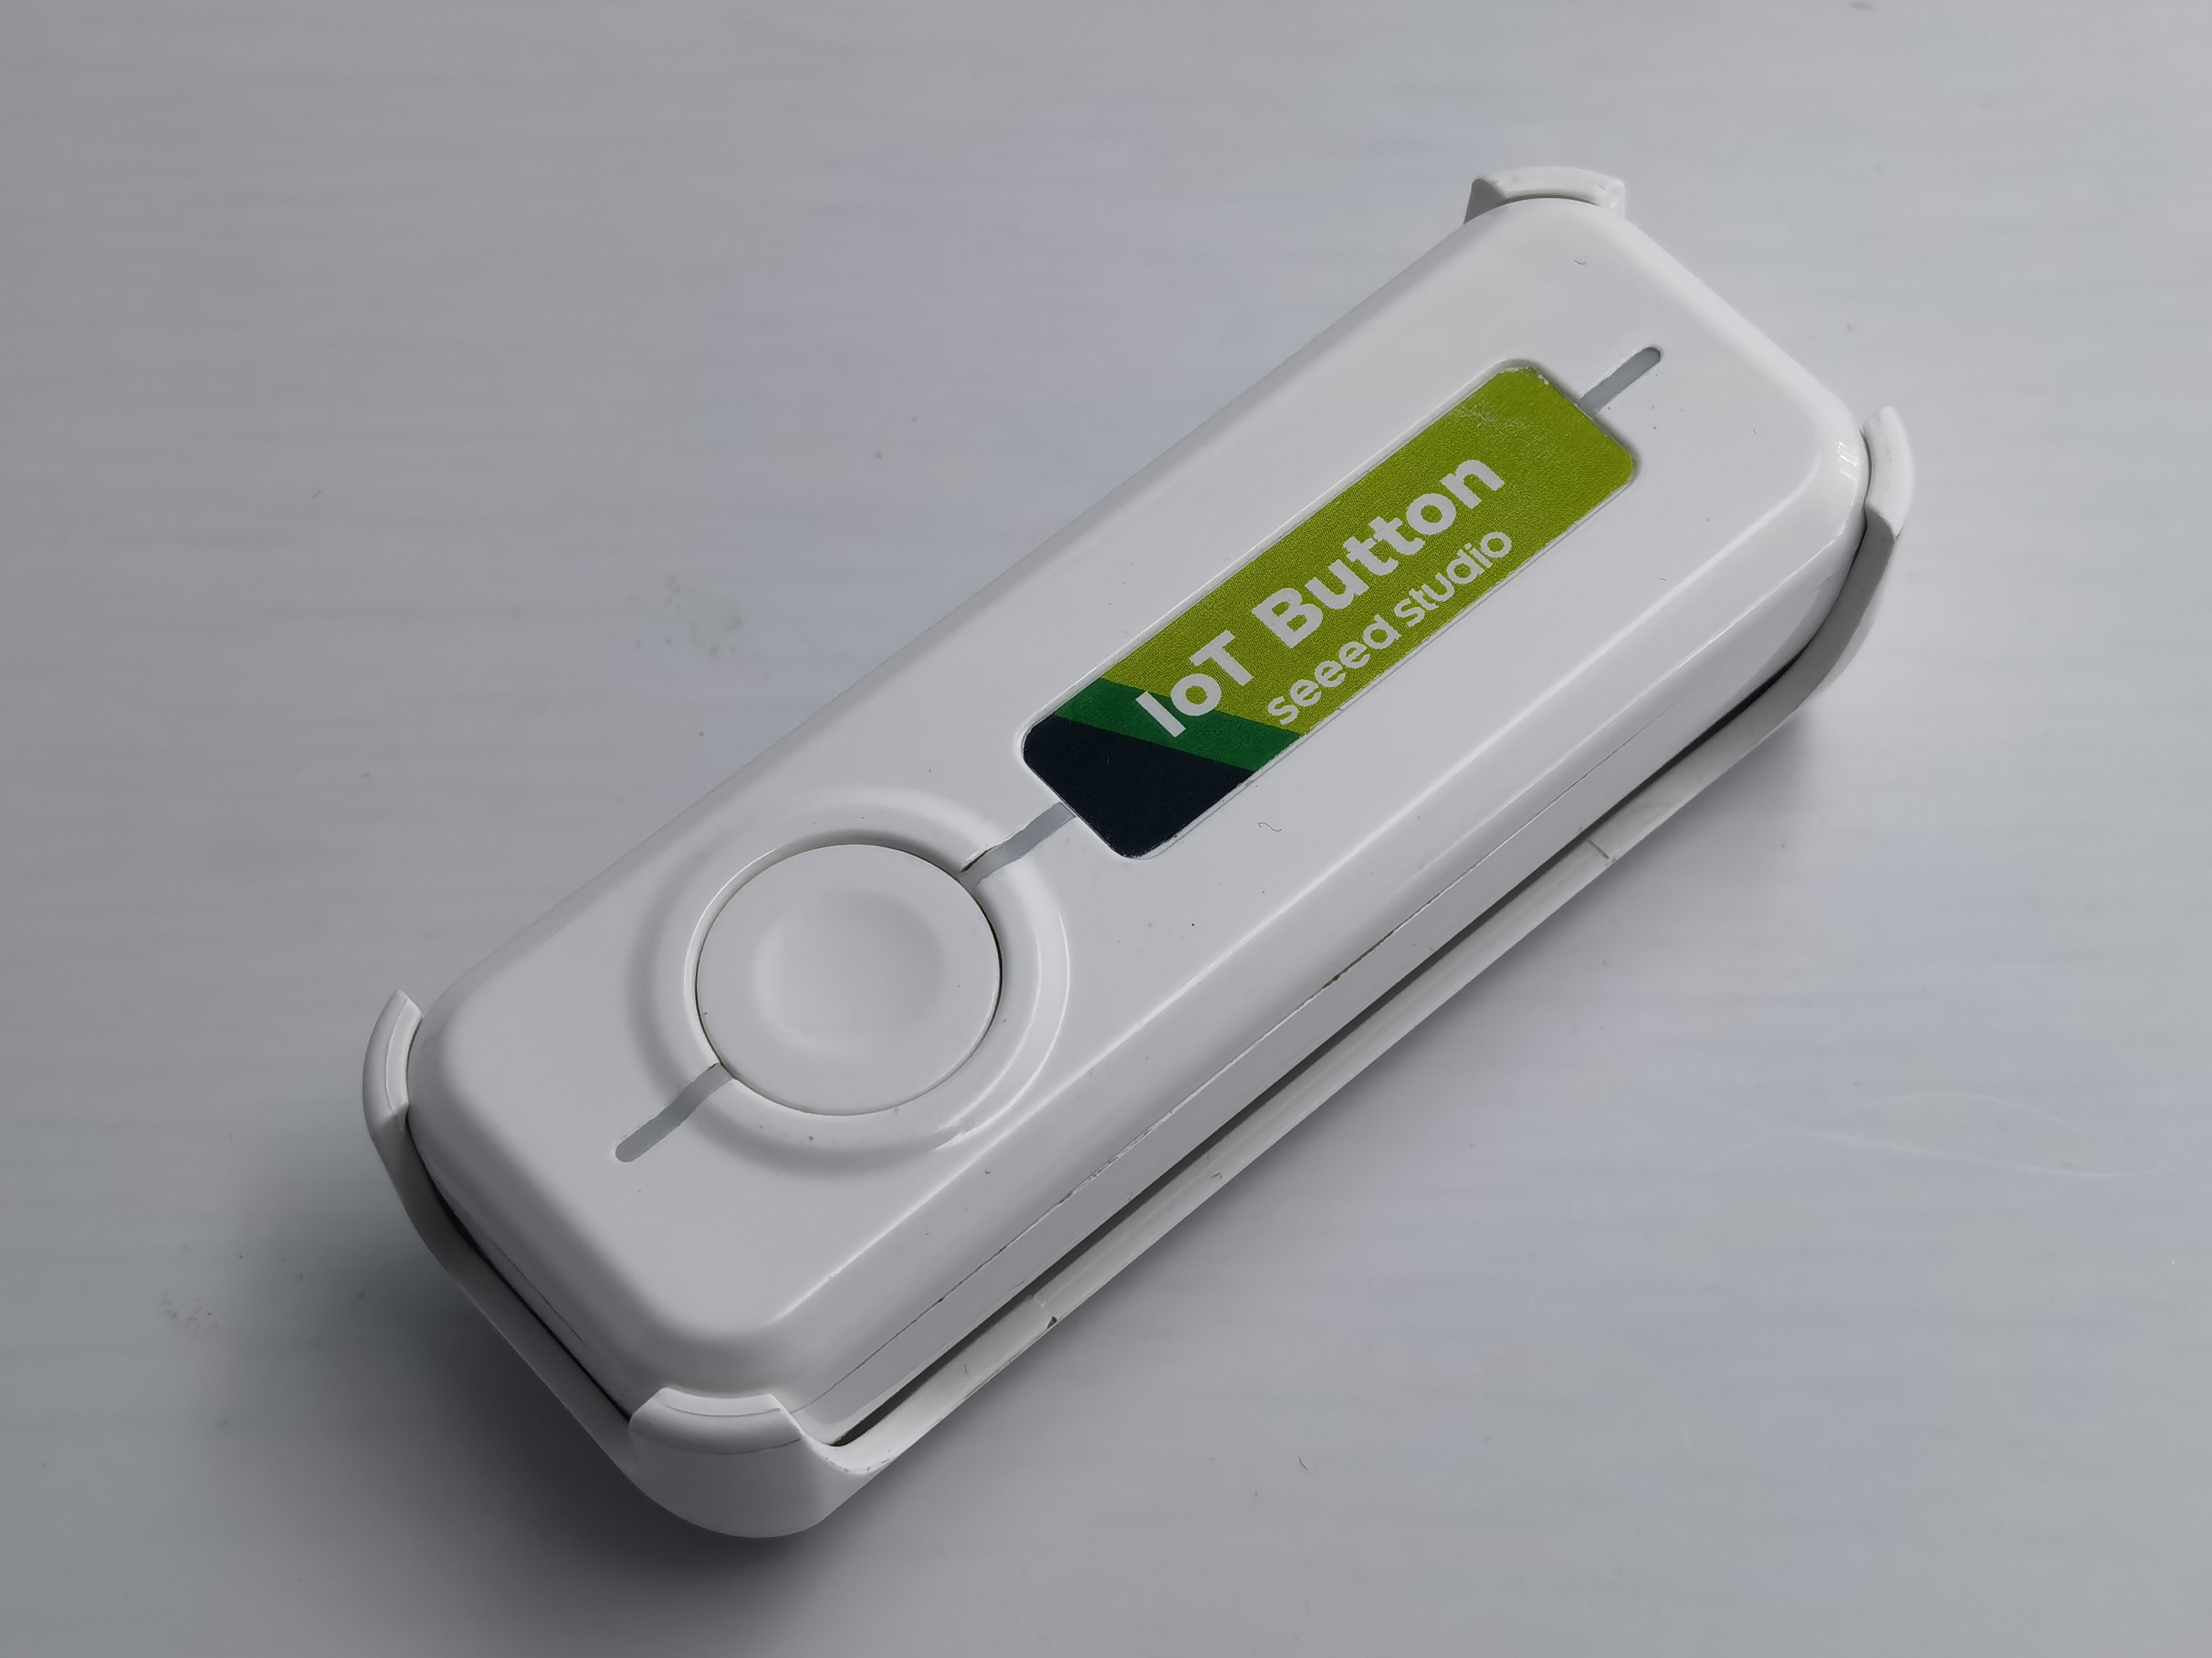
Seeed Studio IoT 按钮是一个多功能智能按钮,配备内置的 ESP32-C6 芯片。它是一个完整的独立设备,可以通过 Zigbee 与 Home Assistant 集成,以控制各种设备并触发自动化。凭借其 ESP32-C6 芯片,它提供低功耗和可靠的连接性。
功能概述(基于最新固件)
-
多动作按钮检测
- 单击、双击和三击。
- 短长按(按住 1-5 秒)。
- 长按(按住 > 5 秒)触发 Zigbee 恢复出厂设置。
- 立即报告按下和释放事件,用于实时自动化。
-
四个 Zigbee 端点
- 端点 10: 反映物理按钮实时状态的主二进制传感器(按下时为开,释放时为关)。
- 端点 11: 通过单击切换的虚拟开关。
- 端点 12: 通过双击切换的虚拟开关。
- 端点 13: 通过短长按切换的虚拟开关。
-
电池监控(仅限 IoT 按钮 V2)
- 通过 ADC 读取电池电压,并应用指数移动平均(EMA)滤波器以获得平滑、稳定的读数。
- 向 Zigbee 报告电压(以 0.01V 为单位)和电池百分比。
- 低电量状态(< 20%)驱动红色 LED 指示器。
-
LED 反馈
- RGB WS2812 LED 为点击动作提供视觉反馈(呼吸、闪烁、彩虹效果)。
- 蓝色状态 LED 指示 Zigbee 连接状态。
- 红色状态 LED(仅限 V2)指示低电量状态。
-
电源管理
- 在 2 分钟不活动后自动进入睡眠模式以节省电力。
- V1 使用轻度睡眠,V2 使用带 RTC 状态保持的深度睡眠,确保按钮点击状态不会丢失。
- 按下按钮时立即从睡眠中唤醒。
使用 Arduino 开发自定义 Zigbee 固件
如果您想自定义 IoT 按钮的行为,可以使用 Arduino 开发自己的 Zigbee 固件。
步骤 1:为 ESP32-C6 设置 Arduino IDE
- 安装最新版本的 Arduino IDE。
- 添加 ESP32 开发板支持:
- 转到 文件 > 首选项。
- 在"附加开发板管理器网址"字段中添加
https://raw.githubusercontent.com/espressif/arduino-esp32/gh-pages/package_esp32_index.json。 - 转到 工具 > 开发板 > 开发板管理器。
- 搜索"esp32"并安装最新版本(确保是 3.2.1 版本或更高版本)。
步骤 2:安装所需库
IoT 按钮固件使用 FastLED 库来实现 RGB 效果,以及包含在 ESP32 Arduino 包中的 Espressif Zigbee SDK。FastLED 库可以通过 Arduino 库管理器安装。
-
转到 项目 > 加载库 > 管理库...。
-
搜索"FastLED"并安装 Daniel Garcia 的库。
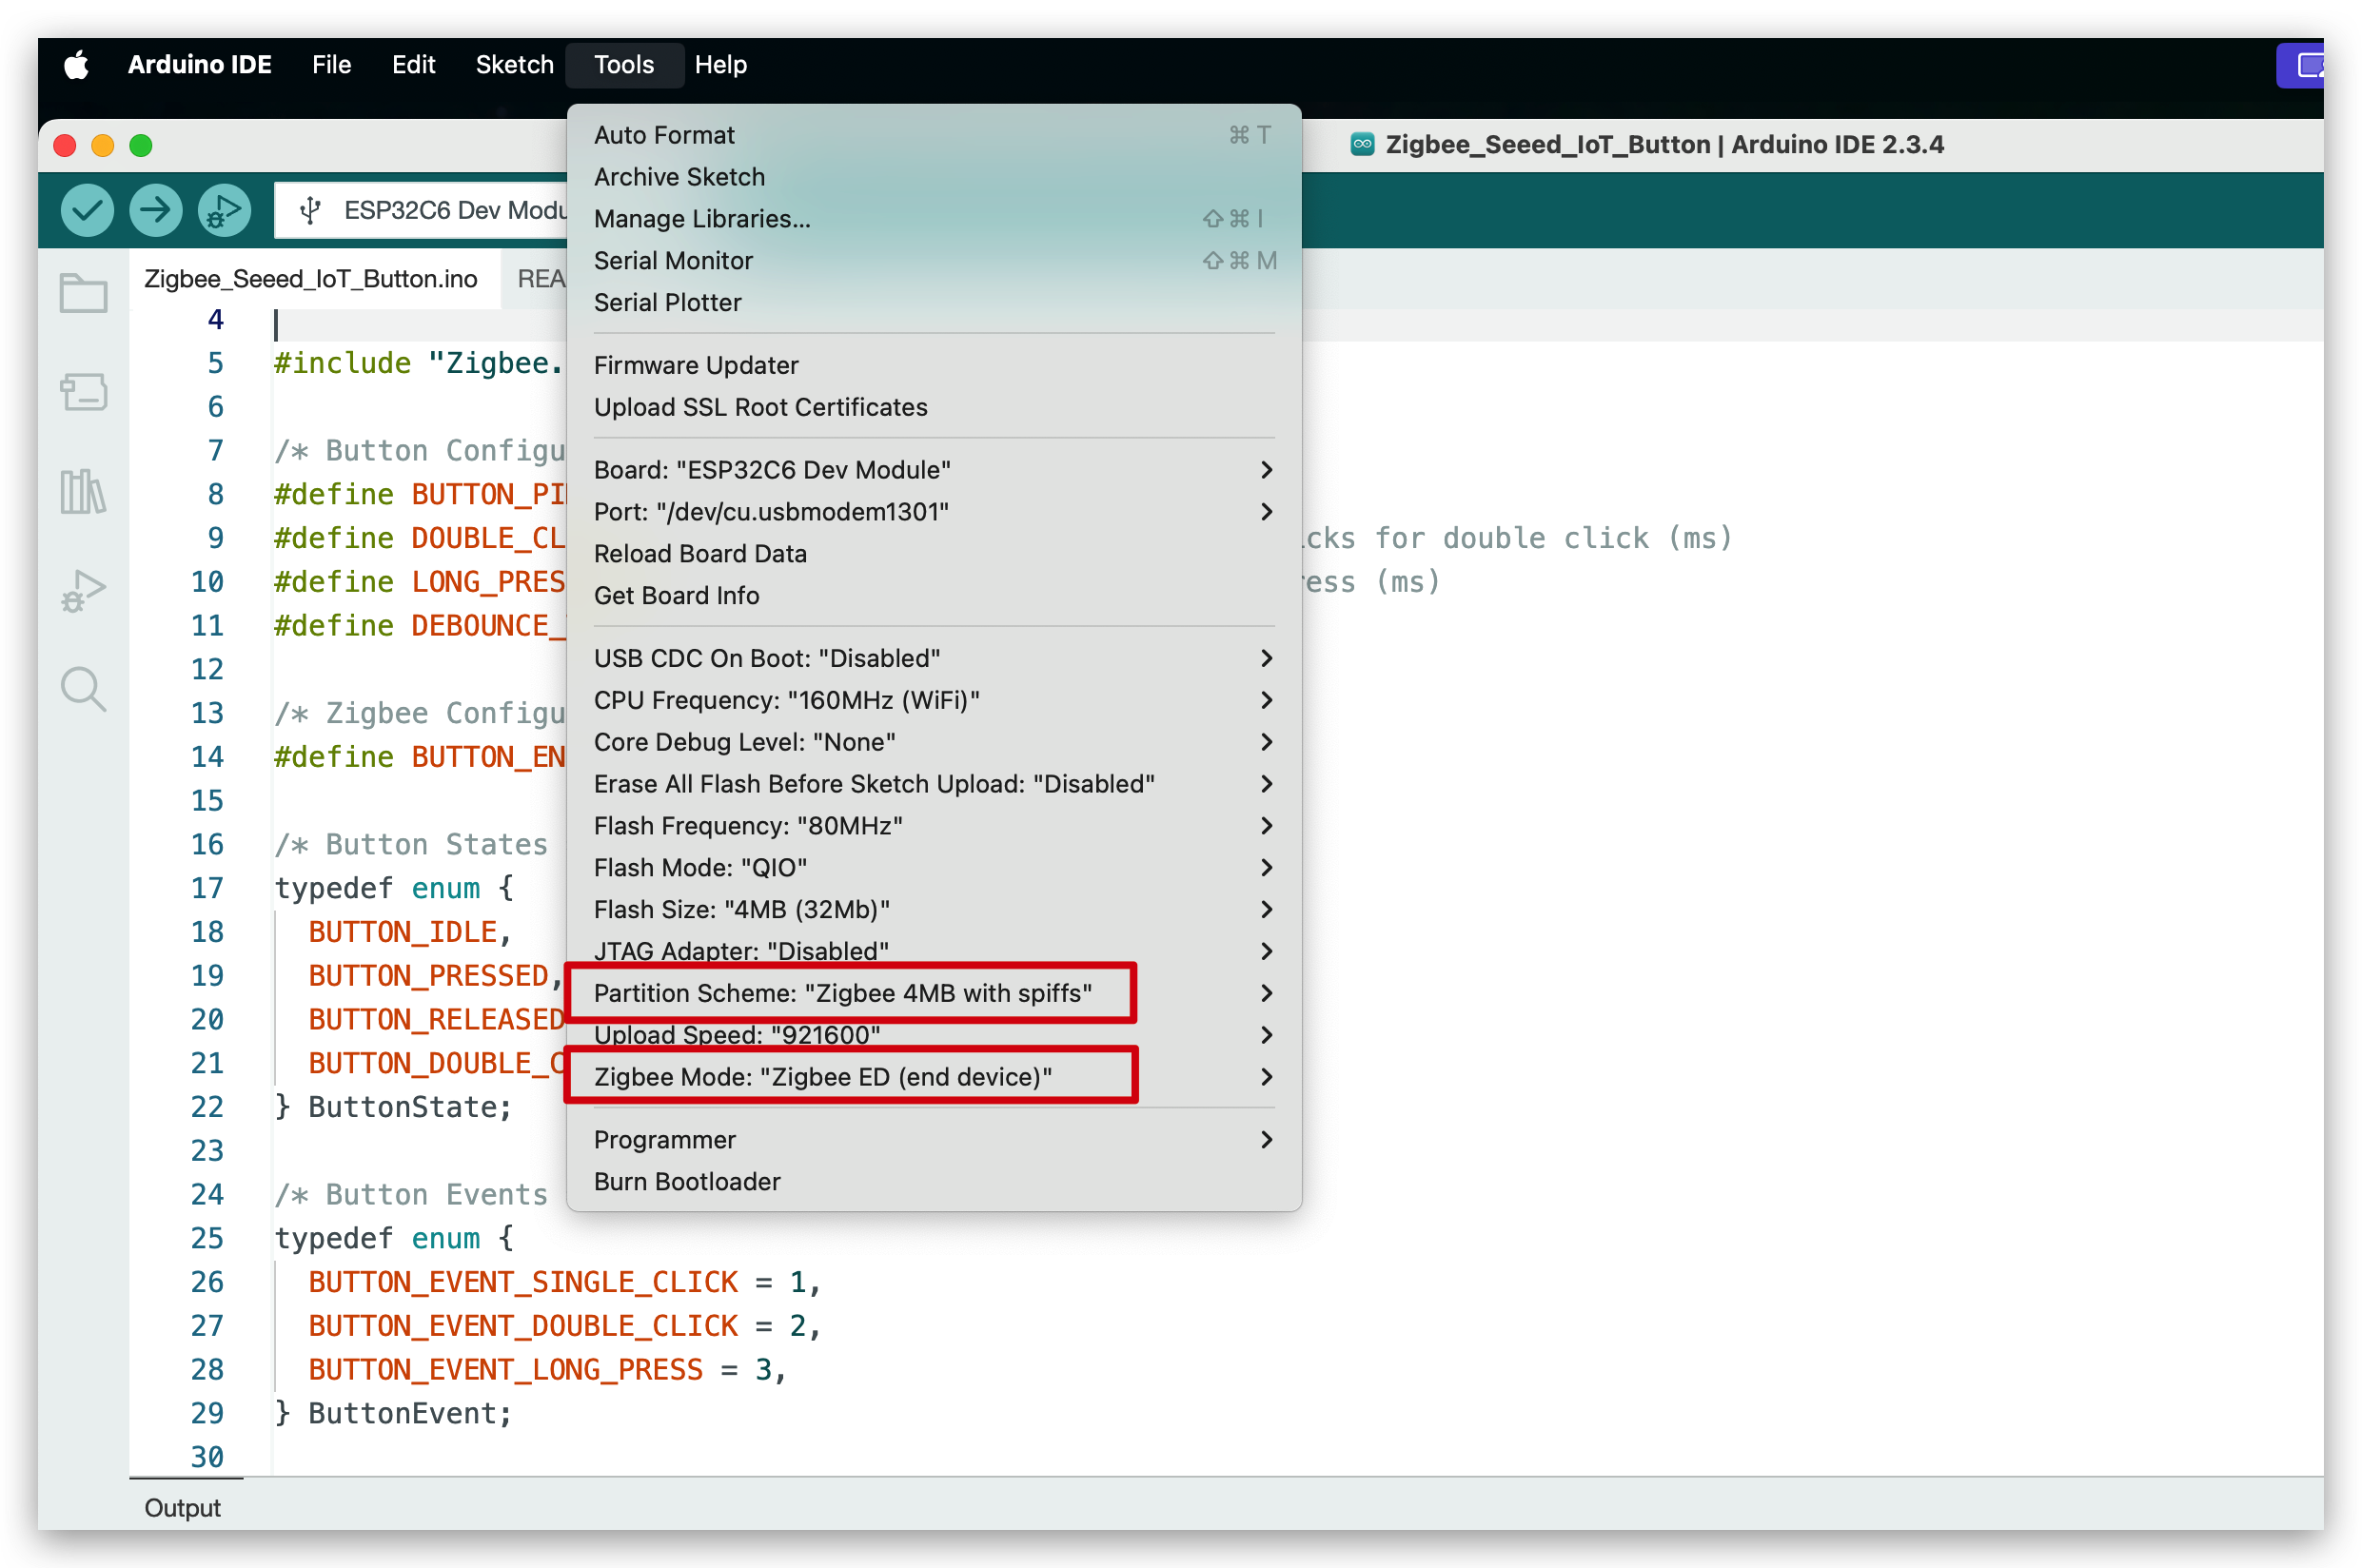
步骤 3:配置 Arduino IDE 进行 Zigbee 开发
-
选择正确的开发板:
- 工具 > 开发板 > ESP32 Arduino > XIAO ESP32C6
-
配置 Zigbee 设置:
- 工具 > Zigbee 模式 > Zigbee 终端设备
- 工具 > 分区方案 > Zigbee 4MB with spiffs
步骤 4:创建您的自定义固件
新固件是一个自包含的 Arduino 项目。它支持 IoT 按钮 V1 和 V2 硬件、高级按钮事件检测(单击、双击、三击、短按/长按)、电池监控(V2)、丰富的 LED 反馈,以及使用 FreeRTOS 任务的强大 Zigbee 集成。
硬件版本选择
代码默认为 IoT 按钮 V2 编译。要为 V1 编译,您必须取消注释代码顶部的相应行:
请验证正确的设备版本。目前市场上所有可用的 IoT 按钮都是 V1。
点击此处预览完整代码
#ifndef ZIGBEE_MODE_ED
#error "Zigbee end device mode is not selected in Tools->Zigbee mode"
#endif

#include "Zigbee.h"
#include <FastLED.h>
#include <freertos/FreeRTOS.h>
#include <freertos/task.h>
#include <freertos/queue.h>
#include <esp_sleep.h>
#include "driver/rtc_io.h"

// Logging macro switch
#define ENABLE_LOGGING // Comment out to disable logging

#ifdef ENABLE_LOGGING
#define LOG_PRINTLN(x) Serial.println(x)
#define LOG_PRINTF(x, ...) Serial.printf(x, __VA_ARGS__)
#else
#define LOG_PRINTLN(x)
#define LOG_PRINTF(x, ...)
#endif

#define IOT_BUTTON_V1  //Uncomment this line to select to compile the iot button v1 version
// #define IOT_BUTTON_V2  //Uncomment this line to select to compile the iot button v2 version

#if !defined(IOT_BUTTON_V1) && !defined(IOT_BUTTON_V2)
#define IOT_BUTTON_V2
#endif

#define BUTTON_PIN_BITMASK(GPIO) (1ULL << GPIO)

/* Hardware Configuration */
#if defined(IOT_BUTTON_V1)
const uint8_t BUTTON_PIN = 9;
const uint8_t BLUE_LED_PIN = 2;
const uint8_t RGB_ENABLE_PIN = 18;
const uint8_t RGB_PIN = 19;
const uint8_t NUM_RGBS = 1;
#elif defined(IOT_BUTTON_V2)
const uint8_t BUTTON_PIN = 2;
const uint8_t BLUE_LED_PIN = 3;
const uint8_t RED_LED_PIN = 14;
const uint8_t RGB_ENABLE_PIN = 18;
const uint8_t RGB_PIN = 19;
const uint8_t NUM_RGBS = 1;
const uint8_t BATTERY_ADC_PIN = 1;
const uint8_t BATTERY_ENABLE_PIN = 0;
const int SAMPLE_COUNT = 10;
const float MIN_VOLTAGE = 2.75;
const float MAX_VOLTAGE = 4.2;
const float ALPHA = 0.1; // Smoothing factor for EMA
#endif

/* Button Configuration */
const uint32_t MULTI_CLICK_TIME = 300;             // Maximum time between clicks for multi-click (ms)
const uint32_t SHORT_LONG_PRESS_TIME = 1000;       // Minimum time for short long press (1 second)
const uint32_t LONG_PRESS_TIME = 5000;             // Minimum time for long press (5 seconds)
const uint32_t DEBOUNCE_TIME = 20;                 // Debounce time (ms)
const uint32_t INACTIVITY_TIMEOUT = 2 * 60 * 1000; // 2 minutes inactivity timeout (ms)

/* LED Configuration */
CRGB rgbs[NUM_RGBS];

/* Button Events */
enum class ButtonEvent
{
  PRESS,            // Pressed
  RELEASE,          // Released
  SINGLE_CLICK,     // Single click
  DOUBLE_CLICK,     // Double click
  TRIPLE_CLICK,     // Triple click
  SHORT_LONG_PRESS, // Short long press (1-5 seconds)
  LONG_PRESS        // Long press (>5 seconds)
};

/* Zigbee Configuration */
#define BUTTON_ENDPOINT 10
#define SWITCH1_ENDPOINT 11
#define SWITCH2_ENDPOINT 12
#define SWITCH3_ENDPOINT 13
ZigbeeBinary zbIoTButton = ZigbeeBinary(BUTTON_ENDPOINT);
ZigbeeBinary zbSwitch1 = ZigbeeBinary(SWITCH1_ENDPOINT);
ZigbeeBinary zbSwitch2 = ZigbeeBinary(SWITCH2_ENDPOINT);
ZigbeeBinary zbSwitch3 = ZigbeeBinary(SWITCH3_ENDPOINT);
bool buttonStatus = false;
RTC_DATA_ATTR bool switch1Status = false;
RTC_DATA_ATTR bool switch2Status = false;
RTC_DATA_ATTR bool switch3Status = false;

/* Global Variables */
QueueHandle_t eventQueue;

uint32_t pressStartTime = 0;
uint32_t lastReleaseTime = 0;
uint8_t clickCount = 0;
bool longPressTriggered = false;
bool clickSequenceActive = false; // Tracks if a click sequence is in progress
TaskHandle_t clickTimeoutTaskHandle = NULL;
uint32_t lastActivityTime = 0;  // Tracks last button activity for sleep
volatile bool isAwake = true;   // Tracks device awake/sleep state
bool lastConnected = false;     // Track previous Zigbee connection state
bool zigbeeInitialized = false; // Track Zigbee initialization status

#if defined(IOT_BUTTON_V2)
// RTC variables for button state persistence
RTC_DATA_ATTR uint32_t pressStartTimeRTC = 0;
RTC_DATA_ATTR uint32_t lastReleaseTimeRTC = 0;
RTC_DATA_ATTR uint8_t clickCountRTC = 0;
RTC_DATA_ATTR bool longPressTriggeredRTC = false;
RTC_DATA_ATTR bool clickSequenceActiveRTC = false;

float emaVoltage = 0.0;
float batteryPercentage = 100.0;
#endif

#if defined(IOT_BUTTON_V2)
/********************* Battery Functions **************************/
void measureBattery()
{
  digitalWrite(BATTERY_ENABLE_PIN, HIGH);
  vTaskDelay(10 / portTICK_PERIOD_MS); // Wait for stabilization

  // Take multiple samples and compute average
  float adcSum = 0;
  for (int i = 0; i < SAMPLE_COUNT; i++)
  {
    adcSum += analogRead(BATTERY_ADC_PIN);
    vTaskDelay(5 / portTICK_PERIOD_MS); // Small delay between samples
  }
  digitalWrite(BATTERY_ENABLE_PIN, LOW);

  float adcAverage = adcSum / SAMPLE_COUNT;
  float voltage = (adcAverage / 4095.0) * 3.3 * 3.0; // Apply divider ratio

  if (voltage < MIN_VOLTAGE)
  {
    emaVoltage = 0.0;
    batteryPercentage = 0.0;
    LOG_PRINTF("Battery voltage: %.2fV (too low or not connected), EMA voltage: %.2fV, Percentage: %.2f%%\n",
               voltage, emaVoltage, batteryPercentage);
  }
  else
  {
    // Update EMA
    if (emaVoltage == 0.0)
    {
      emaVoltage = voltage;
    }
    else
    {
      emaVoltage = ALPHA * voltage + (1 - ALPHA) * emaVoltage;
    }

    // Calculate battery percentage from emaVoltage
    float localBatteryPercentage = (emaVoltage - MIN_VOLTAGE) / (MAX_VOLTAGE - MIN_VOLTAGE) * 100;
    if (localBatteryPercentage < 0)
      localBatteryPercentage = 0;
    if (localBatteryPercentage > 100)
      localBatteryPercentage = 100;

    // Update global battery percentage
    batteryPercentage = localBatteryPercentage;

    LOG_PRINTF("Battery voltage: %.2fV, EMA voltage: %.2fV, Percentage: %.2f%%\n",
               voltage, emaVoltage, localBatteryPercentage);
  }
}
#endif

/********************* FreeRTOS Tasks **************************/
void breathingLedTask(void *pvParameters)
{
  LOG_PRINTLN("Breathing LED");
  uint8_t hue = random8();    // Random color hue
  for (int i = 0; i < 1; i++) // one breathing cycle
  {
    // Brighten
    for (int brightness = 0; brightness <= 255; brightness += 5)
    {
      rgbs[0] = CHSV(hue, 255, brightness);
      FastLED.show();
      vTaskDelay(20 / portTICK_PERIOD_MS);
    }
    // Dim
    for (int brightness = 255; brightness >= 0; brightness -= 5)
    {
      rgbs[0] = CHSV(hue, 255, brightness);
      FastLED.show();
      vTaskDelay(20 / portTICK_PERIOD_MS);
    }
  }
  rgbs[0] = CRGB::Black;
  FastLED.show();
  vTaskDelete(NULL);
}

void blinkLedTask(void *pvParameters)
{
  LOG_PRINTLN("Blink LED");
  uint8_t rand = random8();
  for (int i = 0; i < 2; i++)
  {
    rgbs[0] = CHSV(rand, 255, 255); // Random color
    FastLED.show();
    vTaskDelay(200 / portTICK_PERIOD_MS);
    rgbs[0] = CRGB::Black;
    FastLED.show();
    vTaskDelay(200 / portTICK_PERIOD_MS);
  }
  vTaskDelete(NULL);
}

void rainbowLedTask(void *pvParameters)
{
  LOG_PRINTLN("Rainbow LED");
  for (int hue = 0; hue < 128; hue += 10)
  {
    rgbs[0] = CHSV(hue, 255, 255);
    FastLED.show();
    vTaskDelay(100 / portTICK_PERIOD_MS);
  }
  rgbs[0] = CRGB::Black;
  FastLED.show();
  vTaskDelete(NULL);
}

void clickTimeoutTask(void *pvParameters)
{
  uint32_t localClickCount = clickCount;
  uint32_t localLastReleaseTime = lastReleaseTime;

  while (millis() - localLastReleaseTime < MULTI_CLICK_TIME)
  {
    vTaskDelay(10 / portTICK_PERIOD_MS);
  }

  ButtonEvent event;
  switch (localClickCount)
  {
  case 1:
    event = ButtonEvent::SINGLE_CLICK;
    break;
  case 2:
    event = ButtonEvent::DOUBLE_CLICK;
    break;
  case 3:
    event = ButtonEvent::TRIPLE_CLICK;
    break;
  default:
    vTaskDelete(NULL);
    return;
  }
  xQueueSend(eventQueue, &event, 0);

  clickCount = 0;
  clickSequenceActive = false;
  clickTimeoutTaskHandle = NULL;

  vTaskDelete(NULL);
}

// --- Button Task Refactor ---
static bool debounceButton(bool currentState, uint32_t currentTime, uint32_t &lastDebounceTime)
{
  if (currentTime - lastDebounceTime < DEBOUNCE_TIME)
  {
    vTaskDelay(1 / portTICK_PERIOD_MS);
    return true;
  }
  return false;
}

static void handleButtonPress(uint32_t currentTime)
{
  pressStartTime = currentTime;
  ButtonEvent event = ButtonEvent::PRESS;
  xQueueSend(eventQueue, &event, 0);
  lastActivityTime = millis();

  if (clickSequenceActive && (currentTime - lastReleaseTime <= MULTI_CLICK_TIME))
  {
    clickCount++;
    if (clickTimeoutTaskHandle != NULL)
    {
      vTaskDelete(clickTimeoutTaskHandle);
      clickTimeoutTaskHandle = NULL;
    }
  }
  else
  {
    clickCount = 1;
    clickSequenceActive = true;
  }
  longPressTriggered = false;
}

static void handleButtonRelease(uint32_t currentTime)
{
  uint32_t pressDuration = currentTime - pressStartTime;
  ButtonEvent event = ButtonEvent::RELEASE;
  xQueueSend(eventQueue, &event, 0);
  lastActivityTime = millis();

  if (!longPressTriggered)
  {
    if (pressDuration >= LONG_PRESS_TIME)
    {
      event = ButtonEvent::LONG_PRESS;
      longPressTriggered = true;
      clickSequenceActive = false;
      clickCount = 0;
      xQueueSend(eventQueue, &event, 0);
      if (clickTimeoutTaskHandle != NULL)
      {
        vTaskDelete(clickTimeoutTaskHandle);
        clickTimeoutTaskHandle = NULL;
      }
    }
    else if (pressDuration >= SHORT_LONG_PRESS_TIME)
    {
      event = ButtonEvent::SHORT_LONG_PRESS;
      longPressTriggered = true;
      clickSequenceActive = false;
      clickCount = 0;
      xQueueSend(eventQueue, &event, 0);
      if (clickTimeoutTaskHandle != NULL)
      {
        vTaskDelete(clickTimeoutTaskHandle);
        clickTimeoutTaskHandle = NULL;
      }
    }
    else
    {
      lastReleaseTime = currentTime;
      if (clickTimeoutTaskHandle != NULL)
      {
        vTaskDelete(clickTimeoutTaskHandle);
        clickTimeoutTaskHandle = NULL;
      }
      xTaskCreate(clickTimeoutTask, "ClickTimeout", 2048, NULL, 1, &clickTimeoutTaskHandle);
    }
  }
}

static void checkLongPress(uint32_t currentTime)
{
  if (currentTime - pressStartTime >= LONG_PRESS_TIME)
  {
    ButtonEvent event = ButtonEvent::LONG_PRESS;
    longPressTriggered = true;
    clickSequenceActive = false;
    clickCount = 0;
    xQueueSend(eventQueue, &event, 0);
    lastActivityTime = millis();
    if (clickTimeoutTaskHandle != NULL)
    {
      vTaskDelete(clickTimeoutTaskHandle);
      clickTimeoutTaskHandle = NULL;
    }
  }
}

void buttonTask(void *pvParameters)
{
  uint32_t lastDebounceTime = 0;
  bool lastState = false;

  // Check if woken up by button press
  if (esp_sleep_get_wakeup_cause() == ESP_SLEEP_WAKEUP_EXT1)
  {
    bool currentState = (digitalRead(BUTTON_PIN) == LOW);
    if (currentState)
    {
      handleButtonPress(millis());
    }
  }

  while (1)
  {
    bool currentState = (digitalRead(BUTTON_PIN) == LOW);
    uint32_t currentTime = millis();

    if (debounceButton(currentState, currentTime, lastDebounceTime))
      continue;

    if (currentState != lastState)
    {
      lastDebounceTime = currentTime;
      lastState = currentState;
      if (currentState)
      {
        handleButtonPress(currentTime);
      }
      else
      {
        handleButtonRelease(currentTime);
      }
    }
    else if (currentState && !longPressTriggered)
    {
      checkLongPress(currentTime);
    }

    vTaskDelay(10 / portTICK_PERIOD_MS);
  }
}

void mainTask(void *pvParameters)
{
  ButtonEvent event;
  while (1)
  {
    if (xQueueReceive(eventQueue, &event, portMAX_DELAY) == pdTRUE)
    {
      switch (event)
      {
      case ButtonEvent::PRESS:
        if (buttonStatus == false)
        {
          buttonStatus = true;
          LOG_PRINTLN("Button Pressed");
          if (zigbeeInitialized && Zigbee.connected())
          {
            zbIoTButton.setBinaryInput(buttonStatus);
            zbIoTButton.reportBinaryInput();
          }
        }
        break;

      case ButtonEvent::RELEASE:
        if (buttonStatus == true)
        {
          buttonStatus = false;
          LOG_PRINTLN("Button Released");
          if (zigbeeInitialized && Zigbee.connected())
          {
            zbIoTButton.setBinaryInput(buttonStatus);
            zbIoTButton.reportBinaryInput();
          }
        }
        break;

      case ButtonEvent::SINGLE_CLICK:
        LOG_PRINTLN("Single Click");
        switch1Status = !switch1Status;
        if (zigbeeInitialized && Zigbee.connected())
        {
          zbSwitch1.setBinaryInput(switch1Status);
          zbSwitch1.reportBinaryInput();
        }
        xTaskCreate(breathingLedTask, "BreathingLed", 2048, NULL, 1, NULL);
        break;

      case ButtonEvent::DOUBLE_CLICK:
        LOG_PRINTLN("Double Click");
        switch2Status = !switch2Status;
        if (zigbeeInitialized && Zigbee.connected())
        {
          zbSwitch2.setBinaryInput(switch2Status);
          zbSwitch2.reportBinaryInput();
        }
        xTaskCreate(blinkLedTask, "BlinkLed", 2048, NULL, 1, NULL);
        break;

      case ButtonEvent::TRIPLE_CLICK:
        LOG_PRINTLN("Triple Click");
        if (zigbeeInitialized && Zigbee.connected())
        {
          // Add any specific Zigbee action here if needed
        }
        break;

      case ButtonEvent::SHORT_LONG_PRESS:
        LOG_PRINTLN("Short Long Press");
        switch3Status = !switch3Status;
        if (zigbeeInitialized && Zigbee.connected())
        {
          zbSwitch3.setBinaryInput(switch3Status);
          zbSwitch3.reportBinaryInput();
        }
        xTaskCreate(rainbowLedTask, "RainbowLed", 2048, NULL, 1, NULL);
        break;

      case ButtonEvent::LONG_PRESS:
        LOG_PRINTLN("Long Press\nReset Zigbee");
        vTaskDelay(1000 / portTICK_PERIOD_MS);
        if (zigbeeInitialized)
        {
          Zigbee.factoryReset();
        }
        break;
      }
    }
  }
}

#if defined(IOT_BUTTON_V1)
void ledTask(void *pvParameters)
{
  pinMode(BLUE_LED_PIN, OUTPUT);
  while (1)
  {
    if (isAwake)
    {
      if (!zigbeeInitialized || !Zigbee.connected()) // Blink when not connected or not initialized
      {
        digitalWrite(BLUE_LED_PIN, LOW); // On
        vTaskDelay(500 / portTICK_PERIOD_MS);
        digitalWrite(BLUE_LED_PIN, HIGH); // Off
        vTaskDelay(500 / portTICK_PERIOD_MS);
      }
      else
      {
        digitalWrite(BLUE_LED_PIN, LOW); // On when connected
      }
    }
    else
    {
      digitalWrite(BLUE_LED_PIN, HIGH); // Off during sleep
    }
    vTaskDelay(10 / portTICK_PERIOD_MS);
  }
}
#elif defined(IOT_BUTTON_V2)
void ledTask(void *pvParameters)
{
  pinMode(BLUE_LED_PIN, OUTPUT);
  pinMode(RED_LED_PIN, OUTPUT);
  bool ledState = false;

  while (1)
  {
    if (isAwake)
    {
      bool isLowBattery = (batteryPercentage < 20.0);
      bool isConnected = zigbeeInitialized && Zigbee.connected();
      uint8_t activeLedPin = isLowBattery ? RED_LED_PIN : BLUE_LED_PIN;
      uint8_t inactiveLedPin = isLowBattery ? BLUE_LED_PIN : RED_LED_PIN;

      if (isConnected)
      {
        digitalWrite(activeLedPin, LOW);
        digitalWrite(inactiveLedPin, HIGH);
      }
      else
      {
        ledState = !ledState;
        digitalWrite(activeLedPin, ledState ? LOW : HIGH);
        digitalWrite(inactiveLedPin, HIGH);
      }
    }
    else
    {
      digitalWrite(BLUE_LED_PIN, HIGH);
      digitalWrite(RED_LED_PIN, HIGH);
    }
    vTaskDelay(500 / portTICK_PERIOD_MS);
  }
}
#endif

#if defined(IOT_BUTTON_V2)
void batteryTask(void *pvParameters)
{
  pinMode(BATTERY_ENABLE_PIN, OUTPUT);

  while (1)
  {
    measureBattery();
    if (zigbeeInitialized && Zigbee.connected())
    {
      zbIoTButton.setBatteryVoltage((uint8_t)(emaVoltage * 100)); // Unit: 0.01V
      zbIoTButton.setBatteryPercentage((uint8_t)batteryPercentage);
      zbIoTButton.reportBatteryPercentage();
    }
    vTaskDelay(30000 / portTICK_PERIOD_MS); // Check every 30 seconds
  }
}
#endif

void sleepTask(void *pvParameters)
{
  while (1)
  {
    if (isAwake && (millis() - lastActivityTime > INACTIVITY_TIMEOUT))
    {
      LOG_PRINTLN("Entering sleep due to inactivity");
#if defined(IOT_BUTTON_V1)
      isAwake = false;
      digitalWrite(BLUE_LED_PIN, HIGH);
      esp_sleep_enable_gpio_wakeup();
      digitalWrite(BLUE_LED_PIN, HIGH); // Turn off LED
      gpio_wakeup_enable((gpio_num_t)BUTTON_PIN, GPIO_INTR_LOW_LEVEL);
      digitalWrite(RGB_ENABLE_PIN, LOW);
      esp_light_sleep_start();
      digitalWrite(RGB_ENABLE_PIN, HIGH);
      LOG_PRINTLN("Woke up from light sleep");
      isAwake = true;
      digitalWrite(BLUE_LED_PIN, LOW); // Turn on LED
#elif defined(IOT_BUTTON_V2)
      // Save button state to RTC memory
      pressStartTimeRTC = pressStartTime;
      lastReleaseTimeRTC = lastReleaseTime;
      clickCountRTC = clickCount;
      longPressTriggeredRTC = longPressTriggered;
      clickSequenceActiveRTC = clickSequenceActive;

      digitalWrite(BLUE_LED_PIN, HIGH);
      digitalWrite(RED_LED_PIN, HIGH);
      digitalWrite(RGB_PIN, LOW);
      digitalWrite(RGB_ENABLE_PIN, LOW);
      static gpio_num_t WAKEUP_GPIO = (gpio_num_t)BUTTON_PIN;
      esp_sleep_enable_ext1_wakeup_io(BUTTON_PIN_BITMASK(WAKEUP_GPIO), ESP_EXT1_WAKEUP_ANY_LOW);
      esp_deep_sleep_start();
#endif
    }
    vTaskDelay(10000 / portTICK_PERIOD_MS); // Check every 10 seconds
  }
}

/********************* Zigbee Functions **************************/
void onZigbeeConnected()
{
  if (!zigbeeInitialized)
  {
    return;
  }
#if defined(IOT_BUTTON_V2)
  measureBattery();                                           // Ensure latest battery data
  zbIoTButton.setBatteryVoltage((uint8_t)(emaVoltage * 100)); // Unit: 0.01V
  zbIoTButton.setBatteryPercentage((uint8_t)batteryPercentage);
  zbIoTButton.reportBatteryPercentage();
#endif
  zbSwitch1.setBinaryInput(switch1Status);
  zbSwitch1.reportBinaryInput();
  zbSwitch2.setBinaryInput(switch2Status);
  zbSwitch2.reportBinaryInput();
  zbSwitch3.setBinaryInput(switch3Status);
  zbSwitch3.reportBinaryInput();
}

void zigbeeSetupTask(void *pvParameters)
{
  zbIoTButton.addBinaryInput();
  zbIoTButton.setBinaryInputApplication(BINARY_INPUT_APPLICATION_TYPE_SECURITY_MOTION_DETECTION);
  zbIoTButton.setBinaryInputDescription("Button");
  zbSwitch1.addBinaryInput();
  zbSwitch1.setBinaryInputApplication(BINARY_INPUT_APPLICATION_TYPE_SECURITY_MOTION_DETECTION);
  zbSwitch1.setBinaryInputDescription("Switch1");
  zbSwitch2.addBinaryInput();
  zbSwitch2.setBinaryInputApplication(BINARY_INPUT_APPLICATION_TYPE_SECURITY_MOTION_DETECTION);
  zbSwitch2.setBinaryInputDescription("Switch2");
  zbSwitch3.addBinaryInput();
  zbSwitch3.setBinaryInputApplication(BINARY_INPUT_APPLICATION_TYPE_SECURITY_MOTION_DETECTION);
  zbSwitch3.setBinaryInputDescription("Switch3");

  // Set Zigbee device information
#if defined(IOT_BUTTON_V1)
  zbIoTButton.setManufacturerAndModel("Seeed Studio", "IoT_Button");
#elif defined(IOT_BUTTON_V2)
  zbIoTButton.setManufacturerAndModel("Seeed Studio", "IoT Button V2");
  zbIoTButton.setPowerSource(ZB_POWER_SOURCE_BATTERY, 100);
#endif

  // Add endpoint to Zigbee Core
  Zigbee.addEndpoint(&zbIoTButton);
  Zigbee.addEndpoint(&zbSwitch1);
  Zigbee.addEndpoint(&zbSwitch2);
  Zigbee.addEndpoint(&zbSwitch3);
  esp_zb_cfg_t zigbeeConfig = ZIGBEE_DEFAULT_ED_CONFIG();
  zigbeeConfig.nwk_cfg.zed_cfg.keep_alive = 10000;

  Zigbee.setTimeout(10000); // Set timeout for Zigbee Begin to 10s (default is 30s)
  LOG_PRINTLN("Starting Zigbee...");
  if (!Zigbee.begin(&zigbeeConfig, false))
  {
    LOG_PRINTLN("Zigbee failed to start!");
    LOG_PRINTLN("Please try holding down the 5S key for a long time to reset zigbee");
    zigbeeInitialized = false;
  }
  else
  {
    LOG_PRINTLN("Zigbee started successfully!");
    zigbeeInitialized = true;
  }

  vTaskDelete(NULL); // Terminate the task after completion
}

/********************* Arduino Setup **************************/
void setup()
{
  Serial.begin(115200);

  LOG_PRINTLN("Zigbee IoT Button Starting...");
#if defined(IOT_BUTTON_V2)
  // Restore button state from RTC memory
  pressStartTime = pressStartTimeRTC;
  lastReleaseTime = lastReleaseTimeRTC;
  clickCount = clickCountRTC;
  longPressTriggered = longPressTriggeredRTC;
  clickSequenceActive = clickSequenceActiveRTC;
#endif

  // Initialize button pin
  pinMode(BUTTON_PIN, INPUT_PULLUP);

  pinMode(RGB_ENABLE_PIN, OUTPUT);
  digitalWrite(RGB_ENABLE_PIN, HIGH);
#if defined(IOT_BUTTON_V2)
  pinMode(BATTERY_ENABLE_PIN, OUTPUT);
#endif

  // Initialize LED
  FastLED.addLeds<WS2812, RGB_PIN, GRB>(rgbs, NUM_RGBS);
  FastLED.setBrightness(50);

  // Create event queue
  eventQueue = xQueueCreate(10, sizeof(ButtonEvent));
  if (eventQueue == NULL)
  {
    LOG_PRINTLN("Failed to create event queue!");
    ESP.restart();
  }

#if defined(IOT_BUTTON_V2)
  // Check if woken up by button press and handle immediately
  if (esp_sleep_get_wakeup_cause() == ESP_SLEEP_WAKEUP_EXT1)
  {
    uint32_t currentTime = millis();
    if (digitalRead(BUTTON_PIN) == LOW)
    {
      handleButtonPress(currentTime);
    }
  }
#endif

  // Create FreeRTOS tasks
  xTaskCreate(buttonTask, "ButtonTask", 2048, NULL, 4, NULL);
  xTaskCreate(ledTask, "LedTask", 1024, NULL, 0, NULL);
  xTaskCreate(mainTask, "MainTask", 2048, NULL, 3, NULL);
  xTaskCreate(sleepTask, "SleepTask", 2048, NULL, 2, NULL);
  xTaskCreate(zigbeeSetupTask, "ZigbeeSetup", 2048, NULL, 1, NULL);
#if defined(IOT_BUTTON_V2)
  xTaskCreate(batteryTask, "BatteryTask", 2048, NULL, 1, NULL);
#endif
}

/********************* Arduino Loop **************************/
void loop()
{
  if (zigbeeInitialized)
  {
    bool currentConnected = Zigbee.connected();
    if (currentConnected && !lastConnected)
    {
      LOG_PRINTLN("Zigbee connected!");
      onZigbeeConnected();
    }
    else if (!currentConnected && lastConnected)
    {
      LOG_PRINTLN("Zigbee disconnected!");
    }
    lastConnected = currentConnected;
    if (!currentConnected)
    {
      LOG_PRINTLN("Zigbee not connected, retrying...");
      vTaskDelay(5000 / portTICK_PERIOD_MS);
    }
    else
    {
      vTaskDelay(1000 / portTICK_PERIOD_MS);
    }
  }
  else
  {
    vTaskDelay(1000 / portTICK_PERIOD_MS); // Keep loop running even if Zigbee fails
  }
}
文档可能不会随着代码更新而及时更新,您也可以点击下面的按钮获取最新的步骤。
步骤 5:上传并测试您的固件
- 通过 USB 将您的 IoT Button 连接到计算机。
- 在 Arduino IDE 中选择正确的端口。
- 点击上传按钮。
- 打开串口监视器(波特率 115200)查看调试信息。
- 刷写完成后,按钮就可以进行配对了。
步骤 6:在 Home Assistant 中设置 Zigbee
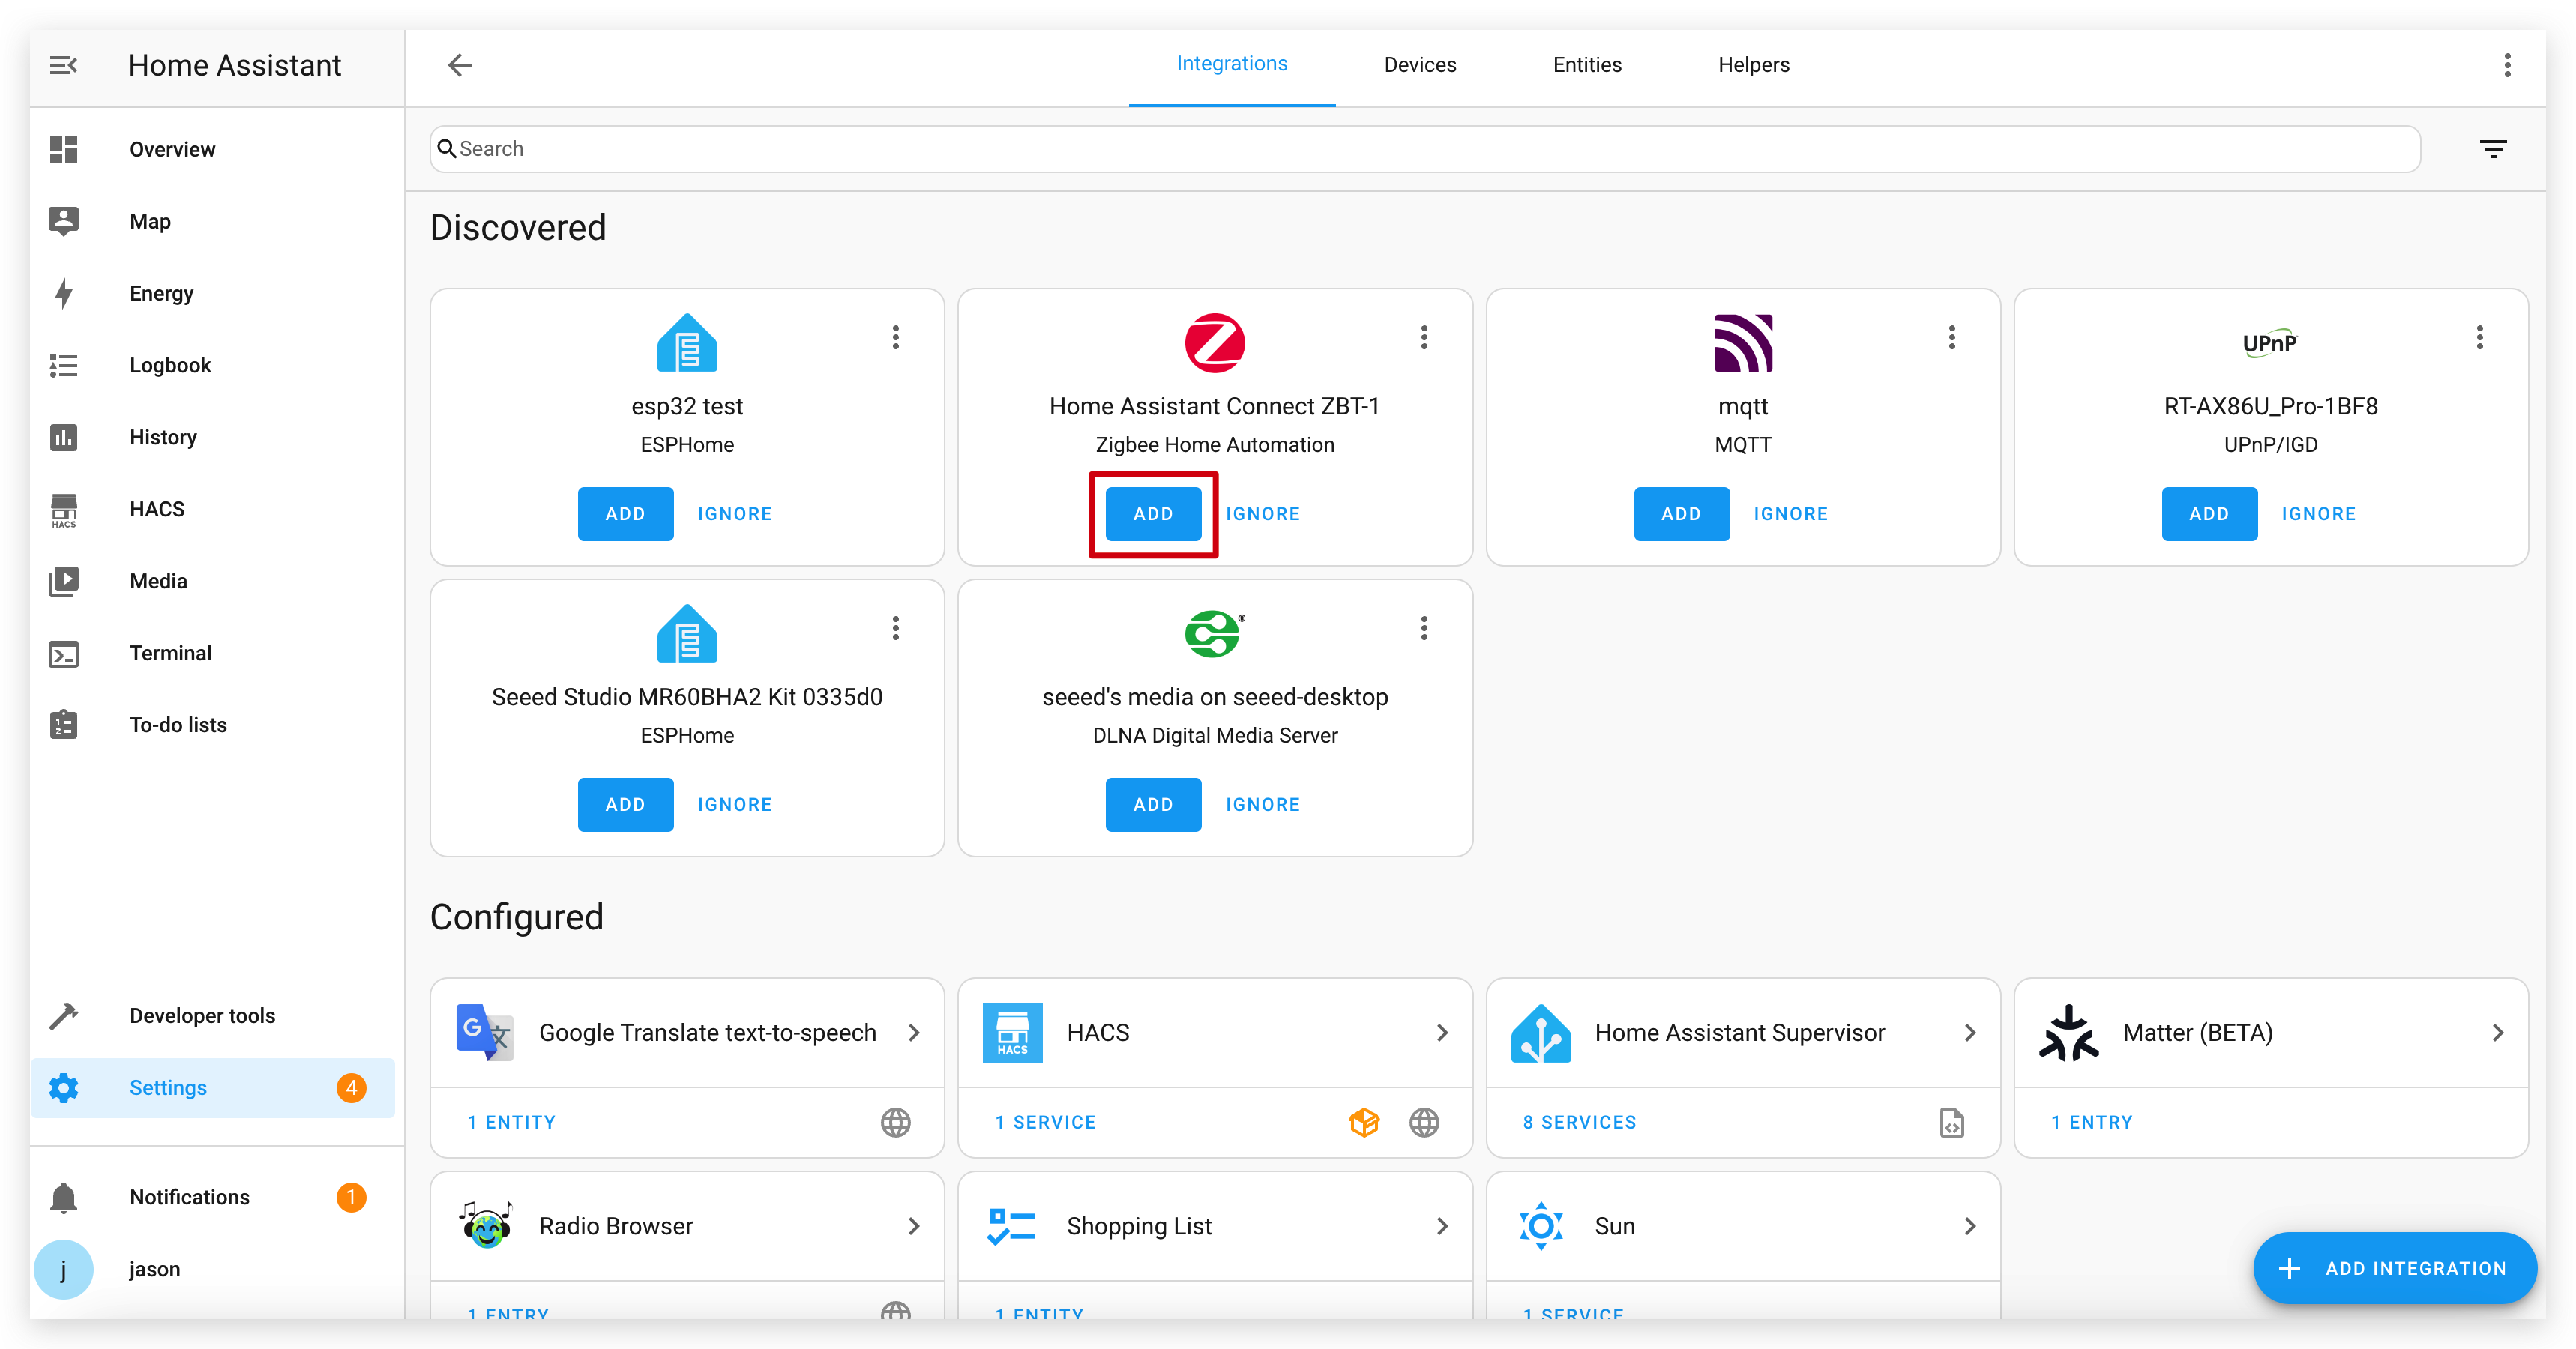
在配对您的 IoT Button 之前,您需要在 Home Assistant 中设置 Zigbee 协调器:
- 安装 Zigbee 协调器:将 Zigbee 协调器(如 Home Assistant Connect ZBT-1)连接到您的 Home Assistant 服务器。
- 设置 Zigbee Home Automation (ZHA):
- 转到设置 > 设备和服务。
- 点击"添加集成"并搜索"Zigbee Home Automation"。
- 按照提示使用您的协调器设置 ZHA。
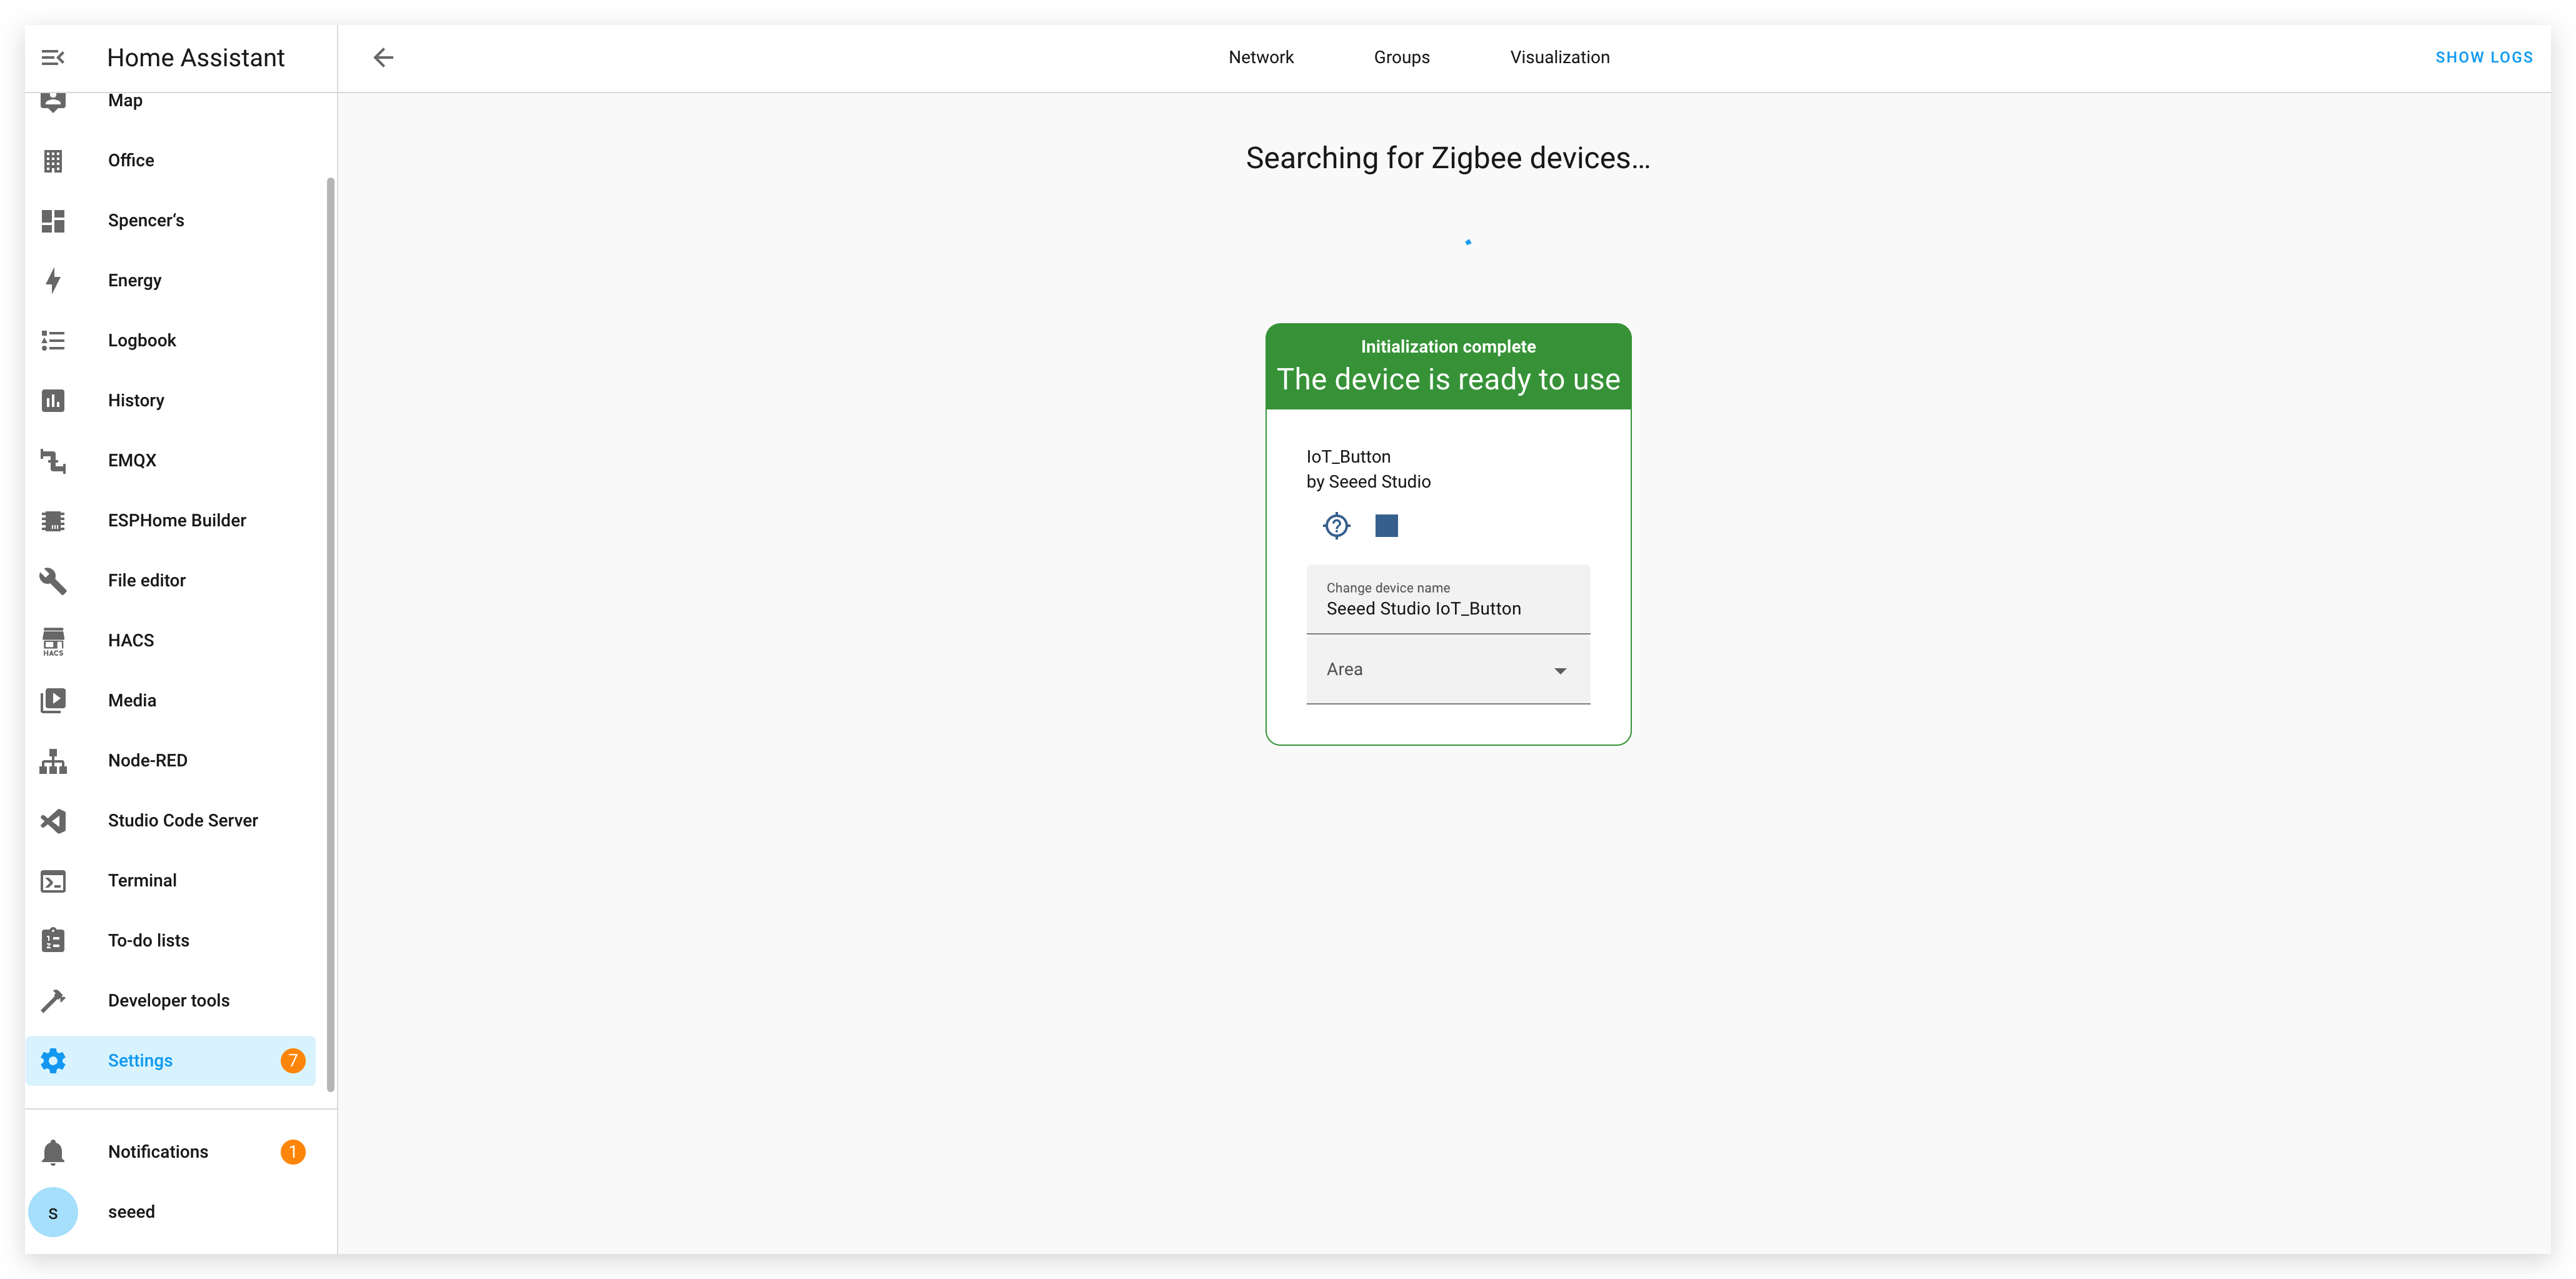
步骤 7:将 IoT Button 与 Home Assistant 配对
- 在 Home Assistant 中,转到设置 > 设备和服务 > Zigbee Home Automation。
- 点击您的 Zigbee 协调器设备。
- 点击"添加设备"将协调器置于配对模式。
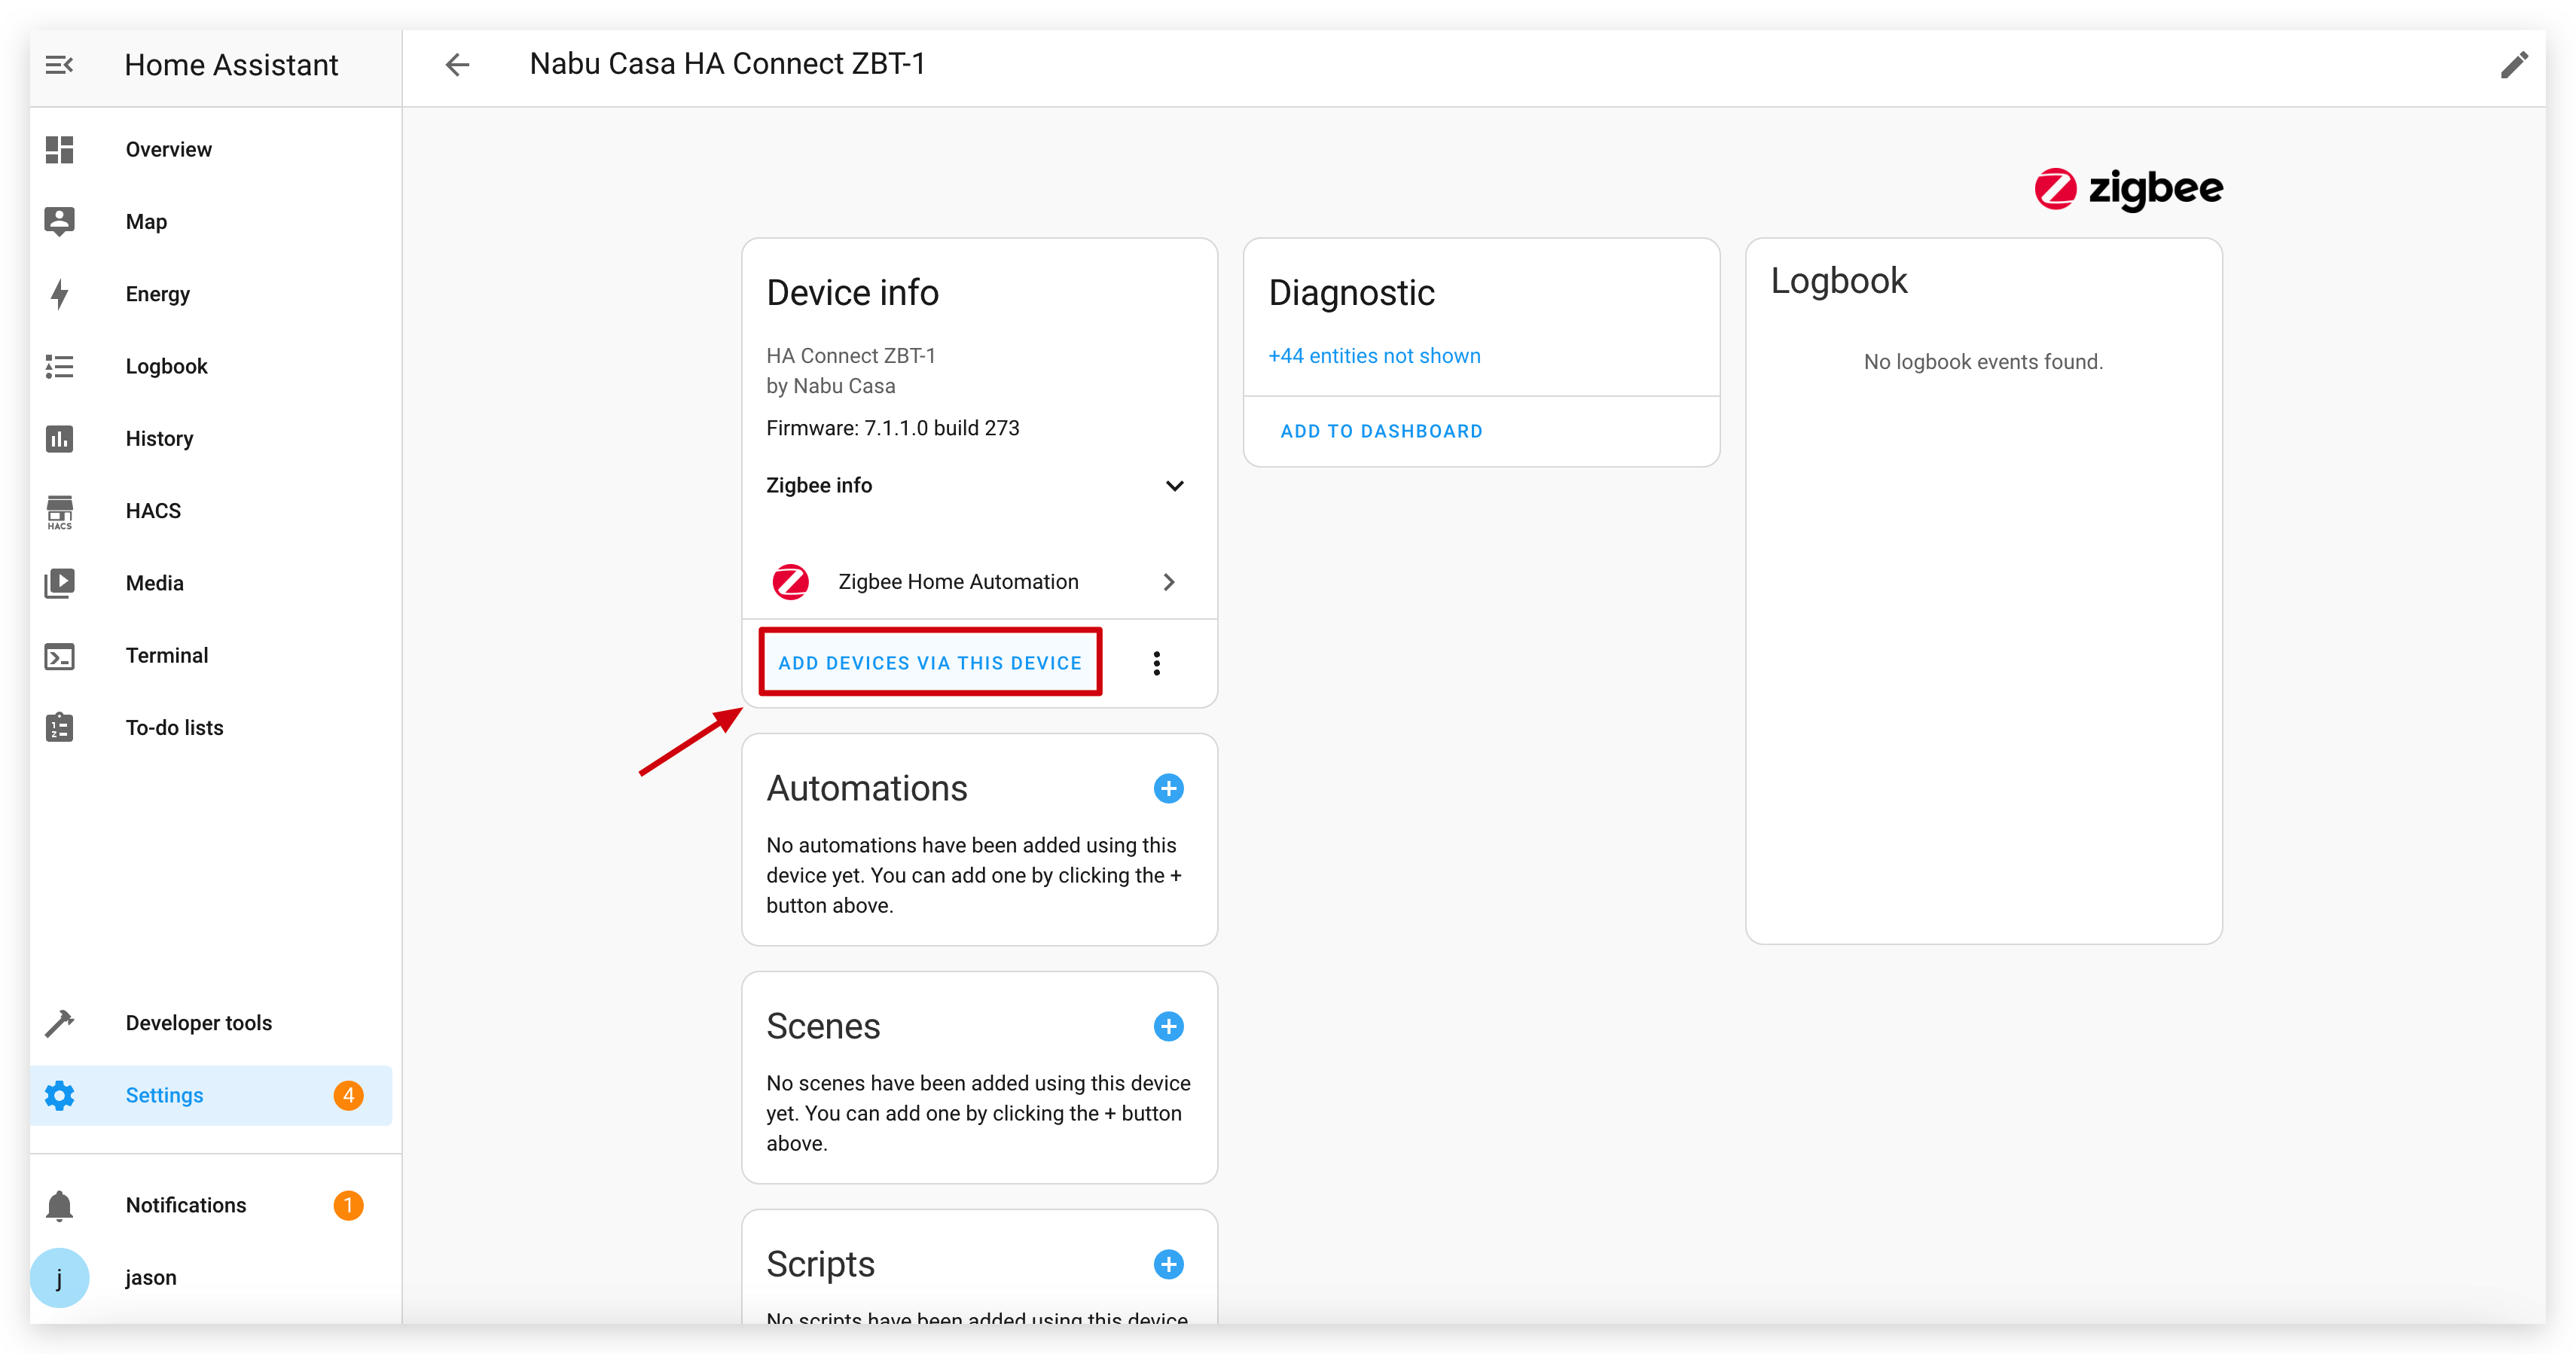
- 按一次 IoT Button 上的按钮来唤醒它并启动配对。如果无法配对,请尝试按住按钮超过 5 秒钟以触发恢复出厂设置,这也会将其置于配对模式。
- Home Assistant 应该会发现 IoT Button 为"Seeed Studio IoT_Button"。
- 按照提示完成配对过程。您将看到一个具有多个实体(一个二进制传感器和三个开关)的设备。
步骤 8:在 Home Assistant 中创建自动化
配对完成后,您可以基于按钮的操作创建自动化。固件将不同的点击类型作为单独的开关公开,使自动化变得简单。
- 转到设置 > 自动化和场景 > 创建自动化。
- 选择"设备"作为触发器类型。
- 在设备列表中找到您的 IoT Button。
- 从列表中选择所需的触发器。ZHA 将不同的点击作为设备操作公开,例如:
- "单击"(来自端点 11 上的虚拟开关)
- "双击"(来自端点 12 上的虚拟开关)
- "长按"(来自端点 13 上的虚拟开关)
- 配置按下按钮时要执行的操作。
- 保存自动化。
在 Home Assistant YAML 中使用双击切换灯光的示例自动化:
alias: IoT Button Double Click - Toggle Living Room Light
description: ""
trigger:
  - platform: device
    domain: zha
    device_id: YOUR_DEVICE_ID_HERE # Replace with your button's device ID
    type: "remote_button_double_press" # The exact type may vary, select it from the UI
action:
  - service: light.toggle
    target:
      entity_id: light.living_room
mode: single
结论
具有 Zigbee 功能的 Seeed Studio IoT Button 提供了一种多功能且节能的方式来控制您的智能家居。无论您使用预构建的固件还是开发自己的自定义解决方案,该按钮都为在 Home Assistant 中触发复杂自动化提供了简单的界面。
通过利用 ESP32-C6 的内置 Zigbee 功能,IoT Button 可以在电池供电下长时间运行,同时与您的智能家居生态系统保持可靠的连接。
故障排除
Q1:为什么我的设备在更换电池后不断掉线且无法连接到互联网?我可以确认电池是有电的。
电池取出后,由于 18650 电池的芯片保护策略,需要通过充电的 USB 电源线稍微激活一下才能正常工作。
资源
- [GITHUB] Seeed IoT Button Github 仓库
- [PDF] Seeed IoT Button 原理图 PDF
- [SCH&PCB] Seeed IoT Button 原理图和 PCB
技术支持和产品讨论
感谢您选择我们的产品!我们在这里为您提供不同的支持,以确保您使用我们产品的体验尽可能顺畅。我们提供多种沟通渠道,以满足不同的偏好和需求。