Home Assistant 与声音事件检测模块
介绍
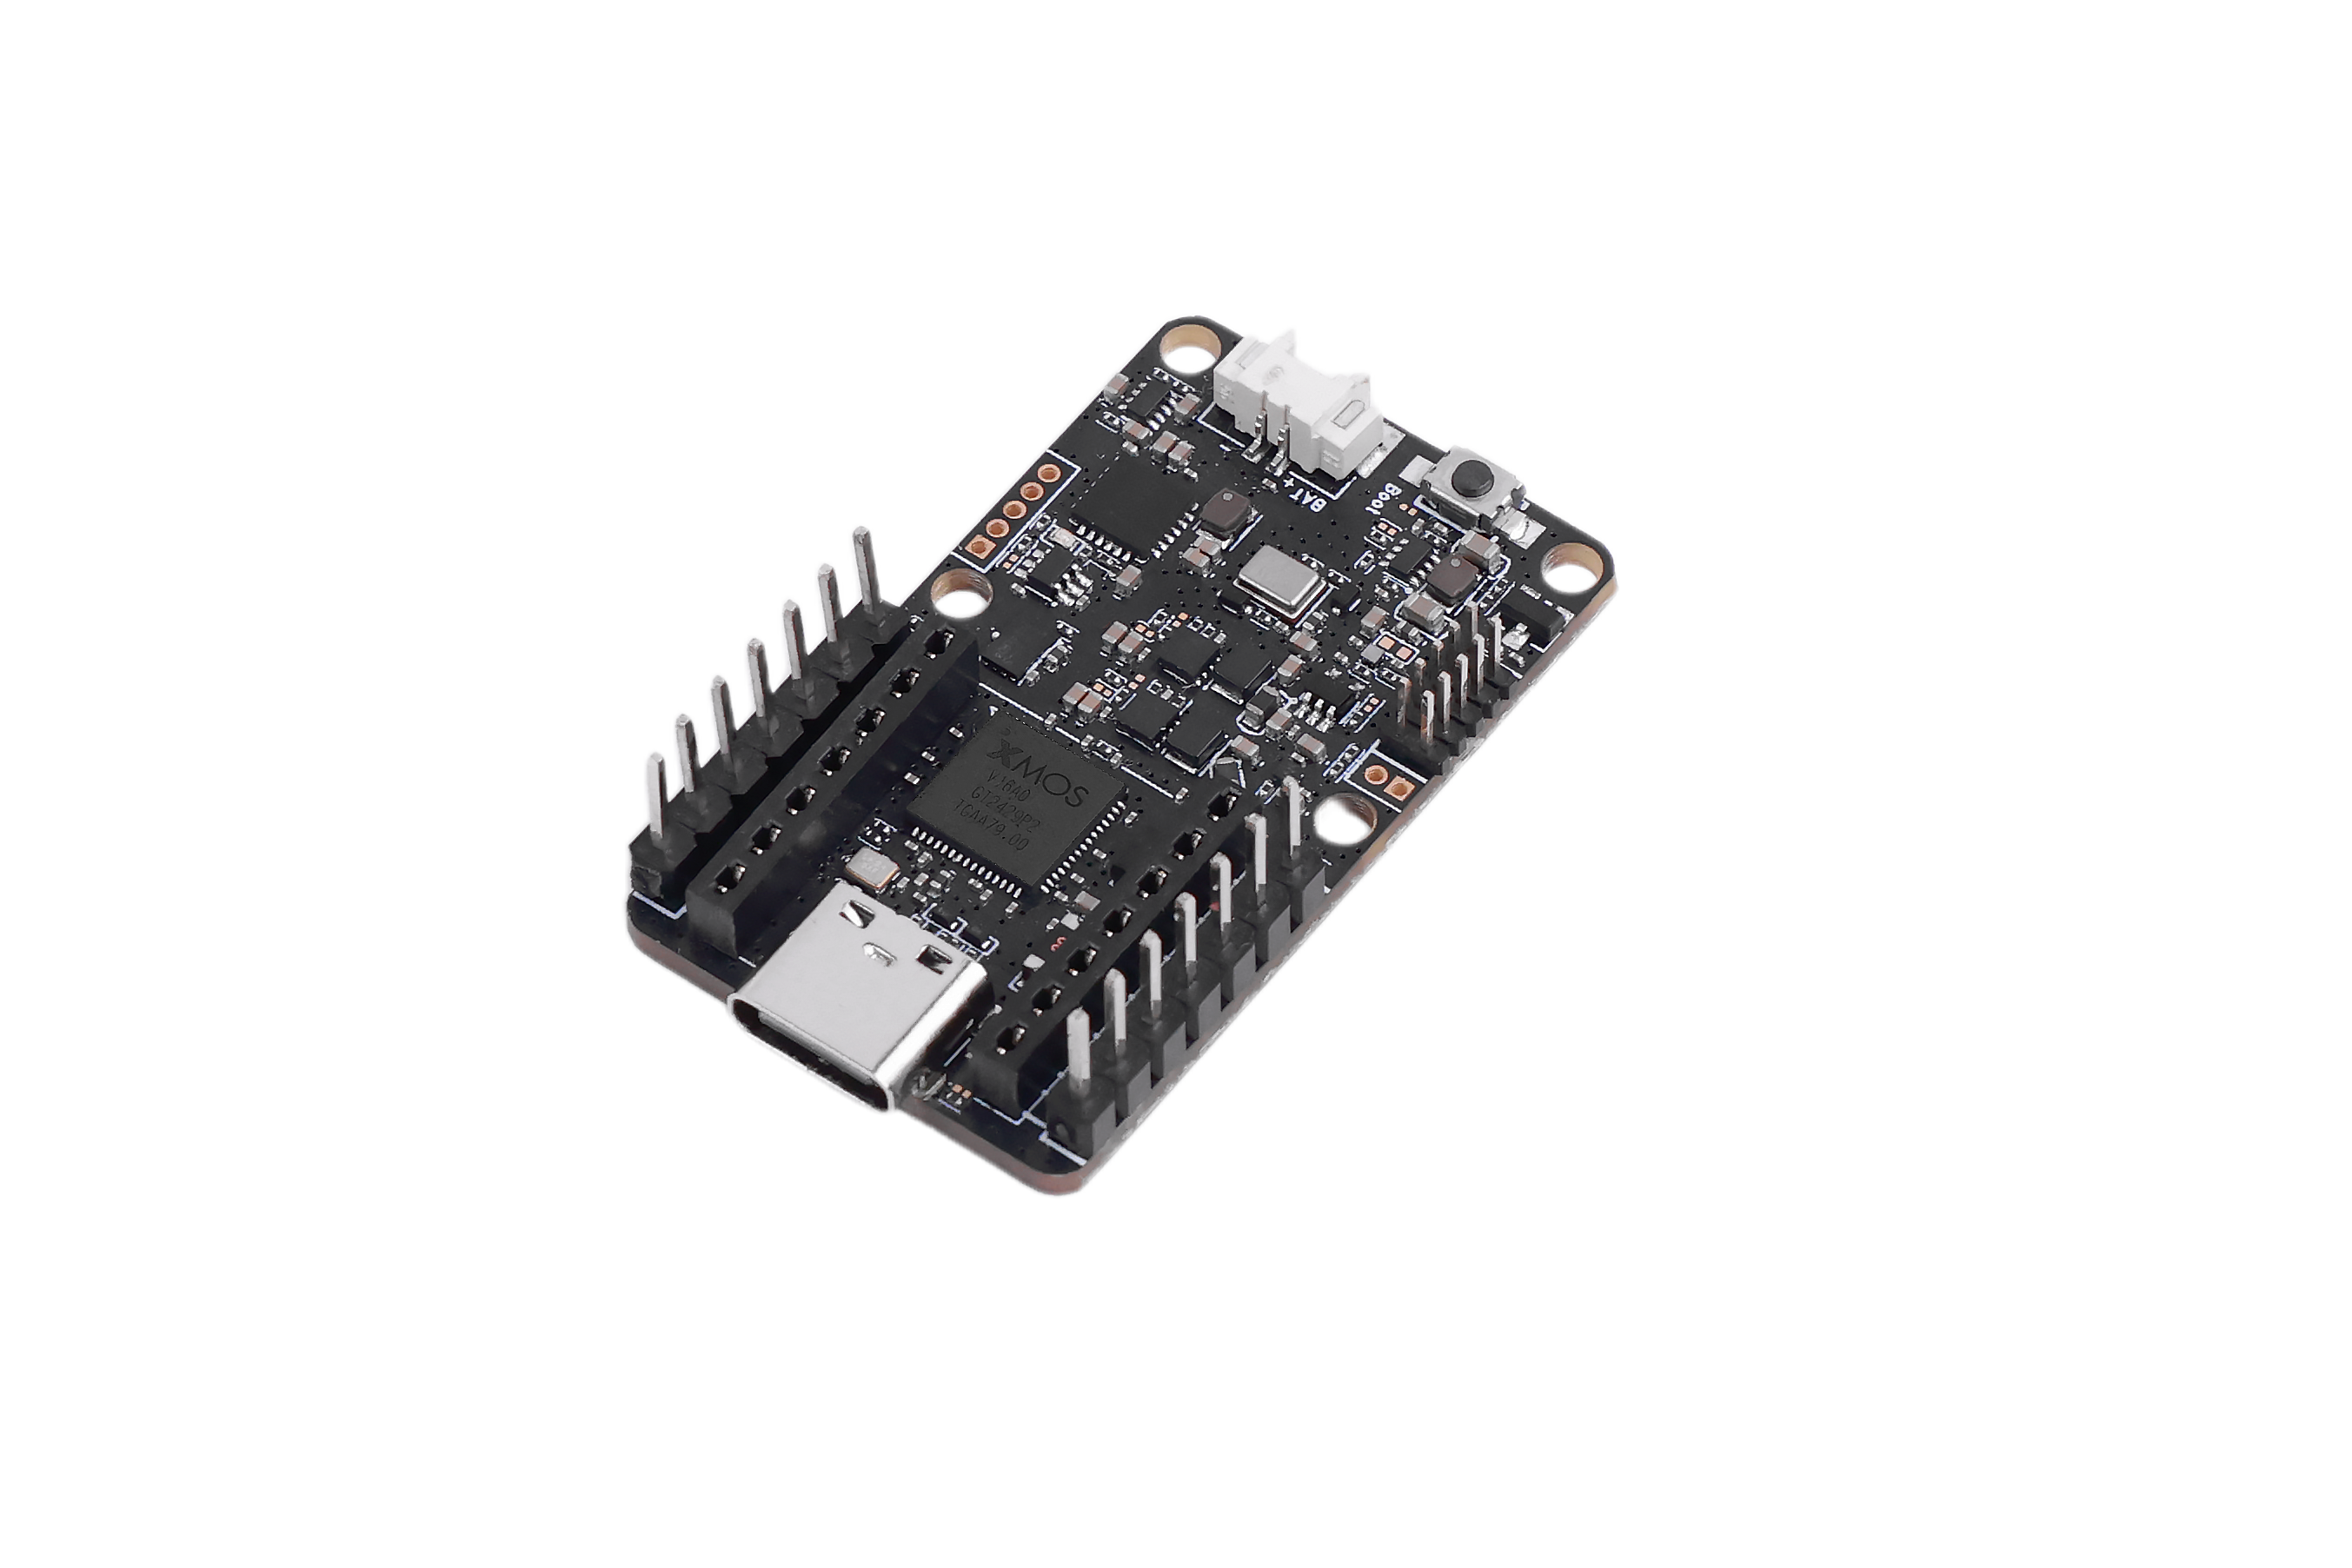
一款紧凑的边缘音频板可提供实时声音检测,并具备强大的本地数据隐私保护能力。它可以检测五种异常声音事件——婴儿哭声、玻璃破碎声、枪声、T3/T4 警报以及打鼾声——从而实现即时响应和可靠的早期预警。在本教程中,我们将学习如何为 XIAO ESP32 开发板编译并上传固件。
所需硬件
| ReSpeaker XVF3800 | Home Assistant Yellow Kit | Xiao ESP32S3 |
|---|---|---|
 |  |  |
安装 ESPHome Builder
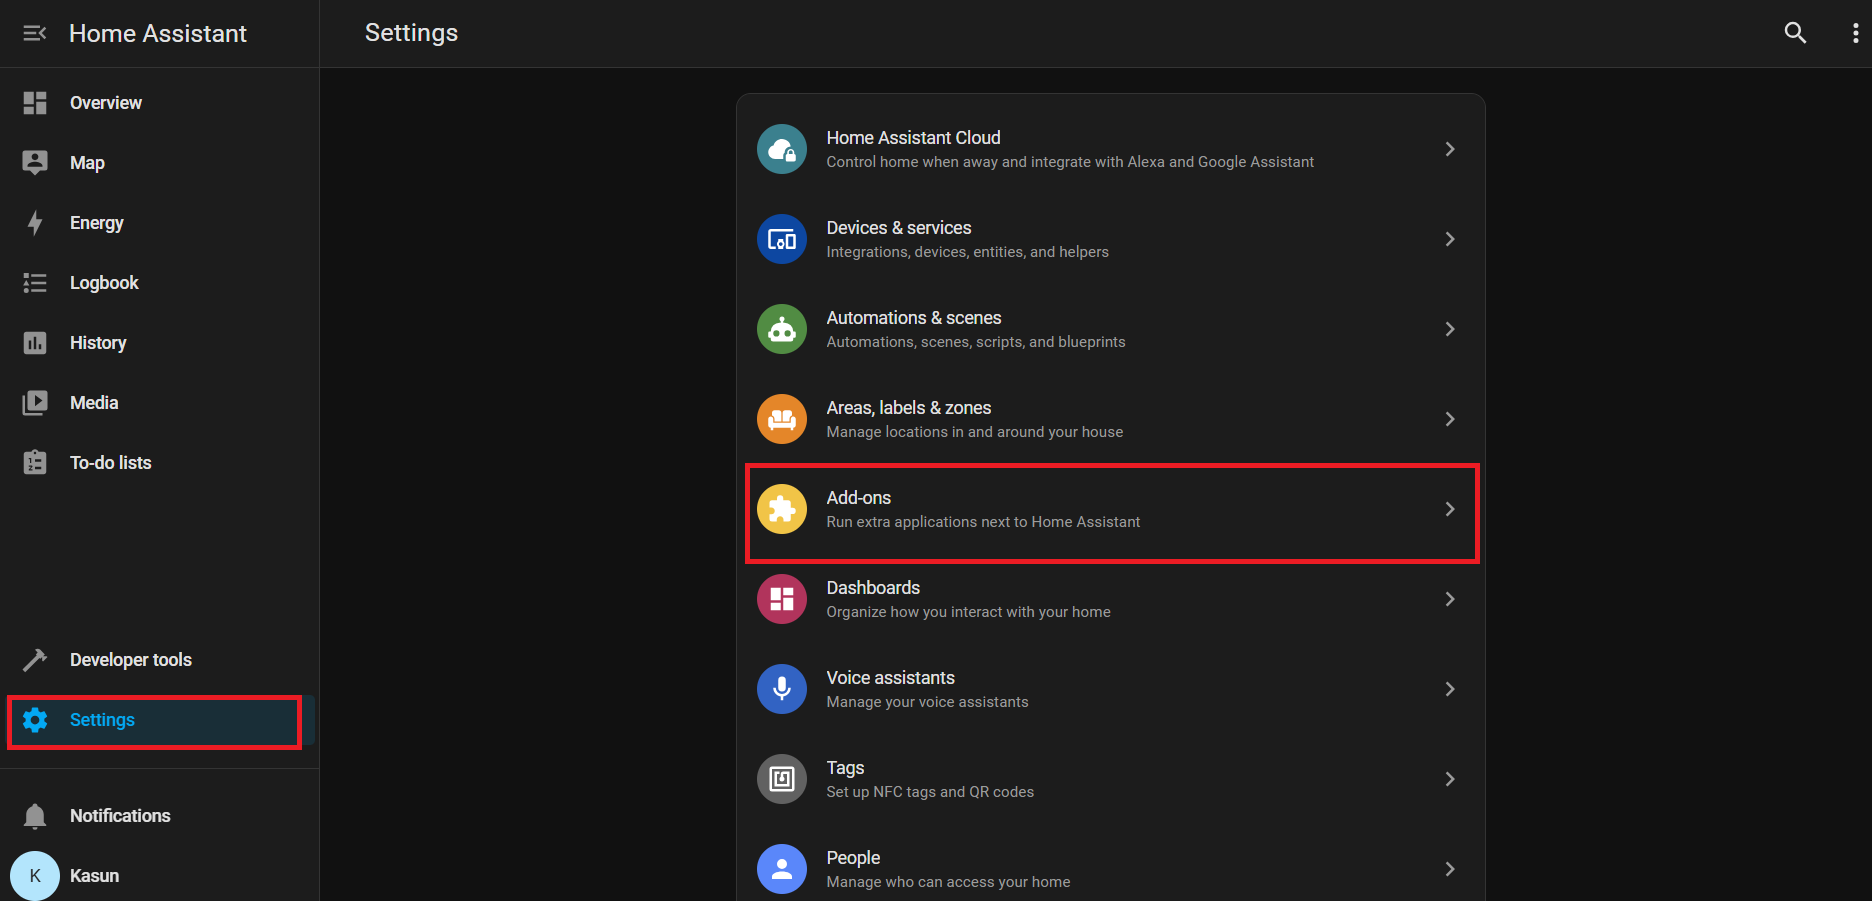
在 Settings → Add-ons → Click on Add-on Store → Install ESPHome Device Builder 中安装 ESPHome Device Builder 插件。
进入 Home Assistant > Settings > Add-ons。
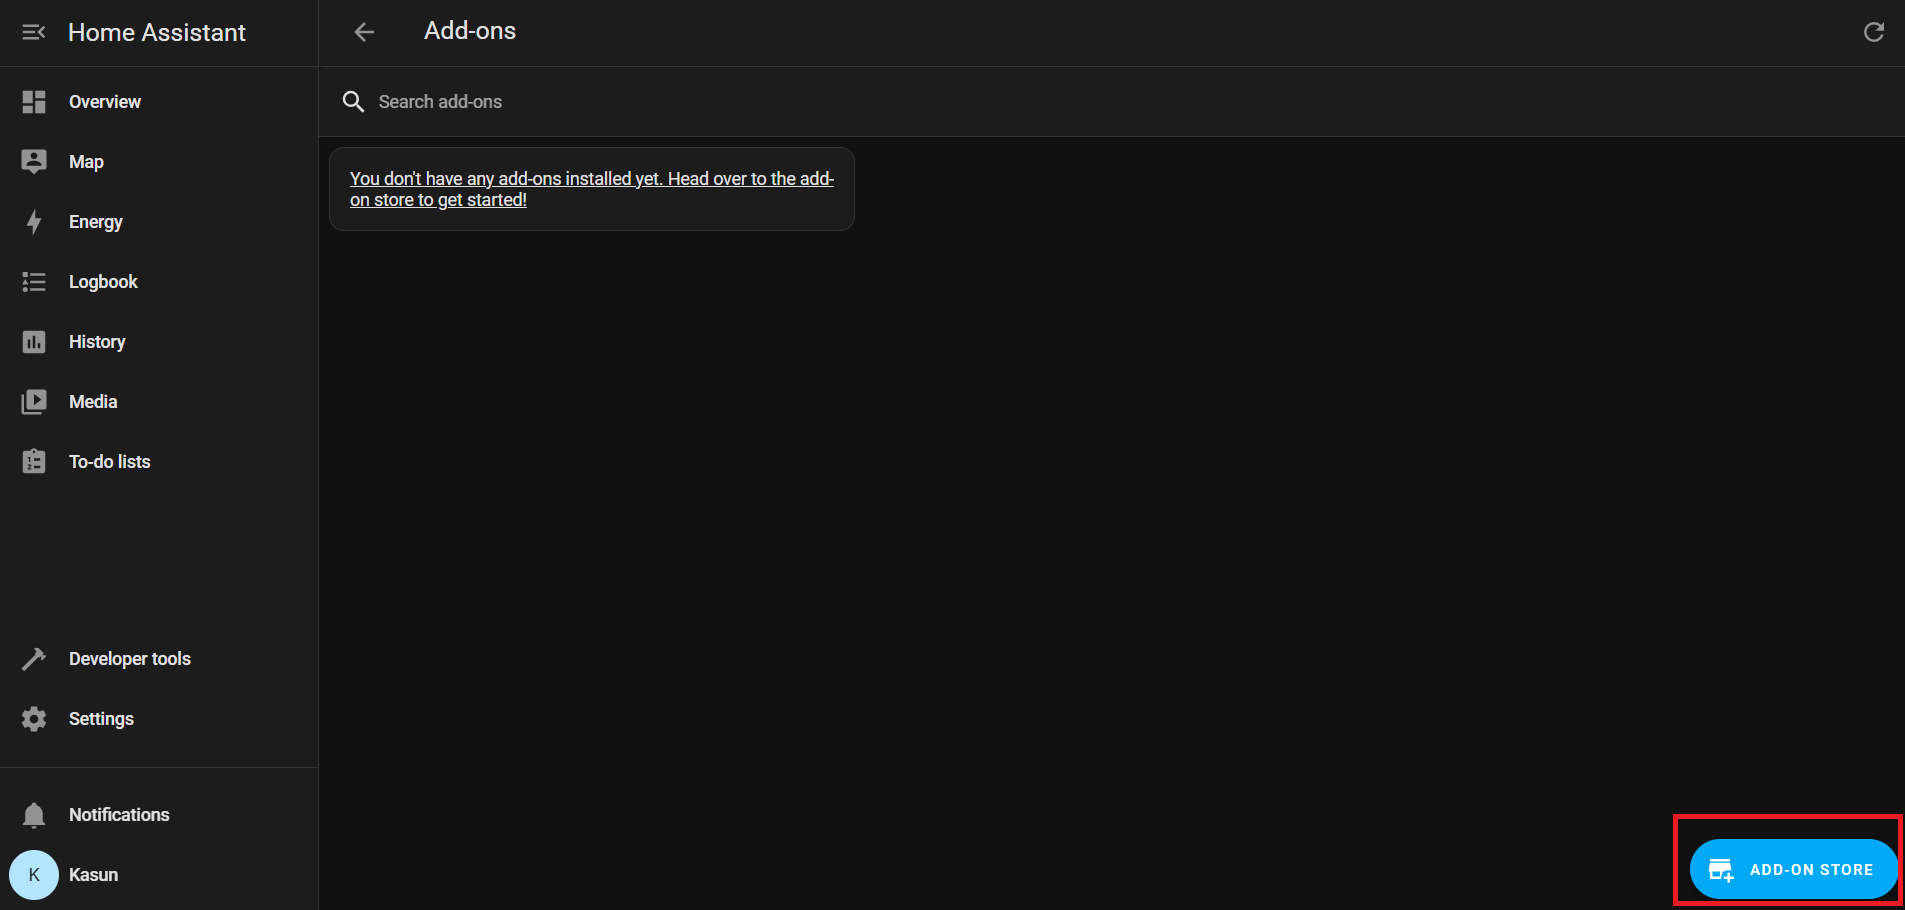
点击 Add-on Store(通常在右下角)
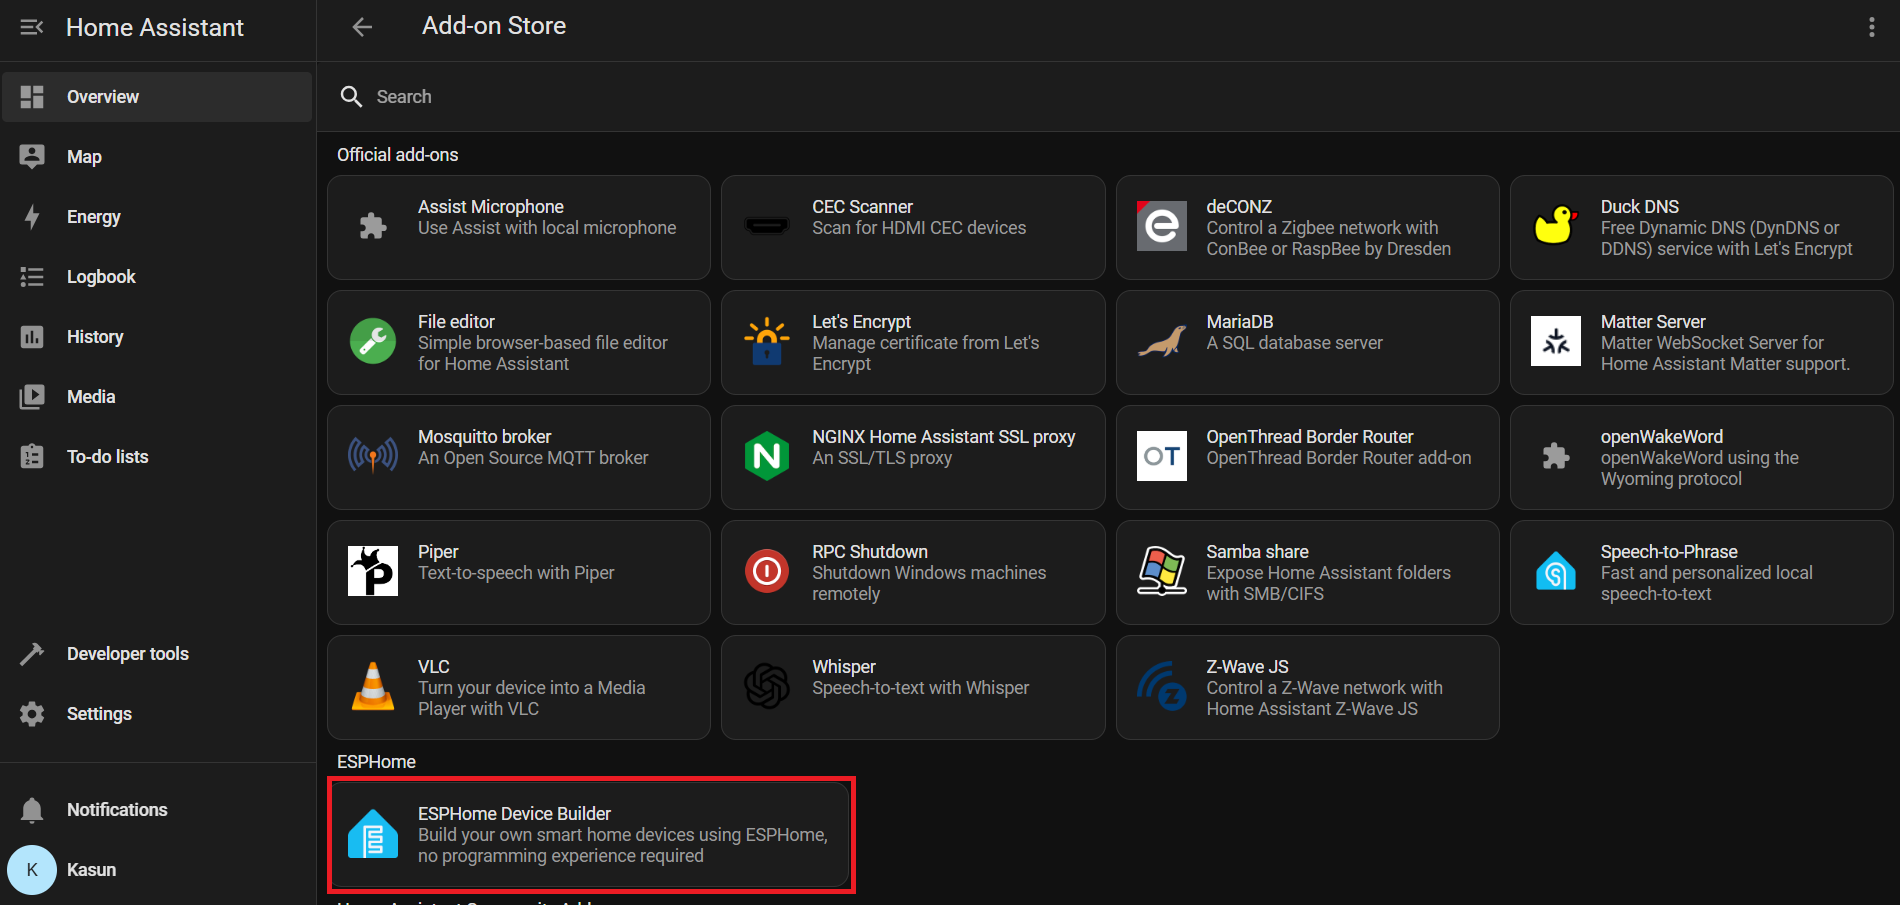
在 Official add-ons 下搜索并安装 ESPHome Device Builder。
安装完成后,点击 Start 运行 ESPHome 插件。
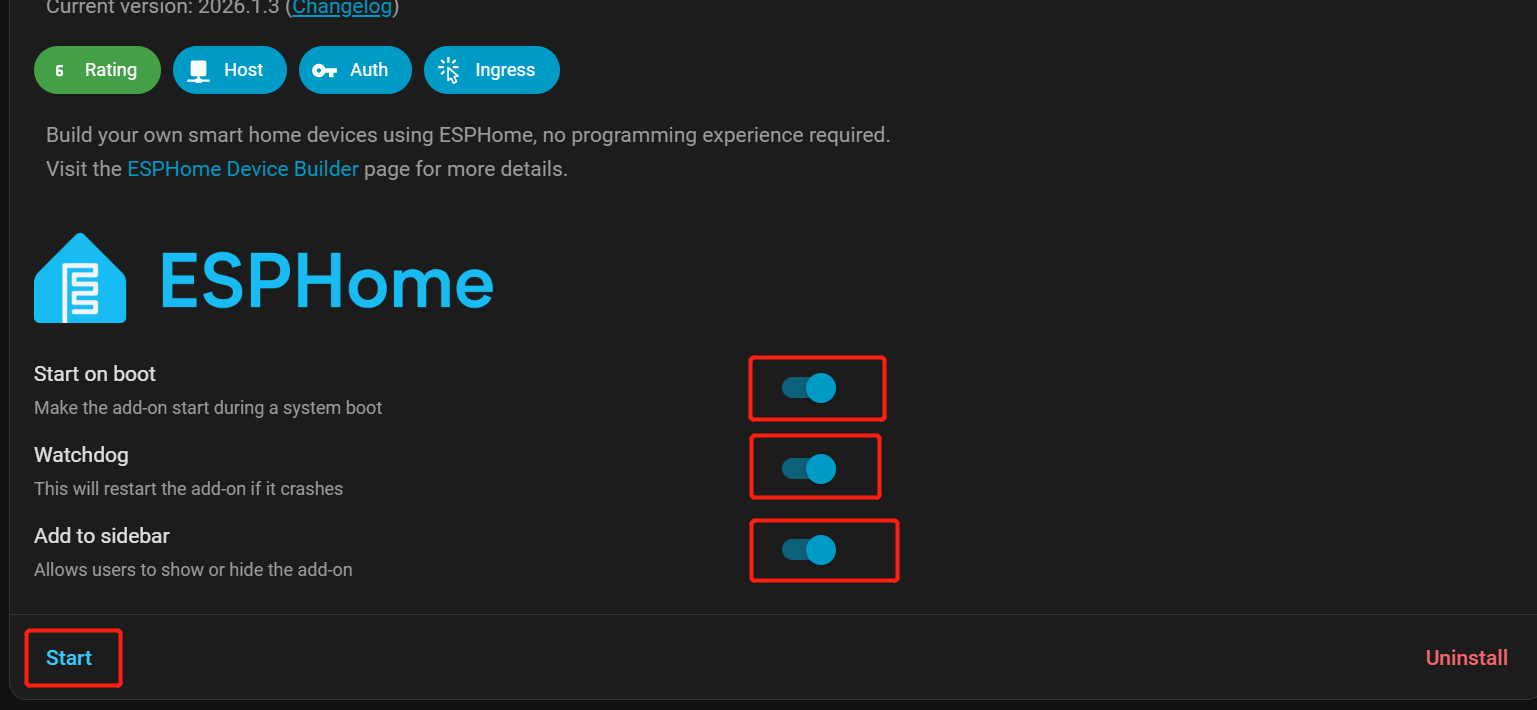
启用 Start on Boot, Watchdog, and Show in Sidebar 以便更轻松地访问。
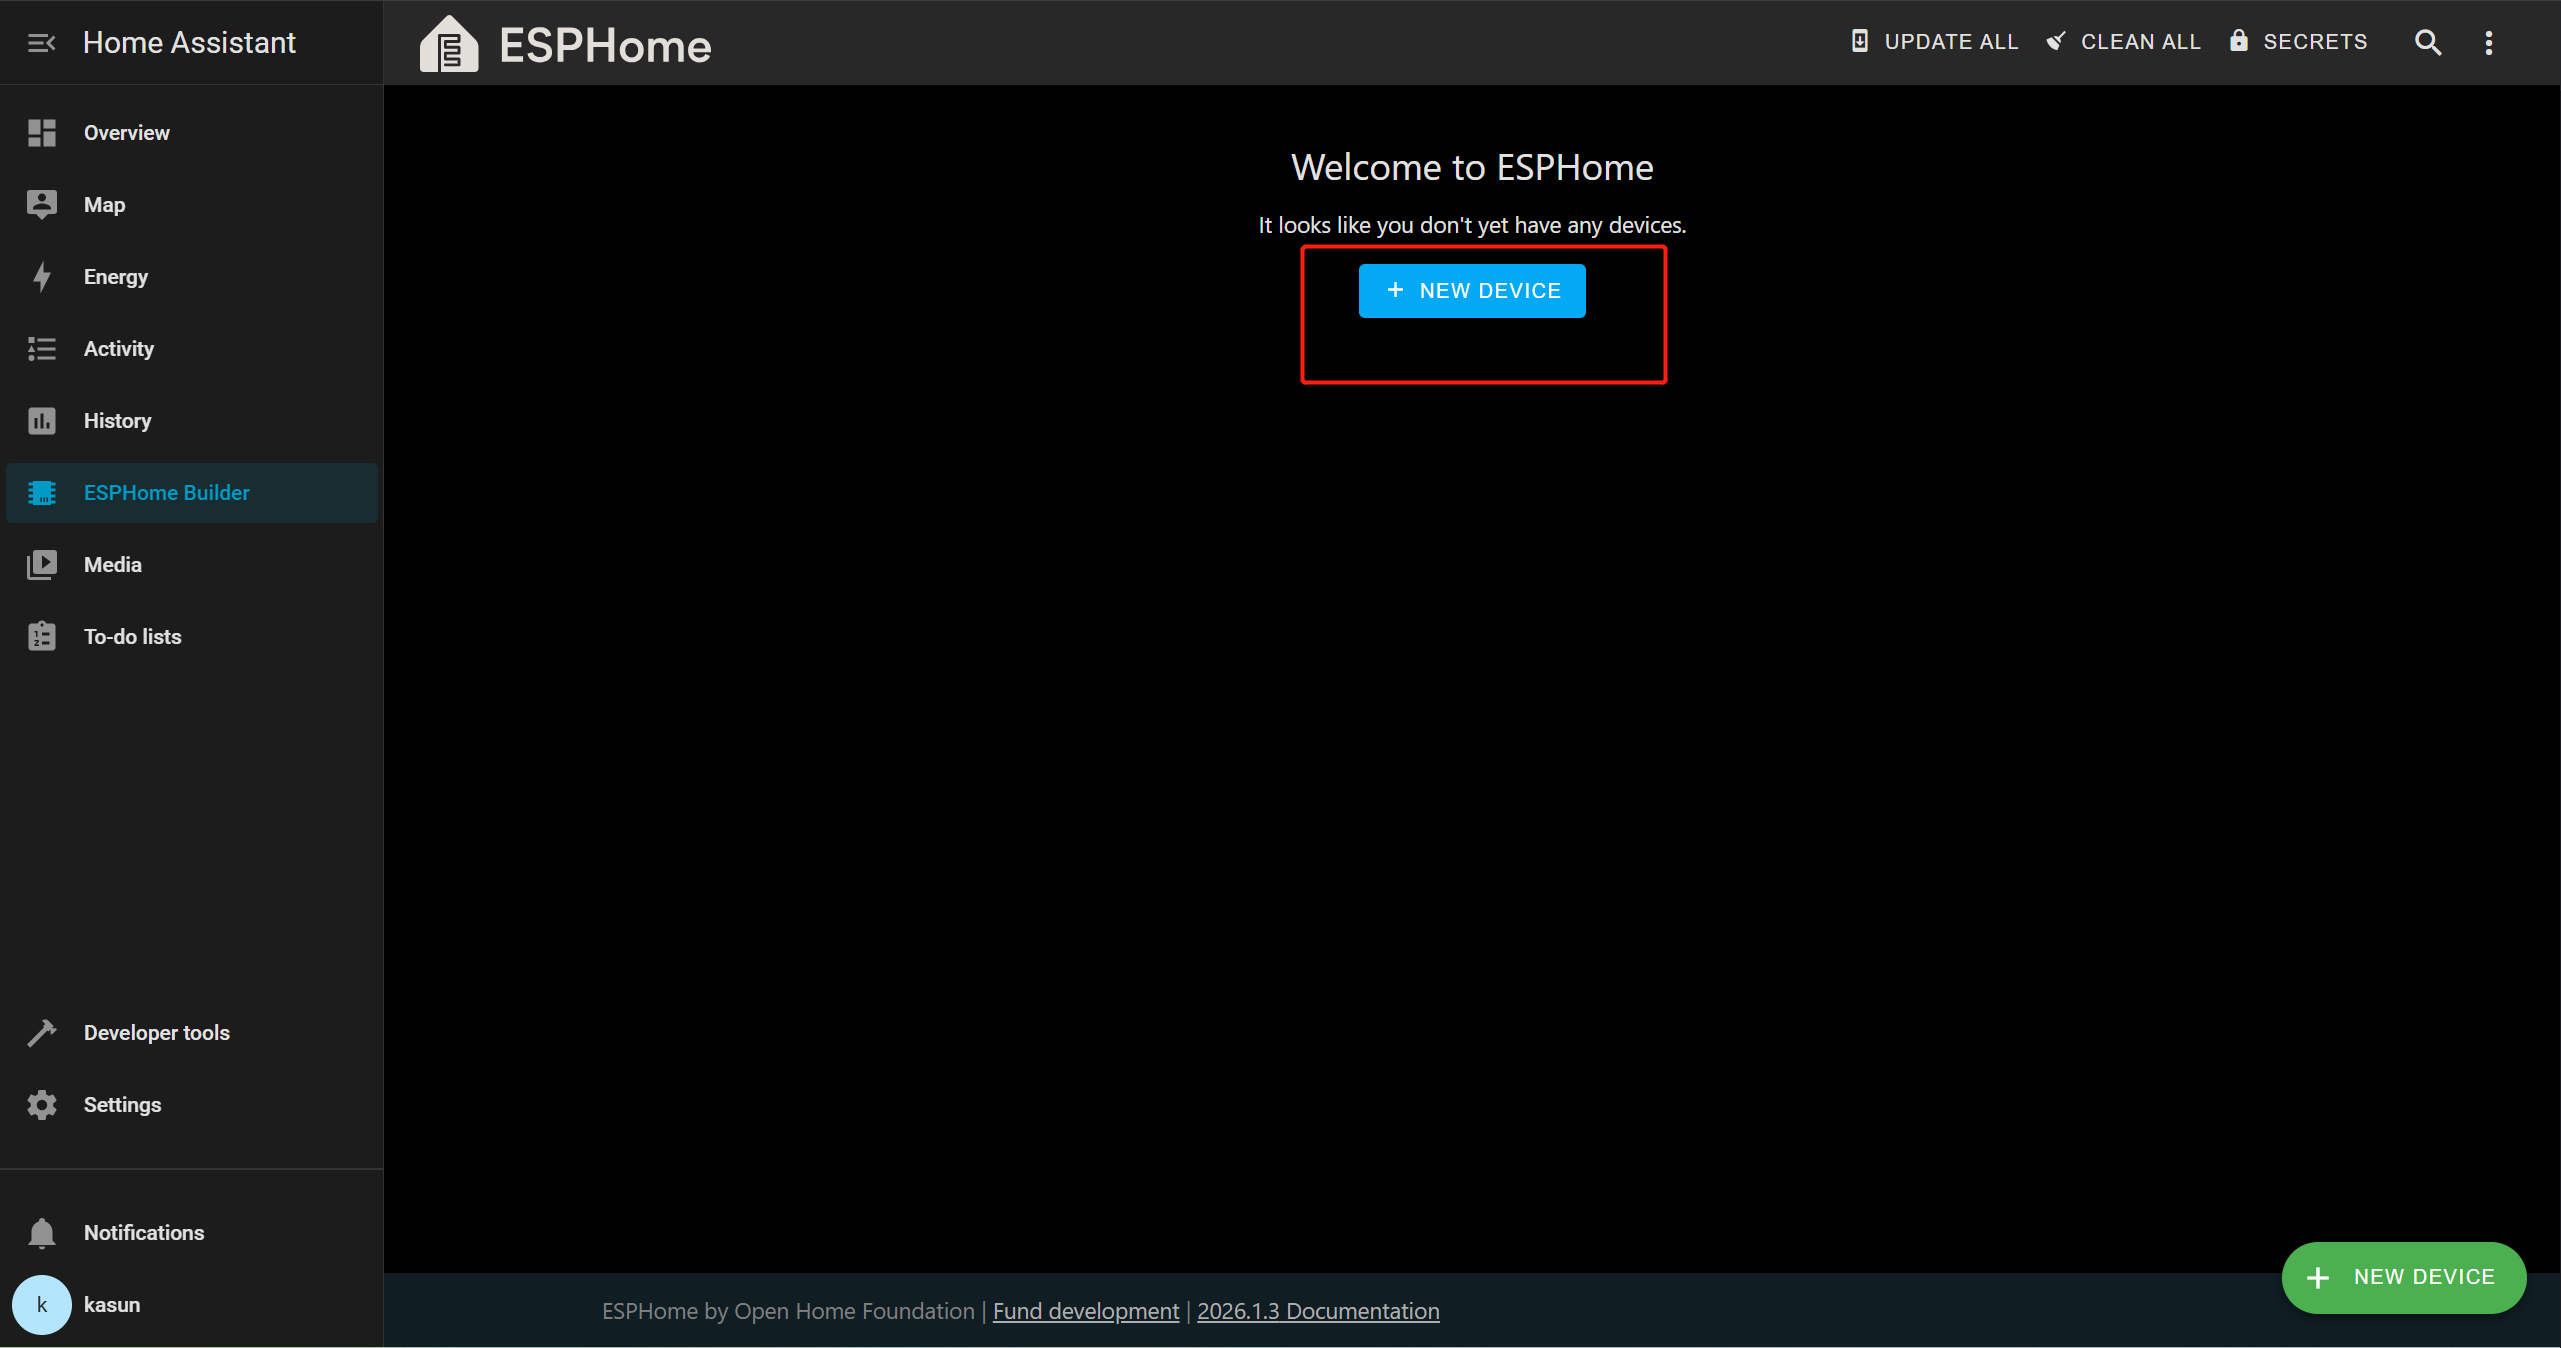
在 Home Assistant 侧边栏中进入 ESPHome Builder。
添加声音事件设备
点击 + NEW DEVICE.
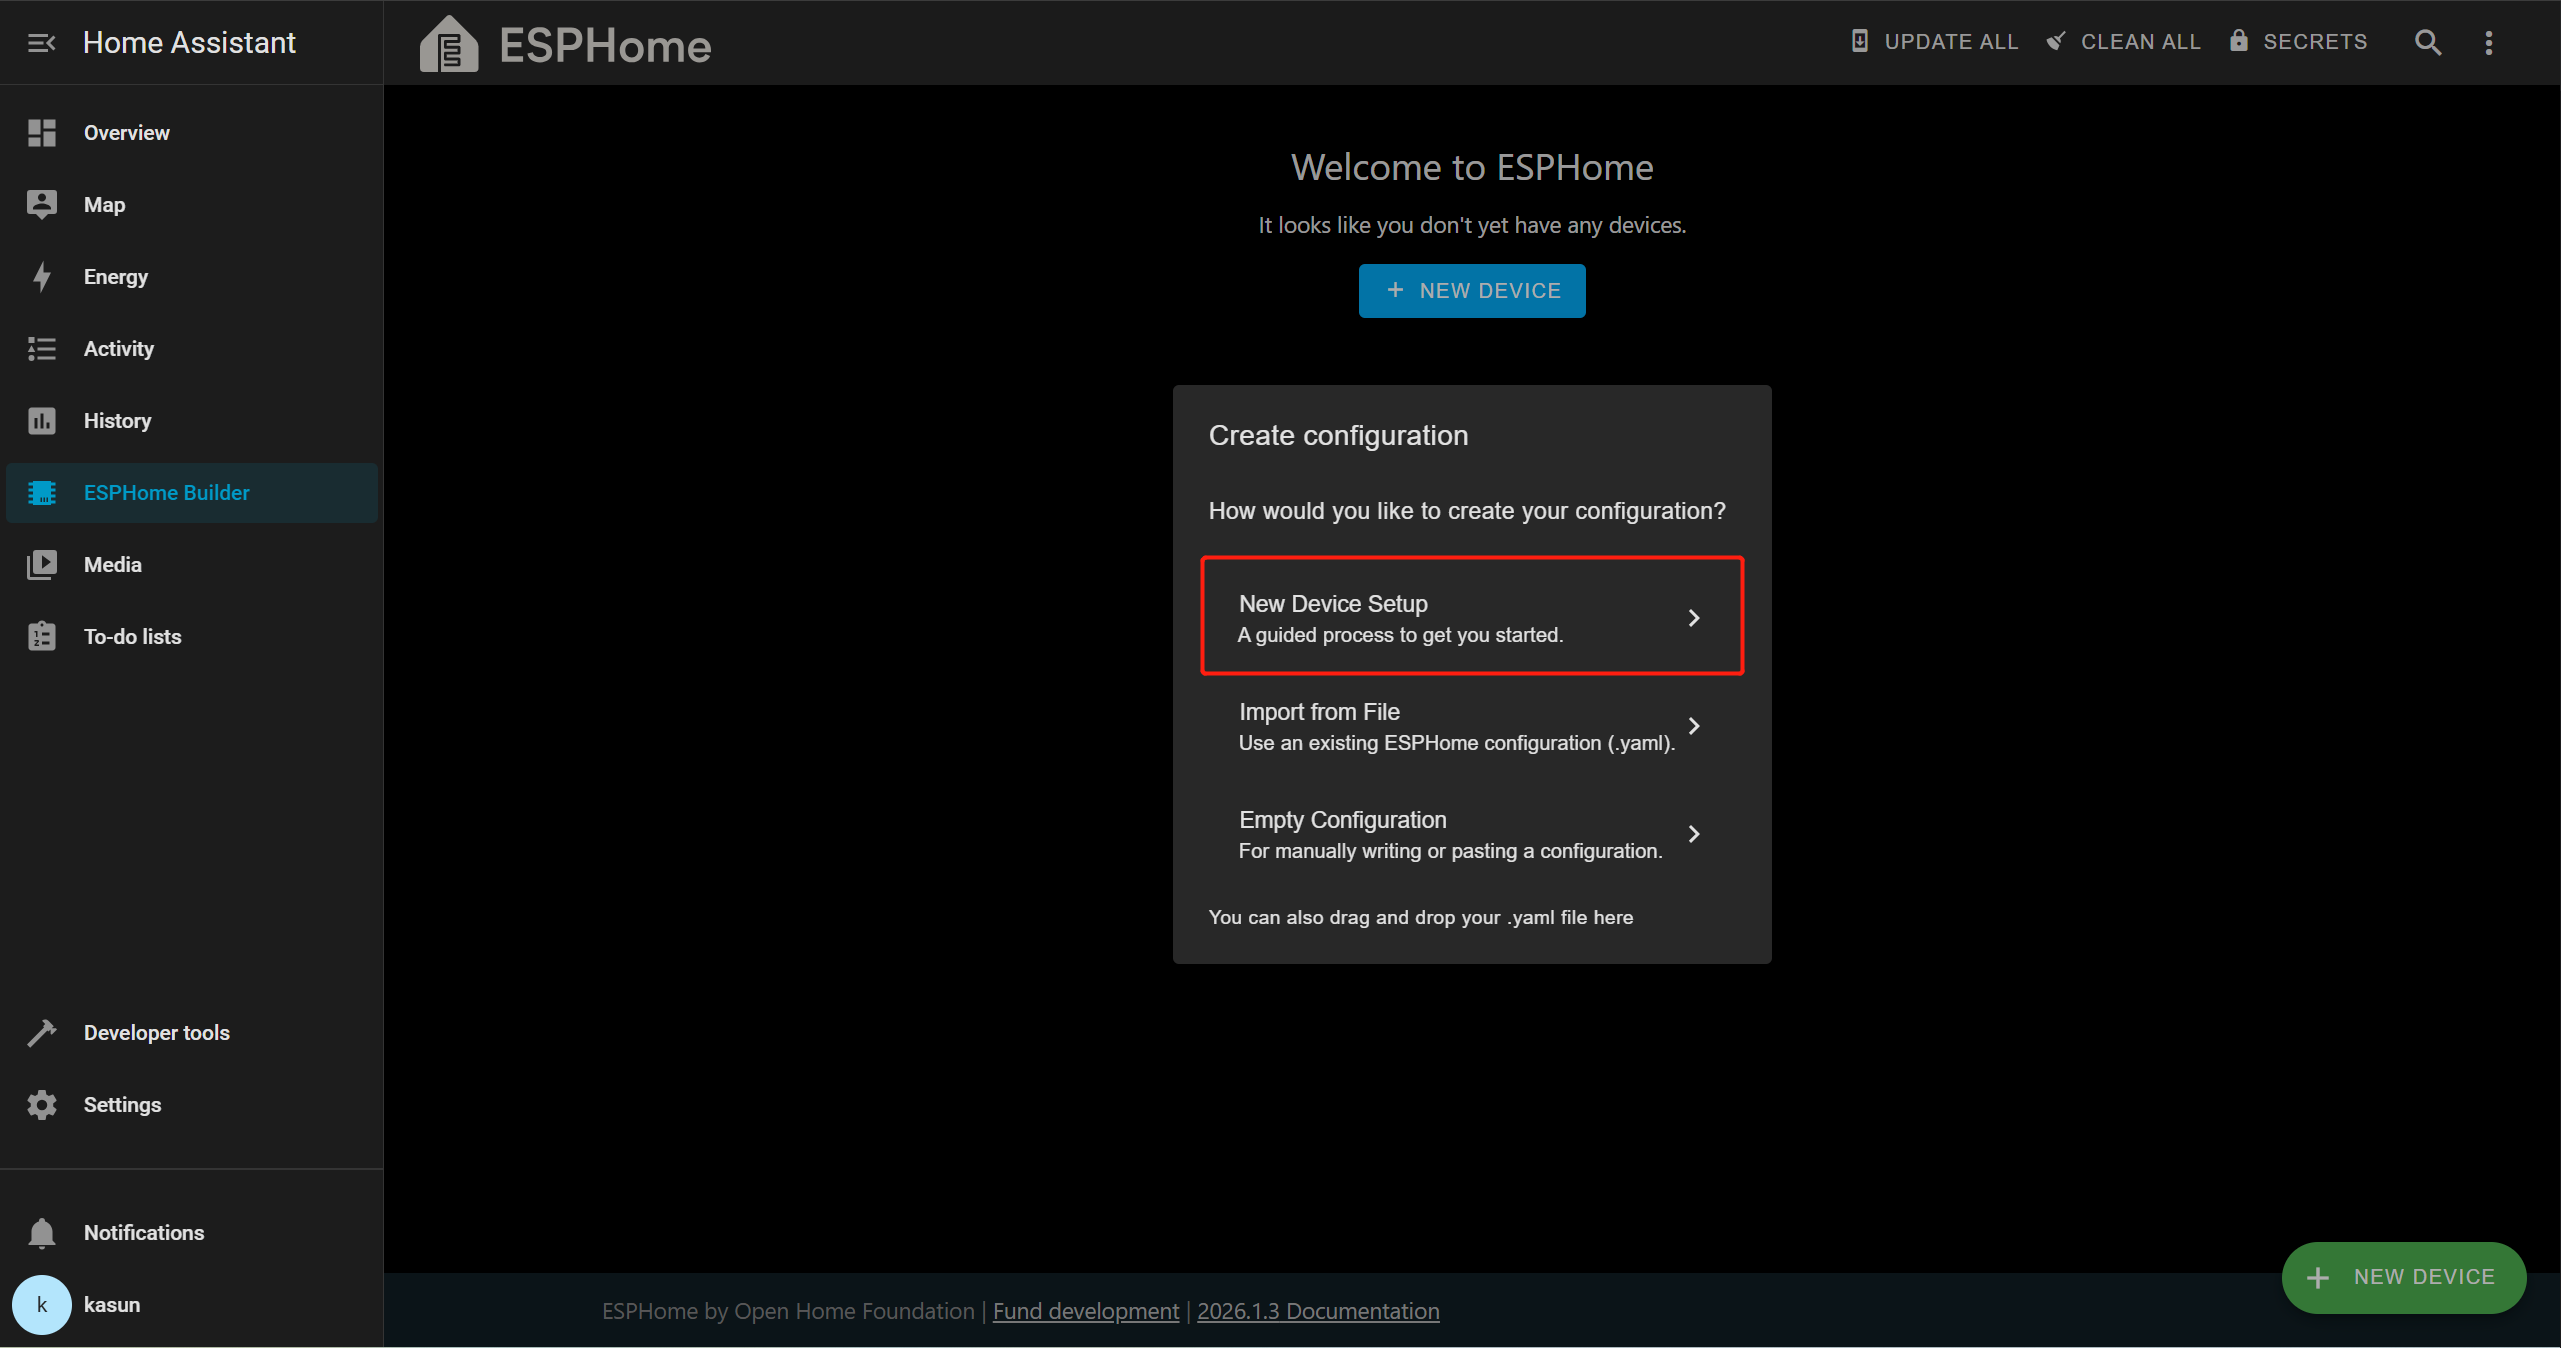
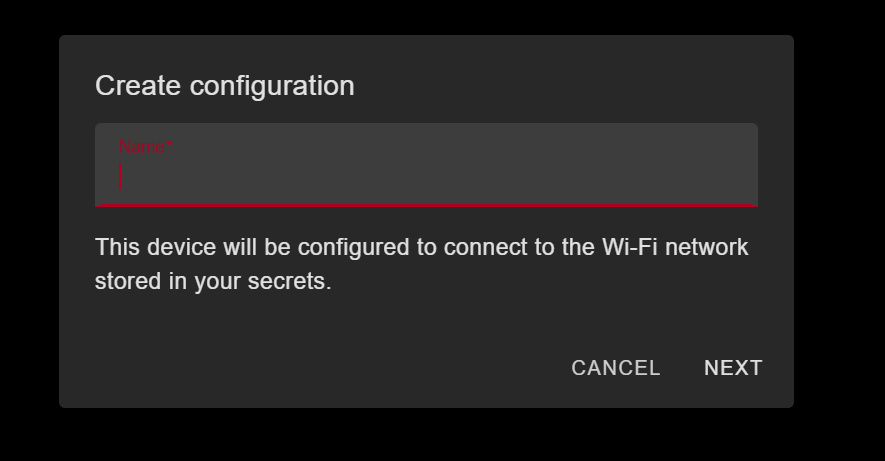
点击 Continue → New Device Setup,然后为设备输入一个合适的名称。
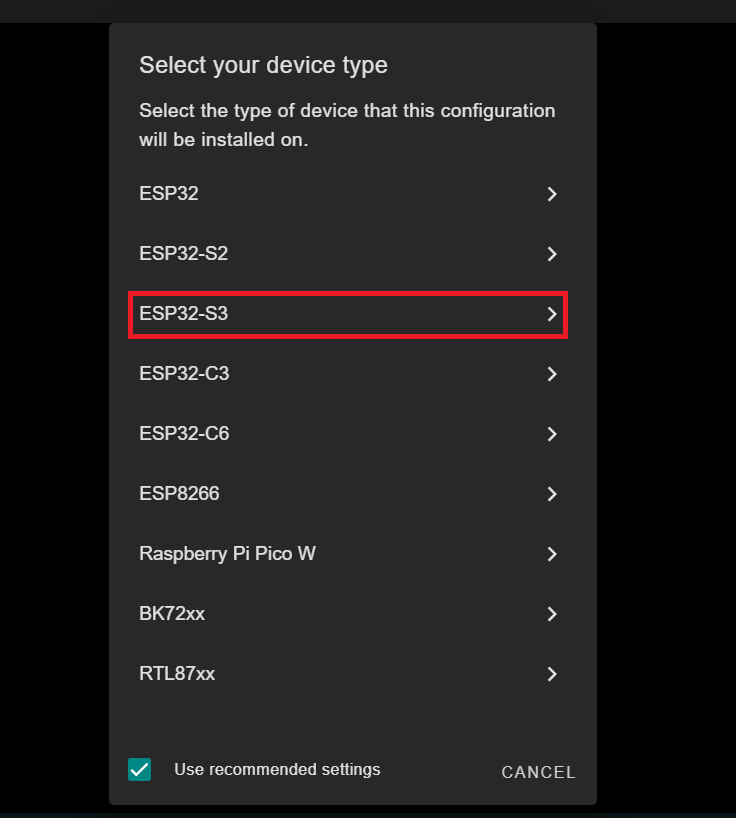
在本演示中,我们使用的是 XIAO ESP32-S3,因此将 ESP32-S3 选择为目标开发板。根据你所使用的开发板,这一选项可能会有所不同。
选择你新建的设备条目并点击 Edit。删除整个 YAML 模板,然后将提供的 YAML 文件复制并粘贴到编辑器中。
声音事件 YAML
##############################################################
#  Sound Event Sensor - ESPHome Configuration
#  Sensor: XU316 / AudioEventSensor (Seeed)
#  Communication: UART via AT Commands
#  No external .h file needed - pure YAML + inline lambdas
##############################################################

esphome:
  name: sound-event-sensor
  friendly_name: Sound Event Sensor

  on_boot:
    priority: -100   # Run after everything else is initialized
    then:
      - logger.log: "=== Sound Event Sensor Booting ==="

      # Step 1: Wait for sensor to be ready
      - delay: 2s

      # Step 2: Reset device for clean state
      - logger.log: "Resetting device..."
      - uart.write:
          id: uart_bus
          data: "AT+RESET\r\n"
      - delay: 3s   # Wait for device to come back up after reset
      - logger.log: "Device reset complete."

      # Step 3: Get and log firmware version
      - logger.log: "Requesting firmware version..."
      - uart.write:
          id: uart_bus
          data: "AT+GETFWVERSION\r\n"
      - delay: 500ms

      # Step 4: Apply all settings from the configurable values below
      - script.execute: apply_all_settings

      - logger.log: "=== Setup complete. Monitoring for events... ==="


##############################################################
#  Hardware Settings - Change these to match YOUR wiring
##############################################################
esp32:
  board: esp32-s3-devkitc-1
  variant: esp32s3
  framework:
    type: arduino
    version: recommended


##############################################################
#  Network
##############################################################
wifi:
  ssid: !secret wifi_ssid
  password: !secret wifi_password
  ap:
    ssid: "SoundSensor Fallback"
    password: "soundsensor123"

captive_portal:

ota:
  - platform: esphome
    password: !secret ota_password

api:
  id: api_id

logger:
  level: DEBUG   # Set to INFO to reduce log noise after testing


##############################################################
#  UART - The serial link to your sensor
#  Adjust tx_pin / rx_pin to match your wiring
##############################################################
uart:
  id: uart_bus
  tx_pin: GPIO43    # ← CHANGE to your TX pin
  rx_pin: GPIO44    # ← CHANGE to your RX pin
  baud_rate: 115200
  debug:            # Remove this block after testing
    direction: BOTH
    dummy_receiver: false


##############################################################
#  Global Variables (internal state)
##############################################################
globals:
  # UART line receive buffer
  - id: uart_rx_buffer
    type: std::string
    restore_value: no
    initial_value: '""'


##############################################################
#  SCRIPTS
##############################################################
script:
  - id: apply_all_settings
    then:
      # ── Build detect types from whichever switches are ON ──
      - lambda: |-
          std::string types = "";
          auto add = [&](bool on, const char* name) {
            if (on) { types += (types.empty() ? "" : ","); types += name; }
          };
          add(id(sw_detect_baby_cry).state,    "baby_cry");
          add(id(sw_detect_glass_break).state, "glass_break");
          add(id(sw_detect_gunshot).state,     "gunshot");
          add(id(sw_detect_snore).state,       "snore");
          add(id(sw_detect_t3).state,          "T3");
          add(id(sw_detect_t4).state,          "T4");
          if (types.empty()) types = "gunshot";   // safety fallback
          std::string cmd = "AT+SETDETECT=" + types + "\r\n";
          ESP_LOGI("sound", "Setting detect types: %s", types.c_str());
          id(uart_bus).write_array((const uint8_t*)cmd.c_str(), cmd.length());

      - delay: 400ms

      # ── Set thresholds for all 6 event types ──────────────
      - lambda: |-
          int val = (int) id(num_thr_baby_cry).state;
          std::string cmd = "AT+SETEVENTTHRESHOLD=baby_cry," + std::to_string(val) + "\r\n";
          ESP_LOGI("sound", "baby_cry threshold -> %d", val);
          id(uart_bus).write_array((const uint8_t*)cmd.c_str(), cmd.length());
      - delay: 400ms

      - lambda: |-
          int val = (int) id(num_thr_glass_break).state;
          std::string cmd = "AT+SETEVENTTHRESHOLD=glass_break," + std::to_string(val) + "\r\n";
          ESP_LOGI("sound", "glass_break threshold -> %d", val);
          id(uart_bus).write_array((const uint8_t*)cmd.c_str(), cmd.length());
      - delay: 400ms

      - lambda: |-
          int val = (int) id(num_thr_gunshot).state;
          std::string cmd = "AT+SETEVENTTHRESHOLD=gunshot," + std::to_string(val) + "\r\n";
          ESP_LOGI("sound", "gunshot threshold -> %d", val);
          id(uart_bus).write_array((const uint8_t*)cmd.c_str(), cmd.length());
      - delay: 400ms

      - lambda: |-
          int val = (int) id(num_thr_snore).state;
          std::string cmd = "AT+SETEVENTTHRESHOLD=snore," + std::to_string(val) + "\r\n";
          ESP_LOGI("sound", "snore threshold -> %d", val);
          id(uart_bus).write_array((const uint8_t*)cmd.c_str(), cmd.length());
      - delay: 400ms

      - lambda: |-
          int val = (int) id(num_thr_t3).state;
          std::string cmd = "AT+SETEVENTTHRESHOLD=T3," + std::to_string(val) + "\r\n";
          ESP_LOGI("sound", "T3 threshold -> %d", val);
          id(uart_bus).write_array((const uint8_t*)cmd.c_str(), cmd.length());
      - delay: 400ms

      - lambda: |-
          int val = (int) id(num_thr_t4).state;
          std::string cmd = "AT+SETEVENTTHRESHOLD=T4," + std::to_string(val) + "\r\n";
          ESP_LOGI("sound", "T4 threshold -> %d", val);
          id(uart_bus).write_array((const uint8_t*)cmd.c_str(), cmd.length());
      - delay: 400ms

      # ── Save to sensor flash ───────────────────────────────
      - logger.log: "Saving config to sensor..."
      - uart.write:
          id: uart_bus
          data: "AT+SAVECONFIG\r\n"
      - delay: 500ms
      - logger.log: "Settings applied and saved!"


##############################################################
#  INTERVAL - Parse incoming UART lines every 50ms
##############################################################
interval:
  - interval: 50ms
    then:
      - lambda: |-
          while (id(uart_bus).available()) {
            uint8_t b;
            id(uart_bus).read_byte(&b);
            char c = (char)b;

            if (c == '\n') {
              std::string line = id(uart_rx_buffer);
              id(uart_rx_buffer) = "";
              if (!line.empty() && line.back() == '\r') line.pop_back();
              if (line.empty()) continue;

              ESP_LOGD("uart_rx", "<- %s", line.c_str());

              // ── +EVENT: id,confidence ─────────────────────
              if (line.size() > 7 && line.substr(0, 7) == "+EVENT:") {
                std::string payload = line.substr(7);
                while (!payload.empty() && payload[0] == ' ') payload.erase(0,1);

                size_t comma = payload.find(',');
                if (comma != std::string::npos) {
                  int event_id = std::stoi(payload.substr(0, comma));
                  int pct      = (int) std::stof(payload.substr(comma + 1));

                  // ID map matches AudioEventSensor.cpp
                  const char* label_map[] = {"", "baby_cry", "glass_break", "gunshot", "snore", "T3", "T4"};
                  std::string name = (event_id >= 1 && event_id <= 6) ? label_map[event_id] : "unknown";
                  std::string full = name + " " + std::to_string(pct) + "% confidence";

                  id(txt_last_event_full).publish_state(full);
                  id(txt_last_event_name).publish_state(name);
                  id(sen_confidence).publish_state((float)pct);
                  ESP_LOGI("sound", "EVENT: %s", full.c_str());
                }
              }

              // ── +GETFWVERSION:1.0.0 ───────────────────────
              else if (line.size() > 14 && line.substr(0, 14) == "+GETFWVERSION:") {
                std::string ver = line.substr(14);
                while (!ver.empty() && ver[0] == ' ') ver.erase(0,1);
                id(txt_firmware_version).publish_state(ver);
                ESP_LOGI("sound", "Firmware: %s", ver.c_str());
              }

              else if (line == "OK") {
                ESP_LOGD("sound", "<- OK");
              } else if (line.size() >= 5 && line.substr(0, 5) == "ERROR") {
                ESP_LOGW("sound", "<- ERROR: %s", line.c_str());
              }

            } else if (c != '\r') {
              id(uart_rx_buffer) += c;
            }
          }


##############################################################
#  SWITCHES
#  All 6 events ON by default — user can disable any in HA
#  After changing: press the "Apply Settings" button
##############################################################
switch:
  - platform: template
    name: "Detect Baby Cry"          # Class ID 1
    id: sw_detect_baby_cry
    icon: mdi:baby-face-outline
    optimistic: true
    restore_mode: RESTORE_DEFAULT_ON  # ← ON by default

  - platform: template
    name: "Detect Glass Break"       # Class ID 2
    id: sw_detect_glass_break
    icon: mdi:glass-fragile
    optimistic: true
    restore_mode: RESTORE_DEFAULT_ON  # ← ON by default

  - platform: template
    name: "Detect Gunshot"           # Class ID 3
    id: sw_detect_gunshot
    icon: mdi:target
    optimistic: true
    restore_mode: RESTORE_DEFAULT_ON  # ← ON by default

  - platform: template
    name: "Detect Snore"             # Class ID 4
    id: sw_detect_snore
    icon: mdi:sleep
    optimistic: true
    restore_mode: RESTORE_DEFAULT_ON  # ← ON by default

  - platform: template
    name: "Detect T3"                # Class ID 5 (custom event)
    id: sw_detect_t3
    icon: mdi:waveform
    optimistic: true
    restore_mode: RESTORE_DEFAULT_ON  # ← ON by default

  - platform: template
    name: "Detect T4"                # Class ID 6 (custom event)
    id: sw_detect_t4
    icon: mdi:waveform
    optimistic: true
    restore_mode: RESTORE_DEFAULT_ON  # ← ON by default


##############################################################
#  NUMBER SLIDERS - Confidence thresholds
#  All default to 80% — adjust per event in HA
#  After changing: press the "Apply Settings" button
##############################################################
number:
  - platform: template
    name: "Baby Cry Threshold"
    id: num_thr_baby_cry
    icon: mdi:tune
    unit_of_measurement: "%"
    min_value: 0
    max_value: 100
    step: 5
    initial_value: 80             # ← Default 80%
    restore_value: true
    optimistic: true

  - platform: template
    name: "Glass Break Threshold"
    id: num_thr_glass_break
    icon: mdi:tune
    unit_of_measurement: "%"
    min_value: 0
    max_value: 100
    step: 5
    initial_value: 80             # ← Default 80%
    restore_value: true
    optimistic: true

  - platform: template
    name: "Gunshot Threshold"
    id: num_thr_gunshot
    icon: mdi:tune
    unit_of_measurement: "%"
    min_value: 0
    max_value: 100
    step: 5
    initial_value: 80             # ← Default 80%
    restore_value: true
    optimistic: true

  - platform: template
    name: "Snore Threshold"
    id: num_thr_snore
    icon: mdi:tune
    unit_of_measurement: "%"
    min_value: 0
    max_value: 100
    step: 5
    initial_value: 80             # ← Default 80%
    restore_value: true
    optimistic: true

  - platform: template
    name: "T3 Threshold"
    id: num_thr_t3
    icon: mdi:tune
    unit_of_measurement: "%"
    min_value: 0
    max_value: 100
    step: 5
    initial_value: 80             # ← Default 80%
    restore_value: true
    optimistic: true

  - platform: template
    name: "T4 Threshold"
    id: num_thr_t4
    icon: mdi:tune
    unit_of_measurement: "%"
    min_value: 0
    max_value: 100
    step: 5
    initial_value: 80             # ← Default 80%
    restore_value: true
    optimistic: true


##############################################################
#  BUTTONS
##############################################################
button:
  - platform: template
    name: "Apply Settings"
    id: btn_apply_settings
    icon: mdi:content-save-cog
    on_press:
      - script.execute: apply_all_settings

  - platform: template
    name: "Reset Sensor"
    id: btn_reset
    icon: mdi:restart
    on_press:
      - logger.log: "Manual reset triggered"
      - uart.write:
          id: uart_bus
          data: "AT+RESET\r\n"
      - delay: 3s
      - script.execute: apply_all_settings

  - platform: template
    name: "Save Sensor Config"
    id: btn_save_config
    icon: mdi:content-save
    on_press:
      - uart.write:
          id: uart_bus
          data: "AT+SAVECONFIG\r\n"

  - platform: template
    name: "Get Firmware Version"
    id: btn_get_fw
    icon: mdi:information
    on_press:
      - uart.write:
          id: uart_bus
          data: "AT+GETFWVERSION\r\n"

  - platform: restart
    name: "Restart ESP32"
    icon: mdi:restart-alert
    entity_category: config


##############################################################
#  TEXT SENSORS
##############################################################
text_sensor:
  - platform: template
    name: "Last Sound Event"
    id: txt_last_event_full
    icon: mdi:ear-hearing
    # Example: "glass_break 87% confidence"

  - platform: template
    name: "Event Type"
    id: txt_last_event_name
    icon: mdi:waveform
    # Example: "gunshot"
    # Use this in HA automations → trigger when state = "gunshot"

  - platform: template
    name: "Firmware Version"
    id: txt_firmware_version
    icon: mdi:chip
    entity_category: diagnostic

  - platform: wifi_info
    ip_address:
      name: "IP Address"
      icon: mdi:ip-network
      entity_category: diagnostic
    ssid:
      name: "Connected SSID"
      icon: mdi:wifi
      entity_category: diagnostic


##############################################################
#  SENSORS
##############################################################
sensor:
  - platform: template
    name: "Event Confidence"
    id: sen_confidence
    icon: mdi:percent
    unit_of_measurement: "%"
    accuracy_decimals: 0

  - platform: wifi_signal
    name: "WiFi Signal"
    update_interval: 60s
    entity_category: diagnostic
    icon: mdi:wifi-strength-2
在本示例中,我们使用的是 XIAO ESP32S3,因此你可能需要根据自己的开发板和接线配置,在 YAML 文件中更新以下参数
board: esp32-s3-devkitc-1 # your board name
tx_pin: GPIO43 # your TX pin connection
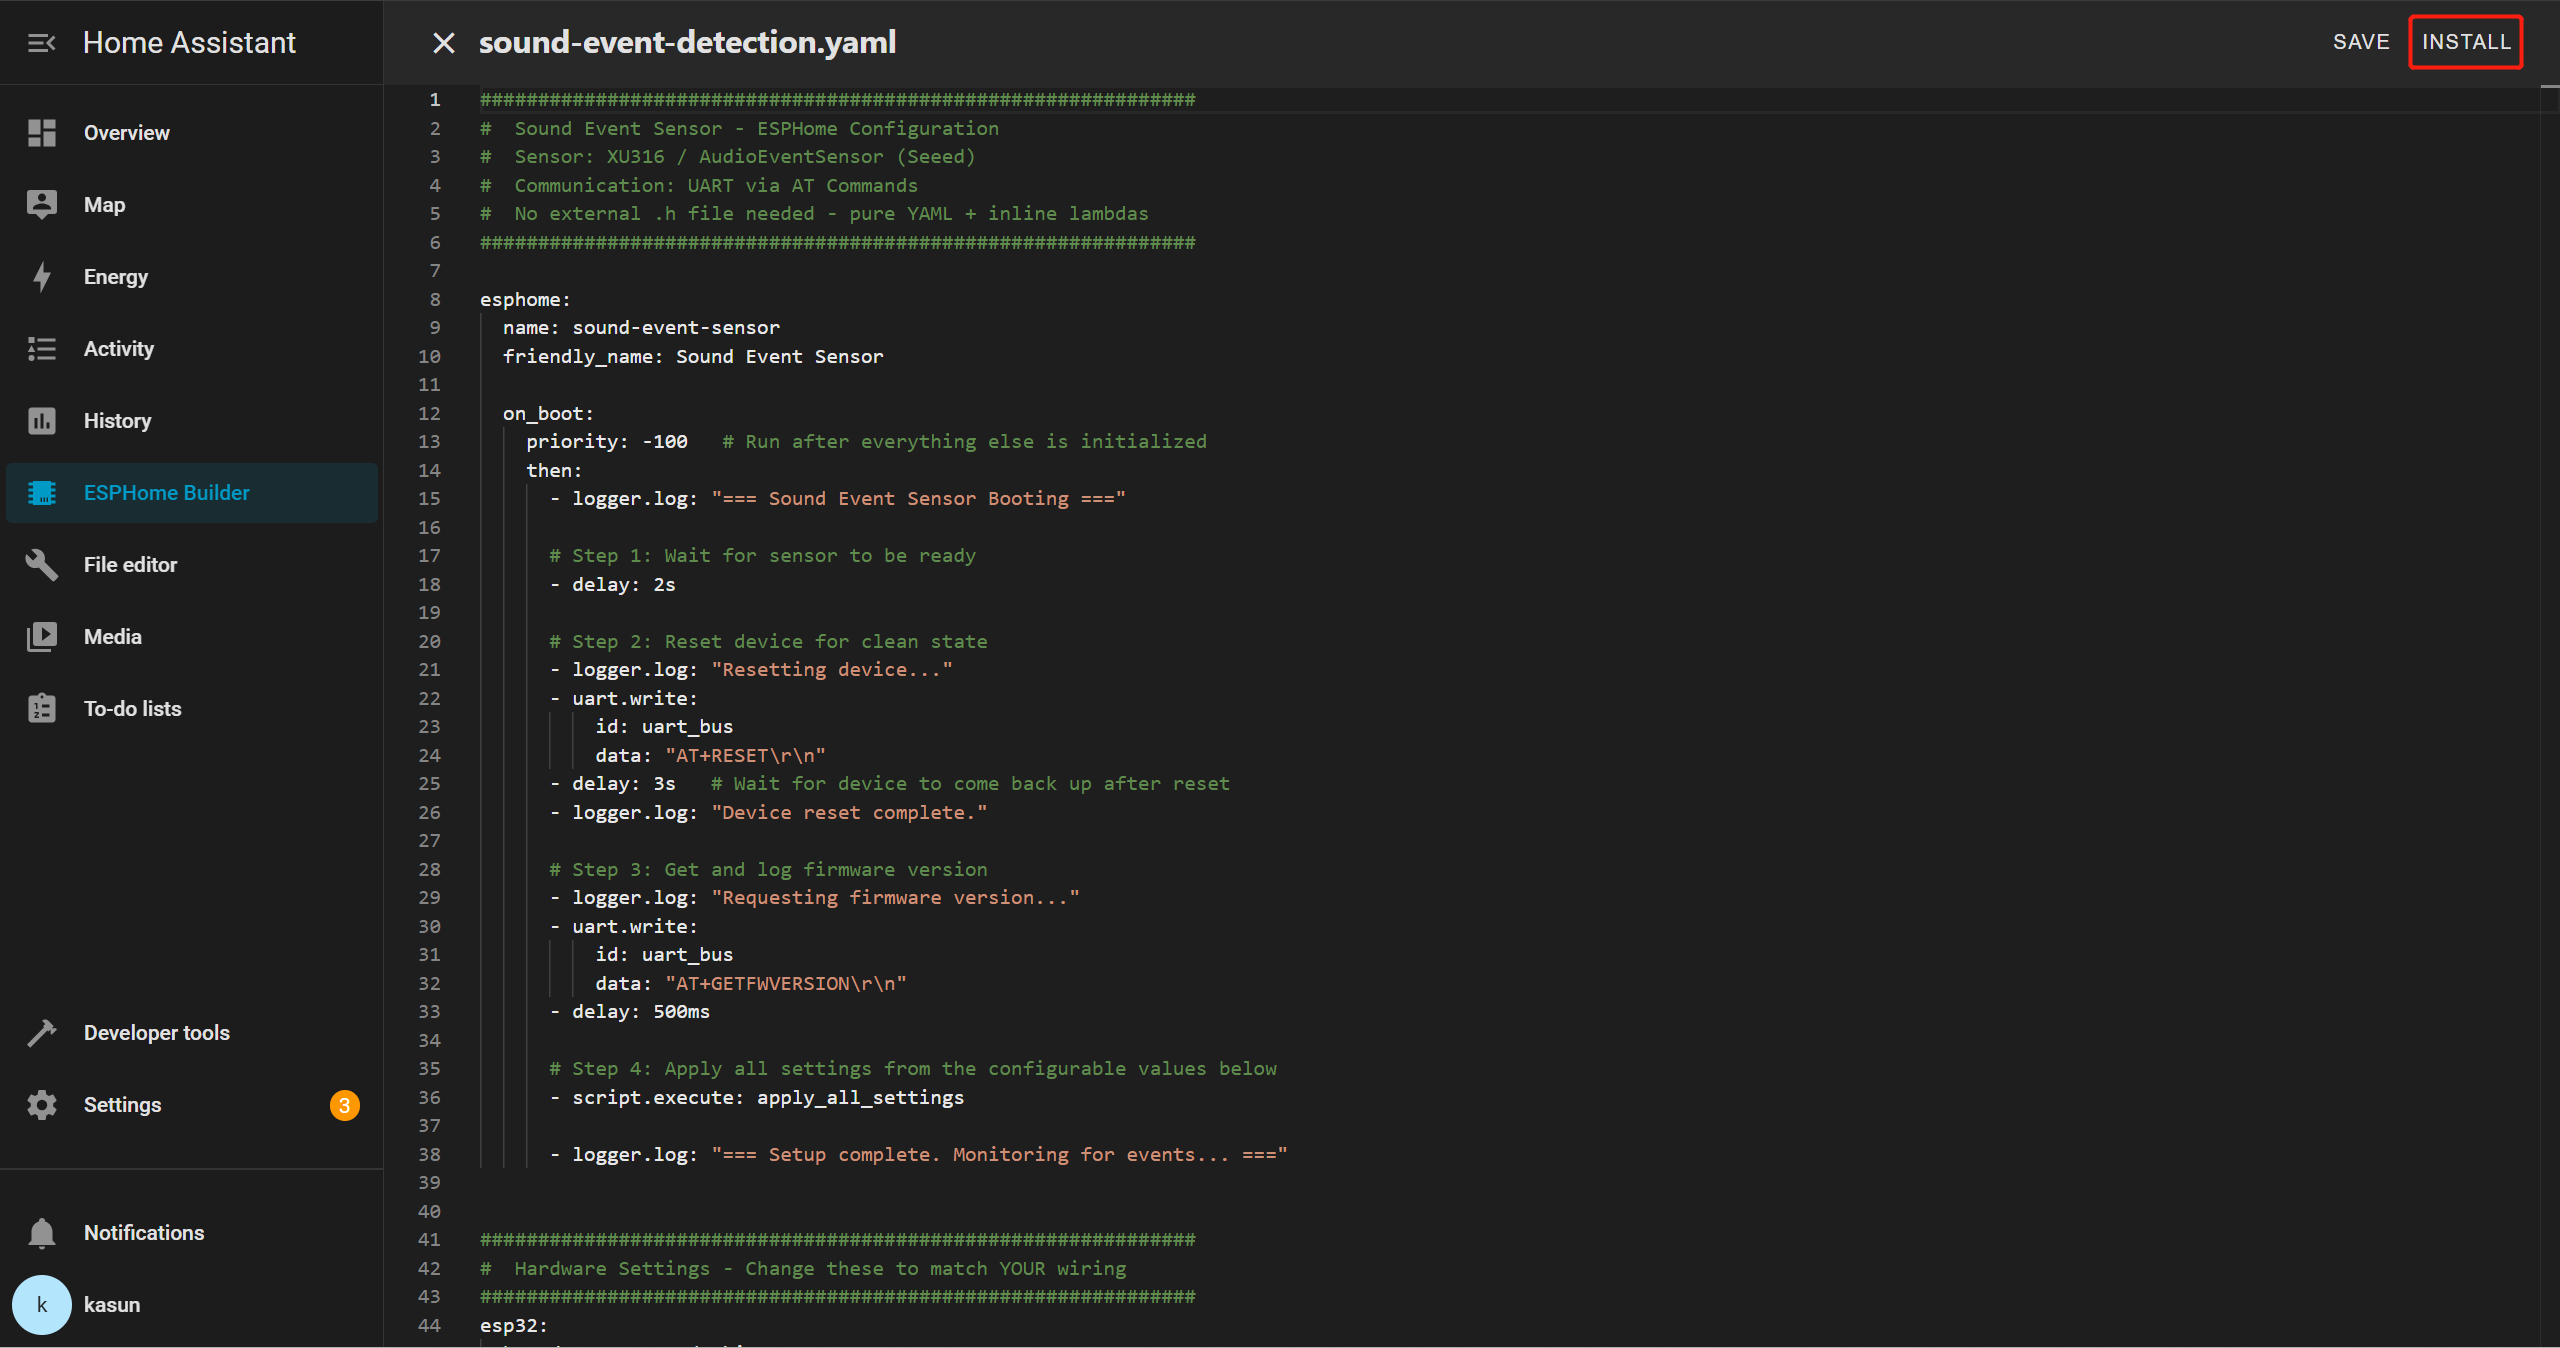
rx_pin: GPIO44 # your RX pin connection
YAML 保存后,点击 INSTALL。
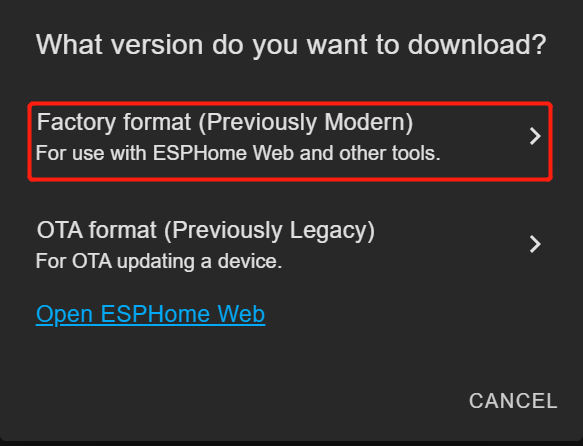
选择 Manual Download

等待固件编译完成。
从 Factory Format 将生成的 .bin 固件文件下载到你的电脑。
使用 USB Type-C 线将嵌入式声音传感器 ESP32-S3 开发板连接到电脑。
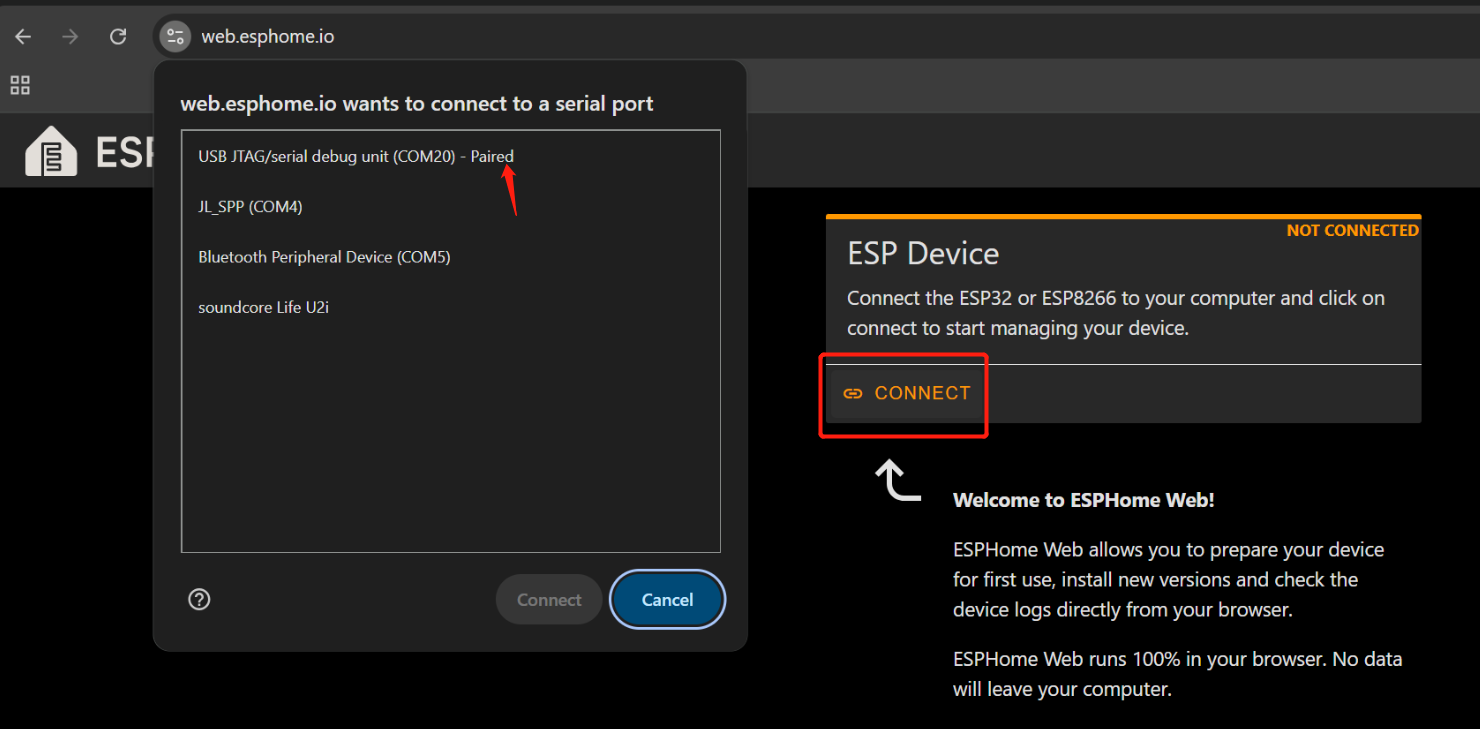
在 Google Chrome 中打开 Web ESPHome。
点击 Connect,并在列表中选择正确的串口。
连接成功后,点击 INSTALL
选择刚刚下载的 .bin 文件。
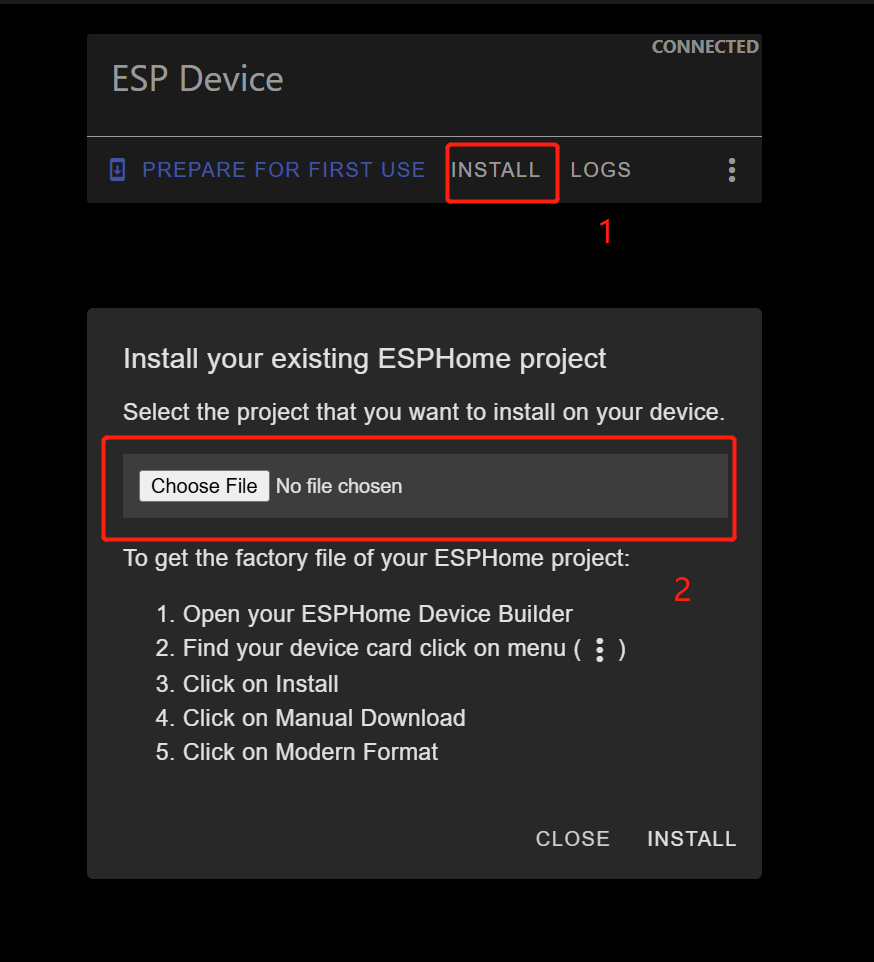
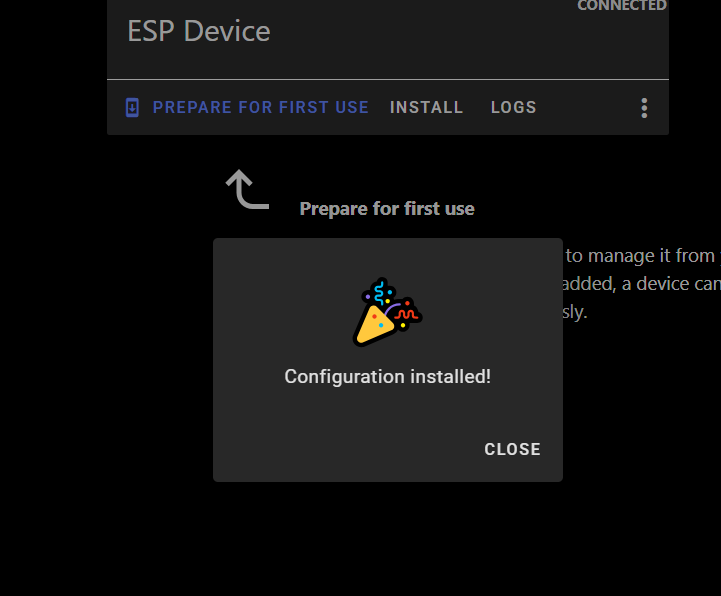
等待安装完成(可能需要几分钟)。
成功后,你会看到一条确认消息。
返回 Home Assistant > Settings > Devices & Services。
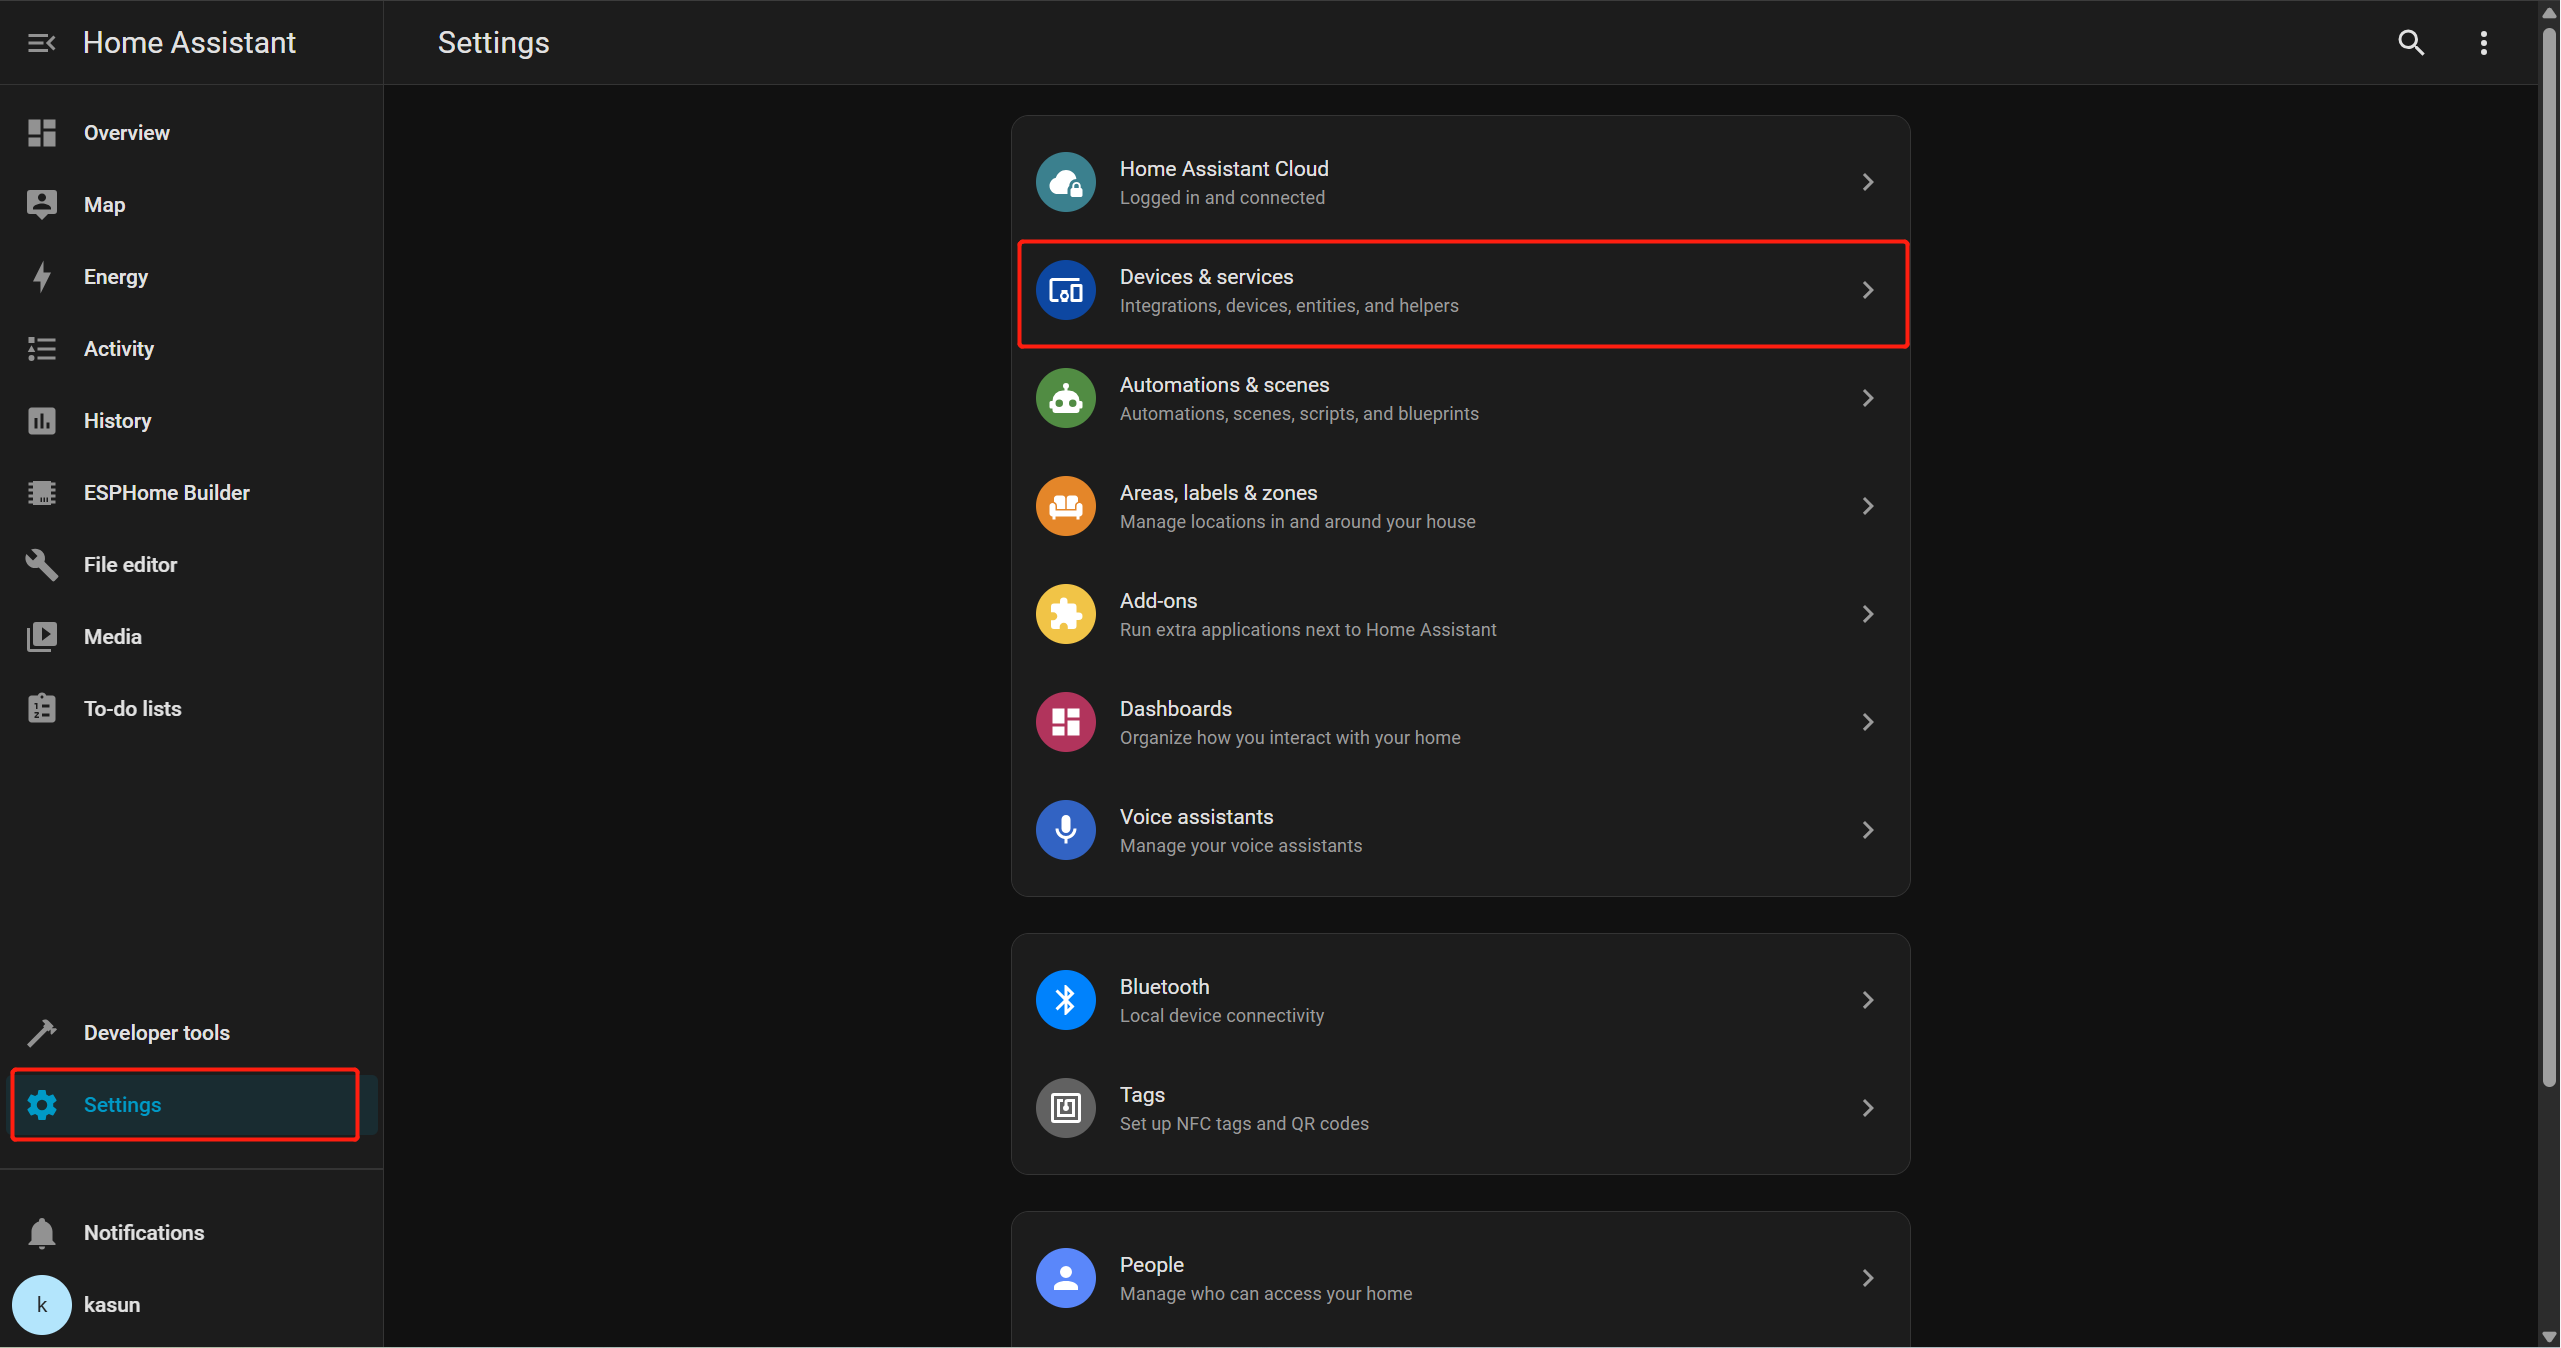
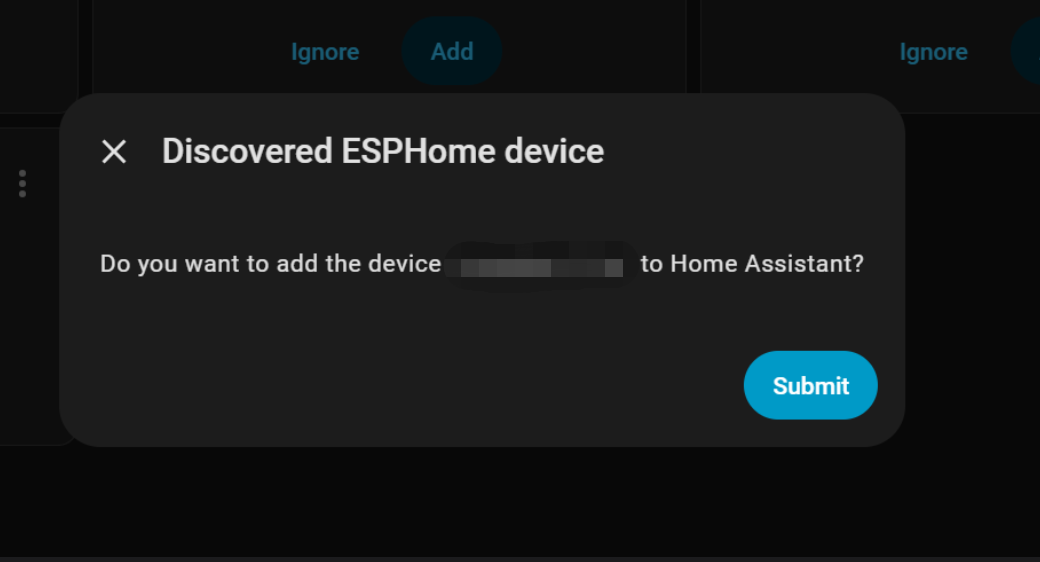
你应该会看到 ESPHome 被列为已发现的集成。
点击 Add,然后点击 Submit 完成设置。
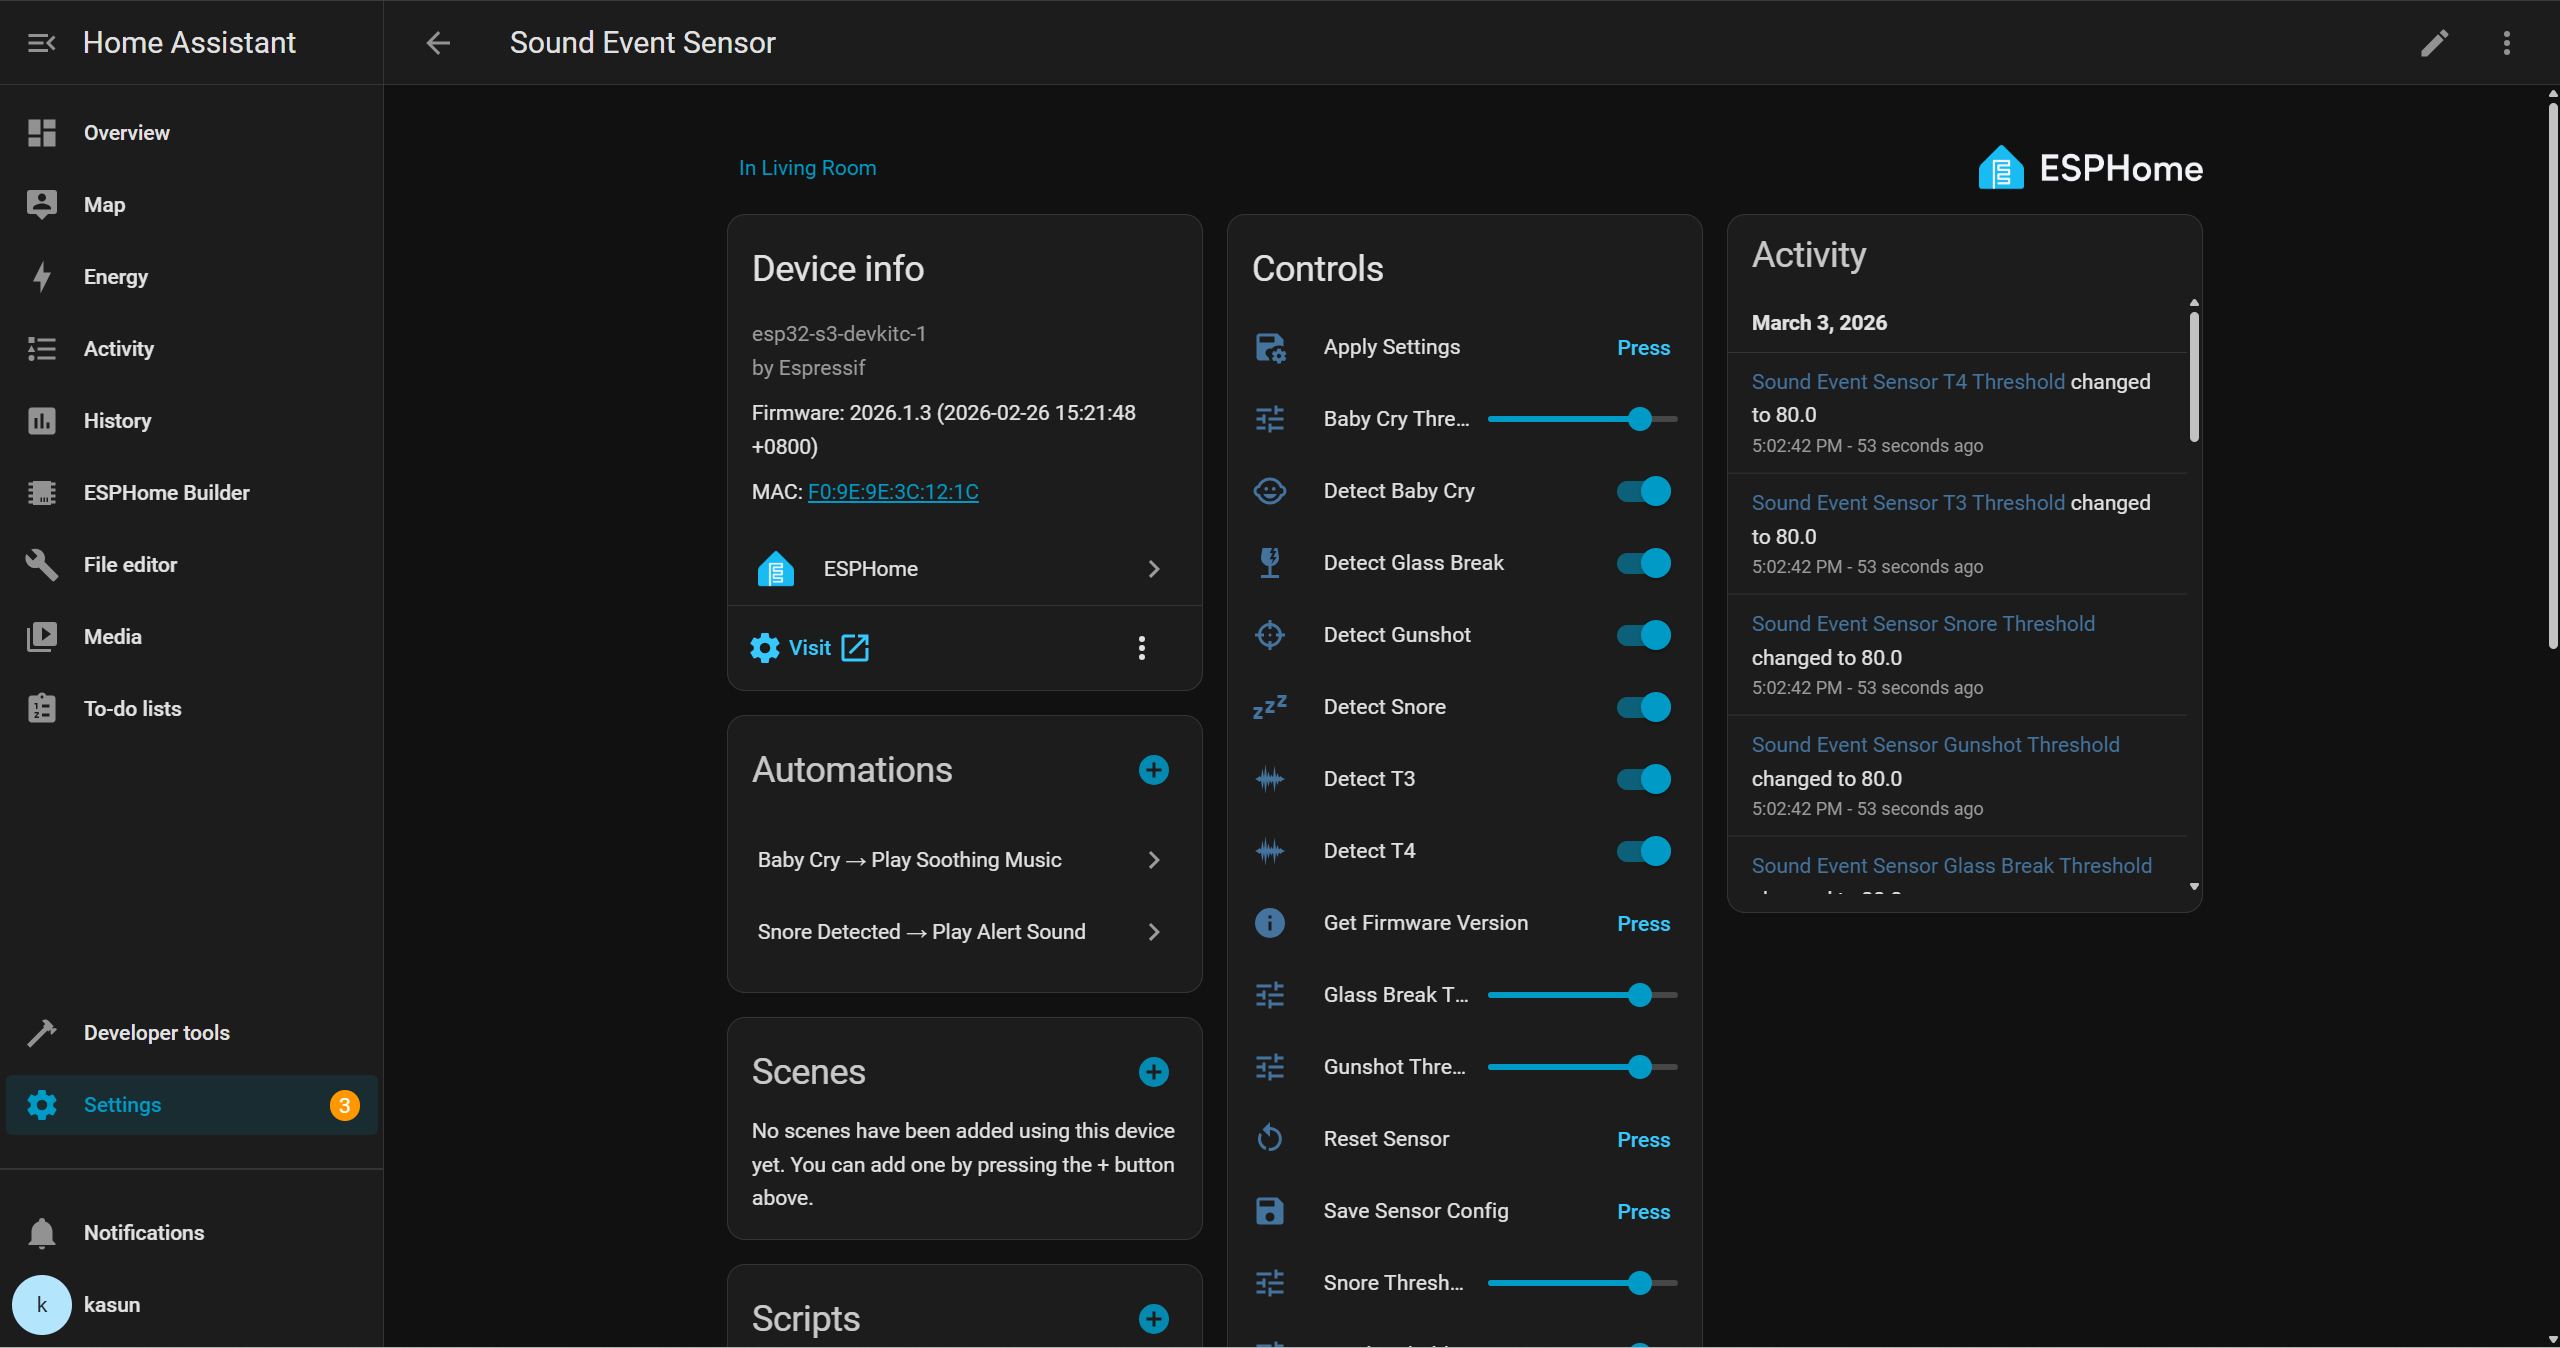
然后,你就可以通过 Home Assistant 界面与设备交互,并与其他外设一起创建自己的自动化。例如,当检测到玻璃破碎时触发蜂鸣器,或者在检测到婴儿哭声时,自动在智能音箱上播放舒缓的摇篮曲。
演示
技术支持与产品讨论
感谢你选择我们的产品!我们为你提供多种支持方式,以确保你在使用我们产品的过程中尽可能顺利。我们提供多种沟通渠道,以满足不同的偏好和需求。