如何在reComputer Jetson上运行带语音交互的VLM
介绍
本指南详细说明了如何在reComputer Nvidia Jetson设备上运行带语音交互的多模态视觉语言模型(VLM)。该模型利用官方Nvidia Jetson平台的强大计算能力,结合阿里巴巴开源的语音转文本模型SenseVoice和coqui-ai的文本转语音(TTS)模型,来执行复杂的多模态任务。通过遵循本指南,您将能够成功安装和操作此系统,使其具备视觉识别和语音交互能力,从而为您的项目提供更智能的解决方案。
VLM(视觉语言模型)介绍
视觉语言模型(VLM)是为Nvidia Jetson平台优化的多模态模型。它结合了视觉和语言处理来处理复杂任务,如物体识别和生成描述性语言。VLM适用于自动驾驶、智能监控和智能家居等领域,提供智能直观的解决方案。
SenseVoice介绍
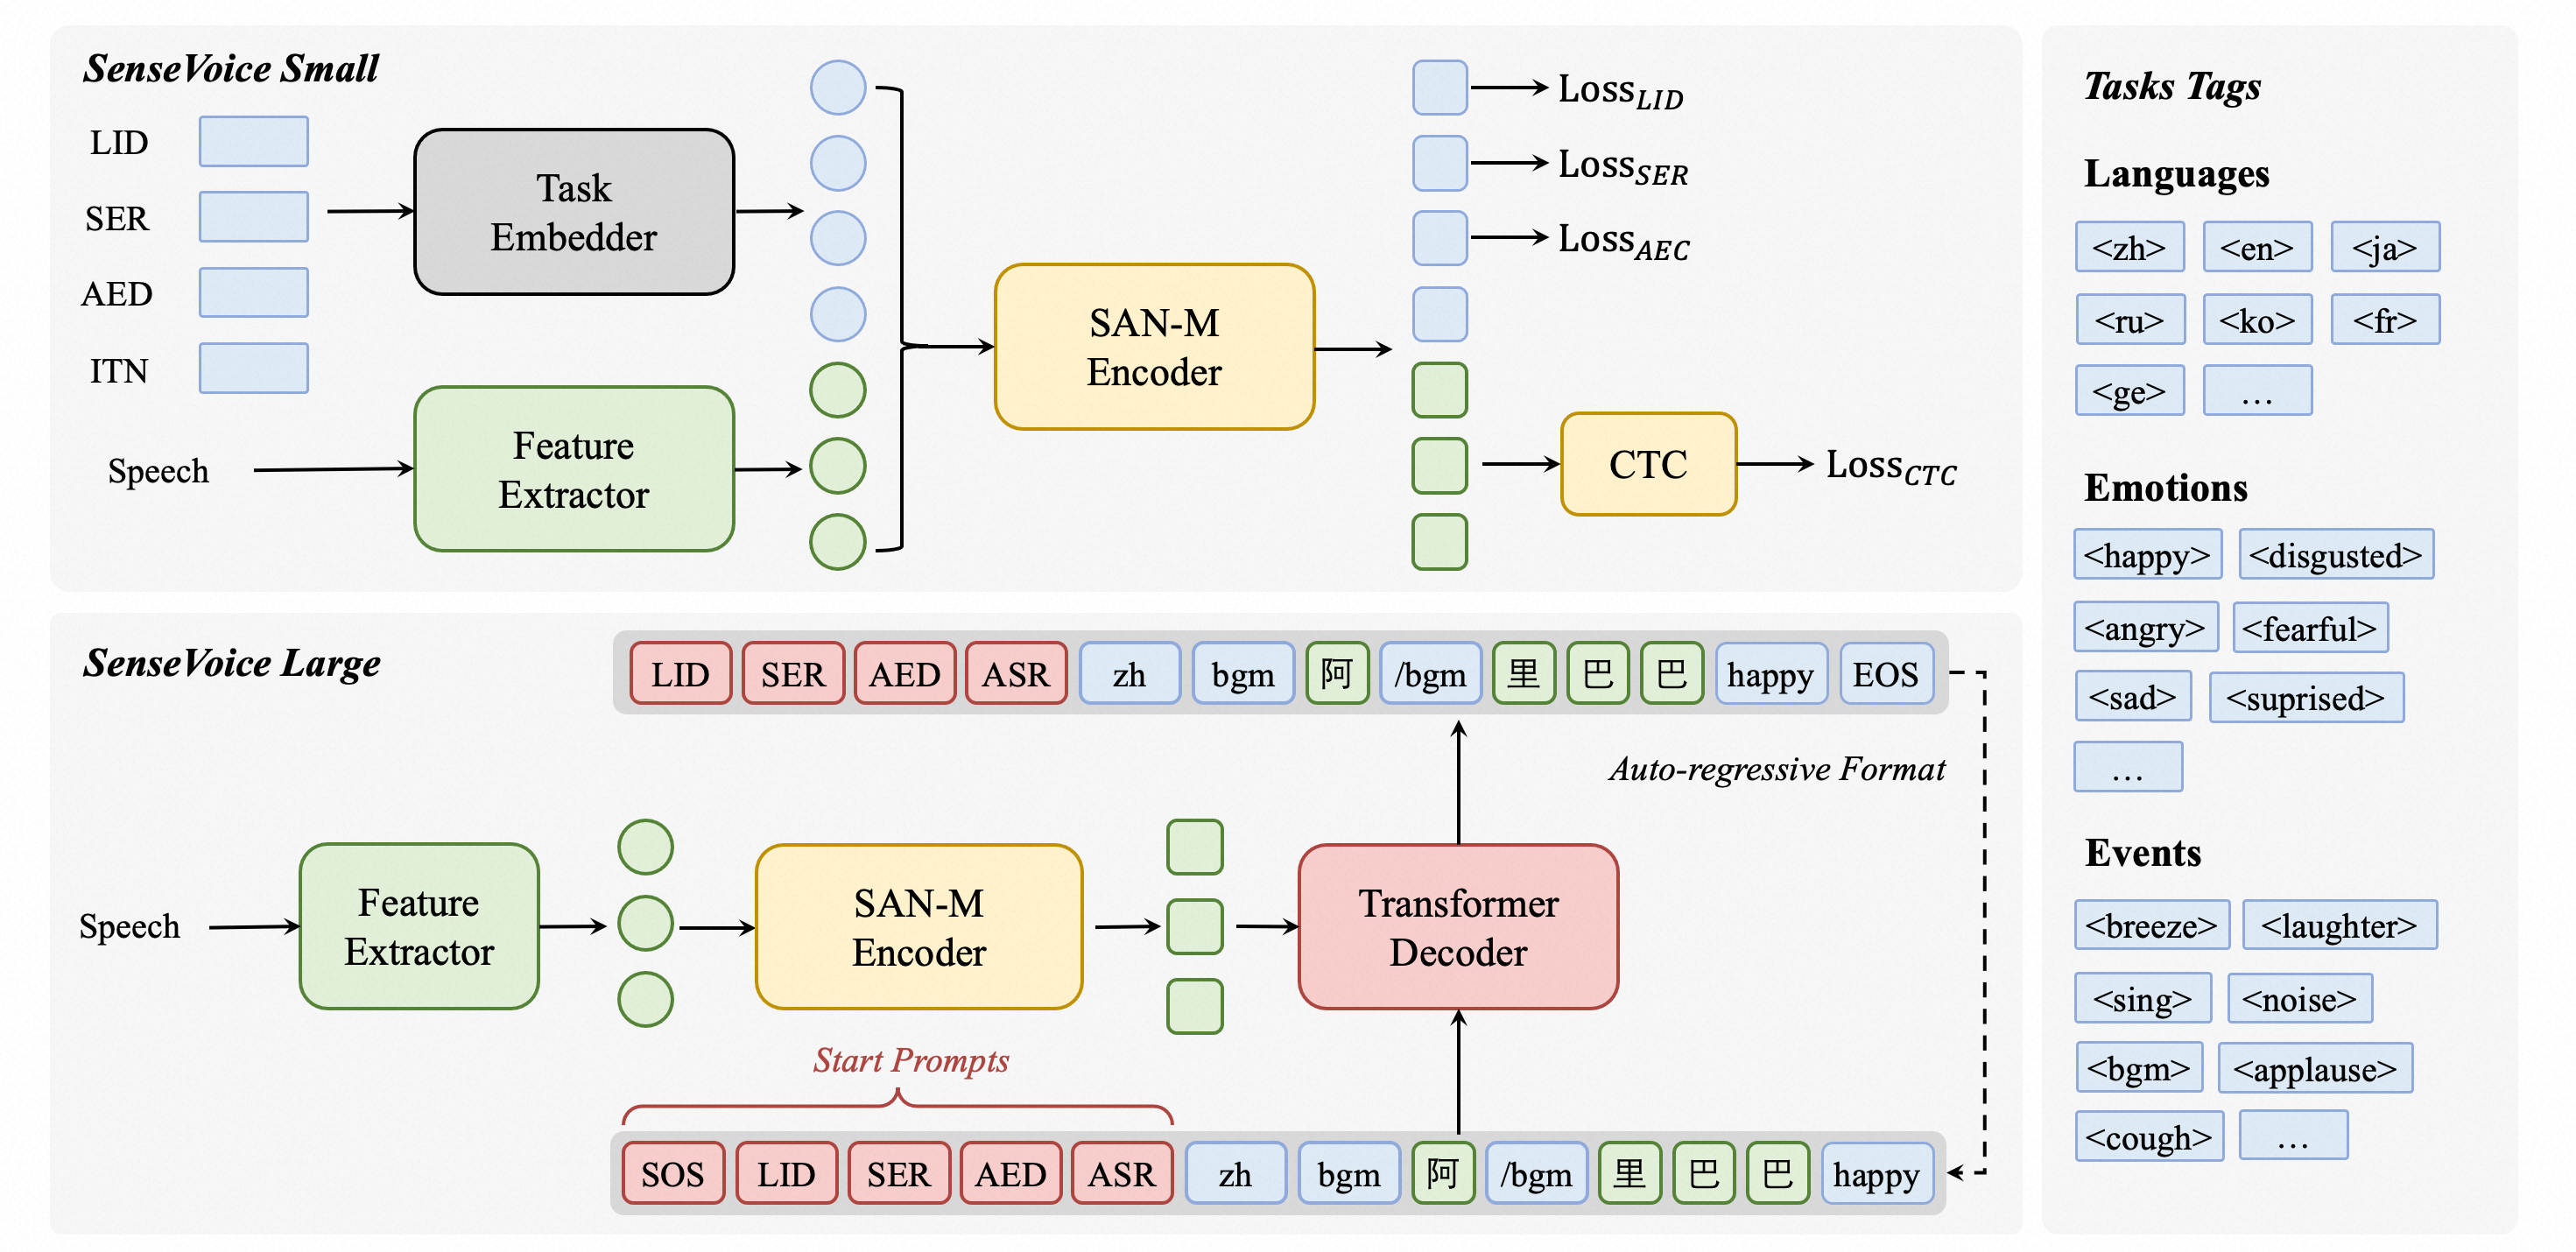
SenseVoice是一个专注于高精度多语言语音识别、语音情感识别和音频事件检测的开源模型。它在超过40万小时的数据上进行训练,支持50多种语言,性能超越Whisper模型。SenseVoice-Small模型提供超低延迟,仅需70毫秒即可处理10秒音频。它还提供便捷的微调功能,支持多种语言部署,包括Python、C++、HTML、Java和C#。
TTS(文本转语音)介绍
TTS模型是用于文本转语音任务的高性能深度学习模型。它包含各种模型,如Tacotron2和声码器,如MelGAN和WaveRNN。TTS模型支持多说话人TTS、高效训练,并提供数据集整理和模型测试工具。其模块化代码库允许轻松实现新功能。

先决条件
- 具有16GB以上内存的reComputer Jetson AGX Orin 64G或reComputer Jetson J4012 16G设备。
- USB免驱动扬声器麦克风
- 能够输出RTSP流地址的IP摄像头。我们还包含了如何使用NVIDIA Nvstreamer工具将本地视频转换为RTSP流的说明。
我们已经在reComputer Orin NX 16GB和AGX Orin 64GB开发套件上测试了本wiki的可行性。

安装
初始化系统环境
-
使用 JP6 安装初始系统后,您需要检查
CUDA和其他库的安装情况。您可以通过运行sudo apt-get install nvidia-jetpack来验证和安装它们。 -
安装
python3-pip、jtop和docker-ce。 -
通过运行以下命令安装必要的依赖项:
sudo apt-get install libportaudio2 libportaudiocpp0 portaudio19-dev
sudo pip3 install pyaudio playsound subprocess wave keyboard
sudo pip3 --upgrade setuptools
sudo pip3 install sudachipy==0.5.2 -
检查音频输入和输出以及 USB 扬声器麦克风是否正常工作,并确保网络连接稳定。
安装 VLM
本项目的核心功能是视觉语言模型(VLM)。我们提供了一个关于如何在 reComputer Nvidia Jetson 上使用 VLM 的指南。请参考此链接获取安装和使用说明。在继续以下步骤之前,请确保您完全了解如何在 VLM 中使用文本描述进行推理。
安装 Pytorch Torchaudio
我们为初学者提供了 Nvidia Jetson AI 课程,其中包括如何安装 PyTorch、Torchaudio 和 Torchvision 的说明。请根据您的系统环境下载并安装这些包。
安装 Speech_vlm(基于 SenseVoice)
-
克隆 Speech_vlm 包:
cd ~/
git clone https://github.com/ZhuYaoHui1998/speech_vlm.git -
安装 Speech_vlm 环境:
cd ~/speech_vlm
sudo pip3 install -r requement.txt
安装 TTS(基于 Coqui-ai)
cd ~/speech_vlm/TTS
sudo pip3 install .[all]
使用方法
speech_vlm 仓库的结构如下:
speech_vlm/
├── /TTS   # Coqui-ai TTS program
├── config # VLM config
├── README.md    #Project Introduction
├── requirements.txt   #SenseVoice required environment libraries
├── compose.yaml   #VLM Docker Compose startup file
├── delete_id.sh     #Delete camera ID script
├── example_1.wav     #Audio feedback sound tone template (replaceable)
├── model.py     #SenseVoice main program
├── set_alerts.sh     #Set up camera alerts
├── set_describe.sh     #Text input to have the VLM describe the current scene
├── set_streamer_id.sh  #Add RTSP camera to VLM
├── view_rtsp.py  # View RTSP stream by opencv
└── vlm_voice.py  # multimodal main program
-
启动 VLM
cd ~/speech_vlm
sudo docker compose up -d
-
将 RTSP 流添加到 VLM
查看 speech_vlm 仓库下 set_streamer_id.sh 的内容:
#!/bin/bash
curl --location 'http://0.0.0.0:5010/api/v1/live-stream' \
--header 'Content-Type: application/json' \
--data '{"liveStreamUrl": "RTSP stream address"}'
将 0.0.0.0 替换为 Jetson 设备的 IP 地址,将 RTSP stream address 替换为摄像头的 RTSP 流地址。
例如:
#!/bin/bash
curl --location 'http://192.168.49.227:5010/api/v1/live-stream' \
--header 'Content-Type: application/json' \
--data '{"liveStreamUrl": "rtsp://admin:[email protected]:554//Streaming/Channels/1"}'
如果您没有 RTSP 摄像头,我们提供了关于如何使用 NVStreamer 将本地视频流式传输为 RTSP 以及将它们添加到 VLM 的说明。
运行 set_streamer_id.sh
cd ~/speech_vlm
sudo chmod +x ./set_streamer_id.sh
./set_streamer_id.sh
我们将获得一个摄像头ID,这个ID非常重要,需要记录下来,如下所示:

- 运行 vlm_voice.py
您需要在以下两行Python代码中替换 0.0.0.0:
API_URL = 'http://0.0.0.0:5010/api/v1/chat/completions'  # API endpoint
REQUEST_ID = ""  # Request ID
使用 Jetson IP 地址并填入从步骤 2 返回的摄像头 ID 来替换 REQUEST_ID。
vlm_voice.py
import pyaudio
import wave
import keyboard
import subprocess
import json
from funasr import AutoModel
from funasr.utils.postprocess_utils import rich_transcription_postprocess
import time
import torch
from TTS.api import TTS
import os
# Get device
device = "cuda" if torch.cuda.is_available() else "cpu"

# Init TTS
api = TTS("tts_models/en/ljspeech/glow-tts").to(device)

# Configuration parameters
FORMAT = pyaudio.paInt16  # 16-bit resolution
CHANNELS = 1  # Mono channel
CHUNK = 1024  # Number of samples per chunk
OUTPUT_FILENAME = "output.wav"  # Output file name
API_URL = 'http://192.168.49.227:5010/api/v1/chat/completions'  # API endpoint
REQUEST_ID = "1388b691-3b9f-4bda-9d70-0ff0696f80f4"  # Request ID

# Initialize PyAudio
audio = pyaudio.PyAudio()
# Prepare the list to store recording data
frames = []

# Initialize Micphone Rate
print("Available audio input devices:")
for i in range(audio.get_device_count()):
    info = audio.get_device_info_by_index(i)
    print(f"Device {i}: {info['name']} - {info['maxInputChannels']} channels")

device_index = int(input("Please select the device index for your USB microphone: "))

device_info = audio.get_device_info_by_index(device_index)
supported_sample_rates = [8000, 16000, 32000, 44100, 48000]
supported_rate=0
for rate in supported_sample_rates:
    try:
        if audio.is_format_supported(rate,
                                     input_device=device_index,
                                     input_channels=1,
                                     input_format=pyaudio.paInt16):
            supported_rate=rate
            print(f"{rate} Hz is supported.")
    except ValueError:
        print(f"{rate} Hz is not supported.")


# Initialize the model
model = "./SenseVoiceSmall"
model = AutoModel(
    model=model,
    vad_model="./speech_fsmn_vad_zh-cn-16k-common-pytorch",
    vad_kwargs={"max_single_segment_time": 30000},
    trust_remote_code=True,
    disable_log=True
)


def extract_content(json_response):
    try:
        # 解析JSON字符串
        data = json.loads(json_response)

        # 提取content部分
        content = data["choices"][0]["message"]["content"]

        print(f"{content}")
        return content
    except KeyError as e:
        print(f"Key error: {e}")
    except json.JSONDecodeError as e:
        print(f"JSON decode error: {e}")
    except Exception as e:
        print(f"An unexpected error occurred: {e}")

def start_recording():
    global frames
    frames = []

    try:
        stream = audio.open(format=FORMAT, channels=CHANNELS,
                            rate=supported_rate, input=True,
                            frames_per_buffer=CHUNK, input_device_index=device_index)
        print("Recording started... Press '2' to stop recording.")

        while True:
            if keyboard.is_pressed('2'):
                print("Recording stopped.")
                break
            data = stream.read(CHUNK)
            frames.append(data)

        stream.stop_stream()
        stream.close()

    except Exception as e:
        print(f"An error occurred during recording: {e}")

def save_recording():
    try:
        waveFile = wave.open(OUTPUT_FILENAME, 'wb')
        waveFile.setnchannels(CHANNELS)
        waveFile.setsampwidth(audio.get_sample_size(FORMAT))
        waveFile.setframerate(supported_rate)
        waveFile.writeframes(b''.join(frames))
        waveFile.close()
        print(f"Recording saved as {OUTPUT_FILENAME}")
    except Exception as e:
        print(f"An error occurred while saving the recording: {e}")

def send_alert(text):
    # Construct the JSON payload
    payload = {
        "messages": [
            {
                "role": "system",
                "content": "You are a helpful AI assistant."
            },
            {
                "role": "user",
                "content": [
                    {
                        "type": "stream",
                        "stream": {
                            "stream_id": REQUEST_ID
                        }
                    },
                    {
                        "type": "text",
                        "text": text
                    }
                ]
            }
        ],
        "min_tokens": 1,
        "max_tokens": 128
    }

    # Convert the payload to a JSON string
    json_payload = json.dumps(payload)

    # Execute the curl command using subprocess
    curl_command = [
        'curl', '--location', API_URL,
        '--header', 'Content-Type: application/json',
        '--data', json_payload
    ]

    try:
        result = subprocess.run(curl_command, check=True, capture_output=True, text=True)
        ##Get words
        content_result=extract_content(result.stdout)
        # TTS
        api.tts_to_file(
            str(content_result),
            speaker_wav="./example_1.wav",
            file_path="speech.wav"
        )
        # Convert audio rate
        subprocess.run(['ffmpeg', '-i', 'speech.wav', '-ar',str(supported_rate), 'speech1.wav','-y'])
        # Play audio
        wf = wave.open('./speech1.wav', 'rb')
        stream = audio.open(format=pyaudio.paInt16,
                        channels=1,
                        rate=supported_rate,
                        output=True,
                        output_device_index=device_index)
        data = wf.readframes(1024)
        while data:
            stream.write(data)
            data = wf.readframes(1024)
        # Play audio
        os.remove('speech.wav')
        os.remove('speech1.wav')
        stream.stop_stream()
        stream.close()
        wf.close()  # Close the wave file as well

        #print(f"Alert sent successfully: {result.stdout}")
    except subprocess.CalledProcessError as e:
        print(f"An error occurred while sending the alert: {e.stderr}")
    finally:
        # Even if an error occurs, try to close the stream
        if stream.is_active():
            stream.stop_stream()
            os.remove('speech.wav')
            os.remove('speech1.wav')
            stream.close()
print("Welcome to the Recording and Speech-to-Text System!")
print("Press '1' to start recording, '2' to stop recording.")

while True:
    if keyboard.is_pressed('1'):
        print("Preparing to start recording...")
        start_recording()
        save_recording()

        print("Processing the recording file, please wait...")
        try:
            res = model.generate(
                input=f"./{OUTPUT_FILENAME}",
                cache={},
                language="auto",  # "zh", "en", "yue", "ja", "ko", "nospeech"
                use_itn=True,
                batch_size_s=60,
                merge_vad=True,
                merge_length_s=15,
            )
            text = rich_transcription_postprocess(res[0]["text"])
            print(f"Speech-to-Text Result:\n{text}")

            # Send the transcription result as an alert
            send_alert(text)

        except Exception as e:
            print(f"An error occurred while processing the recording: {e}")

    time.sleep(0.1)  # Reduce CPU usage
Run python:
cd ~/speech_vlm
sudo python3 vlm_voice.py
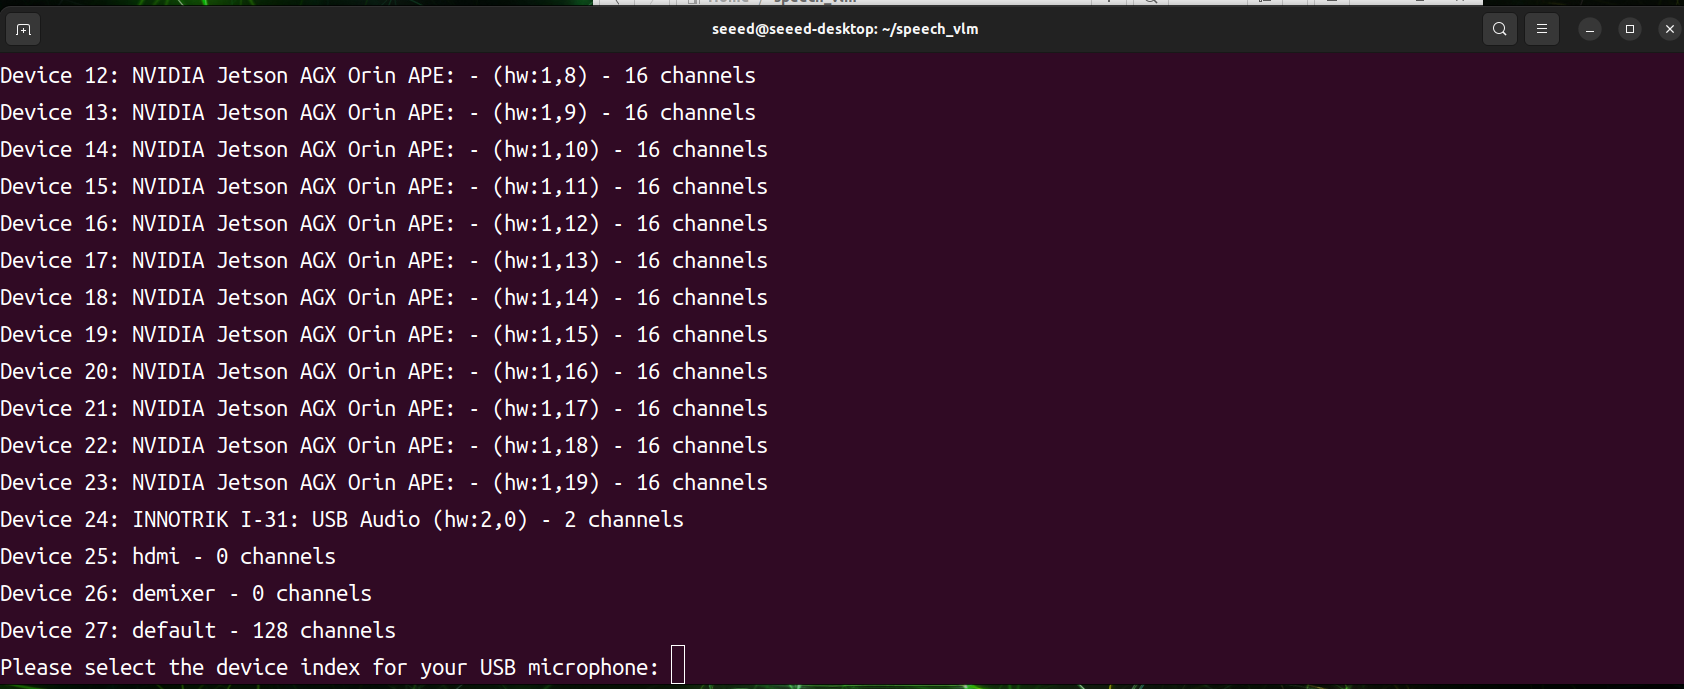
程序启动后,它将扫描所有音频输入和输出设备。您需要手动选择所需音频设备的索引ID。程序即将开始工作,然后按 1 录音,按 2 发送。
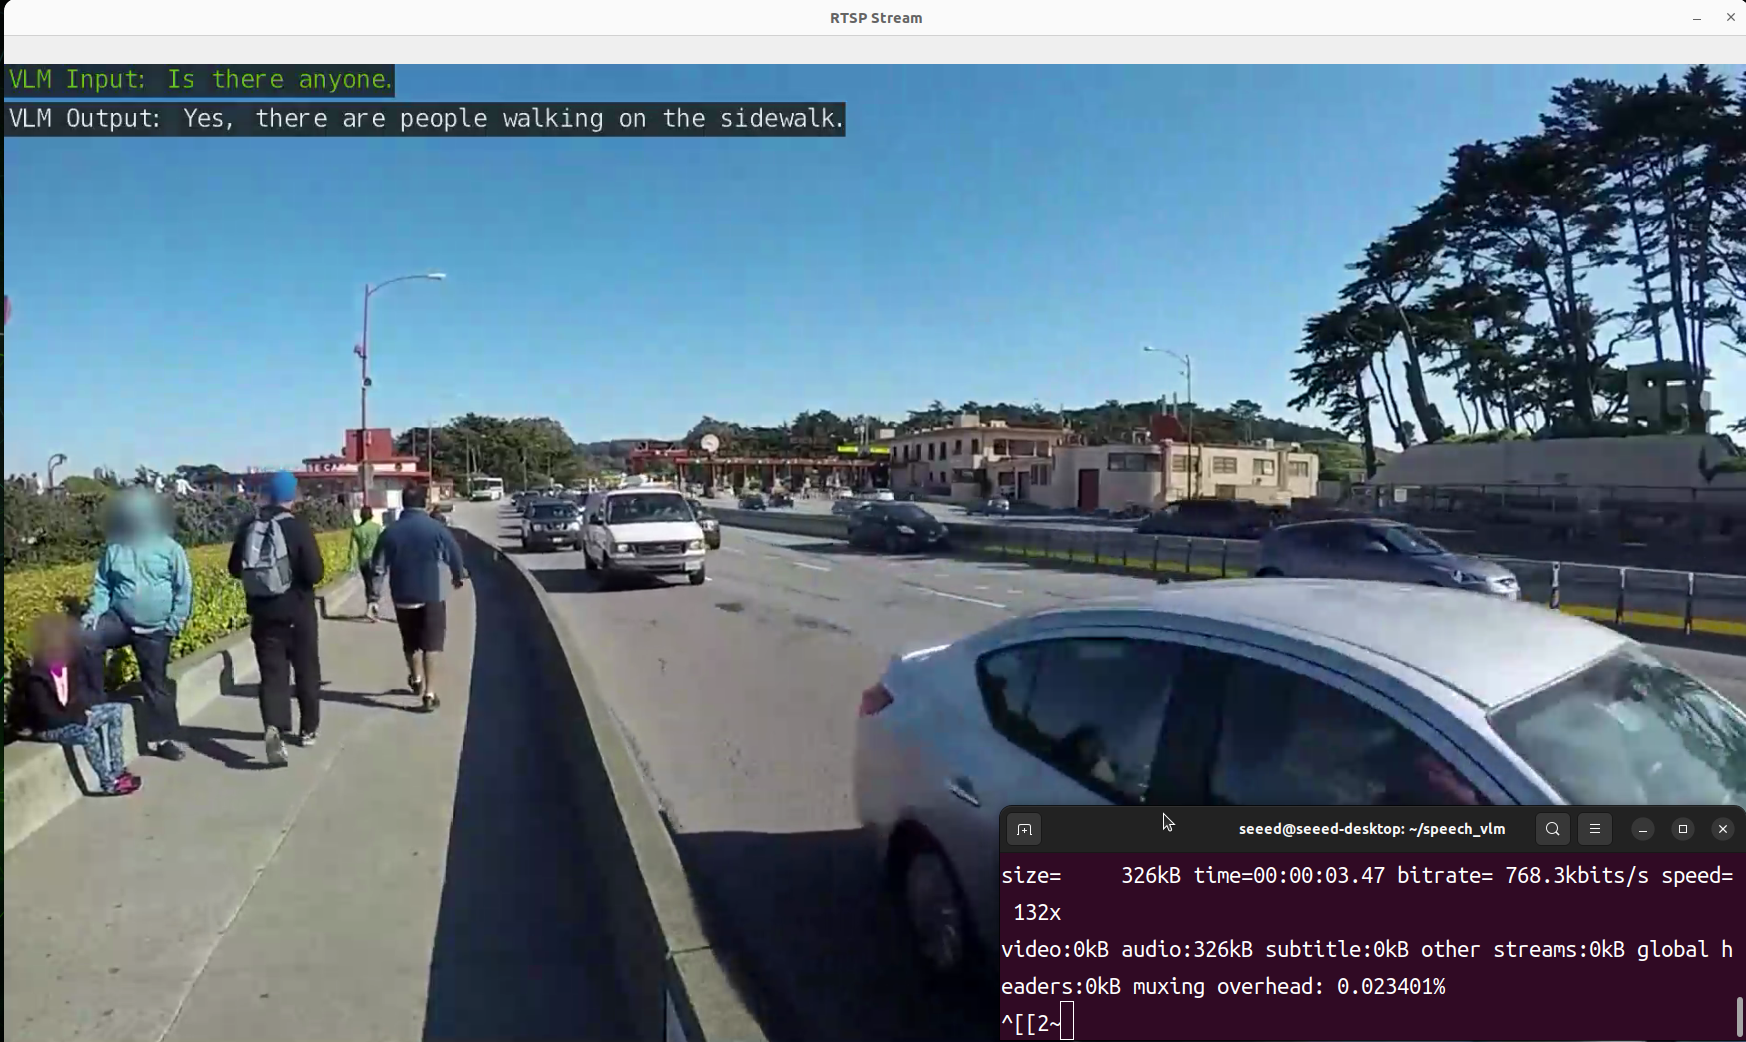
- 查看结果
我们准备了一个 view_rtsp.py 脚本来查看输出结果。您需要将 rtsp_url = "rtsp://0.0.0.0:5011/out" 中的IP部分替换为您的Jetson设备的IP地址。
viwe_rtsp.py
import cv2

rtsp_url = "rtsp://192.168.49.227:5011/out"

cap = cv2.VideoCapture(rtsp_url)

if not cap.isOpened():
    print("Cannot open RTSP stream")
    exit()

while True:
    ret, frame = cap.read()
    if not ret:
        print("Failed to retrieve frame")
        break

    height, width = frame.shape[:2]

    frame_resized = cv2.resize(frame, (int(width // 1.1), int(height // 1.1)))

    cv2.imshow('RTSP Stream', frame_resized)

    if cv2.waitKey(1) & 0xFF == ord('q'):
        break

cap.release()
cv2.destroyAllWindows()
sudo pip3 install opencv-python
cd ~/speech_vlm
sudo python3 view_rtsp.py
演示
技术支持与产品讨论
感谢您选择我们的产品!我们在这里为您提供不同的支持,以确保您使用我们产品的体验尽可能顺畅。我们提供多种沟通渠道,以满足不同的偏好和需求。