如何在reComputer Nvidia Jetson上使用VNC远程桌面工具
介绍
VNC是一个远程桌面工具,允许您从其他PC设备远程控制您的reComputer Nvidia Jetson,实时访问图形桌面。本wiki介绍如何在reComputer Nvidia Jetson上安装和使用VNC。
先决条件
- 一台Jetson设备:适用于所有Seeed Studio Nvidia设备
如果您不想连接显示器,必须使用**HDMI虚拟插头**来启用远程桌面控制。
-800x800.png)
开始使用
安装VNC
步骤1. 在Jetson上安装VNC:
 sudo apt update
 sudo apt install vino
步骤 2. 设置 VNC 服务器在每次登录时自动启动:
 cd /usr/lib/systemd/user/graphical-session.target.wants
 sudo ln -s ../vino-server.service ./.
步骤 3. 配置 VNC 服务器
 gsettings set org.gnome.Vino prompt-enabled false
 gsettings set org.gnome.Vino require-encryption false
步骤 4. 设置密码以访问VNC服务器
# Replace thepassword with your desired password
 gsettings set org.gnome.Vino authentication-methods "['vnc']"
 gsettings set org.gnome.Vino vnc-password $(echo -n 'thepassword'|base64)
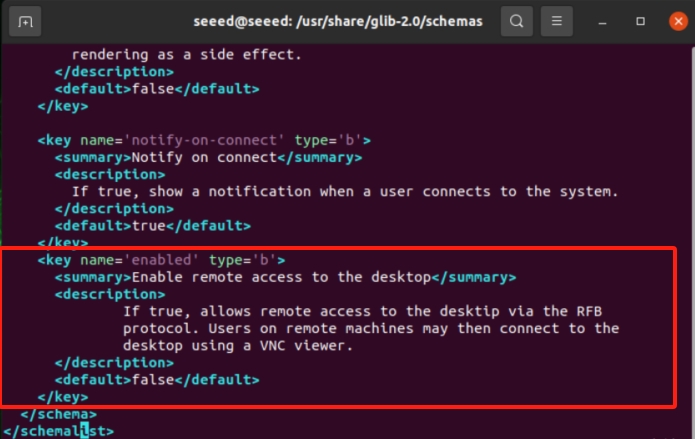
步骤 5. 编辑 org.gnome 以添加 enabled key 的参数
 cd /usr/share/glib-2.0/schemas
 sudo cp org.gnome.Vino.gschema.xml org.gnome.Vino.gschema.xml.old
 sudo vi org.gnome.Vino.gschema.xml
将以下代码粘贴到下面的位置,确保格式与下方所示相同。
<key name='enabled' type='b'>
      <summary>Enable remote access to the desktop</summary>
      <description>
              If true, allows remote access to the desktip via the RFB
              protocol. Users on remote machines may then connect to the
              desktop using a VNC viewer.
      </description>
      <default>false</default>
    </key>
编译和启动
编译:
 sudo glib-compile-schemas /usr/share/glib-2.0/schemas
 sudo reboot
开始:
/usr/lib/vino/vino-server
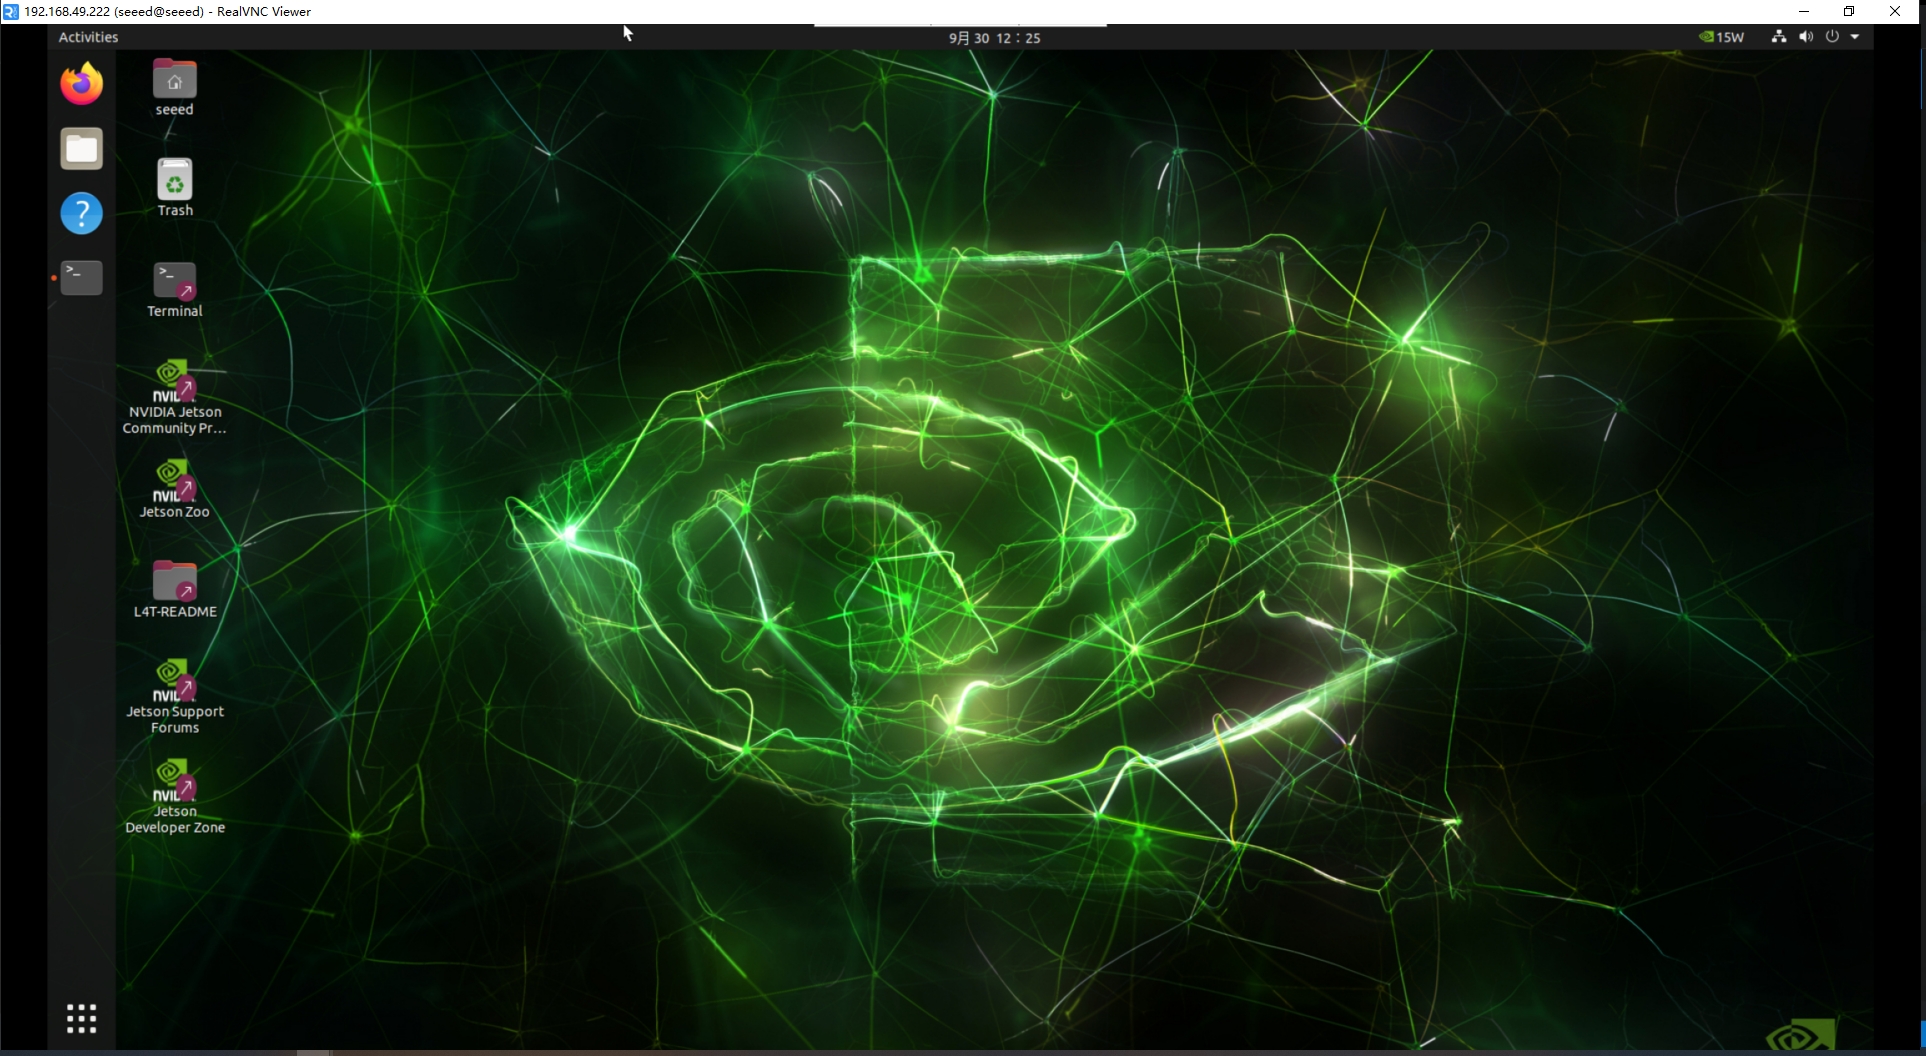
从另一台计算机连接到 VNC 服务
您需要知道 Jetson 开发套件的 IP 地址才能从另一台计算机连接。在您的开发套件上运行 ifconfig 命令,记下分配给 eth0 接口的 IP 地址(如果使用以太网)、wlan0 接口(如果使用无线网络)或 l4tbr0(如果使用 USB 设备模式以太网连接)。然后,您需要将 HDMI 虚拟插头连接到 Jetson。
-
Windows:
- 步骤 1:从这里下载并安装 VNC viewer。
- 步骤 2:启动 VNC viewer 并输入您开发套件的 IP 地址。
- 步骤 3:如果您已为 VNC 服务器配置了身份验证,请提供 VNC 密码。
-
MacOS:
- 步骤 1:打开 Finder 并从菜单栏选择 Go | Go to Folder。
- 步骤 2:输入 "/System/Library/CoreServices/Applications" 并点击 Go。
- 步骤 3:打开名为 Screen Sharing 的应用程序并输入连接信息。例如:username@。
- 步骤 4:点击连接。
- 步骤 5:如果您已为 VNC 服务器配置了身份验证,请提供 VNC 密码。
-
Linux:下面的示例使用 gvncviewer,但您喜欢的任何 vnc 客户端都应该可以正常工作。一个流行的替代方案是 remmina。
-
步骤 1:通过执行以下命令安装 gvncviewer:
sudo apt update
sudo apt install gvncviewer -
步骤 2:启动 gvncviewer。
gvncviewer -
步骤 3:如果您已为 VNC 服务器配置了身份验证,请提供 VNC 密码。
-
启用 VNC 服务器在每次登录时自动启动:
步骤 1. 在应用程序中搜索 Startup Application Preferences。

步骤 2. 点击 Add 按钮,您可以在 Name 和 Comment 字段中填入任何文本。在 Command 字段中,添加以下指令:
nohup /usr/lib/vino/vino-server > /dev/null 2>&1 &
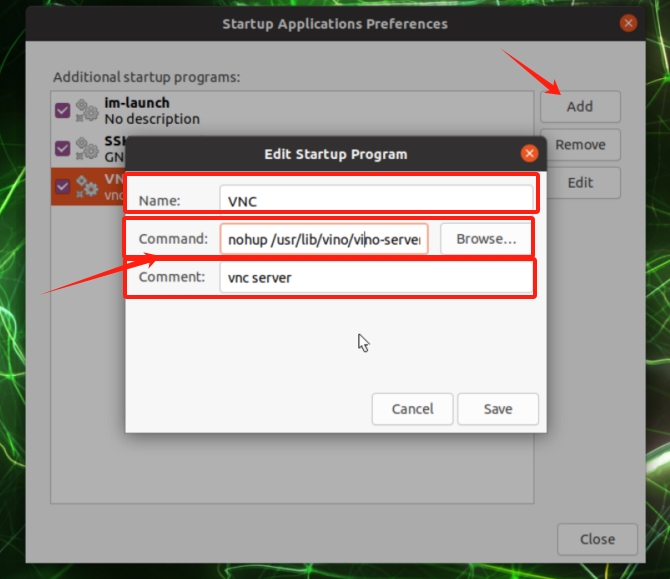
点击 Save 并重启 reComputer。断开显示器连接并将 HDMI 虚拟插头 连接到 Jetson。现在,您可以通过 VNC 进行验证。
技术支持与产品讨论
感谢您选择我们的产品!我们在这里为您提供不同的支持,以确保您使用我们产品的体验尽可能顺畅。我们提供多种沟通渠道,以满足不同的偏好和需求。