ESPHome Cookbook:XIAO 7.5" ePaper Panel
本页是针对 XIAO 7.5" Panel 的 ESPHome cookbook。通用的基础内容——选择刷写路径、通用 YAML 模板、连接到 Home Assistant——都在 Work with ESPHome 中。如果你刚接触 Seeed ePaper 上的 ESPHome,建议先快速浏览那一页;本页重点讲解基于 XIAO ESP32-C3 的面板特有的内容。

Home Assistant 简介
Home Assistant 是一个功能强大的开源家庭自动化平台,它可以让你通过一个统一的界面来控制和监控智能家居设备。它充当智能家居的中央枢纽,使你能够自动化日常流程、监控传感器,并打造更智能的居住空间。

为什么选择 Home Assistant?
-
本地控制:与许多基于云的解决方案不同,Home Assistant 在你的本地网络上运行,确保数据隐私,即使在没有互联网连接时,自动化也能正常工作。
-
广泛的设备支持:Home Assistant 可以与成千上万种不同的智能家居设备和服务集成,具有极高的通用性和前瞻性。
-
强大的自动化能力:可以创建复杂的自动化规则,响应时间、设备状态、传感器读数等各种触发条件。
-
可自定义仪表盘:你可以自行设计用户界面,展示对你最重要的信息。
为什么要在 Home Assistant 中使用电子纸显示屏?
XIAO 7.5" ePaper Panel 是 Home Assistant 的绝佳搭档,原因包括:
-
能效高:电子纸显示屏只在更新内容时消耗电能,非常适合显示天气预报、日历事件或系统状态等持久信息。
-
可视性好:与 LCD 屏不同,电子纸显示屏在任何光照条件下都易于阅读,包括直射阳光,非常适合作为壁挂式家庭控制面板。
-
电池寿命长:配合深度睡眠模式,显示屏在单次电池充电后可以运行数月,同时仍能一眼提供有价值的信息。
-
灵活集成:通过 ESPHome,显示屏可以与 Home Assistant 无缝集成,让你以优雅、始终可见的形式展示来自智能家居系统的任意数据。
这些优势使 XIAO 7.5" ePaper Panel 成为为你的 Home Assistant 系统打造节能、常亮信息面板的理想选择。
ESPHome 集成
ESPHome 是一个专为 ESP8266/ESP32 设备设计的开源固件生成工具。它允许你使用简单的 YAML 配置文件创建自定义固件,然后刷写到设备上。对于 XIAO 7.5" ePaper Panel,ESPHome 充当关键的中间件,使设备能够与 Home Assistant 通信。
系统的工作方式是将你的 YAML 配置转换为在 ESP 设备上运行的完整固件。该固件负责处理连接网络、与 Home Assistant 通信以及控制 ePaper 显示屏等所有复杂任务。结合 Home Assistant,ESPHome 为构建复杂的家庭自动化显示与控制界面提供了一个强大的平台。
下面我们来看看如何进行设置,并充分利用这块多功能显示屏。
入门指南
在开始本教程的具体内容之前,你需要准备好以下硬件。
所需材料


Home Assistant Green 是自动化家庭的最简单、最注重隐私的方式。它提供了极其简便的安装流程,并允许你通过一个系统控制所有智能设备,且所有数据默认本地存储。该主板受益于蓬勃发展的 Home Assistant 生态系统,并将通过开源社区在每个月持续改进。
我们推荐在本教程中使用 Home Assistant Green 作为 Home Assistant 主机,当然你也可以使用任何带 Supervisor 的 Home Assistant 主机。
我们也为部分 Seeed Studio 产品编写了 Home Assistant 的安装教程,请参考以下内容。
- 在 ODYSSEY-X86 上使用 Home Assistant 入门
- 在 reTerminal 上使用 Home Assistant 入门
- 在 LinkStar H68K/reRouter CM4 上使用 Home Assistant 入门
如果你没有使用 Seeed Studio 的产品,也可以在 Home Assistant 官方网站上查看并学习其他平台的 Home Assistant 安装方法。
步骤 1. 安装 ESPHome
如果你已经安装了 ESPHome,可以跳过此步骤。
进入 Settings -> Add-ons -> ADD-ON STORE


搜索 ESPHome 并点击它。然后点击 INSTALL 和 START。
如果你在插件商店中找不到 ESPHome,请确保你使用的是支持插件的 Home Assistant 安装方式(例如 Home Assistant OS 或 supervised 安装)。对于其他安装类型(如 Home Assistant Container),你可能需要使用 Docker 独立运行 ESPHome Device Builder。更多详情请参阅ESPHome 官方文档。

然后,ESPHome Builder 会出现在侧边栏中。

步骤 2. 添加新设备
进入 ESPHome 并点击 NEW DEVICE。

给设备起一个你喜欢的名字,然后点击 NEXT。


创建新设备后,点击 EDIT。

步骤 3. 安装固件
这是一个非常基础的示例,会在显示屏上显示 "Hello World!"。
主要目的是向你展示将固件安装到设备上的不同方式。
在安装 ESPHome 并添加新设备后,你可以复制下面的代码,并像下图所示那样粘贴到 captive_portal 之后。
点击此处预览完整代码
# define font to display words
font:
  - file: "gfonts://Inter@700"
    id: font1
    size: 24

# define SPI interface
spi:
  clk_pin: GPIO8
  mosi_pin: GPIO10

display:
  - platform: waveshare_epaper
    cs_pin: GPIO3
    dc_pin: GPIO5
    busy_pin:
      number: GPIO4
      inverted: true
    reset_pin: GPIO2
    model: 7.50inv2
    update_interval: 30s
    lambda: |-
      it.print(0, 0, id(font1), "Hello World!");

点击 INSTALL 将代码安装到设备上,你将看到如下图像。
- 通过浏览器安装
- 通过主机安装
- 通过 Wi-Fi 安装
如果你的 Home Assistant 主机(Raspberry PI/Green/Yellow 等)离你比较远,我们推荐使用这种方式。你可以使用手边的电脑进行安装。
首先,你需要点击 Manual download 下载已编译好的固件。

打开这个网站,我们将在这里把固件上传到 ePaper 面板。

回到 ESPHome 下载固件。

选择 Factory 格式。

使用 USB 线 将 ePaper 面板连接到电脑,然后点击 CONNECT。

选择 usbmodemxxx(Windows 为 COMxxx)并点击连接。遇到问题?点击这里。

点击 INSTALL 并选择你刚刚下载的固件。

稍等片刻,你会在屏幕上看到 “Hello world!” ~


如果你的 Home Assistant 主机(Raspberry PI/Green/Yellow 等)就在附近,我们推荐使用这种方式,因为它更简单。
在你将代码安装到设备之前,需要使用 USB 线 将此设备连接到运行 Home Assistant 的 Raspberry Pi 或 HA Green(Yellow)等设备。
按照下图所示点击选项,将代码安装到设备上。设备处于深度睡眠模式时没有找到端口?

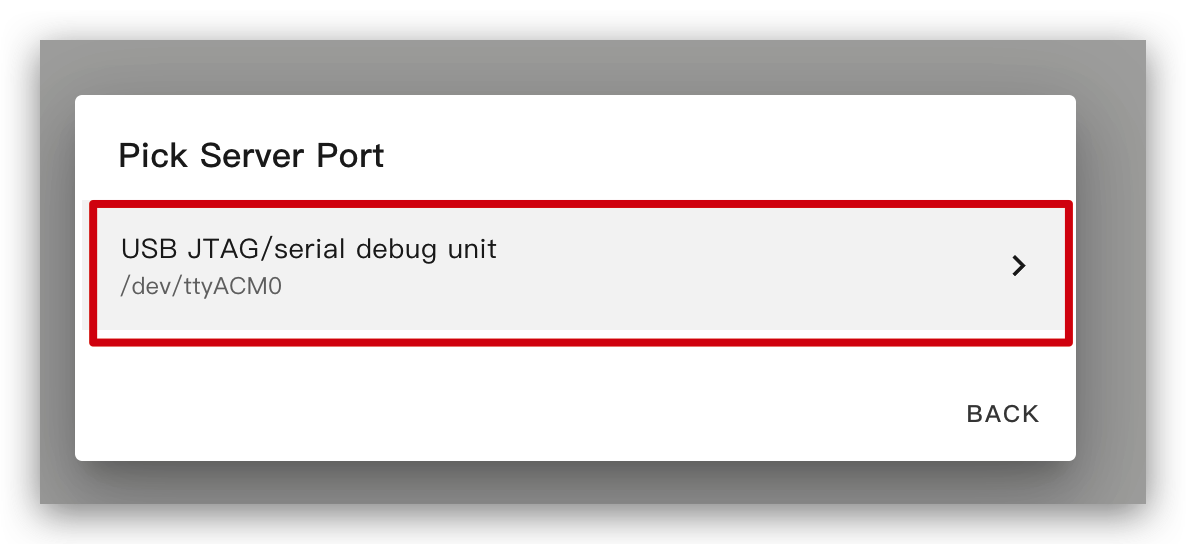
稍等片刻,你会看到如下图所示的反馈。这意味着代码已成功运行。

这是最简单的方式,但前提是首次安装程序时,你需要先使用左侧的方法将程序上传到 ePaper 面板。之后,你就可以通过 Wi-Fi 上传。同时,请确保你的 YAML 配置中包含正确配置的 ota 和 api 部分,并带有有效的加密密钥,以保证此方法可以正常工作。
通过这种方式,你无需将 ePaper 面板连接到任何设备,只需确保它在线即可。
点击该选项,固件就会自动安装到 ePaper 面板上。

稍等片刻,你会看到如下图所示的反馈。如果失败,可能是信号较弱。请将设备移近路由器。遇到问题?点击这里。

基本用法
1. 显示图形
这个示例会在屏幕上显示图形。
在安装 ESPHome 并添加新设备后,你可以复制下面的代码,并按照下图所示粘贴到 captive_portal 部分。
点击这里复制代码。
spi:
  clk_pin: GPIO8
  mosi_pin: GPIO10

display:
  - platform: waveshare_epaper
    model: 7.50inv2
    cs_pin: GPIO3
    dc_pin: GPIO5
    reset_pin: GPIO2
    busy_pin:
      number: GPIO4
      inverted: true
    update_interval: 5min
    lambda: |-
      it.rectangle(10, 10, 100, 50);
      it.rectangle(150, 10, 50, 50);
      it.circle(250, 35, 25);

      it.filled_rectangle(10, 80, 100, 50);
      it.filled_rectangle(150, 80, 50, 50);
      it.filled_circle(250, 105, 25);

当你看到如下图所示的反馈时,说明代码已成功运行。
你也可以点击这里查看更多用法。

2. 在 HA 中显示信息
这个示例会在屏幕上显示 HA 中的信息。
首先,你需要将此设备添加到 HA。否则,你无法从 HA 获取信息。
如果 HA 没有显示该设备,你应该先运行上面的示例。运行完上面的示例后,你就可以在 HA 中看到该设备。
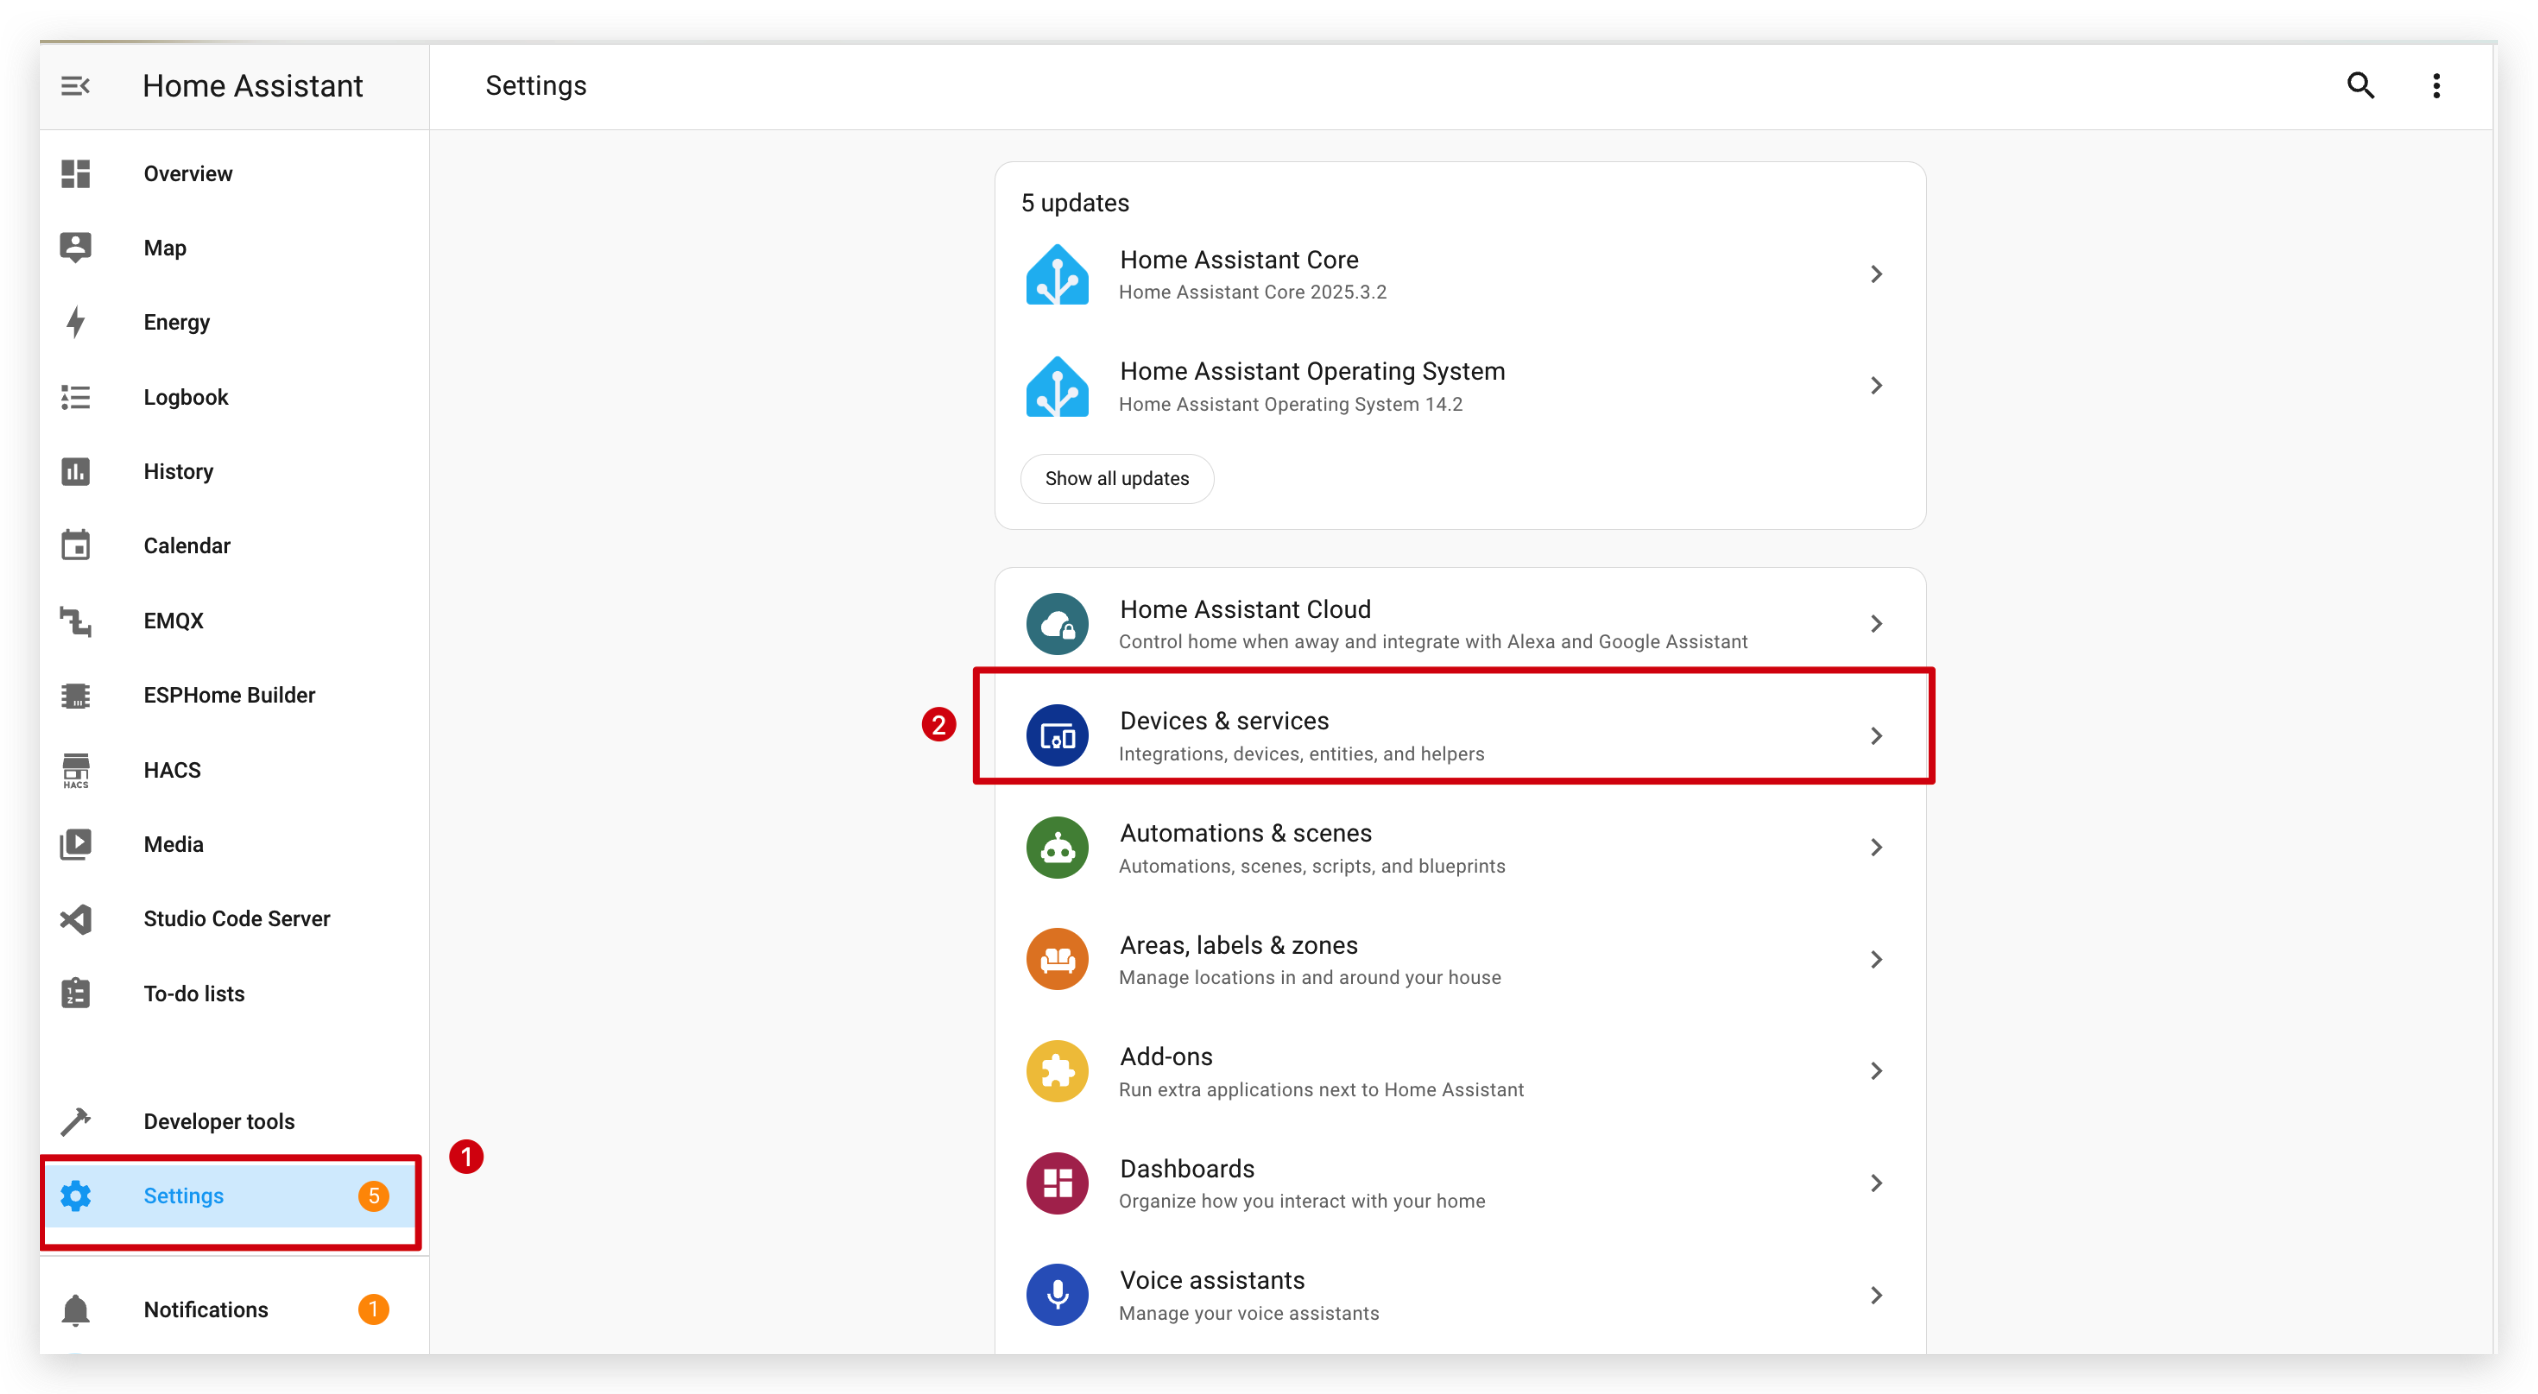

然后,点击 SUBMIT 和 FINISH。


在安装 ESPHome 并添加新设备后,你可以复制下面的代码,并按照下图所示粘贴到 captive_portal 之后。
点击这里预览完整代码
# Define font to show info
font:
  - file: "gfonts://Inter@700"
    id: myFont
    size: 24

# Get info from HA, as string format
text_sensor:
  - platform: homeassistant
    entity_id: weather.forecast_home
    id: myWeather
    internal: true
  - platform: homeassistant
    entity_id: weather.forecast_home
    id: myTemperature
    attribute: "temperature"
    internal: true

# Get info from HA, as float format
sensor:
  - platform: homeassistant
    entity_id: weather.forecast_home
    id: myPressure
    attribute: "pressure"
    internal: true

# Display info via SPI
spi:
  clk_pin: GPIO8
  mosi_pin: GPIO10

display:
  - platform: waveshare_epaper
    cs_pin: GPIO3
    dc_pin: GPIO5
    busy_pin:
      number: GPIO4
      inverted: true
    reset_pin: GPIO2
    model: 7.50inv2
    update_interval: 30s
    lambda: |-
      //print info in log
      ESP_LOGD("epaper", "weather: %s", id(myWeather).state.c_str());
      ESP_LOGD("epaper", "temperature: %s", id(myTemperature).state.c_str());
      ESP_LOGD("epaper", "pressure: %.1f", id(myPressure).state);
      //display info in epaper screen
      it.printf(100, 100, id(myFont), "%s", id(myWeather).state.c_str());
      it.printf(100, 150, id(myFont), "%s", id(myTemperature).state.c_str());
      it.printf(100, 200, id(myFont), "%.1f", id(myPressure).state);
将这些代码安装到你的设备上。

这段代码的功能是从 HA 获取 天气、温度 和 气压,并将它们显示在屏幕上。

当你看到如下图所示的反馈时,说明代码已成功运行。


3. 显示图标
本示例将在显示屏上显示图标。
首先,我们需要安装一个文件编辑器附加组件。搜索 Studio Code Server 并点击它。点击 INSTALL 和 START。


接着然后,创建一个名为 fonts 的新文件夹,并下载此文件并将其放入 fonts 文件夹中。

安装 ESPHome 并添加新设备后,你可以复制下面的代码,并像下图所示粘贴到 captive_portal 之后。
点击此处预览完整代码
font:
  - file: 'fonts/materialdesignicons-webfont.ttf'  #here is the directory to save ttf file
    id: font_mdi_large
    size: 200        # big size icon
    glyphs: &mdi-weather-glyphs
      - "\U000F0595" # weather cloudy
      - "\U000F0592" # weather hail
  - file: 'fonts/materialdesignicons-webfont.ttf'
    id: font_mdi_medium   # small size icon
    size: 40
    glyphs: *mdi-weather-glyphs

spi:
  clk_pin: GPIO8
  mosi_pin: GPIO10

display:
  - platform: waveshare_epaper
    cs_pin: GPIO3
    dc_pin: GPIO5
    busy_pin:
      number: GPIO4
      inverted: true
    reset_pin: GPIO2
    model: 7.50inv2
    update_interval: 30s
    lambda: |-
      it.printf(100, 200, id(font_mdi_medium), TextAlign::CENTER, "\U000F0595");
      it.printf(400, 200, id(font_mdi_large), TextAlign::CENTER, "\U000F0592");

当你看到如下图所示的反馈时,表示代码运行成功。

如果你想使用其他图标,可以点击下面的按钮查看更多。
选择一个你想要的图标。

复制代码并将其粘贴到 captive_portal 部分,如下图所示。


4. 显示图片
本示例将在显示屏上显示任意你喜欢的图片。
与上一个示例类似,我们需要安装 Studio Code Server 并创建一个名为 image 的新文件夹来保存图片。
然后将一张图片放入 image 文件夹。你可以点击下面的按钮下载一张图片来试一试。

安装 ESPHome 并添加新设备后,你可以复制下面的代码,并像下图所示粘贴到 captive_portal 之后。
点击此处预览完整代码
image:
  - file: /config/esphome/image/wifi.jpg    # the path where you save the image, png or jpg format
    id: myImage
    type: BINARY
    resize: 800x480    # how big you want to show, the biggest size should be as same as ePaper Penal pixel(800x480)
    invert_alpha: true   # invert color

spi:
  clk_pin: GPIO8
  mosi_pin: GPIO10

display:
  - platform: waveshare_epaper
    cs_pin: GPIO3
    dc_pin: GPIO5
    busy_pin:
      number: GPIO4
      inverted: true
    reset_pin: GPIO2
    model: 7.50inv2
    update_interval: 30s
    lambda: |-
      it.image(0, 0, id(myImage));

当你看到如下图所示的反馈时,表示代码运行成功。

示例 1. 将 Home Assistant 仪表盘截图
本示例将在显示屏上显示 HA 的截图。
首先,你需要安装一个截图附加组件 Puppet,点击此处安装。

请注意版本应当高于或等于 1.11.4。安装完成后,进入 Configuration page。我们需要为此附加组件创建一个 access_token。

请查看下一步以创建一个 token 并粘贴到这里。

前往 Security page 底部创建一个 token,然后复制并粘贴到 Puppet 附加组件中。

记得重启 Puppet 附加组件。

启动该附加组件会在端口 10000 上启动一个新服务器。你请求的任何路径都会返回该页面的截图。你需要指定想要的视口大小。
例如,要获取默认仪表盘 1000px x 1000px 的截图,请访问:
# http://192.168.1.191:10000/lovelace/0?viewport=1000x1000(My address)

http://homeassistant.local:10000/lovelace/0?viewport=1000x1000
为了减少 E Ink® 显示屏的颜色数量,你可以添加 eink 参数。该值表示要使用的颜色数量(包括黑色)。例如,对于 2 色 E Ink® 显示屏:
http://homeassistant.local:10000/lovelace/0?viewport=1000x1000&eink=2
如果你使用 eink=2,你还可以通过添加 invert 参数来反转颜色:
http://homeassistant.local:10000/lovelace/0?viewport=1000x1000&eink=2&invert
此外,你也可以截取其他页面的截图,例如 HA 中的 To-do lists 页面:
http://192.168.1.191:10000/todo?viewport=800x480&eink=2&invert
你可以在浏览器中输入此链接来查看截图效果。

安装 ESPHome 并添加新设备后,你可以复制下面的代码,并像下图所示粘贴到 captive_portal 之后。
点击此处预览完整代码
http_request:
  verify_ssl: false
  timeout: 10s
  watchdog_timeout: 15s

online_image:
  - id: dashboard_image
    format: PNG
    type: BINARY
    buffer_size: 30000
    url: http://192.168.1.191:10000/todo?viewport=800x480&eink=2&invert #change this link to your screenshot link
    update_interval: 30s
    on_download_finished:
      - delay: 0ms
      - component.update: main_display

spi:
  clk_pin: GPIO8
  mosi_pin: GPIO10

display:
  - platform: waveshare_epaper
    id: main_display
    cs_pin: GPIO3
    dc_pin: GPIO5
    busy_pin:
      number: GPIO4
      inverted: true
    reset_pin: GPIO2
    model: 7.50inv2
    update_interval: never
    lambda: |-
      it.image(0, 0, id(dashboard_image));

当你看到如下图所示的反馈时,表示代码已成功运行。

示例 2. 深度睡眠模式
在深度睡眠模式下,你无法直接向设备上传代码。你需要先进入下载模式。点击此处跳转到 Q3。
本示例将演示如何使用深度睡眠模式来节省电量。每 6 小时更新一次信息。使用 2000mAh 电池大约可以持续 3 个月。
在安装 ESPHome 并添加新设备后,你可以复制下面的代码,并像下图所示那样粘贴到 captive_portal 之后。
点击此处预览完整代码
globals:
  - id: sleep_counter
    type: int
    restore_value: yes  # key parameter, to use RTC storage
    initial_value: '0'

# Here is deep sleep part
deep_sleep:
  id: deep_sleep_1
  run_duration: 30s  # Device wake up and run 30s (enough to display)
  sleep_duration: 3min  # deep sleep for 3min

interval:
  - interval: 29s  # run this command before the end of run_duration
    then:
      - logger.log: "Entering deep sleep now..."

font:
  - file: "gfonts://Inter@700"
    id: font1
    size: 24

spi:
  clk_pin: GPIO8
  mosi_pin: GPIO10

display:
  - platform: waveshare_epaper
    cs_pin: GPIO3
    dc_pin: GPIO5
    busy_pin:
      number: GPIO4
      inverted: true
    reset_pin: GPIO2
    model: 7.50inv2
    update_interval: 3min
    lambda: |-
      id(sleep_counter) += 1;
      ESP_LOGD("main", "Wakeup count: %d", id(sleep_counter));
      it.printf(100, 100, id(font1), "Wakeup count: %d", id(sleep_counter));

你会看到一个计数器。每次唤醒时它都会加一。

示例 3. 综合示例
为了让你更好地理解,我们强烈建议你先运行上面的基础用法示例。
本示例将演示如何从 HA 获取天气信息和日历信息,并将其显示在屏幕上。更重要的是,它将使用深度睡眠模式来节省电量。每 6 小时更新一次信息。使用 2000mAh 电池大约可以持续 3 个月。
首先,你需要检查在 HA 中是否有天气组件。通常,在你安装 HA 时就会有一个。

你也可以进入 Developer Tools -> STATES 来检查在 HA 中是否有天气信息。下面是你之后将获取到的信息。

第二步,你需要在 HA 中安装日历组件。
进入 Settings -> Devices & Services -> Integrations -> Add Integration


选择 Local Calendar 并点击 SUBMIT 按钮。


之后,你会在已配置部分和侧边栏中看到 Local Calendar。

点击侧边栏中的 Calendar,并创建 3 个新日历,名称分别为 calendar、epaper_event 和 new_calendar。你也可以使用其他名称,但请在后续代码中保持名称一致。


在复制代码之前,请将 wifi.jpg、图标 ttf 文件和字体 ttf 文件 放入 image 文件夹和 fonts 文件夹中。
点击此处预览完整代码
esphome:
  name: dashboard
  friendly_name: dashboard

esp32:
  board: esp32-c3-devkitm-1
  framework:
    type: arduino

# Enable logging
logger:

# Enable Home Assistant API
api:
  encryption:
    key: "jBgx0v+Y9eKiQmYTk0SCnHgtDowNDZqgFU26Z2VTYzM="

ota:
  - platform: esphome
    password: "9f78b53ef216c5d689f7408bb1ebe728"

# -------------------------------------- Keep your code above, change your code below --------------------------------------

globals:
  - id: wifi_status
    type: int
    restore_value: no
    initial_value: "0"
  - id: first_update_done
    type: bool
    restore_value: no
    initial_value: "false"

wifi:
  ssid: !secret wifi_ssid
  password: !secret wifi_password
  on_connect:
    then:
      - lambda: |-
          id(wifi_status) = 1;
  on_disconnect:
    then:
      - lambda: |-
          id(wifi_status) = 0;


captive_portal:

# Here is deep sleep part
deep_sleep:
  id: deep_sleep_1
  run_duration: 1min  # Device wake up and run 60s (enough to pull data and update)
  sleep_duration: 60min  # deep sleep for 1h

script:
  - id: update_display
    then:
      - component.update: my_display

interval:
  # Condition: wifi connected && data retrieved && first time
  - interval: 10s  # Check every second
    then:
      - if:
          condition:
            and:
              - wifi.connected:
              - lambda: "return !id(ha_calendar_event_1).state.empty();"
              - lambda: "return !id(first_update_done);"
          then:
            - lambda: |-
                ESP_LOGD("Display", "Updating Display...");
            - script.execute: update_display  # Refresh immediately
            - lambda: "id(first_update_done) = true;"
  - interval: 59s  # run this command before 1s of run_duration end
    then:
      - logger.log: "Entering deep sleep now..."


image:
  - file: image/wifi.jpg
    type: BINARY
    id: esphome_logo
    resize: 400x240
    invert_alpha: true

# Connect to Home Assistant to get time
time:
  - platform: homeassistant
    id: homeassistant_time

text_sensor:
  - platform: homeassistant
    id: ha_calendar_event_1
    entity_id: calendar.calendar
    attribute: "message"
  - platform: homeassistant
    id: ha_calendar_start_time_1
    entity_id: calendar.calendar
    attribute: "start_time"
  - platform: homeassistant
    id: ha_calendar_end_time_1
    entity_id: calendar.calendar
    attribute: "end_time"

  - platform: homeassistant
    id: ha_calendar_event_2
    entity_id: calendar.epaper_event
    attribute: "message"
  - platform: homeassistant
    id: ha_calendar_start_time_2
    entity_id: calendar.epaper_event
    attribute: "start_time"
  - platform: homeassistant
    id: ha_calendar_end_time_2
    entity_id: calendar.epaper_event
    attribute: "end_time"

  - platform: homeassistant
    id: ha_calendar_event_3
    entity_id: calendar.new_calendar
    attribute: "message"
  - platform: homeassistant
    id: ha_calendar_start_time_3
    entity_id: calendar.new_calendar
    attribute: "start_time"
  - platform: homeassistant
    id: ha_calendar_end_time_3
    entity_id: calendar.new_calendar
    attribute: "end_time"

  - platform: homeassistant
    entity_id: weather.forecast_home
    id: myWeather
  - platform: homeassistant
    entity_id: weather.forecast_home
    id: temp
    attribute: "temperature"
  - platform: homeassistant
    entity_id: weather.forecast_home
    id: humi
    attribute: "humidity"
  - platform: homeassistant
    entity_id: weather.forecast_home
    id: press
    attribute: "pressure"
  - platform: homeassistant
    entity_id: weather.forecast_home
    id: wind
    attribute: "wind_speed"

font:
  - file: "fonts/Montserrat-Black.ttf"
    id: web_font
    size: 20
  - file: "fonts/Montserrat-Black.ttf"
    id: data_font
    size: 30
  - file: "fonts/Montserrat-Black.ttf"
    id: sensor_font
    size: 22

  - file: "gfonts://Inter@700" #
    id: font1
    size: 24

  - file: 'fonts/materialdesignicons-webfont.ttf' # Directory to save ttf file
    id: font_mdi_large
    size: 200
    glyphs: &mdi-weather-glyphs # https://pictogrammers.com/library/mdi/
      - "\U000F050F" # Thermometer
      - "\U000F058E" # Humidity
      - "\U000F059D" # Wind speed
      - "\U000F0D60" # Atmospheric pressure
      - "\U000F0590" # Cloudy weather
      - "\U000F0596" # Rainy weather
      - "\U000F0598" # Snowy weather
      - "\U000F0599" # Sunny weather
  - file: 'fonts/materialdesignicons-webfont.ttf'
    id: font_weather # Copy the above icon and change the size to 40
    size: 200
    glyphs: *mdi-weather-glyphs
  - file: 'fonts/materialdesignicons-webfont.ttf'
    id: img_font_sensor # Copy the above icon and change the size to 40
    size: 70
    glyphs: *mdi-weather-glyphs

spi:
  clk_pin: GPIO8
  mosi_pin: GPIO10

display:
  - platform: waveshare_epaper
    id: my_display
    cs_pin: GPIO3
    dc_pin: GPIO5
    busy_pin:
      number: GPIO4
      inverted: true
    reset_pin: GPIO2
    model: 7.50inv2
    update_interval: 50s
    lambda: |-
      if(id(wifi_status) == 0){
        it.image(180, 0, id(esphome_logo));
        it.print(230, 300, id(data_font), "WI-FI CONNECTING");
      }else{
        // Draw weather images here
        std::string weather_string = id(myWeather).state.c_str();
        if(weather_string == "rainy" || weather_string == "lightning" || weather_string == "pouring"){
          // Draw rainy weather image
          it.printf(120, 85, id(font_weather), TextAlign::CENTER, "\U000F0596");
        }else if(weather_string == "snowy"){
          // Draw snowy weather image
          it.printf(120, 85, id(font_weather), TextAlign::CENTER, "\U000F0598");
        }else if(weather_string == "sunny" || weather_string == "windy"){
          // Draw sunny weather image
          it.printf(120, 85, id(font_weather), TextAlign::CENTER, "\U000F0599");
        }else{
          // Draw cloudy weather image
          it.printf(120, 85, id(font_weather), TextAlign::CENTER, "\U000F0590");
        }

        auto time_now = id(homeassistant_time).now();
        // Month conversion
        const char* months[] = {
          "January", "February", "March", "April", "May", "June",
          "July", "August", "September", "October", "November", "December"
        };
        const char* month_str = months[time_now.month - 1];  // Month index starts from 0
        // Get the day
        int day = time_now.day_of_month;
        // Draw the date
        it.printf(250, 110, id(data_font), "%s %d", month_str, day);
        // Get the day of the week
        const char* days[] = {"Saturday", "Sunday", "Monday", "Tuesday", "Wednesday", "Thursday", "Friday"};
        const char* day_of_week = days[time_now.day_of_week];
        it.printf(250, 70, id(data_font), "%s", day_of_week);

        int x = 20, y = 180, w = 180, h = 120, r = 10, thickness = 4;
        // Draw four borders
        it.filled_rectangle(x + r, y, w - 2 * r, thickness); // Top border
        it.filled_rectangle(x + r, y + h - thickness, w - 2 * r, thickness); // Bottom border
        it.filled_rectangle(x, y + r, thickness, h - 2 * r); // Left border
        it.filled_rectangle(x + w - thickness, y + r, thickness, h - 2 * r); // Right border
        // Draw four rounded corners
        it.filled_circle(x + r, y + r, r); // Top-left corner
        it.filled_circle(x + w - r, y + r, r); // Top-right corner
        it.filled_circle(x + r, y + h - r, r); // Bottom-left corner
        it.filled_circle(x + w - r, y + h - r, r); // Bottom-right corner
        // Fill the inside with black to form a border
        it.filled_rectangle(x + thickness, y + thickness, w - 2 * thickness, h - 2 * thickness, COLOR_OFF);
        // Temperature
        it.printf(x+10, y+10, id(sensor_font), "Temperature");
        it.printf(x+45, y+75, id(img_font_sensor), TextAlign::CENTER, "\U000F050F");
        // Get temperature data
        it.printf(x+75,y+65, id(data_font), "%s°F", id(temp).state.c_str());

        x = 220;
        y = 180;
        // Draw four borders
        it.filled_rectangle(x + r, y, w - 2 * r, thickness); // Top border
        it.filled_rectangle(x + r, y + h - thickness, w - 2 * r, thickness); // Bottom border
        it.filled_rectangle(x, y + r, thickness, h - 2 * r); // Left border
        it.filled_rectangle(x + w - thickness, y + r, thickness, h - 2 * r); // Right border
        // Draw four rounded corners
        it.filled_circle(x + r, y + r, r); // Top-left corner
        it.filled_circle(x + w - r, y + r, r); // Top-right corner
        it.filled_circle(x + r, y + h - r, r); // Bottom-left corner
        it.filled_circle(x + w - r, y + h - r, r); // Bottom-right corner
        // Fill the inside with black to form a border
        it.filled_rectangle(x + thickness, y + thickness, w - 2 * thickness, h - 2 * thickness, COLOR_OFF);
        // Humidity
        it.printf(x+10, y+10, id(sensor_font), "Humidity");
        it.printf(x+45, y+75, id(img_font_sensor), TextAlign::CENTER, "\U000F058E");
        // Get humidity data
        it.printf(x+75,y+65, id(data_font), "%s%%", id(humi).state.c_str());

        x = 20;
        y = 320;
        // Draw four borders
        it.filled_rectangle(x + r, y, w - 2 * r, thickness); // Top border
        it.filled_rectangle(x + r, y + h - thickness, w - 2 * r, thickness); // Bottom border
        it.filled_rectangle(x, y + r, thickness, h - 2 * r); // Left border
        it.filled_rectangle(x + w - thickness, y + r, thickness, h - 2 * r); // Right border
        // Draw four rounded corners
        it.filled_circle(x + r, y + r, r); // Top-left corner
        it.filled_circle(x + w - r, y + r, r); // Top-right corner
        it.filled_circle(x + r, y + h - r, r); // Bottom-left corner
        it.filled_circle(x + w - r, y + h - r, r); // Bottom-right corner
        // Fill the inside with black to form a border
        it.filled_rectangle(x + thickness, y + thickness, w - 2 * thickness, h - 2 * thickness, COLOR_OFF);
        // Air Pressure
        it.printf(x+10, y+10, id(sensor_font), "Air Pressure");
        it.printf(x+45, y+75, id(img_font_sensor), TextAlign::CENTER, "\U000F0D60");
        // Get atmospheric pressure data
        it.printf(x+85,y+50, id(data_font), "%s", id(press).state.c_str());
        it.printf(x+85,y+78, id(sensor_font), "inHg");

        x = 220;
        y = 320;
        // Draw four borders
        it.filled_rectangle(x + r, y, w - 2 * r, thickness); // Top border
        it.filled_rectangle(x + r, y + h - thickness, w - 2 * r, thickness); // Bottom border
        it.filled_rectangle(x, y + r, thickness, h - 2 * r); // Left border
        it.filled_rectangle(x + w - thickness, y + r, thickness, h - 2 * r); // Right border
        // Draw four rounded corners
        it.filled_circle(x + r, y + r, r); // Top-left corner
        it.filled_circle(x + w - r, y + r, r); // Top-right corner
        it.filled_circle(x + r, y + h - r, r); // Bottom-left corner
        it.filled_circle(x + w - r, y + h - r, r); // Bottom-right corner
        // Fill the inside with black to form a border
        it.filled_rectangle(x + thickness, y + thickness, w - 2 * thickness, h - 2 * thickness, COLOR_OFF);
        // Wind Speed
        it.printf(x+10, y+10, id(sensor_font), "Wind Speed");
        it.printf(x+45, y+75, id(img_font_sensor), TextAlign::CENTER, "\U000F059D");
        // Get wind speed data
        it.printf(x+85,y+50, id(data_font), "%s", id(wind).state.c_str());
        it.printf(x+85,y+78, id(sensor_font), "mph");

        // Draw a vertical line
        it.filled_rectangle(430, 30, 5, 430);
        // Right section
        it.printf(540, 40, id(data_font), "Calendar");

        // Define event structure
        struct Event {
            std::string message;
            std::string start_time;
            std::string end_time;
            time_t start_timestamp;
        };

        // Parse time string to time_t (UNIX timestamp)
        auto parse_time = [](const std::string &time_str) -> time_t {
            struct tm timeinfo = {};
            if (strptime(time_str.c_str(), "%Y-%m-%d %H:%M:%S", &timeinfo) == nullptr) {
                return 0;  // Invalid time
            }
            return mktime(&timeinfo);
        };

        // Create event list
        std::vector<Event> events = {
            {id(ha_calendar_event_1).state, id(ha_calendar_start_time_1).state, id(ha_calendar_end_time_1).state, parse_time(id(ha_calendar_start_time_1).state)},
            {id(ha_calendar_event_2).state, id(ha_calendar_start_time_2).state, id(ha_calendar_end_time_2).state, parse_time(id(ha_calendar_start_time_2).state)},
            {id(ha_calendar_event_3).state, id(ha_calendar_start_time_3).state, id(ha_calendar_end_time_3).state, parse_time(id(ha_calendar_start_time_3).state)}
        };
        ESP_LOGD("myCalendar", "Start Time: %s -> %ld", id(ha_calendar_start_time_1).state.c_str(), parse_time(id(ha_calendar_start_time_1).state));
        ESP_LOGD("myCalendar", "Start Time: %s -> %ld", id(ha_calendar_start_time_2).state.c_str(), parse_time(id(ha_calendar_start_time_2).state));
        ESP_LOGD("myCalendar", "Start Time: %s -> %ld", id(ha_calendar_start_time_3).state.c_str(), parse_time(id(ha_calendar_start_time_3).state));

        // Filter invalid events (start_timestamp == 0)
        events.erase(std::remove_if(events.begin(), events.end(), [](const Event &e) { return e.start_timestamp == 0; }), events.end());

        // Sort by `start_timestamp` (earliest to latest)
        std::sort(events.begin(), events.end(), [](const Event &a, const Event &b) {
            return a.start_timestamp < b.start_timestamp;
        });

        // Define a function to format time
        auto format_time = [](std::string time_str) -> std::string {
            struct tm timeinfo;
            if (strptime(time_str.c_str(), "%Y-%m-%d %H:%M:%S", &timeinfo) == nullptr) {
                return "Invalid";
            }
            char buffer[10];
            strftime(buffer, sizeof(buffer), "%I:%M%p", &timeinfo); // Convert to 12-hour format
            return std::string(buffer);
        };
        // Parse date
        auto format_date = [](const std::string &time_str) -> std::string {
            struct tm timeinfo = {};
            if (strptime(time_str.c_str(), "%Y-%m-%d %H:%M:%S", &timeinfo) == nullptr) {
                return "Invalid";
            }
            char buffer[6];  // Need to store "MM-DD\0"
            strftime(buffer, sizeof(buffer), "%m-%d", &timeinfo);
            return std::string(buffer);
        };

        // Draw events
        int even_x_start_offset = 460;
        int even_y_start_offset = 80;
        for (const auto &event : events) {
          if(even_y_start_offset >= 420){
            break;
          }

          // Format time
          std::string formatted_date = format_date(event.start_time);
          std::string formatted_start_time = format_time(event.start_time);
          std::string formatted_end_time = format_time(event.end_time);

          // Combine time range string
          std::string time_range = formatted_start_time + " - " + formatted_end_time;
          time_range = formatted_date + "  " + time_range;
          if(formatted_start_time == "Invalid" || formatted_end_time == "Invalid"){
            time_range.clear();
          }
          // Display time range, e.g., "10:00AM - 11:00AM"
          it.printf(even_x_start_offset, even_y_start_offset, id(sensor_font), "%s", time_range.c_str());
          even_y_start_offset += 30;
          // Display event name
          it.printf(even_x_start_offset, even_y_start_offset, id(sensor_font), "%s", event.message.c_str());
          even_y_start_offset += 40;
        }
      }
当你看到如下图所示的反馈时,表示代码已成功运行。

常见问题
Q1:为什么没有数据?


在这种情况下,你需要进入 Settings -> Devices & Services -> Integrations 来**重新配置(RECONGFIGURE)**设备。还没有找到你的 ePaper Panel?尝试重启 HA。
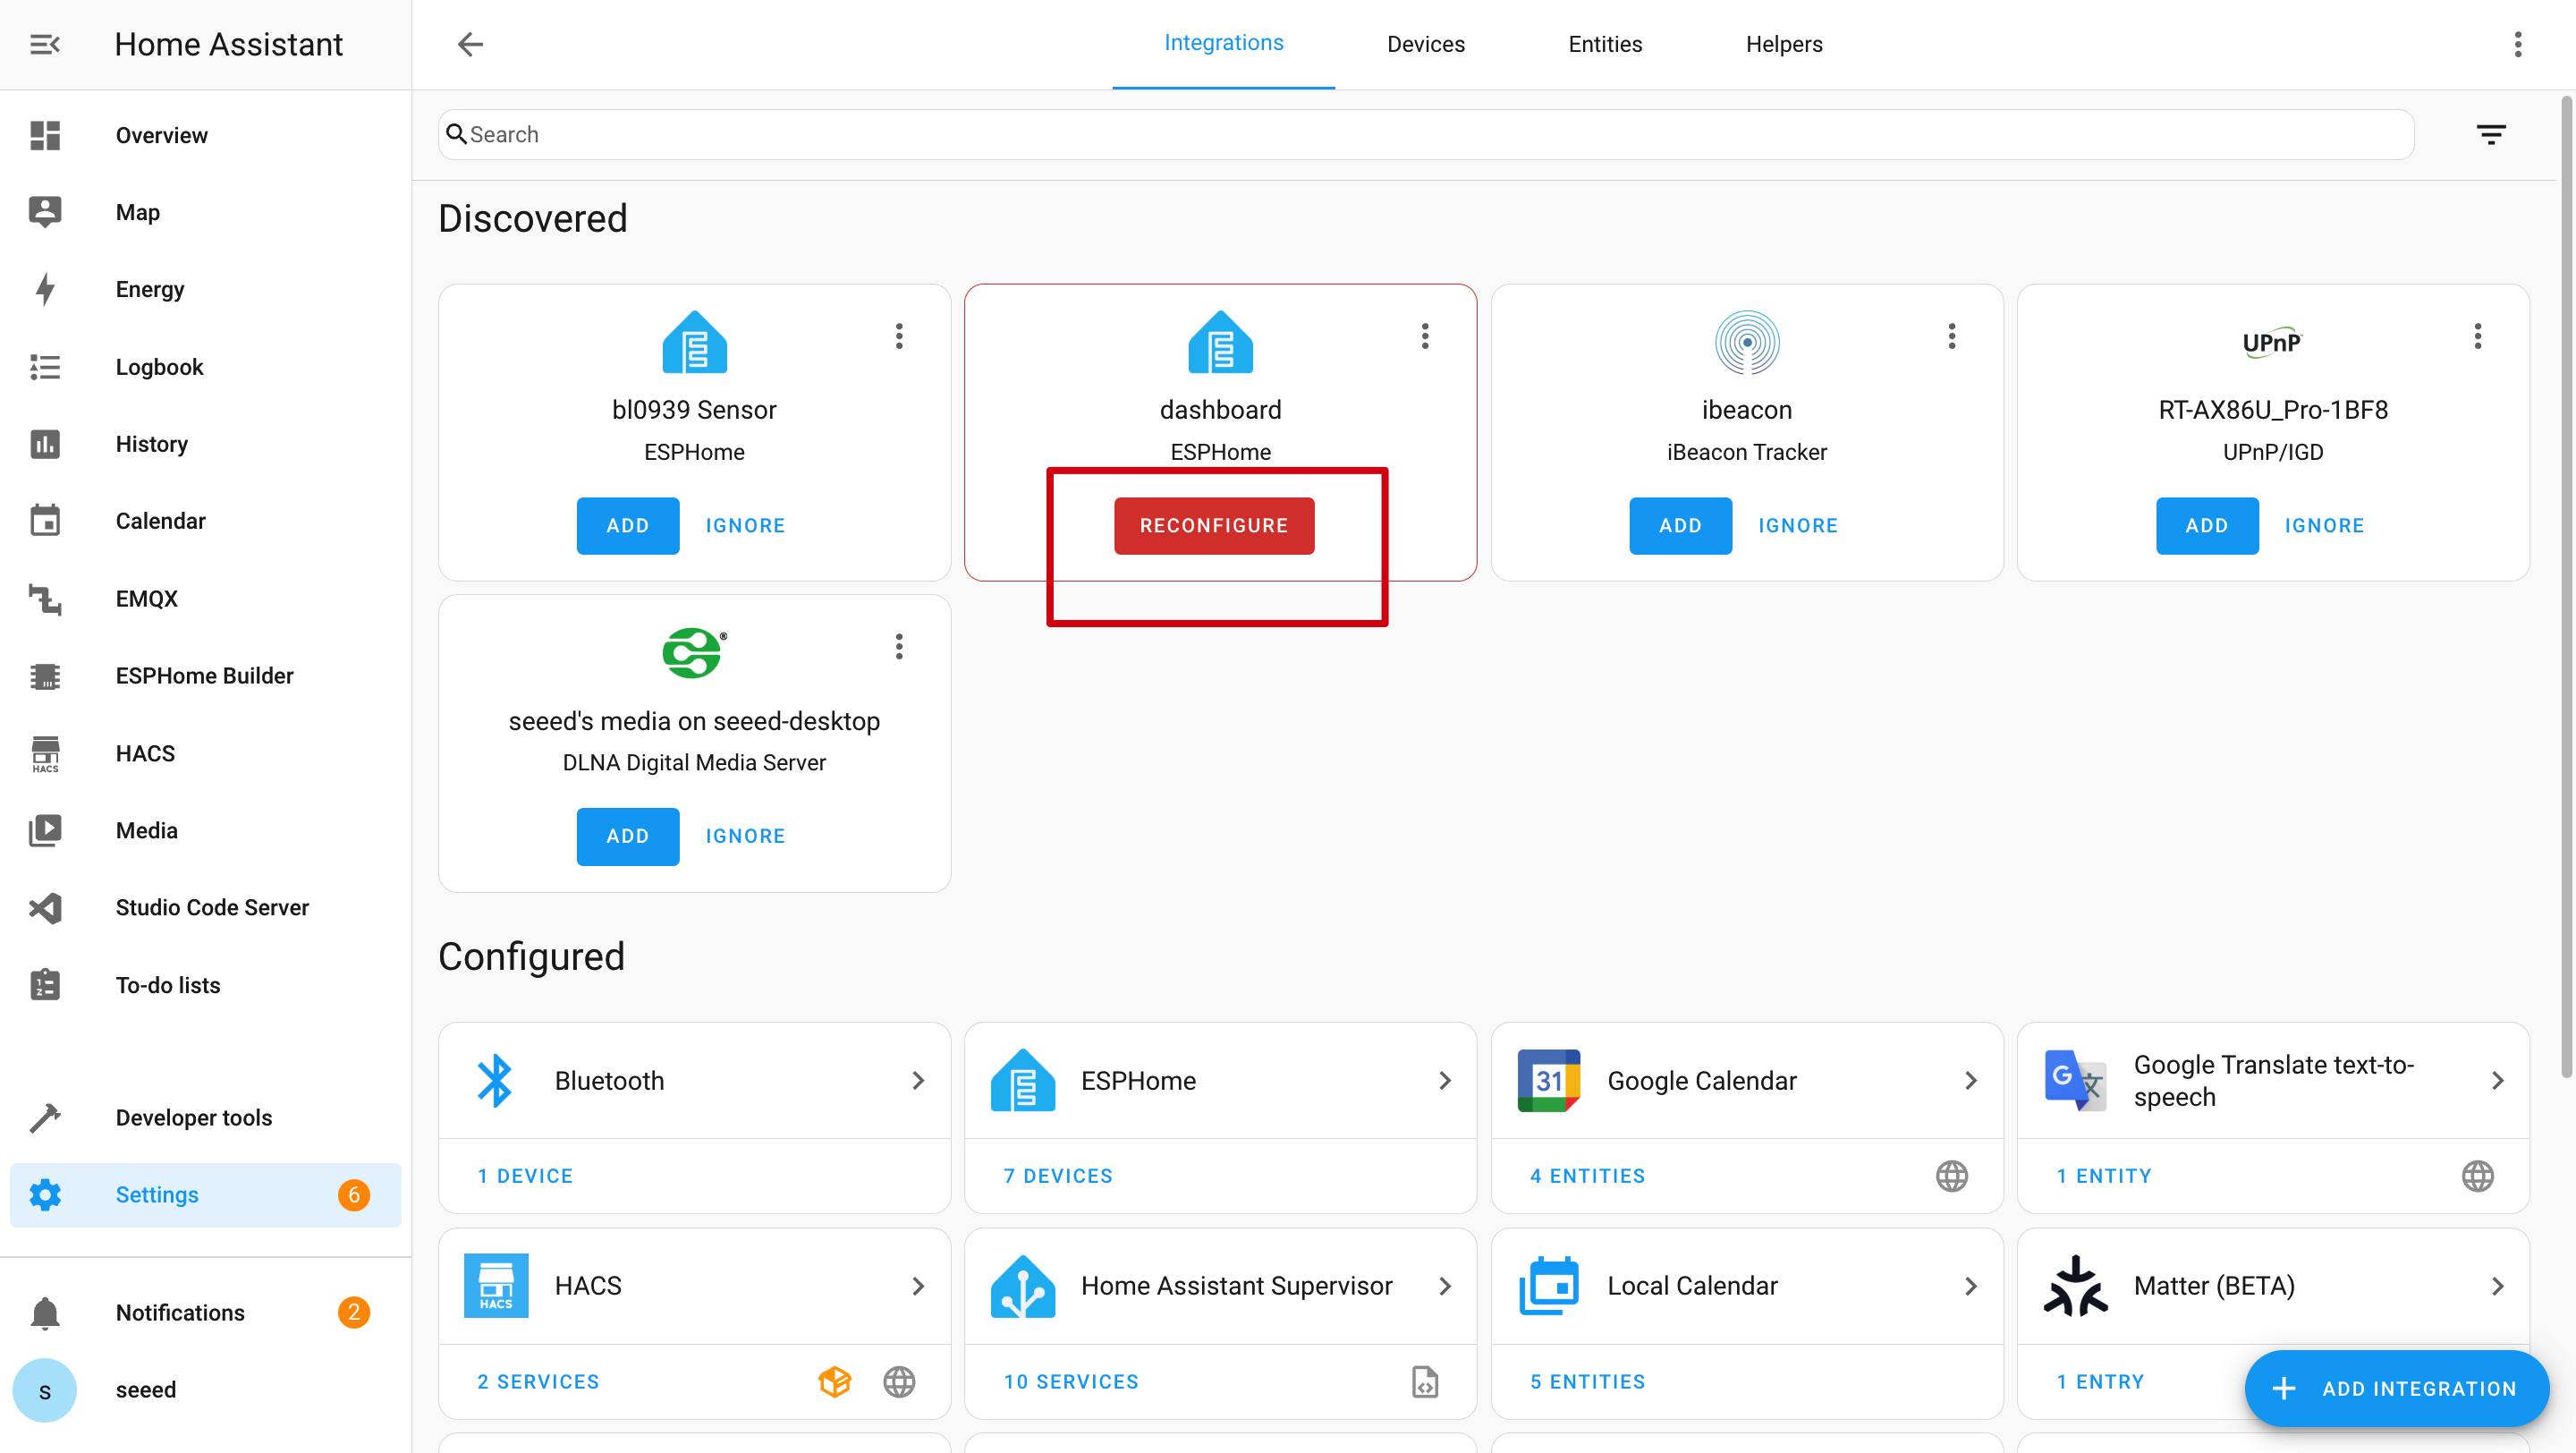
Q2:为什么我在 Home Assistant 中获取不到这些数据?
在这种情况下,你需要进入 Settings -> Devices & Services -> Integrations 来**添加(ADD)**你的设备到 HA。
Q3:设备处于深度睡眠模式时,如何上传新程序?


当设备处于深度睡眠模式时,你无法直接上传新程序。
-
首先,确保设备已开启,然后按下板子背面的 Boot 按钮。
-
单击一次 Reset 按钮,并松开 Boot 按钮。
-
之后,关闭电池开关并拔掉电源线。
-
最后,重新插上电源线并上传新程序。
Q4:电池能用多久?
记得在充电时打开电池按钮。否则,电池将无法充电。
根据我们的测试,每 6 小时刷新一次屏幕,在深度睡眠模式下电池可持续约 3 个月。
Q5:ePaper Panel 无法连接到你的电脑?

尝试多次拔插,或者根据提示安装驱动程序。
Q6:通过 Wi-Fi 上传程序失败?

在这种情况下,你的 ePaper Panel 处于离线或深度睡眠模式。请让它重新上线或将其唤醒。
资源
- [STP]: 3D 模型外壳
- [PDF]: ePaper 驱动板原理图 PDF
技术支持与产品讨论
感谢你选择我们的产品!我们将为你提供多种支持,以确保你在使用我们产品时的体验尽可能顺畅。我们提供多种沟通渠道,以满足不同的偏好和需求。