Seeed Studio XIAO ESP32-C5 的蓝牙使用
| Seeed Studio XIAO ESP32-C5 |
|---|
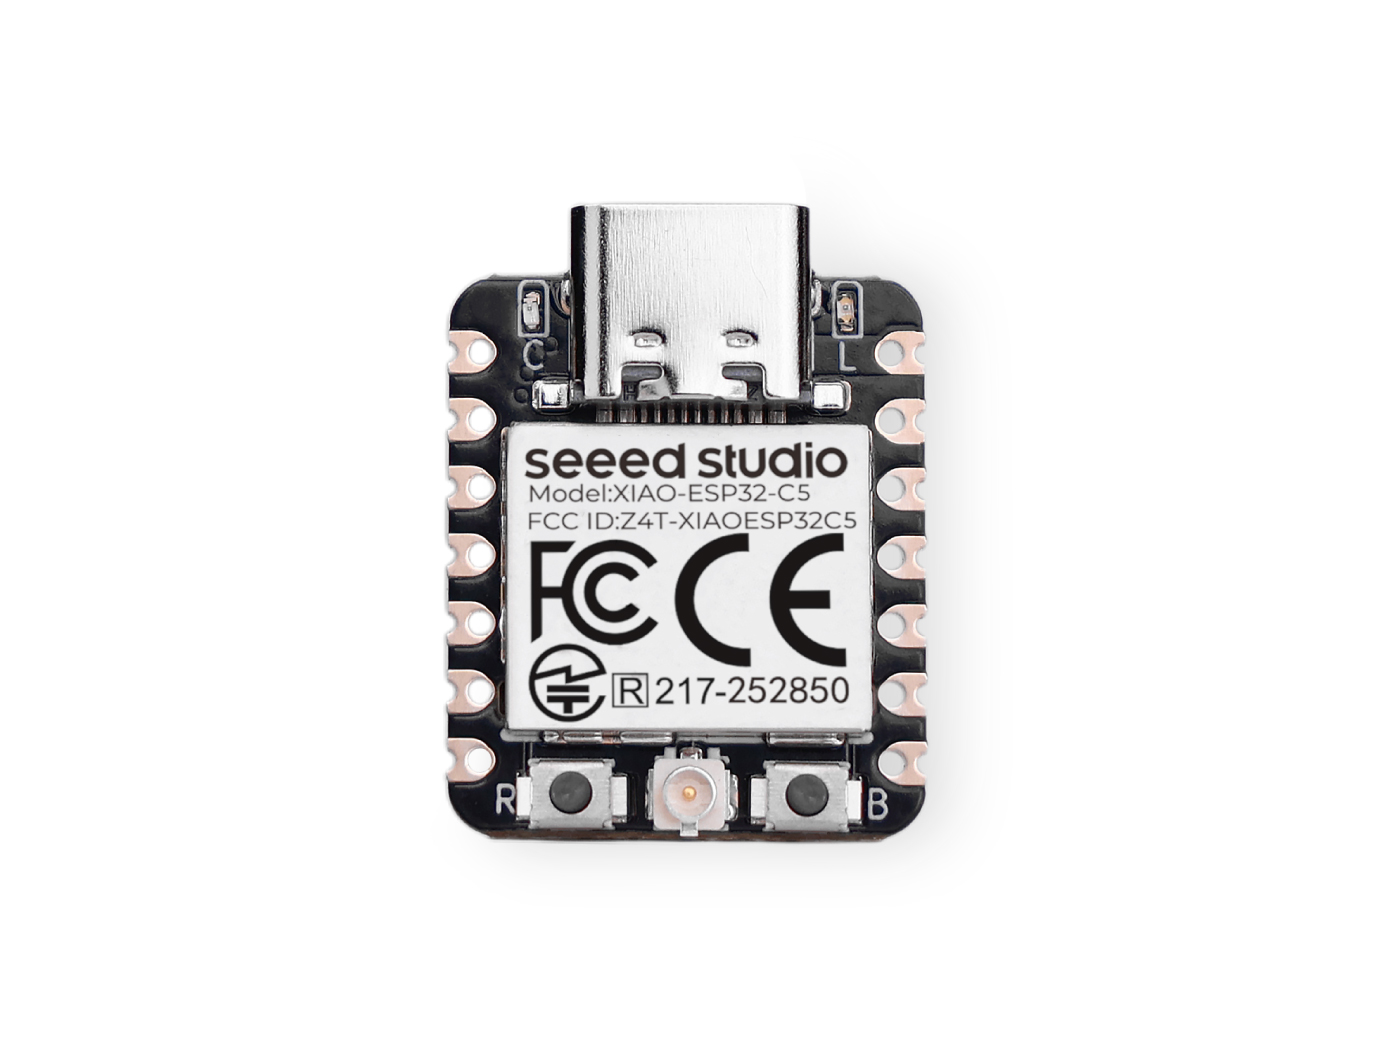 |
Seeed Studio XIAO ESP32-C5 是一款功能强大的开发板,支持 Bluetooth 5、BLE 和 Mesh 网络,使其成为需要无线连接的各类物联网应用的理想选择。凭借出色的射频性能,XIAO ESP32-C5 能够在多种距离范围内提供可靠且高速的无线通信,使其既适用于短距离也适用于远距离的无线应用。在本教程中,我们将重点介绍 XIAO ESP32-C5 蓝牙功能的一些基础特性,例如如何扫描附近的蓝牙设备、如何建立蓝牙连接,以及如何通过蓝牙连接收发数据。
入门指南
天线安装
在 Seeed Studio XIAO ESP32-C5 的包装内,配有一个专用的 Wi-Fi/BT 天线连接器。为了获得最佳的 WiFi/Bluetooth 信号强度,你需要取出包装中附带的天线并将其连接到该连接器上。
蓝牙低功耗(BLE)使用
Bluetooth Low Energy,简称 BLE,是一种节能型的蓝牙变体。BLE 的主要应用是短距离传输少量数据(低带宽)。与始终保持连接的传统蓝牙不同,BLE 除非在发起连接时,否则会一直保持在休眠模式。
ESP32-C5 只支持 BLE,不支持传统蓝牙(Bluetooth Classic)
由于这些特性,BLE 非常适合在纽扣电池上运行、需要周期性交换少量数据的应用。例如,BLE 在医疗保健、健身、追踪、Beacon、安防以及家庭自动化等行业中有着广泛用途。
这使得它的功耗非常低。BLE 的功耗大约比传统蓝牙低 100 倍(具体取决于使用场景)。
关于 XIAO ESP32-C5 的 BLE 部分,我们将在接下来的三个小节中介绍其使用方法。
- 一些基础概念 -- 我们首先会了解一些在 BLE 中可能经常用到的概念,以帮助我们理解 BLE 程序的执行过程和思路。
- BLE 扫描器 -- 本节将讲解如何搜索附近的蓝牙设备,并在串口监视器中打印出来。
- BLE 服务器/客户端 -- 本节将讲解如何将 XIAO ESP32-C5 作为服务器和客户端来发送和接收指定的数据消息,同时也会用于从手机向 XIAO 接收或发送消息。
一些基础概念
服务器和客户端
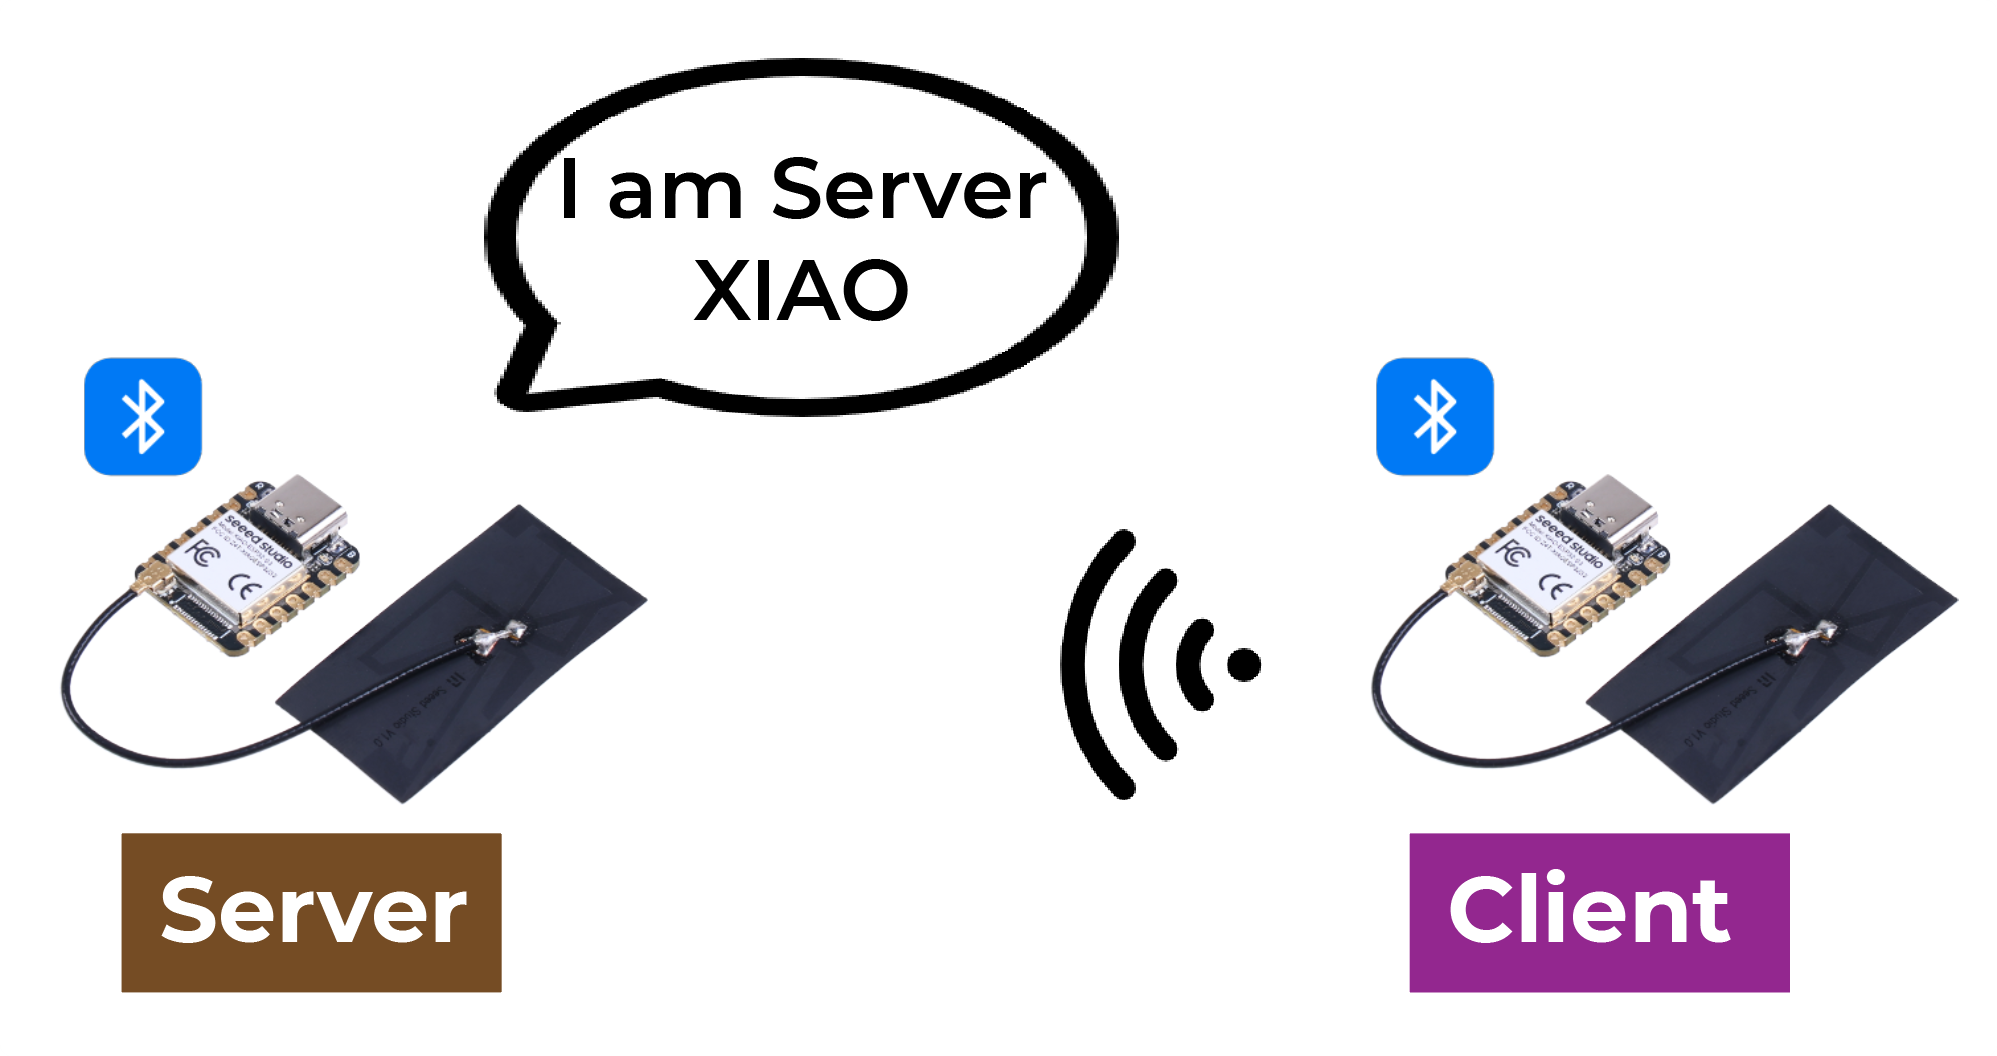
在蓝牙低功耗中,设备分为两种类型:服务器和客户端。XIAO ESP32-C5 既可以作为客户端,也可以作为服务器。
服务器会广播自身的存在,以便被其他设备发现,并包含客户端可以读取的数据。客户端会扫描附近的设备,当找到目标服务器后,就会建立连接并监听接收数据。这被称为点对点通信。
Attribute(属性)
Attribute 实际上就是一条数据。每个蓝牙设备都是用来提供某种服务的,而服务是数据的集合,这个集合可以称为数据库,数据库中的每一条记录就是一个 Attribute,所以这里我把 Attribute 翻译为数据条目。你可以把一个蓝牙设备想象成一张表格,表格中的每一行就是一个 Attribute。

GATT
当两个蓝牙设备建立连接时,它们需要一种协议来确定如何通信。GATT(Generic Attribute Profile,通用属性配置文件)就是这样一种协议,它定义了蓝牙设备之间数据是如何传输的。
在 GATT 协议中,设备的功能和属性被组织成称为服务(Service)、特征(Characteristic)和描述符(Descriptor)的结构。服务表示设备提供的一组相关功能和特性。每个服务可以包含多个特征,特征定义了服务的某个属性或行为,例如传感器数据或控制命令。每个特征都有唯一的标识符和一个值,通过读取或写入该值来进行通信。描述符用于描述特征的元数据,例如特征值的格式和访问权限。
通过使用 GATT 协议,蓝牙设备可以在不同的应用场景中进行通信,例如传输传感器数据或控制远程设备。
BLE Characteristic(特征)
ATT 是 Attribute Protocol(属性协议)的缩写。它是 BLE 中进行数据交换的底层机制。ATT 依赖一组命令,例如 Requests、Responses、Notifications 和 Indications。在蓝牙协议栈中,ATT 是负责传输数据的层,因此在分析蓝牙数据包时,它是主要关注的对象。
ATT 命令正式名称为 ATT PDU(Protocol Data Unit,协议数据单元)。它包括 4 大类:读(read)、写(write)、通知(notify)和指示(indicate)。这些命令可以分为两种类型:像 Write Request 和 Indication 这样的操作需要对端确认,而 Write Command 和 Notification 则不需要。
Service 和 Characteristic 定义在 GATT 层。服务端提供 Service,Service 就是数据,而数据就是 Attribute,Service 和 Characteristic 是数据的逻辑呈现形式,或者说用户能够看到的数据最终都会被转换为 Service 和 Characteristic。
我们从手机端的角度来看一下 Service 和 Characteristic 是什么样子的。nRF Connect 是一款应用,它可以非常直观地向我们展示每个数据包应该是什么样子。
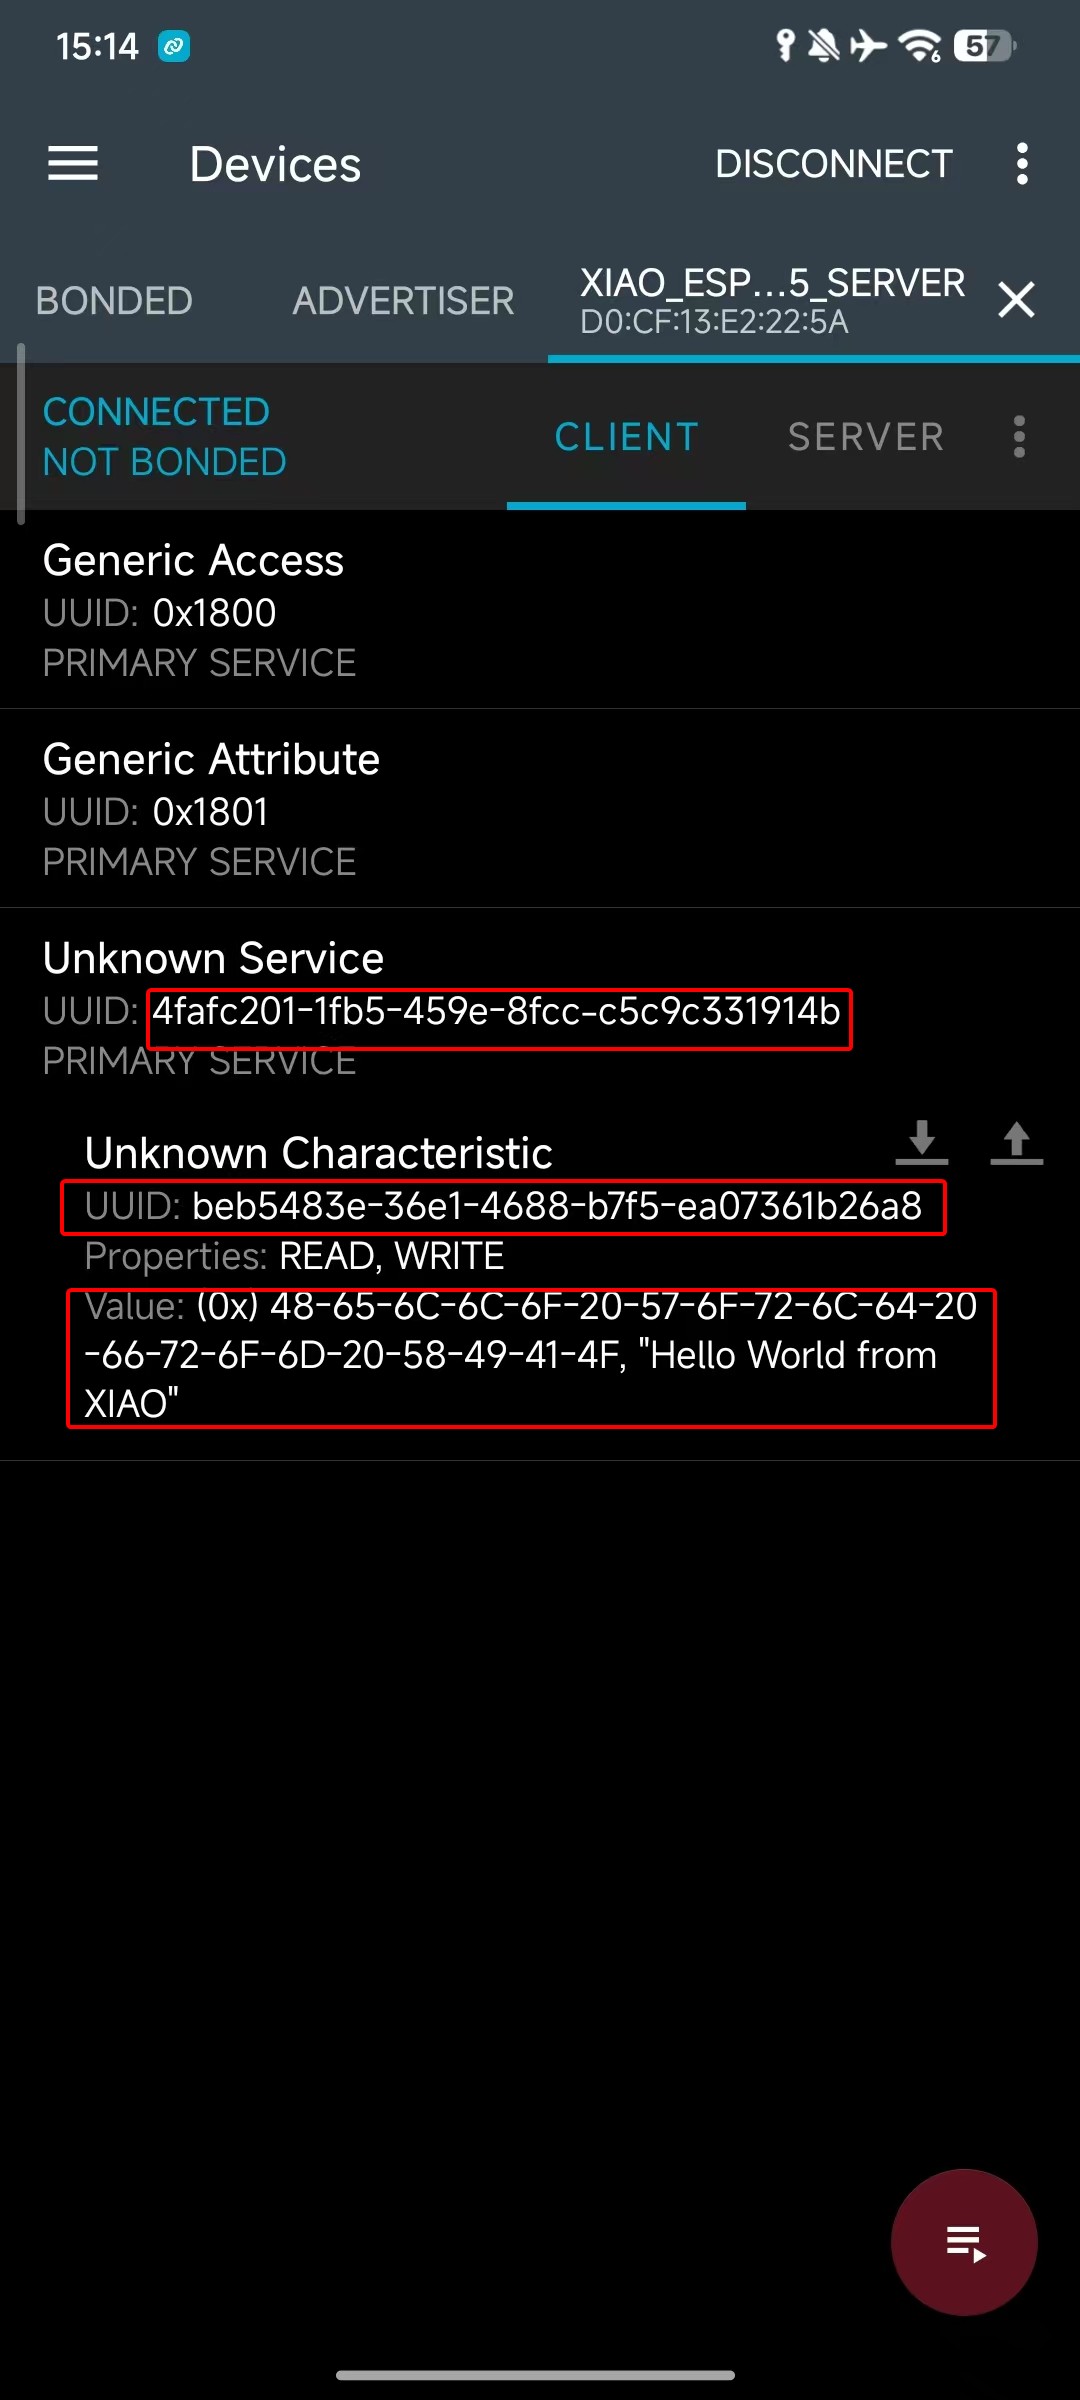
可以看到,在蓝牙规范中,每一个具体的蓝牙应用都是由多个 Service 组成,而每个 Service 又由多个 Characteristic 组成。一个 Characteristic 由 UUID、Properties 和 Value 构成。
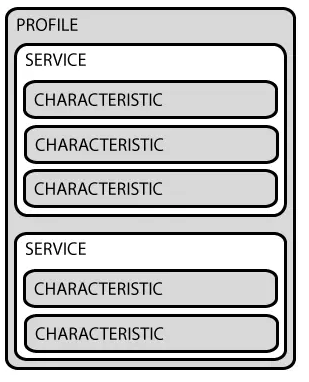
Properties 用于描述对某个特征可以进行的操作类型和权限,例如是否支持读、写、通知等。这与一个 ATT PDU 中包含的四大类操作类似。
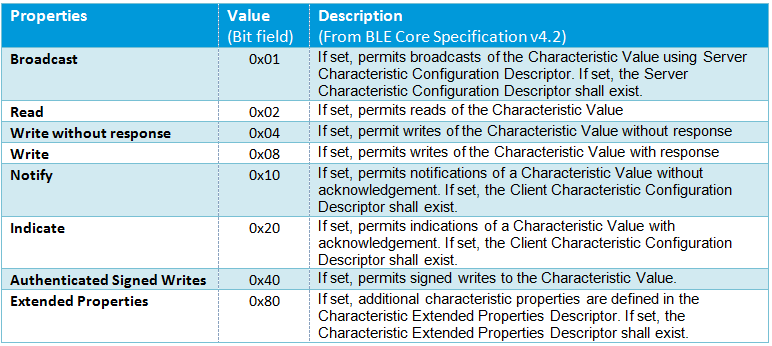
UUID
每个 Service、Characteristic 和 Descriptor 都有一个 UUID(Universally Unique Identifier,通用唯一标识符)。UUID 是一个唯一的 128 位(16 字节)数字。例如:
ea094cbd-3695-4205-b32d-70c1dea93c35
对于 SIG(Bluetooth Special Interest Group,蓝牙特别兴趣小组) 指定的所有类型、服务和配置文件,都有缩短形式的 UUID。但如果你的应用需要自定义 UUID,可以使用这个 UUID 生成网站 来生成。
BLE 使用示例
接下来,我们将通过几个实际示例来介绍如何在 XIAO ESP32-C5 上使用 Bluetooth Low Energy (BLE)。
下面的示例是基于 Arduino IDE 实现的。如果你之前没有使用过 Arduino IDE,请访问:Seeed Studio XIAO ESP32-C5 入门指南
BLE 扫描器
在 BLE 扫描器模式 下,XIAO ESP32-C5 充当 Central(中心设备) 或 Observer(观察者)。它不会建立连接,而是监听周围其他设备广播的 Advertising 数据包。
程序
- 下面是一个参考代码片段,演示如何在 XIAO ESP32-C5 上使用 BLE 扫描器模式。
#include <BLEDevice.h>
#include <BLEUtils.h>
#include <BLEScan.h>
#include <BLEAdvertisedDevice.h>

int scanTime = 5; // Scanning duration (seconds)
BLEScan* pBLEScan;

class MyAdvertisedDeviceCallbacks: public BLEAdvertisedDeviceCallbacks {
    void onResult(BLEAdvertisedDevice advertisedDevice) {
      // Callback function when a device is discovered
      Serial.printf("Device found: %s \n", advertisedDevice.toString().c_str());
    }
};

void setup() {
  Serial.begin(115200);
  Serial.println("Initializing BLE Scanner...");

  BLEDevice::init("");
  pBLEScan = BLEDevice::getScan(); // Create scan object
  pBLEScan->setAdvertisedDeviceCallbacks(new MyAdvertisedDeviceCallbacks());
  pBLEScan->setActiveScan(true); // Active scan (consumes more power but gets more complete information)
  pBLEScan->setInterval(100);
  pBLEScan->setWindow(99);
}

void loop() {
  Serial.println("Starting scan...");
  // false here means do not keep duplicate device results, true to keep
  BLEScanResults* foundDevices = pBLEScan->start(scanTime, false);

  Serial.print("Scan finished, number of devices found: ");
  Serial.println(foundDevices->getCount());
  Serial.println("Scan completed, clearing results...");

  pBLEScan->clearResults();   // Clear cache to release memory
  delay(2000);
}
效果展示
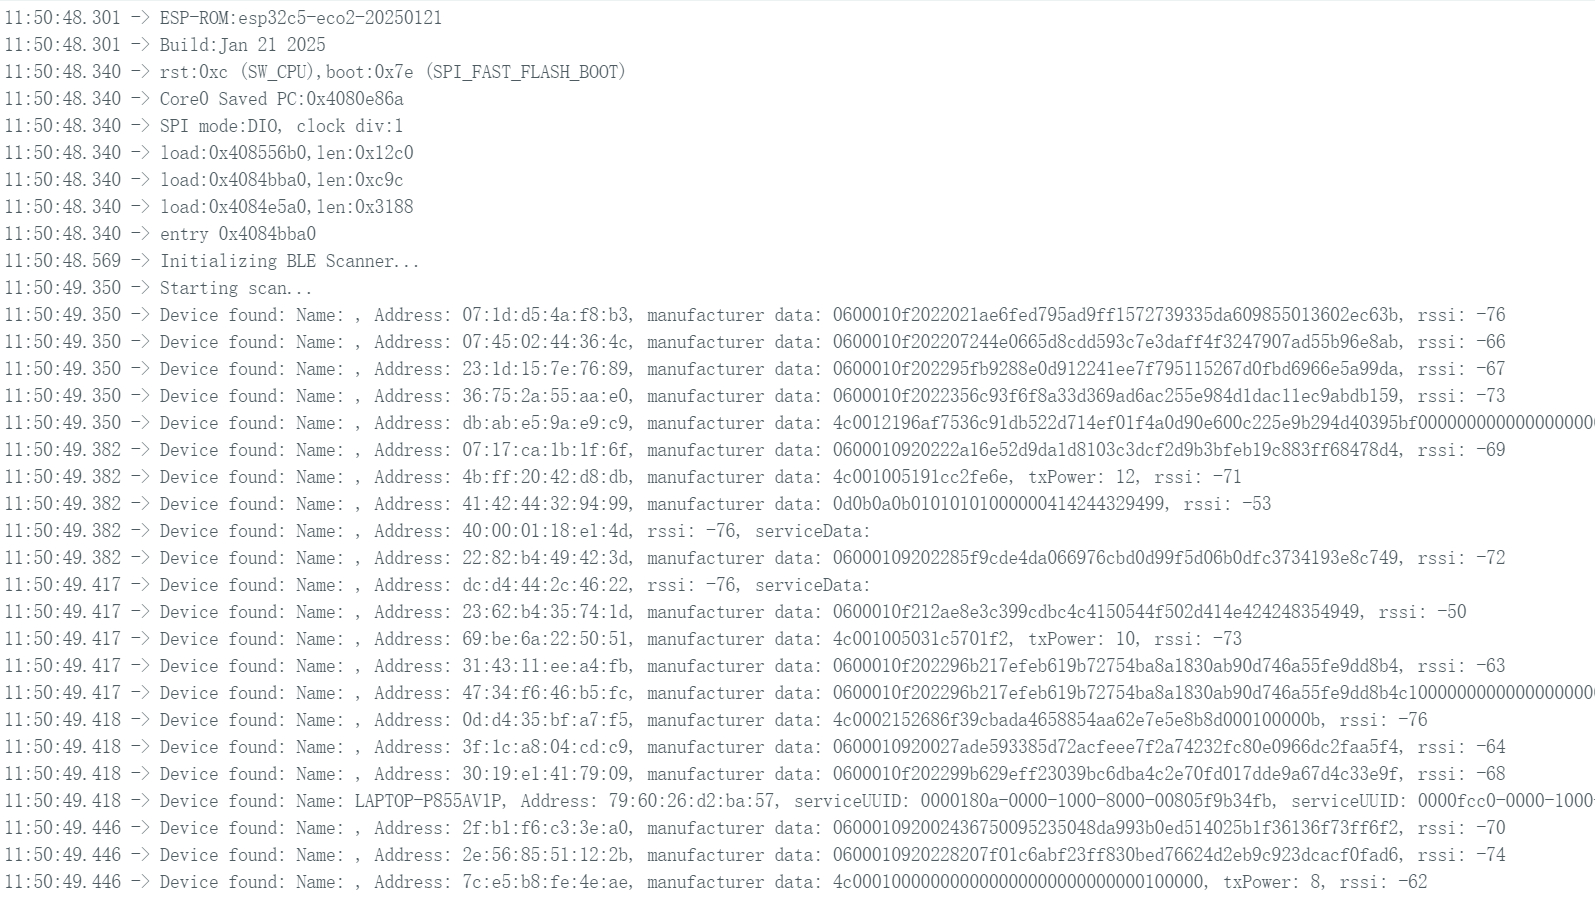
- 上传代码并打开串口监视器;XIAO ESP32-C5 将扫描周围环境中的蓝牙设备并打印相关信息。
BLE Server/Client
在 BLE Server 模式下,创建一个 Service 和 Characteristic,广播其存在,并等待其他设备连接以进行数据读写。
在 BLE Client 模式下,Client 扫描特定的 Service UUID,在找到 Server 后发起连接,并读取或写入 Server 的 characteristic 值。
BLE Server 程序
接下来,将通过一个代码示例演示如何在 XIAO ESP32-C5 上搭建 BLE Server。
- 参考代码
#include <BLEDevice.h>
#include <BLEUtils.h>
#include <BLEServer.h>

// Website for generating UUID: uuidgenerator.net
#define SERVICE_UUID        "4fafc201-1fb5-459e-8fcc-c5c9c331914b"
#define CHARACTERISTIC_UUID "beb5483e-36e1-4688-b7f5-ea07361b26a8"

class MyCallbacks: public BLECharacteristicCallbacks {
    void onWrite(BLECharacteristic *pCharacteristic) {
      String value = pCharacteristic->getValue();
      if (value.length() > 0) {
        Serial.print("Data received from Client: ");
        for (int i = 0; i < value.length(); i++)
          Serial.print(value[i]);
        Serial.println();
      }
    }
};

void setup() {
  Serial.begin(115200);

  // 1. Initialize BLE
  BLEDevice::init("XIAO_ESP32C5_Server");

  // 2. Create Server
  BLEServer *pServer = BLEDevice::createServer();

  // 3. Create Service
  BLEService *pService = pServer->createService(SERVICE_UUID);

  // 4. Create Characteristic (set read/write permissions)
  BLECharacteristic *pCharacteristic = pService->createCharacteristic(
                                         CHARACTERISTIC_UUID,
                                         BLECharacteristic::PROPERTY_READ |
                                         BLECharacteristic::PROPERTY_WRITE
                                       );

  pCharacteristic->setCallbacks(new MyCallbacks()); // Set write callback function
  pCharacteristic->setValue("Hello World from XIAO"); // Set initial value

  // 5. Start Service
  pService->start();

  // 6. Start Advertising
  BLEAdvertising *pAdvertising = BLEDevice::getAdvertising();
  pAdvertising->addServiceUUID(SERVICE_UUID);
  pAdvertising->setScanResponse(true);
  pAdvertising->setMinPreferred(0x06);
  BLEDevice::startAdvertising();
}

void loop() {
  delay(2000);
}
效果展示
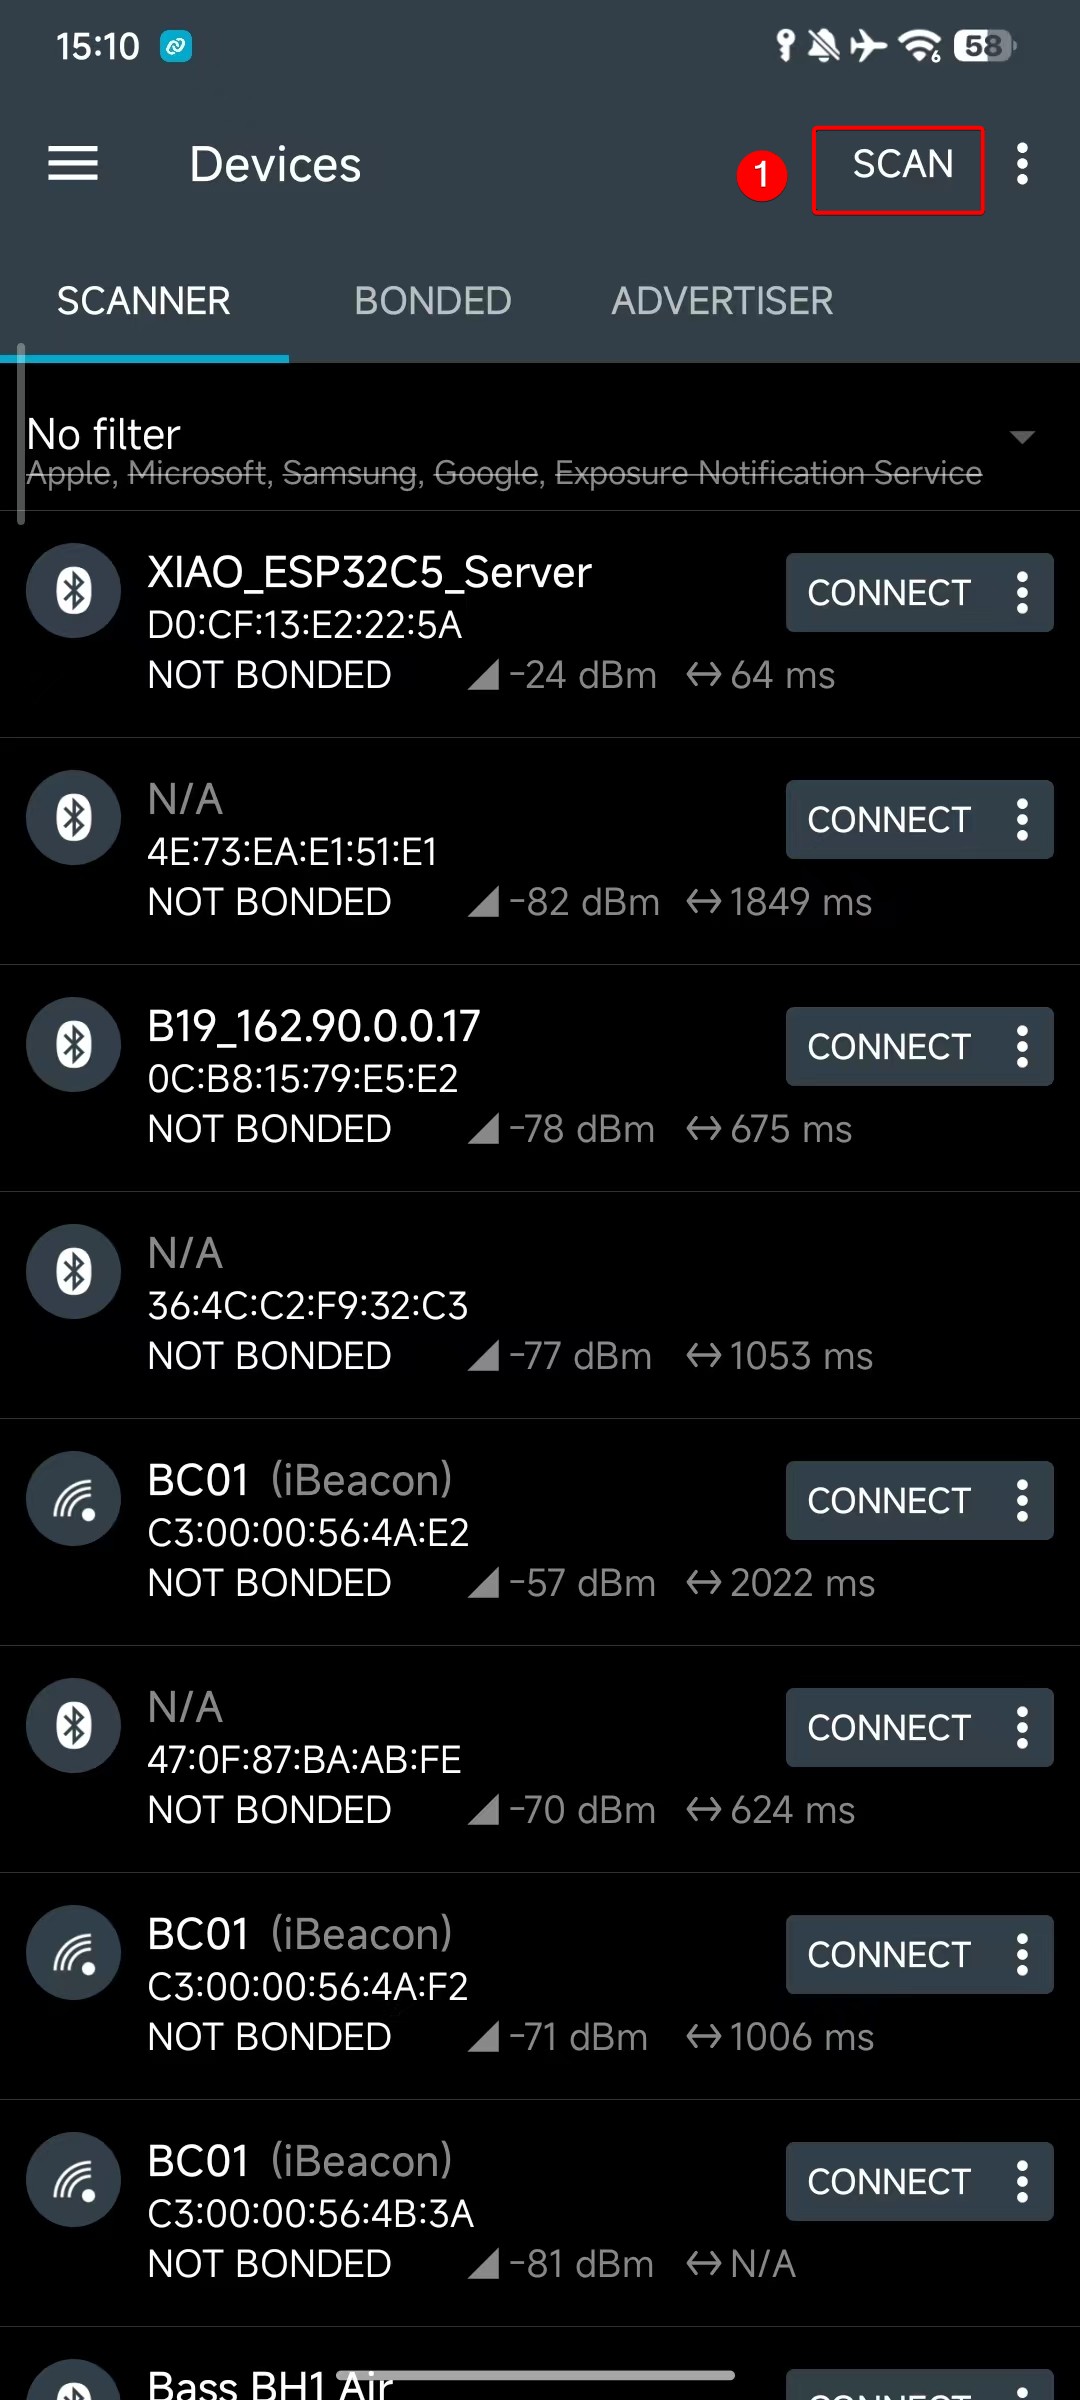
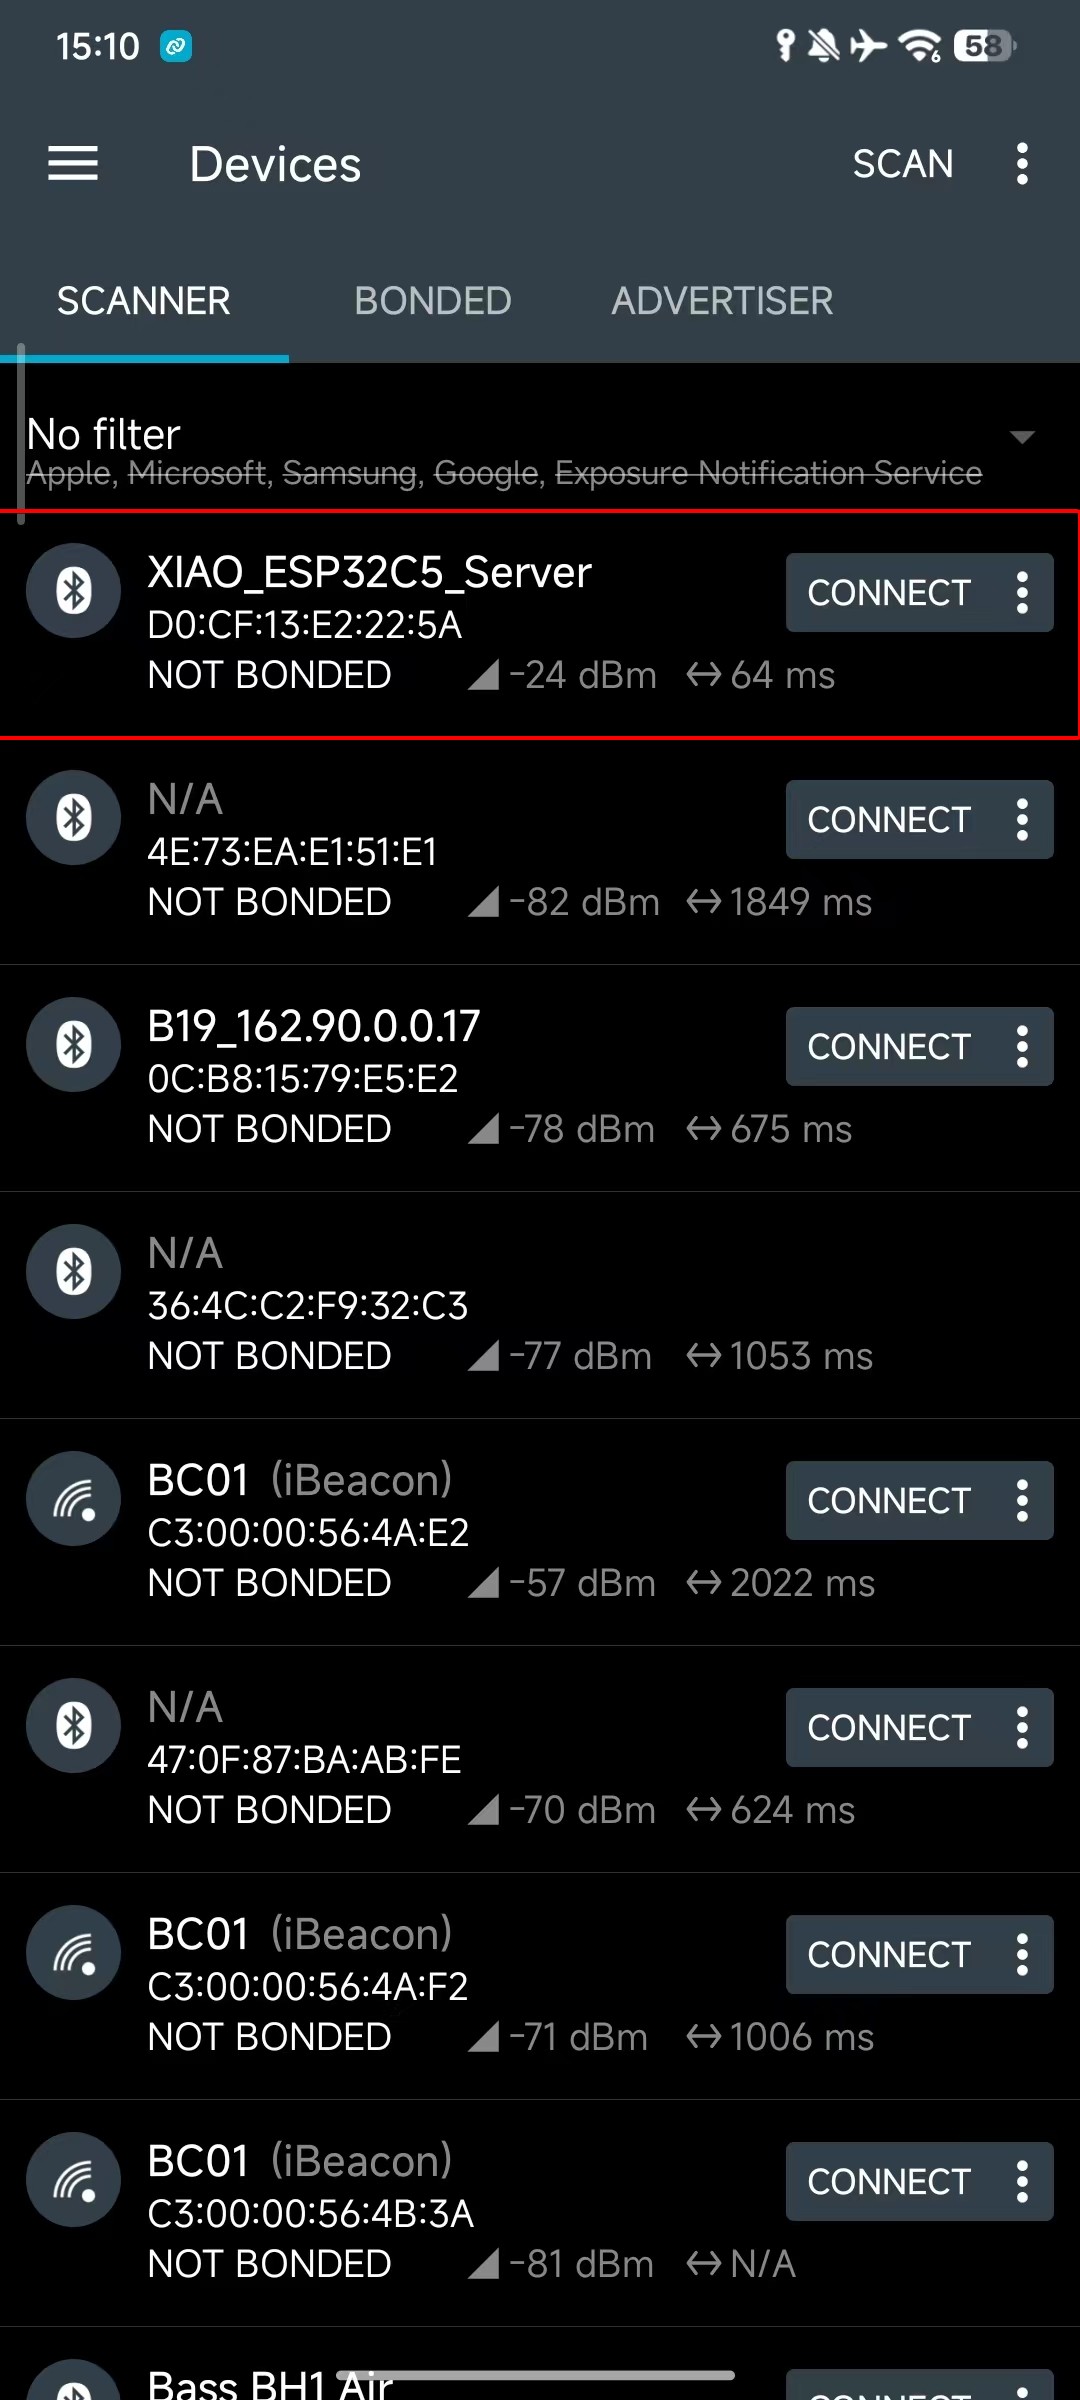
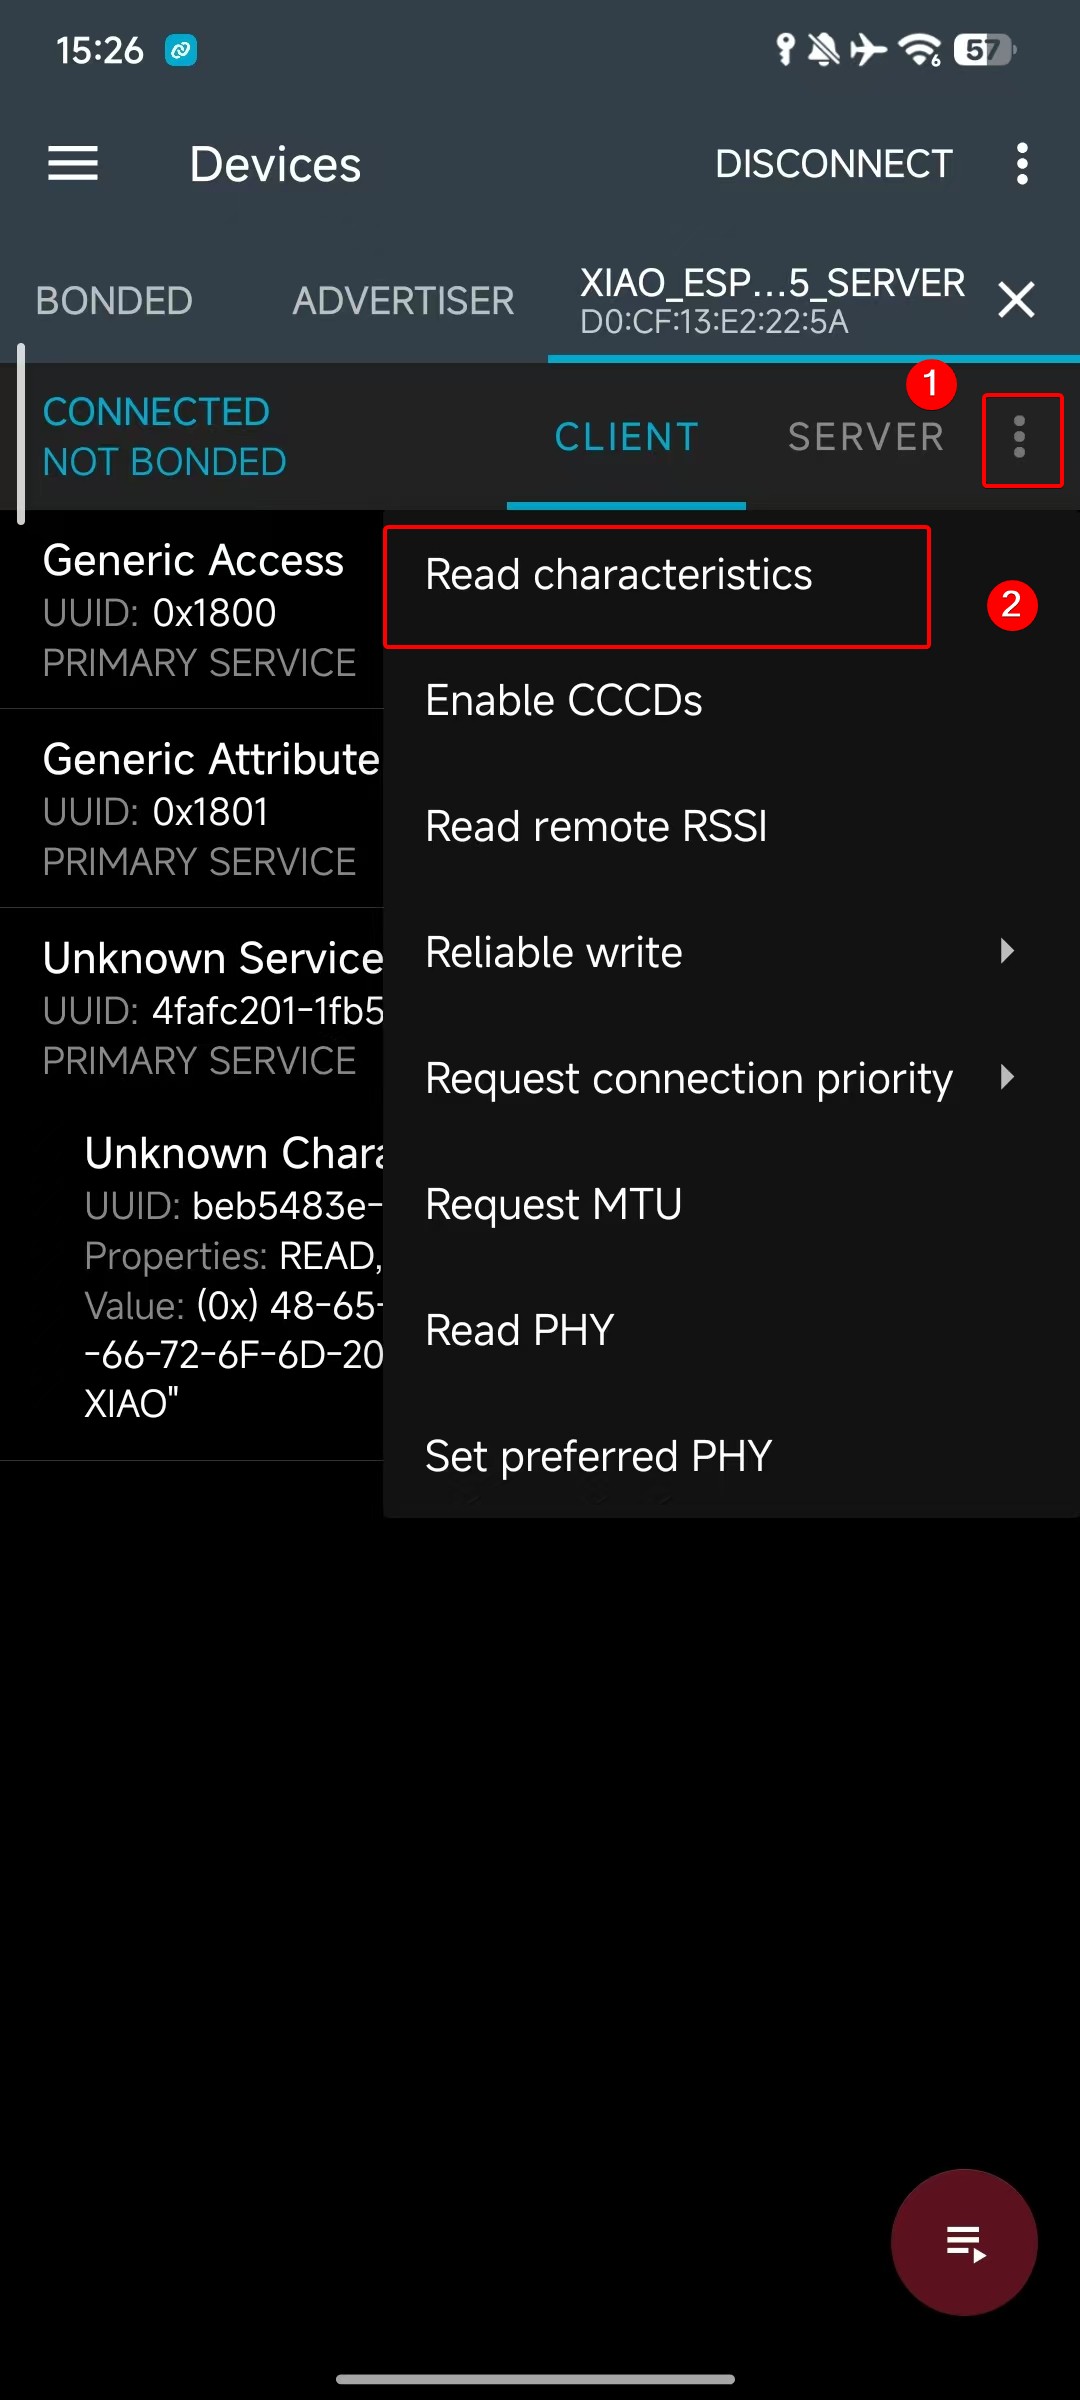
- 上传代码,然后下载 nRF Connect 应用,扫描并发现 BLE 设备(如上所述,名称为 XIAO_ESP32C5_Server),并选择它以建立连接。
同时,你可以在各大手机应用商店中搜索并下载 nRF Connect 应用,它可以让你的手机搜索并连接蓝牙设备。
- Android: nRF Connect
- IOS: nRF Connect
下载软件后,按照下图所示步骤搜索并连接 XIAO ESP32-C5,你将看到广播的 Hello World from XIAO。
 |  |  | |
BLE Client 程序
接下来,将通过一个代码示例演示如何在 XIAO ESP32-C5 上搭建 BLE Client。要使用 Client 功能,你至少需要两个支持蓝牙的 XIAO 设备:一个作为 Server 发送数据,另一个作为 Client 接收数据。
参考代码
#include <BLEDevice.h>
#include <BLEUtils.h>
#include <BLEScan.h>
#include <BLEAdvertisedDevice.h>
#include <BLEClient.h>

// UUID of the Server (must be exactly the same as the Server)
static BLEUUID serviceUUID("4fafc201-1fb5-459e-8fcc-c5c9c331914b");
static BLEUUID charUUID("beb5483e-36e1-4688-b7f5-ea07361b26a8");

// Scanning parameters
const int scanTime = 10; // Scanning duration (seconds)

// Global variables
static BLEAddress serverAddress;        // Address of the found Server
static bool deviceFound = false;        // Whether the target device is found
static BLERemoteCharacteristic* pRemoteCharacteristic = nullptr;
static BLEClient* pClient = nullptr;

// Scan callback: called when a device is discovered
class MyAdvertisedDeviceCallbacks : public BLEAdvertisedDeviceCallbacks {
  void onResult(BLEAdvertisedDevice advertisedDevice) {
    // Check if it contains the service UUID we need
    if (advertisedDevice.haveServiceUUID() && advertisedDevice.isAdvertisingService(serviceUUID)) {
      Serial.print("Found target Server! Name: ");
      Serial.print(advertisedDevice.getName().c_str());
      Serial.print(", Address: ");
      Serial.println(advertisedDevice.getAddress().toString().c_str());

      serverAddress = advertisedDevice.getAddress();
      deviceFound = true;

      // Stop scanning (stop once found)
      BLEDevice::getScan()->stop();
    }
  }
};

// Client connection callback (optional, used to monitor connection status)
class MyClientCallbacks : public BLEClientCallbacks {
  void onConnect(BLEClient* pclient) {
    Serial.println("Connected to Server successfully!");
  }

  void onDisconnect(BLEClient* pclient) {
    Serial.println("Disconnected from Server.");
    deviceFound = false;  // Rescan next time
  }
};

void setup() {
  Serial.begin(115200);
  while (!Serial); // Wait for serial port to open (optional)

  Serial.println("Starting BLE Client...");

  BLEDevice::init("XIAO_Client");  // Client device name

  // Start the first scan
  scanAndConnect();
}

void loop() {
  // If connected successfully, read/write data every 5 seconds
  if (pClient && pClient->isConnected() && pRemoteCharacteristic) {
    // Read characteristic value
    String value = pRemoteCharacteristic->readValue();
    Serial.print("Read value from Server: ");
    Serial.println(value.c_str());

    // Write new data (with response)
    String sendMsg = "Hello from Client @ " + String(millis() / 1000) + "s";
    pRemoteCharacteristic->writeValue(sendMsg.c_str(), true);  // true = require response
    Serial.println("Sent: " + sendMsg);

    delay(5000);
  }
  else {
    // Not connected or disconnected → rescan
    if (!deviceFound || (pClient && !pClient->isConnected())) {
      Serial.println("Server not connected, rescanning...");
      scanAndConnect();
    }
    delay(1000);
  }
}

// Encapsulate scan + connect logic
void scanAndConnect() {
  BLEScan* pBLEScan = BLEDevice::getScan();
  pBLEScan->setAdvertisedDeviceCallbacks(new MyAdvertisedDeviceCallbacks());
  pBLEScan->setActiveScan(true);  // Active scan to get more information
  pBLEScan->setInterval(100);
  pBLEScan->setWindow(99);

  Serial.println("Scanning for Server...");
  deviceFound = false;
  pBLEScan->start(scanTime, false);  // Scan for scanTime seconds

  if (!deviceFound) {
    Serial.println("Target Server not found, will retry later.");
    return;
  }

  // Create client and connect after finding the device
  pClient = BLEDevice::createClient();
  pClient->setClientCallbacks(new MyClientCallbacks());

  Serial.print("Connecting to ");
  Serial.println(serverAddress.toString().c_str());

  if (!pClient->connect(serverAddress)) {
    Serial.println("Connection failed!");
    return;
  }

  // Get remote service
  BLERemoteService* pRemoteService = pClient->getService(serviceUUID);
  if (pRemoteService == nullptr) {
    Serial.println("Failed to find service UUID");
    pClient->disconnect();
    return;
  }
  Serial.println("Service found.");

  // Get remote characteristic
  pRemoteCharacteristic = pRemoteService->getCharacteristic(charUUID);
  if (pRemoteCharacteristic == nullptr) {
    Serial.println("Failed to find characteristic UUID");
    pClient->disconnect();
    return;
  }
  Serial.println("Characteristic found. Ready to communicate!");
}
效果展示
- 上传代码,然后打开串口监视器进行观察——你将接收到由 Server 发送的蓝牙数据。
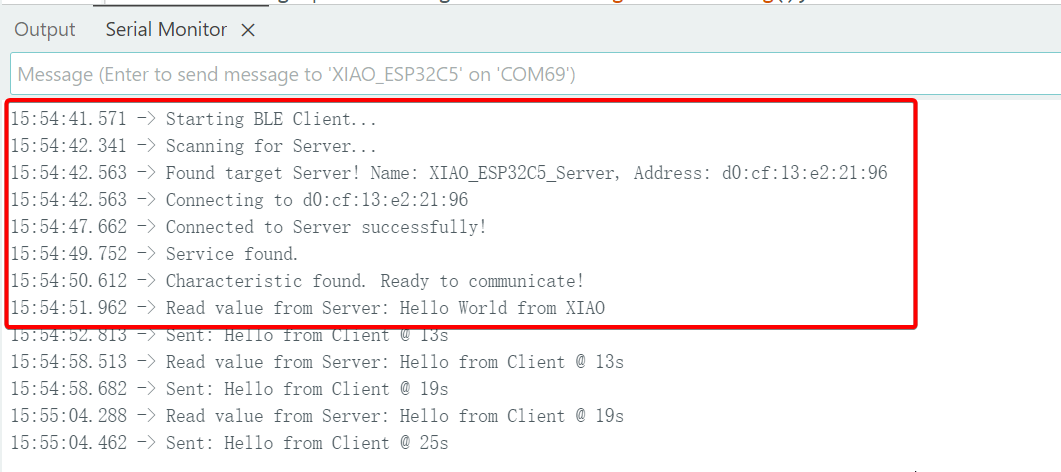
在验证 Client 功能时,你需要事先将 Server 程序烧录到另一块 XIAO 设备上,否则验证将失败。
NimBLE-Arduino
原生 Arduino BLEDevice 库基于 Bluedroid 协议栈,功能完整但会占用大量 Flash 和 RAM。NimBLE 是一个完全重写的 BLE 协议栈(源自 Apache Mynewt),具有以下优点:
-
极低的内存占用(RAM 使用量减少超过 50%)。
-
更快的连接速度。
-
API 兼容性:其设计几乎完全兼容原生 Arduino BLE 库的语法,只需修改头文件并进行少量类型调整即可。
你可以访问作者的 GitHub 仓库:NimBLE-Arduino 了解更多详细信息。
接下来,我们将基于 NimBLE-Arduino 库实现一个蓝牙扫描功能。
程序
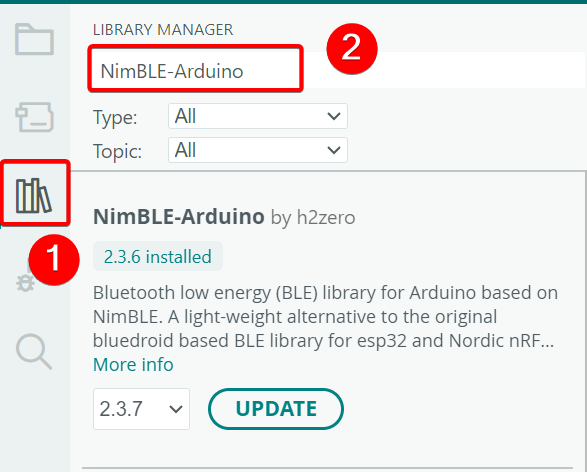
- 安装 NimBLE-Arduino 库。
参考代码
#include <Arduino.h>
#include <NimBLEDevice.h>
#include <NimBLEAdvertisedDevice.h>
#include "NimBLEEddystoneTLM.h"
#include "NimBLEBeacon.h"

#define ENDIAN_CHANGE_U16(x) ((((x) & 0xFF00) >> 8) + (((x) & 0xFF) << 8))

int         scanTime = 5 * 1000; // In milliseconds
NimBLEScan* pBLEScan;

class ScanCallbacks : public NimBLEScanCallbacks {
    void onResult(const NimBLEAdvertisedDevice* advertisedDevice) override {
        if (advertisedDevice->haveName()) {
            Serial.print("Device name: ");
            Serial.println(advertisedDevice->getName().c_str());
            Serial.println("");
        }

        if (advertisedDevice->haveServiceUUID()) {
            NimBLEUUID devUUID = advertisedDevice->getServiceUUID();
            Serial.print("Found ServiceUUID: ");
            Serial.println(devUUID.toString().c_str());
            Serial.println("");
        } else if (advertisedDevice->haveManufacturerData() == true) {
            std::string strManufacturerData = advertisedDevice->getManufacturerData();
            if (strManufacturerData.length() == 25 && strManufacturerData[0] == 0x4C && strManufacturerData[1] == 0x00) {
                Serial.println("Found an iBeacon!");
                NimBLEBeacon oBeacon = NimBLEBeacon();
                oBeacon.setData(reinterpret_cast<const uint8_t*>(strManufacturerData.data()), strManufacturerData.length());
                Serial.printf("iBeacon Frame\n");
                Serial.printf("ID: %04X Major: %d Minor: %d UUID: %s Power: %d\n",
                              oBeacon.getManufacturerId(),
                              ENDIAN_CHANGE_U16(oBeacon.getMajor()),
                              ENDIAN_CHANGE_U16(oBeacon.getMinor()),
                              oBeacon.getProximityUUID().toString().c_str(),
                              oBeacon.getSignalPower());
            } else {
                Serial.println("Found another manufacturers beacon!");
                Serial.printf("strManufacturerData: %d ", strManufacturerData.length());
                for (int i = 0; i < strManufacturerData.length(); i++) {
                    Serial.printf("[%X]", strManufacturerData[i]);
                }
                Serial.printf("\n");
            }
            return;
        }

        NimBLEUUID eddyUUID = (uint16_t)0xfeaa;

        if (advertisedDevice->getServiceUUID().equals(eddyUUID)) {
            std::string serviceData = advertisedDevice->getServiceData(eddyUUID);
            if (serviceData[0] == 0x20) {
                Serial.println("Found an EddystoneTLM beacon!");
                NimBLEEddystoneTLM foundEddyTLM = NimBLEEddystoneTLM();
                foundEddyTLM.setData(reinterpret_cast<const uint8_t*>(serviceData.data()), serviceData.length());

                Serial.printf("Reported battery voltage: %dmV\n", foundEddyTLM.getVolt());
                Serial.printf("Reported temperature from TLM class: %.2fC\n", (double)foundEddyTLM.getTemp());
                int   temp     = (int)serviceData[5] + (int)(serviceData[4] << 8);
                float calcTemp = temp / 256.0f;
                Serial.printf("Reported temperature from data: %.2fC\n", calcTemp);
                Serial.printf("Reported advertise count: %d\n", foundEddyTLM.getCount());
                Serial.printf("Reported time since last reboot: %ds\n", foundEddyTLM.getTime());
                Serial.println("\n");
                Serial.print(foundEddyTLM.toString().c_str());
                Serial.println("\n");
            }
        }
    }
} scanCallbacks;

void setup() {
    Serial.begin(115200);
    Serial.println("Scanning...");

    NimBLEDevice::init("Beacon-scanner");
    pBLEScan = BLEDevice::getScan();
    pBLEScan->setScanCallbacks(&scanCallbacks);
    pBLEScan->setActiveScan(true);
    pBLEScan->setInterval(100);
    pBLEScan->setWindow(100);
}

void loop() {
    NimBLEScanResults foundDevices = pBLEScan->getResults(scanTime, false);
    Serial.print("Devices found: ");
    Serial.println(foundDevices.getCount());
    Serial.println("Scan done!");
    pBLEScan->clearResults(); // delete results scan buffer to release memory
    delay(2000);
}
效果展示
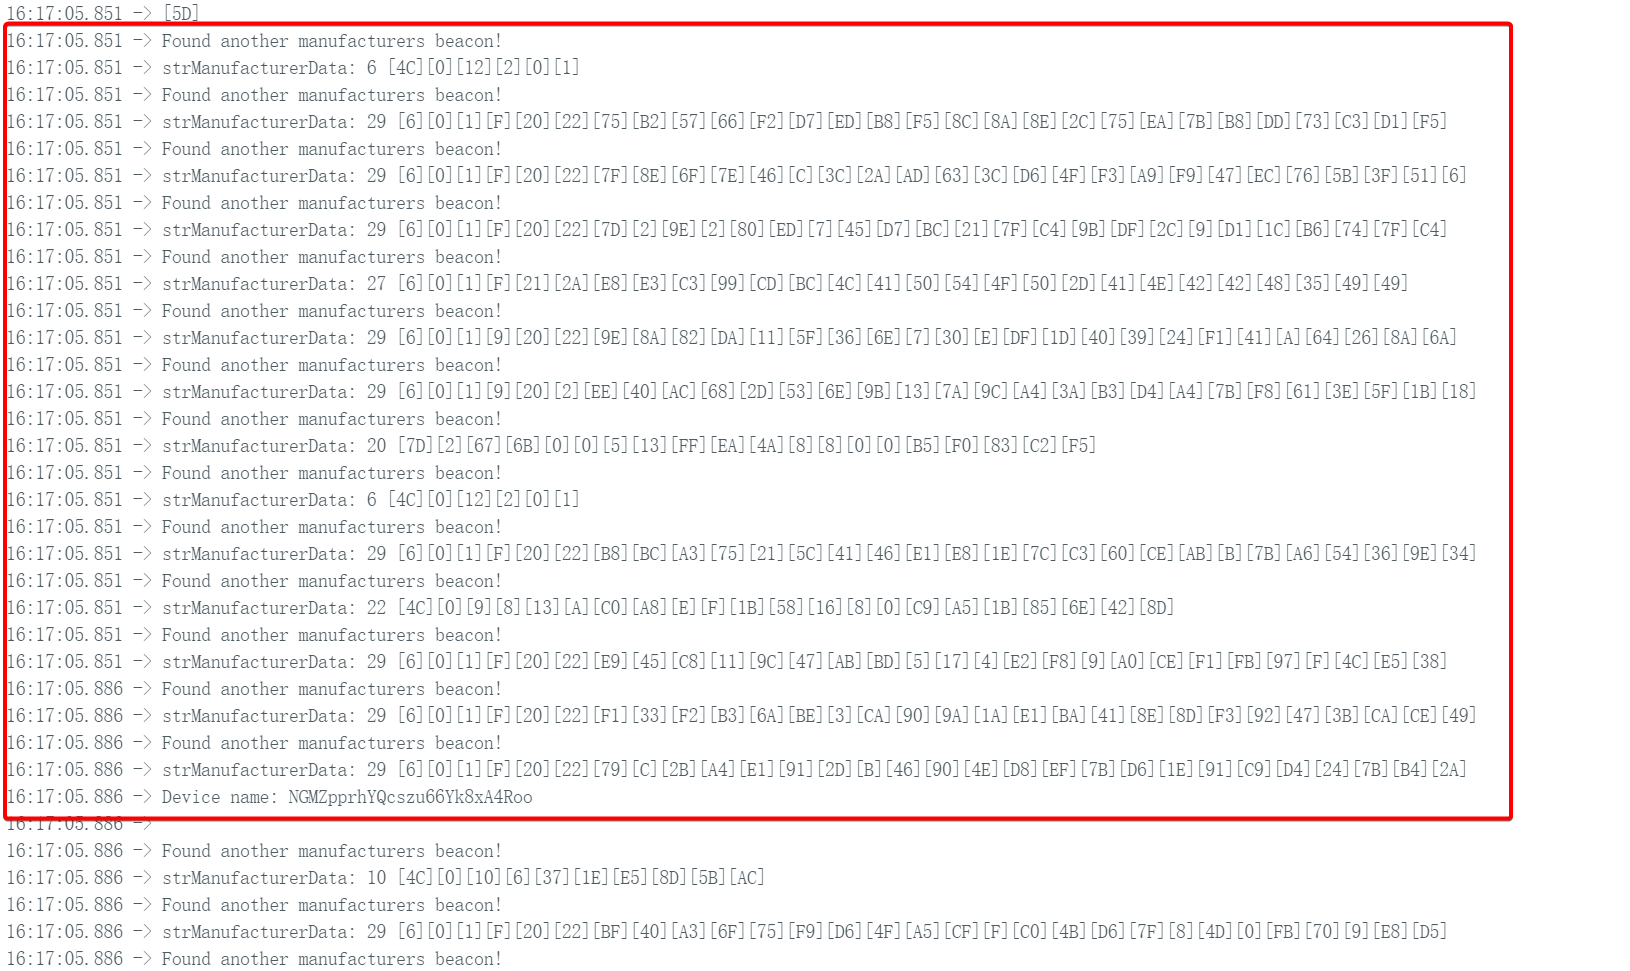
- 上传代码并打开串口监视器进行观察。它同样实现了蓝牙扫描功能,但扫描速度更快。
示例:连接到 Home Assistant
到目前为止,你应该已经对 XIAO ESP32-C5 的 BLE 模式有了基本的了解。
接下来,我们可以动手做一个更实用的项目:让 XIAO ESP32-C5 模拟一个温湿度传感器(或一个简单的按键开关),并通过 BLE 周期性地广播传感器数据或状态。Home Assistant 会自动发现这个 BLE 设备,并在界面上直接显示当前的温湿度数值(或按键状态),无需额外复杂的集成配置。
这个简单的示例充分展示了 ESP32-C5 在物联网(IoT)和智能家居领域的巨大潜力:其低功耗、易开发,以及对被动 BLE 设备的开箱即用支持,使任何人都能快速搭建自己的智能传感器网络。
如果你从未使用过 Home Assistant,可以访问:将 XIAO ESP32-C5 连接到 Home Assistant
- 参考代码
#include <NimBLEDevice.h>

// Simulated temperature value
float temp = 20.0;

void setup() {
  Serial.begin(115200);

  // 1. Initialize NimBLE
  NimBLEDevice::init("XIAO_BTHome_Sensor");

  // 2. Create advertising object
  NimBLEAdvertising *pAdvertising = NimBLEDevice::getAdvertising();

  // ==========================================
  // Construct BTHome data packet (This is the most critical part)
  // ==========================================
  // Reference: https://bthome.io/format/

  std::string serviceData = "";

  // A. BTHome device information byte (Required)
  // bit 0: Encryption (0=No)
  // bit 1-2: Version (2=v2)
  // Result: 0100 0000 -> 0x40
  serviceData += (char)0x40;

  // B. Temperature data (16-bit, 0.01 factor)
  // ID: 0x02 (Temperature)
  serviceData += (char)0x02;

  // Value: Assume 25.50°C -> 2550 (0x09F6) -> Little-endian: F6 09
  int16_t tempInt = (int16_t)(temp * 100);
  serviceData += (char)(tempInt & 0xFF);        // Low byte
  serviceData += (char)((tempInt >> 8) & 0xFF); // High byte

  // C. Battery level (8-bit, %) - Optional
  // ID: 0x01 (Battery)
  serviceData += (char)0x01;
  serviceData += (char)85; // 85%

  // ==========================================

  // 3. Put the constructed data into Service Data
  // BTHome UUID is 0xFCD2
  NimBLEAdvertisementData oAdvertisementData = NimBLEAdvertisementData();
  oAdvertisementData.setFlags(0x06); // General Discovery Mode
  oAdvertisementData.setServiceData(NimBLEUUID((uint16_t)0xFCD2), serviceData);

  // 4. Set advertising parameters
  pAdvertising->setAdvertisementData(oAdvertisementData);

  // 5. Start advertising (Advertise every 3 seconds, can be set longer to save power in practice)
  pAdvertising->start();

  Serial.println("BTHome advertising started...");
}

void loop() {
  // To update data dynamically: stop advertising -> update data -> restart advertising
  // For simple demonstration, only static advertising logic is used here
  // In actual projects, you will read sensors here, update oAdvertisementData, then enter sleep mode
  delay(10000);
}
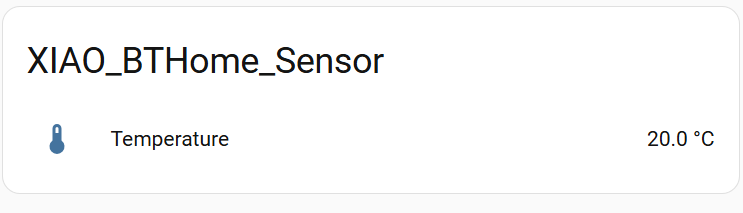
- 上传代码并打开 Home Assistant 平台。你可以在 Settings -> Devices & Services 下找到 BTHome 设备,并将其添加到仪表盘。
技术支持与产品讨论
感谢你选择我们的产品!我们将为你提供多种支持,以确保你在使用我们产品的过程中尽可能顺利。我们提供多种沟通渠道,以满足不同的偏好和需求。