XIAO ESP32-C5 与 FreeRTOS
概述
FreeRTOS 是一个由 C 库组成的集合,包含一个实时内核和一组实现互补功能的模块化库。FreeRTOS 内核是一个实时内核(或实时调度器),使基于 FreeRTOS 构建的应用程序能够满足其硬实时要求。它使应用程序能够组织为独立执行线程的集合。

FreeRTOS 移植
FreeRTOS 是一个开源的 RTOS 内核,已预集成到 Arduino ESP32 Core 中(基于 ESP-IDF 构建)。因此,在 ESP32 上运行的每个 Arduino 程序实际上都在后台使用 FreeRTOS。FreeRTOS 内核已移植到所有 ESP 芯片架构,包括 Xtensa 和 RISC-V(例如 XIAO ESP32-C5)。
因此,本教程基于 Arduino 框架编写,以提供更易于访问的开发体验。
硬件准备
| Seeed Studio XIAO ESP32-C5 |
|---|
 |
软件准备
如果您还没有使用过 Arduino IDE,请参考 Seeed Studio XIAO ESP32-C5 入门指南。
任务介绍
任务是处理器被要求执行的小功能/作业,具有一组设置。任务可以从小功能到无限循环功能。
任务是 FreeRTOS 应用程序中执行的基本单元。它们本质上是与其他任务并发运行的函数。这允许高效的多任务处理和响应性。
任务属性
- TaskFunction:这是包含任务实际逻辑的函数。它是任务执行的入口点。
- StackSize:这指定为任务堆栈分配的内存量。堆栈用于存储局部变量、函数返回地址和临时数据。
- TaskPriority:这决定了任务相对于其他任务的重要性。高优先级任务比低优先级任务有更大的机会被优先执行。
- TaskParameters:这些是可选参数,可以在创建任务时传递给任务函数。它们可用于为任务提供额外的上下文或配置。
- CoreAffinity:这指定任务应分配给哪个 CPU 核心。在多核系统中,这可用于优化性能或平衡工作负载。
创建任务
要在 FreeRTOS 中创建任务,使用 xTaskCreate 函数。此函数接受多个参数,包括任务函数、任务名称、堆栈大小、参数、优先级和创建任务的句柄。
TaskHandle_t task;
xTaskCreate(
        taskFunction,             /* Function that implements the task. */
        "taskName",               /* Text name for the task. */
        configMINIMAL_STACK_SIZE, /* Stack size in words, or bytes. */
        NULL,                     /* Parameter passed into the task. */
        tskIDLE_PRIORITY,         /* Priority at which the task is created. */
        &task                     /* Used to pass out the created task's handle. */
        );
任务函数
任务函数是任务将执行的实际代码。
void taskFunction(void * pvParameters) {
  /*
  Function definition goes here
  */
}
任务可视化
创建四个简单任务来可视化 FreeRTOS 的工作原理。
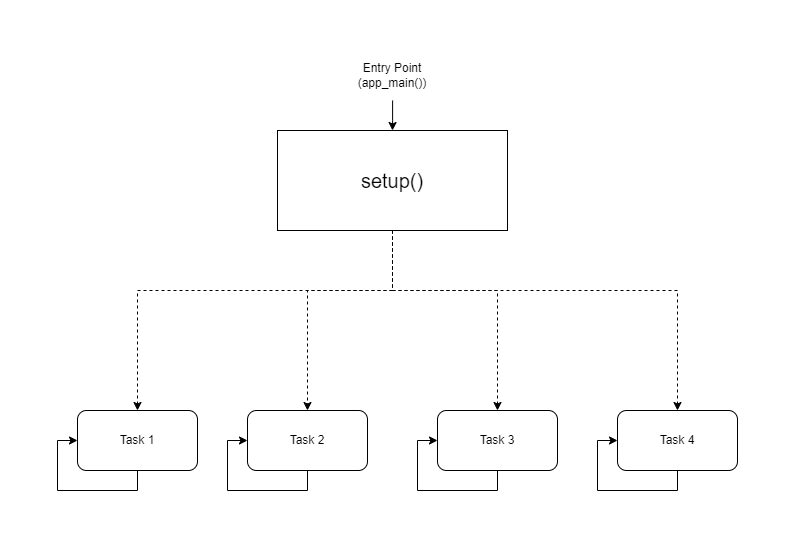
- 可视化表示
taskFunction1 (1000ms delay)
taskFunction2 (500ms delay)
taskFunction3 (500ms delay)
taskFunction4 (500ms delay)
- 参考代码
freertos.ino
#include <Arduino.h>

// Task handles
TaskHandle_t task1, task2, task3, task4;

// ---------------------- Task Function Definitions ----------------------

void taskFunction1(void * pvParameters) {
    for (;;) { // Infinite loop, equivalent to while(true)
        // Print Task 1 and Hello message
        Serial.println("Task 1: Hello from task 1");

        // Delay 1000ms (1 second)
        vTaskDelay(pdMS_TO_TICKS(1000));
    }
}

void taskFunction2(void * pvParameters) {
    for (;;) {
        Serial.println("Task 2: Hello from task 2");
        vTaskDelay(pdMS_TO_TICKS(500)); // Delay 500ms
    }
}

void taskFunction3(void * pvParameters) {
    for (;;) {
        Serial.println("Task 3: Hello from task 3");
        vTaskDelay(pdMS_TO_TICKS(500));
    }
}

void taskFunction4(void * pvParameters) {
    for (;;) {
        Serial.println("Task 4: Hello from task 4");
        vTaskDelay(pdMS_TO_TICKS(500));
    }
}

// ---------------------- Main Program Entry ----------------------

void setup() {
    // 1. Initialize serial port (C5 typically uses USB CDC)
    Serial.begin(115200);

    // Give the serial port some startup time to prevent loss of initial prints
    delay(2000);
    Serial.println("--- ESP32-C5 FreeRTOS Tasks Demo ---");

    // 2. Create tasks
    // Use xTaskCreate, no need to specify core - the system will automatically schedule on the only Core 0
    // Important: Set stack size to 4096 bytes to prevent Stack Overflow

    xTaskCreate(
        taskFunction1,    /* Task function */
        "task_1",         /* Task name */
        4096,             /* Stack size (Bytes) - Do NOT use configMINIMAL_STACK_SIZE */
        NULL,             /* Parameters */
        1,                /* Priority */
        &task1            /* Handle */
    );

    xTaskCreate(
        taskFunction2,
        "task_2",
        4096,
        NULL,
        1,
        &task2
    );

    xTaskCreate(
        taskFunction3,
        "task_3",
        4096,
        NULL,
        1,
        &task3
    );

    xTaskCreate(
        taskFunction4,
        "task_4",
        4096,
        NULL,
        1,
        &task4
    );
}

void loop() {
    // Main loop is idle, reserved for task execution
    // To prove the main loop is still active, you can print occasionally or leave it empty
    delay(1000);
}
configMINIMAL_STACK_SIZE 可以在 sdkconfig 中更改。
- 四个任务:代码定义了四个任务:taskFunction1、taskFunction2、taskFunction3 和 taskFunction4。
- 任务优先级:所有任务都使用 tskIDLE_PRIORITY 创建。这意味着它们具有相同的优先级。
- 任务延迟:taskFunction1 的延迟为 1000ms,而其他三个的延迟为 500ms。
XIAO ESP32-C5 是一个高频单核 RISC-V 微控制器,因此无法进行核心切换;否则会导致堆栈溢出。
传感器与 FreeRTOS
接下来,我将使用 XIAO ESP32-C5、FreeRTOS 和各种传感器实现一个智能入口欢迎系统。
该系统模拟智能家居中的入口场景:
-
环境监测: 实时监测入口处的温度和湿度(使用 DHT11 传感器)并在屏幕上显示数据。
-
人体感应: 利用超声波传感器检测是否有人接近。
-
智能欢迎:
-
当无人在场时(距离较远): LED 关闭,屏幕显示环境数据,系统进入节能/待机界面。
-
当有人接近时(距离较近,例如 < 30cm): LED 自动点亮(模拟门廊灯),屏幕显示欢迎!。
-
硬件准备
您需要准备一块 XIAO ESP32-C5 开发板和以下传感器。
| Seeed Studio XIAO ESP32-C5 | Seeed Studio XIAO 扩展底板 | Grove - 紫色 LED | Grove - 温湿度传感器 (DHT11) | Grove - 超声波距离传感器 |
|---|---|---|---|---|
|  |  |  |  |
软件
下载库文件并将其放置在您的 Arduino 库路径中。
-
Grove - Temperature & Humidity Sensor (DHT11)
-
Grove - Ultrasonic Distance Sensor
-
参考代码
Smart_Entrance_Welcome_System.ino
#include <Arduino.h>
#include <Wire.h>
#include <Adafruit_GFX.h>
#include <Adafruit_SSD1306.h>
#include "Ultrasonic.h"
#include "Grove_Temperature_And_Humidity_Sensor.h"
// ---------------- Configuration Area ----------------
// Pin Definitions
#define PIN_DHT D6 // DHT11 connection pin
#define PIN_ULTRASONIC D7 // Ultrasonic sensor connection pin
#define PIN_LED D2 // LED light pin
#define PIN_SDA D4 // OLED SDA pin
#define PIN_SCL D5 // OLED SCL pin
// Sensor Type Definition
#define DHTTYPE DHT11
// OLED Parameters
#define SCREEN_WIDTH 128
#define SCREEN_HEIGHT 64
#define OLED_RESET -1
// Logic Parameters
#define DIST_THRESHOLD 30 // Person detected if within 30cm
#define DHT_READ_INTERVAL 3000 // DHT11 reading interval (milliseconds)
#define DHT_TIMEOUT 250 // DHT11 reading timeout (milliseconds)
// ---------------- Object Initialization ----------------
Ultrasonic ultrasonic(PIN_ULTRASONIC);
DHT dht(PIN_DHT, DHTTYPE);
Adafruit_SSD1306 display(SCREEN_WIDTH, SCREEN_HEIGHT, &Wire, OLED_RESET);
// ---------------- Shared Data Structure ----------------
struct SystemState {
float temperature;
float humidity;
long distanceCm;
bool personDetected;
bool dhtValid; // Whether DHT data is valid
unsigned long lastDHTUpdate; // Last DHT update time
};
// Global State Variable
SystemState currentState = {0.0, 0.0, 0, false, false, 0};
// Mutex: Protect shared data access
SemaphoreHandle_t xMutex;
// I2C Mutex: Protect I2C bus access
SemaphoreHandle_t xI2CMutex;
// Task Handles
TaskHandle_t taskDHTHandle, taskUltraHandle, taskOLEDHandle, taskLogicHandle;
// ---------------- Task Function Implementations ----------------
// Task 1: DHT Temperature & Humidity Reading (Optimized - Non-blocking)
void taskDHT(void *pvParameters) {
dht.begin();
float temp_hum_val[2] = {0};
unsigned long lastReadTime = 0;
for (;;) {
unsigned long currentTime = millis();
// Control reading frequency to avoid frequent reads
if (currentTime - lastReadTime >= DHT_READ_INTERVAL) {
// Release CPU before sensor reading to allow other tasks to run
// Read sensor without holding mutex
bool readSuccess = !dht.readTempAndHumidity(temp_hum_val);
if (readSuccess) {
// Only acquire lock and update data quickly after successful reading
if (xSemaphoreTake(xMutex, pdMS_TO_TICKS(100)) == pdTRUE) {
currentState.humidity = temp_hum_val[0];
currentState.temperature = temp_hum_val[1];
currentState.dhtValid = true;
currentState.lastDHTUpdate = currentTime;
xSemaphoreGive(xMutex);
}
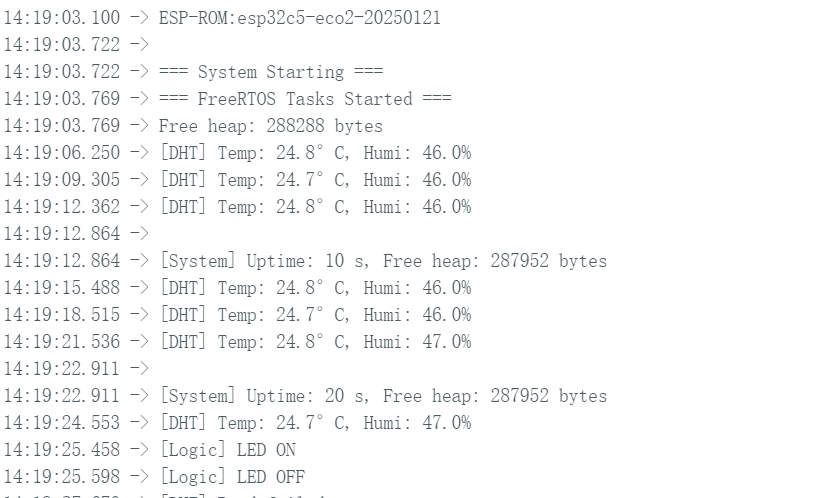
Serial.printf("[DHT] Temp: %.1f°C, Humi: %.1f%%\n",
temp_hum_val[1], temp_hum_val[0]);
} else {
Serial.println("[DHT] Read failed");
// Mark data as invalid
if (xSemaphoreTake(xMutex, pdMS_TO_TICKS(100)) == pdTRUE) {
currentState.dhtValid = false;
xSemaphoreGive(xMutex);
}
}
lastReadTime = currentTime;
}
// Use longer delay to yield CPU time
vTaskDelay(pdMS_TO_TICKS(500));
}
}
// Task 2: Ultrasonic Distance Measurement (Optimized)
void taskUltrasonic(void *pvParameters) {
for (;;) {
// Perform measurement without holding mutex
long RangeInCentimeters = ultrasonic.MeasureInCentimeters();
// Update data quickly
if (xSemaphoreTake(xMutex, pdMS_TO_TICKS(50)) == pdTRUE) {
currentState.distanceCm = RangeInCentimeters;
// Determine if person is present
if (RangeInCentimeters > 0 && RangeInCentimeters < DIST_THRESHOLD) {
currentState.personDetected = true;
} else {
currentState.personDetected = false;
}
xSemaphoreGive(xMutex);
}
// Appropriate delay to avoid excessive frequency
vTaskDelay(pdMS_TO_TICKS(100));
}
}
// Task 3: LED Logic Control (Optimized)
void taskLogic(void *pvParameters) {
pinMode(PIN_LED, OUTPUT);
bool isPerson = false;
bool lastState = false;
for (;;) {
// Read state quickly
if (xSemaphoreTake(xMutex, pdMS_TO_TICKS(10)) == pdTRUE) {
isPerson = currentState.personDetected;
xSemaphoreGive(xMutex);
}
// Perform operation only when state changes
if (isPerson != lastState) {
digitalWrite(PIN_LED, isPerson ? HIGH : LOW);
Serial.printf("[Logic] LED %s\n", isPerson ? "ON" : "OFF");
lastState = isPerson;
}
vTaskDelay(pdMS_TO_TICKS(50));
}
}
// Task 4: OLED Display (Optimized - Using I2C Mutex)
void taskOLED(void *pvParameters) {
// Initialize I2C
Wire.begin(PIN_SDA, PIN_SCL);
Wire.setClock(400000); // Set I2C to fast mode 400kHz
// Protect initialization with I2C mutex
if (xSemaphoreTake(xI2CMutex, portMAX_DELAY) == pdTRUE) {
if(!display.begin(SSD1306_SWITCHCAPVCC, 0x3C)) {
Serial.println(F("[OLED] Init failed"));
xSemaphoreGive(xI2CMutex);
vTaskDelete(NULL);
}
display.clearDisplay();
display.setTextColor(SSD1306_WHITE);
display.display();
xSemaphoreGive(xI2CMutex);
}
SystemState localState;
unsigned long lastUpdate = 0;
const unsigned long UPDATE_INTERVAL = 250; // Reduce refresh rate to 4Hz
for (;;) {
unsigned long currentTime = millis();
// Control refresh rate
if (currentTime - lastUpdate < UPDATE_INTERVAL) {
vTaskDelay(pdMS_TO_TICKS(50));
continue;
}
// Copy data quickly
if (xSemaphoreTake(xMutex, pdMS_TO_TICKS(50)) == pdTRUE) {
localState = currentState;
xSemaphoreGive(xMutex);
} else {
// Skip update if mutex acquisition fails
vTaskDelay(pdMS_TO_TICKS(50));
continue;
}
// Protect display operations with I2C mutex
if (xSemaphoreTake(xI2CMutex, pdMS_TO_TICKS(100)) == pdTRUE) {
display.clearDisplay();
if (localState.personDetected) {
// --- Person Approaching Mode ---
display.setTextSize(2);
display.setCursor(10, 10);
display.println(F("WELCOME!"));
display.setTextSize(1);
display.setCursor(10, 35);
display.print(F("Distance: "));
display.print(localState.distanceCm);
display.println(F(" cm"));
// Display temperature and humidity (if valid)
if (localState.dhtValid) {
display.setCursor(10, 50);
display.print(localState.temperature, 1);
display.print(F("C "));
display.print(localState.humidity, 0);
display.println(F("%"));
}
} else {
// --- Environment Monitoring Mode ---
display.setTextSize(1);
display.setCursor(0, 0);
display.println(F("-- Home Monitor --"));
if (localState.dhtValid) {
display.setCursor(0, 20);
display.print(F("Temperature: "));
display.print(localState.temperature, 1);
display.println(F(" C"));
display.setCursor(0, 35);
display.print(F("Humidity: "));
display.print(localState.humidity, 0);
display.println(F(" %"));
// Display data age
unsigned long dataAge = (millis() - localState.lastDHTUpdate) / 1000;
display.setCursor(0, 50);
display.print(F("Updated: "));
display.print(dataAge);
display.println(F("s ago"));
} else {
display.setCursor(0, 28);
display.println(F("Sensor reading..."));
}
}
display.display();
xSemaphoreGive(xI2CMutex);
}
lastUpdate = currentTime;
vTaskDelay(pdMS_TO_TICKS(50));
}
}
// ---------------- Setup & Loop ----------------
void setup() {
Serial.begin(115200);
delay(1000);
Serial.println("\n=== System Starting ===");
// Create mutexes
xMutex = xSemaphoreCreateMutex();
xI2CMutex = xSemaphoreCreateMutex();
if (xMutex == NULL || xI2CMutex == NULL) {
Serial.println("[ERROR] Failed to create mutex!");
while(1) delay(1000);
}
// Create tasks - adjust priority and stack size
// Priority: Higher number = higher priority
// DHT task: lowest priority (1) - slow reading and non-urgent
xTaskCreate(taskDHT, "DHT_Task", 4096, NULL, 1, &taskDHTHandle);
// Ultrasonic task: medium priority (2) - requires fast response
xTaskCreate(taskUltrasonic, "Ultra_Task", 3072, NULL, 2, &taskUltraHandle);
// Logic task: medium priority (2) - same level as ultrasonic
xTaskCreate(taskLogic, "Logic_Task", 2048, NULL, 2, &taskLogicHandle);
// OLED task: low priority (1) - display does not require real-time performance
xTaskCreate(taskOLED, "OLED_Task", 4096, NULL, 1, &taskOLEDHandle);
Serial.println("=== FreeRTOS Tasks Started ===");
Serial.printf("Free heap: %d bytes\n", ESP.getFreeHeap());
}
void loop() {
// Monitor system status
static unsigned long lastReport = 0;
unsigned long now = millis();
if (now - lastReport > 10000) { // Report every 10 seconds
Serial.printf("\n[System] Uptime: %lu s, Free heap: %d bytes\n",
now / 1000, ESP.getFreeHeap());
lastReport = now;
}
vTaskDelay(pdMS_TO_TICKS(1000));
}
结果
- 上传代码后,您可以通过串口监视器观察结果。
- 显示屏效果
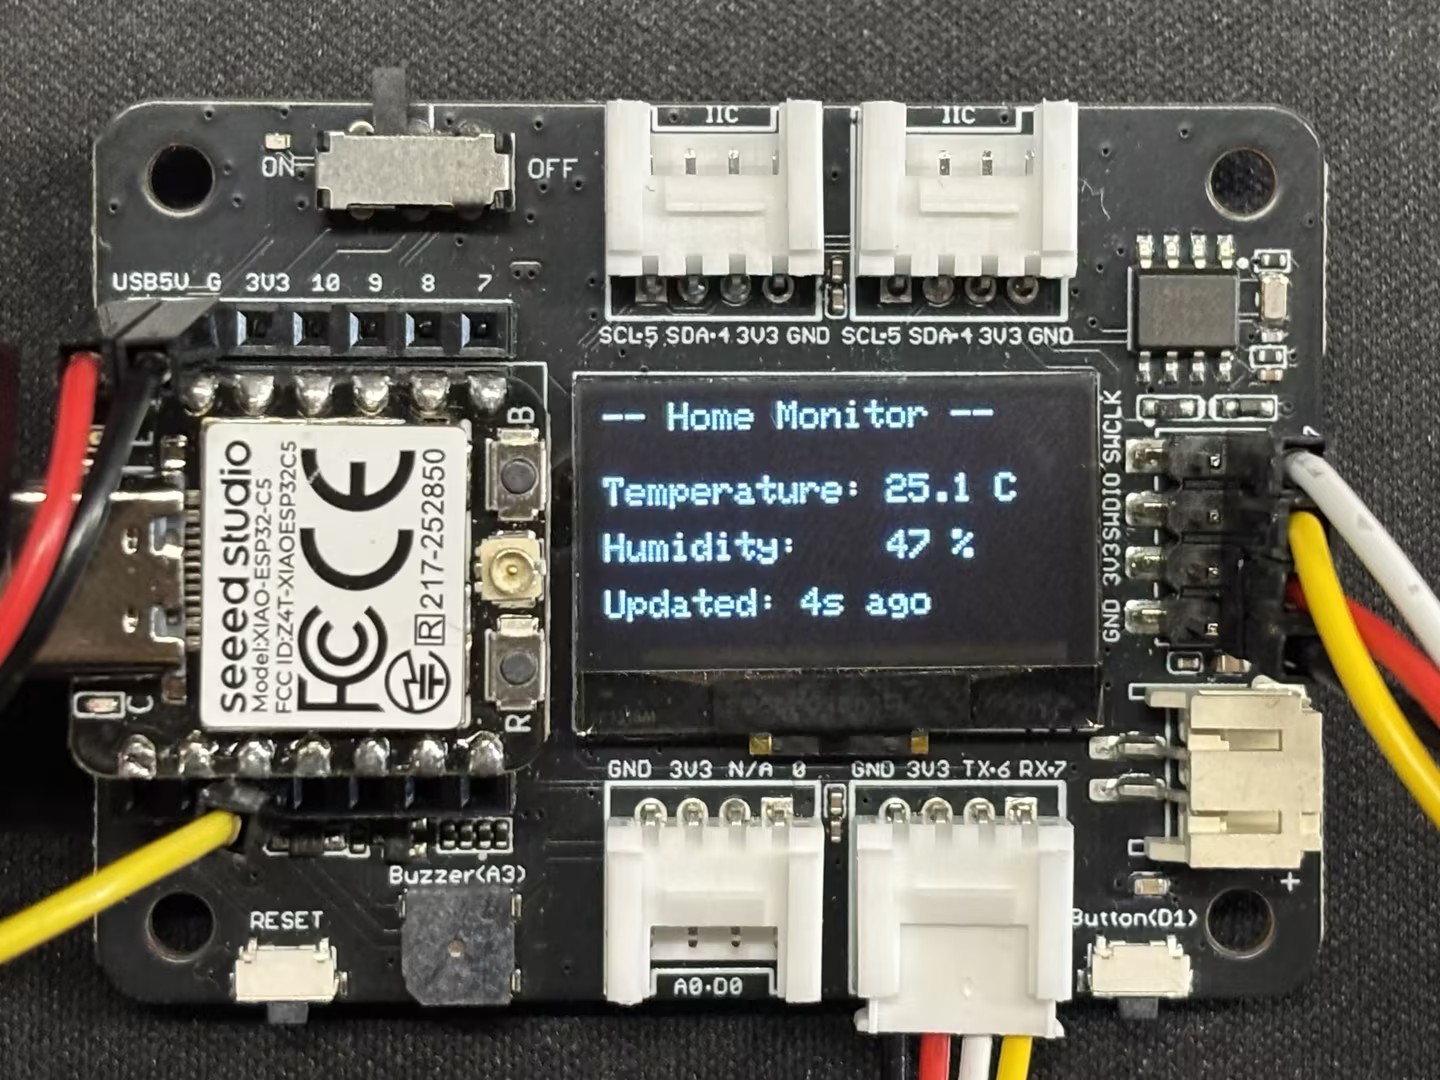 | 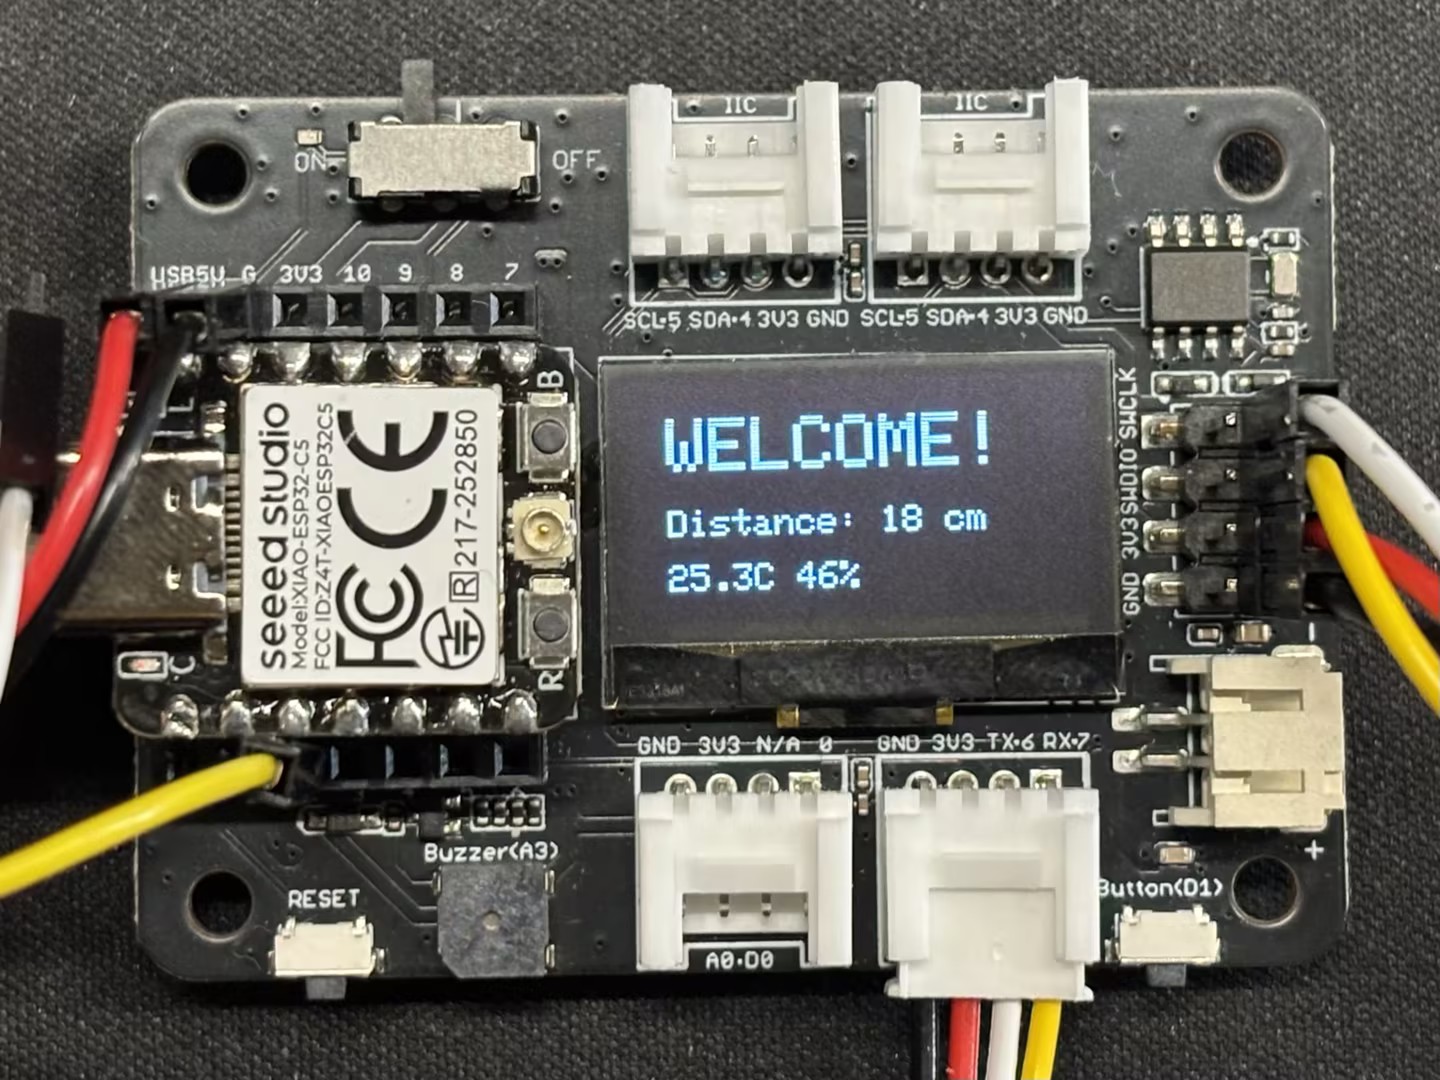 |
- 实际效果
结论
我相信通过本指南,您已经牢固掌握了 XIAO ESP32-C5 和 FreeRTOS。我期待看到您在各种应用中的创新创作和发明!
技术支持与产品讨论
感谢您选择我们的产品!我们在这里为您提供不同的支持,以确保您使用我们产品的体验尽可能顺畅。我们提供多种沟通渠道,以满足不同的偏好和需求。