基于 XIAO ESP32S3 的迷你 ChatGPT 语音助手
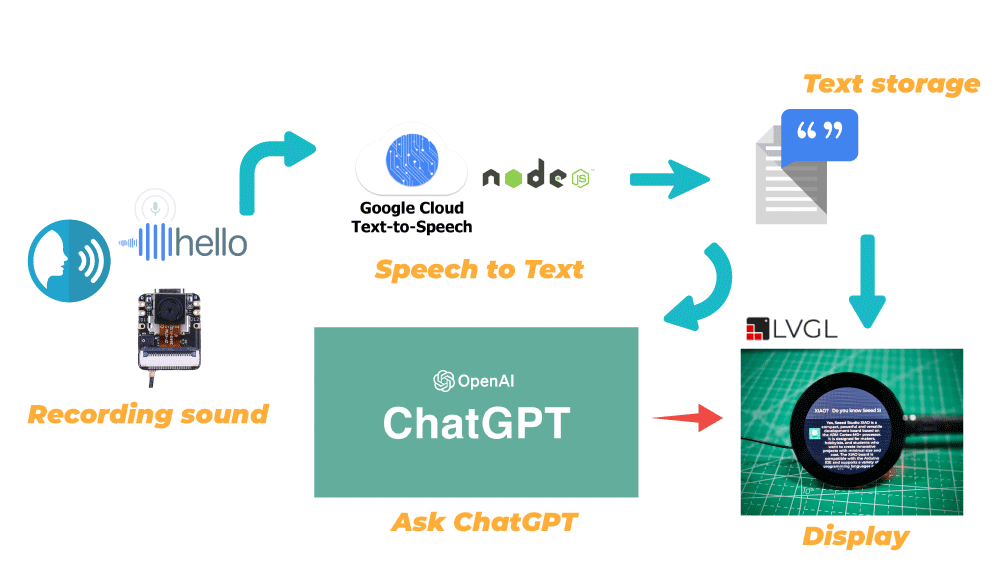
我们很高兴今天为您带来一个全新的项目,使用 XIAO ESP32S3 Sense 和 XIAO 圆形显示屏!该项目旨在首先使用 XIAO ESP32S3 Sense 的麦克风和 Google Cloud 的语音转文本服务构建语音识别系统。然后使用识别的语音文本调用 OpenAI 的接口向 ChatGPT 提问并返回答案。最后,我们在屏幕上显示识别的语音和答案内容。
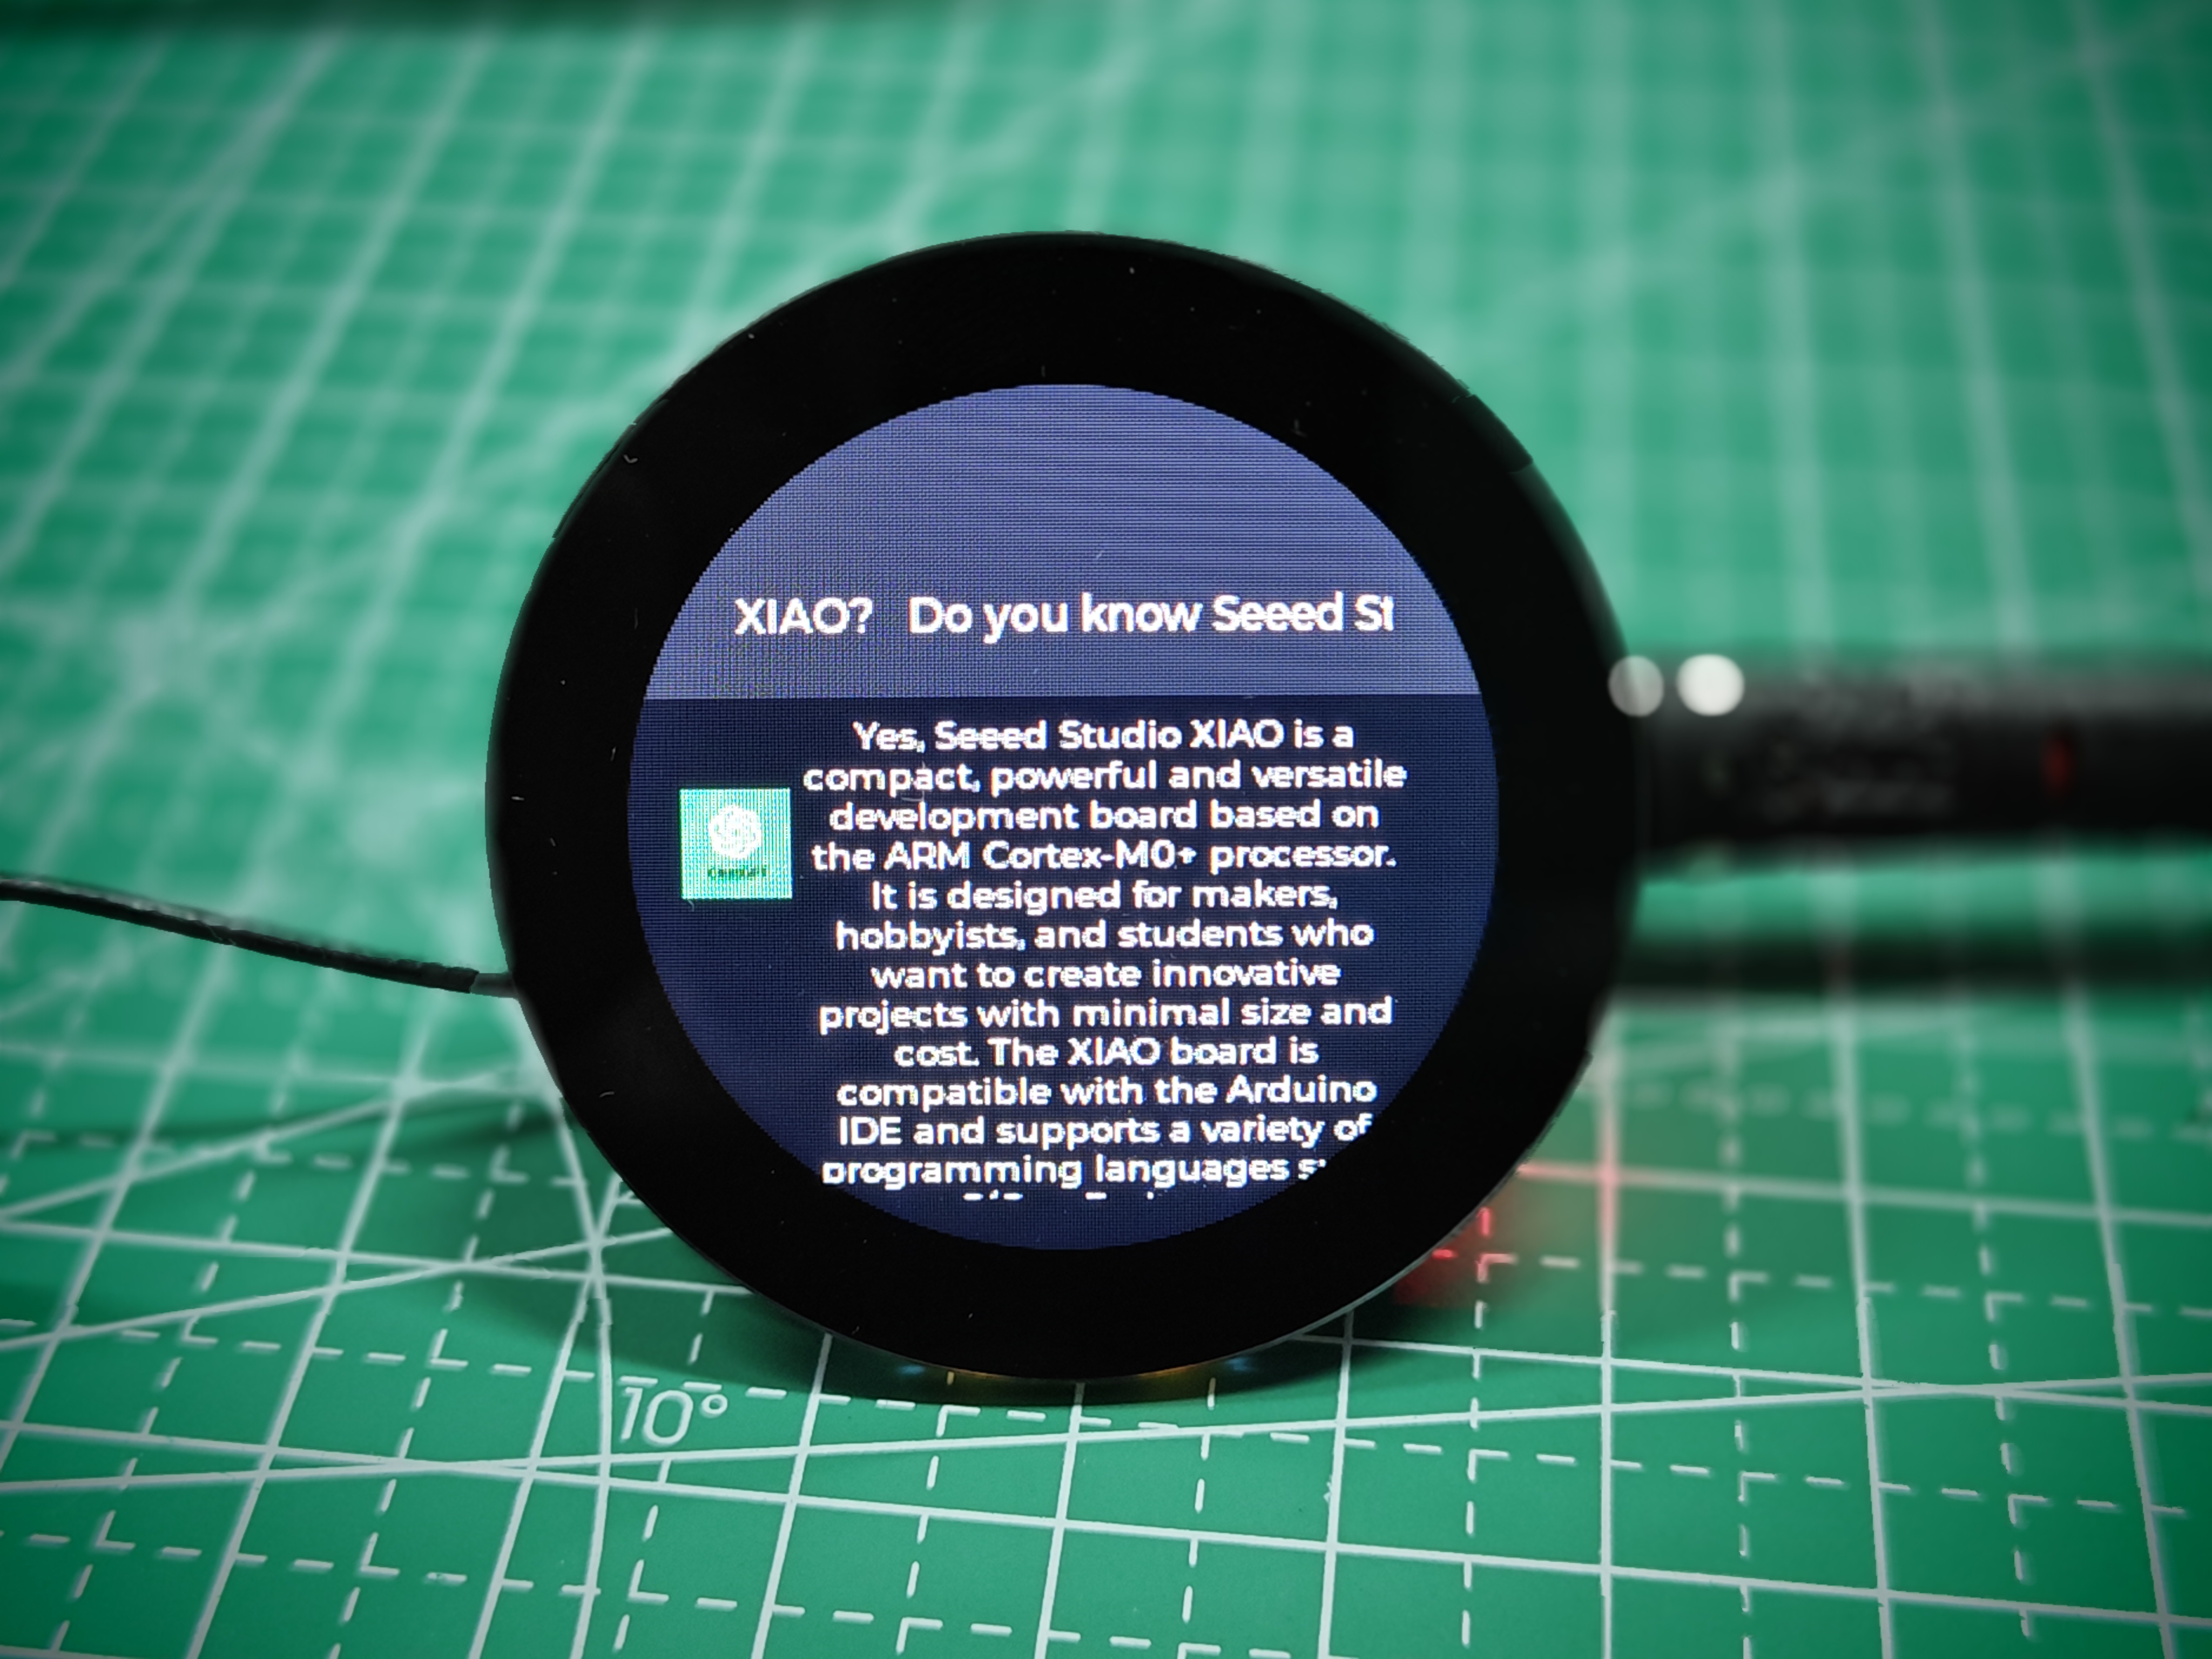
这就是我们的智能"XIAO"助手!
让我们看看完成这个项目所需的一些基本步骤。
- 注册并启用 Google Cloud 语音转文本服务
- 在本地主机上部署语音转文本服务
- 将 XIAO ESP32S3 Sense 录制的音频文件上传到 Google Cloud 进行识别
- 在 XIAO ESP32S3 Sense 上部署 ChatGPT
- 屏幕显示内容设计和程序集成
总体框架结构如下图所示。
入门指南
在开始这个项目之前,您可能需要按照这里的描述提前准备硬件和软件。
硬件准备
如果您想完整体验整个程序内容,您至少需要具备以下硬件设备。

除此之外,我们还需要一张不超过 32GB 的 FAT32 格式 microSD 卡来存储录音文件。
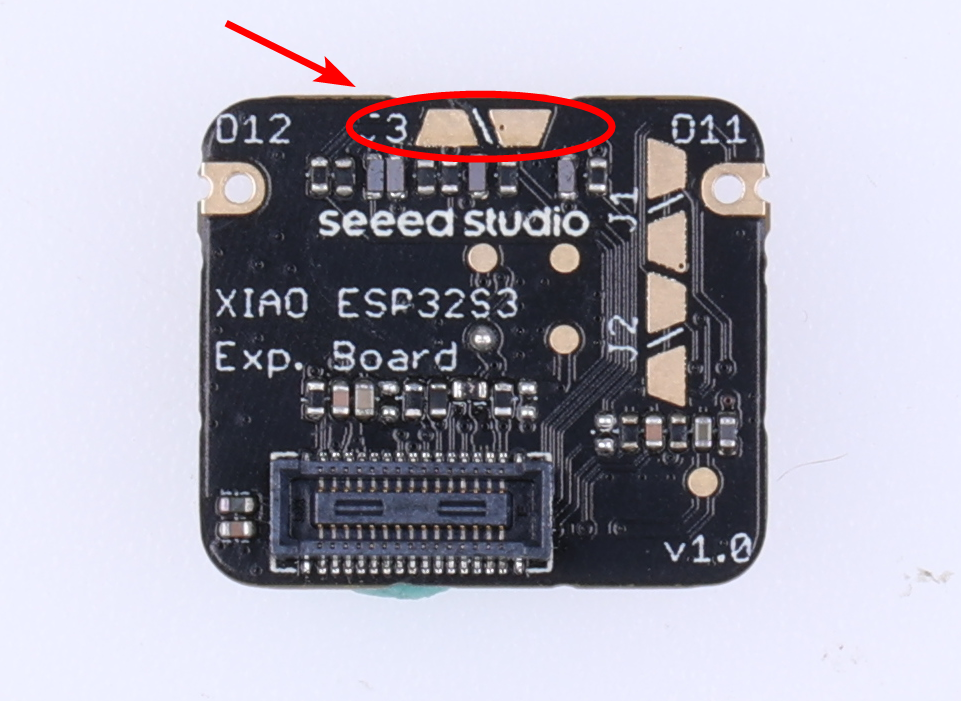
由于 XIAO EPS32S3 Sense 设计有三个连接到 SD 卡插槽的上拉电阻 R4~R6,而圆形显示屏也有上拉电阻,当两者同时使用时无法读取 SD 卡。为了解决这个问题,我们需要切断 XIAO ESP32S3 Sense 扩展板上的 J3。
断开 J3 后,XIAO ESP32S3 Sense 上的 SD 卡插槽将无法正常工作,因此您需要将 microSD 卡插入圆形显示屏上的 SD 卡插槽。
接下来,请按顺序安装 microSD 卡、XIAO ESP32S3 Sense 和圆形显示屏。
我们建议您先拆下摄像头模块,以避免在用刀片切断 J3 连接时刮伤摄像头。
软件准备
由于使用了 XIAO ESP32S3,请在开始之前根据 Wiki 说明安装 XIAO ESP32S3 板载包。
除此之外,我们还使用了 XIAO 圆形显示屏,因此您还需要根据 Wiki 为扩展板准备库。
在项目期间,我们可能还会使用一些第三方库,例如 ChatGPT 的库和 ArduinoJSON,您可以在这里下载并添加到 Arduino 开发环境中。
除了基本库之外,我们还需要使用 Node 服务,因此您需要自己安装 Nodejs,您可以直接从官方网站下载。
一切准备就绪后,让我们开始今天的教程。
注册并启用 Google Cloud Speech to Text 服务
您也可以直接参考 Google Cloud 官方教程 了解如何注册并启动 Google Cloud 语音转文本服务来进行配置。
Speech-to-Text 是一个由 Google 人工智能 (AI) 技术驱动的 API。您将音频数据发送给 Speech-to-Text,然后接收音频数据的文本转录作为响应。在您开始向 Speech-to-Text 发送请求之前,您必须在 Google Cloud 控制台中启用该 API。
步骤 1. 登录 Google Cloud 控制台
您可以点击这里跳转到 Google Cloud 控制台,如果您还没有注册 Google Cloud,可以在这里进行注册。
步骤 2. 前往项目选择器页面
您可以选择现有项目或创建新项目。有关创建项目的更多信息,请参阅创建和管理项目。
如果您创建新项目,系统会提示您将计费账户链接到此项目。如果您使用的是现有项目,请确保已启用计费功能。
注意:您必须启用计费才能使用 Speech-to-Text API,但是除非您超出免费配额,否则不会收费。有关更多详细信息,请参阅定价页面。

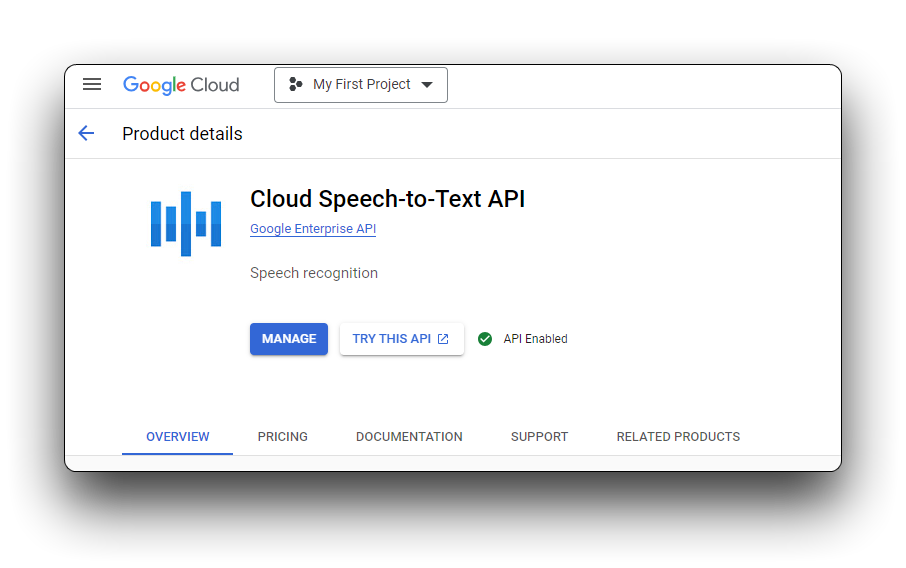
步骤 3. 启动 Speech-to-Text 服务
选择项目并将其链接到计费账户后,您可以启用 Speech-to-Text API。转到页面顶部的搜索产品和资源栏,输入 speech。从结果列表中选择 Cloud Speech-to-Text API。
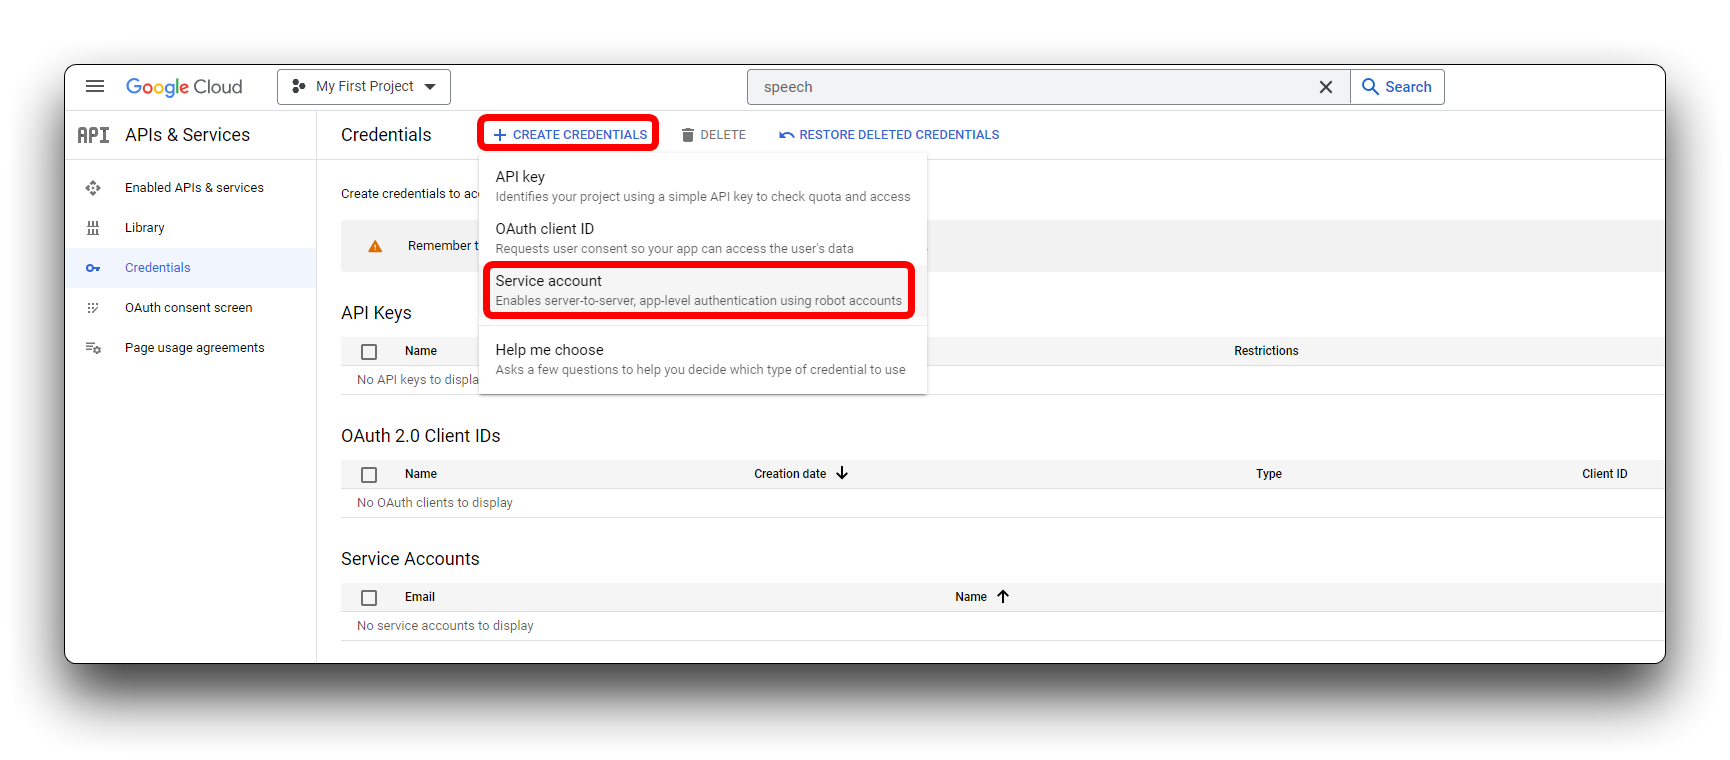
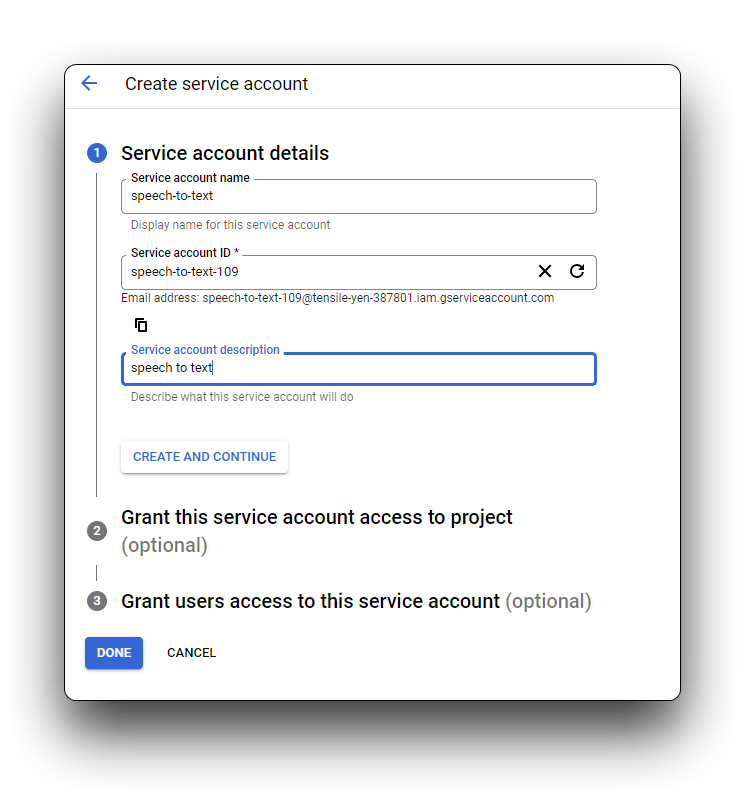
步骤 4. 创建服务账户
如果您的项目还没有服务账户,请创建一个新的服务账户。您必须创建服务账户才能使用 Speech-to-Text。
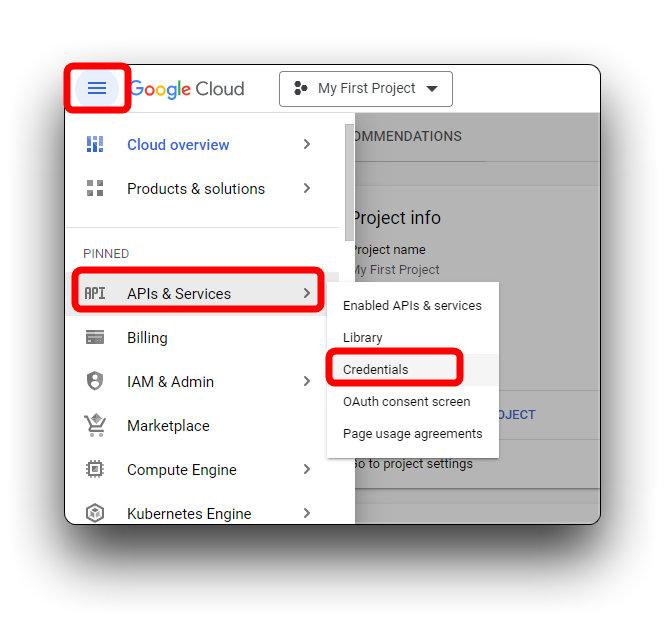
在新弹出的页面上,在 CREATE CREDENTIALS 下选择 Service account。
在 service account name 框中,为新服务账户输入唯一名称。您的输入会自动填充到 Service account ID 框中。Service account description 框是可选的,但如果您计划将多个服务账户与您的项目关联,建议填写。在此框中输入服务账户的简要描述,然后点击 CREATE AND CONTINUE。
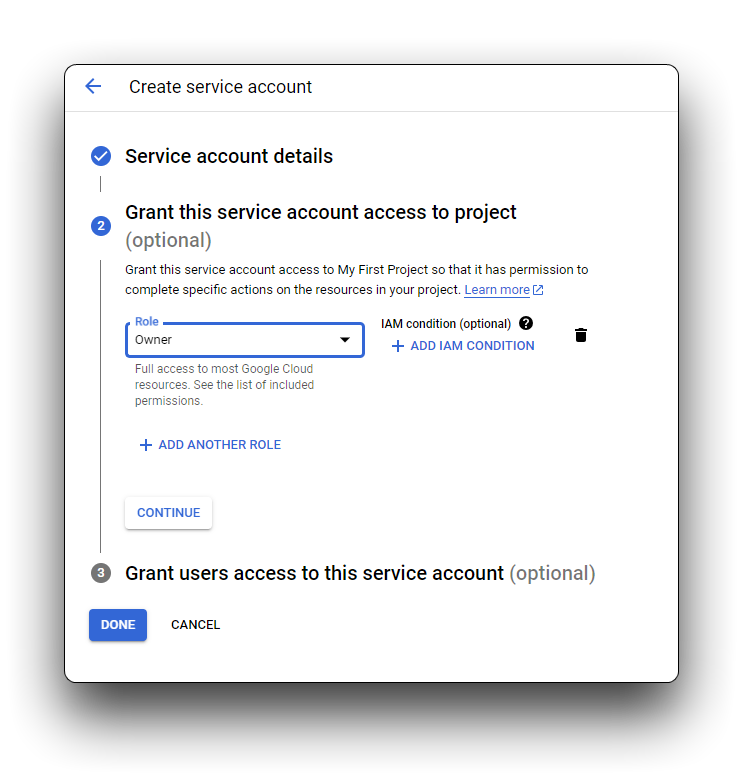
我们建议您为服务账户分配一个基本的 IAM 角色。如果需要,您也可以为单个服务账户分配多个角色。有关可用角色和每个角色允许的权限的详细信息,请参阅 IAM 角色。点击 Select a role 下拉菜单并向下滚动到 Owner。您可以从右侧列中显示的选项中为此服务账户选择角色。点击 CONTINUE。
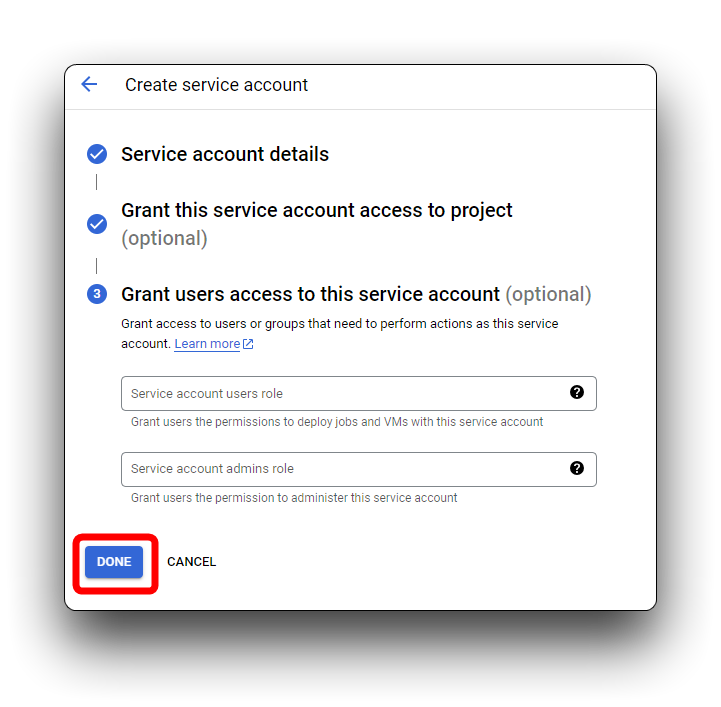
最后一步允许您可选地允许其他实体(个人、Google 群组等)访问您的服务账户。如果您不需要授予额外的访问权限,可以点击 DONE 而无需输入任何信息。
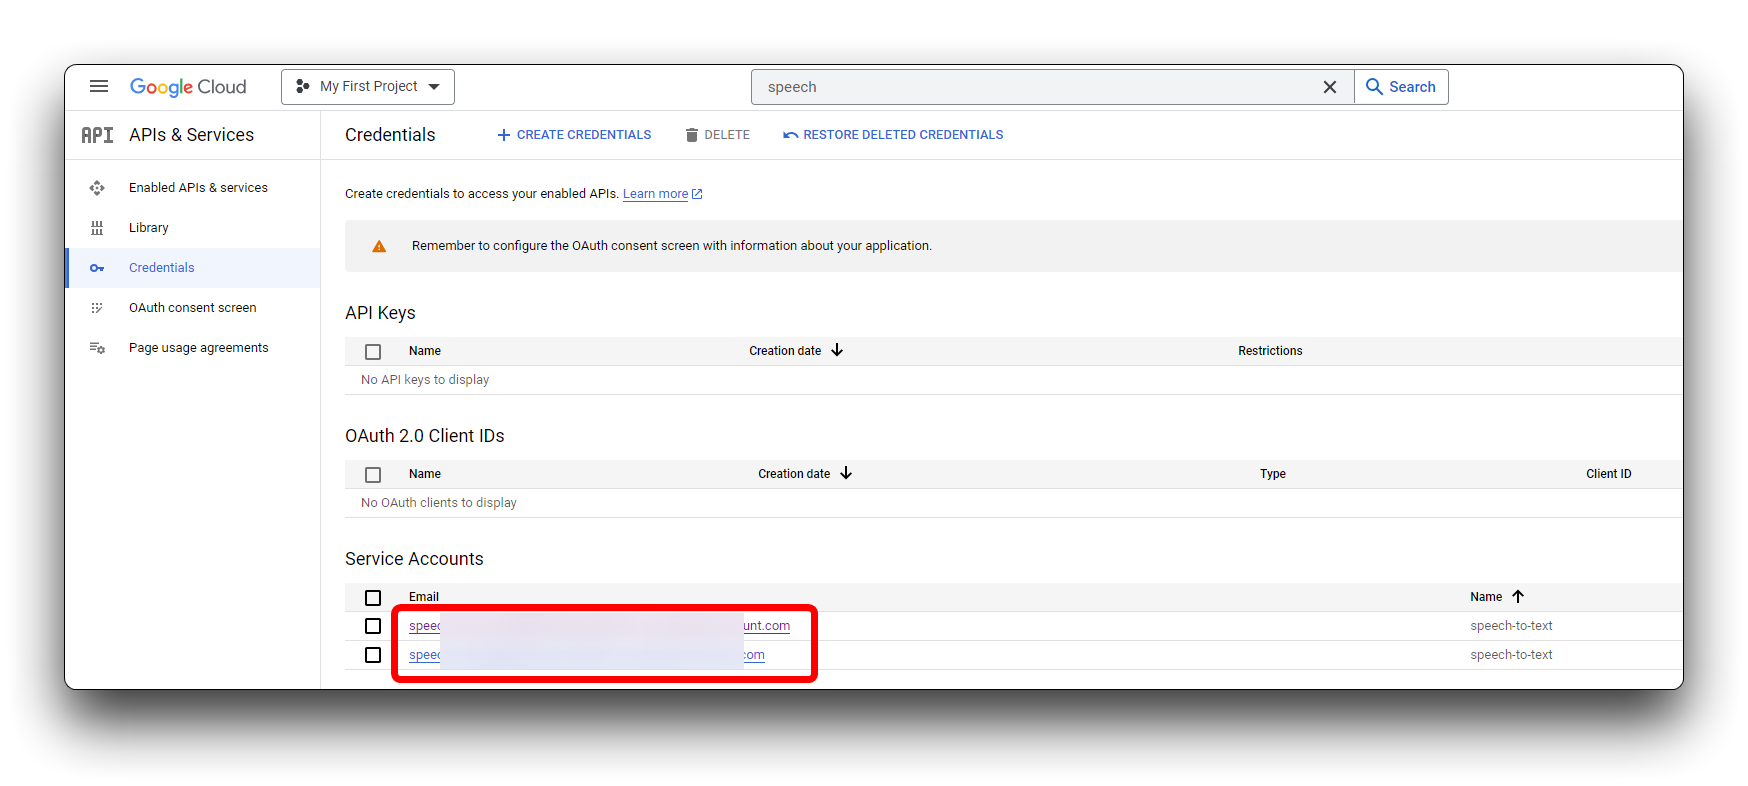
服务账户现在列在 Service Accounts 页面上。您可以随时更改服务账户的权限、添加或生成新密钥以及授予访问权限。
步骤 5. 为您的服务账户创建 JSON 密钥
当您向 Speech-to-Text 发送请求时,您需要在身份验证过程中使用此私钥。
要创建密钥,请点击服务账户并选择 KEYS 选项卡。点击 ADD KEY -> Create new key。我们建议您创建 JSON 格式的密钥。
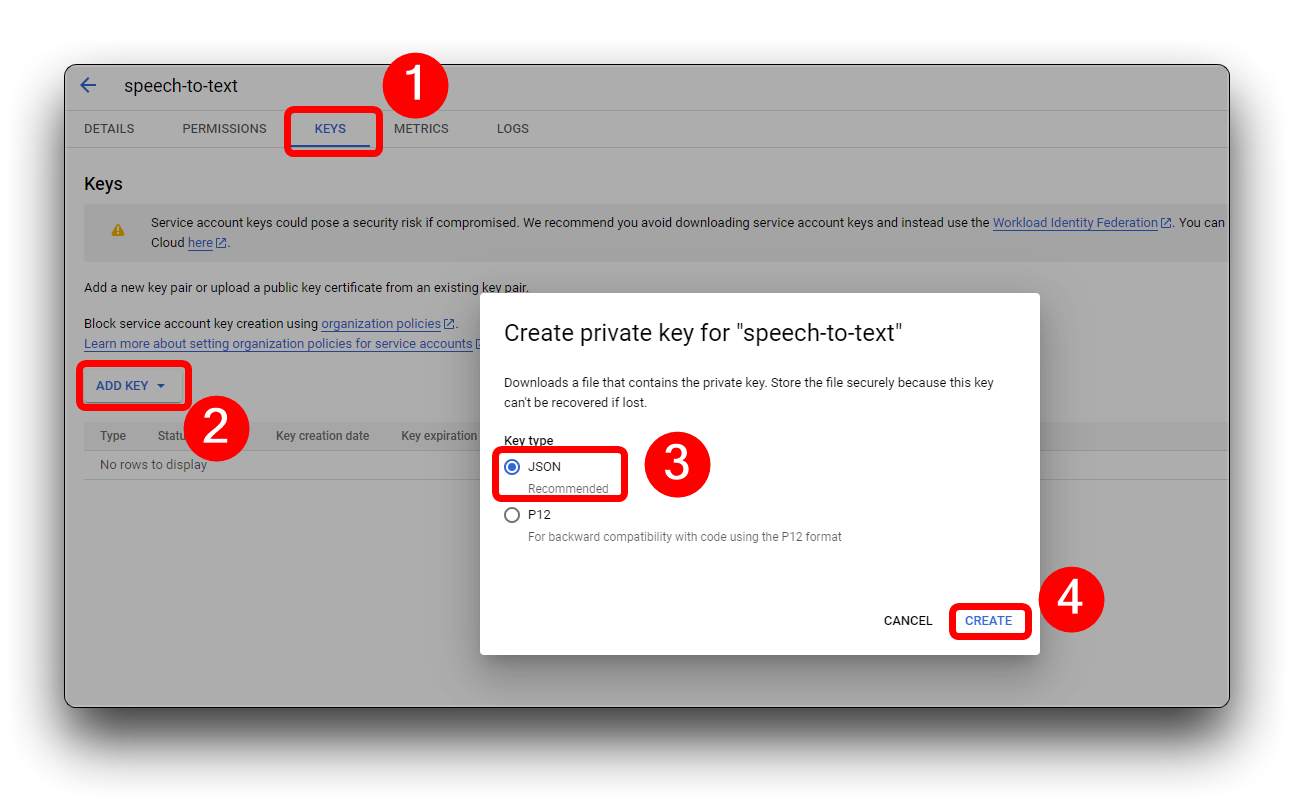
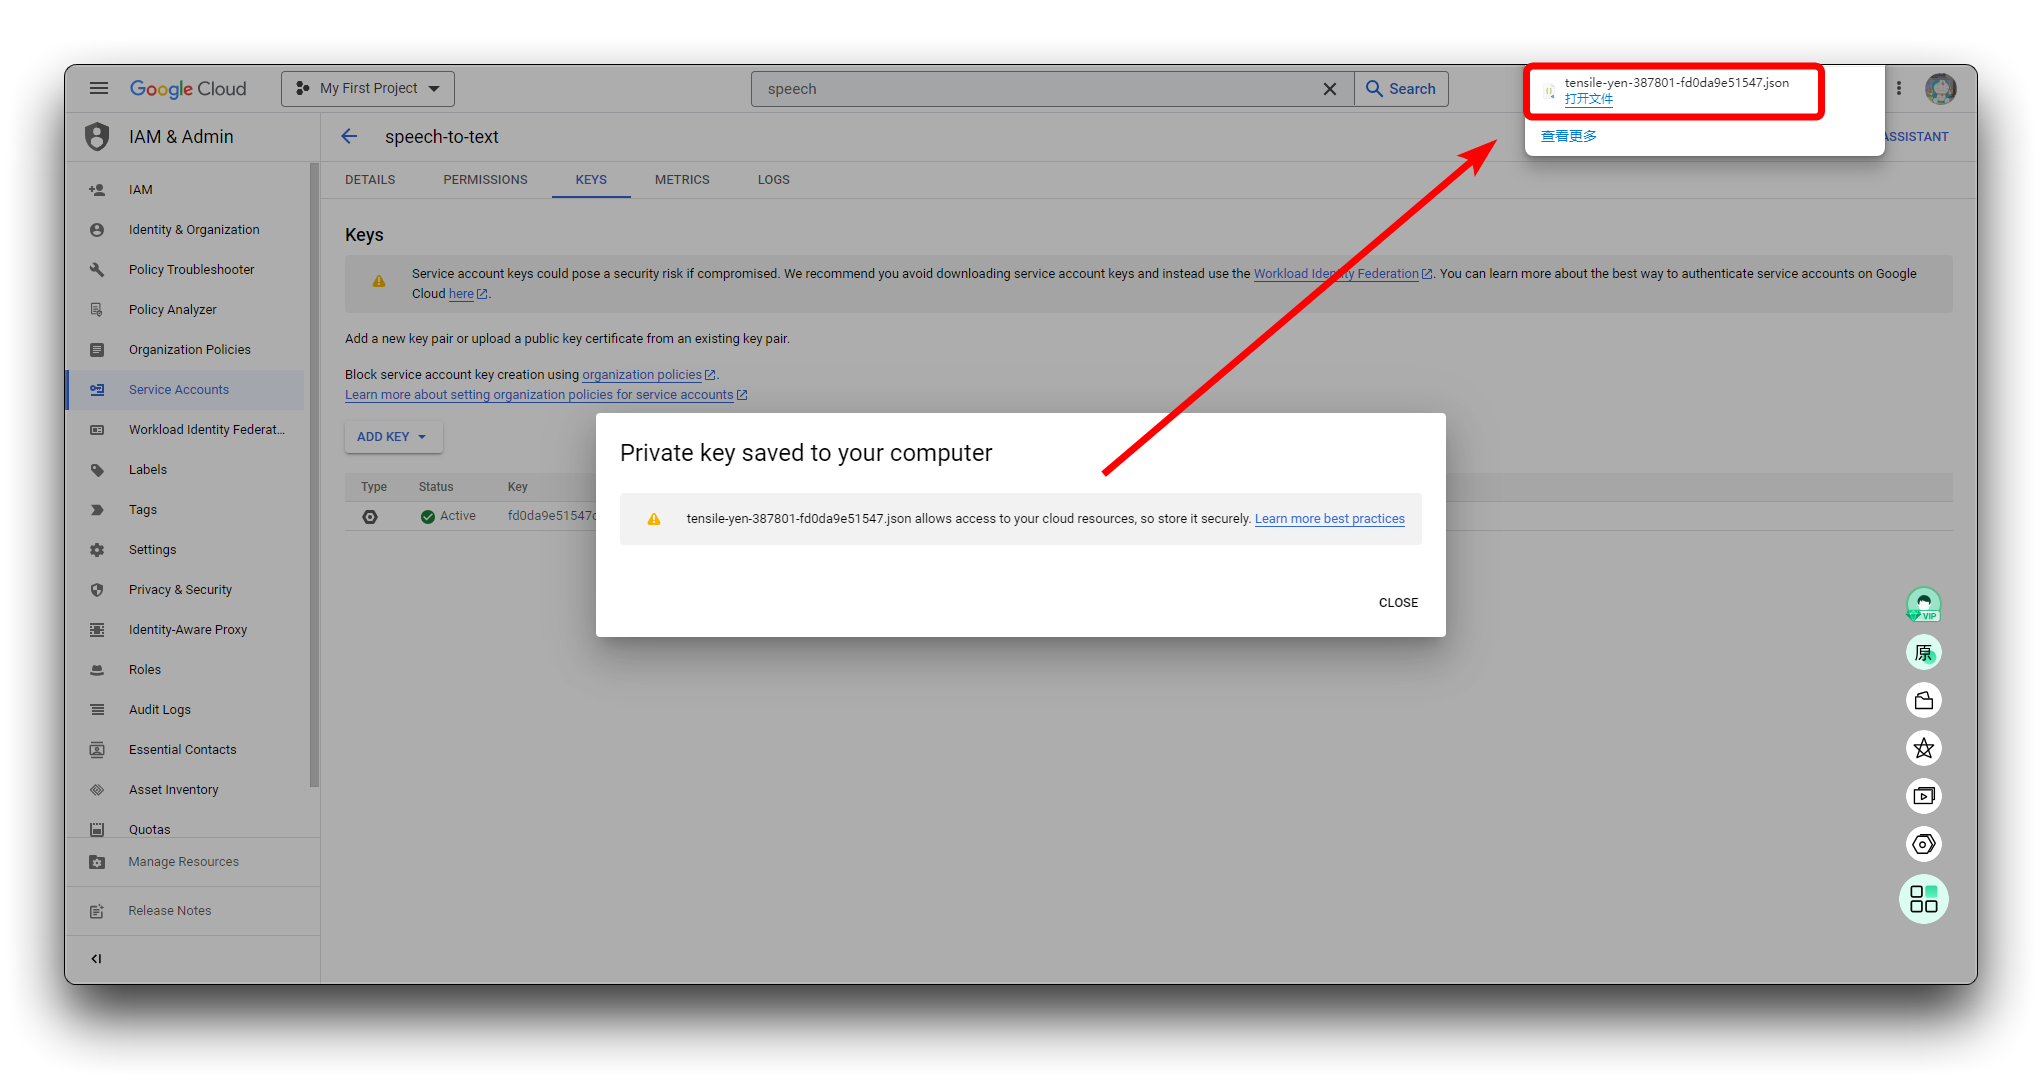
一个您选择格式的新密钥会自动下载。将此文件存储在安全位置并记录文件路径。当您在每个新的语音转文本会话开始时进行身份验证过程时,您需要将 GOOGLE_APPLICATION_CREDENTIALS 环境变量指向此文件。这是对语音转文本请求进行身份验证的重要步骤。密钥的唯一ID会显示在服务账户名称旁边。
请保持密钥为JSON格式,因为我们将在后续步骤中使用它。
在本地主机上部署语音转文本服务
步骤6. 下载项目文件
我们已经打包了完成整个教程所需的项目文件,您可以使用下面的按钮直接从Github下载,或者您可以使用Git命令在本地下载。
git clone https://github.com/limengdu/XIAO-ESP32S3Sense-Speech2ChatGPT.git
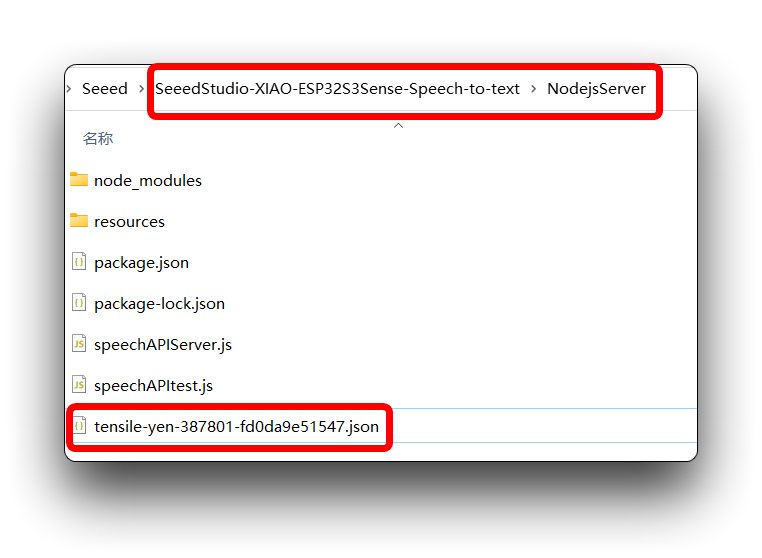
与此同时,您可以将我们在步骤 5中准备的 JSON 文件复制到 NodejsServer 文件夹中,我们稍后会使用它。
步骤 7. 设置您的身份验证环境变量
为了设置您的 GOOGLE_APPLICATION_CREDENTIALS,您必须拥有与您的项目关联的服务账户,并且能够访问该服务账户的 JSON 密钥。
通过设置环境变量 GOOGLE_APPLICATION_CREDENTIALS 为您的应用程序代码提供身份验证凭据。
- Windows
- MacOS or Linux
对于 PowerShell:
$env:GOOGLE_APPLICATION_CREDENTIALS="KEY_PATH"
将 KEY_PATH 替换为包含您的服务账户密钥的 JSON 文件路径。
例如:
$env:GOOGLE_APPLICATION_CREDENTIALS="C:\Users\username\Downloads\service-account-file.json"
对于命令提示符:
set GOOGLE_APPLICATION_CREDENTIALS=KEY_PATH
将 KEY_PATH 替换为包含您的服务账户密钥的 JSON 文件路径。
export GOOGLE_APPLICATION_CREDENTIALS="KEY_PATH"
将 KEY_PATH 替换为包含您的服务账户密钥的 JSON 文件路径。
例如:
export GOOGLE_APPLICATION_CREDENTIALS="/home/user/Downloads/service-account-file.json"
在前面的步骤中,我们已经将 JSON 文件放置在 NodejsServer 文件夹中,因此我们可以直接进入该文件夹,右键单击并选择 在 Powershell 中打开 来进入 Windows 终端。
然后只需输入命令。
$env:GOOGLE_APPLICATION_CREDENTIALS="tensile-yen-3xxxxx-fdxxxxxxxxxx.json"
执行上述命令时请使用您的 JSON 文件名。
如果您重启了计算机或关闭了 Powershell,这可能需要您重新配置环境变量来添加密钥。
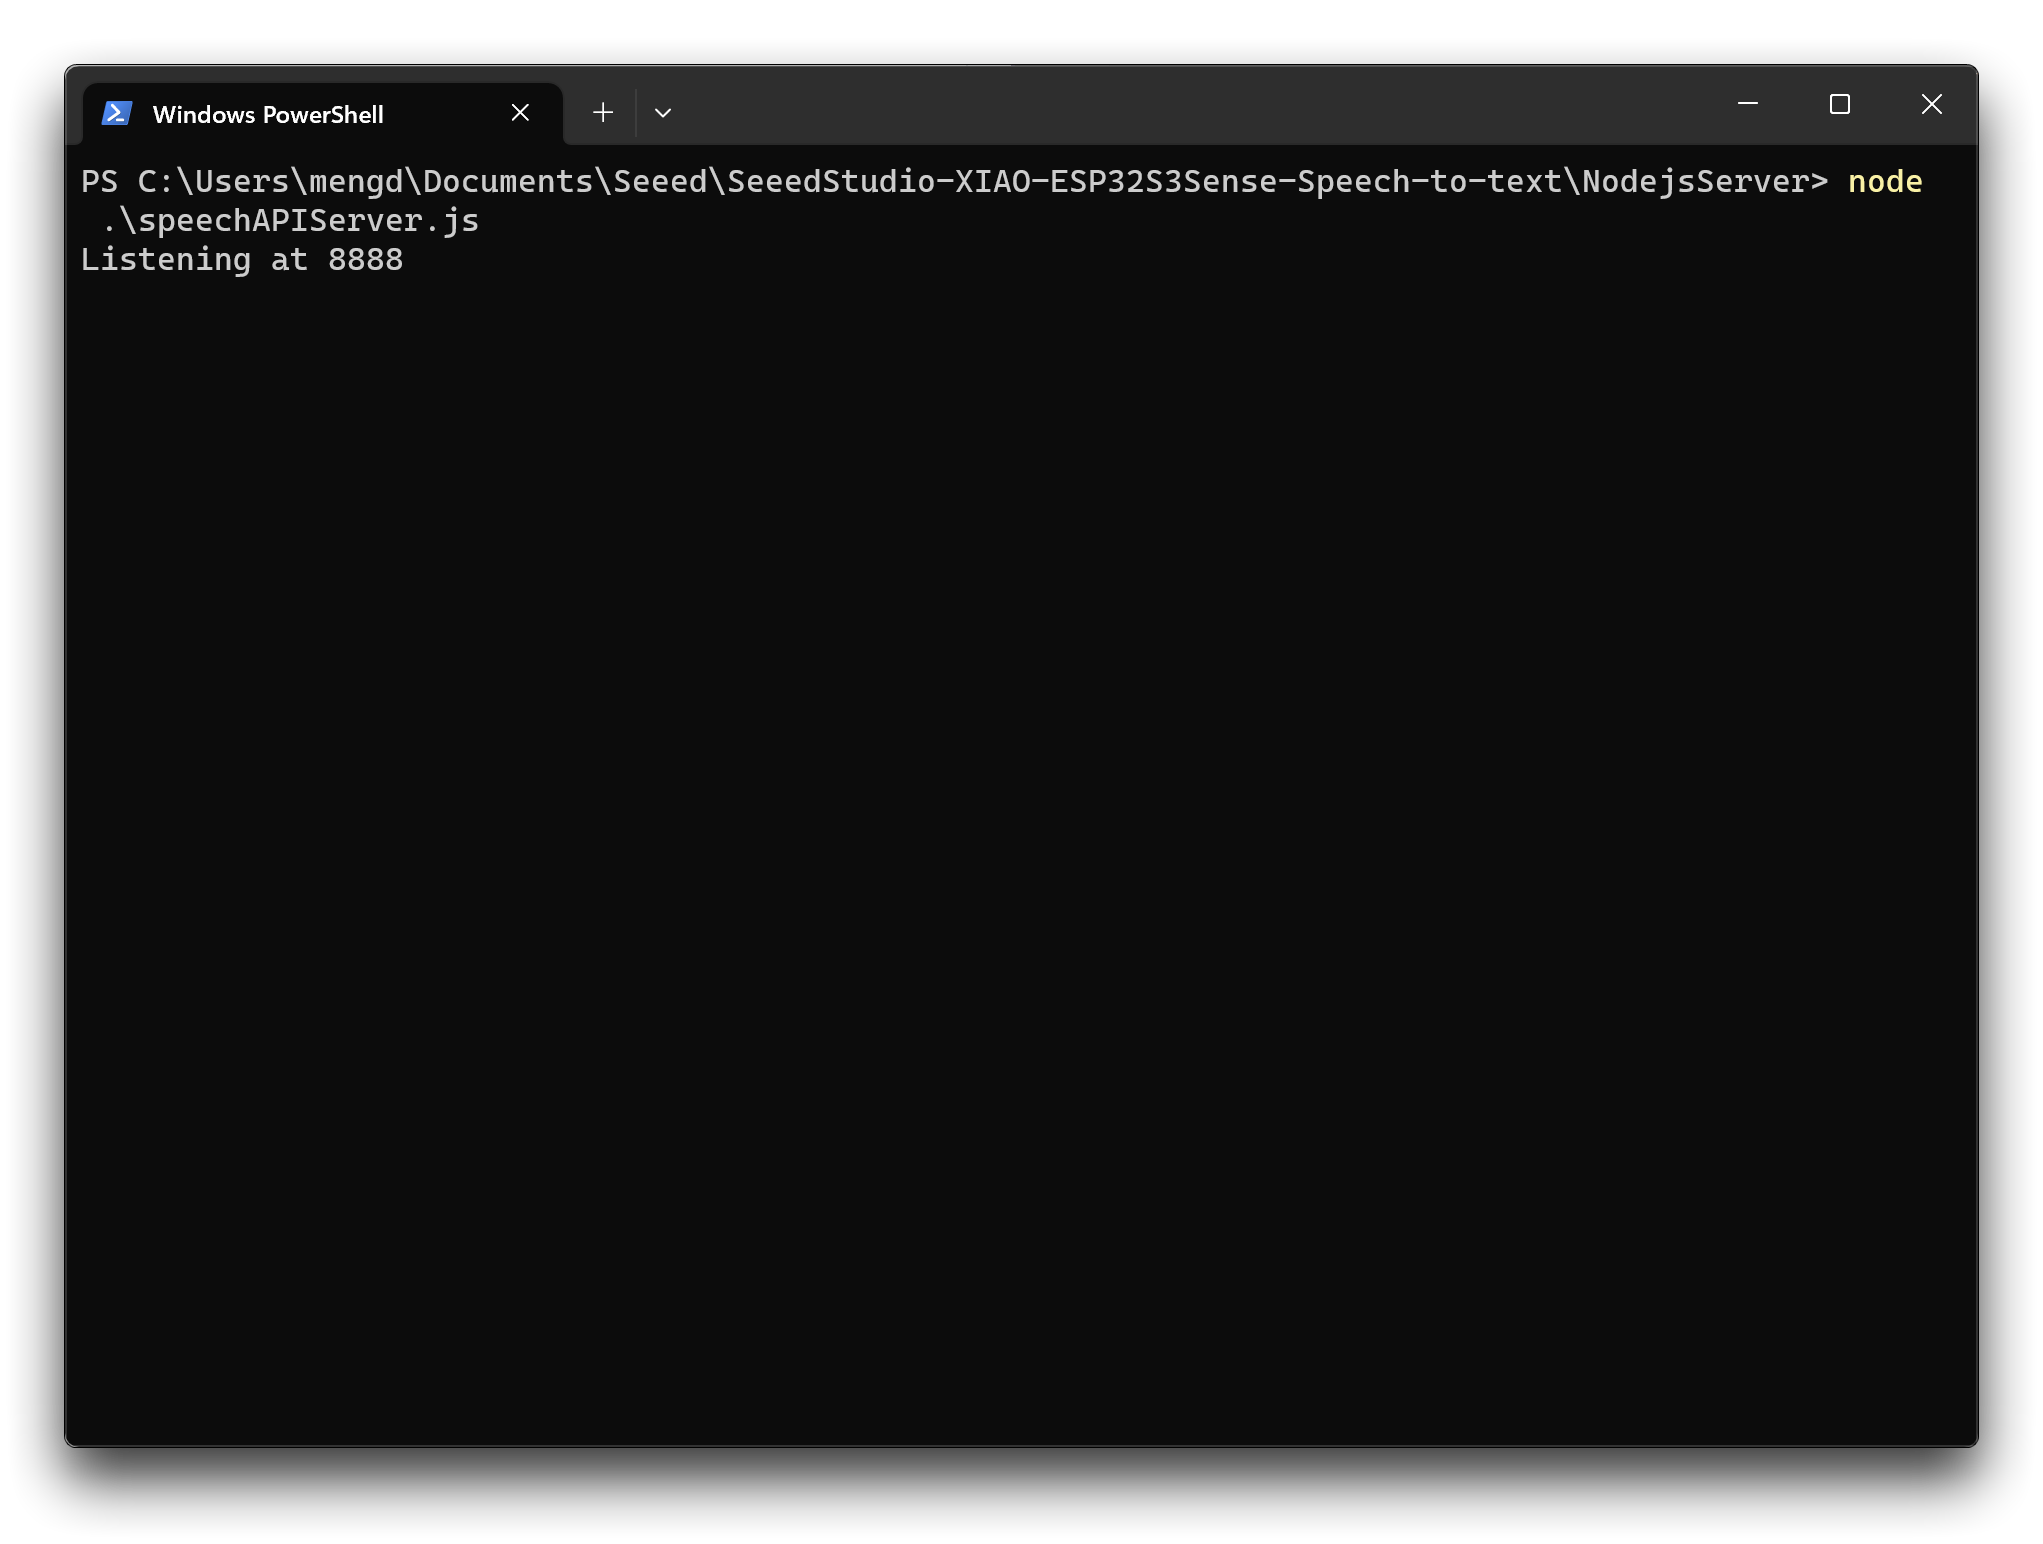
步骤 8. 测试本地 Google Cloud 语音转文本服务的部署
一切就绪后,我们可以使用一段录制的音频,结合一个 json 程序,来检查我们的部署是否成功地将录音转换为文本。
请在项目文件夹中的 NodejsServer 中打开一个 Powershell 窗口。
然后输入以下命令。此命令将执行 speechAPItest.js 文件,并使用项目资源文件夹中的录音文件作为音频输入源发送到 Google Cloud 进行分析,并返回识别的语音内容。
node ./speechAPItest.js
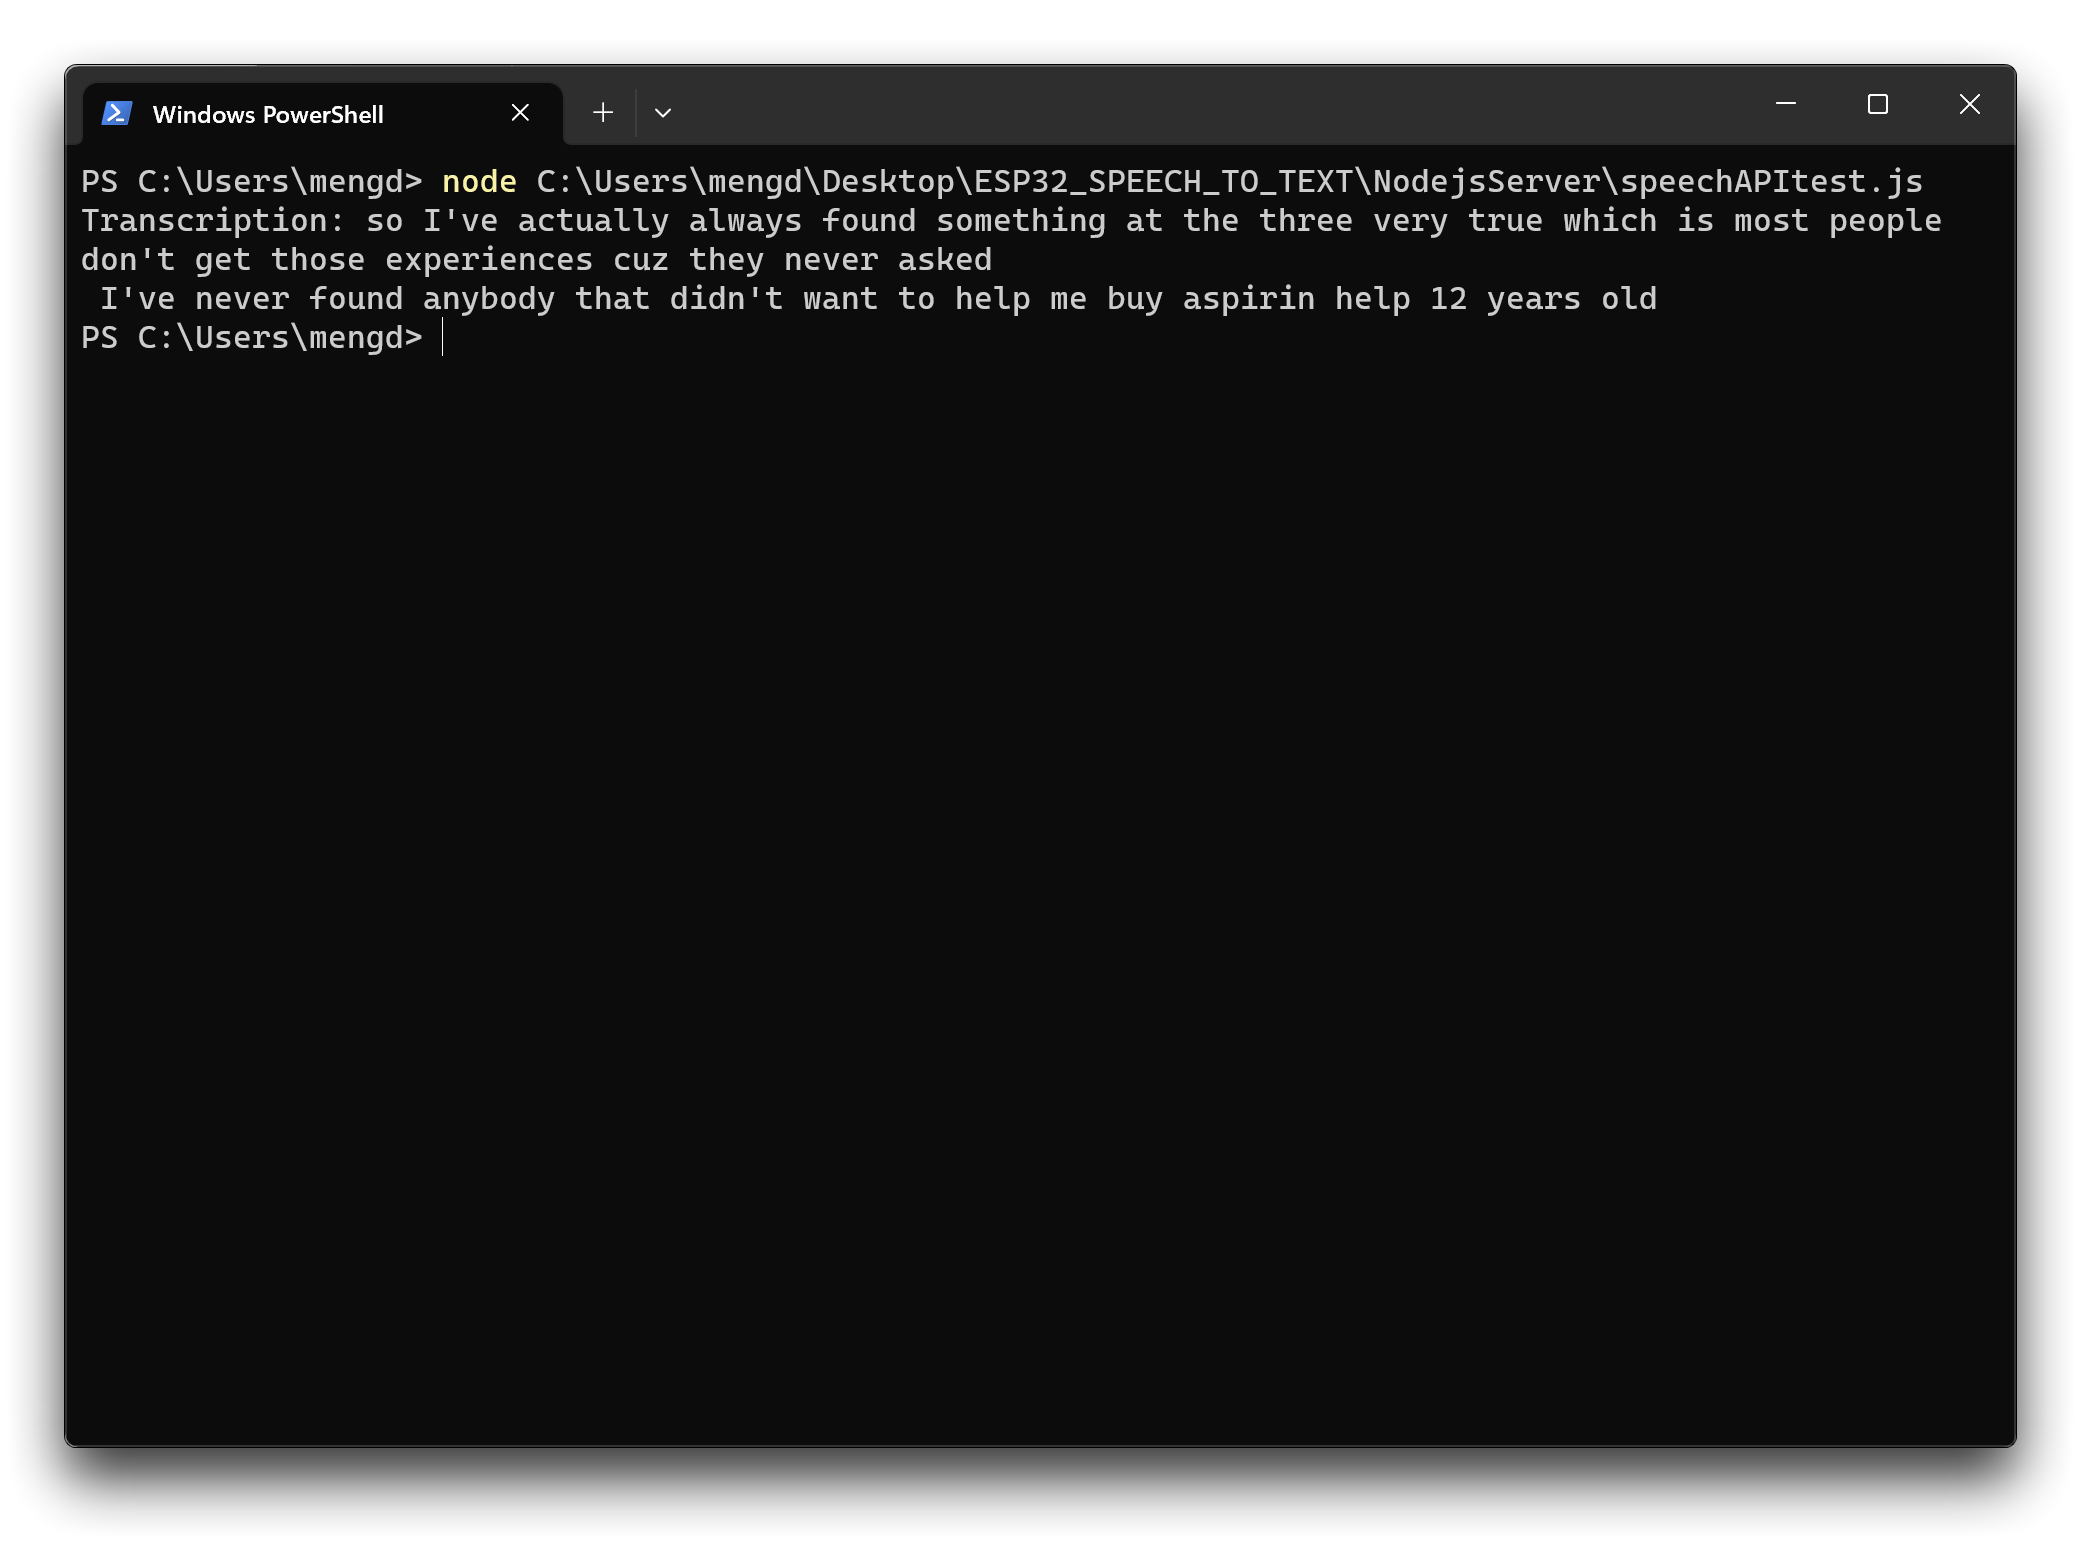
如果您的实现如上所示工作,这表明您已成功在本地主机上部署了 Google Cloud 服务,并准备好进行下一步。
如果您遇到问题,可以查阅官方 Google Cloud 说明来检查部署过程中是否有任何错误或遗漏的步骤。
将 XIAO ESP32S3 Sense 录制的音频文件上传到 Google Cloud 进行识别
接下来,我们更改上传音频文件的路径。从本地上传改为通过 XIAO ESP32S3 Sense 录制上传。XIAO ESP32S3 Sense 录制的音频文件首先保存到 microSD 卡,然后通过本地端口的方式传输到 Google Cloud。
步骤 9. 开启 Google Cloud 语音识别服务的端口监听
同样,在 NodejsServer 文件夹中,使用 Poweshell 执行以下命令。
node ./speechAPIServer.js
一旦执行,speechAPIServer.js 程序将被执行并持续监听 localhost:8888。一旦文件传输到此端口,将调用 Google Cloud 服务。
一旦监听开始,只需保持窗口打开,服务将保持运行。
步骤 10. 检查主机 IP 地址
因为 XIAO 录制的文件需要通过主机的端口号上传到 Google Cloud 服务,我们需要知道您计算机主机的 IP 地址。
- Windows
- MacOS or Linux
在 Powershell 中执行以下命令以获取您计算机的 IP 地址信息。
ipcofig
在shell中执行以下命令来获取您计算机的IP地址信息。
ifconfig
请记下您的IP地址,因为我们稍后需要使用它。
步骤 11. 为 XIAO ESP32S3 Sense 上传程序
在项目文件夹 XIAOESP32S3-RECORD-UPLOAD 中,我们已经为本节的示例准备了程序。
如果您的ESP32版本是2.0.x。点击这里预览完整程序
#include <I2S.h>
#include <WiFi.h>
#include <HTTPClient.h>
#include "FS.h"
#include "SD.h"
#include "SPI.h"
//Variables to be used in the recording program, do not change for best
#define SAMPLE_RATE 16000U
#define SAMPLE_BITS 16
#define WAV_HEADER_SIZE 44
#define VOLUME_GAIN 2
#define RECORD_TIME 10 // seconds, The maximum value is 240
// Number of bytes required for the recording buffer
uint32_t record_size = (SAMPLE_RATE * SAMPLE_BITS / 8) * RECORD_TIME;
File file;
const char filename[] = "/recording.wav";
bool isWIFIConnected;
void setup() {
// put your setup code here, to run once:
Serial.begin(115200);
while (!Serial) ;
I2S.setAllPins(-1, 42, 41, -1, -1);
//The transmission mode is PDM_MONO_MODE, which means that PDM (pulse density modulation) mono mode is used for transmission
if (!I2S.begin(PDM_MONO_MODE, SAMPLE_RATE, SAMPLE_BITS)) {
Serial.println("Failed to initialize I2S!");
while (1) ;
}
if(!SD.begin(D2)){
Serial.println("Failed to mount SD Card!");
while (1) ;
}
xTaskCreate(i2s_adc, "i2s_adc", 1024 * 8, NULL, 1, NULL);
delay(500);
xTaskCreate(wifiConnect, "wifi_Connect", 4096, NULL, 0, NULL);
}
void loop() {
// put your main code here, to run repeatedly:
}
void i2s_adc(void *arg)
{
uint32_t sample_size = 0;
//This variable will be used to point to the actual recording buffer
uint8_t *rec_buffer = NULL;
Serial.printf("Ready to start recording ...\n");
File file = SD.open(filename, FILE_WRITE);
// Write the header to the WAV file
uint8_t wav_header[WAV_HEADER_SIZE];
//Write the WAV file header information to the wav_header array
generate_wav_header(wav_header, record_size, SAMPLE_RATE);
//Call the file.write() function to write the data in the wav_header array to the newly created WAV file
file.write(wav_header, WAV_HEADER_SIZE);
// This code uses the ESP32's PSRAM (external cache memory) to dynamically allocate a section of memory to store the recording data.
rec_buffer = (uint8_t *)ps_malloc(record_size);
if (rec_buffer == NULL) {
Serial.printf("malloc failed!\n");
while(1) ;
}
Serial.printf("Buffer: %d bytes\n", ESP.getPsramSize() - ESP.getFreePsram());
// Start recording
// I2S port number (in this case I2S_NUM_0),
// a pointer to the buffer to which the data is to be written (i.e. rec_buffer),
// the size of the data to be read (i.e. record_size),
// a pointer to a variable that points to the actual size of the data being read (i.e. &sample_size),
// and the maximum time to wait for the data to be read (in this case portMAX_DELAY, indicating an infinite wait time).
esp_i2s::i2s_read(esp_i2s::I2S_NUM_0, rec_buffer, record_size, &sample_size, portMAX_DELAY);
if (sample_size == 0) {
Serial.printf("Record Failed!\n");
} else {
Serial.printf("Record %d bytes\n", sample_size);
}
// Increase volume
for (uint32_t i = 0; i < sample_size; i += SAMPLE_BITS/8) {
(*(uint16_t *)(rec_buffer+i)) <<= VOLUME_GAIN;
}
// Write data to the WAV file
Serial.printf("Writing to the file ...\n");
if (file.write(rec_buffer, record_size) != record_size)
Serial.printf("Write file Failed!\n");
free(rec_buffer);
rec_buffer = NULL;
file.close();
Serial.printf("The recording is over.\n");
listDir(SD, "/", 0);
if(isWIFIConnected){
uploadFile();
}
vTaskDelete(NULL);
}
void generate_wav_header(uint8_t *wav_header, uint32_t wav_size, uint32_t sample_rate)
{
// See this for reference: http://soundfile.sapp.org/doc/WaveFormat/
uint32_t file_size = wav_size + WAV_HEADER_SIZE - 8;
uint32_t byte_rate = SAMPLE_RATE * SAMPLE_BITS / 8;
const uint8_t set_wav_header[] = {
'R', 'I', 'F', 'F', // ChunkID
file_size, file_size >> 8, file_size >> 16, file_size >> 24, // ChunkSize
'W', 'A', 'V', 'E', // Format
'f', 'm', 't', ' ', // Subchunk1ID
0x10, 0x00, 0x00, 0x00, // Subchunk1Size (16 for PCM)
0x01, 0x00, // AudioFormat (1 for PCM)
0x01, 0x00, // NumChannels (1 channel)
sample_rate, sample_rate >> 8, sample_rate >> 16, sample_rate >> 24, // SampleRate
byte_rate, byte_rate >> 8, byte_rate >> 16, byte_rate >> 24, // ByteRate
0x02, 0x00, // BlockAlign
0x10, 0x00, // BitsPerSample (16 bits)
'd', 'a', 't', 'a', // Subchunk2ID
wav_size, wav_size >> 8, wav_size >> 16, wav_size >> 24, // Subchunk2Size
};
memcpy(wav_header, set_wav_header, sizeof(set_wav_header));
}
void listDir(fs::FS &fs, const char * dirname, uint8_t levels){
Serial.printf("Listing directory: %s\n", dirname);
File root = fs.open(dirname);
if(!root){
Serial.println("Failed to open directory");
return;
}
if(!root.isDirectory()){
Serial.println("Not a directory");
return;
}
File file = root.openNextFile();
while(file){
if(file.isDirectory()){
Serial.print(" DIR : ");
Serial.println(file.name());
if(levels){
listDir(fs, file.path(), levels -1);
}
} else {
Serial.print(" FILE: ");
Serial.print(file.name());
Serial.print(" SIZE: ");
Serial.println(file.size());
}
file = root.openNextFile();
}
}
void wifiConnect(void *pvParameters){
isWIFIConnected = false;
char* ssid = "wifi-ssid";
char* password = "wifi-password";
Serial.print("Try to connect to ");
Serial.println(ssid);
WiFi.begin(ssid, password);
while(WiFi.status() != WL_CONNECTED){
vTaskDelay(500);
Serial.print(".");
}
Serial.println("Wi-Fi Connected!");
isWIFIConnected = true;
while(true){
vTaskDelay(1000);
}
}
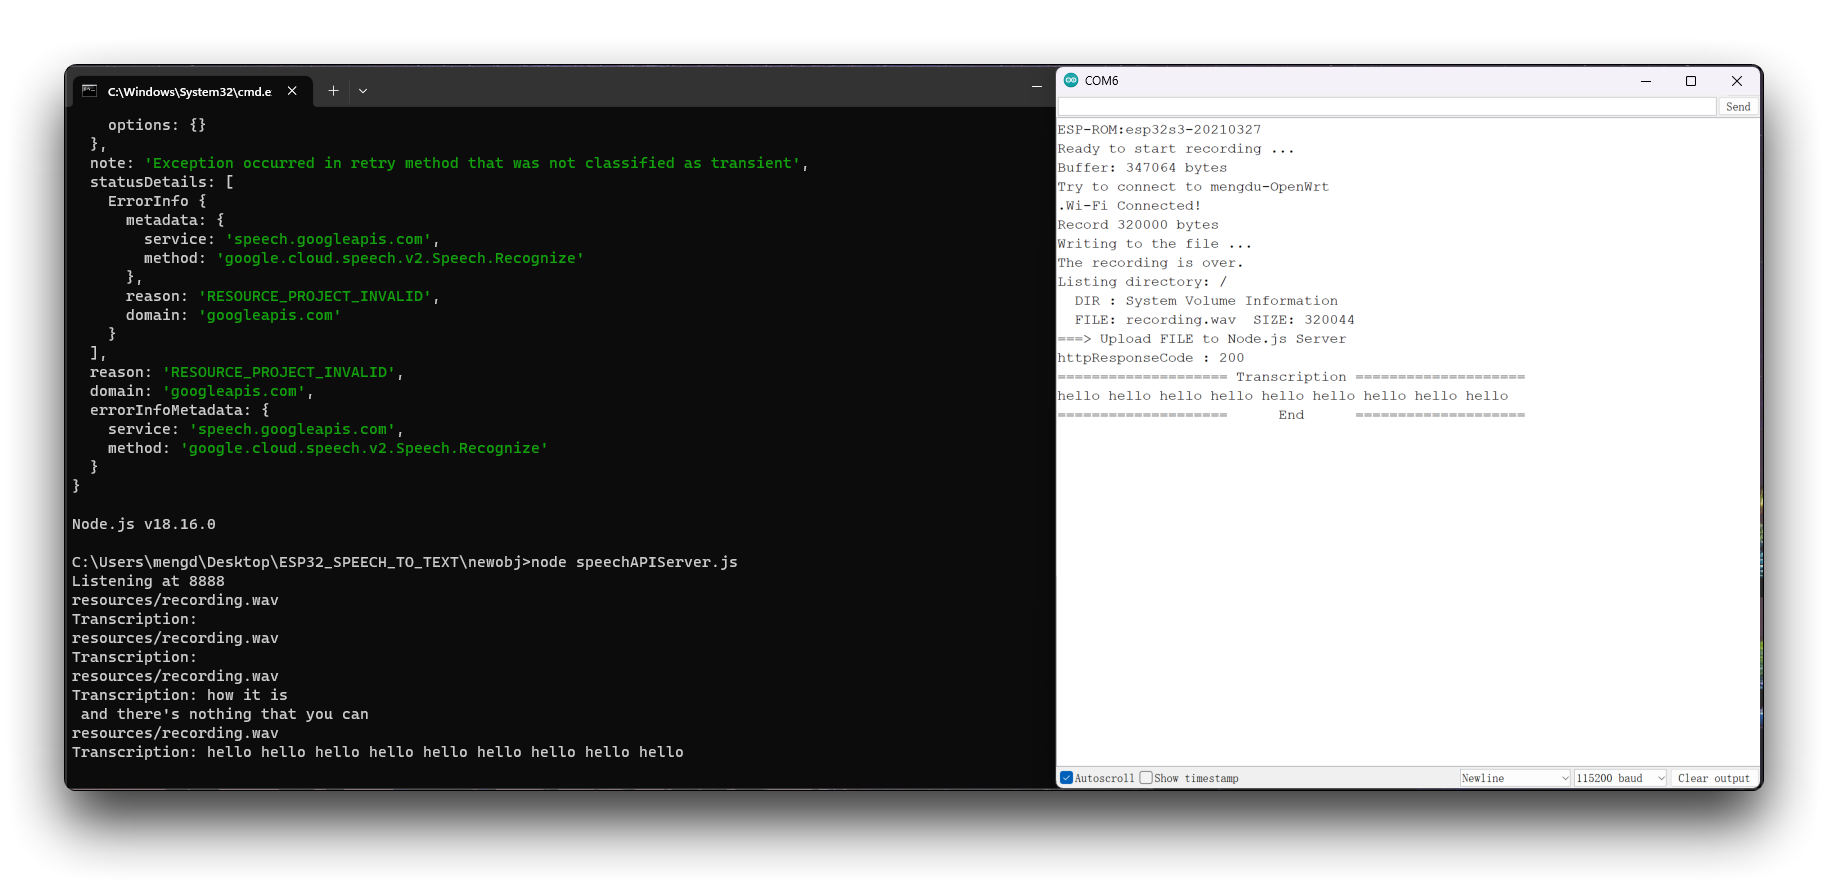
void uploadFile(){
file = SD.open(filename, FILE_READ);
if(!file){
Serial.println("FILE IS NOT AVAILABLE!");
return;
}
Serial.println("===> Upload FILE to Node.js Server");
HTTPClient client;
client.begin("http://192.168.1.208:8888/uploadAudio");
client.addHeader("Content-Type", "audio/wav");
int httpResponseCode = client.sendRequest("POST", &file, file.size());
Serial.print("httpResponseCode : ");
Serial.println(httpResponseCode);
if(httpResponseCode == 200){
String response = client.getString();
Serial.println("==================== Transcription ====================");
Serial.println(response);
Serial.println("==================== End ====================");
}else{
Serial.println("Error");
}
file.close();
client.end();
}
如果您的 ESP32 版本是 3.0.x,请点击此处预览完整程序
#include <ESP_I2S.h>
#include <WiFi.h>
#include <HTTPClient.h>
#include "FS.h"
#include "SD.h"
#include "SPI.h"

//Variables to be used in the recording program, do not change for best
#define SAMPLE_RATE 16000U
#define SAMPLE_BITS 16
#define WAV_HEADER_SIZE 44
#define VOLUME_GAIN 2
#define RECORD_TIME 10      // seconds, The maximum value is 240

//define I2S
I2SClass I2S;

// Number of bytes required for the recording buffer
uint32_t record_size = (SAMPLE_RATE * SAMPLE_BITS / 8) * RECORD_TIME;

File file;
const char filename[] = "/recording.wav";

bool isWIFIConnected;

void setup() {
  // put your setup code here, to run once:
  Serial.begin(115200);
  while (!Serial) ;

  // setup 42 PDM clock and 41 PDM data pins
  I2S.setPinsPdmRx(42, 41);

  //The transmission mode is PDM_MONO_MODE, which means that PDM (pulse density modulation) mono mode is used for transmission
  if (!I2S.begin(I2S_MODE_PDM_RX, 16000, I2S_DATA_BIT_WIDTH_16BIT, I2S_SLOT_MODE_MONO)) {
    Serial.println("Failed to initialize I2S!");
    while (1) ;
  }

  if(!SD.begin(D2)){
    Serial.println("Failed to mount SD Card!");
    while (1) ;
  }

  xTaskCreate(i2s_adc, "i2s_adc", 1024 * 8, NULL, 1, NULL);
  delay(500);
  xTaskCreate(wifiConnect, "wifi_Connect", 4096, NULL, 0, NULL);
}

void loop() {
  // put your main code here, to run repeatedly:
}

void i2s_adc(void *arg)
{
  uint32_t sample_size = 0;

  //This variable will be used to point to the actual recording buffer
  uint8_t *rec_buffer = NULL;
  Serial.printf("Ready to start recording ...\n");

  File file = SD.open(filename, FILE_WRITE);

  // Write the header to the WAV file
  uint8_t wav_header[WAV_HEADER_SIZE];

  //Write the WAV file header information to the wav_header array
  generate_wav_header(wav_header, record_size, SAMPLE_RATE);

  //Call the file.write() function to write the data in the wav_header array to the newly created WAV file
  file.write(wav_header, WAV_HEADER_SIZE);

  // This code uses the ESP32's PSRAM (external cache memory) to dynamically allocate a section of memory to store the recording data.
  rec_buffer = (uint8_t *)ps_malloc(record_size);
  if (rec_buffer == NULL) {
    Serial.printf("malloc failed!\n");
    while(1) ;
  }
  Serial.printf("Buffer: %d bytes\n", ESP.getPsramSize() - ESP.getFreePsram());

  // Start recording
  // I2S port number (in this case I2S_NUM_0),
  // a pointer to the buffer to which the data is to be written (i.e. rec_buffer),
  // the size of the data to be read (i.e. record_size),
  // a pointer to a variable that points to the actual size of the data being read (i.e. &sample_size),
  // and the maximum time to wait for the data to be read (in this case portMAX_DELAY, indicating an infinite wait time).
  esp_i2s::i2s_read(esp_i2s::I2S_NUM_0, rec_buffer, record_size, &sample_size, portMAX_DELAY);
  if (sample_size == 0) {
    Serial.printf("Record Failed!\n");
  } else {
    Serial.printf("Record %d bytes\n", sample_size);
  }

  // Increase volume
  for (uint32_t i = 0; i < sample_size; i += SAMPLE_BITS/8) {
    (*(uint16_t *)(rec_buffer+i)) <<= VOLUME_GAIN;
  }

  // Write data to the WAV file
  Serial.printf("Writing to the file ...\n");
  if (file.write(rec_buffer, record_size) != record_size)
    Serial.printf("Write file Failed!\n");

  free(rec_buffer);
  rec_buffer = NULL;
  file.close();
  Serial.printf("The recording is over.\n");

  listDir(SD, "/", 0);

  if(isWIFIConnected){
    uploadFile();
  }

  vTaskDelete(NULL);
}


void generate_wav_header(uint8_t *wav_header, uint32_t wav_size, uint32_t sample_rate)
{
  // See this for reference: http://soundfile.sapp.org/doc/WaveFormat/
  uint32_t file_size = wav_size + WAV_HEADER_SIZE - 8;
  uint32_t byte_rate = SAMPLE_RATE * SAMPLE_BITS / 8;
  const uint8_t set_wav_header[] = {
    'R', 'I', 'F', 'F', // ChunkID
    file_size, file_size >> 8, file_size >> 16, file_size >> 24, // ChunkSize
    'W', 'A', 'V', 'E', // Format
    'f', 'm', 't', ' ', // Subchunk1ID
    0x10, 0x00, 0x00, 0x00, // Subchunk1Size (16 for PCM)
    0x01, 0x00, // AudioFormat (1 for PCM)
    0x01, 0x00, // NumChannels (1 channel)
    sample_rate, sample_rate >> 8, sample_rate >> 16, sample_rate >> 24, // SampleRate
    byte_rate, byte_rate >> 8, byte_rate >> 16, byte_rate >> 24, // ByteRate
    0x02, 0x00, // BlockAlign
    0x10, 0x00, // BitsPerSample (16 bits)
    'd', 'a', 't', 'a', // Subchunk2ID
    wav_size, wav_size >> 8, wav_size >> 16, wav_size >> 24, // Subchunk2Size
  };
  memcpy(wav_header, set_wav_header, sizeof(set_wav_header));
}


void listDir(fs::FS &fs, const char * dirname, uint8_t levels){
    Serial.printf("Listing directory: %s\n", dirname);

    File root = fs.open(dirname);
    if(!root){
        Serial.println("Failed to open directory");
        return;
    }
    if(!root.isDirectory()){
        Serial.println("Not a directory");
        return;
    }

    File file = root.openNextFile();
    while(file){
        if(file.isDirectory()){
            Serial.print("  DIR : ");
            Serial.println(file.name());
            if(levels){
                listDir(fs, file.path(), levels -1);
            }
        } else {
            Serial.print("  FILE: ");
            Serial.print(file.name());
            Serial.print("  SIZE: ");
            Serial.println(file.size());
        }
        file = root.openNextFile();
    }
}

void wifiConnect(void *pvParameters){
  isWIFIConnected = false;
  char* ssid = "wifi-ssid";
  char* password = "wifi-password";
  Serial.print("Try to connect to ");
  Serial.println(ssid);
  WiFi.begin(ssid, password);
  while(WiFi.status() != WL_CONNECTED){
    vTaskDelay(500);
    Serial.print(".");
  }
  Serial.println("Wi-Fi Connected!");
  isWIFIConnected = true;
  while(true){
    vTaskDelay(1000);
  }
}

void uploadFile(){
  file = SD.open(filename, FILE_READ);
  if(!file){
    Serial.println("FILE IS NOT AVAILABLE!");
    return;
  }

  Serial.println("===> Upload FILE to Node.js Server");

  HTTPClient client;
  client.begin("http://192.168.1.208:8888/uploadAudio");
  client.addHeader("Content-Type", "audio/wav");
  int httpResponseCode = client.sendRequest("POST", &file, file.size());
  Serial.print("httpResponseCode : ");
  Serial.println(httpResponseCode);

  if(httpResponseCode == 200){
    String response = client.getString();
    Serial.println("==================== Transcription ====================");
    Serial.println(response);
    Serial.println("====================      End      ====================");
  }else{
    Serial.println("Error");
  }
  file.close();
  client.end();
}
在编译和上传示例程序之前,您需要更改一些内容以适应您的情况。
- 录音时间 - 在代码的第13行,默认录音时间设置为10秒,您可以调整此录音时间以适合您的需要,最长可达240秒。
- 保存录音文件的名称 - 在代码的第19行,您可以为录音文件更改名称。
- 网络的WiFi名称 - 将代码第172行的网络名称更改为与您部署Google Cloud Services的主机在同一局域网下的网络名称。
- 网络的WiFi密码 - 在代码的第172行,更改对应网络的密码。
- 主机IP地址 - 在代码的第198行,您需要将此处的IP地址更改为您的主机IP地址,并保持端口号为8888。
一旦您根据需要更改了程序并上传后,您可以打开串口监视器并开始准备录制您想说的内容。在十秒录音后,Google Cloud将分析您的录音文件并将识别结果返回给您。
在XIAO ESP32S3 Sense上部署ChatGPT
接下来我们增加难度。继续在代码中添加ChatGPT调用。
步骤12. 使用识别的文本作为问题向ChatGPT提问
在项目文件夹**XIAOESP32S3-SPEECH-TO-CHATGPT**中,我们为本节的示例准备了程序。
如果您的ESP32版本是2.0.x。点击此处预览完整程序
#include <I2S.h>
#include <WiFi.h>
#include <HTTPClient.h>
#include <WiFiClientSecure.h>
#include <ArduinoJson.h>
#include <ChatGPT.hpp>
#include "FS.h"
#include "SD.h"
#include "SPI.h"
// Variables to be used in the recording program, do not change for best
#define SAMPLE_RATE 16000U
#define SAMPLE_BITS 16
#define WAV_HEADER_SIZE 44
#define VOLUME_GAIN 2
#define RECORD_TIME 5 // seconds, The maximum value is 240
const char* ssid = "wifi-ssid";
const char* password = "wifi-password";
// Number of bytes required for the recording buffer
uint32_t record_size = (SAMPLE_RATE * SAMPLE_BITS / 8) * RECORD_TIME;
File file;
const char filename[] = "/recording.wav";
bool isWIFIConnected;
String chatgpt_Q;
TaskHandle_t chatgpt_handle;
WiFiClientSecure client;
ChatGPT<WiFiClientSecure> chat_gpt(&client, "v1", "OpenAI-TOKEN");
//*****************************************Arduino Base******************************************//
void setup() {
// put your setup code here, to run once:
Serial.begin(115200);
while (!Serial) ;
I2S.setAllPins(-1, 42, 41, -1, -1);
// The transmission mode is PDM_MONO_MODE, which means that PDM (pulse density modulation) mono mode is used for transmission
if (!I2S.begin(PDM_MONO_MODE, SAMPLE_RATE, SAMPLE_BITS)) {
Serial.println("Failed to initialize I2S!");
while (1) ;
}
if(!SD.begin(D2)){
Serial.println("Failed to mount SD Card!");
while (1) ;
}
xTaskCreate(wifiConnect, "wifi_Connect", 4096, NULL, 0, NULL);
delay(500);
xTaskCreate(i2s_adc, "i2s_adc", 1024 * 8, NULL, 1, NULL);
xTaskCreate(chatgpt, "chatgpt", 1024 * 8, NULL, 2, &chatgpt_handle);
}
void loop() {
// put your main code here, to run repeatedly:
}
//*****************************************RTOS TASK******************************************//
void i2s_adc(void *arg)
{
while(1){
uint32_t sample_size = 0;
// This variable will be used to point to the actual recording buffer
uint8_t *rec_buffer = NULL;
Serial.printf("Ready to start recording ...\n");
File file = SD.open(filename, FILE_WRITE);
// Write the header to the WAV file
uint8_t wav_header[WAV_HEADER_SIZE];
// Write the WAV file header information to the wav_header array
generate_wav_header(wav_header, record_size, SAMPLE_RATE);
// Call the file.write() function to write the data in the wav_header array to the newly created WAV file
file.write(wav_header, WAV_HEADER_SIZE);
// This code uses the ESP32's PSRAM (external cache memory) to dynamically allocate a section of memory to store the recording data
rec_buffer = (uint8_t *)ps_malloc(record_size);
if (rec_buffer == NULL) {
Serial.printf("malloc failed!\n");
while(1) ;
}
Serial.printf("Buffer: %d bytes\n", ESP.getPsramSize() - ESP.getFreePsram());
// Start recording
// I2S port number (in this case I2S_NUM_0),
// a pointer to the buffer to which the data is to be written (i.e. rec_buffer),
// the size of the data to be read (i.e. record_size),
// a pointer to a variable that points to the actual size of the data being read (i.e. &sample_size),
// and the maximum time to wait for the data to be read (in this case portMAX_DELAY, indicating an infinite wait time).
esp_i2s::i2s_read(esp_i2s::I2S_NUM_0, rec_buffer, record_size, &sample_size, portMAX_DELAY);
if (sample_size == 0) {
Serial.printf("Record Failed!\n");
} else {
Serial.printf("Record %d bytes\n", sample_size);
}
// Increase volume
for (uint32_t i = 0; i < sample_size; i += SAMPLE_BITS/8) {
(*(uint16_t *)(rec_buffer+i)) <<= VOLUME_GAIN;
}
// Write data to the WAV file
Serial.printf("Writing to the file ...\n");
if (file.write(rec_buffer, record_size) != record_size)
Serial.printf("Write file Failed!\n");
free(rec_buffer);
rec_buffer = NULL;
file.close();
Serial.printf("The recording is over.\n");
listDir(SD, "/", 0);
bool uploadStatus = false;
if(isWIFIConnected){
uploadStatus = uploadFile();
}
if(uploadStatus)
xTaskNotifyGive(chatgpt_handle);
vTaskDelay(10000); // Each recording is spaced 10s apart
}
// vTaskDelete(NULL);
}
void wifiConnect(void *pvParameters){
isWIFIConnected = false;
Serial.print("Try to connect to ");
Serial.println(ssid);
WiFi.begin(ssid, password);
while(WiFi.status() != WL_CONNECTED){
vTaskDelay(500);
Serial.print(".");
}
Serial.println("Wi-Fi Connected!");
isWIFIConnected = true;
// Ignore SSL certificate validation
client.setInsecure();
while(true){
vTaskDelay(1000);
}
}
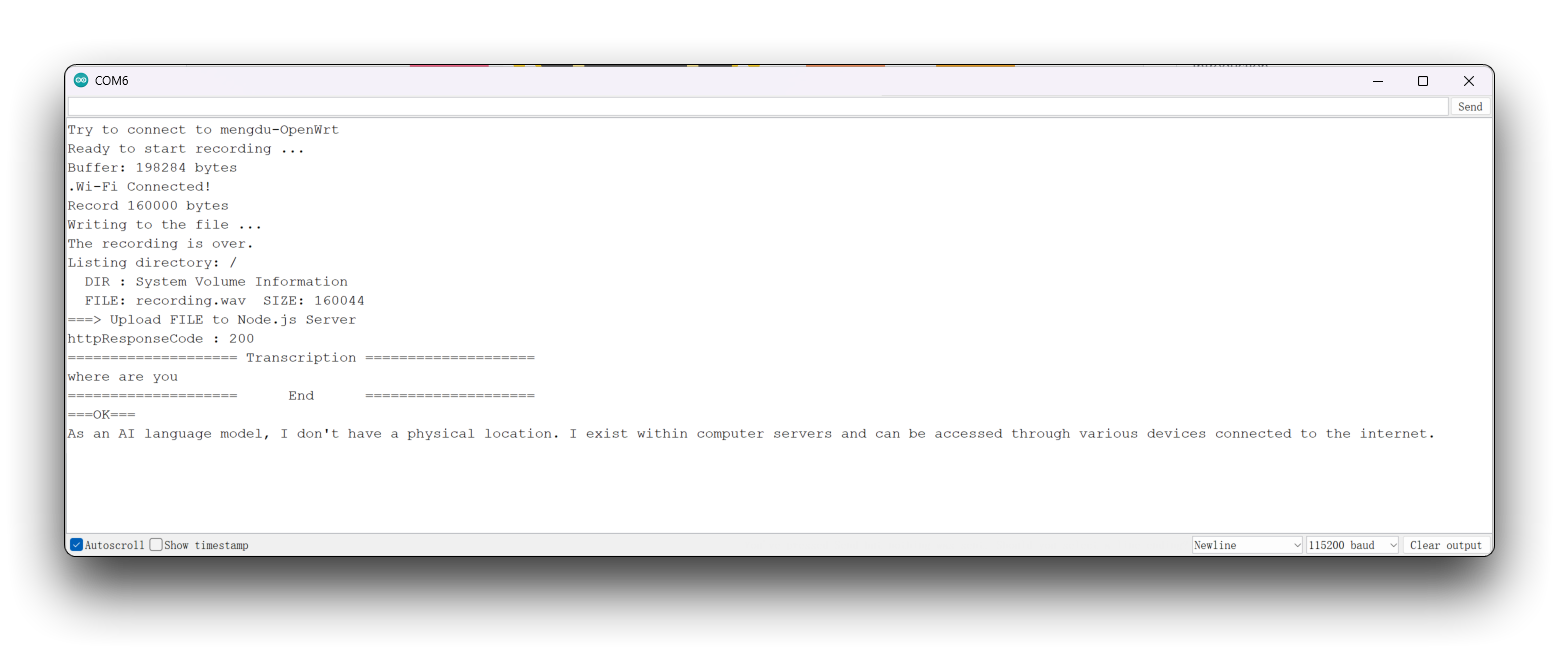
void chatgpt(void *pvParameters){
while(1){
// Waiting for notification signal from Task 1
ulTaskNotifyTake(pdTRUE, portMAX_DELAY);
String result;
if (chat_gpt.simple_message("gpt-3.5-turbo-0301", "user", chatgpt_Q, result)) {
Serial.println("===OK===");
Serial.println(result);
} else {
Serial.println("===ERROR===");
Serial.println(result);
}
}
}
//*****************************************Audio Process******************************************//
void generate_wav_header(uint8_t *wav_header, uint32_t wav_size, uint32_t sample_rate)
{
// See this for reference: http://soundfile.sapp.org/doc/WaveFormat/
uint32_t file_size = wav_size + WAV_HEADER_SIZE - 8;
uint32_t byte_rate = SAMPLE_RATE * SAMPLE_BITS / 8;
const uint8_t set_wav_header[] = {
'R', 'I', 'F', 'F', // ChunkID
file_size, file_size >> 8, file_size >> 16, file_size >> 24, // ChunkSize
'W', 'A', 'V', 'E', // Format
'f', 'm', 't', ' ', // Subchunk1ID
0x10, 0x00, 0x00, 0x00, // Subchunk1Size (16 for PCM)
0x01, 0x00, // AudioFormat (1 for PCM)
0x01, 0x00, // NumChannels (1 channel)
sample_rate, sample_rate >> 8, sample_rate >> 16, sample_rate >> 24, // SampleRate
byte_rate, byte_rate >> 8, byte_rate >> 16, byte_rate >> 24, // ByteRate
0x02, 0x00, // BlockAlign
0x10, 0x00, // BitsPerSample (16 bits)
'd', 'a', 't', 'a', // Subchunk2ID
wav_size, wav_size >> 8, wav_size >> 16, wav_size >> 24, // Subchunk2Size
};
memcpy(wav_header, set_wav_header, sizeof(set_wav_header));
}
//*****************************************File Process******************************************//
void listDir(fs::FS &fs, const char * dirname, uint8_t levels){
Serial.printf("Listing directory: %s\n", dirname);
File root = fs.open(dirname);
if(!root){
Serial.println("Failed to open directory");
return;
}
if(!root.isDirectory()){
Serial.println("Not a directory");
return;
}
File file = root.openNextFile();
while(file){
if(file.isDirectory()){
Serial.print(" DIR : ");
Serial.println(file.name());
if(levels){
listDir(fs, file.path(), levels -1);
}
} else {
Serial.print(" FILE: ");
Serial.print(file.name());
Serial.print(" SIZE: ");
Serial.println(file.size());
}
file = root.openNextFile();
}
}
bool uploadFile(){
file = SD.open(filename, FILE_READ);
if(!file){
Serial.println("FILE IS NOT AVAILABLE!");
return false;
}
Serial.println("===> Upload FILE to Node.js Server");
HTTPClient client;
client.begin("http://192.168.1.208:8888/uploadAudio");
client.addHeader("Content-Type", "audio/wav");
int httpResponseCode = client.sendRequest("POST", &file, file.size());
Serial.print("httpResponseCode : ");
Serial.println(httpResponseCode);
if(httpResponseCode == 200){
String response = client.getString();
Serial.println("==================== Transcription ====================");
Serial.println(response);
chatgpt_Q = response;
Serial.println("==================== End ====================");
file.close();
client.end();
return true;
}else{
Serial.println("Error");
return false;
}
}
如果您的 ESP32 版本是 3.0.x,请点击此处预览完整程序
#include <ESP_I2S.h>
#include <WiFi.h>
#include <HTTPClient.h>
#include <WiFiClientSecure.h>
#include <ArduinoJson.h>
#include <ChatGPT.hpp>
#include "FS.h"
#include "SD.h"
#include "SPI.h"

// Variables to be used in the recording program, do not change for best
#define SAMPLE_RATE 16000U
#define SAMPLE_BITS 16
#define WAV_HEADER_SIZE 44
#define VOLUME_GAIN 2
#define RECORD_TIME 5  // seconds, The maximum value is 240

const char* ssid = "wifi-ssid";
const char* password = "wifi-password";

//define I2S
I2SClass I2S;


// Number of bytes required for the recording buffer
uint32_t record_size = (SAMPLE_RATE * SAMPLE_BITS / 8) * RECORD_TIME;

File file;
const char filename[] = "/recording.wav";
bool isWIFIConnected;

String chatgpt_Q;

TaskHandle_t chatgpt_handle;
WiFiClientSecure client;
ChatGPT<WiFiClientSecure> chat_gpt(&client, "v1", "OpenAI-TOKEN");

//*****************************************Arduino Base******************************************//

void setup() {
  // put your setup code here, to run once:
  Serial.begin(115200);
  while (!Serial) ;

  // setup 42 PDM clock and 41 PDM data pins
  I2S.setPinsPdmRx(42, 41);

  // The transmission mode is PDM_MONO_MODE, which means that PDM (pulse density modulation) mono mode is used for transmission
  if (!I2S.begin(I2S_MODE_PDM_RX, 16000, I2S_DATA_BIT_WIDTH_16BIT, I2S_SLOT_MODE_MONO)) {
    Serial.println("Failed to initialize I2S!");
    while (1) ;
  }

  if(!SD.begin(D2)){
    Serial.println("Failed to mount SD Card!");
    while (1) ;
  }

  xTaskCreate(wifiConnect, "wifi_Connect", 4096, NULL, 0, NULL);
  delay(500);
  xTaskCreate(i2s_adc, "i2s_adc", 1024 * 8, NULL, 1, NULL);
  xTaskCreate(chatgpt, "chatgpt", 1024 * 8, NULL, 2, &chatgpt_handle);
}

void loop() {
  // put your main code here, to run repeatedly:
}

//*****************************************RTOS TASK******************************************//

void i2s_adc(void *arg)
{
  while(1){
    uint32_t sample_size = 0;

    // This variable will be used to point to the actual recording buffer
    uint8_t *rec_buffer = NULL;
    Serial.printf("Ready to start recording ...\n");

    File file = SD.open(filename, FILE_WRITE);

    // Write the header to the WAV file
    uint8_t wav_header[WAV_HEADER_SIZE];

    // Write the WAV file header information to the wav_header array
    generate_wav_header(wav_header, record_size, SAMPLE_RATE);

    // Call the file.write() function to write the data in the wav_header array to the newly created WAV file
    file.write(wav_header, WAV_HEADER_SIZE);

    // This code uses the ESP32's PSRAM (external cache memory) to dynamically allocate a section of memory to store the recording data
    rec_buffer = (uint8_t *)ps_malloc(record_size);
    if (rec_buffer == NULL) {
      Serial.printf("malloc failed!\n");
      while(1) ;
    }
    Serial.printf("Buffer: %d bytes\n", ESP.getPsramSize() - ESP.getFreePsram());

    // Start recording
    // I2S port number (in this case I2S_NUM_0),
    // a pointer to the buffer to which the data is to be written (i.e. rec_buffer),
    // the size of the data to be read (i.e. record_size),
    // a pointer to a variable that points to the actual size of the data being read (i.e. &sample_size),
    // and the maximum time to wait for the data to be read (in this case portMAX_DELAY, indicating an infinite wait time).
    esp_i2s::i2s_read(esp_i2s::I2S_NUM_0, rec_buffer, record_size, &sample_size, portMAX_DELAY);
    if (sample_size == 0) {
      Serial.printf("Record Failed!\n");
    } else {
      Serial.printf("Record %d bytes\n", sample_size);
    }

    // Increase volume
    for (uint32_t i = 0; i < sample_size; i += SAMPLE_BITS/8) {
      (*(uint16_t *)(rec_buffer+i)) <<= VOLUME_GAIN;
    }

    // Write data to the WAV file
    Serial.printf("Writing to the file ...\n");
    if (file.write(rec_buffer, record_size) != record_size)
      Serial.printf("Write file Failed!\n");

    free(rec_buffer);
    rec_buffer = NULL;
    file.close();
    Serial.printf("The recording is over.\n");

    listDir(SD, "/", 0);

    bool uploadStatus = false;

    if(isWIFIConnected){
      uploadStatus = uploadFile();
    }

    if(uploadStatus)
      xTaskNotifyGive(chatgpt_handle);
    vTaskDelay(10000);       // Each recording is spaced 10s apart
  }
//  vTaskDelete(NULL);
}

void wifiConnect(void *pvParameters){
  isWIFIConnected = false;
  Serial.print("Try to connect to ");
  Serial.println(ssid);
  WiFi.begin(ssid, password);
  while(WiFi.status() != WL_CONNECTED){
    vTaskDelay(500);
    Serial.print(".");
  }
  Serial.println("Wi-Fi Connected!");
  isWIFIConnected = true;
  // Ignore SSL certificate validation
  client.setInsecure();
  while(true){
    vTaskDelay(1000);
  }
}

void chatgpt(void *pvParameters){
  while(1){
    // Waiting for notification signal from Task 1
    ulTaskNotifyTake(pdTRUE, portMAX_DELAY);

    String result;
    if (chat_gpt.simple_message("gpt-3.5-turbo-0301", "user", chatgpt_Q, result)) {
      Serial.println("===OK===");
      Serial.println(result);
    } else {
      Serial.println("===ERROR===");
      Serial.println(result);
    }

  }
}

//*****************************************Audio Process******************************************//

void generate_wav_header(uint8_t *wav_header, uint32_t wav_size, uint32_t sample_rate)
{
  // See this for reference: http://soundfile.sapp.org/doc/WaveFormat/
  uint32_t file_size = wav_size + WAV_HEADER_SIZE - 8;
  uint32_t byte_rate = SAMPLE_RATE * SAMPLE_BITS / 8;
  const uint8_t set_wav_header[] = {
    'R', 'I', 'F', 'F', // ChunkID
    file_size, file_size >> 8, file_size >> 16, file_size >> 24, // ChunkSize
    'W', 'A', 'V', 'E', // Format
    'f', 'm', 't', ' ', // Subchunk1ID
    0x10, 0x00, 0x00, 0x00, // Subchunk1Size (16 for PCM)
    0x01, 0x00, // AudioFormat (1 for PCM)
    0x01, 0x00, // NumChannels (1 channel)
    sample_rate, sample_rate >> 8, sample_rate >> 16, sample_rate >> 24, // SampleRate
    byte_rate, byte_rate >> 8, byte_rate >> 16, byte_rate >> 24, // ByteRate
    0x02, 0x00, // BlockAlign
    0x10, 0x00, // BitsPerSample (16 bits)
    'd', 'a', 't', 'a', // Subchunk2ID
    wav_size, wav_size >> 8, wav_size >> 16, wav_size >> 24, // Subchunk2Size
  };
  memcpy(wav_header, set_wav_header, sizeof(set_wav_header));
}

//*****************************************File Process******************************************//

void listDir(fs::FS &fs, const char * dirname, uint8_t levels){
    Serial.printf("Listing directory: %s\n", dirname);

    File root = fs.open(dirname);
    if(!root){
        Serial.println("Failed to open directory");
        return;
    }
    if(!root.isDirectory()){
        Serial.println("Not a directory");
        return;
    }

    File file = root.openNextFile();
    while(file){
        if(file.isDirectory()){
            Serial.print("  DIR : ");
            Serial.println(file.name());
            if(levels){
                listDir(fs, file.path(), levels -1);
            }
        } else {
            Serial.print("  FILE: ");
            Serial.print(file.name());
            Serial.print("  SIZE: ");
            Serial.println(file.size());
        }
        file = root.openNextFile();
    }
}

bool uploadFile(){
  file = SD.open(filename, FILE_READ);
  if(!file){
    Serial.println("FILE IS NOT AVAILABLE!");
    return false;
  }

  Serial.println("===> Upload FILE to Node.js Server");

  HTTPClient client;
  client.begin("http://192.168.1.208:8888/uploadAudio");
  client.addHeader("Content-Type", "audio/wav");
  int httpResponseCode = client.sendRequest("POST", &file, file.size());
  Serial.print("httpResponseCode : ");
  Serial.println(httpResponseCode);

  if(httpResponseCode == 200){
    String response = client.getString();
    Serial.println("==================== Transcription ====================");
    Serial.println(response);
    chatgpt_Q = response;
    Serial.println("====================      End      ====================");
    file.close();
    client.end();
    return true;
  }else{
    Serial.println("Error");
    return false;
  }

}
再次强调,在使用此程序之前,您需要根据需要对代码进行以下更改:
- 网络的WiFi名称 - 将代码第18行的网络名称更改为与您部署Google Cloud Services的主机在同一局域网下的网络名称。
- 网络的WiFi密码 - 在代码第19行,更改对应网络的密码。
- 主机IP地址 - 在代码第241行,您需要将此处的IP地址更改为您的主机IP地址,并保持端口号为8888。
- OpenAI API Token - 由于您需要调用ChatGPT接口,您需要准备OpenAI Token并将其填入代码第33行。如果这是您第一次使用Token,您可以阅读此Wiki内容来学习如何获取它们。
修改完成后,上传程序并打开串口监视器。录音后,您将看到ChatGPT对您问题的回答。
屏幕显示内容设计与程序集成
最后,我们添加一些更精美的功能。我们没有使用串口监视器这种不太适合显示效果的界面,而是使用了触摸屏来实现触摸和点击功能。
步骤13. 使用SquareLine Studio绘制显示屏幕
SquareLine Studio是由LVGL开发的GUI设计工具,LVGL是一个用于嵌入式系统的图形库。SquareLine Studio旨在帮助开发者快速高效地为其嵌入式系统创建和设计用户界面。它提供了拖放界面来设计UI,并支持各种小部件和主题。
因此我们推荐您使用此工具来设计这样的简单界面。如果您想了解更多关于在SquareLine Studio中使用Round Display的信息,您可以查看我们的使用Wiki。
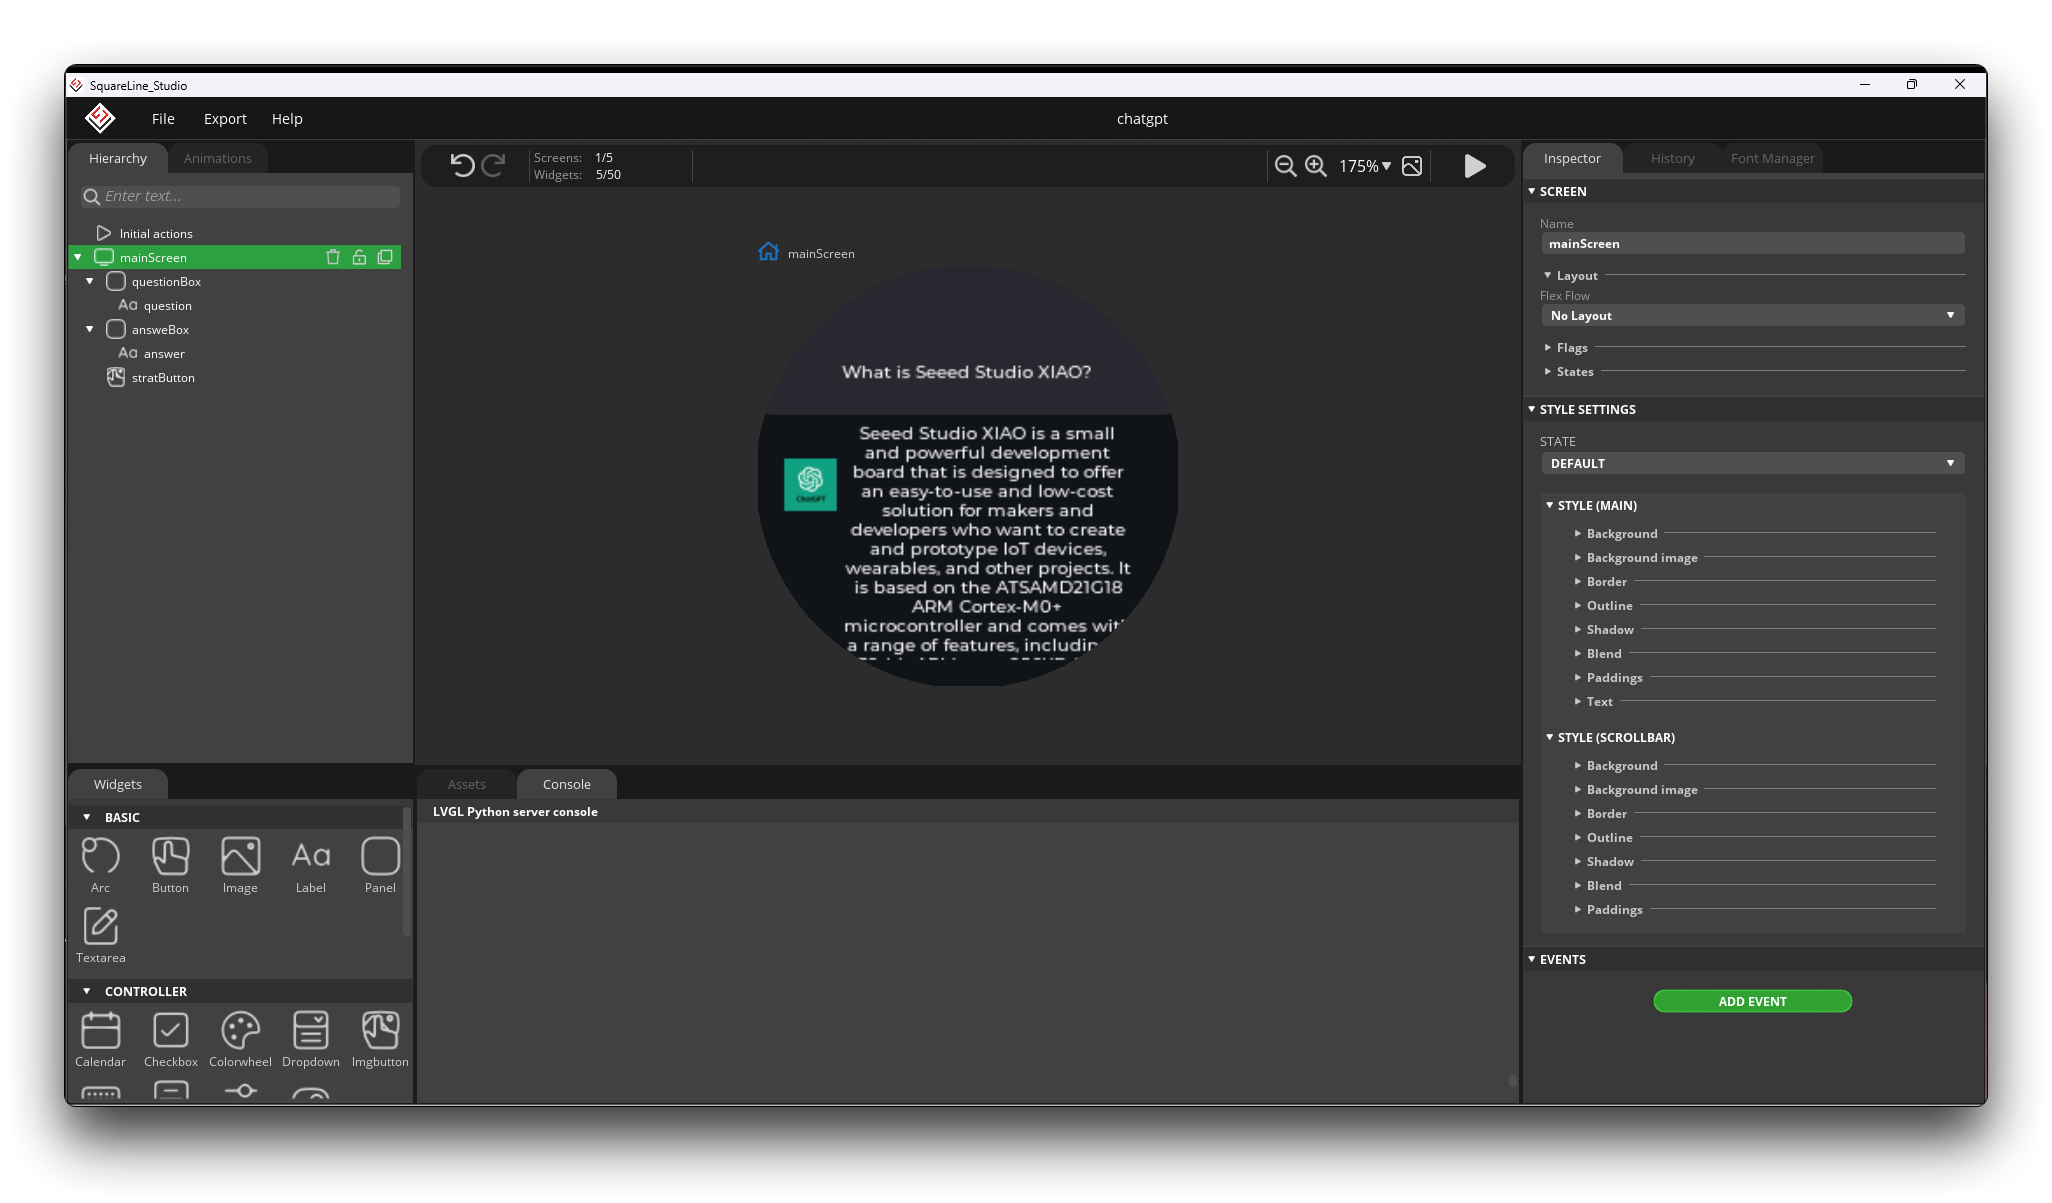
由于篇幅原因,本文不会详细介绍如何设计显示页面,但我们将提供导出的程序代码供您使用。它目前位于该项目文件夹下的ui文件夹中。
我们建议您使用SquareLine Studio的v1.2.3版本。经过测试,v1.3.0版本可能与tft_eSPI库存在兼容性问题。
步骤14. 程序集成
最终完整的项目代码位于 XIAOESP32S3-SPEECH-CHATGPT-COMPLETE 文件夹中。
如果您的ESP32版本是2.0.x。点击此处预览完整程序
#include <lvgl.h>
#include <TFT_eSPI.h>
#include "ui.h"
#include <WiFi.h>
#include <WiFiClientSecure.h>
#include <ArduinoJson.h>
#include <ChatGPT.hpp>
#include <I2S.h>
#include <HTTPClient.h>
#include "FS.h"
#include "SD.h"
#include "SPI.h"


// Import the library for the round display and define the frame used as the TFT display frame
#define USE_TFT_ESPI_LIBRARY
#include "lv_xiao_round_screen.h"


/*Change to your screen resolution*/
static const uint16_t screenWidth  = 240;
static const uint16_t screenHeight = 240;


// Variables to be used in the recording program, do not change for best
#define SAMPLE_RATE 16000U
#define SAMPLE_BITS 16
#define WAV_HEADER_SIZE 44
#define VOLUME_GAIN 2
#define RECORD_TIME 5  // seconds, The maximum value is 240


// Number of bytes required for the recording buffer
uint32_t record_size = (SAMPLE_RATE * SAMPLE_BITS / 8) * RECORD_TIME;


// Name of the file in which the recording is saved
File file;
const char filename[] = "/recording.wav";


// Network connection status flag
bool isWIFIConnected;


// Answers to the questions chatgpt replied to
String response;


// Flags for different task starts
bool recordTask = false;
bool chatgptTask = false;

WiFiClientSecure client;
ChatGPT<WiFiClientSecure> chat_gpt(&client, "v1", "OpenAI-TOKEN");   // Please fill in your OpenAI key


// Please change to your network
const char* ssid = "wifi-ssid";
const char* password = "wifi-password";

static lv_disp_draw_buf_t draw_buf;
static lv_color_t buf[ screenWidth * screenHeight / 10 ];


//****************************************LVGL****************************************************//

#if LV_USE_LOG != 0
/* Serial debugging */
void my_print(const char * buf)
{
    Serial.printf(buf);
    Serial.flush();
}
#endif

/* Display flushing */
void my_disp_flush( lv_disp_drv_t *disp, const lv_area_t *area, lv_color_t *color_p )
{
    uint32_t w = ( area->x2 - area->x1 + 1 );
    uint32_t h = ( area->y2 - area->y1 + 1 );

    tft.startWrite();
    tft.setAddrWindow( area->x1, area->y1, w, h );
    tft.pushColors( ( uint16_t * )&color_p->full, w * h, true );
    tft.endWrite();

    lv_disp_flush_ready( disp );
}

/*Read the touchpad*/
void my_touchpad_read( lv_indev_drv_t * indev_driver, lv_indev_data_t * data )
{
    // uint16_t touchX = 0, touchY = 0;
    // bool touched = false;//tft.getTouch( &touchX, &touchY, 600 );

    lv_coord_t touchX, touchY;
    chsc6x_get_xy(&touchX, &touchY);

    // if( !touched )
    if(!chsc6x_is_pressed())
    {
        data->state = LV_INDEV_STATE_REL;
    }
    else
    {
        data->state = LV_INDEV_STATE_PR;

        /*Set the coordinates*/
        data->point.x = touchX;
        data->point.y = touchY;

//        Serial.print( "Data x " );
//        Serial.println( touchX );
//
//        Serial.print( "Data y " );
//        Serial.println( touchY );

        // You can also start recording by uncommenting and configuring by clicking on the logo
//        if((touchX < 240 && touchX > 230) && (touchY < 120 && touchY > 100)){
          recordTask = true;
//        }
    }
}

//****************************************Arduino Base****************************************************//

void setup()
{
    Serial.begin( 115200 ); /* prepare for possible serial debug */
//    while(!Serial);

    pinMode(TOUCH_INT, INPUT_PULLUP);
    Wire.begin();

    String LVGL_Arduino = "Hello Arduino! ";
    LVGL_Arduino += String('V') + lv_version_major() + "." + lv_version_minor() + "." + lv_version_patch();

    Serial.println( LVGL_Arduino );
    Serial.println( "I am LVGL_Arduino" );

    lv_init();

#if LV_USE_LOG != 0
    lv_log_register_print_cb( my_print ); /* register print function for debugging */
#endif

    tft.begin();          /* TFT init */
    tft.setRotation( 0 ); /* Landscape orientation, flipped */

    lv_disp_draw_buf_init( &draw_buf, buf, NULL, screenWidth * screenHeight / 10 );

    /*Initialize the display*/
    static lv_disp_drv_t disp_drv;
    lv_disp_drv_init( &disp_drv );
    /*Change the following line to your display resolution*/
    disp_drv.hor_res = screenWidth;
    disp_drv.ver_res = screenHeight;
    disp_drv.flush_cb = my_disp_flush;
    disp_drv.draw_buf = &draw_buf;
    lv_disp_drv_register( &disp_drv );

    /*Initialize the (dummy) input device driver*/
    static lv_indev_drv_t indev_drv;
    lv_indev_drv_init( &indev_drv );
    indev_drv.type = LV_INDEV_TYPE_POINTER;
    indev_drv.read_cb = my_touchpad_read;
    lv_indev_drv_register( &indev_drv );

    ui_init();

    I2S.setAllPins(-1, 42, 41, -1, -1);

    //The transmission mode is PDM_MONO_MODE, which means that PDM (pulse density modulation) mono mode is used for transmission
    if (!I2S.begin(PDM_MONO_MODE, SAMPLE_RATE, SAMPLE_BITS)) {
        Serial.println("Failed to initialize I2S!");
        while (1) ;
    }

    if(!SD.begin(D2)){
        Serial.println("Failed to mount SD Card!");
        while (1) ;
    }

    Serial.println( "Setup done" );

    // Create a FreeRTOS task to check the connection status of the network at regular intervals.
    xTaskCreate(wifiConnect, "wifi_Connect", 4096, NULL, 0, NULL);
}

void loop()
{
    lv_timer_handler(); /* let the GUI do its work */
    record();
    chatgpt();
    delay(5);
}

//*****************************************Audio Process******************************************//

void generate_wav_header(uint8_t *wav_header, uint32_t wav_size, uint32_t sample_rate)
{
  // See this for reference: http://soundfile.sapp.org/doc/WaveFormat/
  uint32_t file_size = wav_size + WAV_HEADER_SIZE - 8;
  uint32_t byte_rate = SAMPLE_RATE * SAMPLE_BITS / 8;
  const uint8_t set_wav_header[] = {
    'R', 'I', 'F', 'F', // ChunkID
    file_size, file_size >> 8, file_size >> 16, file_size >> 24, // ChunkSize
    'W', 'A', 'V', 'E', // Format
    'f', 'm', 't', ' ', // Subchunk1ID
    0x10, 0x00, 0x00, 0x00, // Subchunk1Size (16 for PCM)
    0x01, 0x00, // AudioFormat (1 for PCM)
    0x01, 0x00, // NumChannels (1 channel)
    sample_rate, sample_rate >> 8, sample_rate >> 16, sample_rate >> 24, // SampleRate
    byte_rate, byte_rate >> 8, byte_rate >> 16, byte_rate >> 24, // ByteRate
    0x02, 0x00, // BlockAlign
    0x10, 0x00, // BitsPerSample (16 bits)
    'd', 'a', 't', 'a', // Subchunk2ID
    wav_size, wav_size >> 8, wav_size >> 16, wav_size >> 24, // Subchunk2Size
  };
  memcpy(wav_header, set_wav_header, sizeof(set_wav_header));
}

//*****************************************File Process******************************************//

void listDir(fs::FS &fs, const char * dirname, uint8_t levels){
    Serial.printf("Listing directory: %s\n", dirname);

    File root = fs.open(dirname);
    if(!root){
        Serial.println("Failed to open directory");
        return;
    }
    if(!root.isDirectory()){
        Serial.println("Not a directory");
        return;
    }

    File file = root.openNextFile();
    while(file){
        if(file.isDirectory()){
            Serial.print("  DIR : ");
            Serial.println(file.name());
            if(levels){
                listDir(fs, file.path(), levels -1);
            }
        } else {
            Serial.print("  FILE: ");
            Serial.print(file.name());
            Serial.print("  SIZE: ");
            Serial.println(file.size());
        }
        file = root.openNextFile();
    }
}

bool uploadFile(){
  file = SD.open(filename, FILE_READ);
  if(!file){
    Serial.println("FILE IS NOT AVAILABLE!");
    return false;
  }

  Serial.println("===> Upload FILE to Node.js Server");

  HTTPClient client;
  client.begin("http://192.168.1.208:8888/uploadAudio");
  client.addHeader("Content-Type", "audio/wav");
  int httpResponseCode = client.sendRequest("POST", &file, file.size());
  Serial.print("httpResponseCode : ");
  Serial.println(httpResponseCode);

  if(httpResponseCode == 200){
    response = client.getString();
    Serial.println("==================== Transcription ====================");
    Serial.println(response);
    const char* chatgpt_Q = response.c_str();
    lv_label_set_text(ui_question, chatgpt_Q);
    Serial.println("====================      End      ====================");
    file.close();
    client.end();
    recordTask = false;
    chatgptTask = true;
    return true;
  }else{
    Serial.println("Error");
    lv_label_set_text(ui_question, "Error");
    recordTask = false;
    chatgptTask = false;
    return false;
  }
}


//*****************************************Main Functions******************************************//

void record(){
  if(recordTask){
    Serial.println("Record Task Begin!!!");
    lv_label_set_text(ui_question, "Recording ...");
    lv_timer_handler();
    uint32_t sample_size = 0;

    // This variable will be used to point to the actual recording buffer
    uint8_t *rec_buffer = NULL;
    Serial.printf("Ready to start recording ...\n");

    File file = SD.open(filename, FILE_WRITE);

    // Write the header to the WAV file
    uint8_t wav_header[WAV_HEADER_SIZE];

    // Write the WAV file header information to the wav_header array
    generate_wav_header(wav_header, record_size, SAMPLE_RATE);

    // Call the file.write() function to write the data in the wav_header array to the newly created WAV file
    file.write(wav_header, WAV_HEADER_SIZE);

    // This code uses the ESP32's PSRAM (external cache memory) to dynamically allocate a section of memory to store the recording data.
    rec_buffer = (uint8_t *)ps_malloc(record_size);
    if (rec_buffer == NULL) {
      Serial.printf("malloc failed!\n");
      while(1) ;
    }
    Serial.printf("Buffer: %d bytes\n", ESP.getPsramSize() - ESP.getFreePsram());

    // Start recording
    // I2S port number (in this case I2S_NUM_0),
    // a pointer to the buffer to which the data is to be written (i.e. rec_buffer),
    // the size of the data to be read (i.e. record_size),
    // a pointer to a variable that points to the actual size of the data being read (i.e. &sample_size),
    // and the maximum time to wait for the data to be read (in this case portMAX_DELAY, indicating an infinite wait time).
    esp_i2s::i2s_read(esp_i2s::I2S_NUM_0, rec_buffer, record_size, &sample_size, portMAX_DELAY);
    if (sample_size == 0) {
      Serial.printf("Record Failed!\n");
    } else {
      Serial.printf("Record %d bytes\n", sample_size);
    }

    // Increase volume
    for (uint32_t i = 0; i < sample_size; i += SAMPLE_BITS/8) {
      (*(uint16_t *)(rec_buffer+i)) <<= VOLUME_GAIN;
    }

    // Write data to the WAV file
    Serial.printf("Writing to the file ...\n");
    if (file.write(rec_buffer, record_size) != record_size)
      Serial.printf("Write file Failed!\n");

    free(rec_buffer);
    rec_buffer = NULL;
    file.close();
    Serial.printf("The recording is over.\n");
    lv_label_set_text(ui_question, "Identifying ...");
    lv_timer_handler();
    listDir(SD, "/", 0);

    bool uploadStatus = false;

    if(isWIFIConnected){
      uploadStatus = uploadFile();
    }
  }
}

void chatgpt(){
  if(chatgptTask){
    Serial.println("ChatGPT Task Begin!!!");
    lv_label_set_text(ui_answer,"Answering ...");
    lv_timer_handler();
    String result;
    if (chat_gpt.simple_message("gpt-3.5-turbo-0301", "user", response, result)) {
      Serial.println("===OK===");
      Serial.println(result);
      const char* chatgpt_A = result.c_str();
      lv_label_set_text(ui_answer, chatgpt_A);
    } else {
      Serial.println("===ERROR===");
      Serial.println(result);
      lv_label_set_text(ui_answer, "ERROR");
      lv_timer_handler();
    }
    recordTask = false;
    chatgptTask = false;
  }
}

//*****************************************RTOS******************************************//

void wifiConnect(void *pvParameters){
  isWIFIConnected = false;
  Serial.print("Try to connect to ");
  Serial.println(ssid);
  WiFi.begin(ssid, password);
  while(WiFi.status() != WL_CONNECTED){
    vTaskDelay(500);
    Serial.print(".");
  }
  Serial.println("Wi-Fi Connected!");
  isWIFIConnected = true;
  // Ignore SSL certificate validation
  client.setInsecure();
  while(true){
    vTaskDelay(1000);
  }
}
如果您的 ESP32 版本是 3.0.x,请点击此处预览完整程序
#include <lvgl.h>
#include <TFT_eSPI.h>
#include "ui.h"
#include <WiFi.h>
#include <WiFiClientSecure.h>
#include <ArduinoJson.h>
#include <ChatGPT.hpp>
#include <ESP_I2S.h>
#include <HTTPClient.h>
#include "FS.h"
#include "SD.h"
#include "SPI.h"


// Import the library for the round display and define the frame used as the TFT display frame
#define USE_TFT_ESPI_LIBRARY
#include "lv_xiao_round_screen.h"


/*Change to your screen resolution*/
static const uint16_t screenWidth  = 240;
static const uint16_t screenHeight = 240;


// Variables to be used in the recording program, do not change for best
#define SAMPLE_RATE 16000U
#define SAMPLE_BITS 16
#define WAV_HEADER_SIZE 44
#define VOLUME_GAIN 2
#define RECORD_TIME 5  // seconds, The maximum value is 240


// Number of bytes required for the recording buffer
uint32_t record_size = (SAMPLE_RATE * SAMPLE_BITS / 8) * RECORD_TIME;

//define I2S
I2SClass I2S;

// Name of the file in which the recording is saved
File file;
const char filename[] = "/recording.wav";


// Network connection status flag
bool isWIFIConnected;


// Answers to the questions chatgpt replied to
String response;


// Flags for different task starts
bool recordTask = false;
bool chatgptTask = false;

WiFiClientSecure client;
ChatGPT<WiFiClientSecure> chat_gpt(&client, "v1", "OpenAI-TOKEN");   // Please fill in your OpenAI key


// Please change to your network
const char* ssid = "wifi-ssid";
const char* password = "wifi-password";

static lv_disp_draw_buf_t draw_buf;
static lv_color_t buf[ screenWidth * screenHeight / 10 ];


//****************************************LVGL****************************************************//

#if LV_USE_LOG != 0
/* Serial debugging */
void my_print(const char * buf)
{
    Serial.printf(buf);
    Serial.flush();
}
#endif

/* Display flushing */
void my_disp_flush( lv_disp_drv_t *disp, const lv_area_t *area, lv_color_t *color_p )
{
    uint32_t w = ( area->x2 - area->x1 + 1 );
    uint32_t h = ( area->y2 - area->y1 + 1 );

    tft.startWrite();
    tft.setAddrWindow( area->x1, area->y1, w, h );
    tft.pushColors( ( uint16_t * )&color_p->full, w * h, true );
    tft.endWrite();

    lv_disp_flush_ready( disp );
}

/*Read the touchpad*/
void my_touchpad_read( lv_indev_drv_t * indev_driver, lv_indev_data_t * data )
{
    // uint16_t touchX = 0, touchY = 0;
    // bool touched = false;//tft.getTouch( &touchX, &touchY, 600 );

    lv_coord_t touchX, touchY;
    chsc6x_get_xy(&touchX, &touchY);

    // if( !touched )
    if(!chsc6x_is_pressed())
    {
        data->state = LV_INDEV_STATE_REL;
    }
    else
    {
        data->state = LV_INDEV_STATE_PR;

        /*Set the coordinates*/
        data->point.x = touchX;
        data->point.y = touchY;

//        Serial.print( "Data x " );
//        Serial.println( touchX );
//
//        Serial.print( "Data y " );
//        Serial.println( touchY );

        // You can also start recording by uncommenting and configuring by clicking on the logo
//        if((touchX < 240 && touchX > 230) && (touchY < 120 && touchY > 100)){
          recordTask = true;
//        }
    }
}

//****************************************Arduino Base****************************************************//

void setup()
{
    Serial.begin( 115200 ); /* prepare for possible serial debug */
//    while(!Serial);

    pinMode(TOUCH_INT, INPUT_PULLUP);
    Wire.begin();

    String LVGL_Arduino = "Hello Arduino! ";
    LVGL_Arduino += String('V') + lv_version_major() + "." + lv_version_minor() + "." + lv_version_patch();

    Serial.println( LVGL_Arduino );
    Serial.println( "I am LVGL_Arduino" );

    lv_init();

#if LV_USE_LOG != 0
    lv_log_register_print_cb( my_print ); /* register print function for debugging */
#endif

    tft.begin();          /* TFT init */
    tft.setRotation( 0 ); /* Landscape orientation, flipped */

    lv_disp_draw_buf_init( &draw_buf, buf, NULL, screenWidth * screenHeight / 10 );

    /*Initialize the display*/
    static lv_disp_drv_t disp_drv;
    lv_disp_drv_init( &disp_drv );
    /*Change the following line to your display resolution*/
    disp_drv.hor_res = screenWidth;
    disp_drv.ver_res = screenHeight;
    disp_drv.flush_cb = my_disp_flush;
    disp_drv.draw_buf = &draw_buf;
    lv_disp_drv_register( &disp_drv );

    /*Initialize the (dummy) input device driver*/
    static lv_indev_drv_t indev_drv;
    lv_indev_drv_init( &indev_drv );
    indev_drv.type = LV_INDEV_TYPE_POINTER;
    indev_drv.read_cb = my_touchpad_read;
    lv_indev_drv_register( &indev_drv );

    ui_init();

    // setup 42 PDM clock and 41 PDM data pins
    I2S.setPinsPdmRx(42, 41);

    //The transmission mode is PDM_MONO_MODE, which means that PDM (pulse density modulation) mono mode is used for transmission
    if (!I2S.begin(I2S_MODE_PDM_RX, 16000, I2S_DATA_BIT_WIDTH_16BIT, I2S_SLOT_MODE_MONO)) {
        Serial.println("Failed to initialize I2S!");
        while (1) ;
    }

    if(!SD.begin(D2)){
        Serial.println("Failed to mount SD Card!");
        while (1) ;
    }

    Serial.println( "Setup done" );

    // Create a FreeRTOS task to check the connection status of the network at regular intervals.
    xTaskCreate(wifiConnect, "wifi_Connect", 4096, NULL, 0, NULL);
}

void loop()
{
    lv_timer_handler(); /* let the GUI do its work */
    record();
    chatgpt();
    delay(5);
}

//*****************************************Audio Process******************************************//

void generate_wav_header(uint8_t *wav_header, uint32_t wav_size, uint32_t sample_rate)
{
  // See this for reference: http://soundfile.sapp.org/doc/WaveFormat/
  uint32_t file_size = wav_size + WAV_HEADER_SIZE - 8;
  uint32_t byte_rate = SAMPLE_RATE * SAMPLE_BITS / 8;
  const uint8_t set_wav_header[] = {
    'R', 'I', 'F', 'F', // ChunkID
    file_size, file_size >> 8, file_size >> 16, file_size >> 24, // ChunkSize
    'W', 'A', 'V', 'E', // Format
    'f', 'm', 't', ' ', // Subchunk1ID
    0x10, 0x00, 0x00, 0x00, // Subchunk1Size (16 for PCM)
    0x01, 0x00, // AudioFormat (1 for PCM)
    0x01, 0x00, // NumChannels (1 channel)
    sample_rate, sample_rate >> 8, sample_rate >> 16, sample_rate >> 24, // SampleRate
    byte_rate, byte_rate >> 8, byte_rate >> 16, byte_rate >> 24, // ByteRate
    0x02, 0x00, // BlockAlign
    0x10, 0x00, // BitsPerSample (16 bits)
    'd', 'a', 't', 'a', // Subchunk2ID
    wav_size, wav_size >> 8, wav_size >> 16, wav_size >> 24, // Subchunk2Size
  };
  memcpy(wav_header, set_wav_header, sizeof(set_wav_header));
}

//*****************************************File Process******************************************//

void listDir(fs::FS &fs, const char * dirname, uint8_t levels){
    Serial.printf("Listing directory: %s\n", dirname);

    File root = fs.open(dirname);
    if(!root){
        Serial.println("Failed to open directory");
        return;
    }
    if(!root.isDirectory()){
        Serial.println("Not a directory");
        return;
    }

    File file = root.openNextFile();
    while(file){
        if(file.isDirectory()){
            Serial.print("  DIR : ");
            Serial.println(file.name());
            if(levels){
                listDir(fs, file.path(), levels -1);
            }
        } else {
            Serial.print("  FILE: ");
            Serial.print(file.name());
            Serial.print("  SIZE: ");
            Serial.println(file.size());
        }
        file = root.openNextFile();
    }
}

bool uploadFile(){
  file = SD.open(filename, FILE_READ);
  if(!file){
    Serial.println("FILE IS NOT AVAILABLE!");
    return false;
  }

  Serial.println("===> Upload FILE to Node.js Server");

  HTTPClient client;
  client.begin("http://192.168.1.208:8888/uploadAudio");
  client.addHeader("Content-Type", "audio/wav");
  int httpResponseCode = client.sendRequest("POST", &file, file.size());
  Serial.print("httpResponseCode : ");
  Serial.println(httpResponseCode);

  if(httpResponseCode == 200){
    response = client.getString();
    Serial.println("==================== Transcription ====================");
    Serial.println(response);
    const char* chatgpt_Q = response.c_str();
    lv_label_set_text(ui_question, chatgpt_Q);
    Serial.println("====================      End      ====================");
    file.close();
    client.end();
    recordTask = false;
    chatgptTask = true;
    return true;
  }else{
    Serial.println("Error");
    lv_label_set_text(ui_question, "Error");
    recordTask = false;
    chatgptTask = false;
    return false;
  }
}


//*****************************************Main Functions******************************************//

void record(){
  if(recordTask){
    Serial.println("Record Task Begin!!!");
    lv_label_set_text(ui_question, "Recording ...");
    lv_timer_handler();
    uint32_t sample_size = 0;

    // This variable will be used to point to the actual recording buffer
    uint8_t *rec_buffer = NULL;
    Serial.printf("Ready to start recording ...\n");

    File file = SD.open(filename, FILE_WRITE);

    // Write the header to the WAV file
    uint8_t wav_header[WAV_HEADER_SIZE];

    // Write the WAV file header information to the wav_header array
    generate_wav_header(wav_header, record_size, SAMPLE_RATE);

    // Call the file.write() function to write the data in the wav_header array to the newly created WAV file
    file.write(wav_header, WAV_HEADER_SIZE);

    // This code uses the ESP32's PSRAM (external cache memory) to dynamically allocate a section of memory to store the recording data.
    rec_buffer = (uint8_t *)ps_malloc(record_size);
    if (rec_buffer == NULL) {
      Serial.printf("malloc failed!\n");
      while(1) ;
    }
    Serial.printf("Buffer: %d bytes\n", ESP.getPsramSize() - ESP.getFreePsram());

    // Start recording
    // I2S port number (in this case I2S_NUM_0),
    // a pointer to the buffer to which the data is to be written (i.e. rec_buffer),
    // the size of the data to be read (i.e. record_size),
    // a pointer to a variable that points to the actual size of the data being read (i.e. &sample_size),
    // and the maximum time to wait for the data to be read (in this case portMAX_DELAY, indicating an infinite wait time).
    esp_i2s::i2s_read(esp_i2s::I2S_NUM_0, rec_buffer, record_size, &sample_size, portMAX_DELAY);
    if (sample_size == 0) {
      Serial.printf("Record Failed!\n");
    } else {
      Serial.printf("Record %d bytes\n", sample_size);
    }

    // Increase volume
    for (uint32_t i = 0; i < sample_size; i += SAMPLE_BITS/8) {
      (*(uint16_t *)(rec_buffer+i)) <<= VOLUME_GAIN;
    }

    // Write data to the WAV file
    Serial.printf("Writing to the file ...\n");
    if (file.write(rec_buffer, record_size) != record_size)
      Serial.printf("Write file Failed!\n");

    free(rec_buffer);
    rec_buffer = NULL;
    file.close();
    Serial.printf("The recording is over.\n");
    lv_label_set_text(ui_question, "Identifying ...");
    lv_timer_handler();
    listDir(SD, "/", 0);

    bool uploadStatus = false;

    if(isWIFIConnected){
      uploadStatus = uploadFile();
    }
  }
}

void chatgpt(){
  if(chatgptTask){
    Serial.println("ChatGPT Task Begin!!!");
    lv_label_set_text(ui_answer,"Answering ...");
    lv_timer_handler();
    String result;
    if (chat_gpt.simple_message("gpt-3.5-turbo-0301", "user", response, result)) {
      Serial.println("===OK===");
      Serial.println(result);
      const char* chatgpt_A = result.c_str();
      lv_label_set_text(ui_answer, chatgpt_A);
    } else {
      Serial.println("===ERROR===");
      Serial.println(result);
      lv_label_set_text(ui_answer, "ERROR");
      lv_timer_handler();
    }
    recordTask = false;
    chatgptTask = false;
  }
}

//*****************************************RTOS******************************************//

void wifiConnect(void *pvParameters){
  isWIFIConnected = false;
  Serial.print("Try to connect to ");
  Serial.println(ssid);
  WiFi.begin(ssid, password);
  while(WiFi.status() != WL_CONNECTED){
    vTaskDelay(500);
    Serial.print(".");
  }
  Serial.println("Wi-Fi Connected!");
  isWIFIConnected = true;
  // Ignore SSL certificate validation
  client.setInsecure();
  while(true){
    vTaskDelay(1000);
  }
}
在编译和上传示例程序之前,您需要更改一些内容以适应您的情况。
- 网络的WiFi名称 - 将代码第18行的网络名称更改为与您部署Google云服务的主机在同一局域网下的网络名称。
- 网络的WiFi密码 - 在代码的第19行,更改对应网络的密码。
- 主机IP地址 - 在代码的第241行,您需要将此处的IP地址更改为您的主机IP地址,并保持端口号为8888。
- OpenAI API Token - 由于您需要调用ChatGPT接口,您需要准备OpenAI Token并将其填入代码第33行。如果这是您第一次使用Token,您可以阅读此Wiki内容来学习如何获取它们。
上传程序并点击屏幕后,录音任务将开始,此时您可以对着麦克风说出您希望询问的问题。一旦结果被识别,问题将显示在屏幕的上半部分。紧接着,我们将获得ChatGPT的答案,它将显示在屏幕底部。
技术支持与产品讨论
感谢您选择我们的产品!我们在这里为您提供不同的支持,以确保您使用我们产品的体验尽可能顺畅。我们提供多种沟通渠道,以满足不同的偏好和需求。