Seeed Studio XIAO nRF54L15 的 MicroPython
了解 MicroPython
本教程旨在介绍如何在基于 XIAO nRF54L15 的 Thonny 上使用 MicroPython。
MicroPython 是一个具有部分本机代码编译功能的 Python 解释器。它提供了 Python 3.5 功能的子集,专为嵌入式处理器和受限系统实现。它与 CPython 不同,您可以在这里了解更多差异。如果您需要更多有趣的集合,可以查看这里
准备硬件
| Seeed Studio XIAO nRF54L15 | Seeed Studio XIAO nRF54L15 Sense | Seeed Studio XIAO Debug Mate |
|---|---|---|
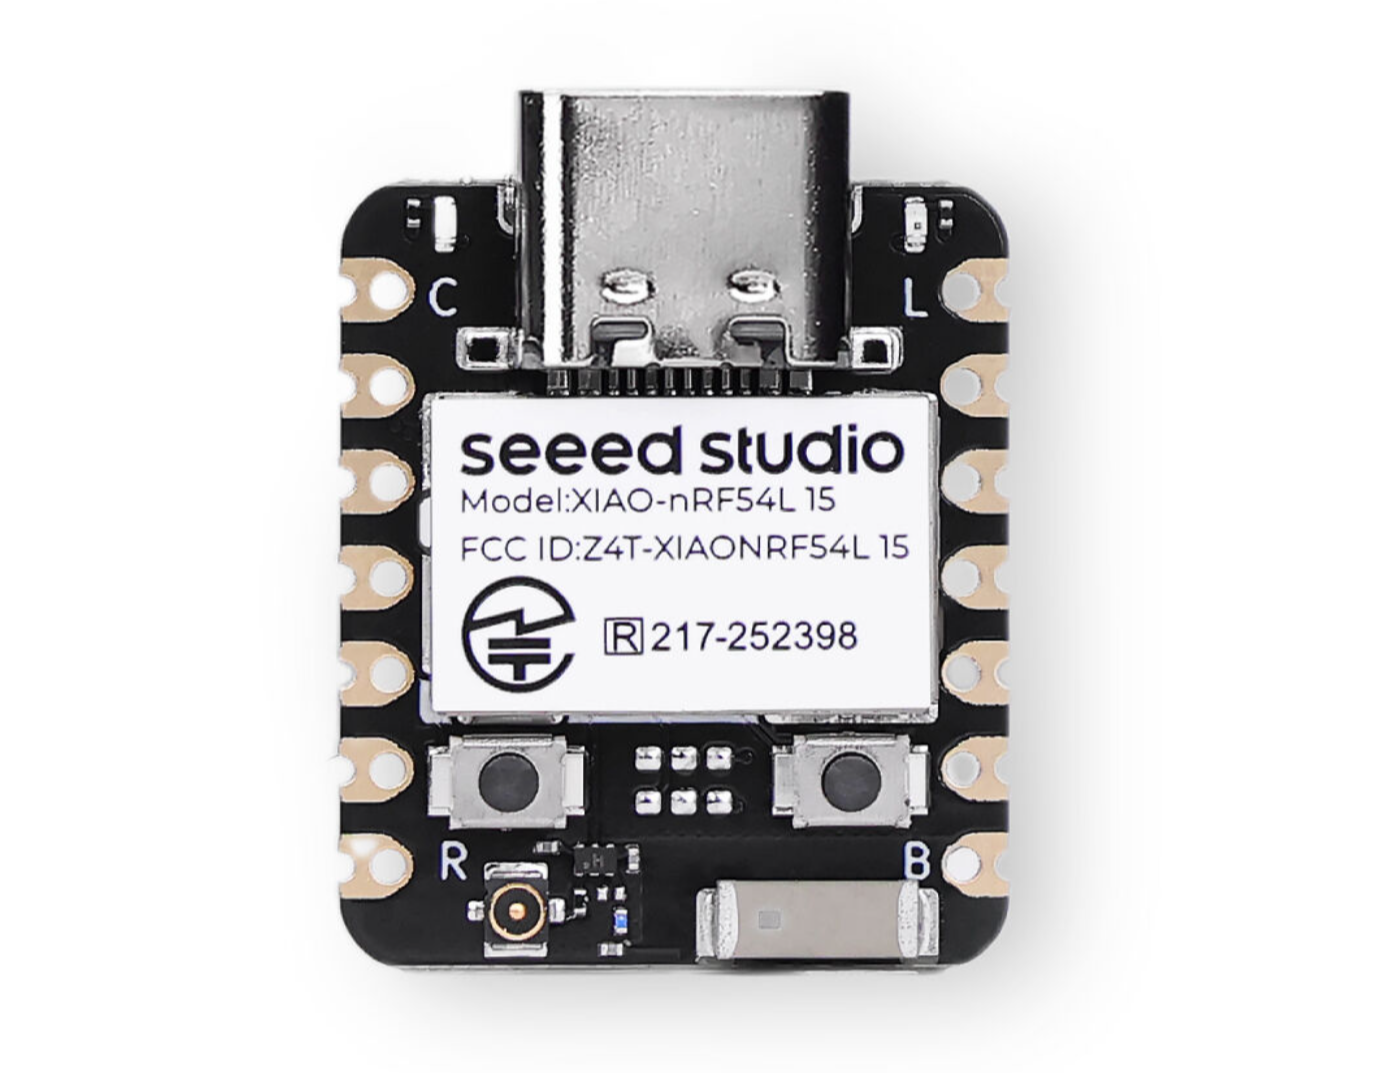 | 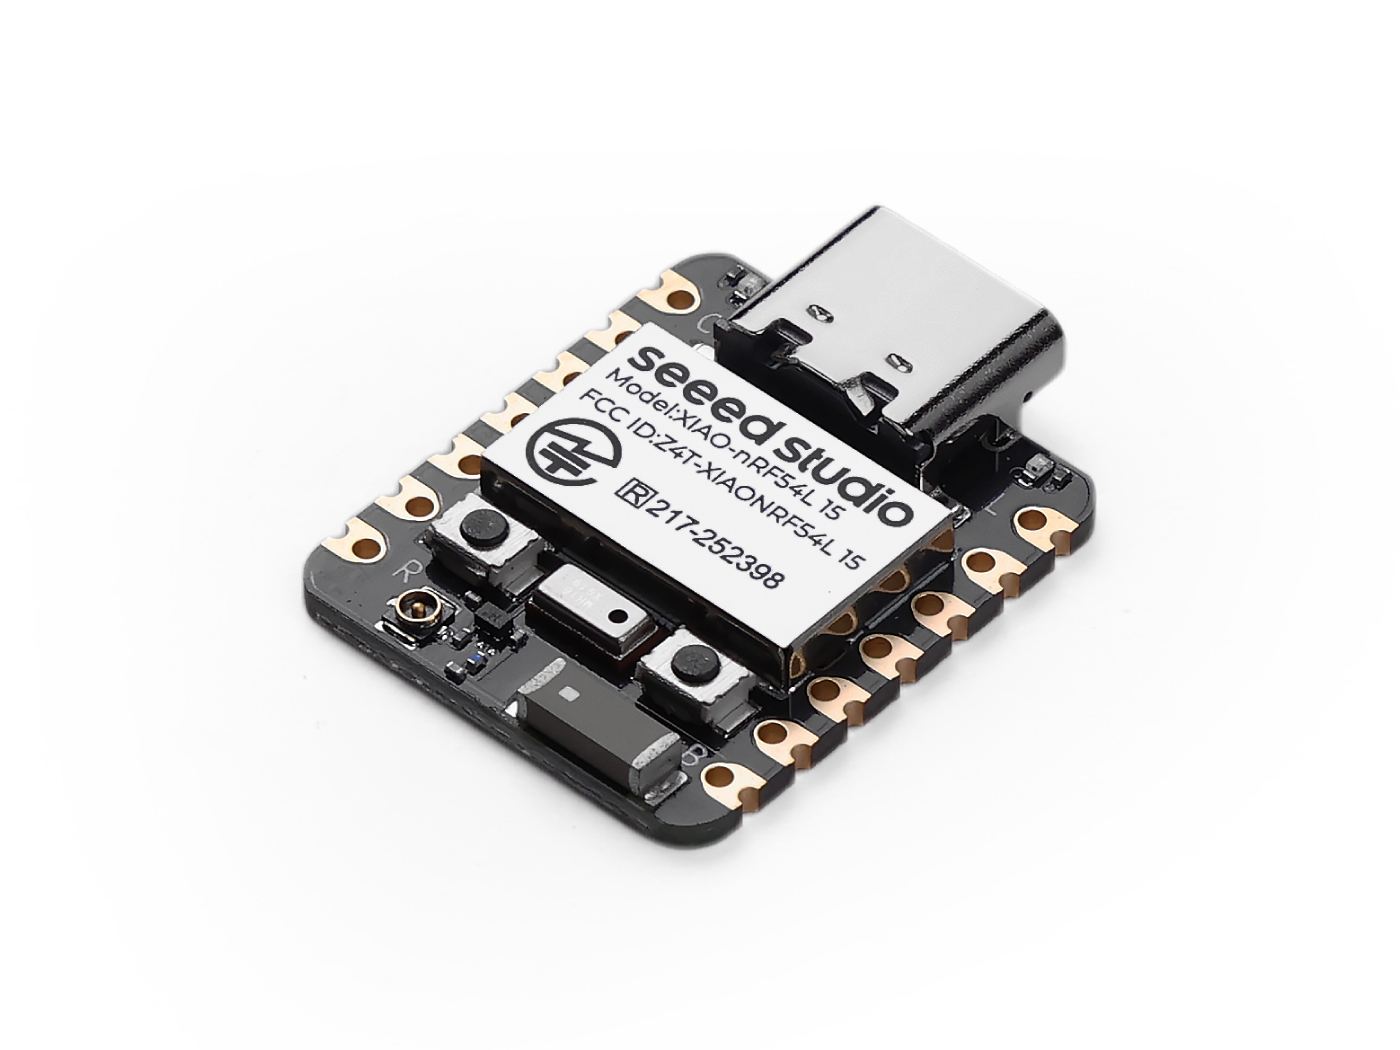 |  |
安装 Thonny IDE
选择适当的版本进行安装。这里,我在 Windows 系统上安装,所以选择了 Windows 版本。
按照所需 Python 版本的说明进行操作。
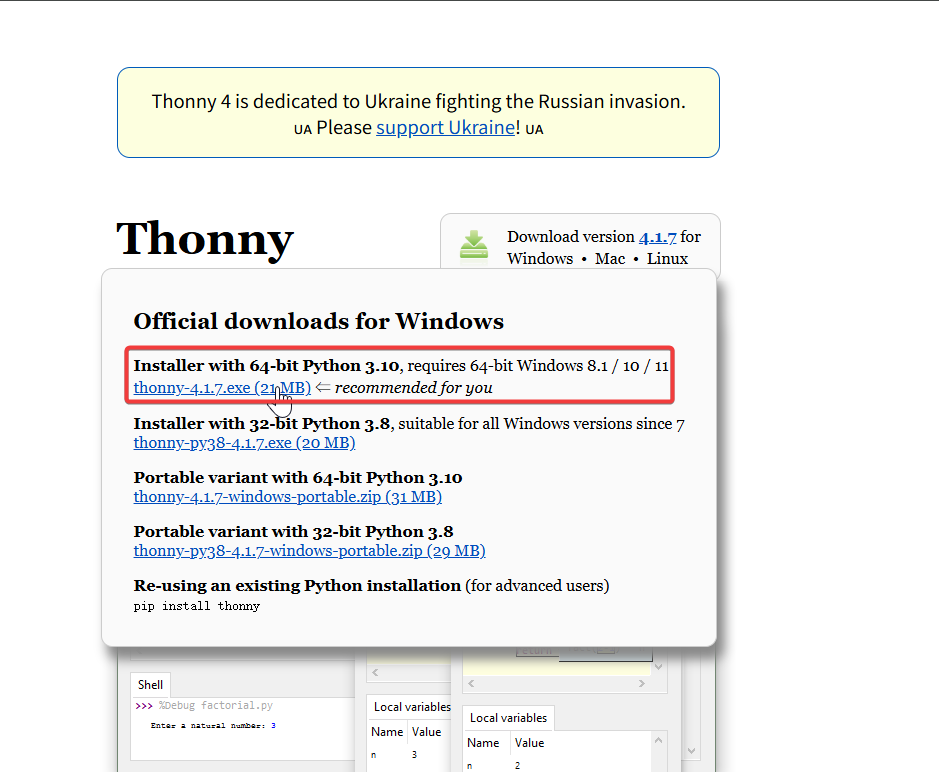
然后,只需按照默认步骤进行配置。
下载仓库
将其克隆到本地机器,然后记住存储此 XIAO nRF54L15 的 MicroPython 的路径。此路径稍后会用到。
git clone https://github.com/Seeed-Studio/micropython-seeed-boards.git

上传板文件
步骤 0. 使用 USB 线将 XIAO NRF54L15 连接到计算机
步骤 1. 为 XIAO nRF54L15 刷写 MicroPython 固件
-
下载固件包并将其解压到适当位置。然后点击 flash.bat,它将自动为您刷写固件。
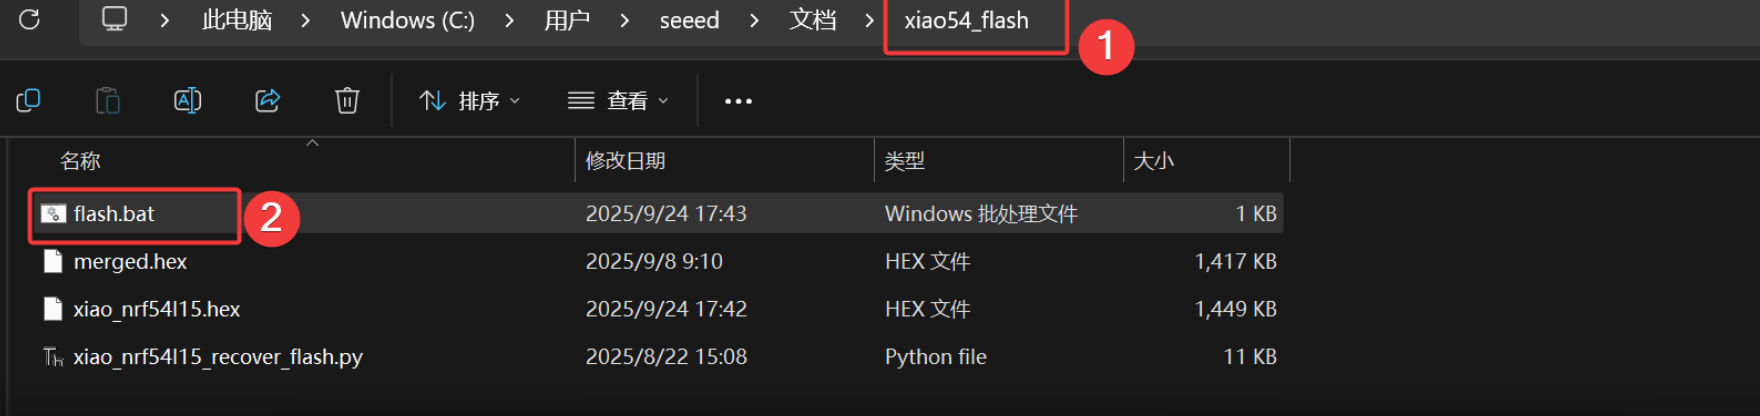
结果如下
此脚本已预配置刷写工具链命令。如果您是第一次使用,可能需要一点时间。下载后会自动崩溃。如果未插入 XIAO NRF54L15,刷写过程中会出现 '200' 错误。
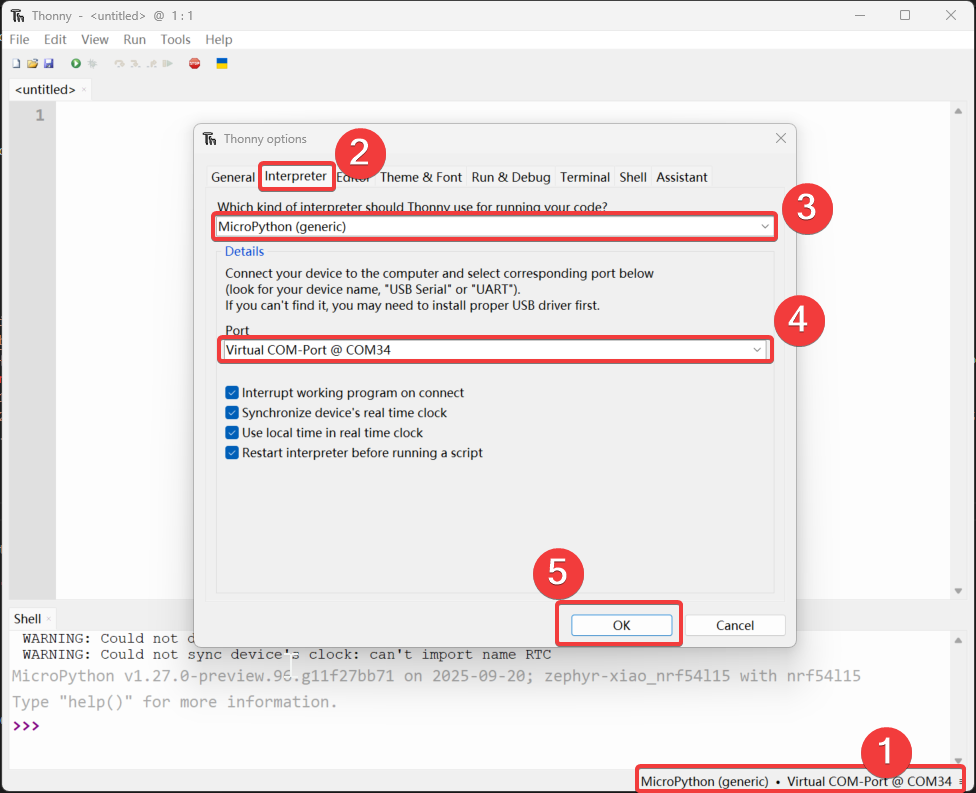
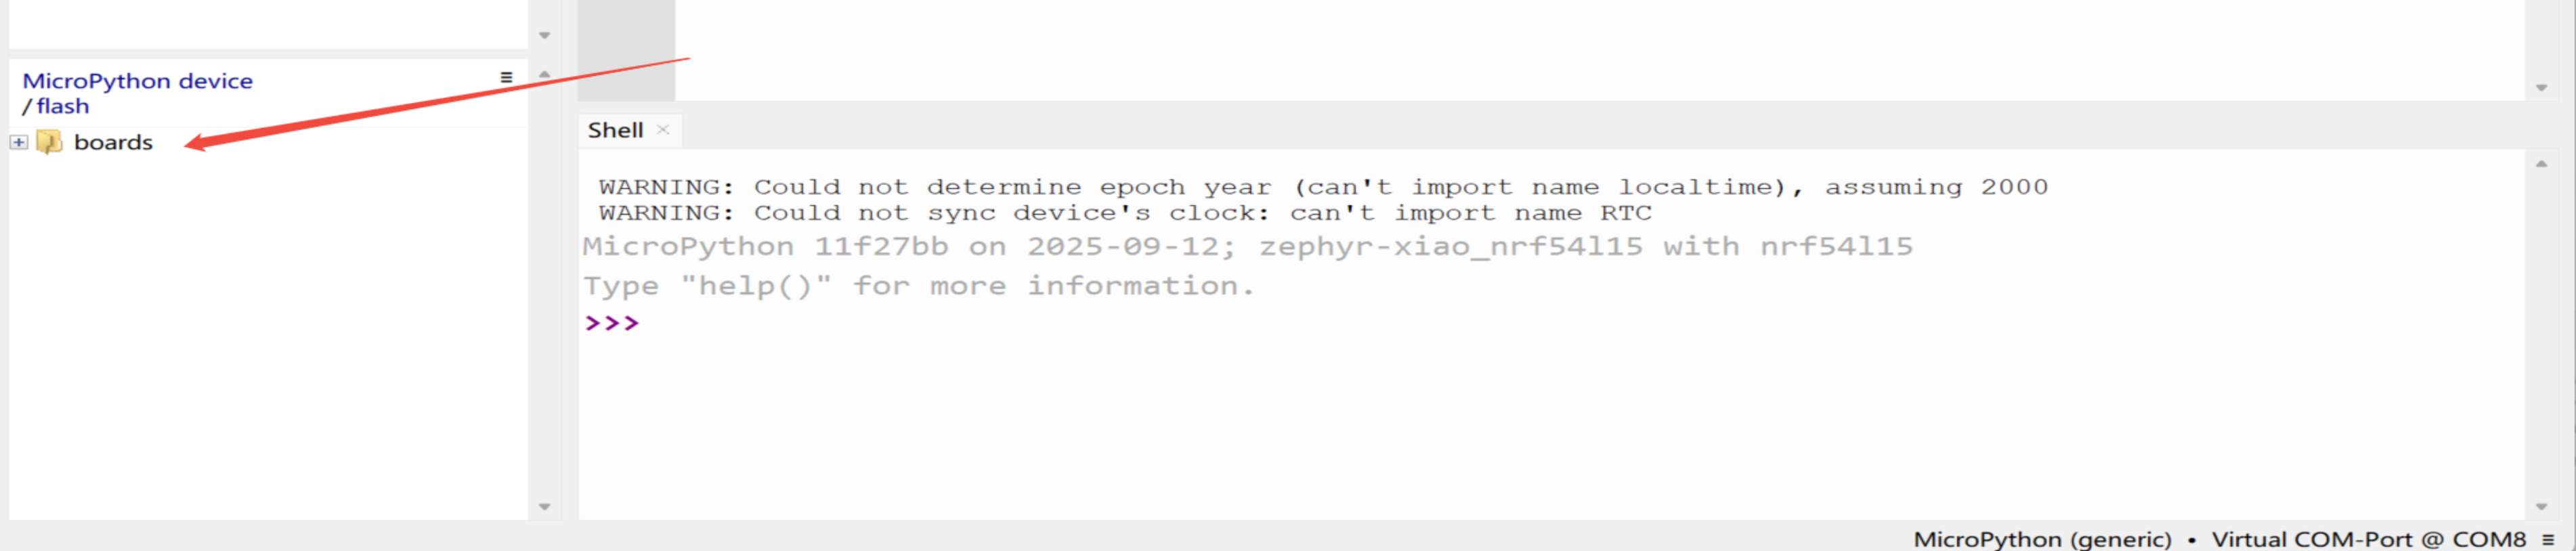
步骤 2. 打开 Thonny IDE,然后点击界面右下角配置解释器选项。选择 MicroPython (generic) 和端口
步骤 3. 上传板文件
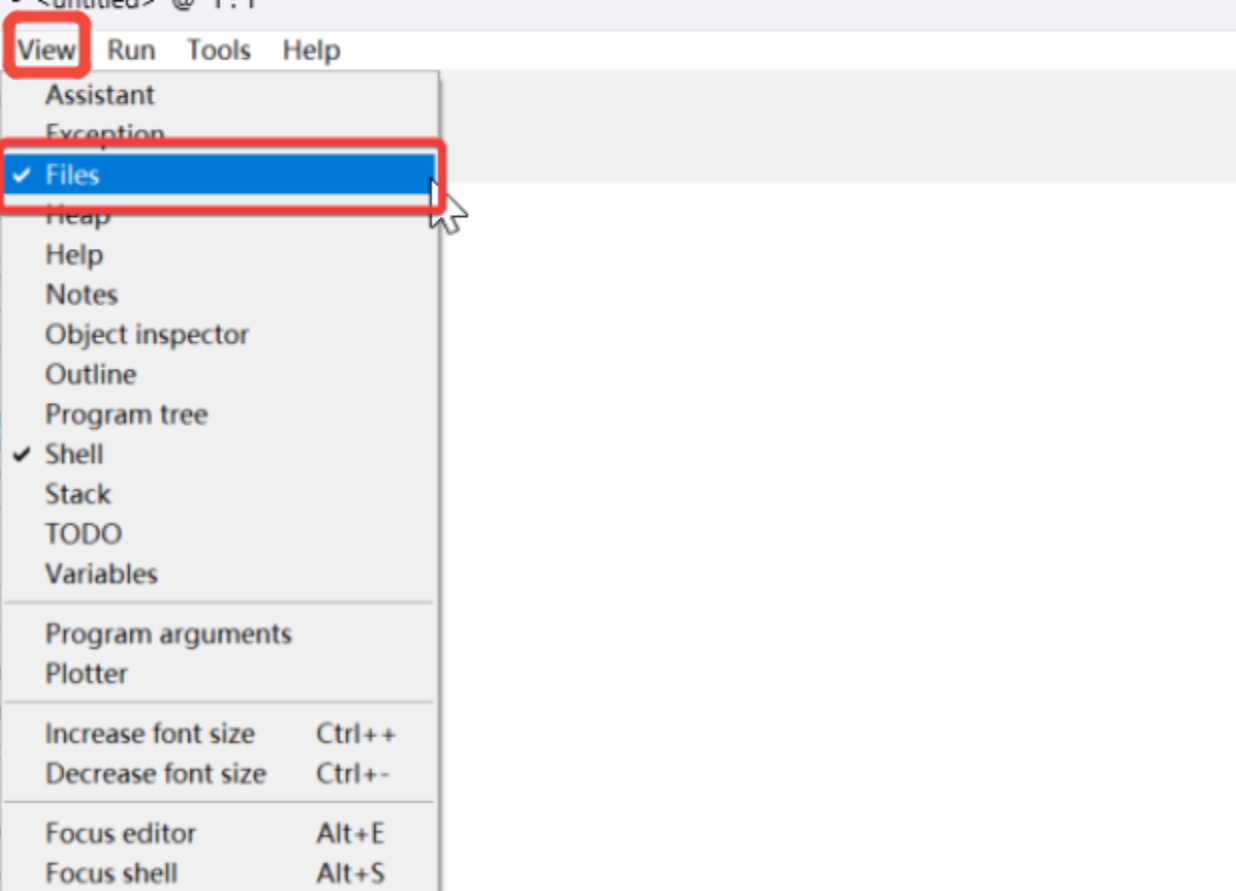
- 打开 "view",选择 "File",文件管理器路径将显示在左侧边栏。
- 打开克隆或下载文件的路径,并打开
micropython-seeed-boards\examples-右键点击 "boards" 文件夹并将其上传到闪存。然后,您将能够在 MicroPython 设备/闪存上看到上传的文件。
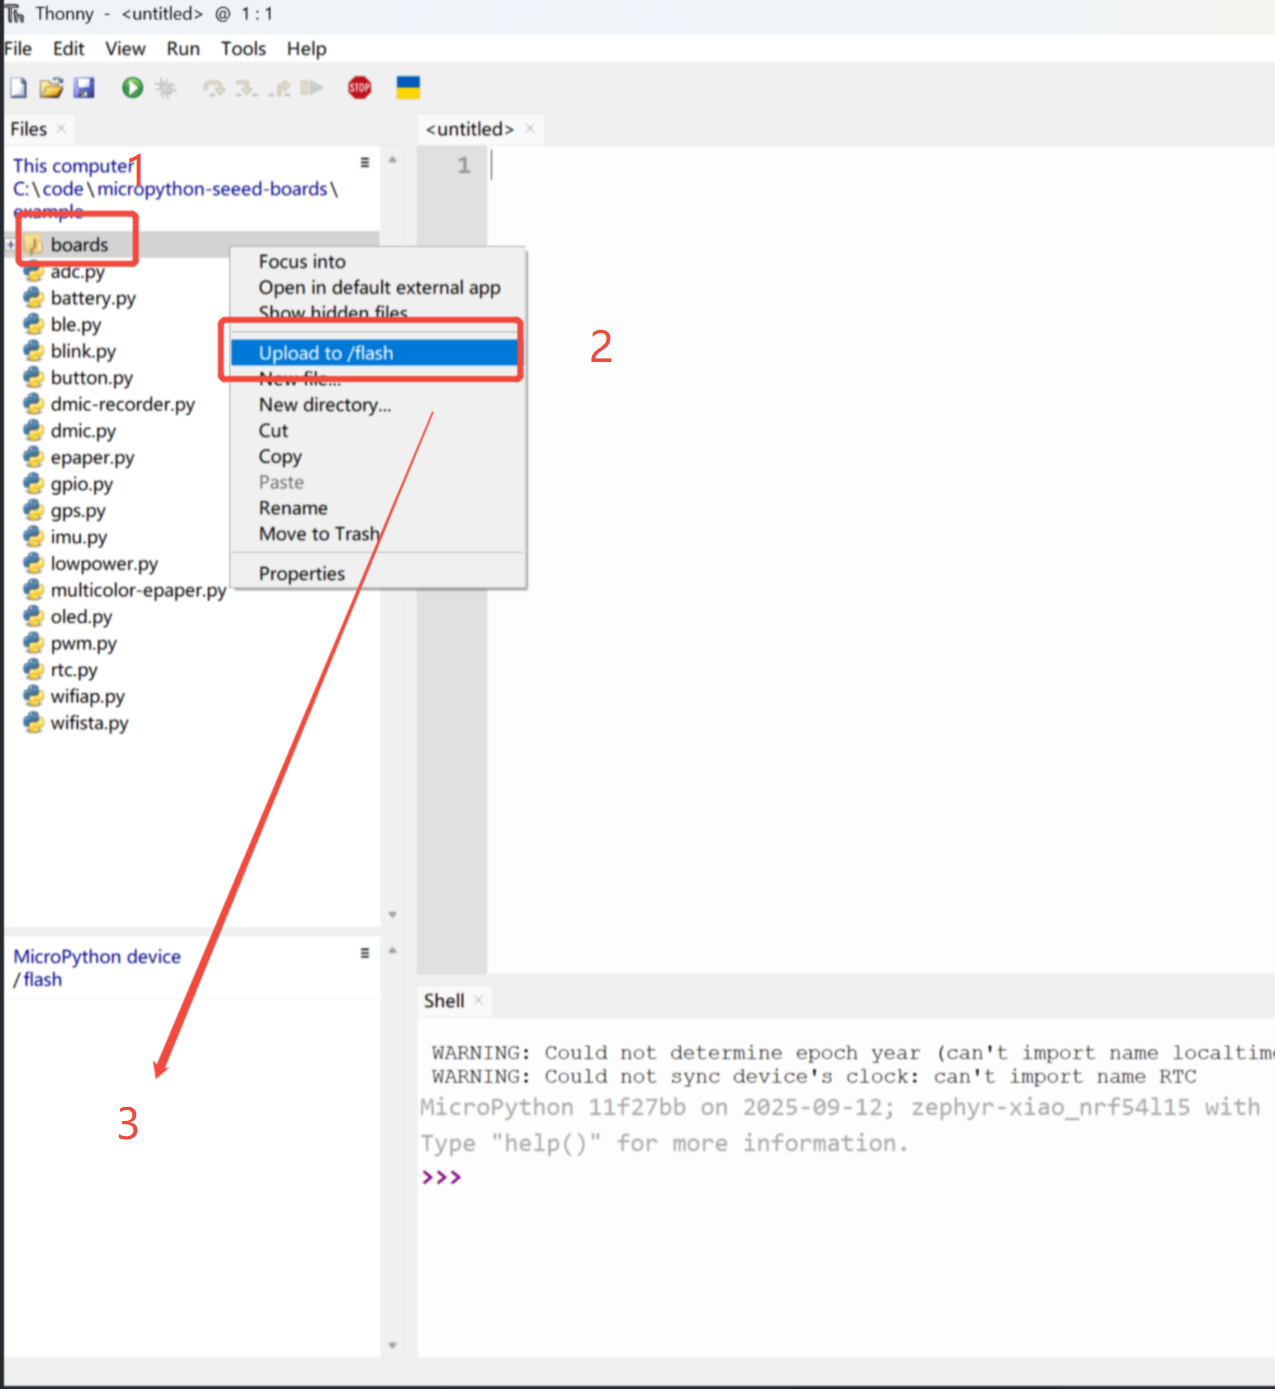
正常情况下,位置 '3' 会出现一个图标
步骤 4. 点亮 LED
打开一个新文件(XX.py)或转到开始页面,然后复制代码并按 F5 运行。
import time
from boards.xiao import XiaoPin

led = "led"

try:
    # Initialize LED
    led = XiaoPin(led, XiaoPin.OUT)
    while True:
        # LED 0.5 seconds on, 0.5 seconds off
        led.value(1)
        time.sleep(0.5)
        led.value(0)
        time.sleep(0.5)
except KeyboardInterrupt:
    print("\nProgram interrupted by user")
except Exception as e:
    print("\nError occurred: %s" % {e})
finally:
    led.value(1)
结果如下:
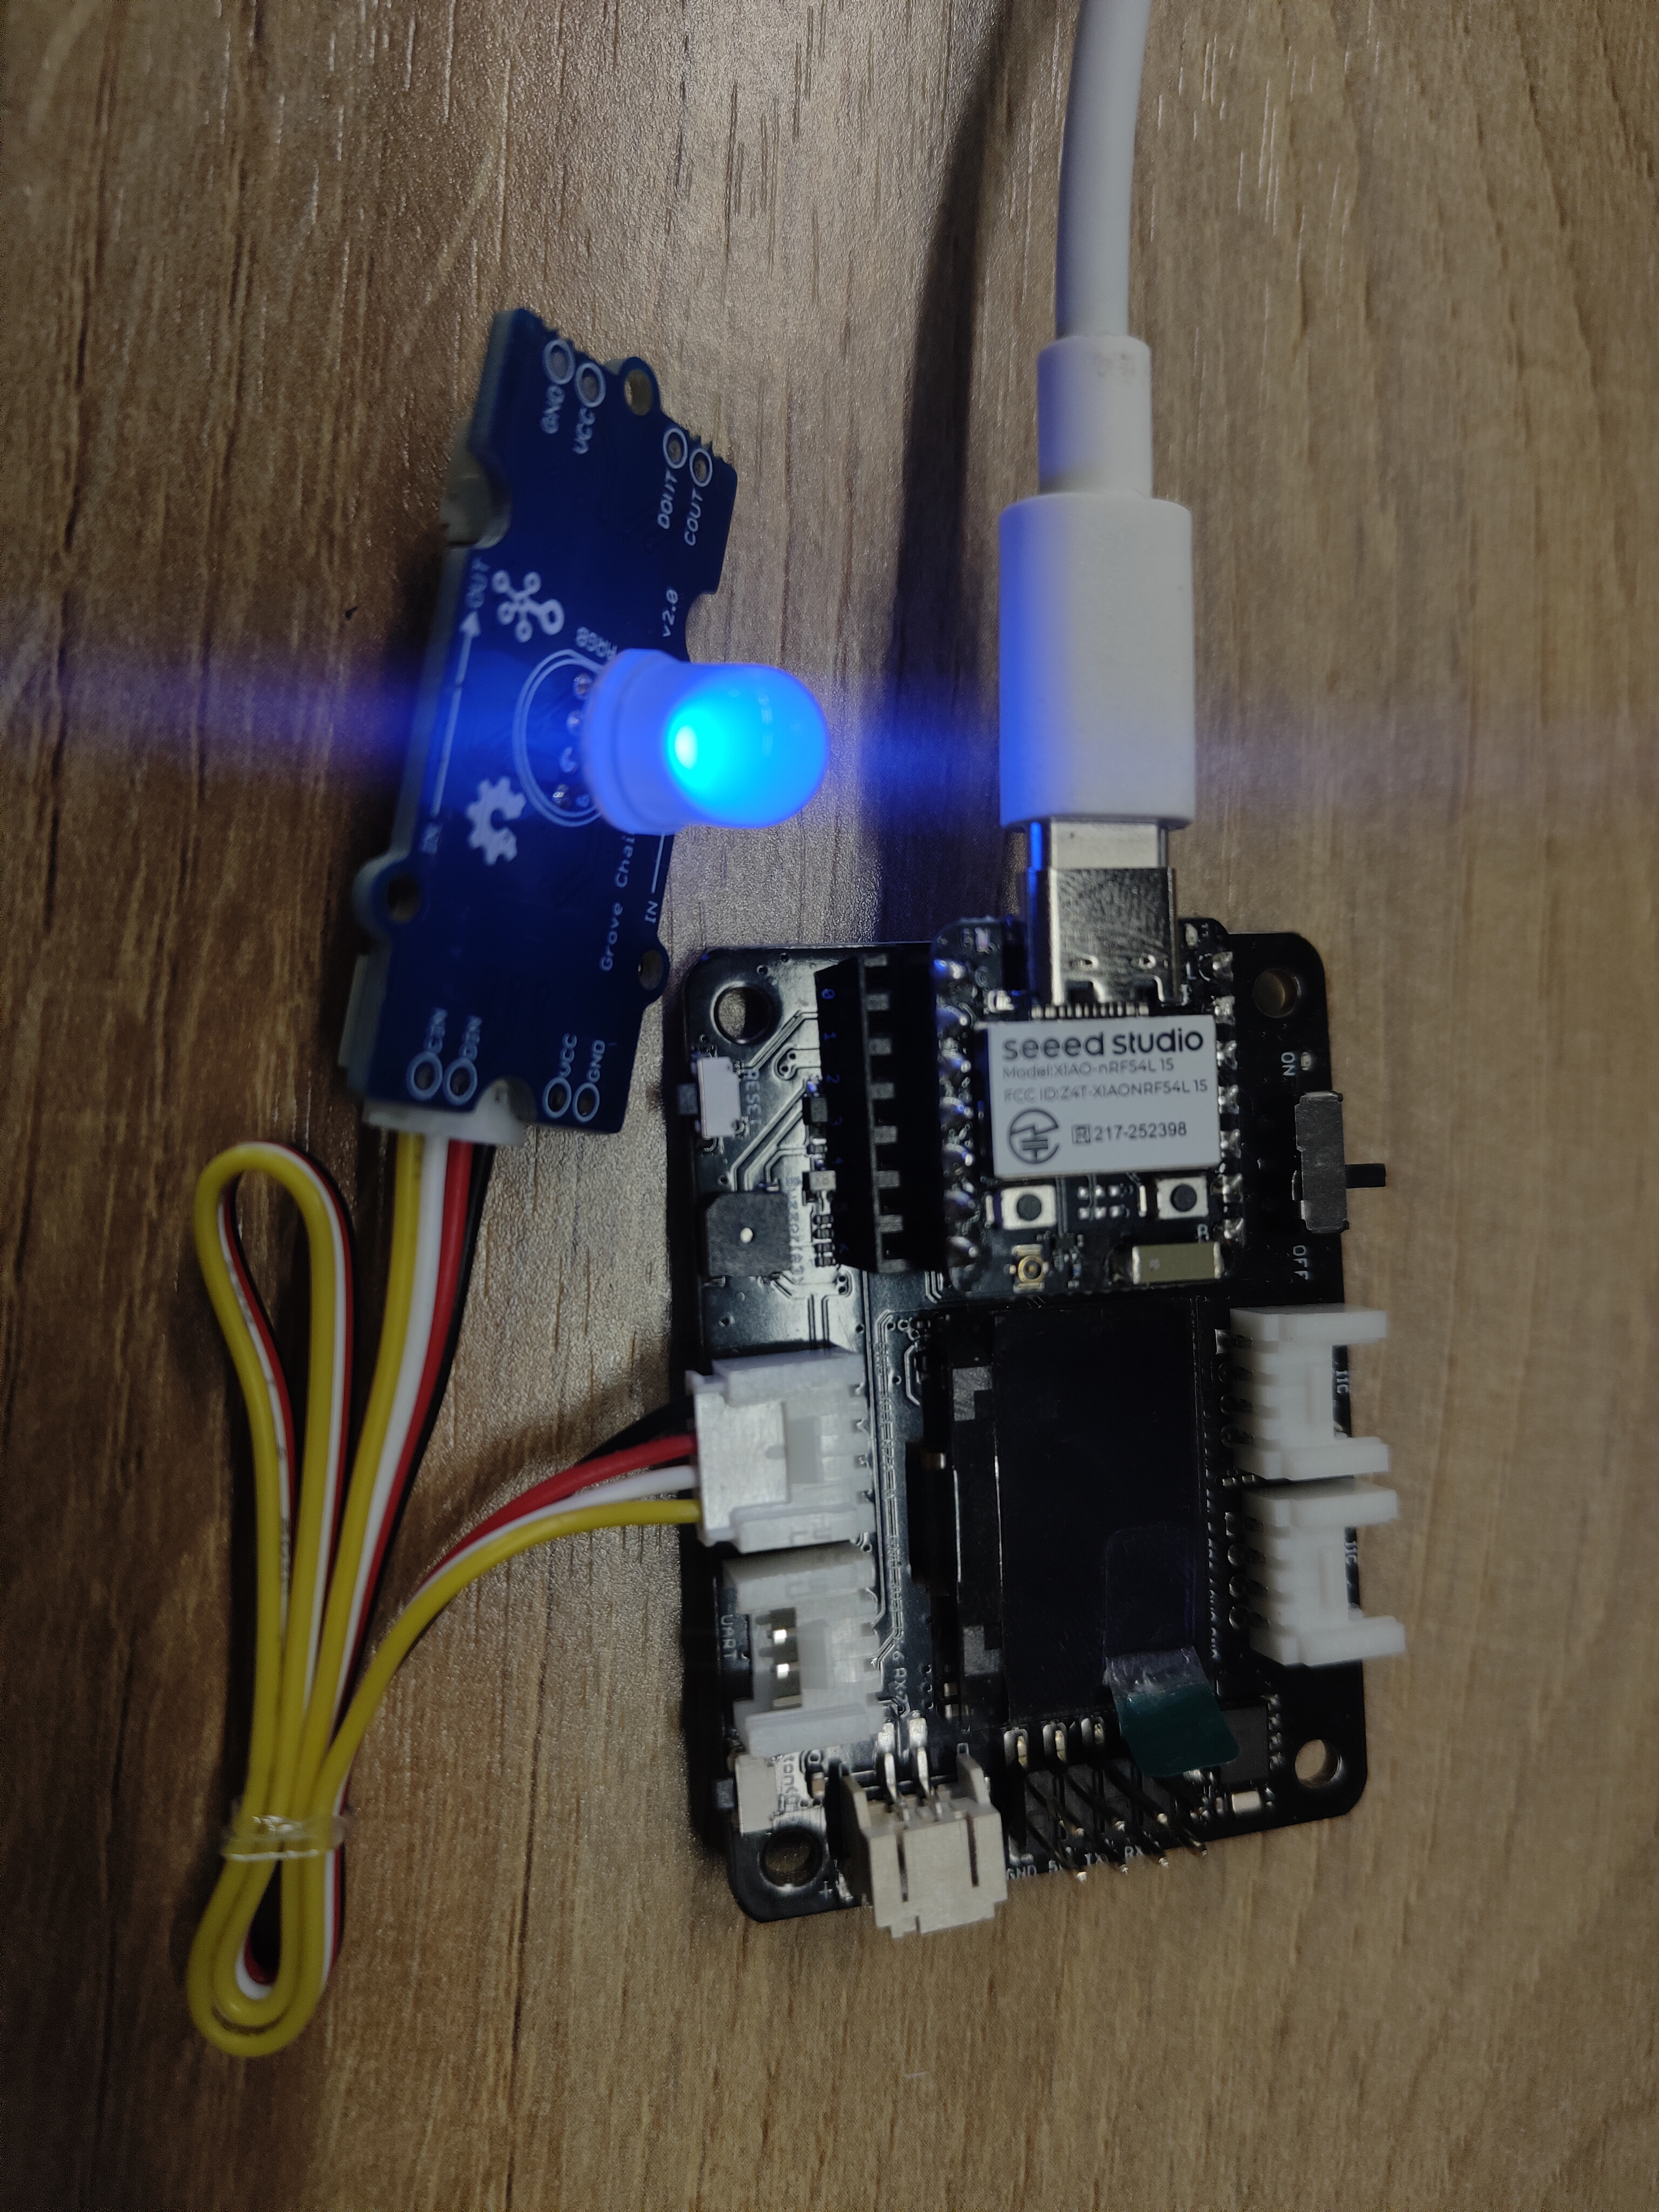
数字
硬件
| Seeed Studio XIAO nRF54L15 Sense | Seeed Studio Expansion Base for XIAO with Grove OLED | Grove - Relay |
|---|---|---|
|  |  |
软件
from machine import Pin
from boards.xiao_nrf54l15 import xiao_nrf54l15 as xiao

# Define a function to get the GPIO information corresponding to pin A0
def get_a0_pin():
    # Get the information of pin A0 through the pin method of the xiao module
    # According to the definition in xiao_nrf54l15.py, A0 corresponds to digital pin 0
    pin_info = xiao.pin(0)  # Get the information of digital pin 0, the return value is a tuple, such as ("gpio1", 4)
    return pin_info

# Define a function to set pin A0 to high level
def set_a0_high():
    # Get the GPIO information of pin A0
    gpio_port, gpio_pin = get_a0_pin()  # Get the port and pin number
    # Create a Pin object, specify the pin as output mode, and set it to high level
    pin = Pin((gpio_port, gpio_pin), Pin.OUT)  # Initialize the pin as output mode
    pin.value(1)  # Set the pin to high level

# Main program
if __name__ == "__main__":
    set_a0_high()  # Call the function to set pin A0 to high level
    print("Pin A0 has been set to high level")  # Output prompt information
代码解释: 这段代码有四个部分,包括导入模块、获取引脚 A0 的 GPIO 信息的函数、将引脚 A0 设置为高电平的函数,以及主函数,其中在主程序中调用了将引脚 A0 设置为高电平的操作。
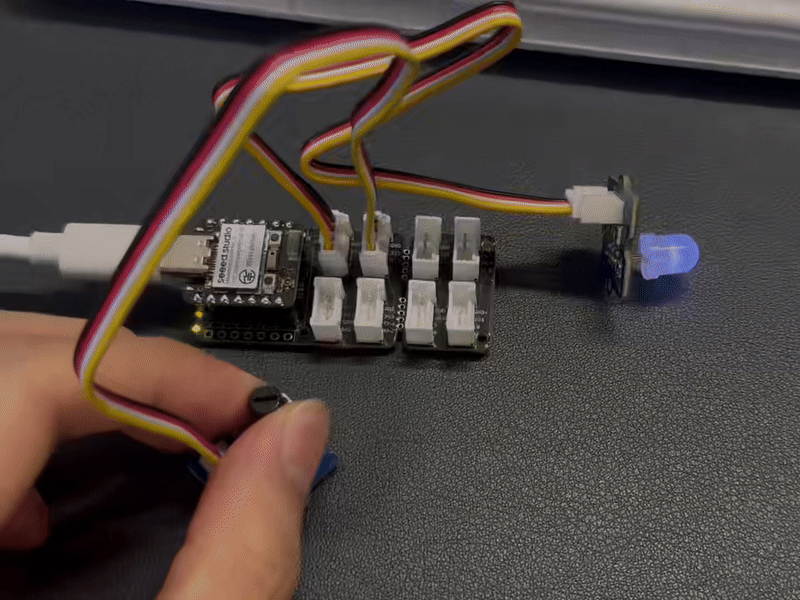
结果
模拟
硬件
| Seeed Studio XIAO nRF54L15 Sense | Grove-Variable Color LED | Grove-Rotary Angle Sensor | Seeed Studio Grove Base for XIAO |
|---|---|---|---|
|  |  |  |
软件
import time
from boards.xiao import XiaoPin, XiaoADC, XiaoPWM

adc = 0    #D0
pwm = 1    #D1

try:
    # Initialize ADC for potentiometer
    adc = XiaoADC(adc)
    # Initialize PWM for LED control
    pwm = XiaoPWM(pwm)
    FREQ = 1000
    PERIOD_NS = 1000000
    pwm.init(freq=FREQ, duty_ns=0)
    # Potentiometer parameters
    MIN_VOLTAGE = 0.0
    MAX_VOLTAGE = 3.3
    DEAD_ZONE = 0.05
    last_duty = -1
    while True:
        # Read ADC voltage value
        voltage = adc.read_uv() / 1000000

        # Ensure voltage is within valid range
        if voltage < MIN_VOLTAGE:
            voltage = MIN_VOLTAGE
        elif voltage > MAX_VOLTAGE:
            voltage = MAX_VOLTAGE

        duty_percent = (voltage - MIN_VOLTAGE) / (MAX_VOLTAGE - MIN_VOLTAGE)

        # Apply dead zone to prevent tiny fluctuations
        if abs(duty_percent - last_duty) < DEAD_ZONE / 100:
            time.sleep(0.05)
            continue

        # Calculate duty cycle time (nanoseconds)
        duty_ns = int(duty_percent * PERIOD_NS)

        # Set PWM duty cycle
        pwm.duty_ns(duty_ns)

        # Print current status
        print("Voltage: {:.2f}V, Duty Cycle: {:.1f}%".format(voltage, duty_percent * 100))

        # Update last duty cycle value
        last_duty = duty_percent

        # Short delay
        time.sleep(0.05)
except KeyboardInterrupt:
    print("\nProgram interrupted by user")
except Exception as e:
    print("\nError occurred: %s" % {e})
finally:
    pwm.deinit()
代码说明: 这段代码可以分为四个部分:
- 导入模块:包括用于延时操作的 time 模块,以及 XiaoADC 和 XiaoPWM 模块
- 初始化硬件:定义 ADC 和 PWM 引脚,并初始化 ADC 以读取电位器的电压,初始化 PWM 以控制 LED 亮度。
- 主程序逻辑:在无限循环中,读取电位器的电压,将其转换为 PWM 占空比,并根据电压调整 LED 亮度。
- 异常处理和清理:捕获用户中断(如按下 Ctrl+C)和其他异常,以确保程序安全退出。
结果
I2C
硬件
软件
import time
from boards.xiao import XiaoI2C
sda = 4 #D4
scl = 5 #D5
i2c = "i2c0"
frq = 400000
i2c = XiaoI2C(i2c, sda, scl, frq)
# --- SSD1306 I2C address and command definitions ---
SSD1306_I2C_ADDR = 0x3C
SSD1306_SET_CONTRAST = 0x81
SSD1306_DISPLAY_ALL_ON_RESUME = 0xA4
SSD1306_DISPLAY_ALL_ON = 0xA5
SSD1306_NORMAL_DISPLAY = 0xA6
SSD1306_INVERT_DISPLAY = 0xA7
SSD1306_DISPLAY_OFF = 0xAE
SSD1306_DISPLAY_ON = 0xAF
SSD1306_SET_DISPLAY_OFFSET = 0xD3
SSD1306_SET_COM_PINS = 0xDA
SSD1306_SET_VCOM_DETECT = 0xDB
SSD1306_SET_DISPLAY_CLOCK_DIV = 0xD5
SSD1306_SET_PRECHARGE = 0xD9
SSD1306_SET_MULTIPLEX = 0xA8
SSD1306_SET_LOW_COLUMN = 0x00
SSD1306_SET_HIGH_COLUMN = 0x10
SSD1306_SET_START_LINE = 0x40
SSD1306_MEMORY_MODE = 0x20
SSD1306_COLUMN_ADDR = 0x21
SSD1306_PAGE_ADDR = 0x22
SSD1306_COM_SCAN_INC = 0xC0
SSD1306_COM_SCAN_DEC = 0xC8
SSD1306_SEG_REMAP = 0xA0
SSD1306_CHARGE_PUMP = 0x8D
# Display dimensions
SSD1306_WIDTH = 128
SSD1306_HEIGHT = 64
SSD1306_PAGES = 8
# Basic 8x8 font
font_data = {
' ': [0x00,0x00,0x00,0x00,0x00,0x00,0x00,0x00],
'A': [0x18,0x24,0x42,0x7E,0x42,0x42,0x42,0x00],
'B': [0x7C,0x42,0x42,0x7C,0x42,0x42,0x7C,0x00],
'C': [0x3C,0x42,0x40,0x40,0x40,0x42,0x3C,0x00],
'D': [0x78,0x44,0x42,0x42,0x42,0x44,0x78,0x00],
'E': [0x7C,0x40,0x40,0x78,0x40,0x40,0x7C,0x00],
'F': [0x7C,0x40,0x40,0x78,0x40,0x40,0x40,0x00],
'G': [0x3C,0x42,0x40,0x4E,0x42,0x42,0x3C,0x00],
'H': [0x44,0x44,0x44,0x7C,0x44,0x44,0x44,0x00],
'I': [0x38,0x10,0x10,0x10,0x10,0x10,0x38,0x00],
'J': [0x1C,0x08,0x08,0x08,0x08,0x48,0x30,0x00],
'K': [0x44,0x48,0x50,0x60,0x50,0x48,0x44,0x00],
'L': [0x40,0x40,0x40,0x40,0x40,0x40,0x7C,0x00],
'M': [0x42,0x66,0x5A,0x42,0x42,0x42,0x42,0x00],
'N': [0x42,0x62,0x52,0x4A,0x46,0x42,0x42,0x00],
'O': [0x3C,0x42,0x42,0x42,0x42,0x42,0x3C,0x00],
'P': [0x7C,0x42,0x42,0x7C,0x40,0x40,0x40,0x00],
'Q': [0x3C,0x42,0x42,0x42,0x4A,0x44,0x3A,0x00],
'R': [0x7C,0x42,0x42,0x7C,0x48,0x44,0x42,0x00],
'S': [0x3C,0x42,0x40,0x3C,0x02,0x42,0x3C,0x00],
'T': [0x7C,0x10,0x10,0x10,0x10,0x10,0x10,0x00],
'U': [0x42,0x42,0x42,0x42,0x42,0x42,0x3C,0x00],
'V': [0x42,0x42,0x42,0x42,0x42,0x24,0x18,0x00],
'W': [0x42,0x42,0x42,0x42,0x5A,0x66,0x42,0x00],
'X': [0x42,0x24,0x18,0x18,0x18,0x24,0x42,0x00],
'Y': [0x44,0x44,0x28,0x10,0x10,0x10,0x10,0x00],
'Z': [0x7E,0x04,0x08,0x10,0x20,0x40,0x7E,0x00],
'0': [0x3C,0x42,0x46,0x4A,0x52,0x62,0x3C,0x00],
'1': [0x10,0x30,0x10,0x10,0x10,0x10,0x38,0x00],
'2': [0x3C,0x42,0x02,0x0C,0x30,0x40,0x7E,0x00],
'3': [0x3C,0x42,0x02,0x1C,0x02,0x42,0x3C,0x00],
'4': [0x08,0x18,0x28,0x48,0x7E,0x08,0x08,0x00],
'5': [0x7E,0x40,0x7C,0x02,0x02,0x42,0x3C,0x00],
'6': [0x1C,0x20,0x40,0x7C,0x42,0x42,0x3C,0x00],
'7': [0x7E,0x42,0x04,0x08,0x10,0x10,0x10,0x00],
'8': [0x3C,0x42,0x42,0x3C,0x42,0x42,0x3C,0x00],
'9': [0x3C,0x42,0x42,0x3E,0x02,0x04,0x38,0x00],
'!': [0x10,0x10,0x10,0x10,0x10,0x00,0x10,0x00],
'?': [0x3C,0x42,0x02,0x0C,0x10,0x00,0x10,0x00],
'.': [0x00,0x00,0x00,0x00,0x00,0x00,0x10,0x00],
',': [0x00,0x00,0x00,0x00,0x00,0x10,0x10,0x20],
':': [0x00,0x10,0x00,0x00,0x00,0x10,0x00,0x00],
';': [0x00,0x10,0x00,0x00,0x00,0x10,0x10,0x20],
'-': [0x00,0x00,0x00,0x7C,0x00,0x00,0x00,0x00],
'_': [0x00,0x00,0x00,0x00,0x00,0x00,0x7E,0x00],
'+': [0x00,0x10,0x10,0x7C,0x10,0x10,0x00,0x00],
'*': [0x00,0x24,0x18,0x7E,0x18,0x24,0x00,0x00],
'/': [0x02,0x04,0x08,0x10,0x20,0x40,0x00,0x00],
'\\': [0x40,0x20,0x10,0x08,0x04,0x02,0x00,0x00],
'=': [0x00,0x00,0x7E,0x00,0x7E,0x00,0x00,0x00],
'\'': [0x10,0x10,0x20,0x00,0x00,0x00,0x00,0x00],
'"': [0x24,0x24,0x00,0x00,0x00,0x00,0x00,0x00],
'(': [0x08,0x10,0x20,0x20,0x20,0x10,0x08,0x00],
')': [0x20,0x10,0x08,0x08,0x08,0x10,0x20,0x00],
'[': [0x1C,0x10,0x10,0x10,0x10,0x10,0x1C,0x00],
']': [0x38,0x08,0x08,0x08,0x08,0x08,0x38,0x00],
'{': [0x0C,0x10,0x10,0x60,0x10,0x10,0x0C,0x00],
'}': [0x30,0x08,0x08,0x06,0x08,0x08,0x30,0x00],
'<': [0x08,0x10,0x20,0x40,0x20,0x10,0x08,0x00],
'>': [0x20,0x10,0x08,0x04,0x08,0x10,0x20,0x00],
'|': [0x10,0x10,0x10,0x10,0x10,0x10,0x10,0x00],
'@': [0x3C,0x42,0x5A,0x5A,0x5C,0x40,0x3C,0x00],
'#': [0x24,0x24,0x7E,0x24,0x7E,0x24,0x24,0x00],
'$': [0x10,0x3C,0x50,0x3C,0x12,0x3C,0x10,0x00],
'%': [0x62,0x64,0x08,0x10,0x26,0x46,0x00,0x00],
'^': [0x10,0x28,0x44,0x00,0x00,0x00,0x00,0x00],
'&': [0x30,0x48,0x50,0x20,0x54,0x48,0x34,0x00],
'~': [0x00,0x00,0x34,0x4C,0x00,0x00,0x00,0x00]
}
# --- Helper functions ---
# Write a single command byte to SSD1306 via I2C
def ssd1306_write_command(cmd):
i2c.writeto(SSD1306_I2C_ADDR, bytes([0x00, cmd]))
# Write multiple command bytes to SSD1306 via I2C
def ssd1306_write_commands(cmds):
data = bytearray([0x00] + list(cmds))
i2c.writeto(SSD1306_I2C_ADDR, data)
# Write display data bytes to SSD1306 via I2C
def ssd1306_write_data(data):
buffer = bytearray(len(data) + 1)
buffer[0] = 0x40
buffer[1:] = data
i2c.writeto(SSD1306_I2C_ADDR, buffer)
# Clear the entire SSD1306 display
def ssd1306_clear():
ssd1306_write_commands(bytearray([SSD1306_COLUMN_ADDR, 0, SSD1306_WIDTH - 1]))
ssd1306_write_commands(bytearray([SSD1306_PAGE_ADDR, 0, SSD1306_PAGES - 1]))
empty_data = bytearray(SSD1306_WIDTH)
for _ in range(SSD1306_PAGES):
ssd1306_write_data(empty_data)
ssd1306_write_commands([SSD1306_COLUMN_ADDR, 0, SSD1306_WIDTH - 1])
# Initialize SSD1306 display with recommended settings
def ssd1306_init():
commands = [
bytearray([SSD1306_DISPLAY_OFF]),
bytearray([SSD1306_SET_DISPLAY_CLOCK_DIV, 0x80]),
bytearray([SSD1306_SET_MULTIPLEX, SSD1306_HEIGHT - 1]),
bytearray([SSD1306_SET_DISPLAY_OFFSET, 0x00]),
bytearray([SSD1306_SET_START_LINE | 0x00]),
bytearray([SSD1306_CHARGE_PUMP, 0x14]),
bytearray([SSD1306_MEMORY_MODE, 0x00]),
bytearray([SSD1306_SEG_REMAP | 0x01]),
bytearray([SSD1306_COM_SCAN_DEC]),
bytearray([SSD1306_SET_COM_PINS, 0x12]),
bytearray([SSD1306_SET_CONTRAST, 0xCF]),
bytearray([SSD1306_SET_PRECHARGE, 0xF1]),
bytearray([SSD1306_SET_VCOM_DETECT, 0x40]),
bytearray([SSD1306_DISPLAY_ALL_ON_RESUME]),
bytearray([SSD1306_NORMAL_DISPLAY]),
bytearray([SSD1306_DISPLAY_ON])
]
for cmd in commands:
ssd1306_write_commands(cmd)
ssd1306_clear()
print("SSD1306 initialized successfully.")
ssd1306_write_commands([SSD1306_COLUMN_ADDR, 0, SSD1306_WIDTH - 1])
# Draw a string of text at specified column and page (row) on SSD1306
def ssd1306_draw_text(text, x, y):
ssd1306_write_commands(bytearray([SSD1306_COLUMN_ADDR, x, x + len(text) * 8 - 1]))
ssd1306_write_commands(bytearray([SSD1306_PAGE_ADDR, y, y + 0]))
display_data = bytearray()
for char in text:
font_bytes = font_data.get(char.upper(), font_data[' '])
for col in range(7, -1, -1):
val = 0
for row in range(8):
if font_bytes[row] & (1 << col):
val |= (1 << row)
display_data.append(val)
ssd1306_write_data(display_data)
i2c_addr = i2c.scan()
if SSD1306_I2C_ADDR not in i2c_addr:
raise Exception("SSD1306 not found on I2C bus")
else:
print("SSD1306 found on I2C bus: 0x{:02X}".format(SSD1306_I2C_ADDR))
# Initialize display
ssd1306_init()
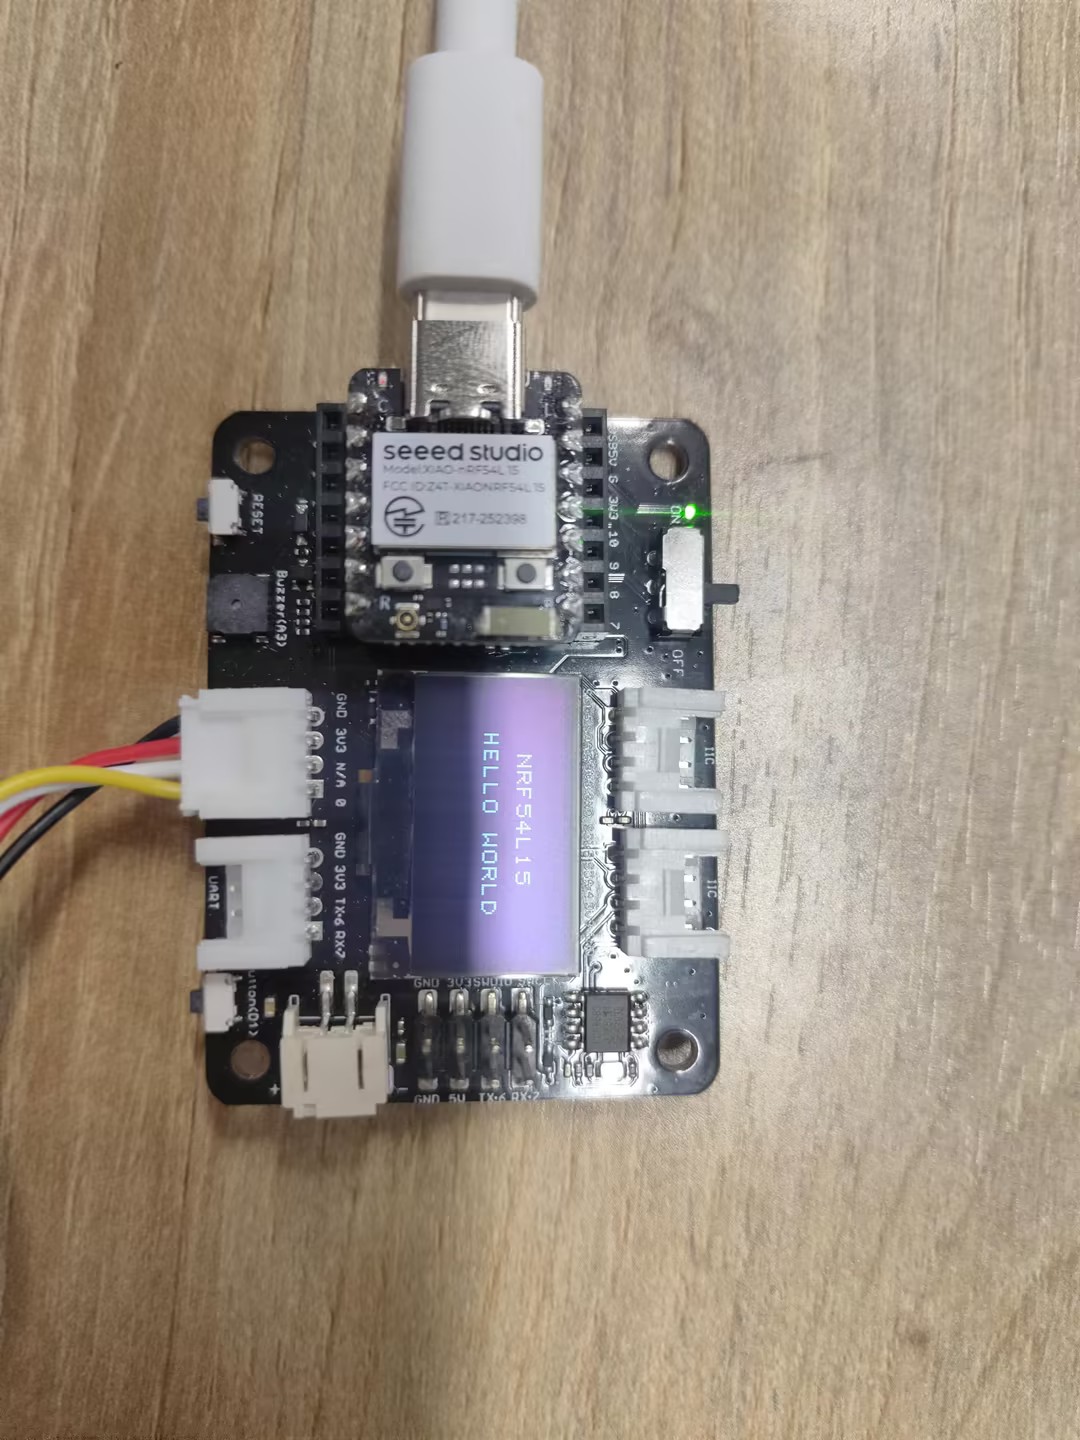
ssd1306_draw_text("NRF54L15", 30, 2)
ssd1306_draw_text("HELLO WORLD", 20, 4)
代码说明:
此代码通过 I2C 通信初始化和控制 SSD1306 OLED 显示屏,定义显示屏的命令和参数,并实现清屏、初始化和显示文本的功能。
-
导入模块并初始化 I2C 通信: 导入了 time 模块用于延时操作,导入了 XiaoI2C 模块来初始化 I2C 通信。定义了 I2C 的 SDA 和 SCL 引脚,并设置了 I2C 频率。然后创建了一个 XiaoI2C 对象,用于与 I2C 设备(如 OLED 显示屏)进行通信。
-
定义 SSD1306 显示屏的指令和参数: 定义了 SSD1306 显示屏的 I2C 地址和一系列控制命令(如设置对比度、显示开/关等)。还定义了显示屏的尺寸参数(宽度、高度和页数)以及一个简单的 8x8 点阵字体库,用于在屏幕上显示字符。
-
定义辅助函数: 定义了一系列辅助函数,用于向 SSD1306 发送命令和数据。
-
主程序逻辑: 首先通过执行 I2C 扫描来检查 SSD1306 显示屏是否连接到 I2C 总线。如果找到显示屏,则调用 ssd1306_init 函数初始化显示屏。然后调用 ssd1306_draw_text 函数在显示屏上显示两行文本 "NRF54L15" 和 "HELLO WORLD"。
结果
SPI
硬件

软件
import time
from boards.xiao import XiaoPin, XiaoSPI
# -------- Pins & SPI --------
RST = 0; CS = 1; DC = 3; BUSY = 5
sck = 9; mosi = 10; miso = 8; spi_id = "spi0"
RST = XiaoPin(RST, XiaoPin.OUT)
CS = XiaoPin(CS, XiaoPin.OUT)
DC = XiaoPin(DC, XiaoPin.OUT)
BUSY = XiaoPin(BUSY, XiaoPin.IN, XiaoPin.PULL_UP)
spi = XiaoSPI(spi_id, 20_000_000, sck, mosi, miso)
# -------- ePaper basics --------
def reset():
RST.value(0); time.sleep_ms(10)
RST.value(1); time.sleep_ms(10)
def send_command(cmd):
DC.value(0); CS.value(0)
spi.write(bytearray([cmd & 0xFF]))
CS.value(1)
def send_data(data):
DC.value(1); CS.value(0)
if isinstance(data, int):
spi.write(bytearray([data & 0xFF]))
else:
spi.write(data)
CS.value(1)
def wait_until_idle():
# If BUSY = 0, it indicates that the device is busy. You can then switch back to polling.
# while BUSY.value() == 0: time.sleep_ms(1)
time.sleep_ms(1)
def init_display():
reset()
send_command(0x00); send_data(0x1F)
send_command(0x04); time.sleep_ms(100); wait_until_idle()
send_command(0x50); send_data(0x21); send_data(0x07)
def clear_screen():
CS.value(0)
DC.value(0); spi.write(b'\x10'); DC.value(1)
for _ in range(48000): spi.write(b'\xFF')
DC.value(0); spi.write(b'\x13'); DC.value(1)
for _ in range(48000): spi.write(b'\xFF')
DC.value(0); spi.write(b'\x12'); CS.value(1)
wait_until_idle()
# -------- Geometry --------
WIDTH, HEIGHT = 800, 480
BYTES_PER_ROW = WIDTH // 8
linebuf = bytearray(BYTES_PER_ROW)
# -------- Minimal 5x7 glyphs (columns, LSB=top) --------
FONT_W, FONT_H = 5, 7
G = {
' ':[0x00,0x00,0x00,0x00,0x00],
# Digits
'0':[0x3E,0x51,0x49,0x45,0x3E],
'1':[0x00,0x42,0x7F,0x40,0x00],
'2':[0x42,0x61,0x51,0x49,0x46],
'3':[0x21,0x41,0x45,0x4B,0x31],
'4':[0x18,0x14,0x12,0x7F,0x10],
'5':[0x27,0x45,0x45,0x45,0x39],
'6':[0x3C,0x4A,0x49,0x49,0x30],
'7':[0x01,0x71,0x09,0x05,0x03],
'8':[0x36,0x49,0x49,0x49,0x36],
'9':[0x06,0x49,0x49,0x29,0x1E],
# Uppercase
'A':[0x7E,0x11,0x11,0x11,0x7E],
'F':[0x7F,0x09,0x09,0x09,0x01],
'H':[0x7F,0x08,0x08,0x08,0x7F],
'I':[0x00,0x41,0x7F,0x41,0x00],
'L':[0x7F,0x40,0x40,0x40,0x40],
'M':[0x7F,0x02,0x0C,0x02,0x7F],
'O':[0x3E,0x41,0x41,0x41,0x3E],
'P':[0x7F,0x09,0x09,0x09,0x06],
'R':[0x7F,0x09,0x19,0x29,0x46],
'T':[0x01,0x01,0x7F,0x01,0x01],
'X':[0x63,0x14,0x08,0x14,0x63],
'Y':[0x07,0x08,0x70,0x08,0x07],
# Lowercase
'a':[0x20,0x54,0x54,0x54,0x78],
'c':[0x38,0x44,0x44,0x44,0x20],
'e':[0x38,0x54,0x54,0x54,0x18],
'h':[0x7F,0x08,0x04,0x04,0x78],
'i':[0x00,0x44,0x7D,0x40,0x00],
'l':[0x00,0x41,0x7F,0x40,0x00],
'n':[0x7C,0x08,0x04,0x04,0x78],
'o':[0x38,0x44,0x44,0x44,0x38],
'p':[0x7C,0x14,0x14,0x14,0x08],
'r':[0x7C,0x08,0x04,0x04,0x08],
't':[0x04,0x3F,0x44,0x40,0x20],
'y':[0x0C,0x50,0x50,0x50,0x3C],
}
def glyph(ch):
return G.get(ch, G[' '])
# -------- Text helpers --------
def text_size(text, scale=1, spacing=1):
w = 0
for _ in text:
w += (FONT_W * scale + spacing)
if w: w -= spacing
return w, FONT_H * scale
def text_pixel(x, y, text, sx, sy, scale=1, spacing=1):
# Return 0 = Black, 1 = White
if y < sy or y >= sy + FONT_H * scale:
return 1
lx = x - sx
if lx < 0:
return 1
cursor = 0
for ch in text:
cw = FONT_W * scale
if cursor <= lx < cursor + cw:
cx_scaled = lx - cursor
cy_scaled = y - sy
cx = cx_scaled // scale
cy = cy_scaled // scale
col = glyph(ch)[cx]
bit = (col >> cy) & 1
return 0 if bit else 1
cursor += cw + spacing
return 1
# -------- Stream update --------
def epaper_update_lines(lines):
CS.value(0)
# The old picture is completely white.
DC.value(0); spi.write(b'\x10'); DC.value(1)
for _ in range(HEIGHT * BYTES_PER_ROW):
spi.write(b'\xFF')
# New image: Generated row by row
DC.value(0); spi.write(b'\x13'); DC.value(1)
for y in range(HEIGHT):
bi = 0; bitpos = 7; linebuf[:] = b'\x00' * BYTES_PER_ROW
for x in range(WIDTH):
val = 1 # Default white
for (txt, tx, ty, scale) in lines:
if text_pixel(x, y, txt, tx, ty, scale) == 0:
val = 0
break
if val:
linebuf[bi] |= (1 << bitpos) # 1 = white
bitpos -= 1
if bitpos < 0:
bitpos = 7; bi += 1
spi.write(linebuf)
# Redresh
DC.value(0); spi.write(b'\x12'); CS.value(1)
wait_until_idle()
# -------- Main --------
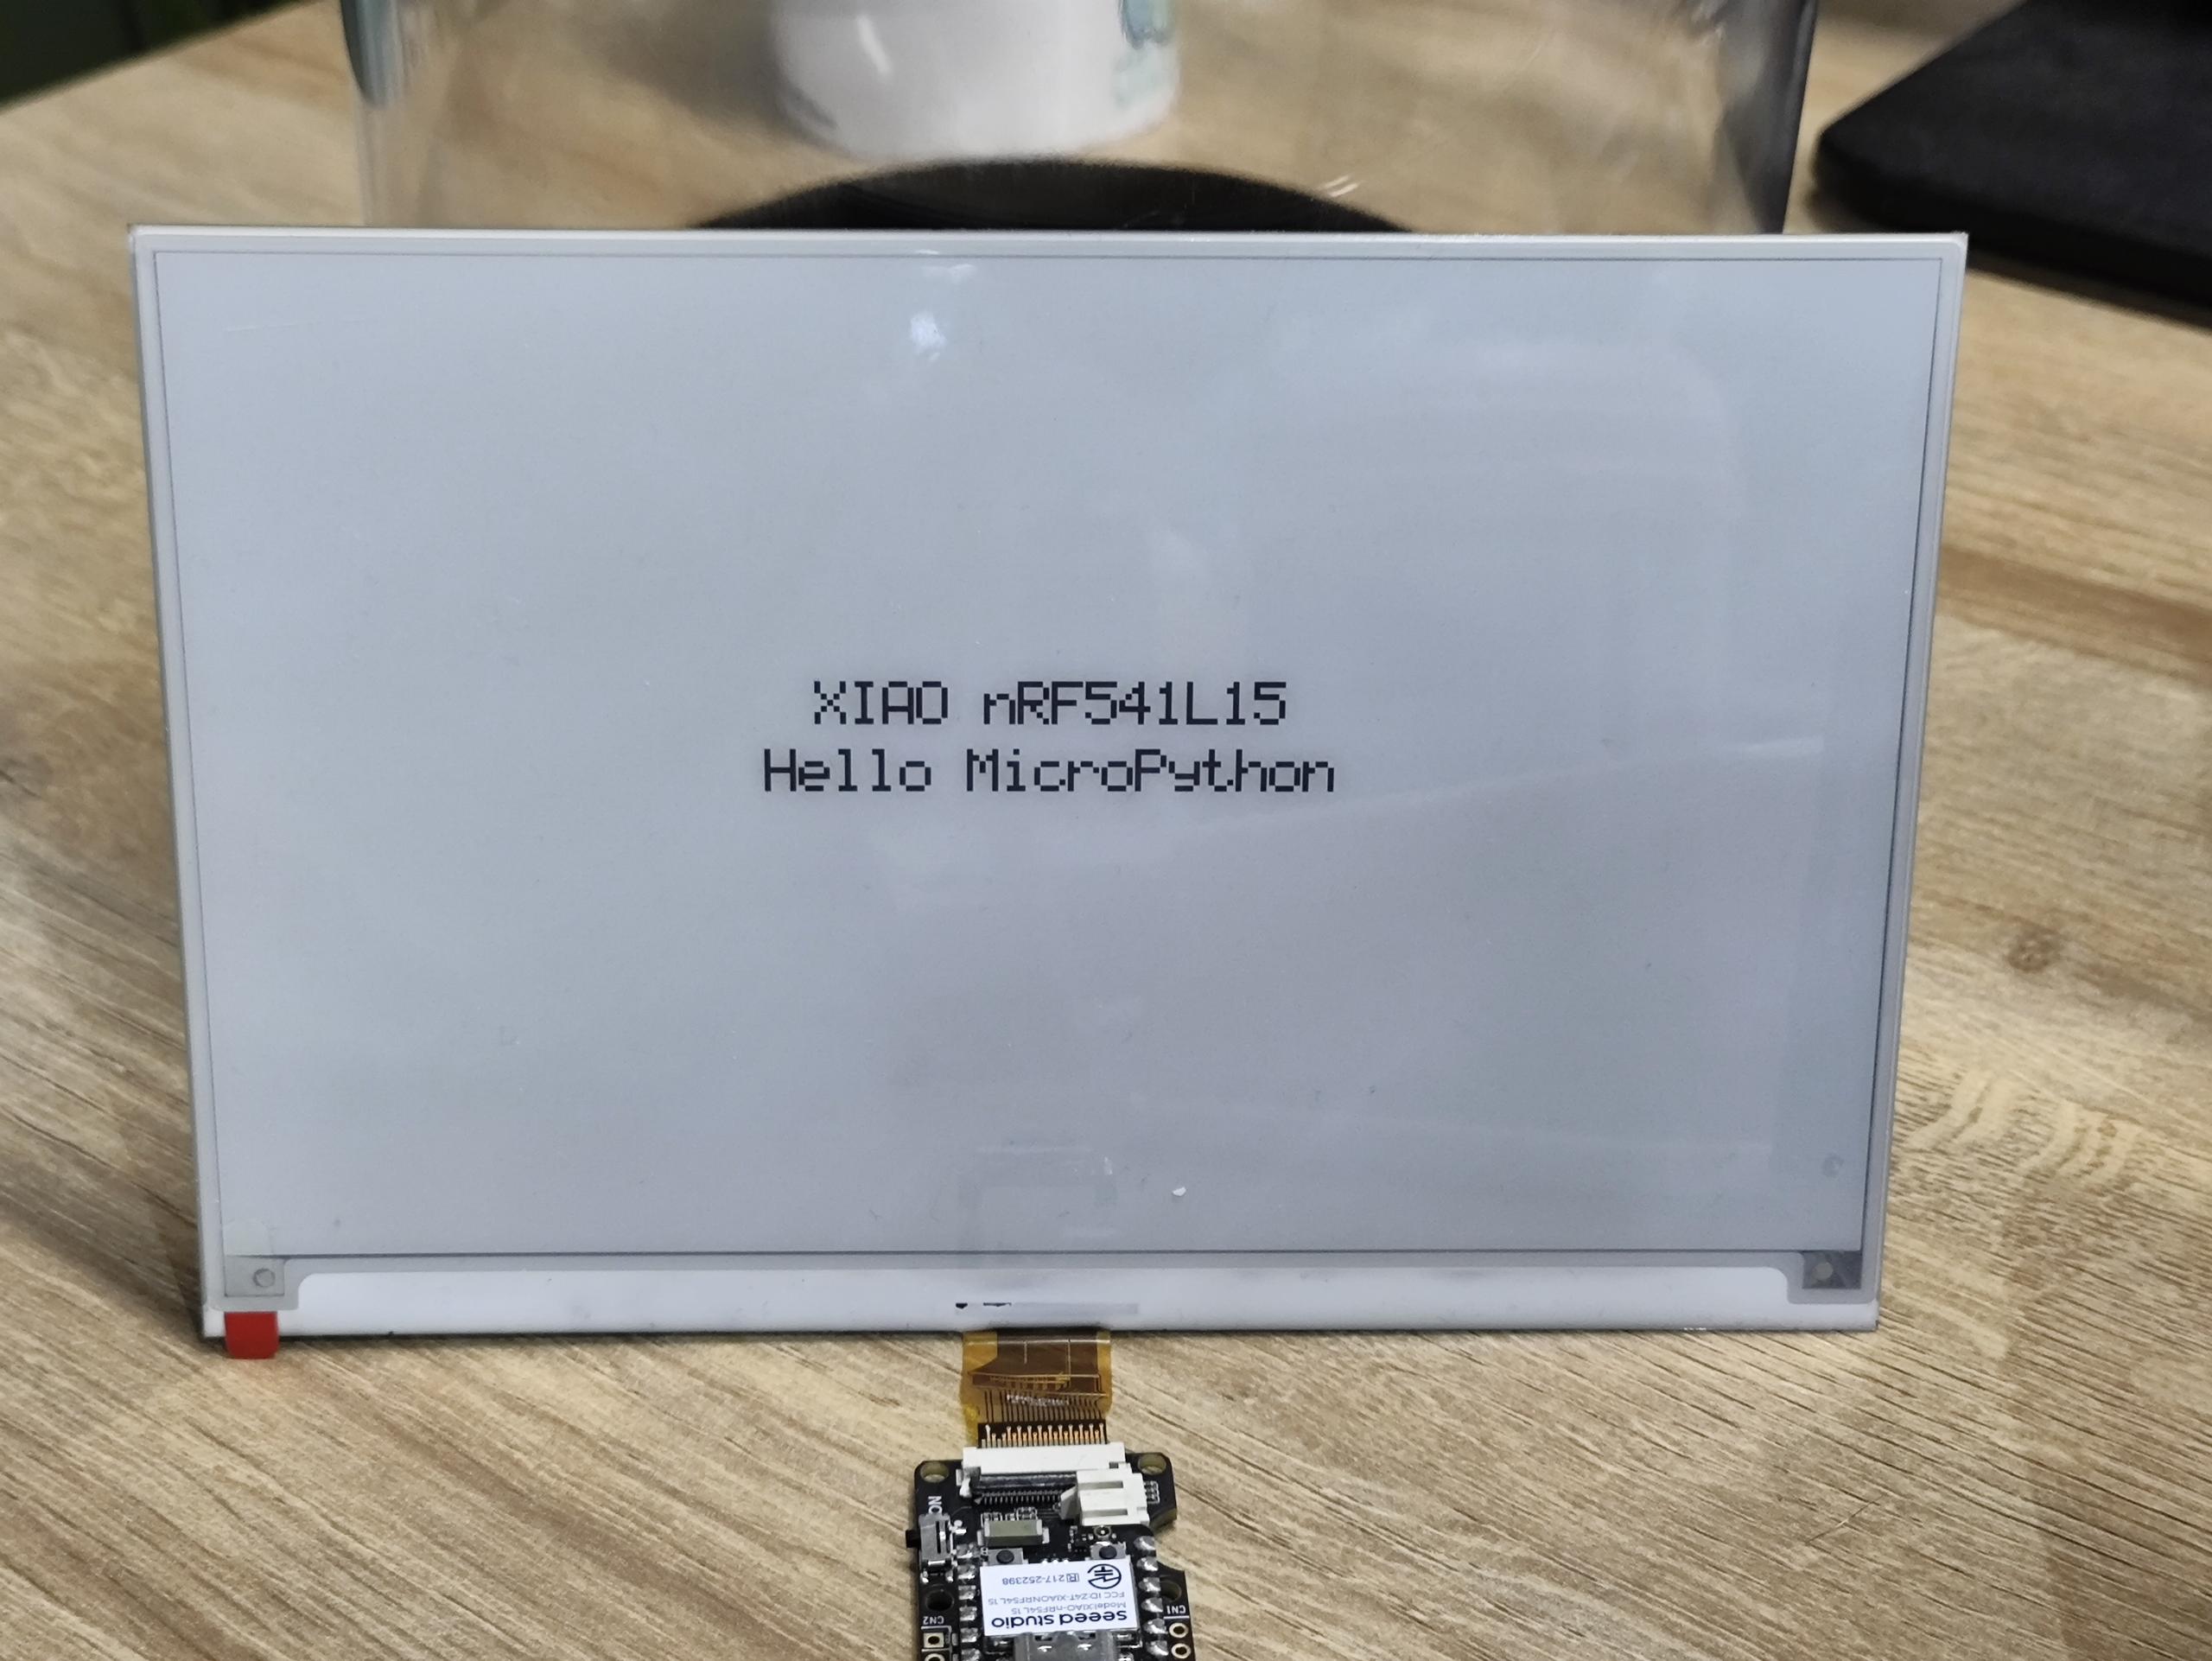
LINE1 = "XIAO nRF541L15"
LINE2 = "Hello MicroPython"
SCALE1 = 3
SCALE2 = 3
def main():
init_display()
clear_screen()
# Centered layout
w1, h1 = text_size(LINE1, SCALE1)
w2, h2 = text_size(LINE2, SCALE2)
total_h = h1 + 12 + h2 # Line spacing: 12 px
y0 = (HEIGHT - total_h) // 2
x1 = (WIDTH - w1) // 2
x2 = (WIDTH - w2) // 2
y1 = y0
y2 = y0 + h1 + 12
lines = [
(LINE1, x1, y1, SCALE1),
(LINE2, x2, y2, SCALE2),
]
epaper_update_lines(lines)
while True:
time.sleep(1_000_000)
if __name__ == "__main__":
main()
代码说明:
-
模块导入
time:启用时间相关功能,如延时。XiaoPin and XiaoSPI:从boards.xiao导入;XiaoPin 用于控制 GPIO 引脚,而 XiaoSPI 处理 SPI 通信。
-
引脚和 SPI 配置
- 定义了特定引脚:复位 (RST)、片选 (CS)、数据/命令 (DC) 和忙碌 (BUSY)。
- 配置了 SPI 相关引脚 (SCK、MOSI、MISO) 和 SPI 控制器。
- 初始化了所有 GPIO 引脚的工作模式(输入/输出)。
- 创建了一个 SPI 实例,设置频率为 20 MHz。
-
ePaper 基本功能
reset():对显示屏执行硬件复位操作。send_command(cmd):传输单字节命令。send_data(data):发送数据,可以是单字节或多字节。wait_until_idle():等待显示屏进入空闲状态(目前通过简单延时实现)。init_display():执行显示屏的初始化程序。clear_screen():清屏,将其设置为全白状态。
-
显示参数
WIDTH, HEIGHT = 800, 480:指定显示屏的分辨率。BYTES_PER_ROW:表示每行像素所需的字节数。linebuf:行缓冲区,临时存储单行的像素数据。
-
字体系统
- 定义了一个简单的 5x7 像素字体,存储在
G字典中。 glyph(ch):检索给定字符对应的像素数据。text_size():计算文本在指定缩放比例下显示时的尺寸。text_pixel(): 确定是否应在特定位置绘制像素(用于文本渲染)。
- 定义了一个简单的 5x7 像素字体,存储在
-
显示更新
- epaper_update_lines(lines): 更新显示的核心函数。
- 首先,发送数据设置全白背景。
- 然后,逐行计算并传输新的图像数据。
- 最后,触发显示刷新以显示新内容。
- 支持多行文本显示,每行可以有不同的位置和缩放比例。
-
main() 函数
- 初始化显示。
- 计算文本的居中位置。
- 为文本行创建配置列表。
- 调用
epaper_update_lines()更新显示内容。 - 进入无限睡眠循环。
结果
自动执行程序
如果您希望您的程序能够自动执行,可以按照以下步骤操作:
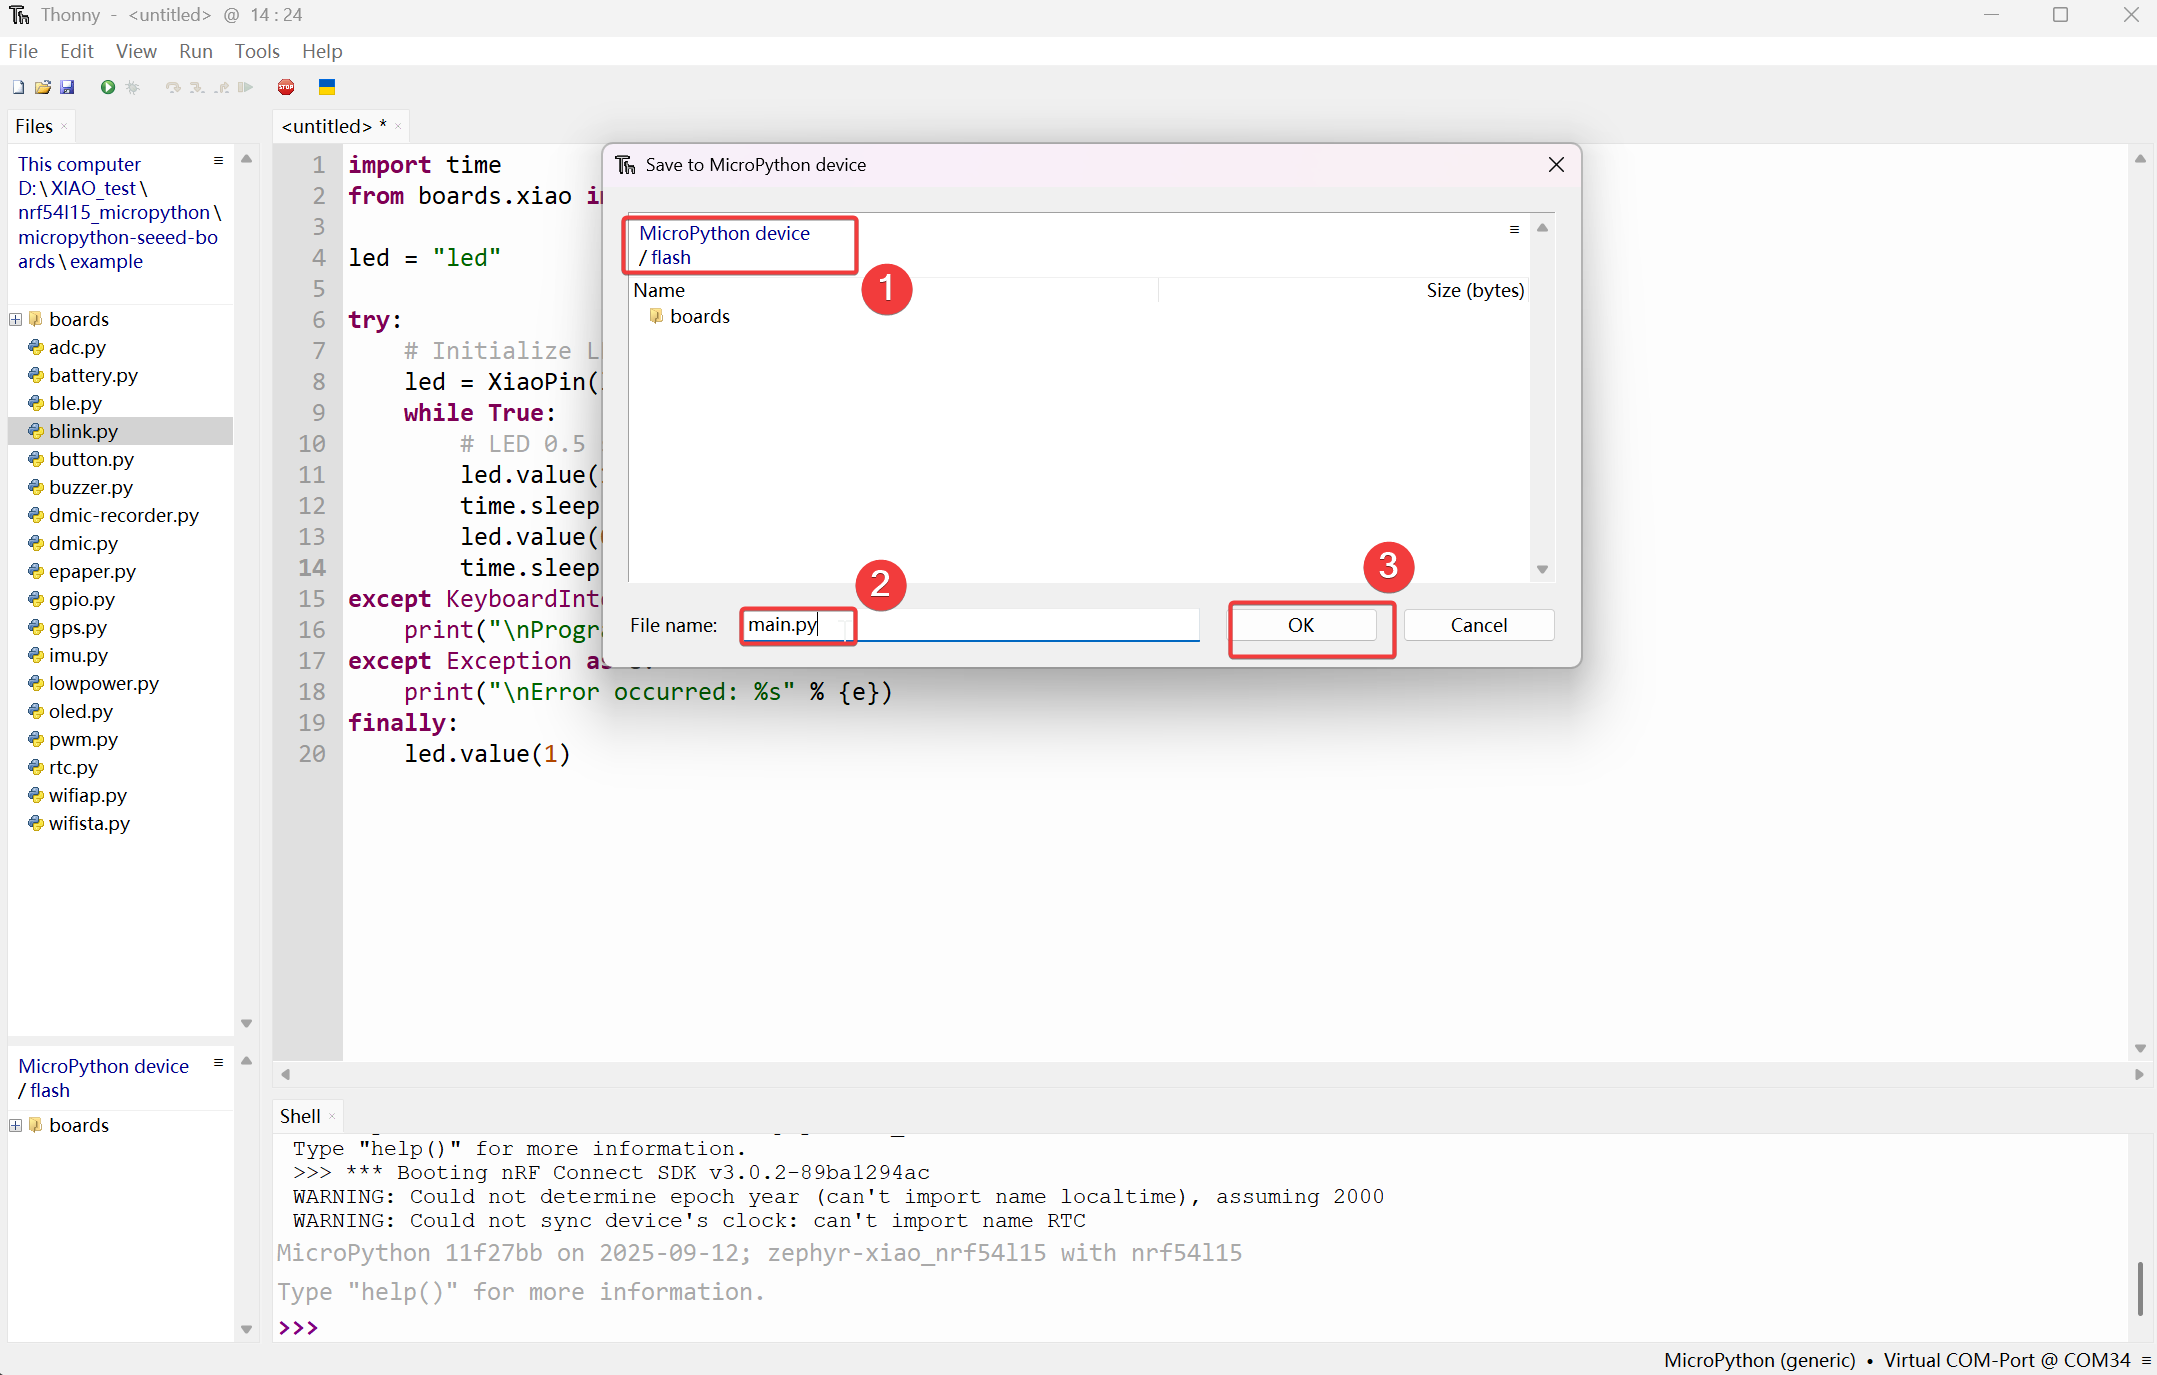
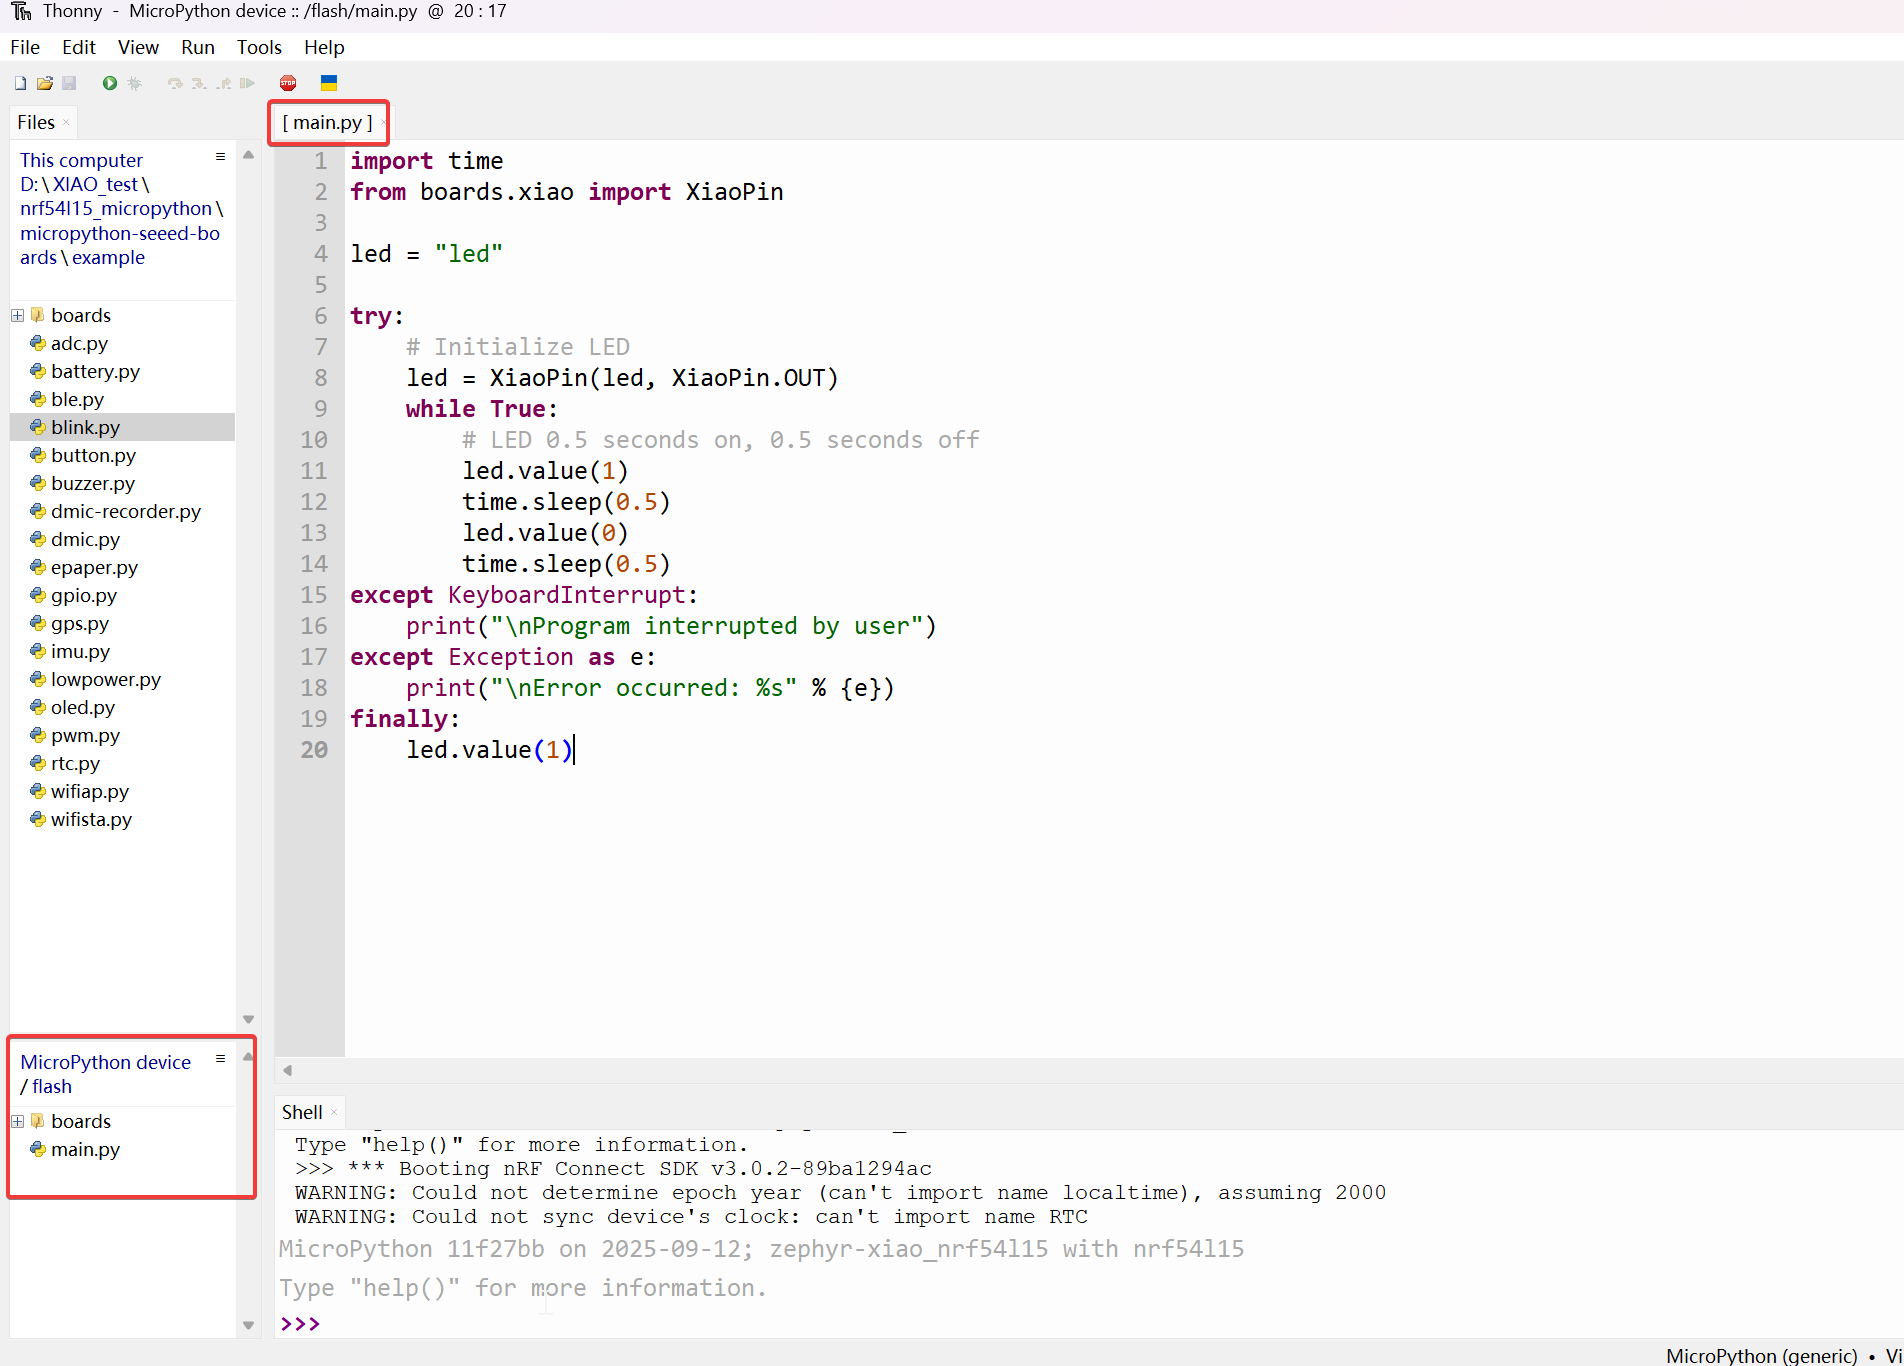
步骤 1. 创建一个新的程序文件,使用 Ctrl + S 将其保存到 MicroPython 设备的闪存中,并命名为 main.py。
这里以闪烁程序为例
然后它将显示在 MicroPython 设备/闪存部分下。
步骤 2. 通过按下板载复位按钮,可以实现自动执行效果。
效果:
常见问题
Bootloader 更新
如果您遇到无法使用 Thonny 上传 MicroPython 程序的情况,这是因为出厂时使用的 Bootloader 版本较旧。
步骤 1. 接线
| OpenOCD / JTAG / SWD | XIAO nRF54L15 |
|---|---|
| 5V | 5V |
| GND | GND |
| SWDIO | SWDIO2 |
| SWDCLK | SWDCLK2 |
| RST | RST |
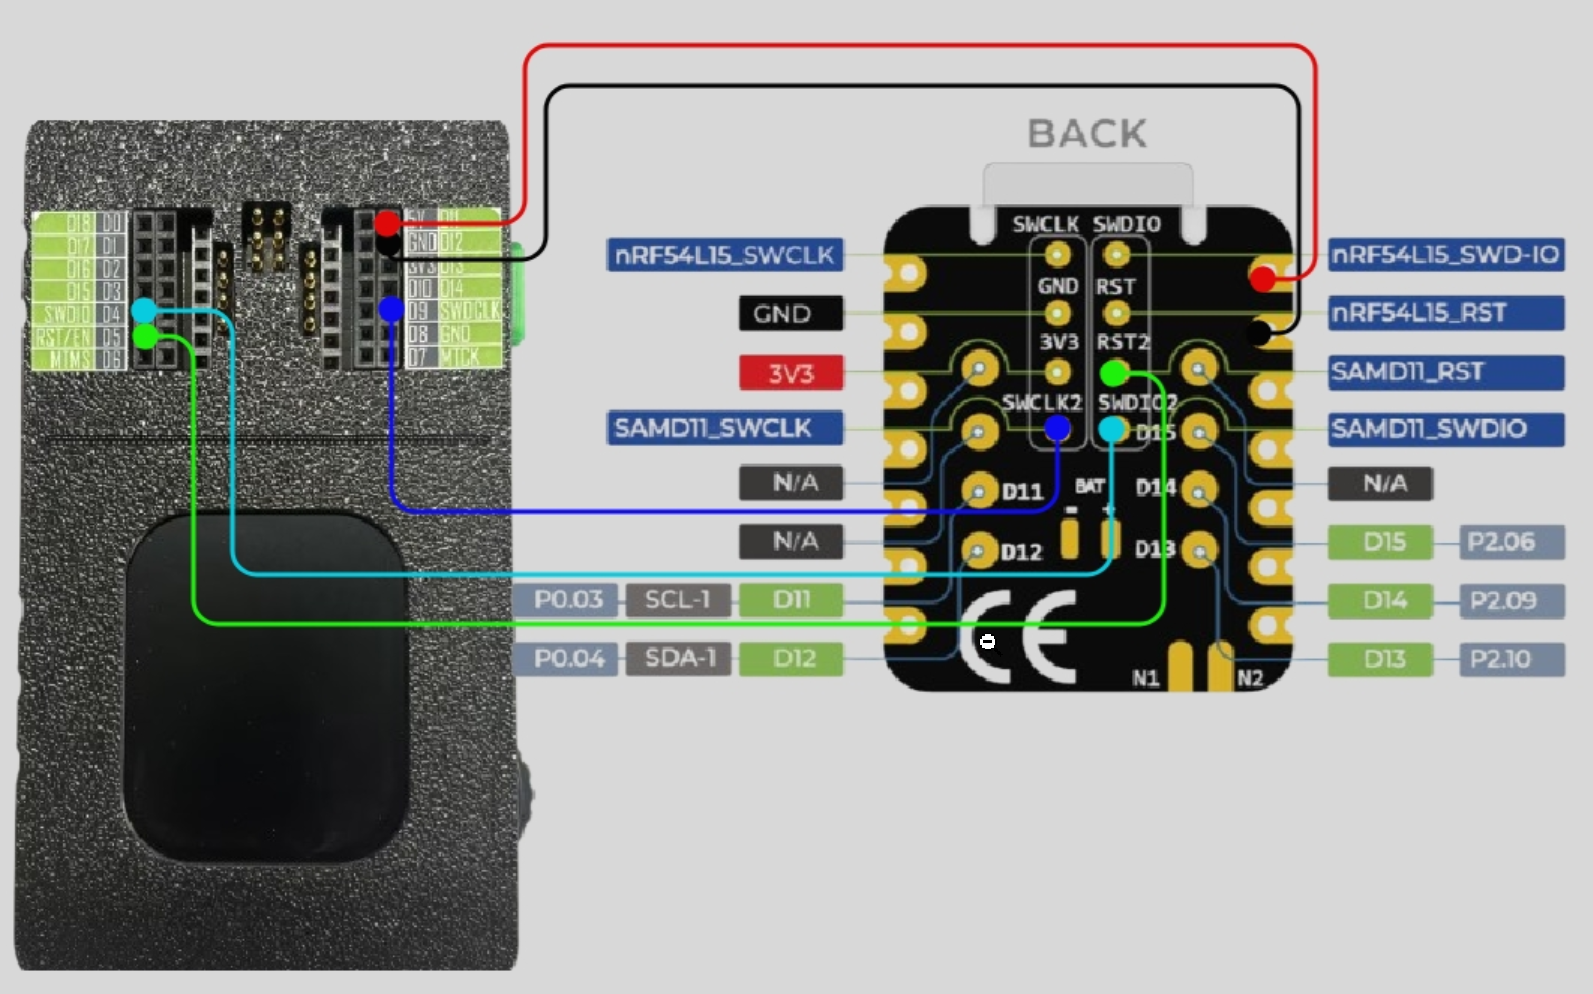
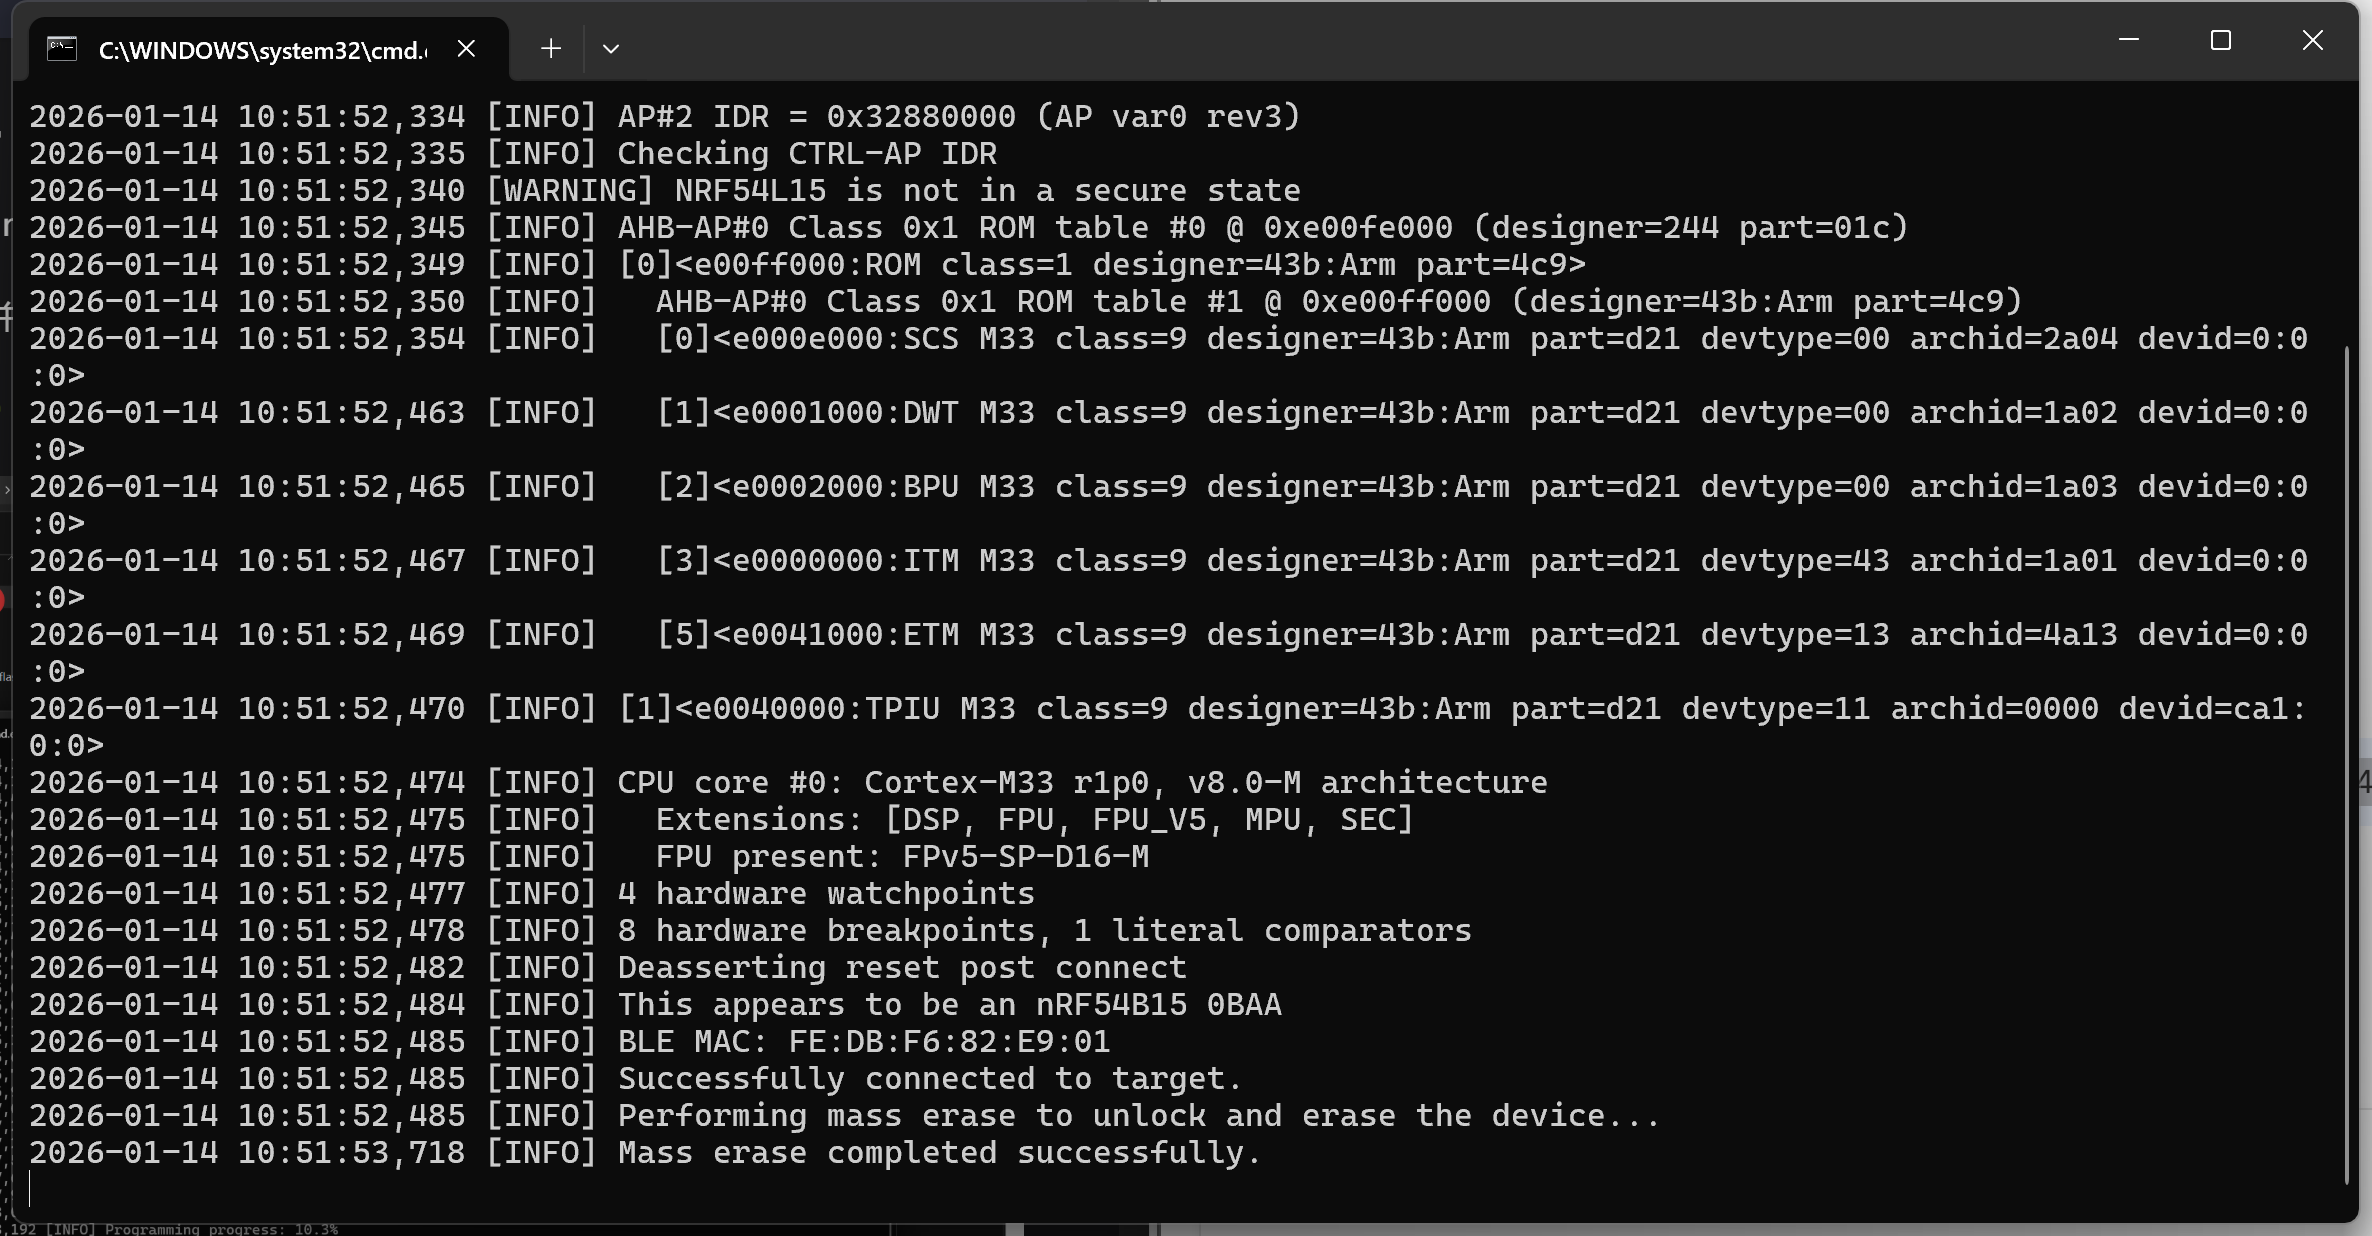
请确保引脚连接正确,以防止烧录过程失败。
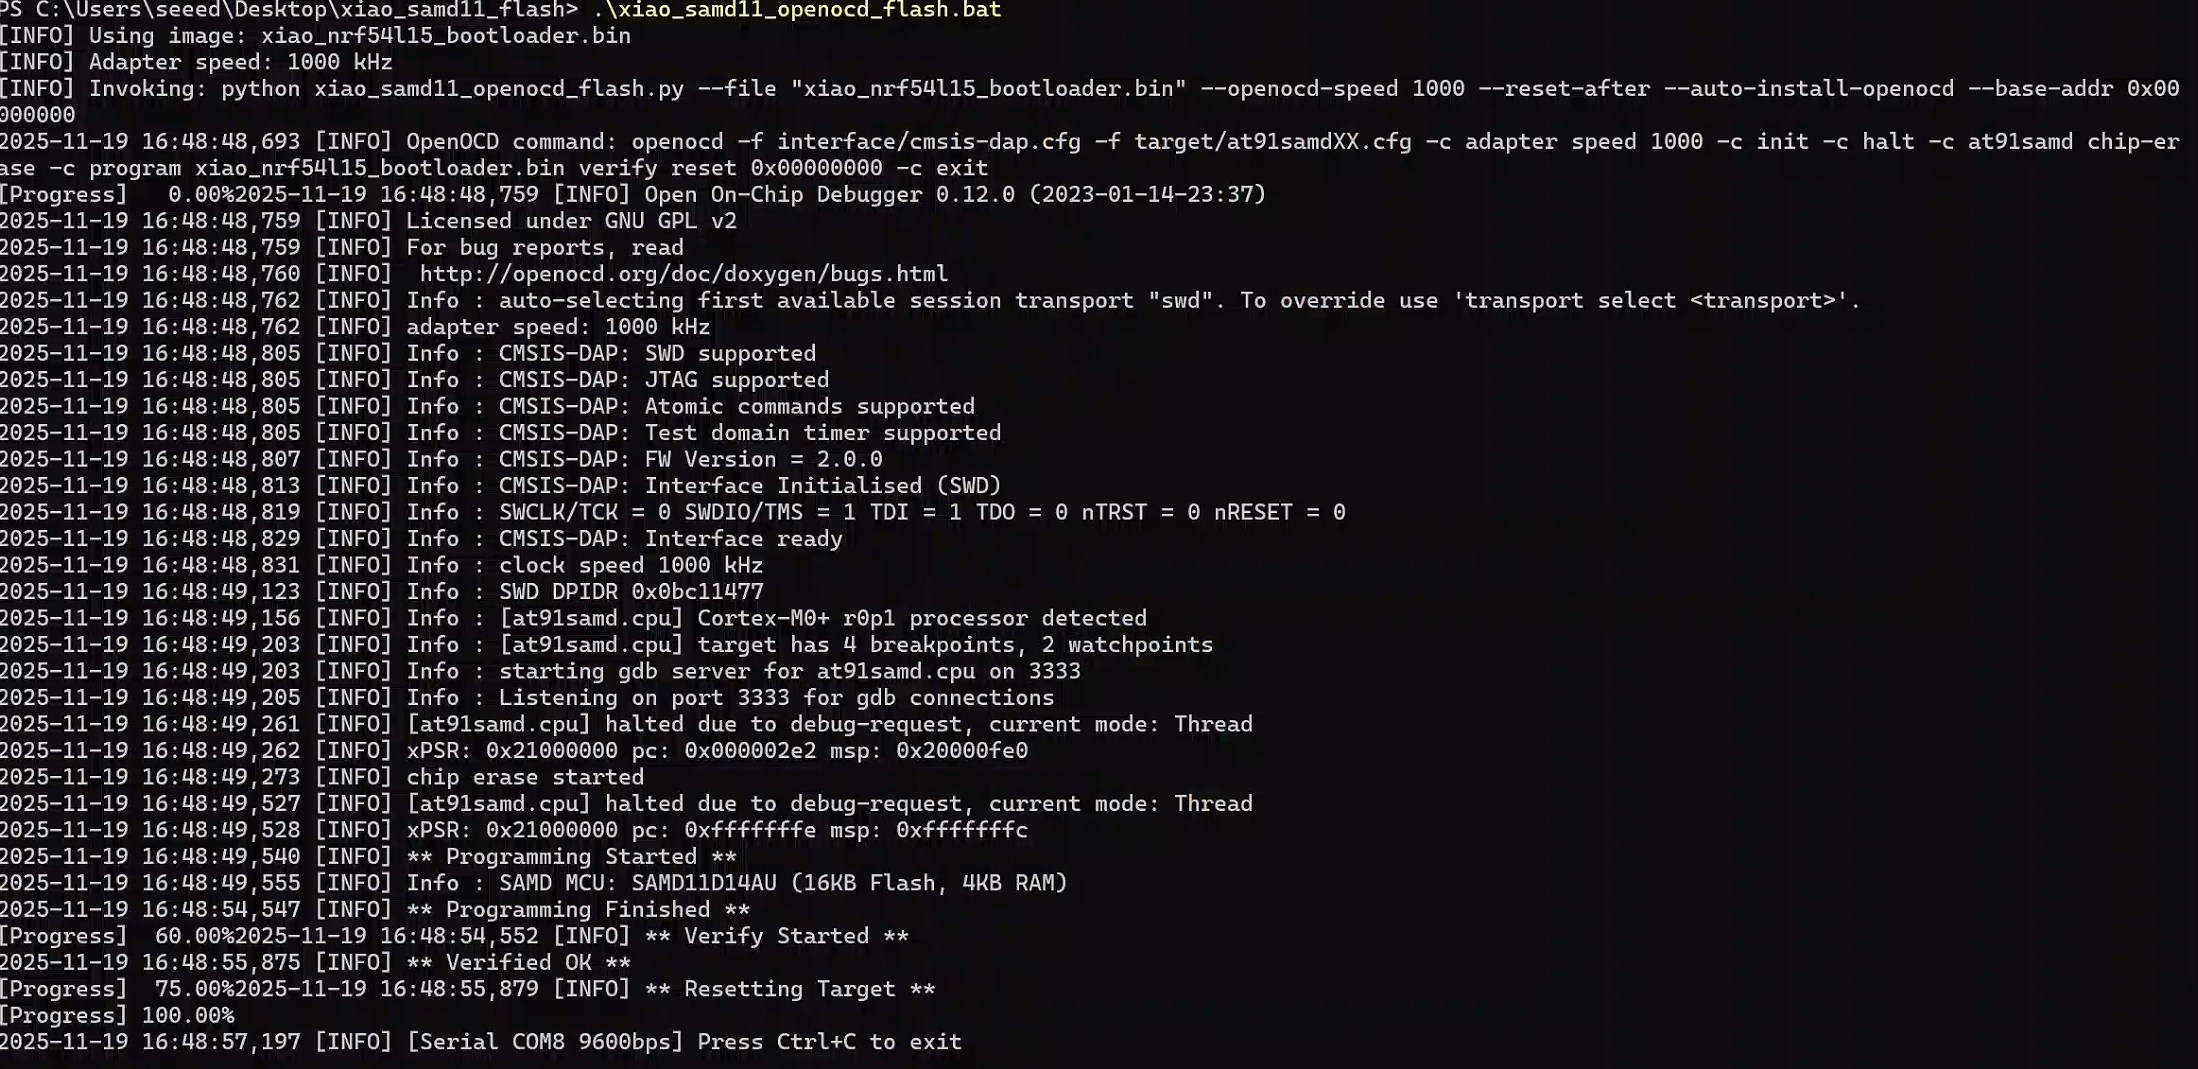
步骤 2. 下载固件烧录程序
步骤 3. 运行脚本
以 Windows 系统为例。解压下载的文件,在文件夹中右键打开终端。执行 .\xiao_samd11_openocd_flash.bat。如果您的接线正确,结果将如下图所示。
在 Mac/Linux 系统上,您需要将 .bat 改为 .sh
技术支持与产品讨论
感谢您选择我们的产品!我们在这里为您提供不同的支持,以确保您使用我们产品的体验尽可能顺畅。我们提供多种沟通渠道,以满足不同的偏好和需求。