XIAO nRF54LM20A 的 Matter
介绍
由 nRF54LM20A SoC 提供动力,XIAO nRF54LM20A 系列支持 Bluetooth LE、Matter、Thread、Zigbee 和 2.4GHz 私有协议,在低延迟场景下可提供高达 4 Mbps 的峰值数据速率。
本教程使用两块 XIAO nRF54LM20A 开发板来验证 Matter 网络:一块作为连接到 Home Assistant 的边界路由器,另一块作为 Matter 设备加入 Thread 网络,并在 Home Assistant 仪表盘上显示模拟的温湿度数据。
感谢作者 @tutoduino 为本 WiKi 提供的思路
本教程基于 VS Code 和 nRF Connect 扩展。如果你对它们还不熟悉,可以参考 XIAO nRF54LM20A nRFConnect SDK Usage
什么是 Matter
Matter(原名 CHIP)是由 Connectivity Standards Alliance(CSA)开发的通用应用层标准。
- 在 IP 网络(Wi-Fi/Ethernet/Thread)上的跨厂商互操作性
- 标准化的设备类型(例如灯具、门锁、恒温器)
- 使用二维码/NFC 的安全配网
- 采用分布式合规账本(DCL)的端到端加密
什么是 OpenThread
OpenThread 是 Thread 网络协议的开源实现。它使用 IEEE 802.15.4 射频技术为物联网设备创建低功耗、安全的 Mesh 网络。其主要特性包括:
- 内置 IPv6 支持(6LoWPAN)
- 自组织网络拓扑
- 所有通信均采用 AES-128 加密
- 兼容小到灯泡或传感器等设备
Matter 与 Thread 之间是什么关系
感谢作者@tutoduino 对这一点做出的非常详细的解释,以下内容引用自其文章!
在对 Matter 和 Thread 进行简要介绍之后,你现在已经了解 Thread 和 Matter 的用途不同,并且工作在技术栈的不同层。总结如下:
Thread:
- Thread 是一种为互联家庭设备设计的低功耗无线 Mesh 网络协议。它为设备之间以及与互联网之间的通信提供了一种可靠且安全的方式。
- Thread 创建了一个本地网络,即使互联网断开,设备之间也仍然可以相互通信。
Matter:
- Matter 是一个位于 Thread、Wi-Fi 和 Ethernet 等网络协议之上的应用层协议。它旨在简化并统一智能家居生态系统,确保来自不同厂商的设备能够无缝协同工作。
- Matter 定义了设备在应用层如何通信和交互,重点关注互操作性、安全性和易用性。
Thread 与 Matter 之间的连接:
- Matter 可以使用 Thread 作为其底层网络协议之一。这意味着使用 Matter 协议的设备可以在 Thread 网络上进行通信。
- Matter 与 Thread 的结合,使得智能家居生态系统更加健壮、安全且具有互操作性,设备可以在本地高效地进行通信。

Home Assistant 简介
Home Assistant 是一个功能强大的开源家庭自动化平台,可让你通过一个统一的界面控制和监控智能家居设备。它充当智能家居的中央枢纽,使你能够自动化日常流程、监控传感器,并打造更智能的居住空间。

硬件准备
硬件准备需要两块 XIAO nRF54LM20A Sense。

蓝牙天线
该开发板使用外置蓝牙天线。为确保更好的蓝牙信号质量并提升蓝牙使用体验,建议安装蓝牙天线。 连接方式如下所示:
通过 Matter 连接到 HomeAssistant
安装附加组件
导航到 Settings -> Apps,并选择 Install app 来添加附加组件。
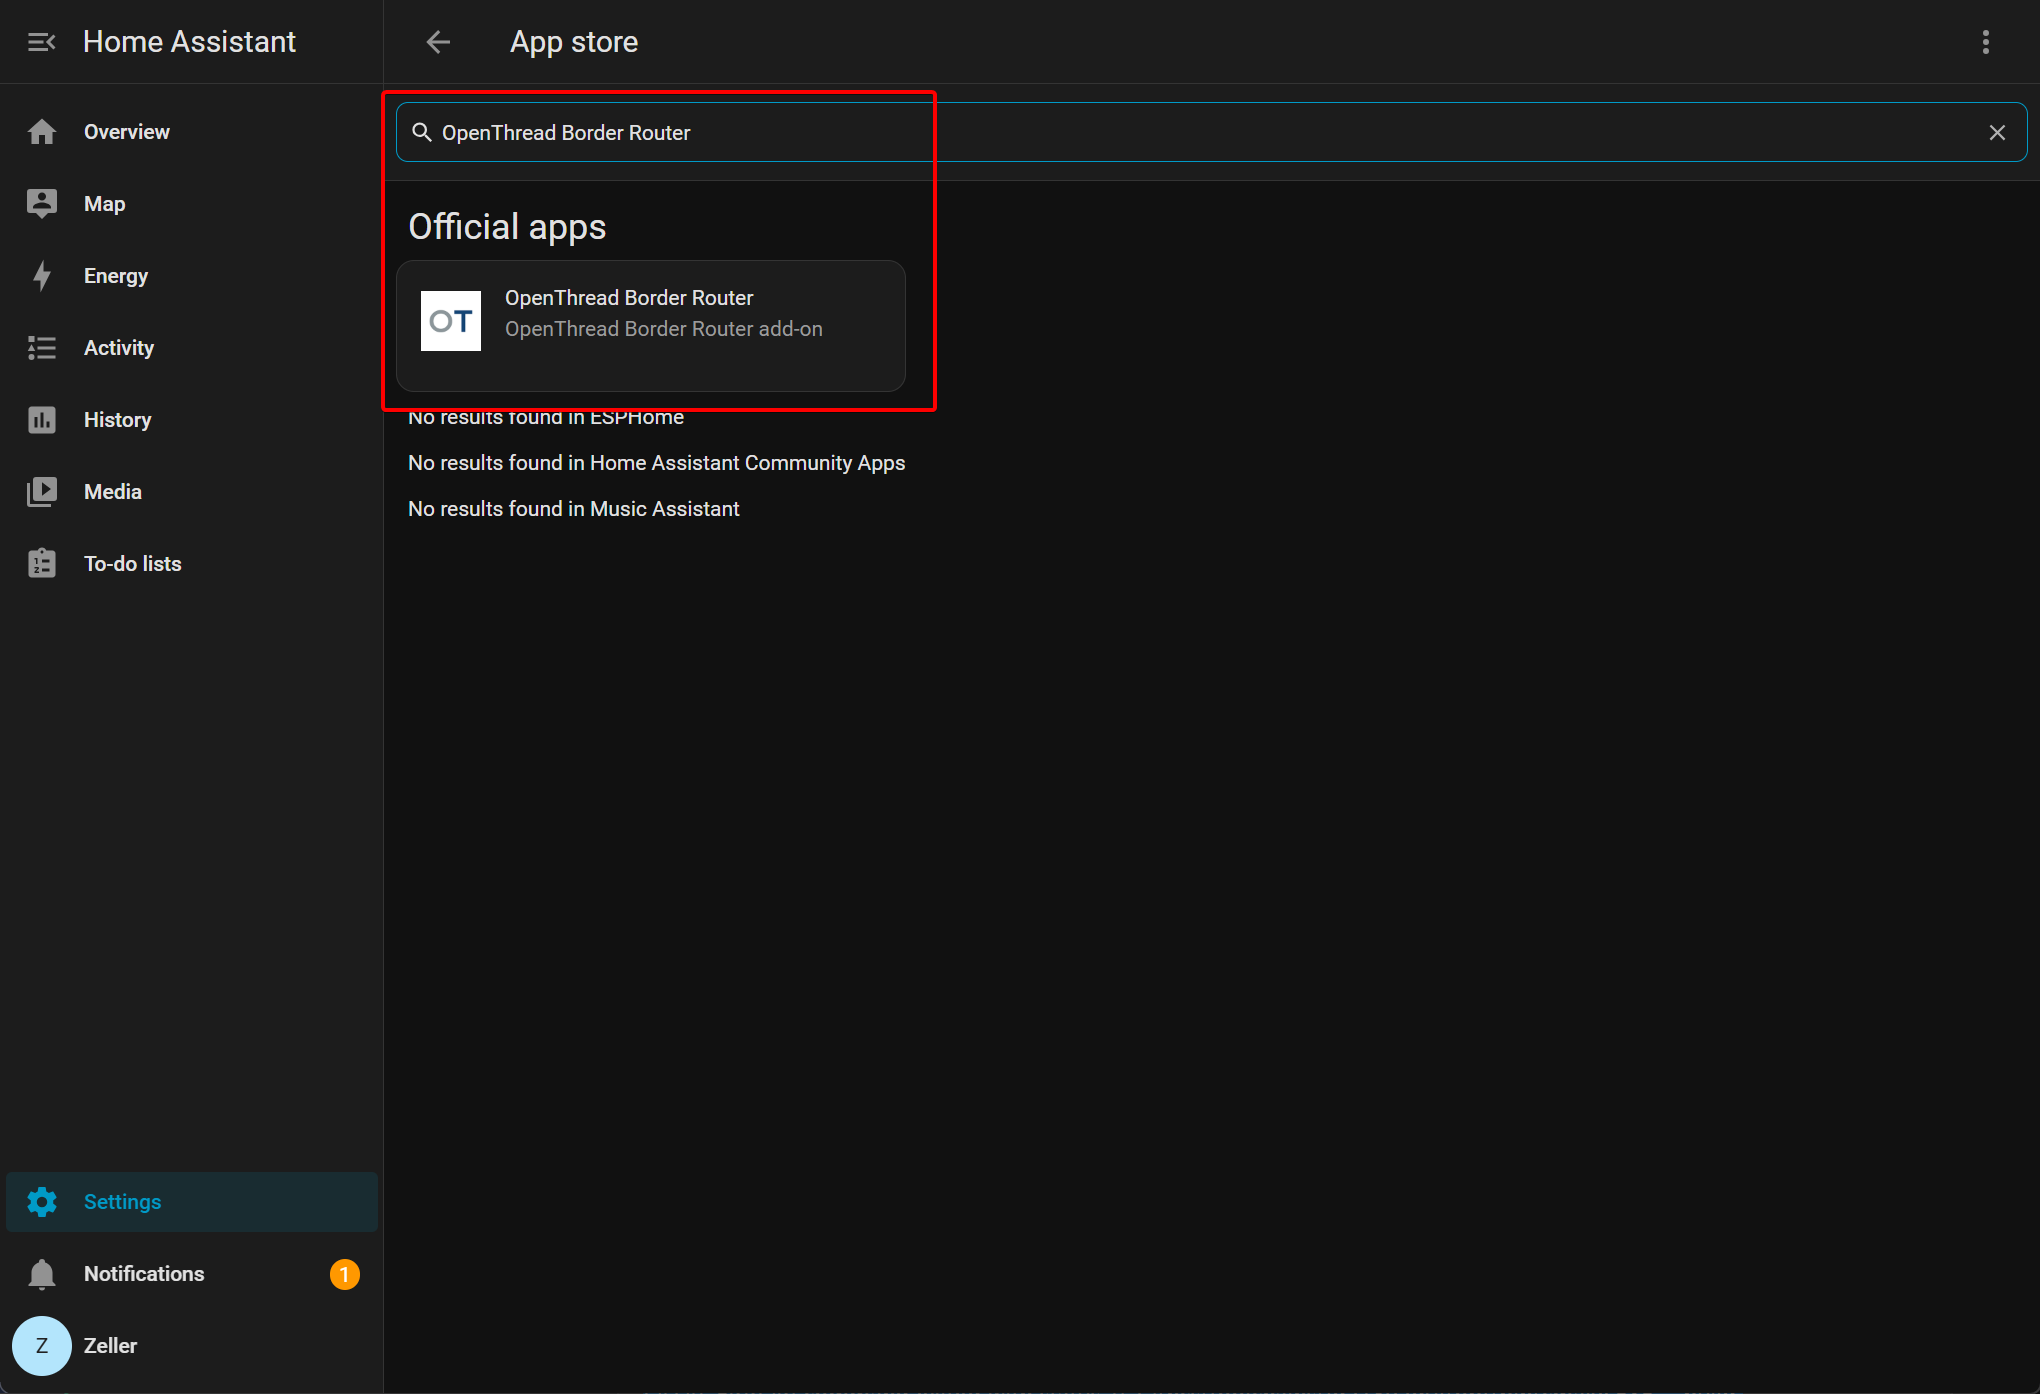
- 添加 Open Thread Border Router 并修改其配置。
- 进入 Settings -> Apps,选择 Install app 添加附加组件,然后搜索 Open Thread Border Router 并完成安装。
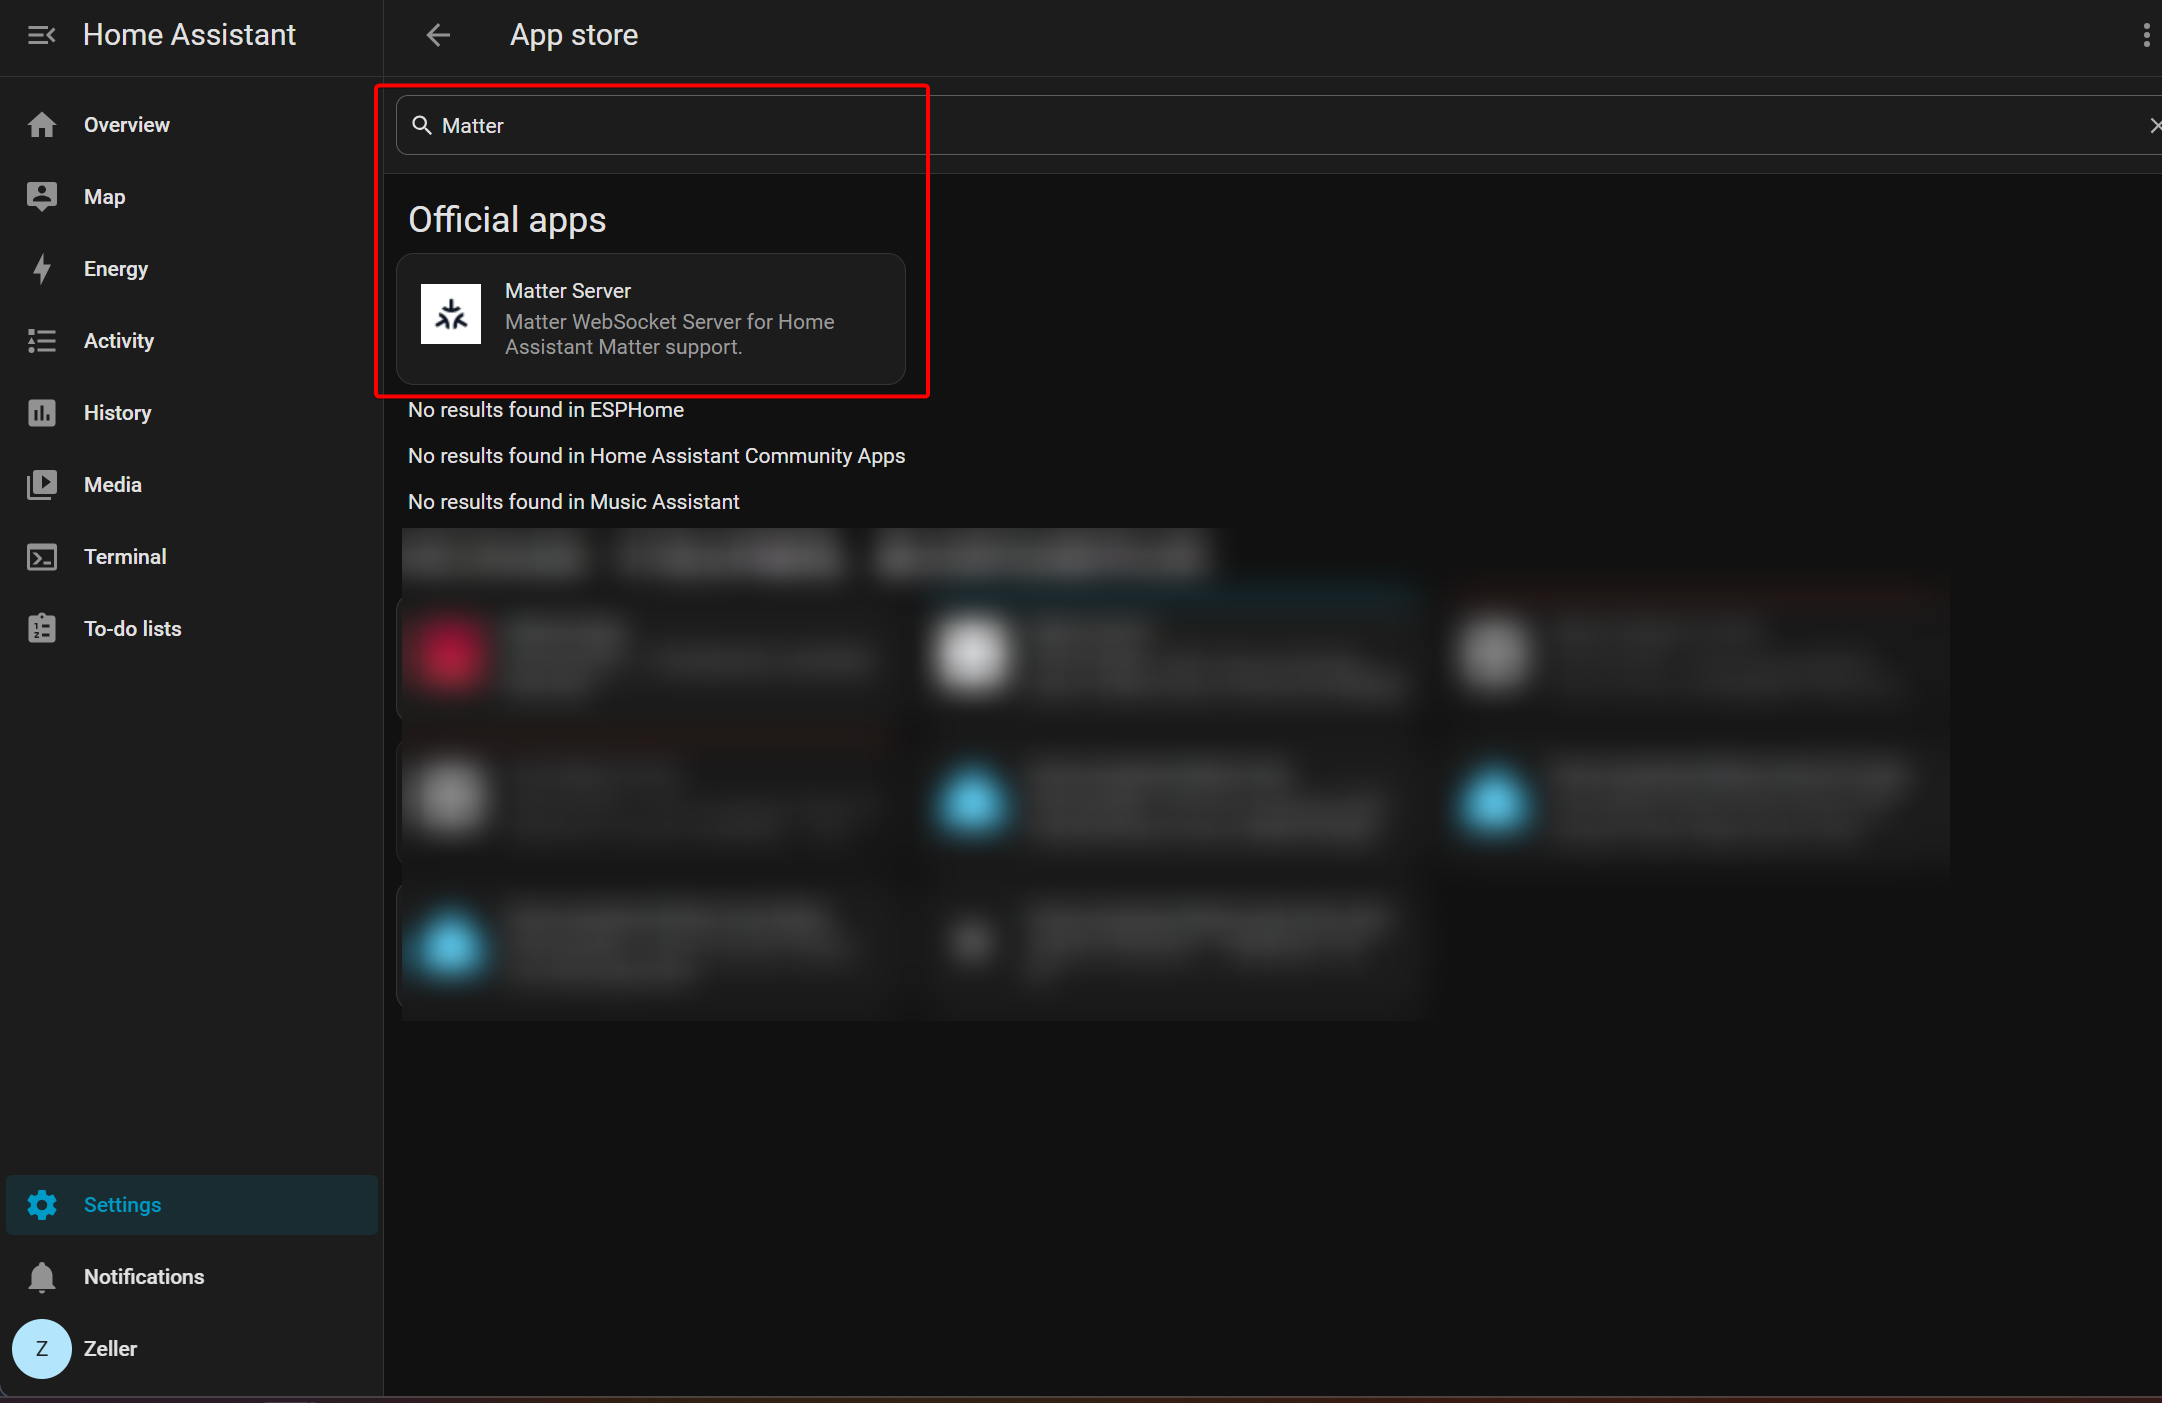
- 添加 Matter Server
配置 Thread 路由
按照以下步骤将一块 XIAO nRF54LM20A 刷写为协处理器,以模拟边界路由器设备。
也可以使用 Thread 路由设备,例如 Connect ZBT-1、Connect ZBT-2 或 Home Assistant Yellow。
使用 RCP 协处理器固件刷写 XIAO nRF54LM20A
本教程基于 VS Code 和 nRF Connect 扩展。如果你对它们还不熟悉,可以参考 XIAO nRF54LM20A nRFConnect SDK Usage
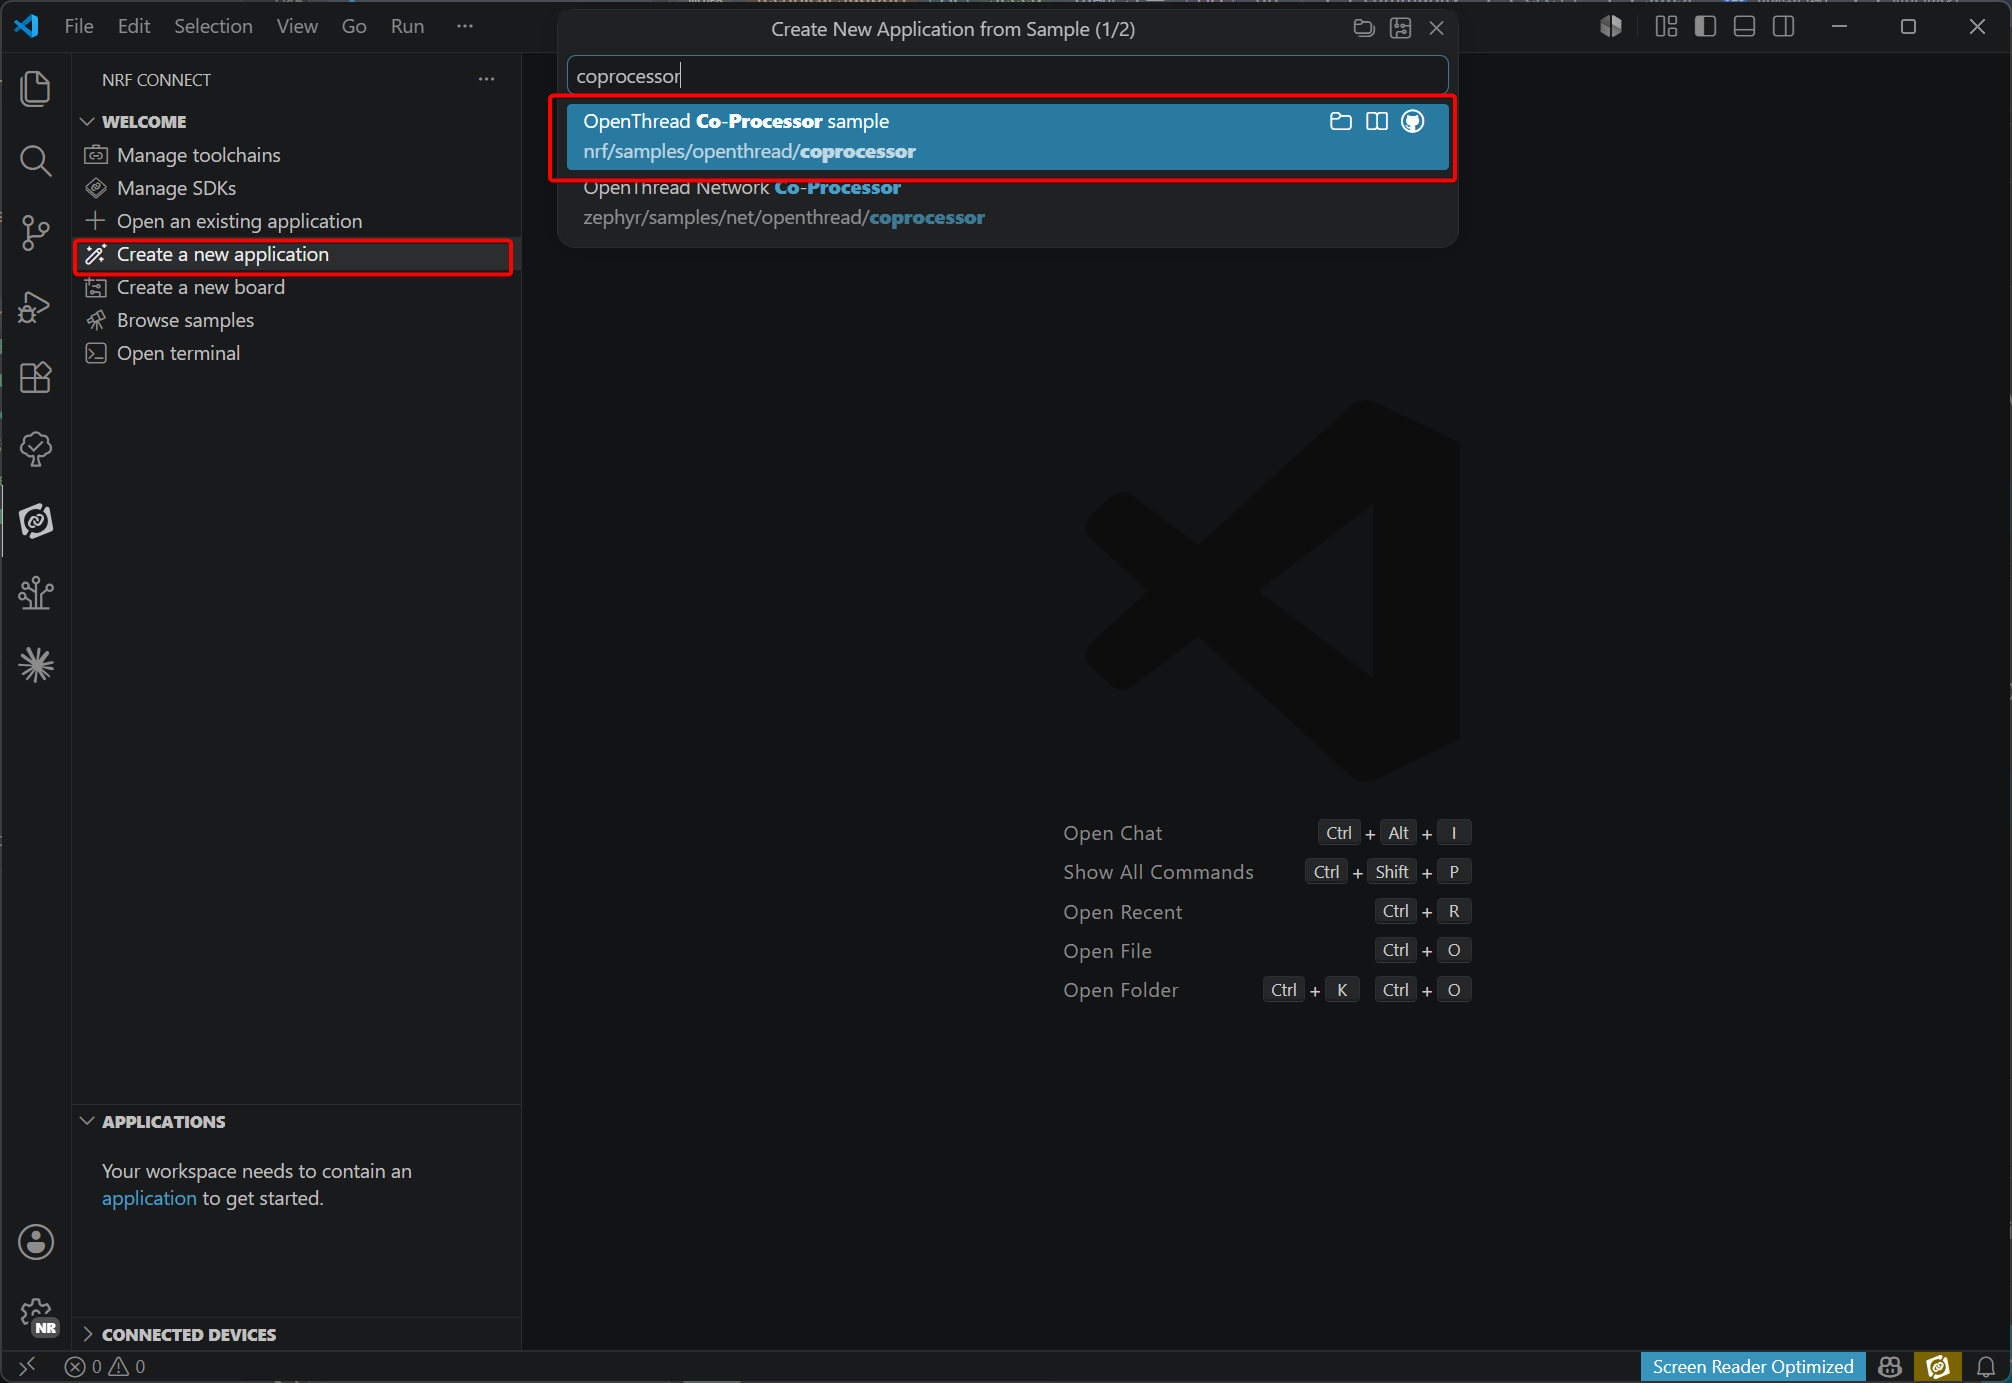
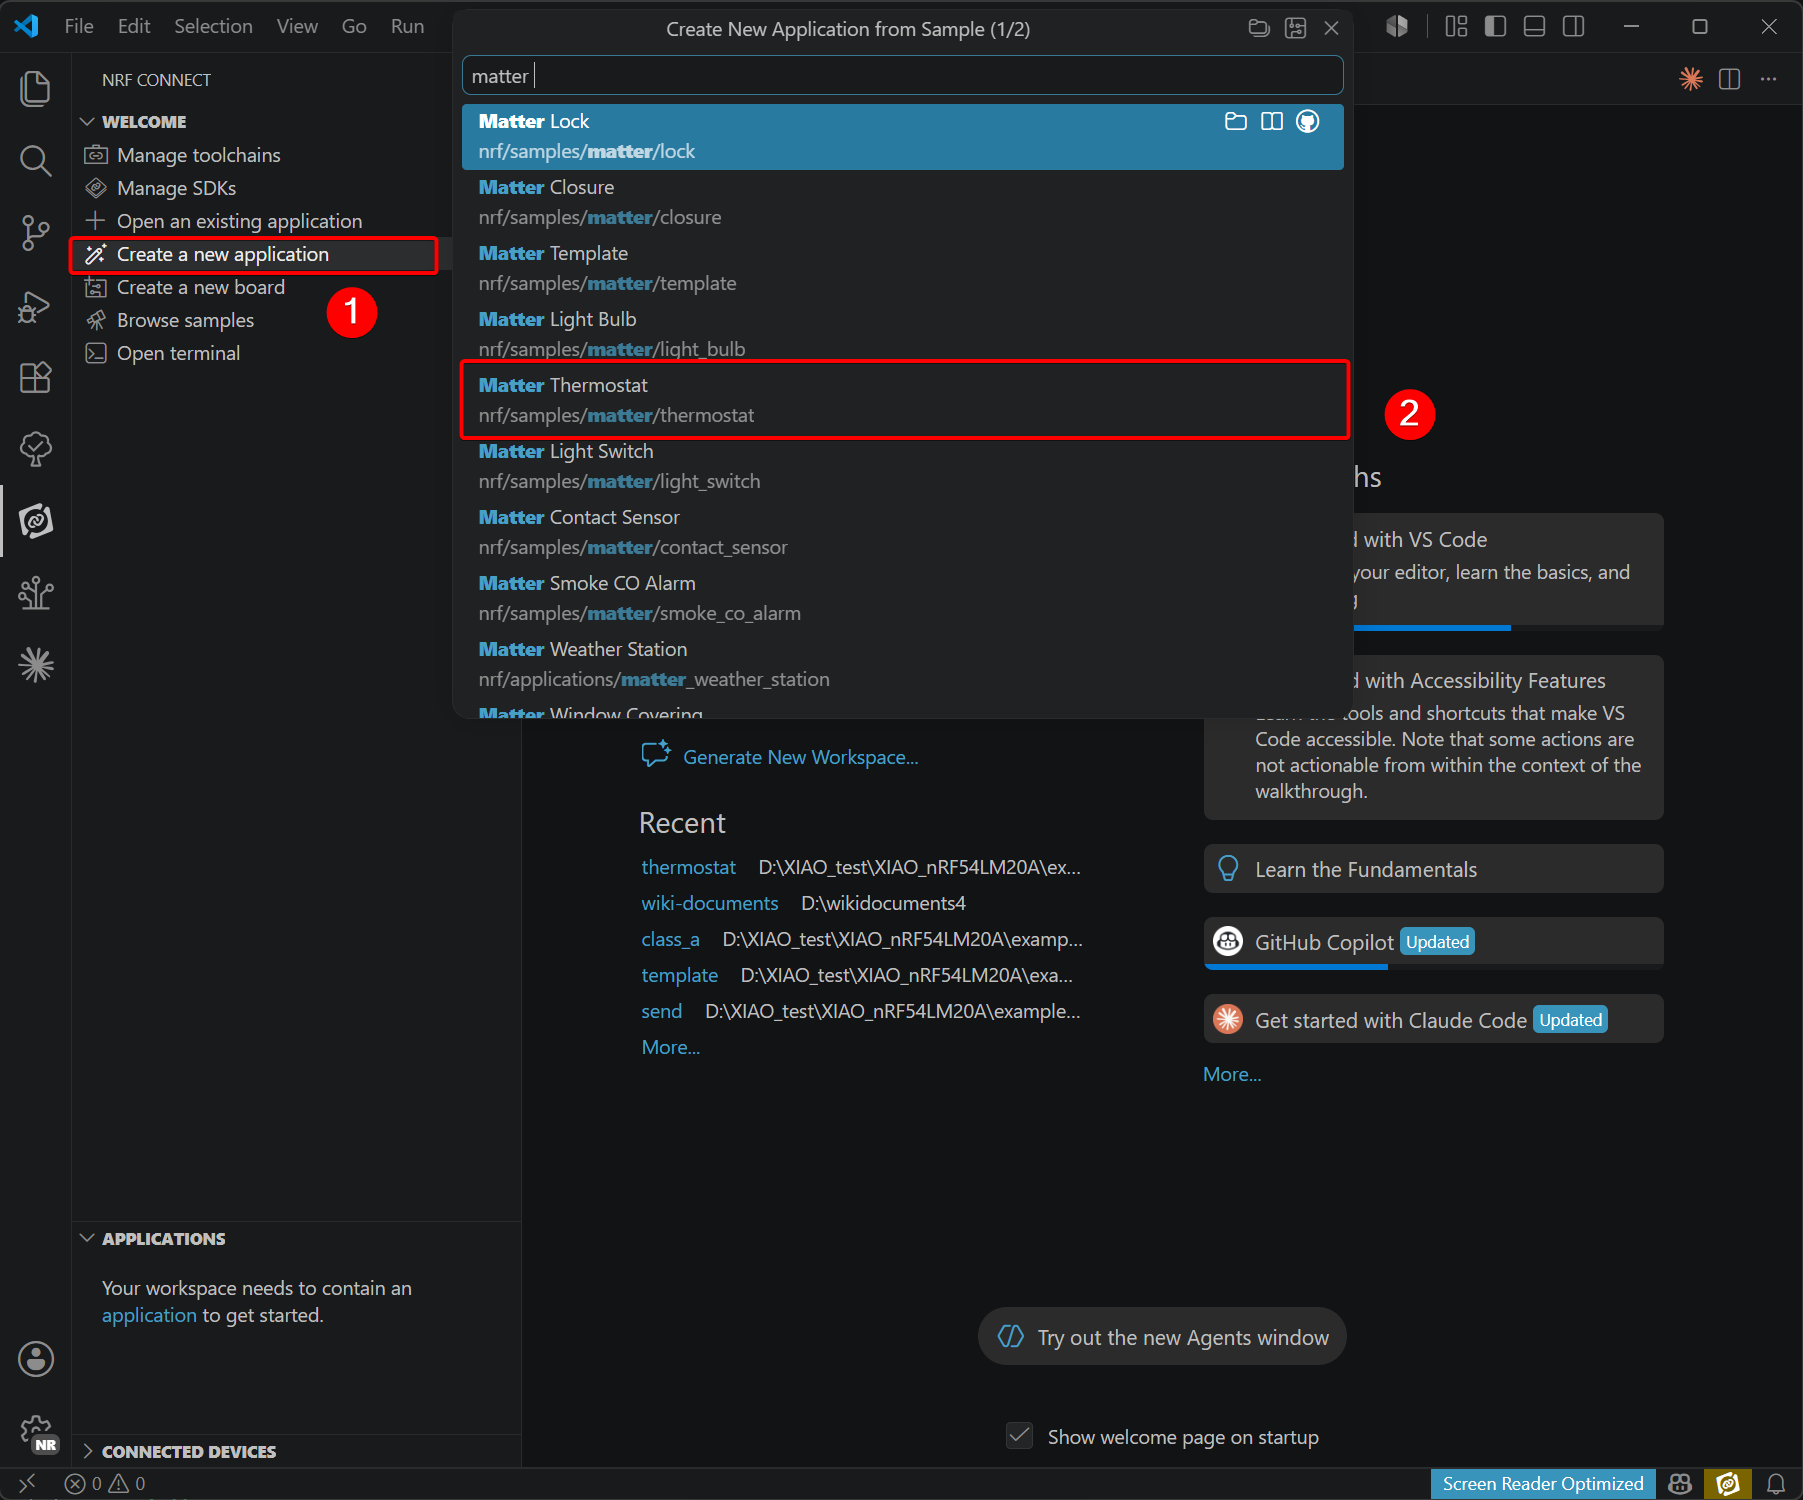
- 选择 Create a new application,选择 copy a sample,搜索 Coprocessor 并创建项目。
- 在 boards 文件夹下添加并修改设备树配置文件。禁用 PMIC 使用的 I2C 配置以避免冲突,并将 UART20 的波特率设置为 1000000。
文件路径:~/boards:
- xiao_nrf54lm20a_nrf54lm20a_cpuapp.overlay。
&uart20 {
        current-speed = <1000000>;
        status = "okay";
        hw-flow-control;
};

/ {
        chosen {
                zephyr,ot-uart = &uart20;
        };
};

&pmic_i2c {
        status = "disabled";
};

&pmic {
        status = "disabled";

        charger {
                status = "disabled";
        };

        regulators {
                status = "disabled";

                LDO1 {
                        status = "disabled";
                };
        };
};
- xiao_nrf54lm20a_nrf54lm20a_cpuapp.conf。
#
# Copyright (c) 2025 Nordic Semiconductor ASA
#
# SPDX-License-Identifier: LicenseRef-Nordic-5-Clause
#

CONFIG_SPI_NOR=n

# Increase Main and shell stack sizes to avoid stack overflow
# while using CRACEN
CONFIG_MAIN_STACK_SIZE=2048
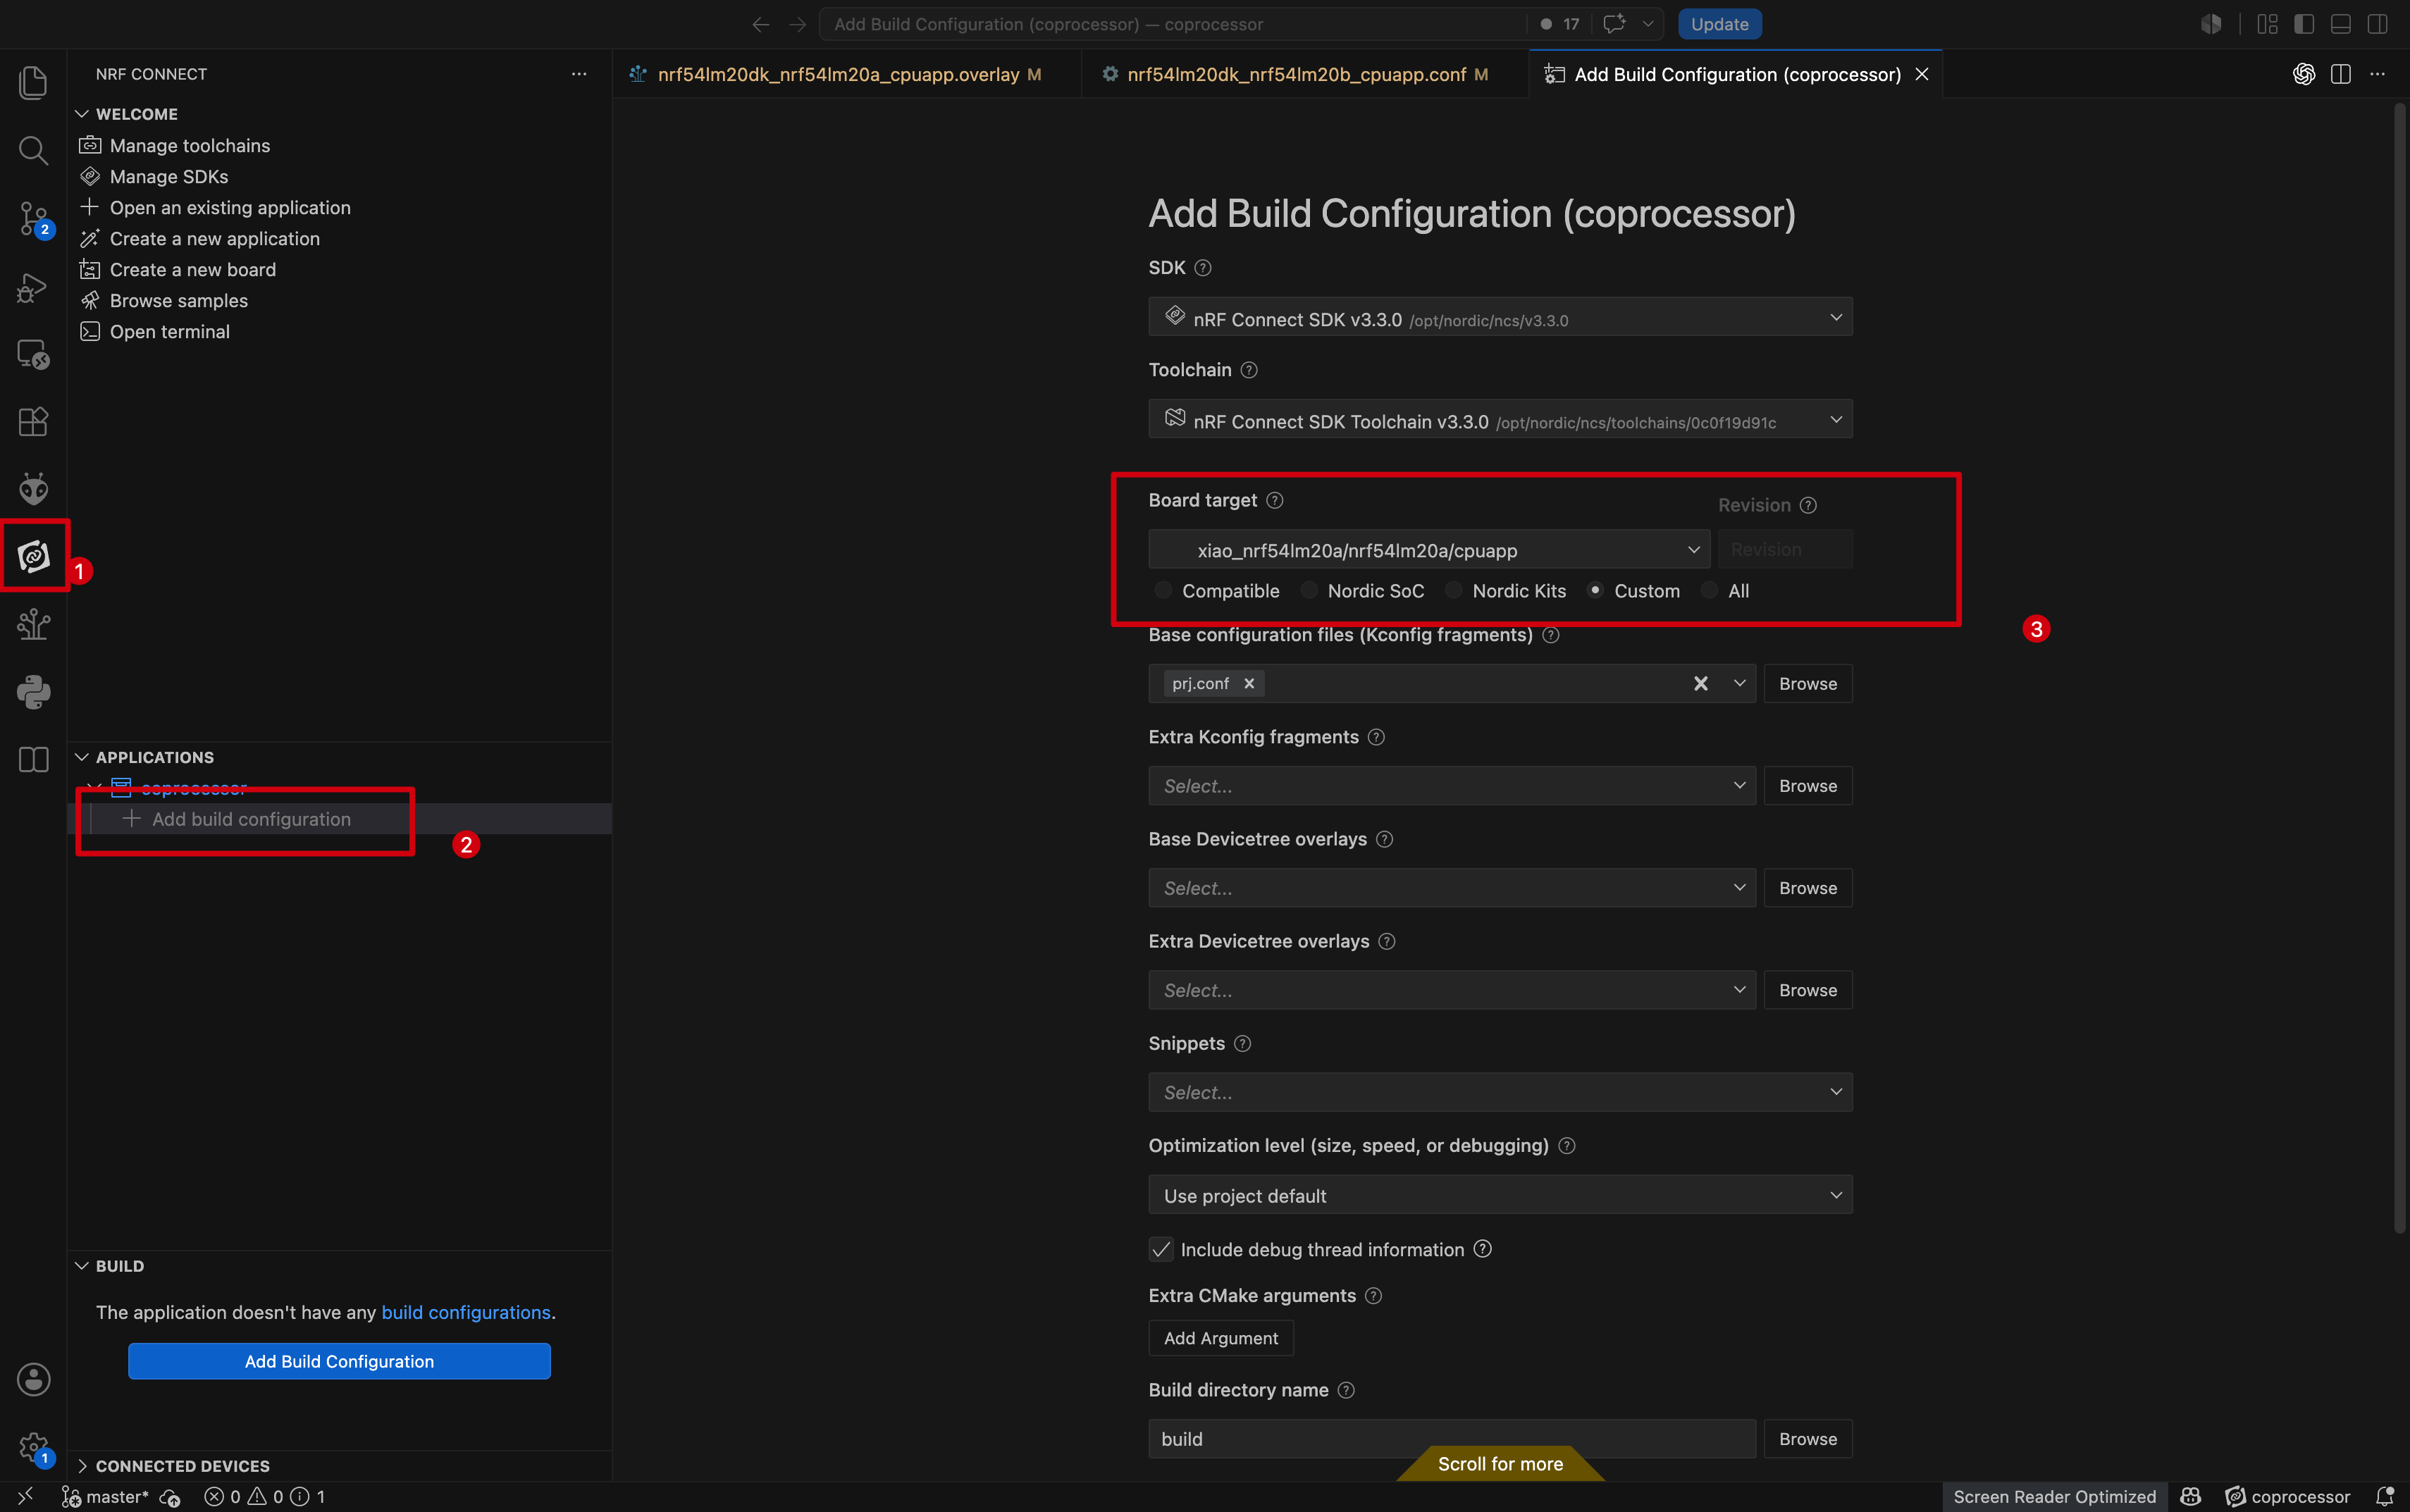
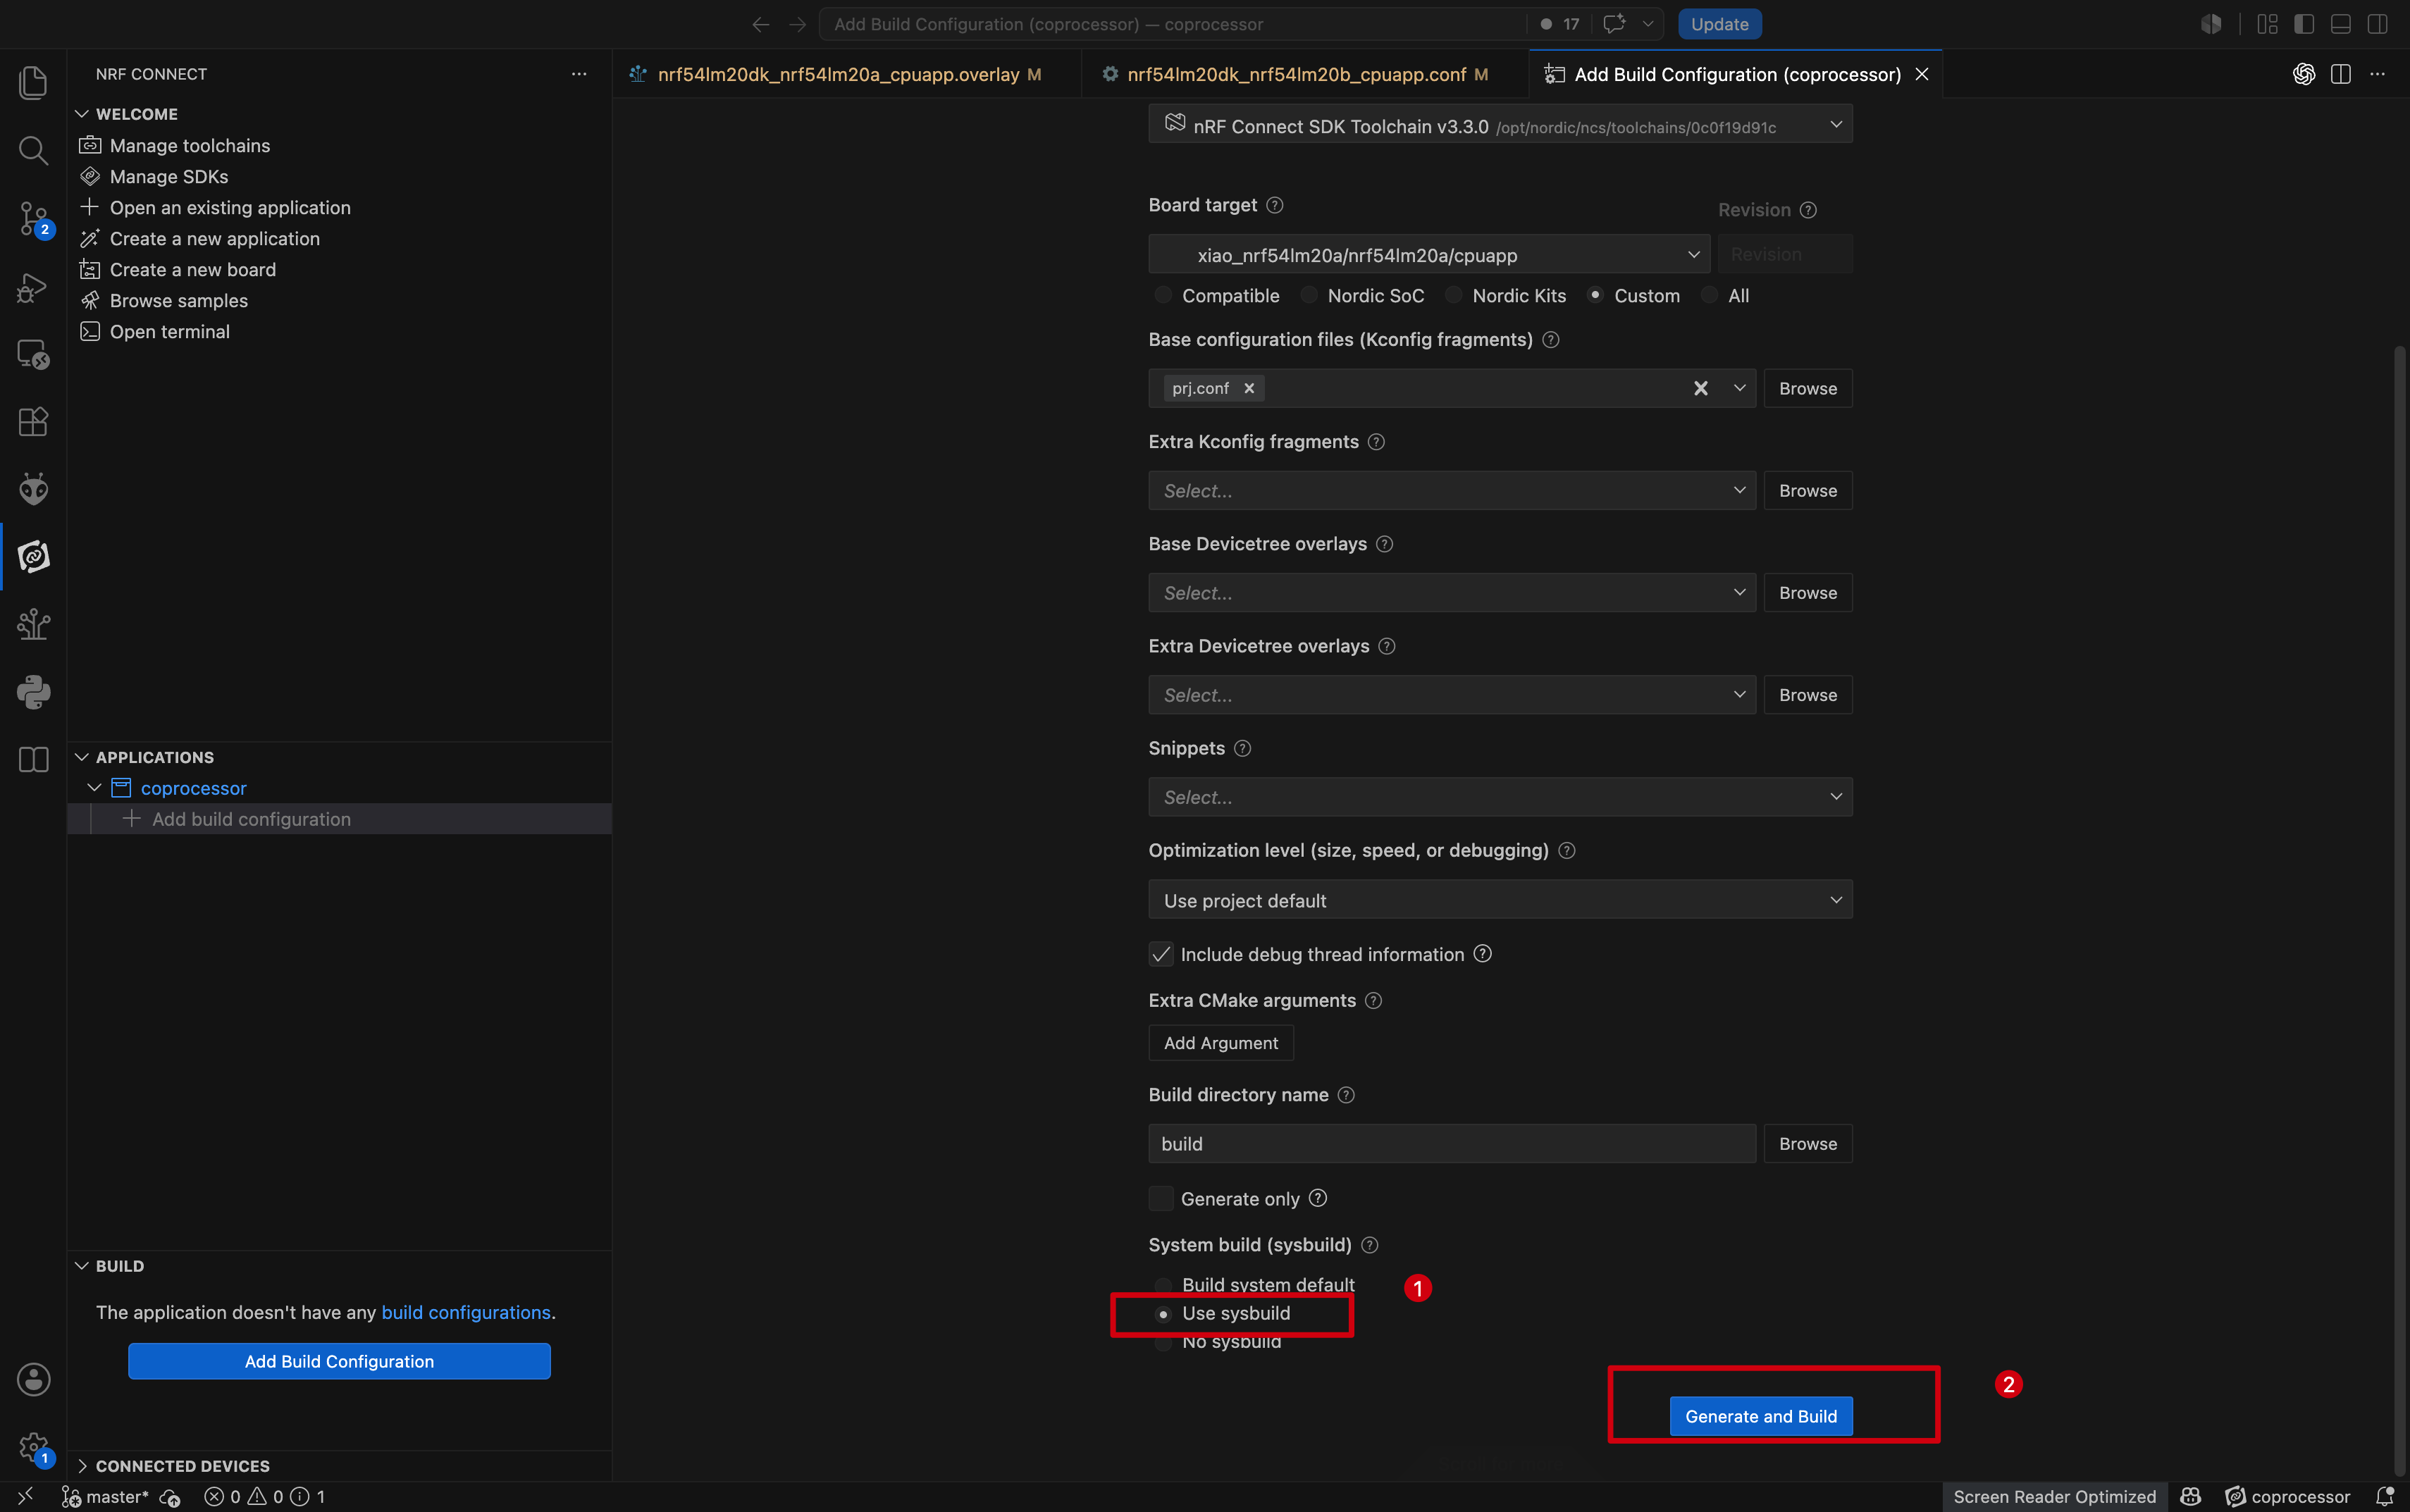
- 构建并启用配置。
- 配置并构建项目。
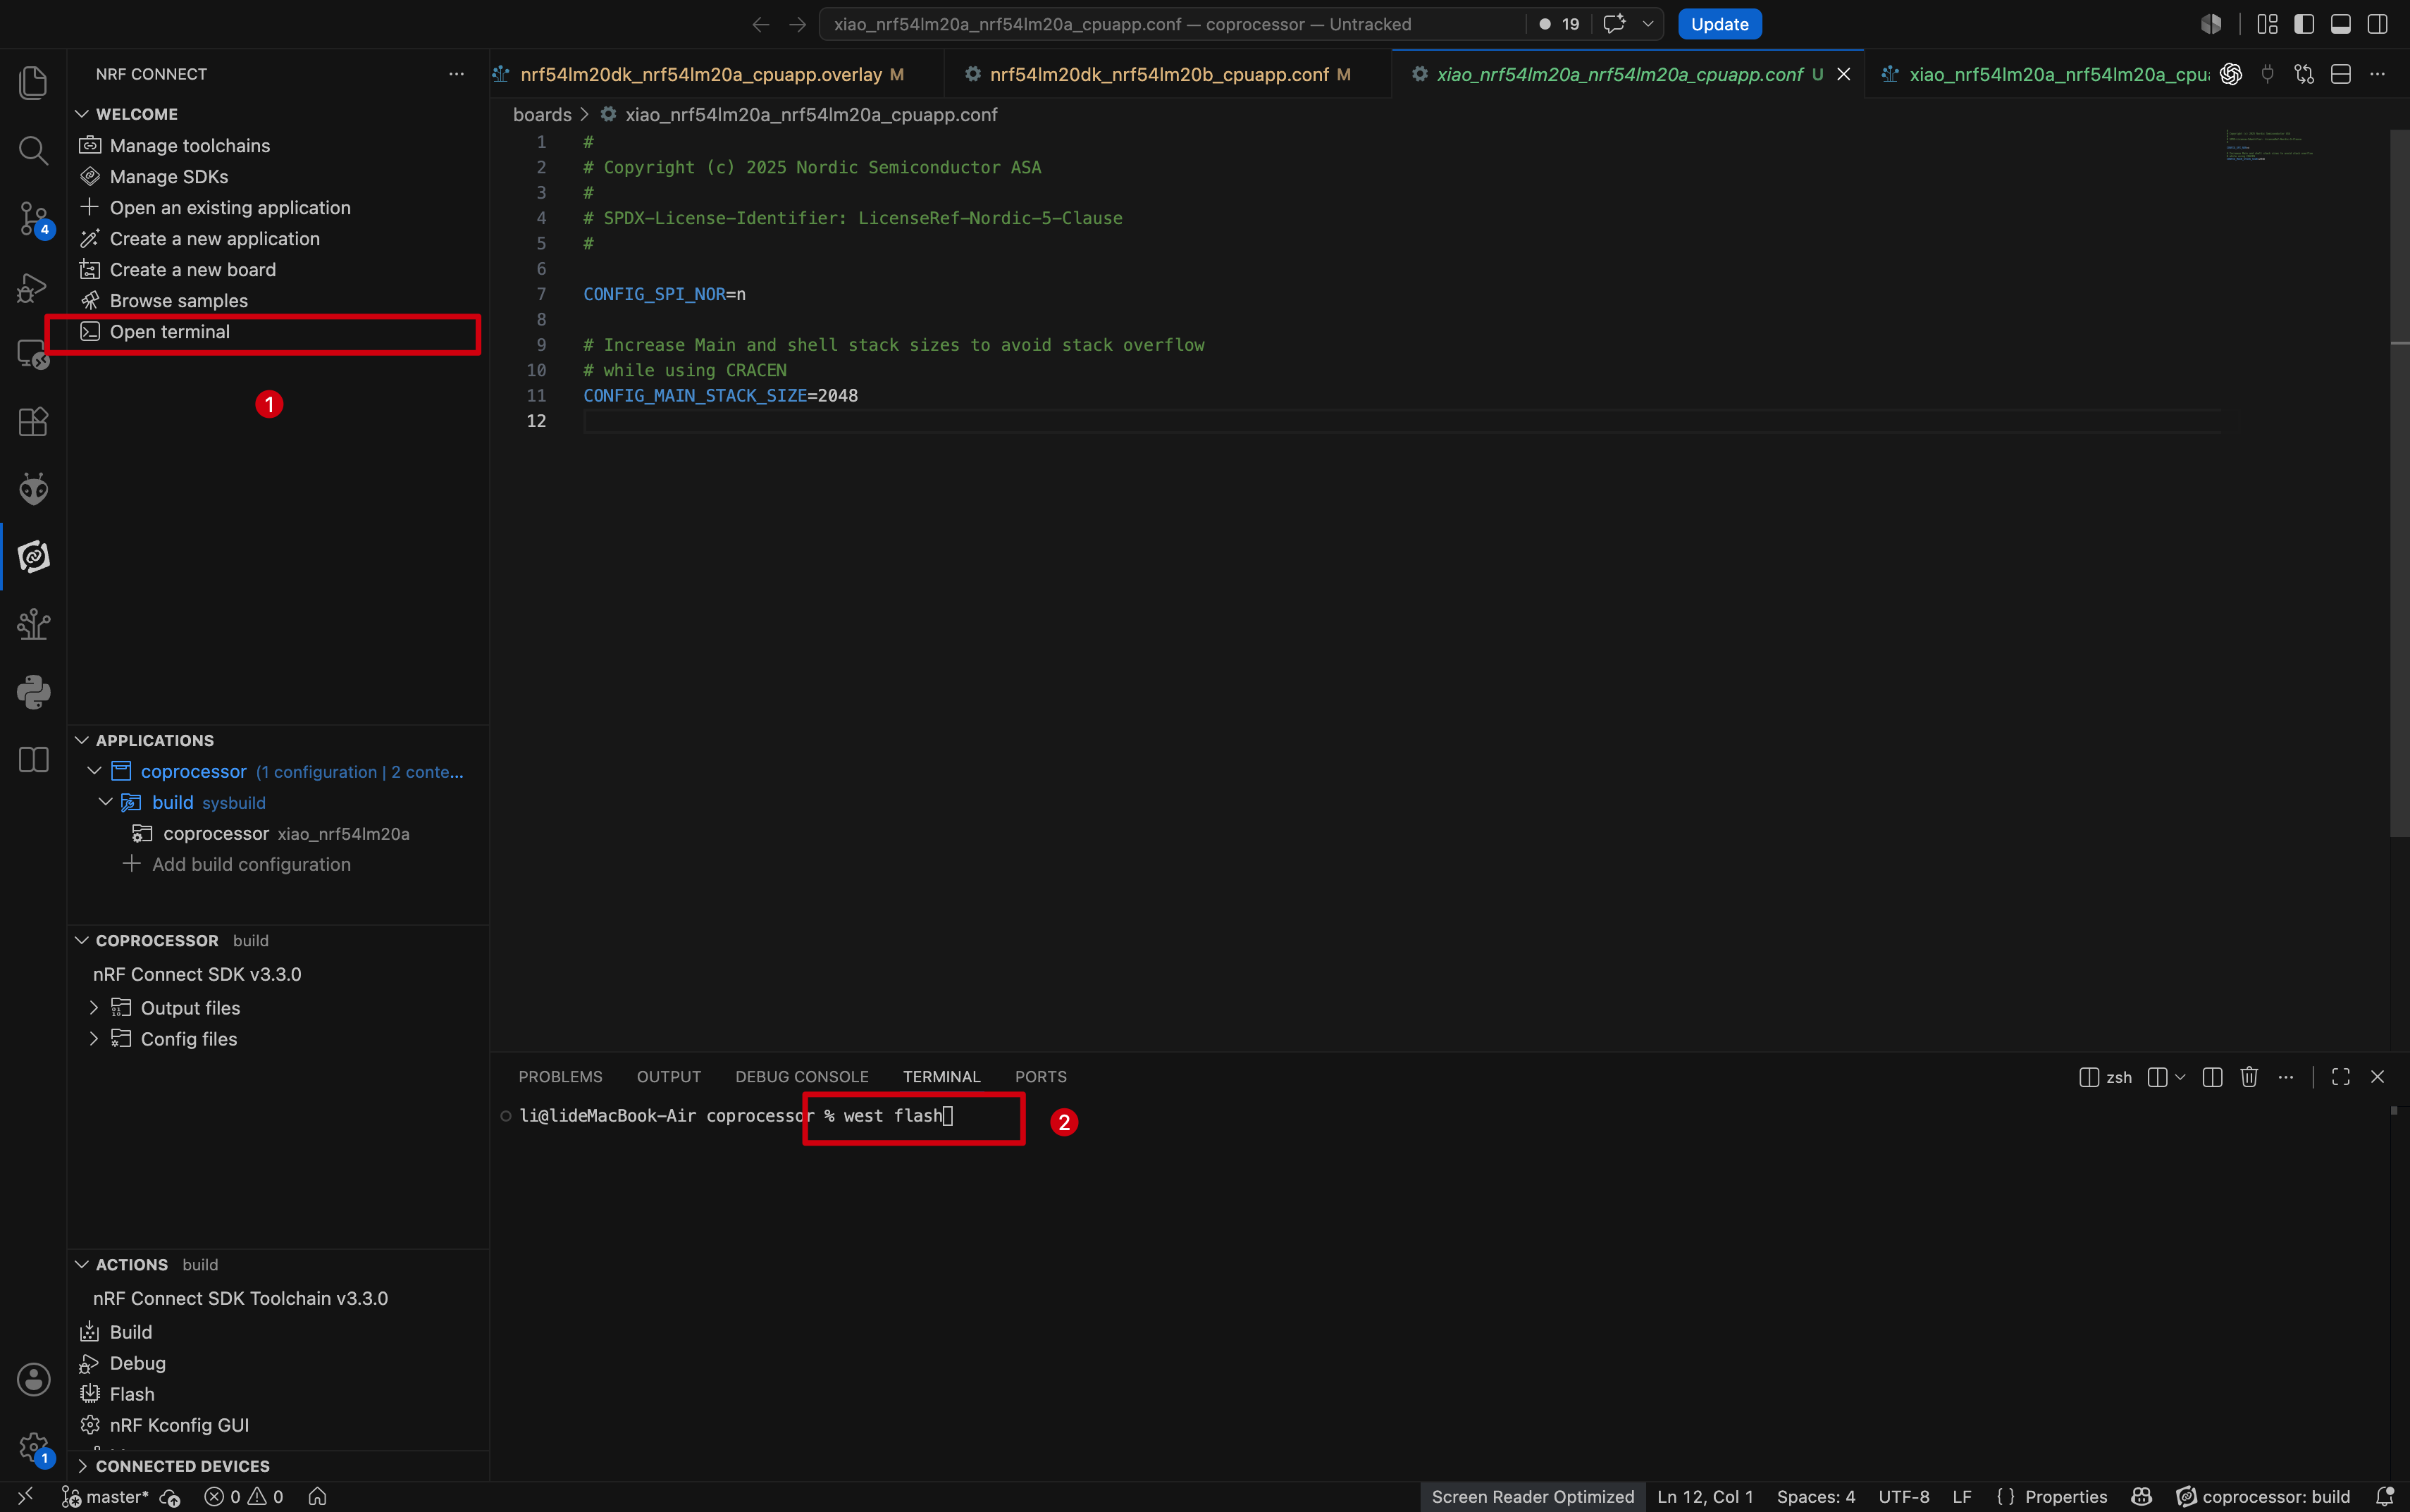
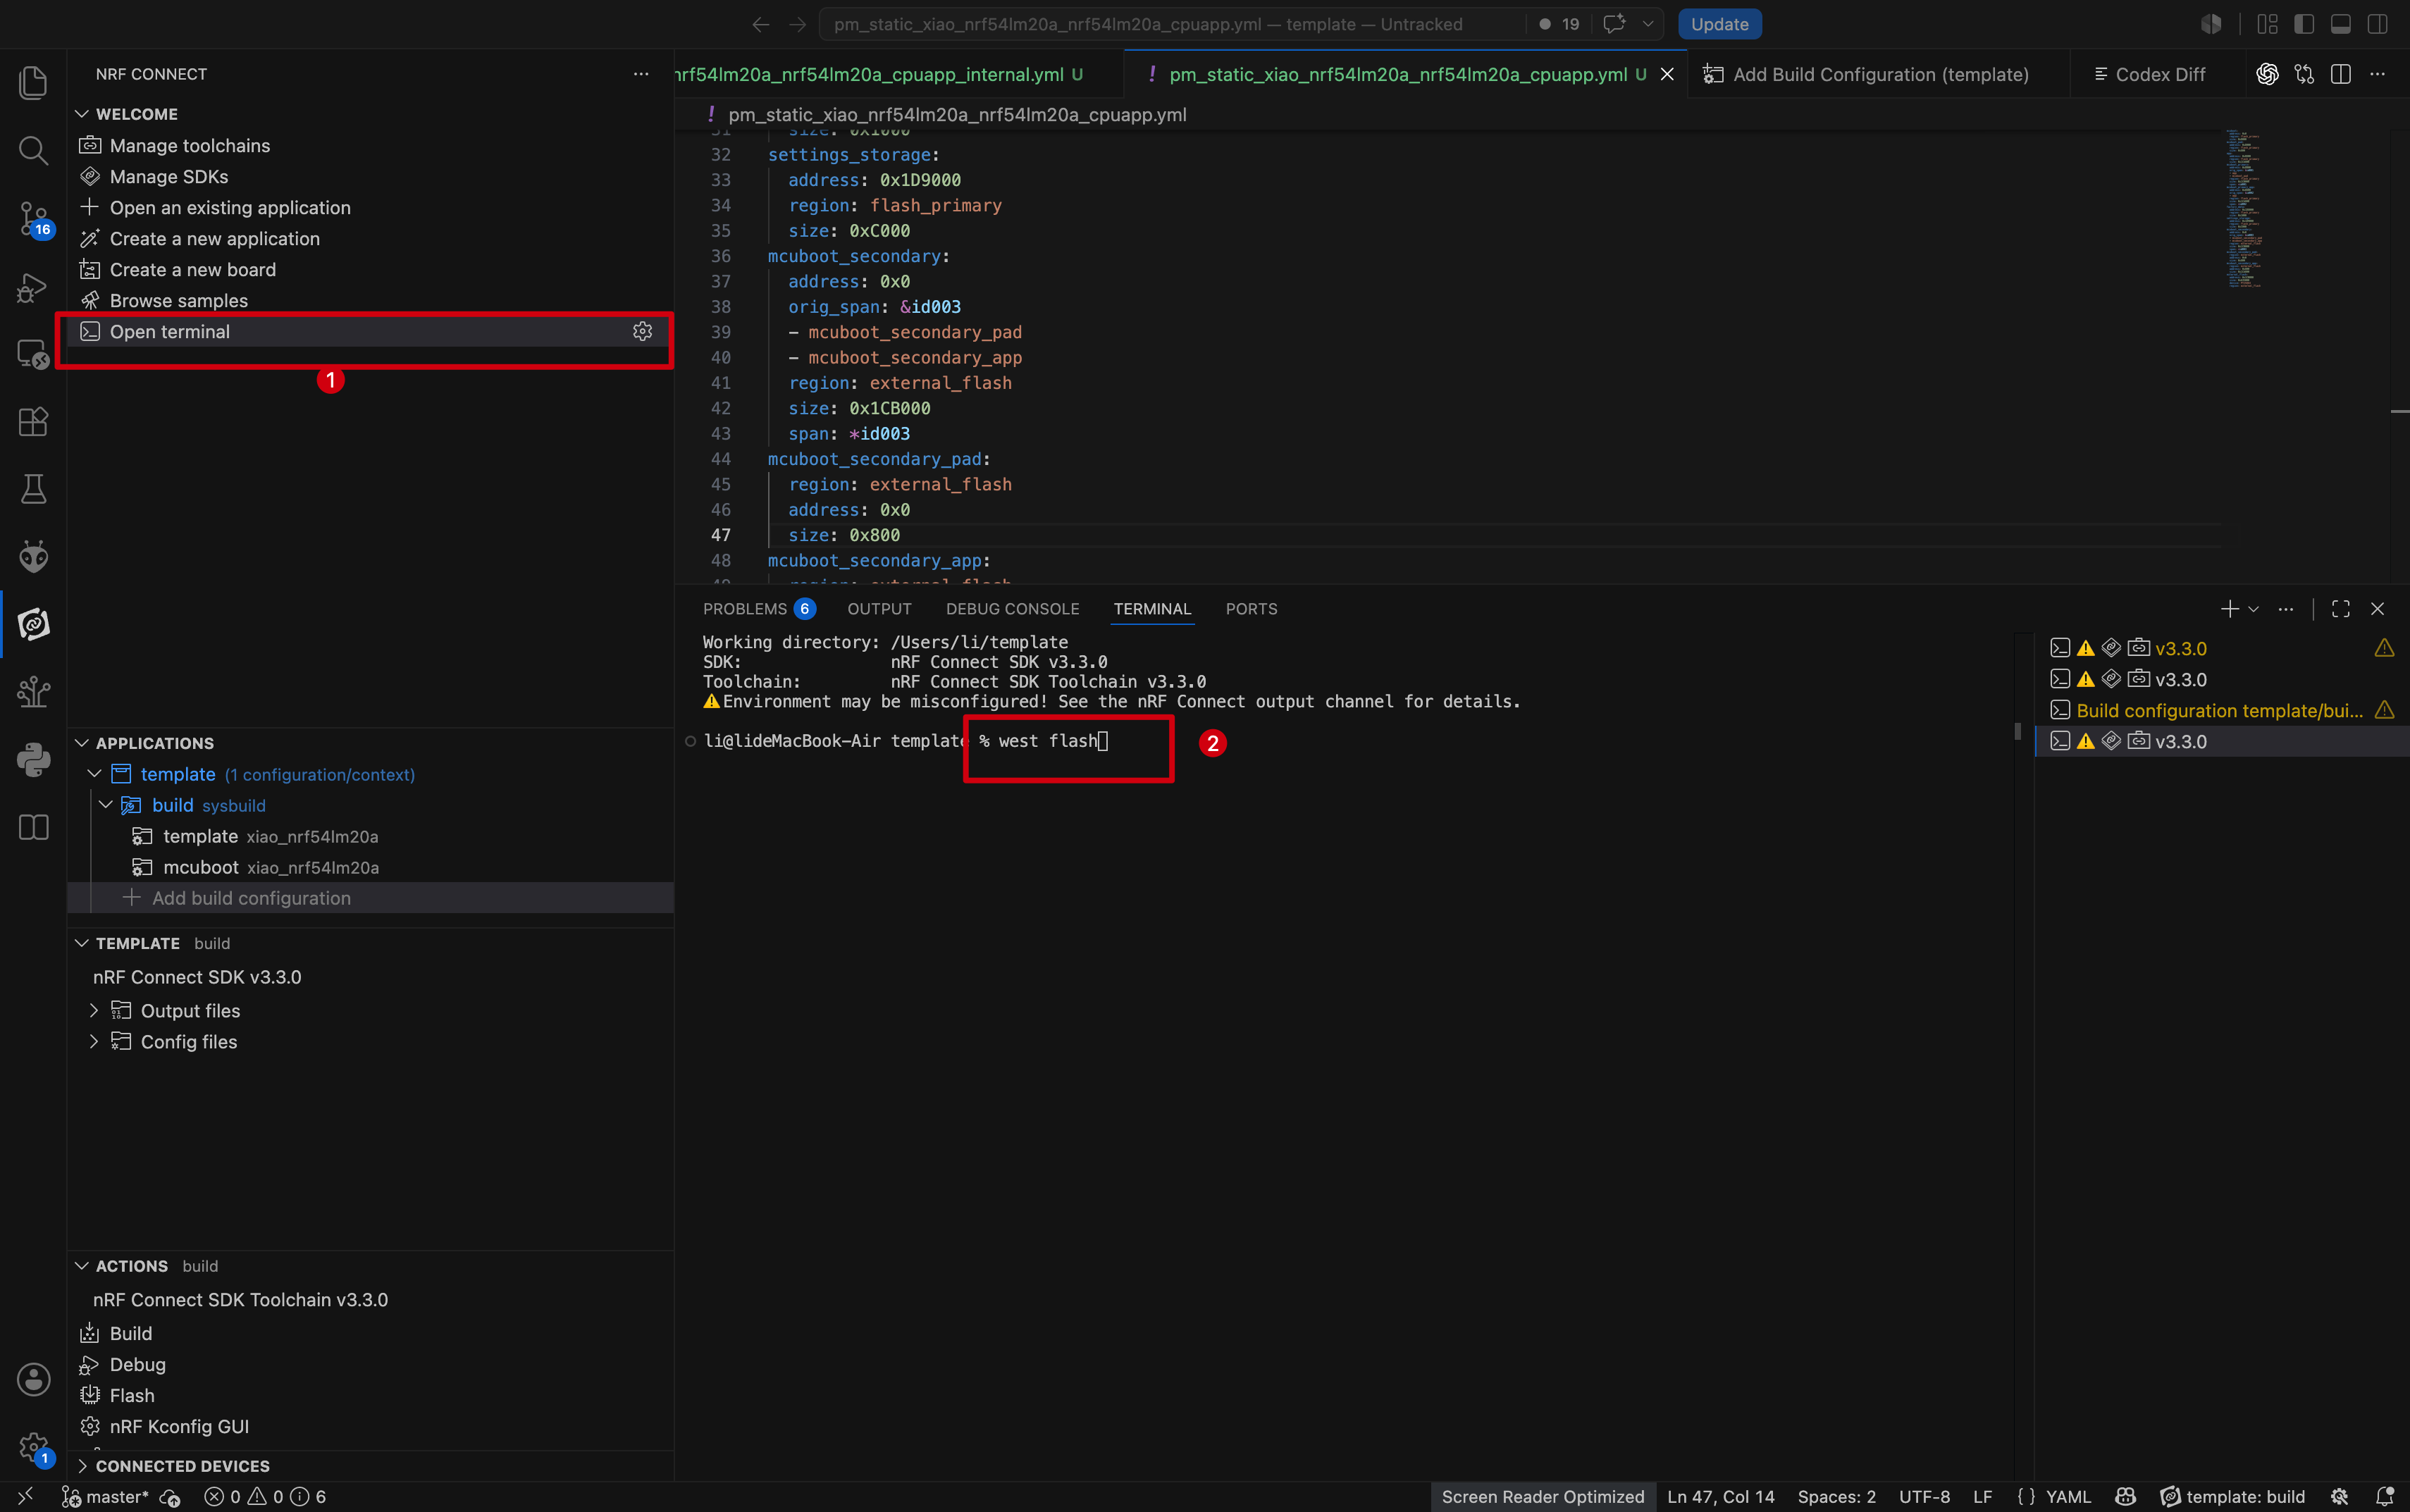
- 使用
west flash烧录固件。
- 要在 Home Assistant 中检测到该设备,请将已烧录 Coprocessor 固件的 XIAO nRF54LM20A 通过 USB-C 连接到 Home Assistant Green。
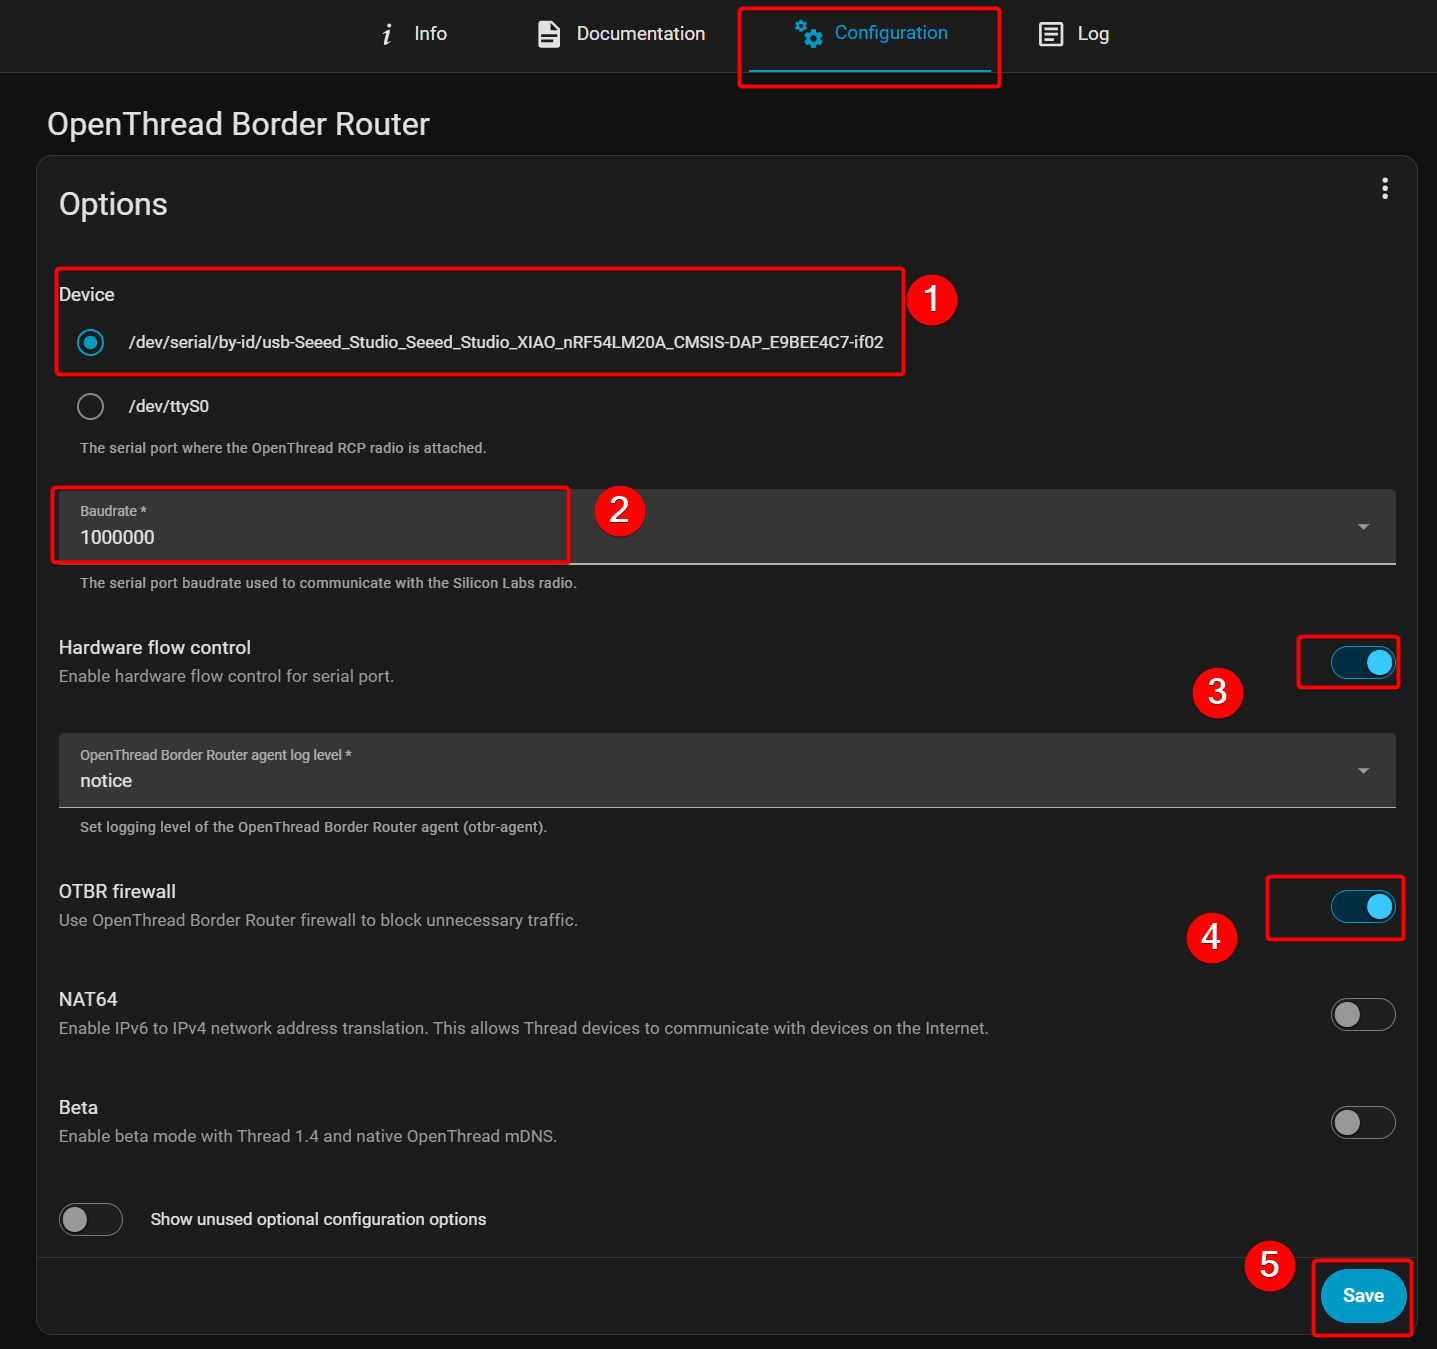
- 打开 Add-on store,找到 Open Thread Border Router 并进行配置。你会看到名为 XIAO nRF54LM20A 的设备;配置波特率和其他参数,然后保存设置。
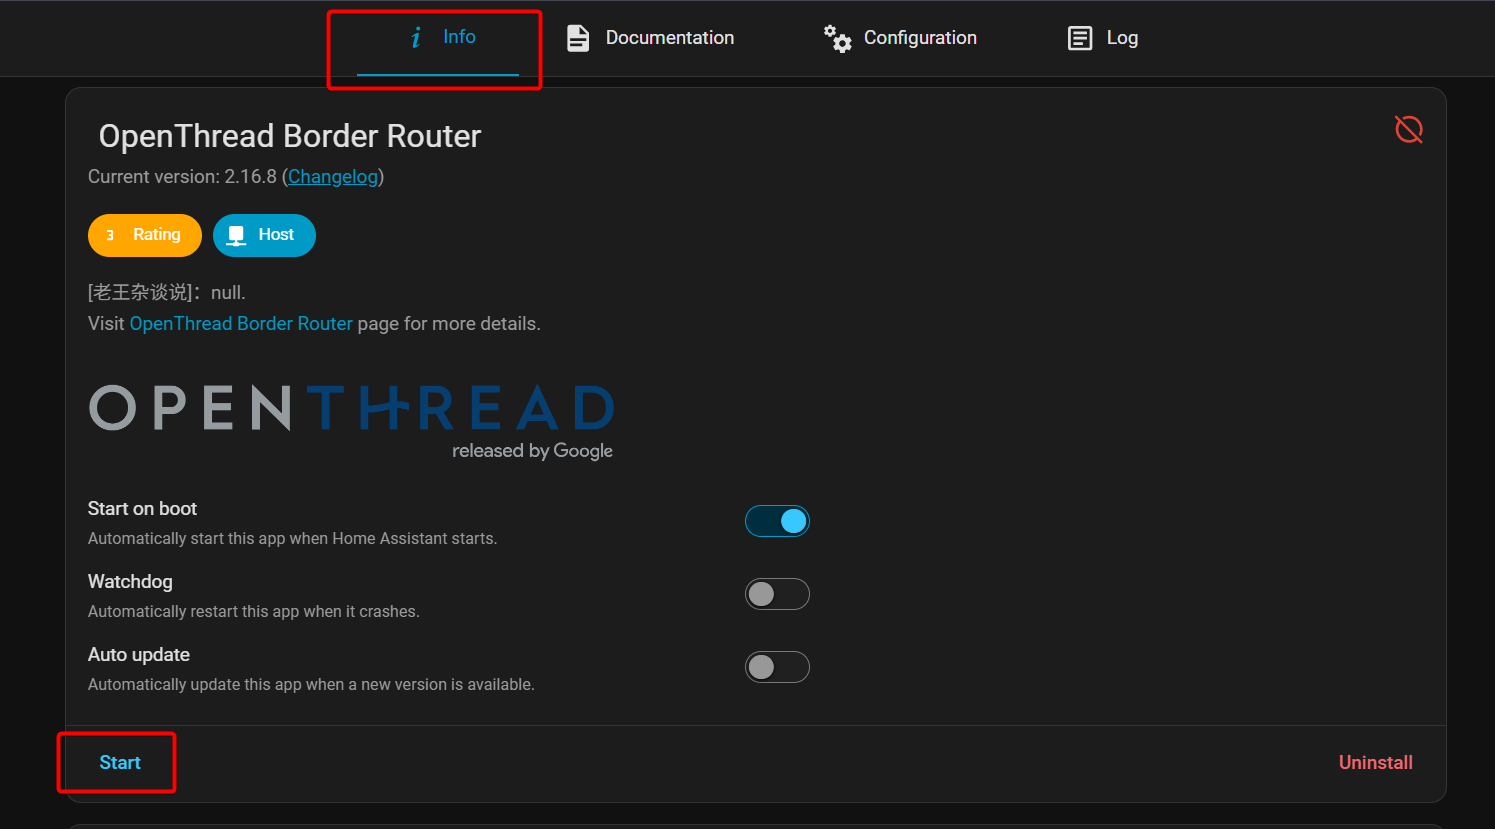
- 在 Info 选项卡下选择 Start。
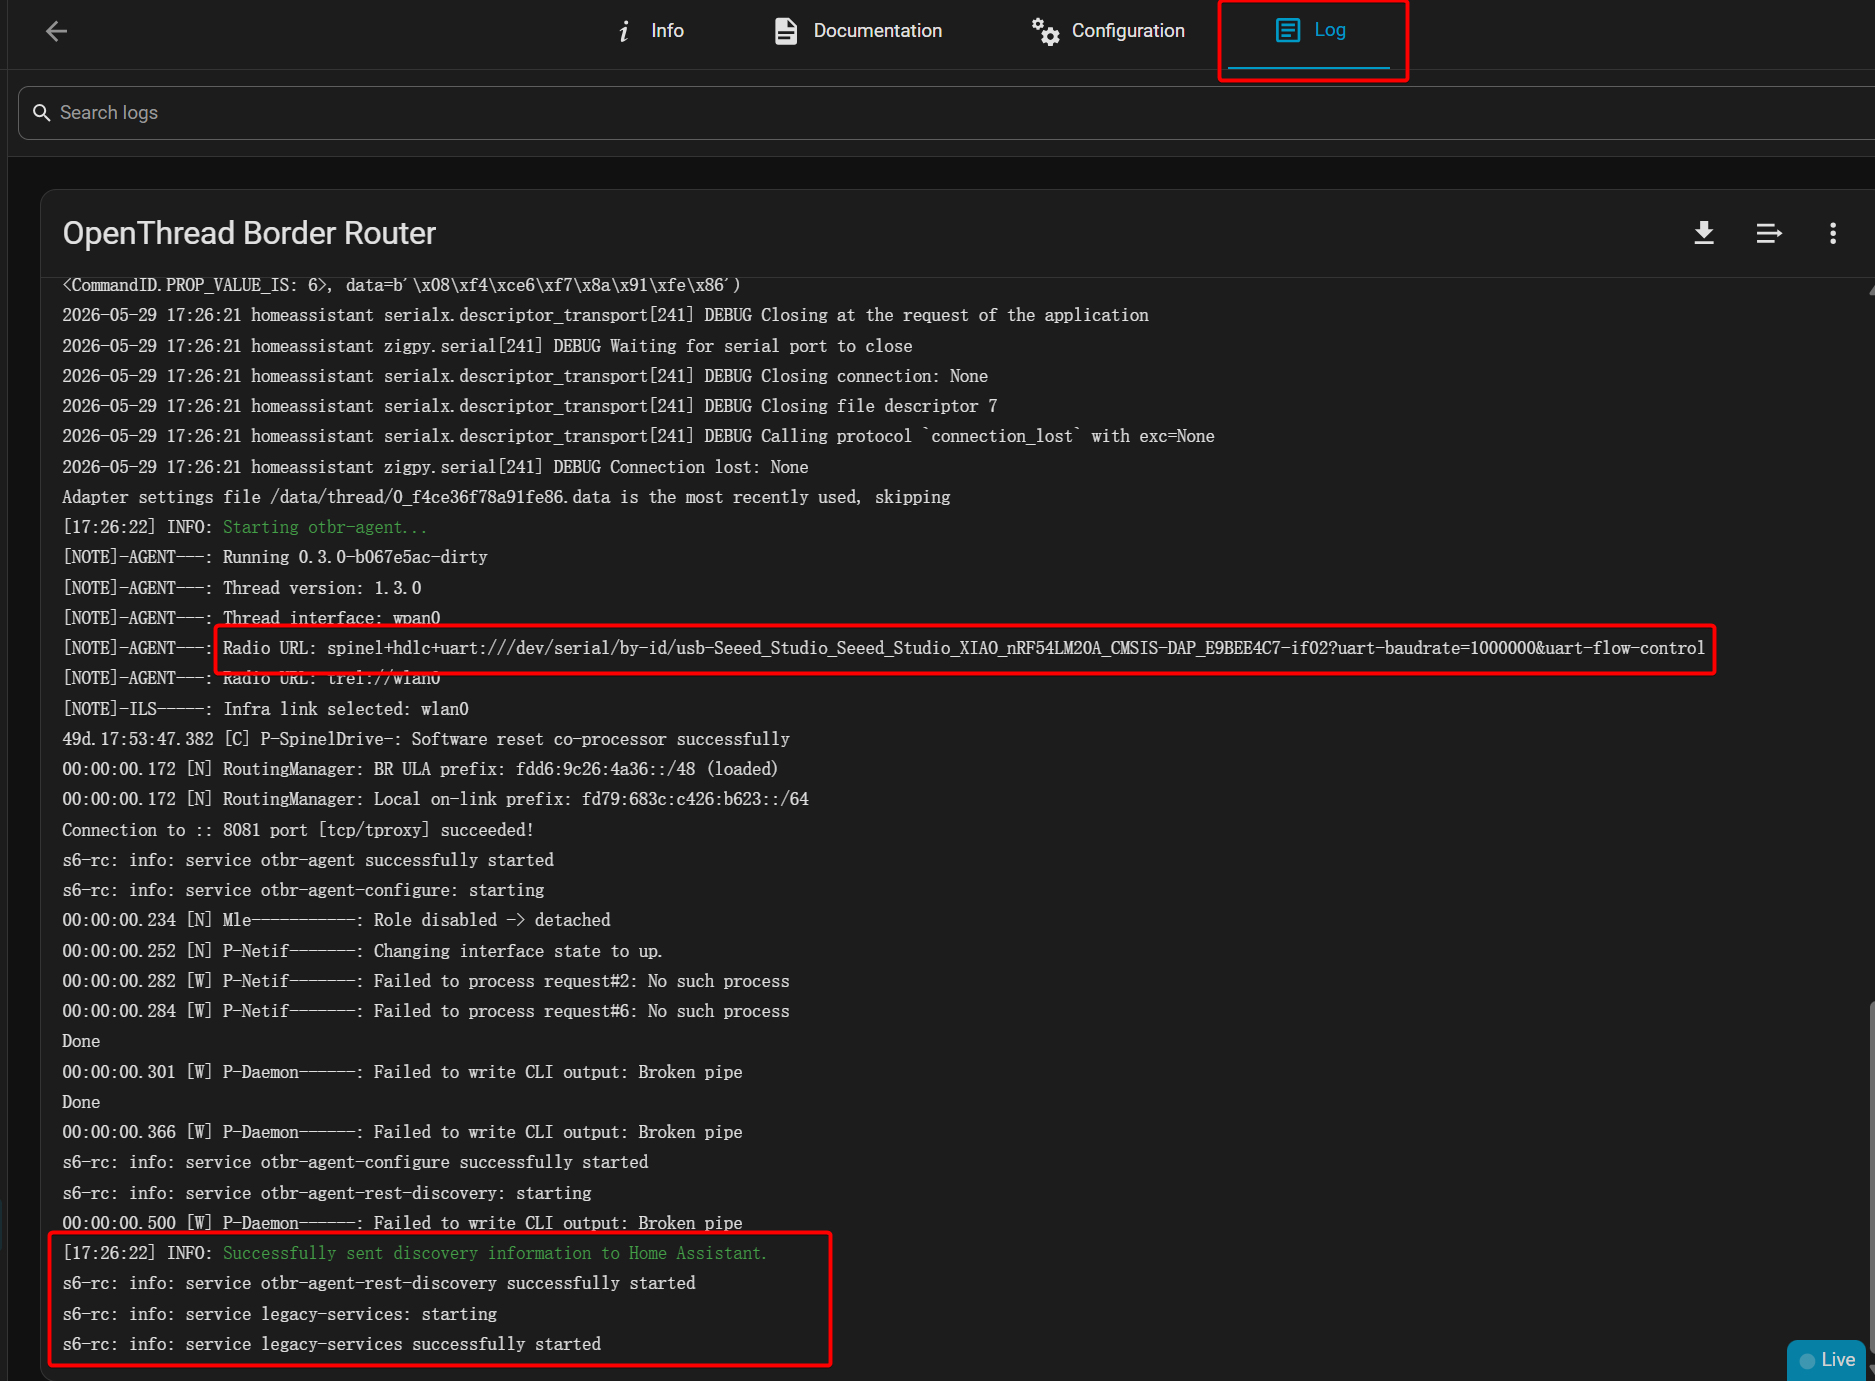
- 你可以在 Log 中查看配置状态——如下面的图所示,配置成功。
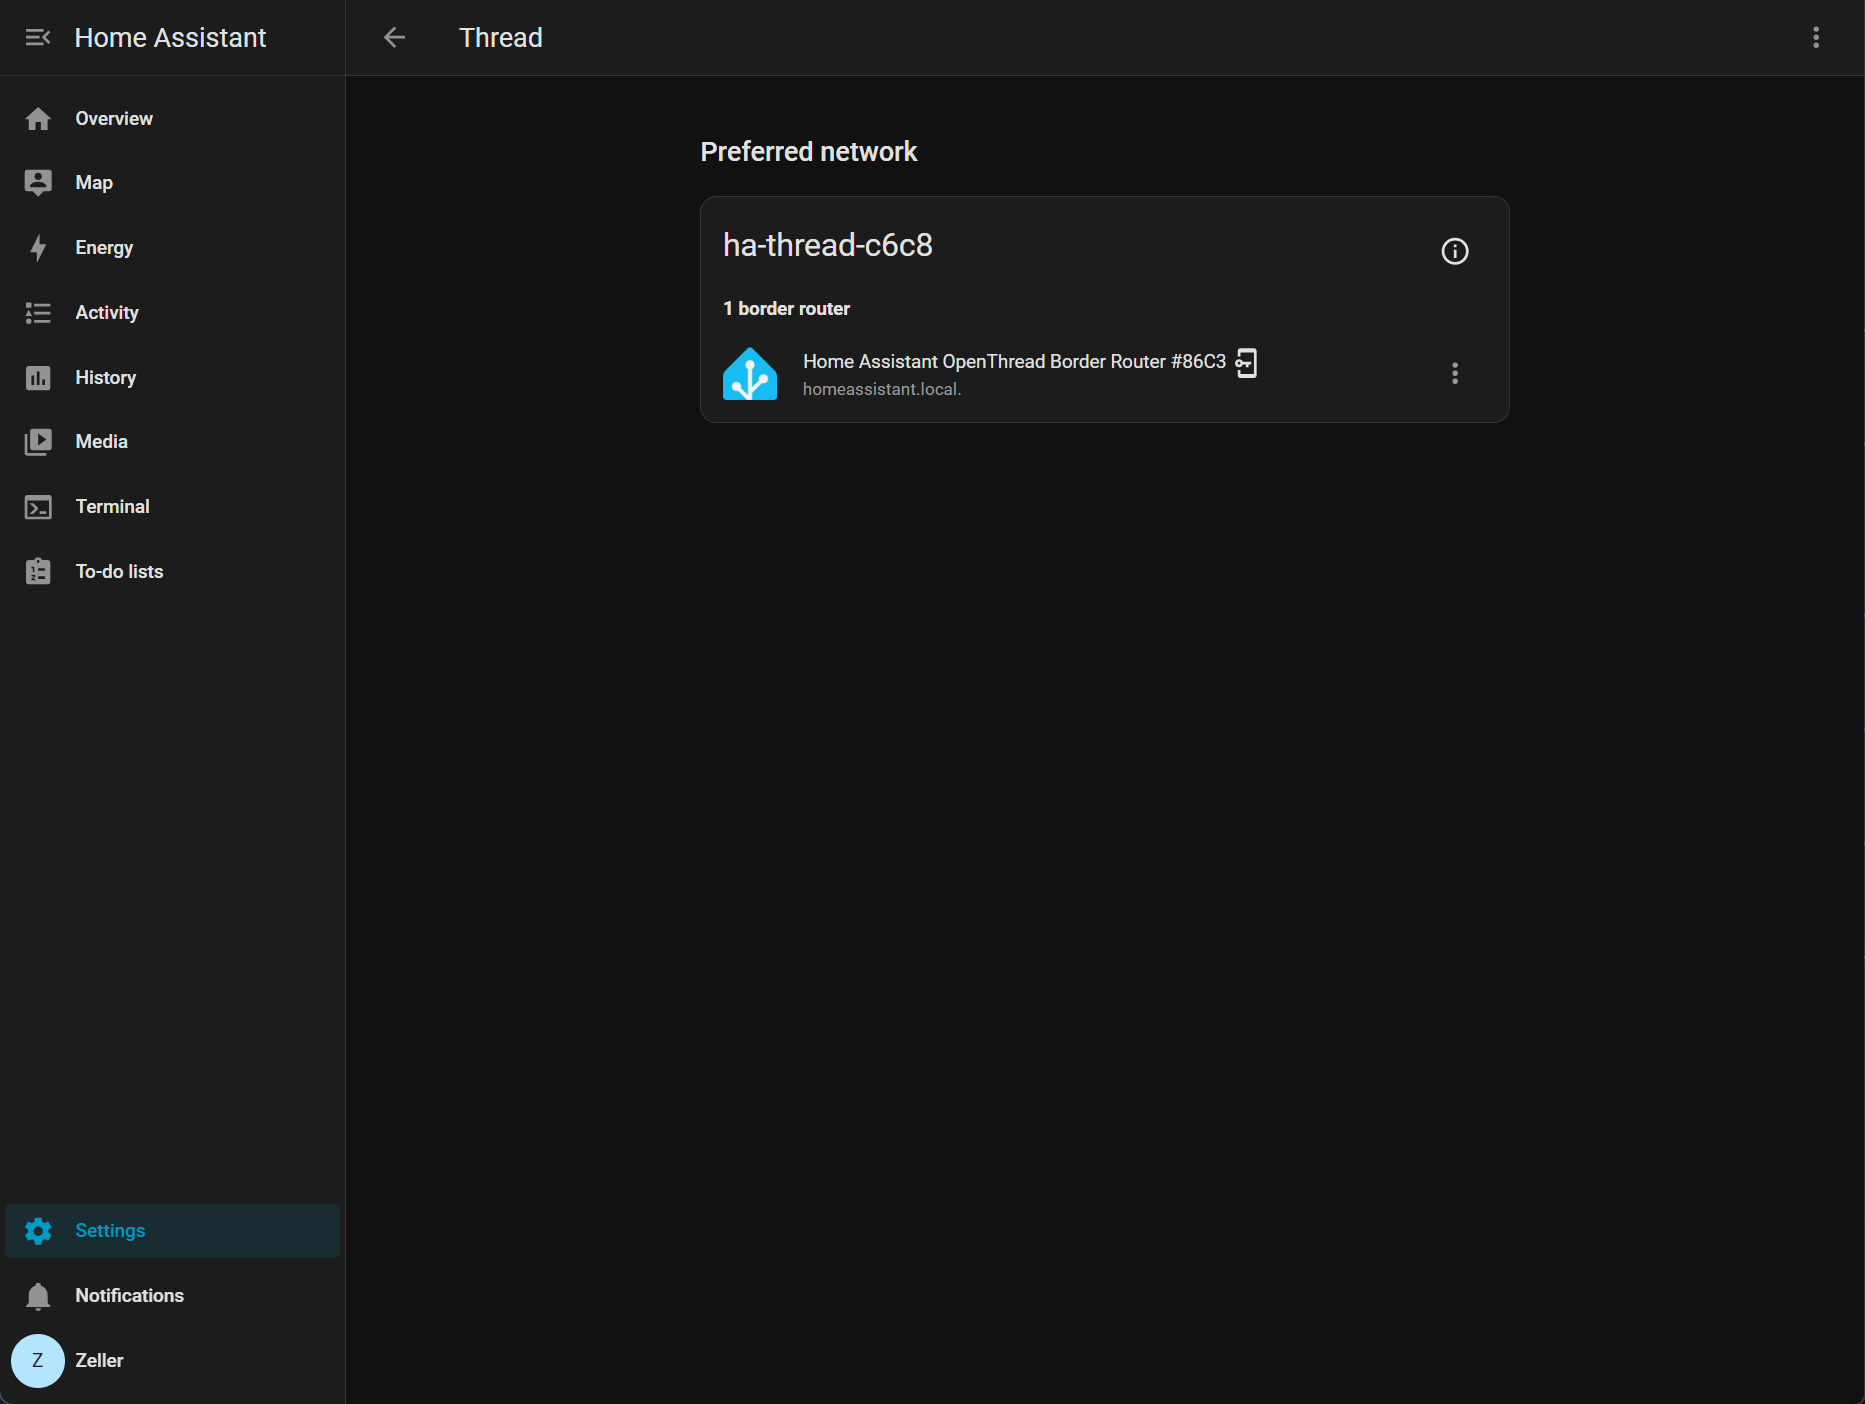
- 前往 Settings -> Thread 来发现设备,通常其名称为
ha-thread-c6c8。
配置 Matter 设备
- 选择 Create a new application,选择 copy a sample,搜索 Matter-Template 并创建项目。
- 修改设备树文件和配置文件。
-
由于 XIAO nRF54LM20A 与 Nordic 官方评估板之间存在硬件差异,因此需要修改设备树和配置文件。官方评估板配备了外部 MX25R64 Flash 芯片,而 XIAO nRF54LM20A 使用的是 PY25Q64;必须进行相应调整。
-
需要添加的文件如下所示:
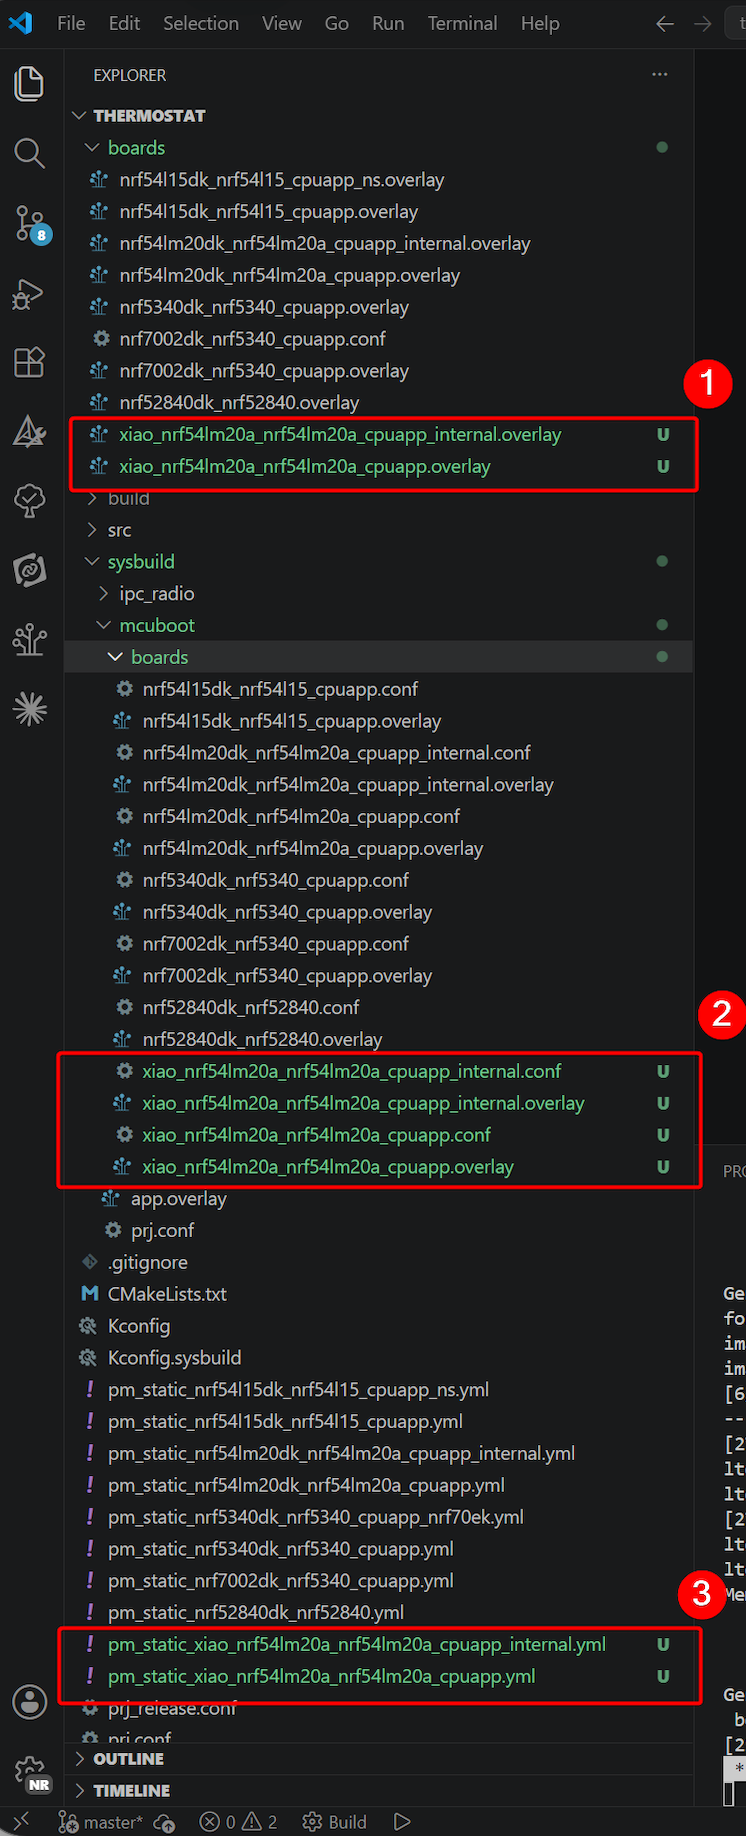
文件路径:~/boards:
- xiao_nrf54lm20a_nrf54lm20a_cpuapp_internal.overlay
- xiao_nrf54lm20a_nrf54lm20a_cpuapp.overlay
xiao_nrf54lm20a_nrf54lm20a_cpuapp_internal.overlay
/*
 * Copyright (c) 2025 Nordic Semiconductor ASA
 *
 * SPDX-License-Identifier: LicenseRef-Nordic-5-Clause
 */

/ {
	aliases {
		/* Use watchdog wdt31 as the application watchdog */
		watchdog0 = &wdt31;
	};
};

&py25q64 {
	status = "disabled";
};

&wdt31 {
	status = "okay";
};
xiao_nrf54lm20a_nrf54lm20a_cpuapp.overlay
/*
 * Copyright (c) 2025 Nordic Semiconductor ASA
 *
 * SPDX-License-Identifier: LicenseRef-Nordic-5-Clause
 */

/ {
	chosen {
		nordic,pm-ext-flash = &py25q64;
	};

	aliases {
		/* Use watchdog wdt31 as the application watchdog */
		watchdog0 = &wdt31;
	};
};

&py25q64 {
	status = "okay";
};

&wdt31 {
	status = "okay";
};
文件路径:~/sysbuild/mcuboot/boards:
xiao_nrf54lm20a_nrf54lm20a_cpuapp_internal.conf
#
# Copyright (c) 2025 Nordic Semiconductor ASA
#
# SPDX-License-Identifier: LicenseRef-Nordic-5-Clause
#

CONFIG_HW_STACK_PROTECTION=n
CONFIG_BOOT_WATCHDOG_FEED=n

# Disable all debug features
CONFIG_ASSERT_VERBOSE=n
CONFIG_ASSERT_NO_FILE_INFO=y
CONFIG_PRINTK=n

# Bootloader size optimization to fit into 28 KB partition.
# These options can be safely disabled because in this configuration,
# the secondary slot resides in the internal RRAM, so features
# needed to handle the external flash are not needed.
CONFIG_SPI_NOR=n
CONFIG_SPI=n

# Increase the maximum number of sectors to 512 to fit the big image size (> 1024 kB).
CONFIG_BOOT_MAX_IMG_SECTORS=512

# Currently, without tickless kernel, the SYSCOUNTER value after the software
# reset is not set properly and due to that the first system interrupt is not called
# in the proper time - the SYSCOUNTER value is set to the value from before
# reset + 1. Hence, the reboot time increases more and more.
# To avoid it enable tickless kernel for mcuboot.
CONFIG_TICKLESS_KERNEL=y
xiao_nrf54lm20a_nrf54lm20a_cpuapp_internal.overlay
/*
 * Copyright (c) 2025 Nordic Semiconductor ASA
 *
 * SPDX-License-Identifier: LicenseRef-Nordic-5-Clause
 */

/* Disable the external flash, as it's not needed
 * for the configuration with secondary slot residing
 * in the internal RRAM.
 */
&py25q64 {
	status = "disabled";
};
xiao_nrf54lm20a_nrf54lm20a_cpuapp.conf
#
# Copyright (c) 2025 Nordic Semiconductor ASA
#
# SPDX-License-Identifier: LicenseRef-Nordic-5-Clause
#

CONFIG_HW_STACK_PROTECTION=n
CONFIG_BOOT_WATCHDOG_FEED=n

# XIAO nRF54LM20A uses SPI NOR external flash (PY25Q64)
CONFIG_GPIO=y
CONFIG_SPI=y
CONFIG_SPI_NOR=y
CONFIG_SPI_NOR_SFDP_DEVICETREE=y
CONFIG_SPI_NOR_FLASH_LAYOUT_PAGE_SIZE=4096

# Increase the maximum number of sectors to 512 to fit the big image size (> 1024 kB).
CONFIG_BOOT_MAX_IMG_SECTORS=512

# Currently, without tickless kernel, the SYSCOUNTER value after the software
# reset is not set properly and due to that the first system interrupt is not called
# in the proper time - the SYSCOUNTER value is set to the value from before
# reset + 1. Hence, the reboot time increases more and more.
# To avoid it enable tickless kernel for mcuboot.
CONFIG_TICKLESS_KERNEL=y
xiao_nrf54lm20a_nrf54lm20a_cpuapp.overlay
/*
 * Copyright (c) 2025 Nordic Semiconductor ASA
 *
 * SPDX-License-Identifier: LicenseRef-Nordic-5-Clause
 */

/ {
	chosen {
		nordic,pm-ext-flash = &py25q64;
	};
};

&py25q64 {
	status = "okay";
};
项目路径 ~/ :
pm_static_xiao_nrf54lm20a_nrf54lm20a_cpuapp_internal.yml
mcuboot:
  address: 0x0
  region: flash_primary
  size: 0xA000
mcuboot_pad:
  address: 0xA000
  region: flash_primary
  size: 0x800
app:
  address: 0xA800
  region: flash_primary
  size: 0x125800
mcuboot_primary:
  address: 0xA000
  orig_span: &id001
  - app
  - mcuboot_pad
  region: flash_primary
  size: 0x126000
  span: *id001
mcuboot_primary_app:
  address: 0xA800
  orig_span: &id002
  - app
  region: flash_primary
  size: 0x125800
  span: *id002
mcuboot_secondary:
  address: 0x130000
  orig_span: &id003
  - mcuboot_secondary_pad
  - mcuboot_secondary_app
  region: flash_primary
  size: 0xC0000
  span: *id003
mcuboot_secondary_pad:
  region: flash_primary
  address: 0x130000
  size: 0x800
# Compression rate 34.75%
mcuboot_secondary_app:
  region: flash_primary
  address: 0x130800
  size: 0xBF800
factory_data:
  address: 0x1F0000
  region: flash_primary
  size: 0x1000
settings_storage:
  address: 0x1F1000
  region: flash_primary
  size: 0xC000
pm_static_xiao_nrf54lm20a_nrf54lm20a_cpuapp.yml
mcuboot:
  address: 0x0
  region: flash_primary
  size: 0xD000
mcuboot_pad:
  address: 0xD000
  region: flash_primary
  size: 0x800
app:
  address: 0xD800
  region: flash_primary
  size: 0x1E2800
mcuboot_primary:
  address: 0xD000
  orig_span: &id001
  - app
  - mcuboot_pad
  region: flash_primary
  size: 0x1E3000
  span: *id001
mcuboot_primary_app:
  address: 0xD800
  orig_span: &id002
  - app
  region: flash_primary
  size: 0x1E2800
  span: *id002
factory_data:
  address: 0x1F0000
  region: flash_primary
  size: 0x1000
settings_storage:
  address: 0x1F1000
  region: flash_primary
  size: 0xC000
mcuboot_secondary:
  address: 0x0
  orig_span: &id003
  - mcuboot_secondary_pad
  - mcuboot_secondary_app
  region: external_flash
  size: 0x1E3000
  span: *id003
mcuboot_secondary_pad:
  region: external_flash
  address: 0x0
  size: 0x800
mcuboot_secondary_app:
  region: external_flash
  address: 0x800
  size: 0x1E2800
external_flash:
  address: 0x1E3000
  size: 0x5DB000
  device: PY25Q64
  region: external_flash
对于最后两个文件,你需要自行创建文件并粘贴代码
新增文件用途说明
| File | Description |
|---|---|
1. 板级 Overlay 文件(boards/)XIAO nRF54LM20A 的应用层设备树 overlay 文件。 | |
xiao_nrf54lm20a_nrf54lm20a_cpuapp.overlay | 外部 Flash 版本:启用 PY25Q64 SPI NOR Flash 作为 OTA 次要分区; |
xiao_nrf54lm20a_nrf54lm20a_cpuapp_internal.overlay | 内部 Flash 版本:禁用 PY25Q64(降低 BOM 成本和功耗); |
2. MCUboot 配置文件(sysbuild/mcuboot/boards/)MCUboot 是一个独立的 Zephyr 镜像,需要其自己的 Kconfig 和设备树 overlay 文件。 | |
xiao_nrf54lm20a_nrf54lm20a_cpuapp.conf | 外部 Flash — Kconfig:启用用于访问 PY25Q64 的 SPI/SPI_NOR 驱动; |
xiao_nrf54lm20a_nrf54lm20a_cpuapp.overlay | 外部 Flash — DTS Overlay:将 PY25Q64 启用为 |
xiao_nrf54lm20a_nrf54lm20a_cpuapp_internal.conf | 内部 Flash — Kconfig: 禁用 SPI/SPI_NOR; |
xiao_nrf54lm20a_nrf54lm20a_cpuapp_internal.overlay | 内部 Flash — DTS Overlay: 禁用 PY25Q64,确保 MCUboot 仅使用内部 Flash。 |
3. 静态分区文件(pm_static_*.yml)Partition Manager 的静态分区表,用于定义 MCUboot、APP、OTA、出厂数据和设置的完整 Flash 布局。 | |
pm_static_xiao_nrf54lm20a_nrf54lm20a_cpuapp.yml | 外部 Flash 版本: |
pm_static_xiao_nrf54lm20a_nrf54lm20a_cpuapp_internal.yml | 内部 Flash 版本: |
将固件烧录并下载到设备
- 继续进行构建配置。
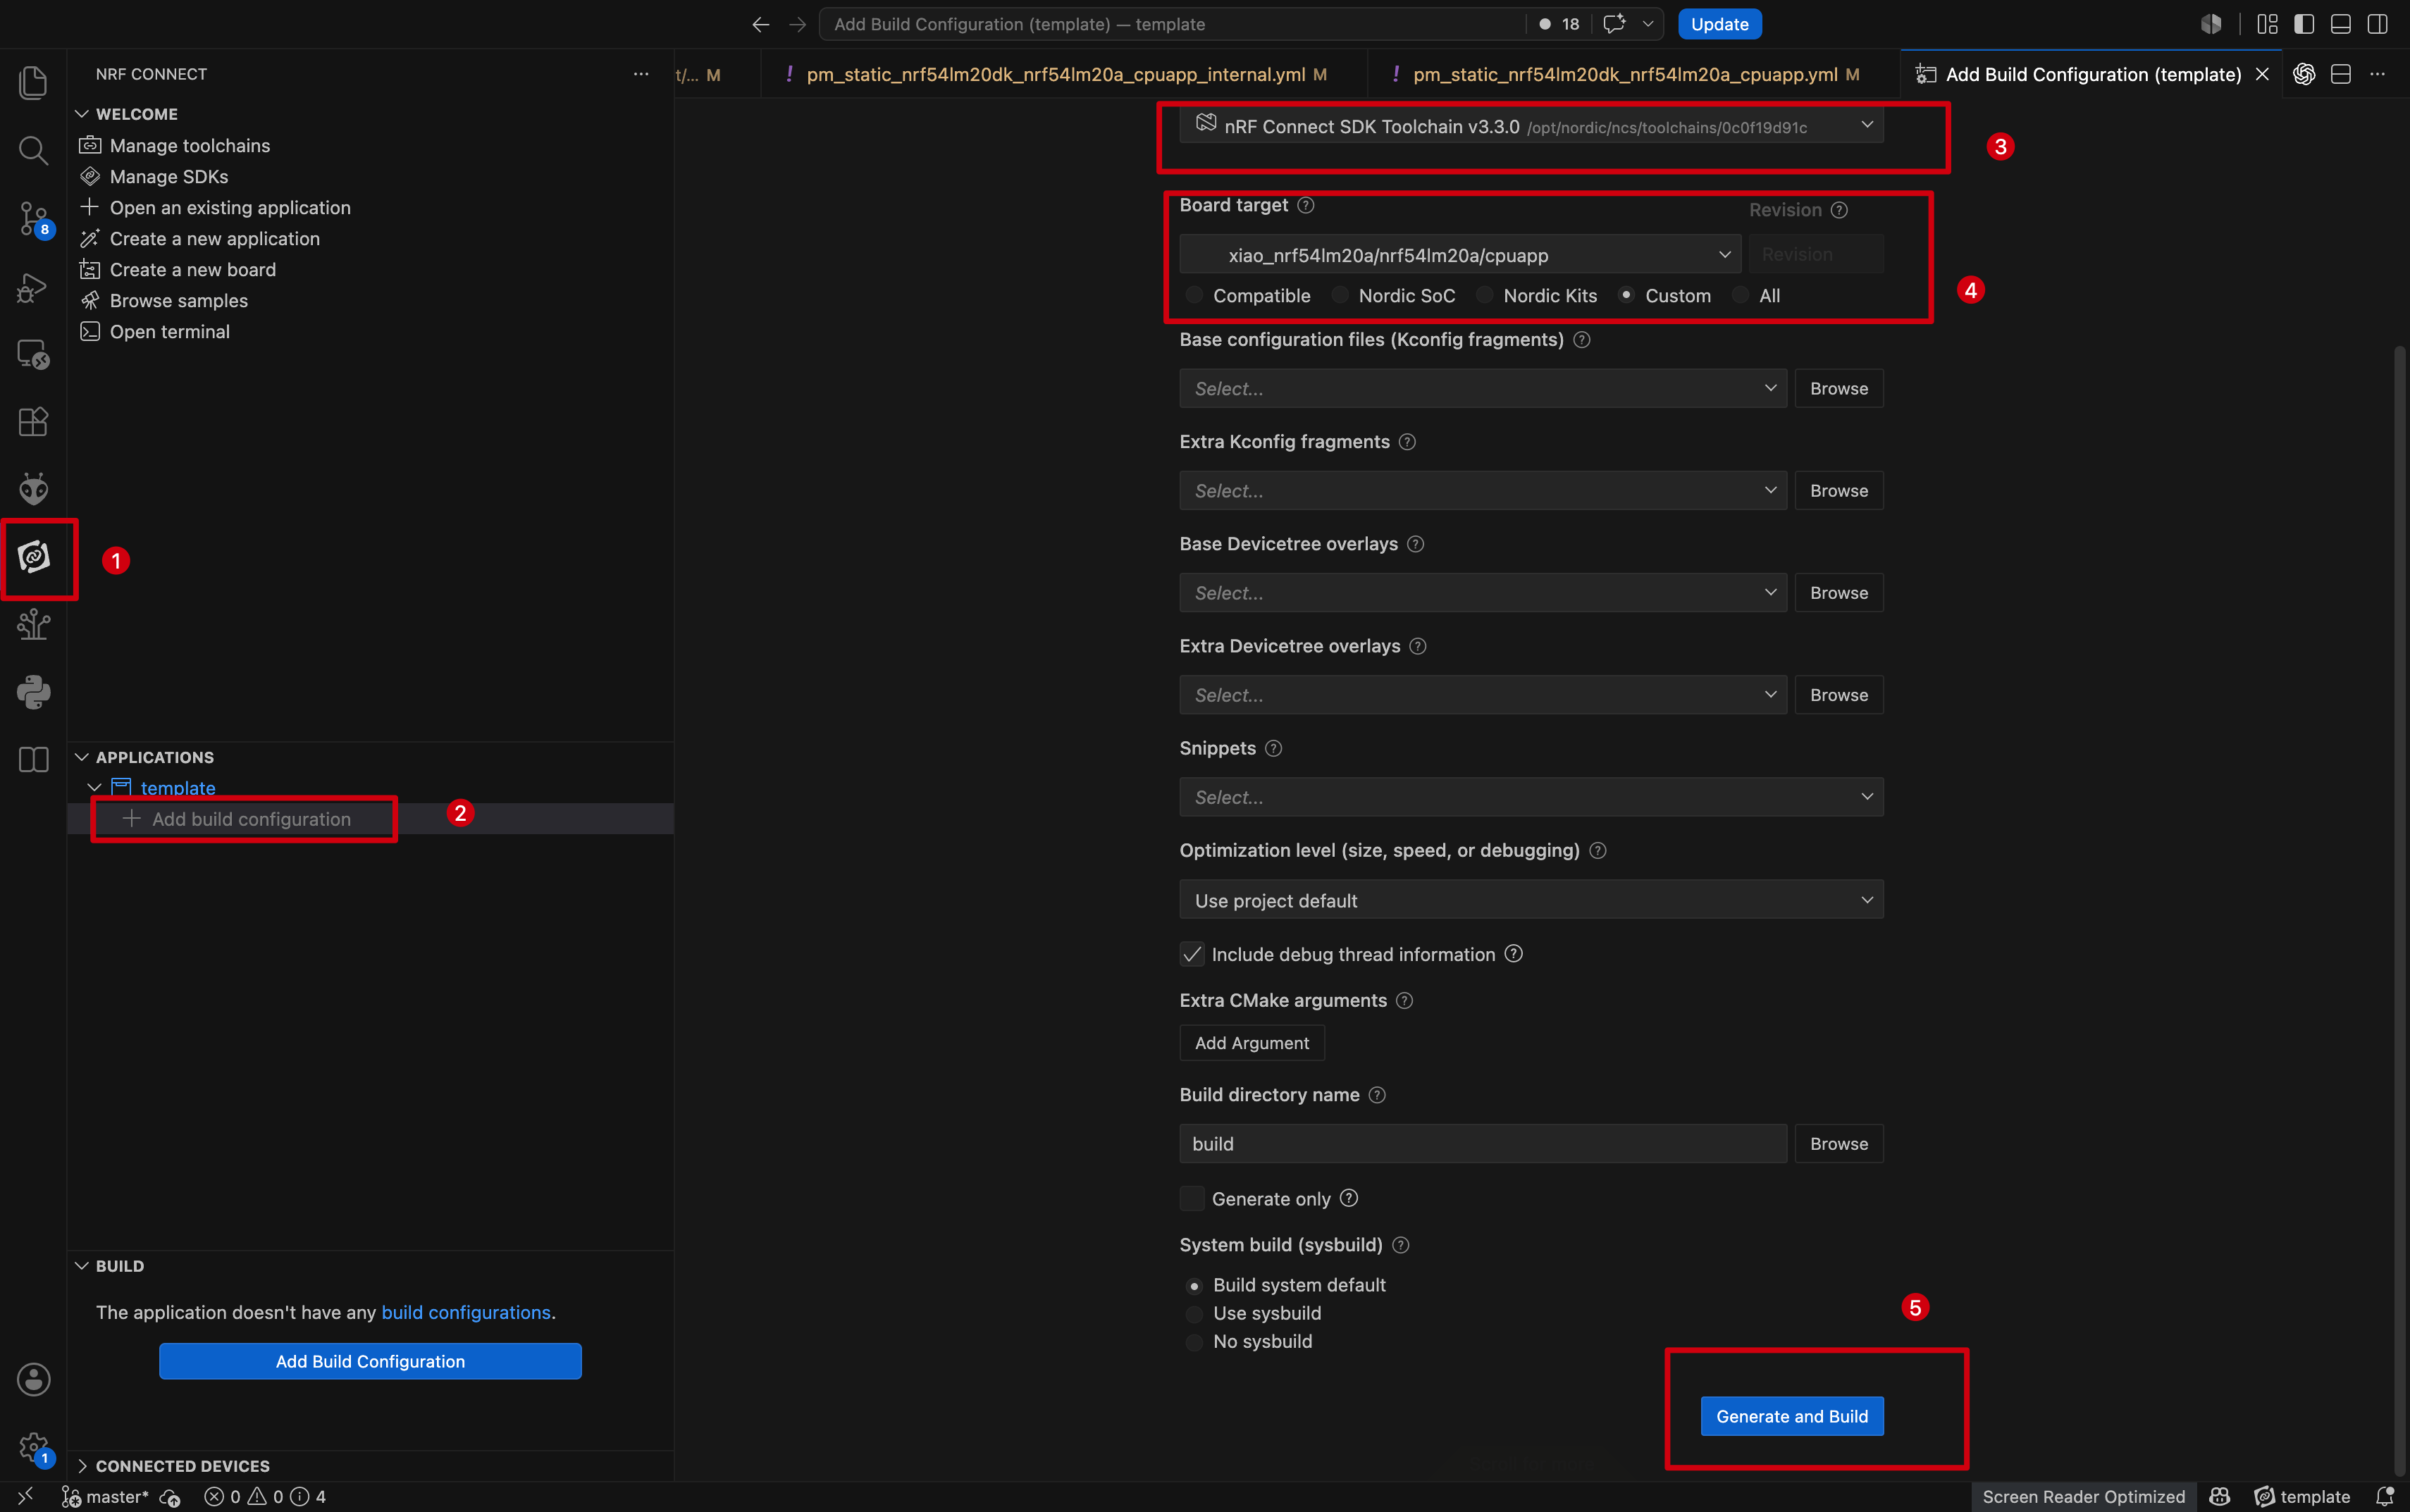
- 选择另一块 XIAO nRF54LM20A 作为目标设备,启动 OpenTerminal,并使用
west flash命令烧录固件。
使用 Home Assistant App 连接 Matter 设备
- 连接 Matter 设备并生成设备二维码。
- 在 NCS 开发环境中,打开 nRF Serial Terminal。
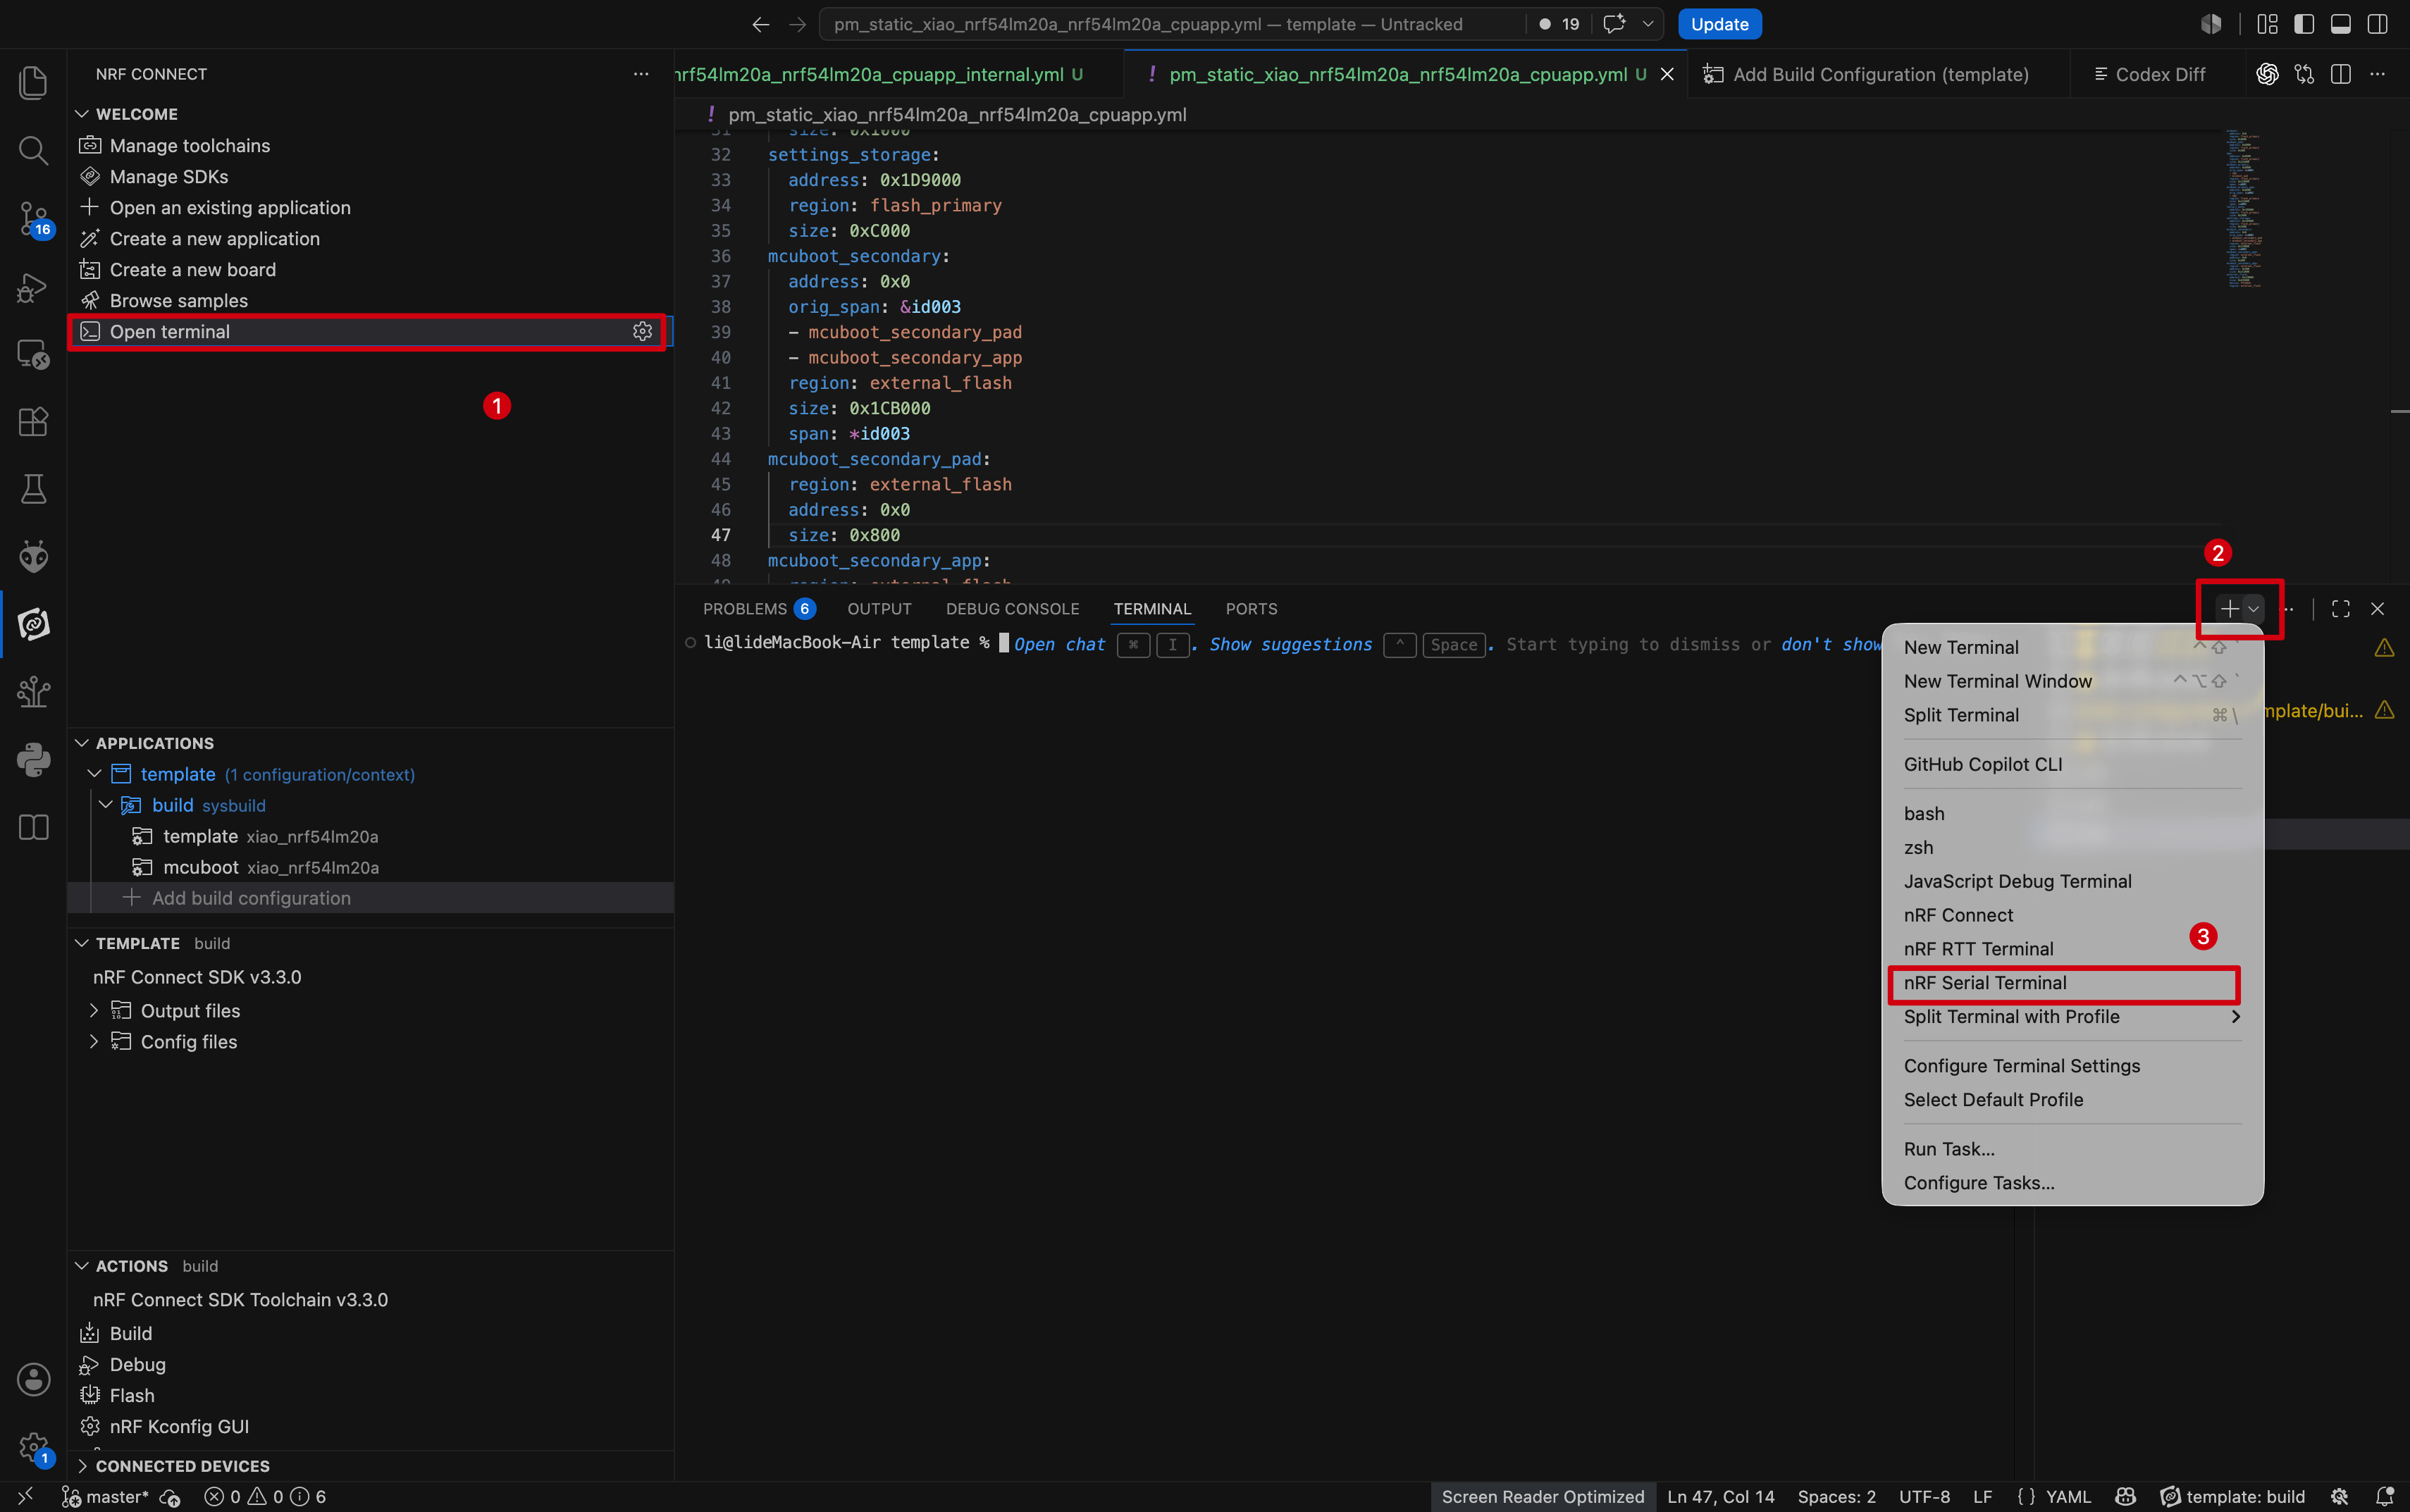
- 界面顶部会弹出串口列表;选择对应 XIAO nRF54LM20A 的串口。

- Matter 设备信息和配对二维码链接将通过串口日志输出。
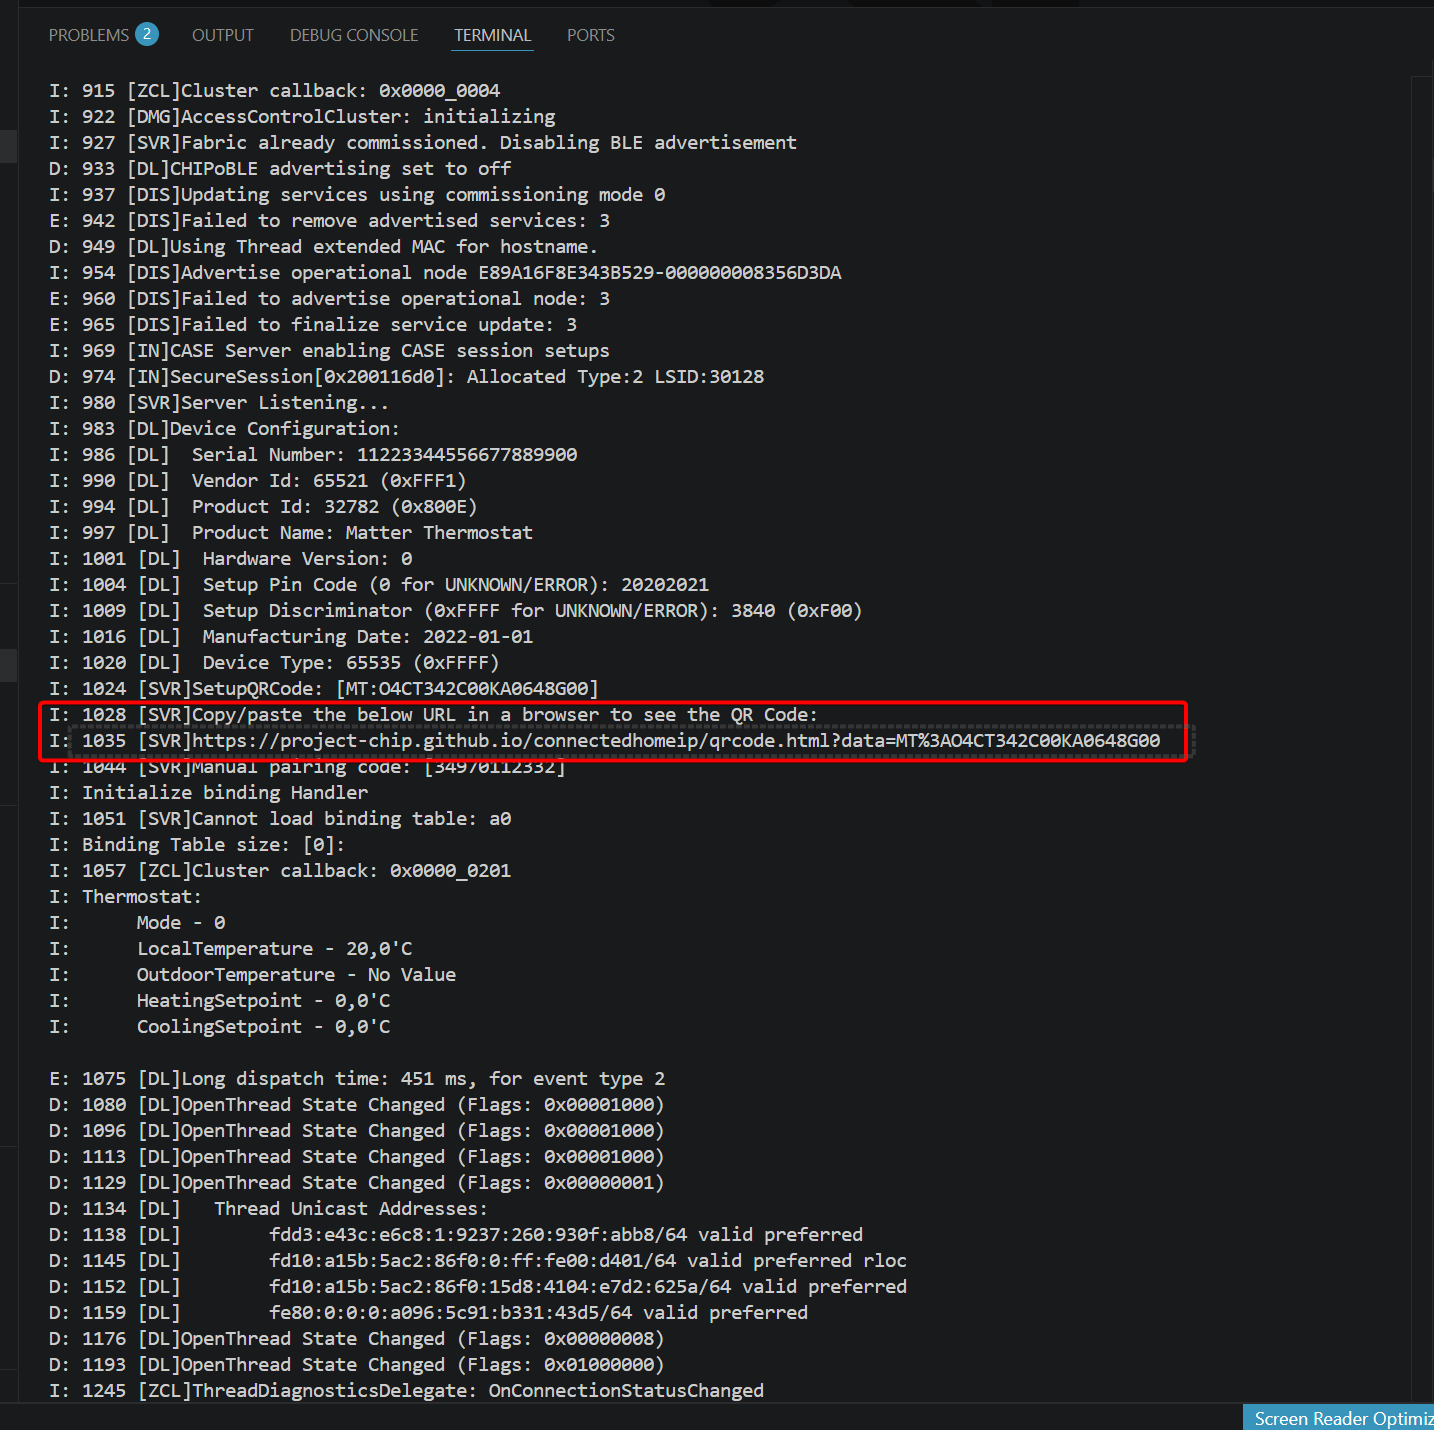
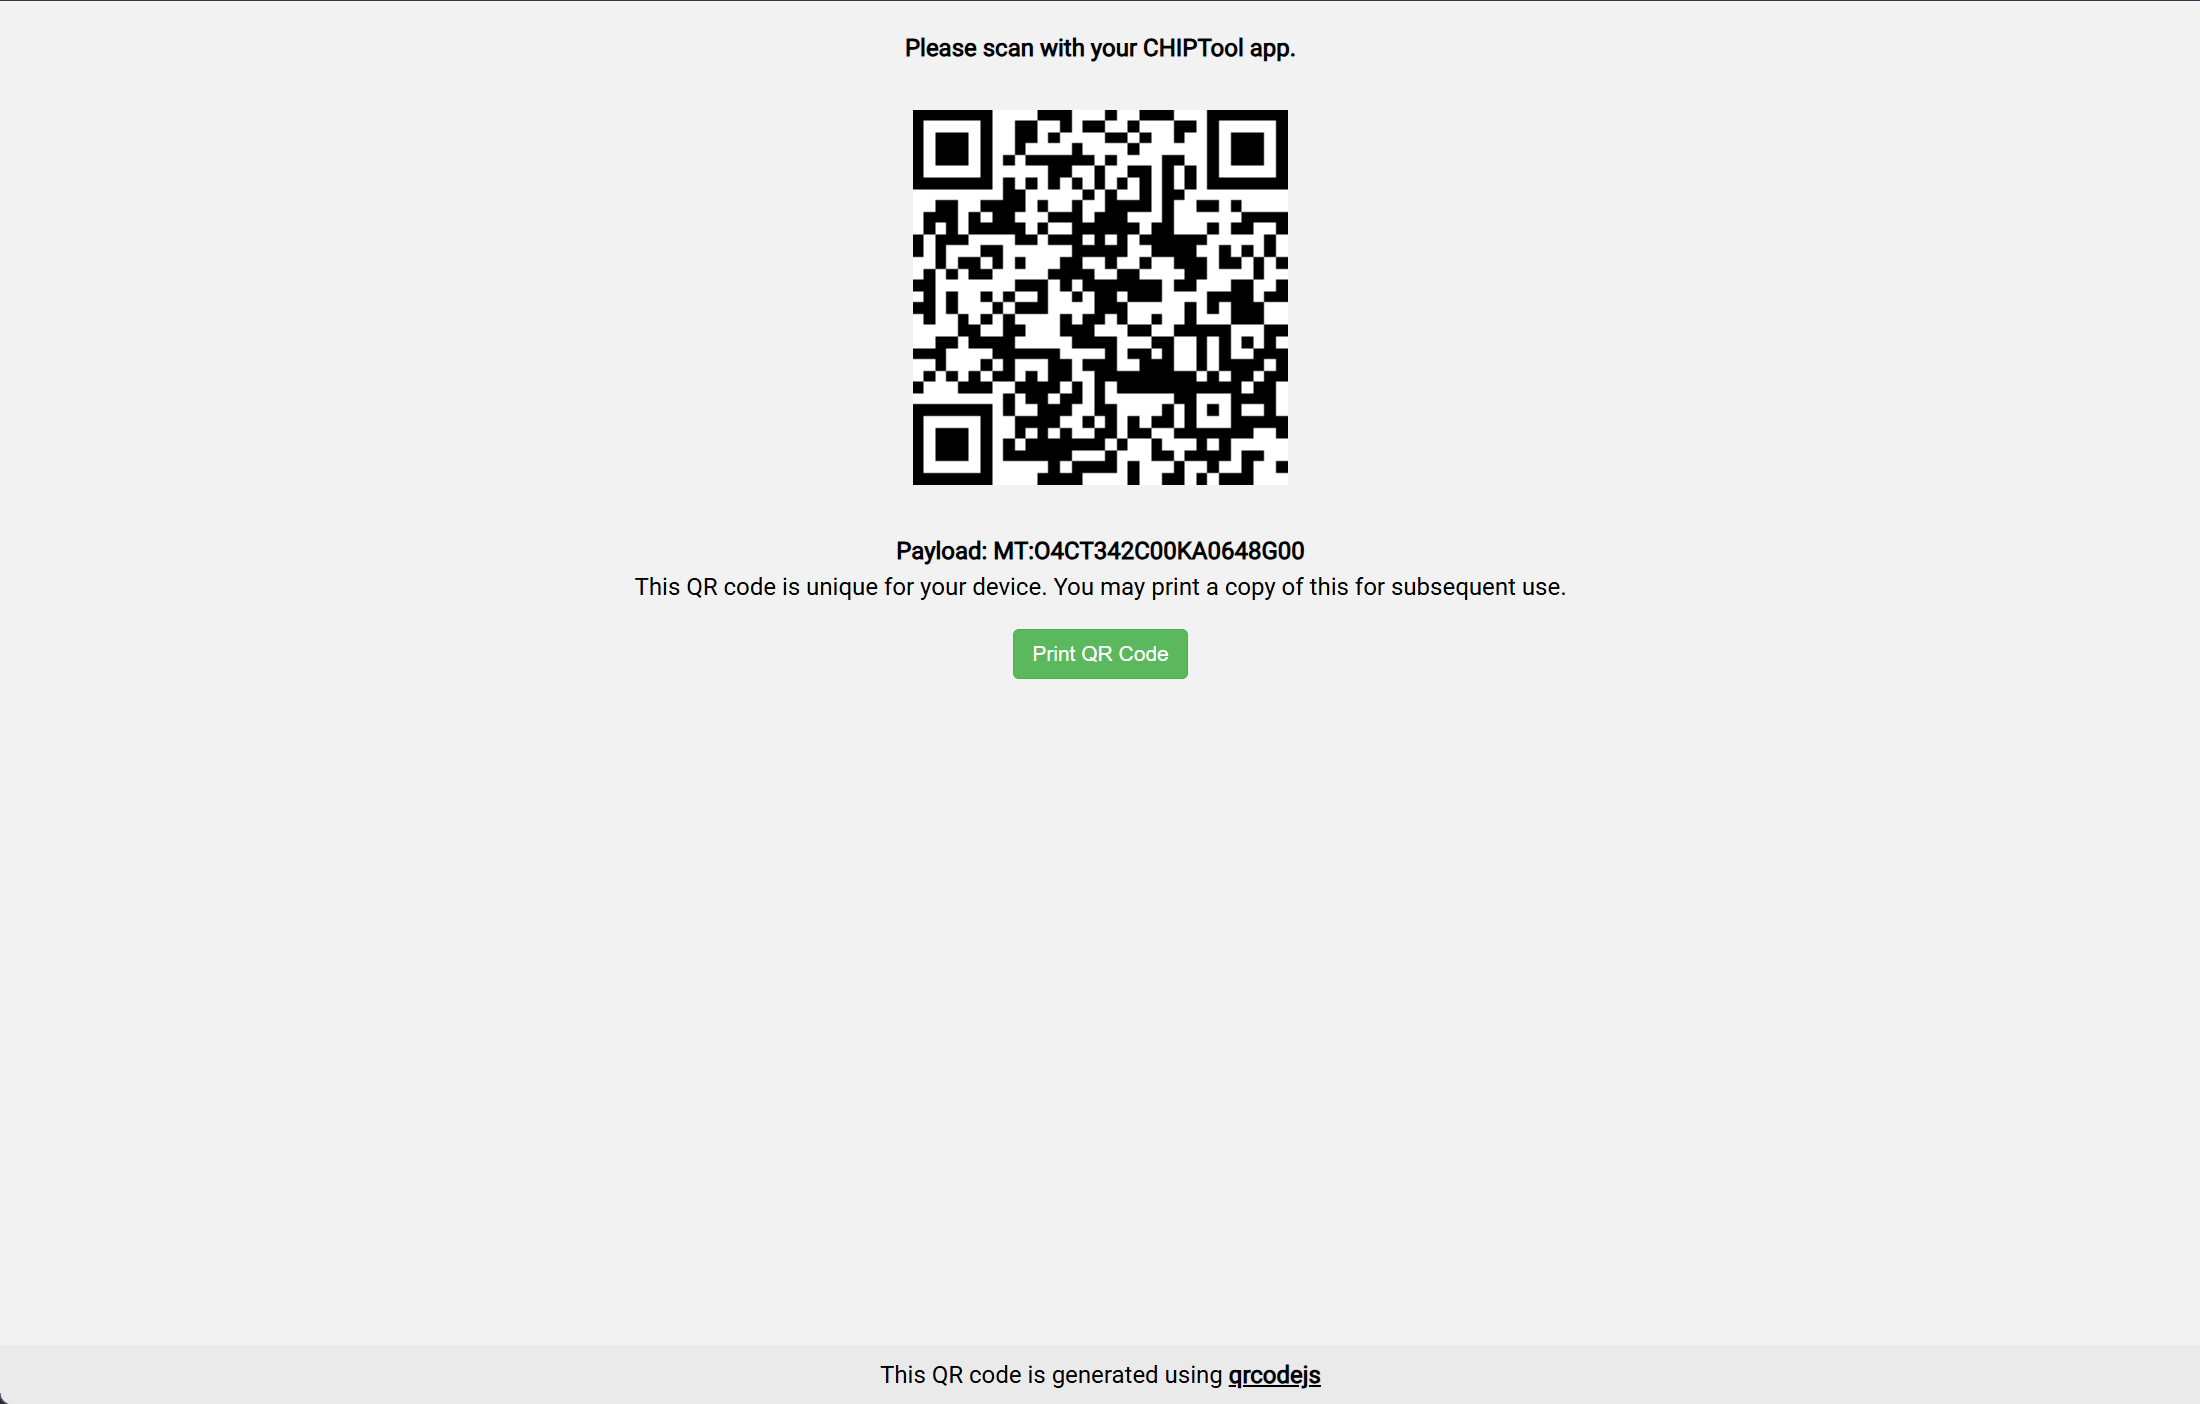
- 直接点击二维码链接,或将链接复制到浏览器中打开。
- 下载 Home Assistant App。
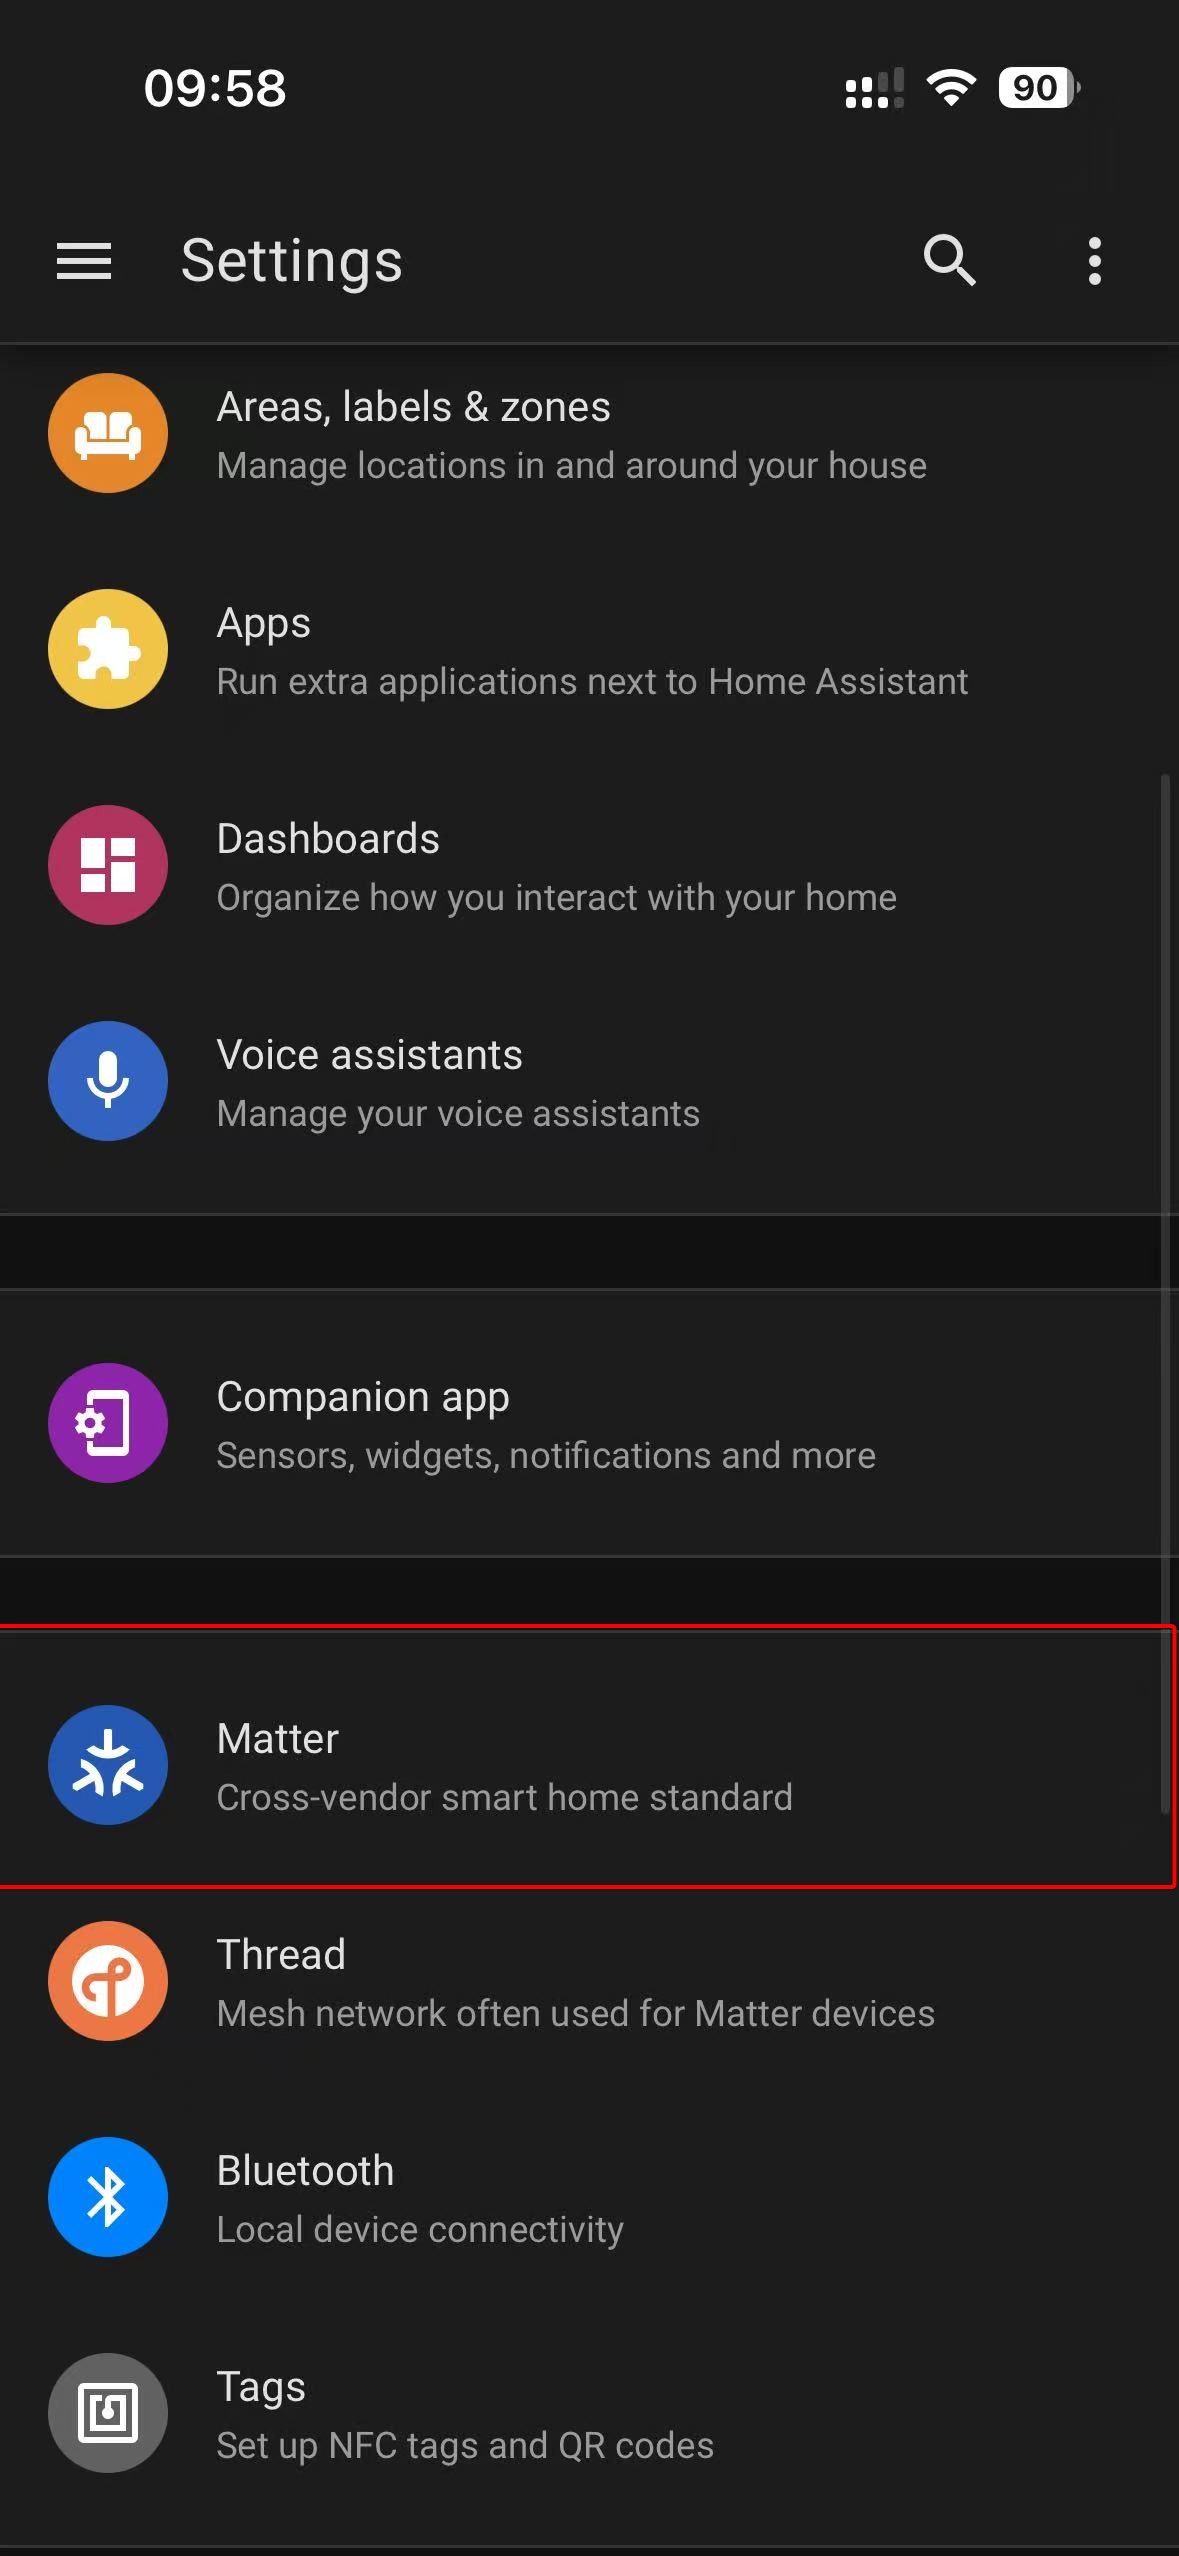
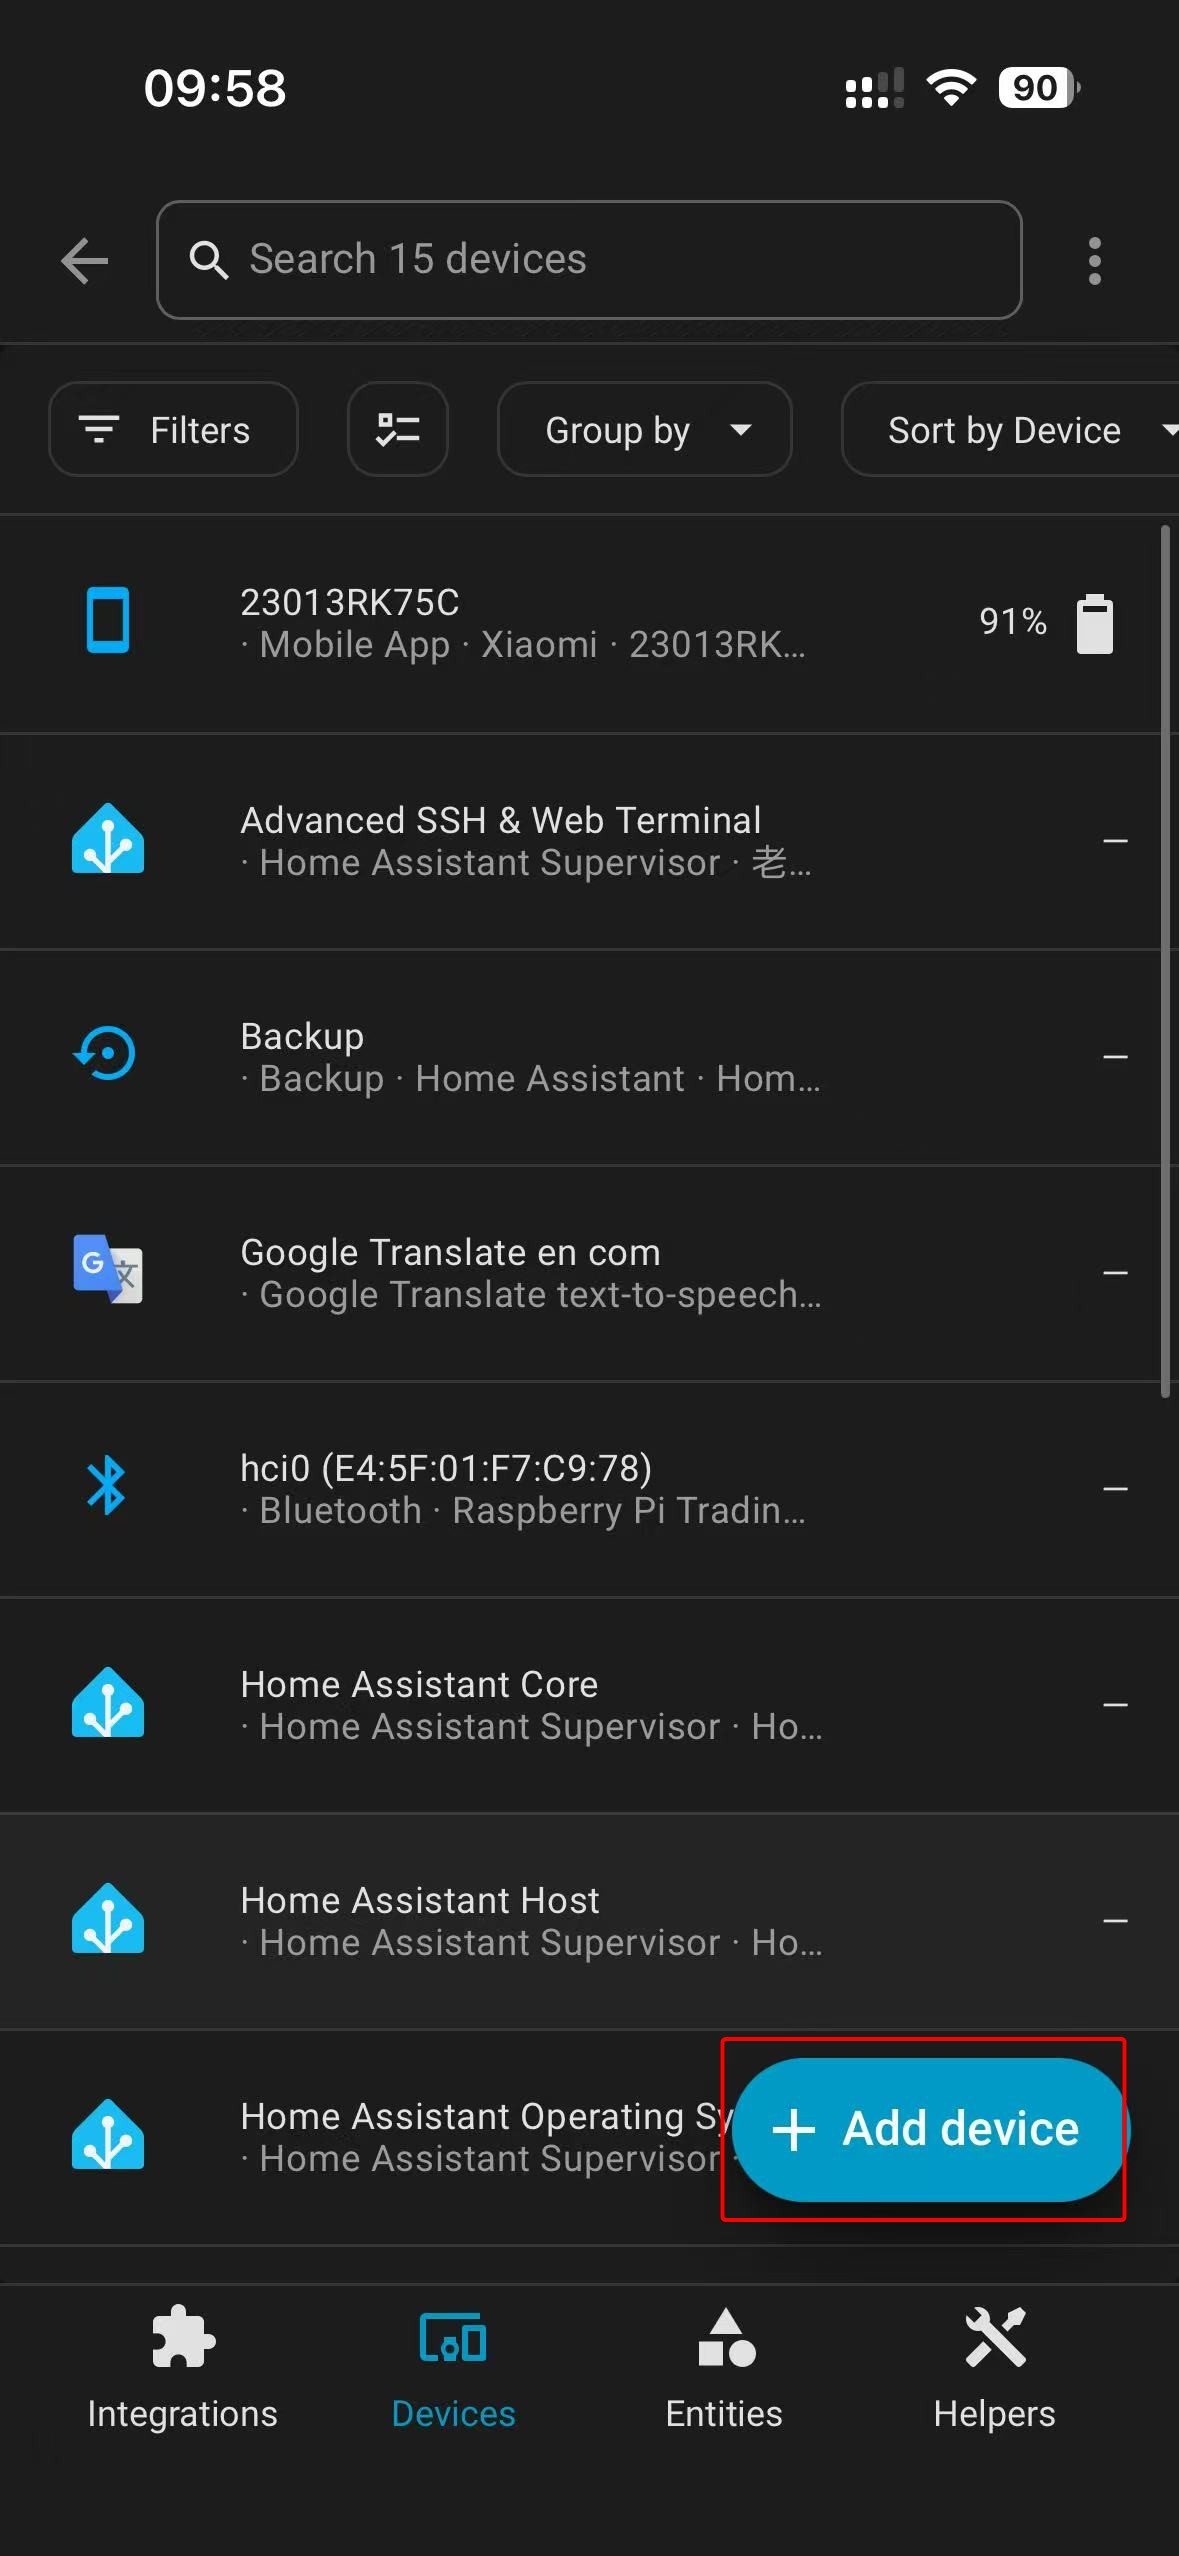
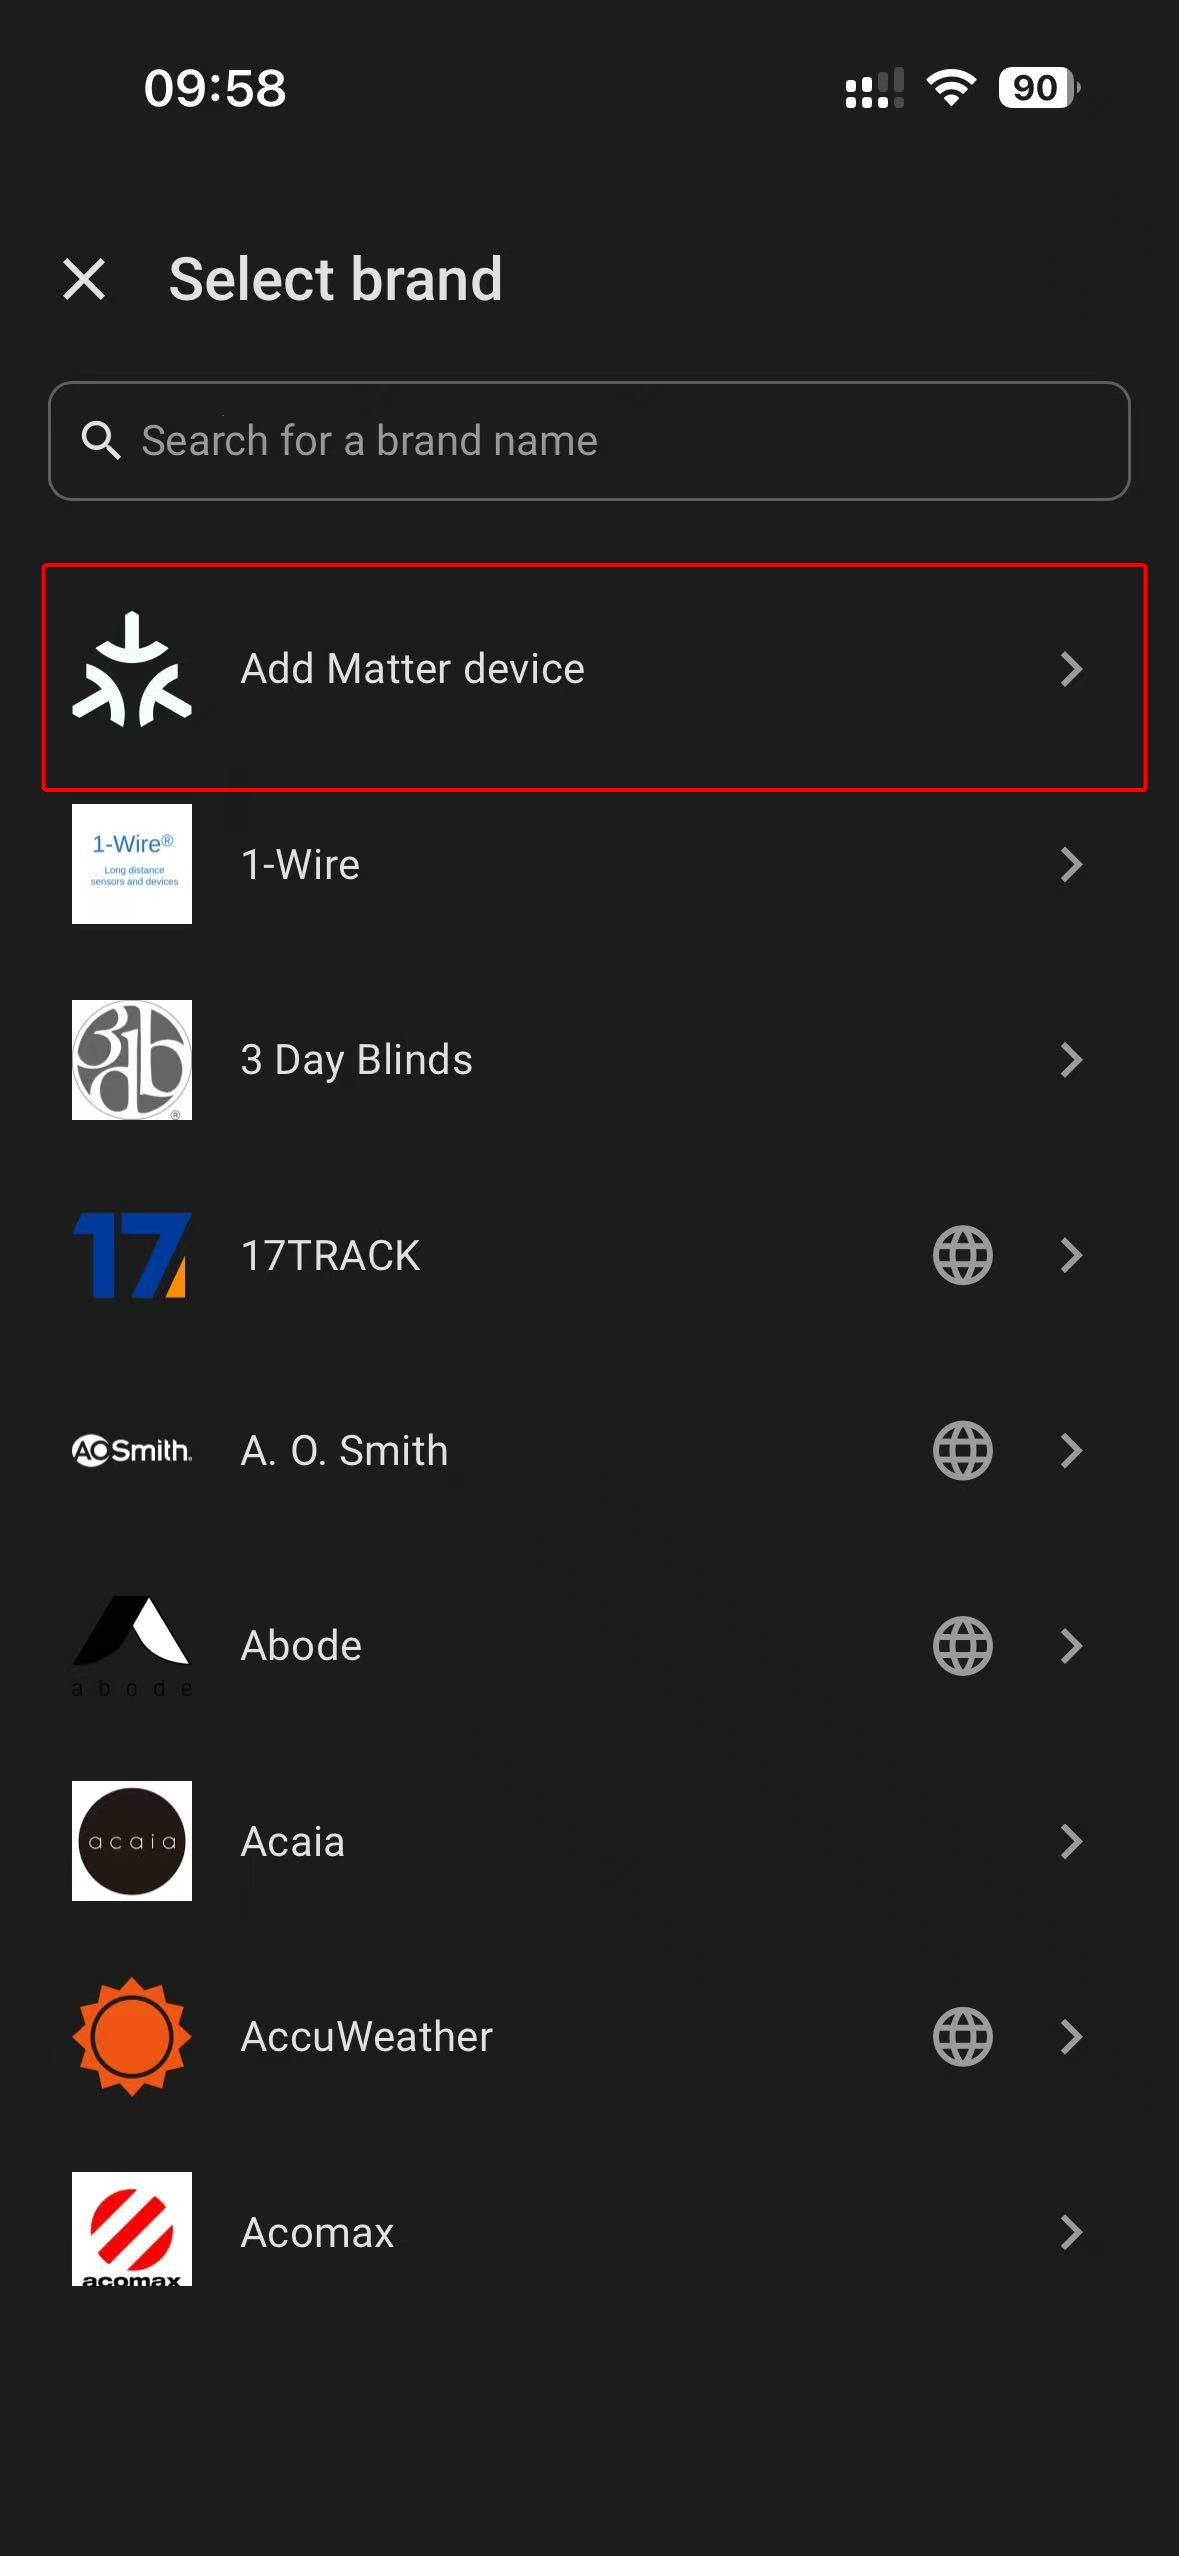
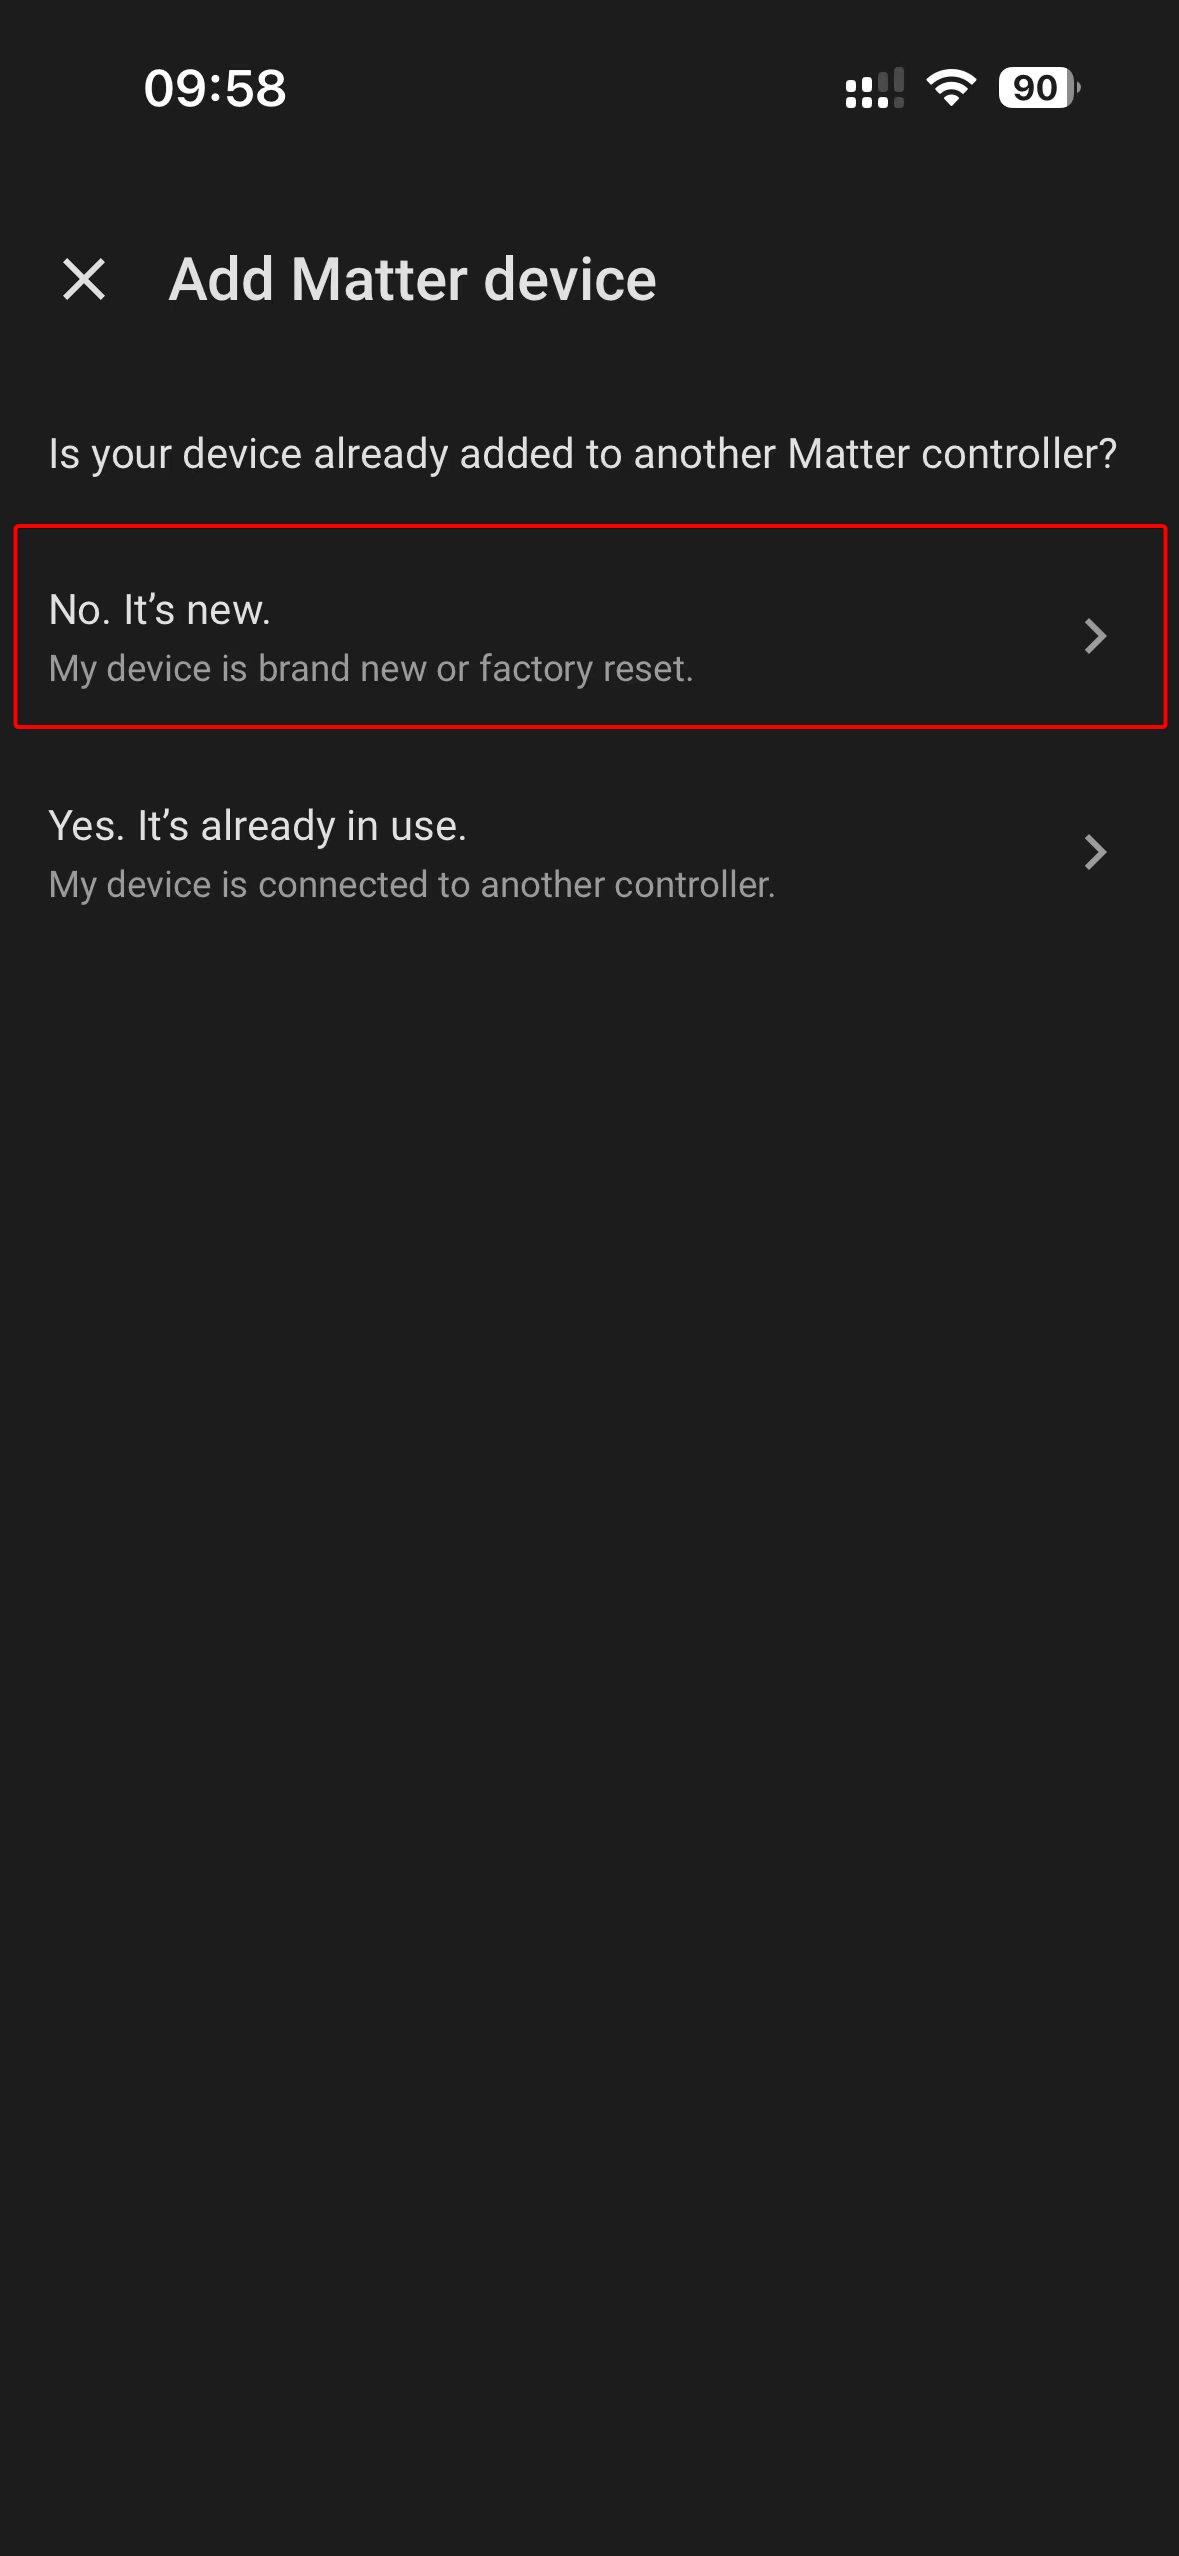
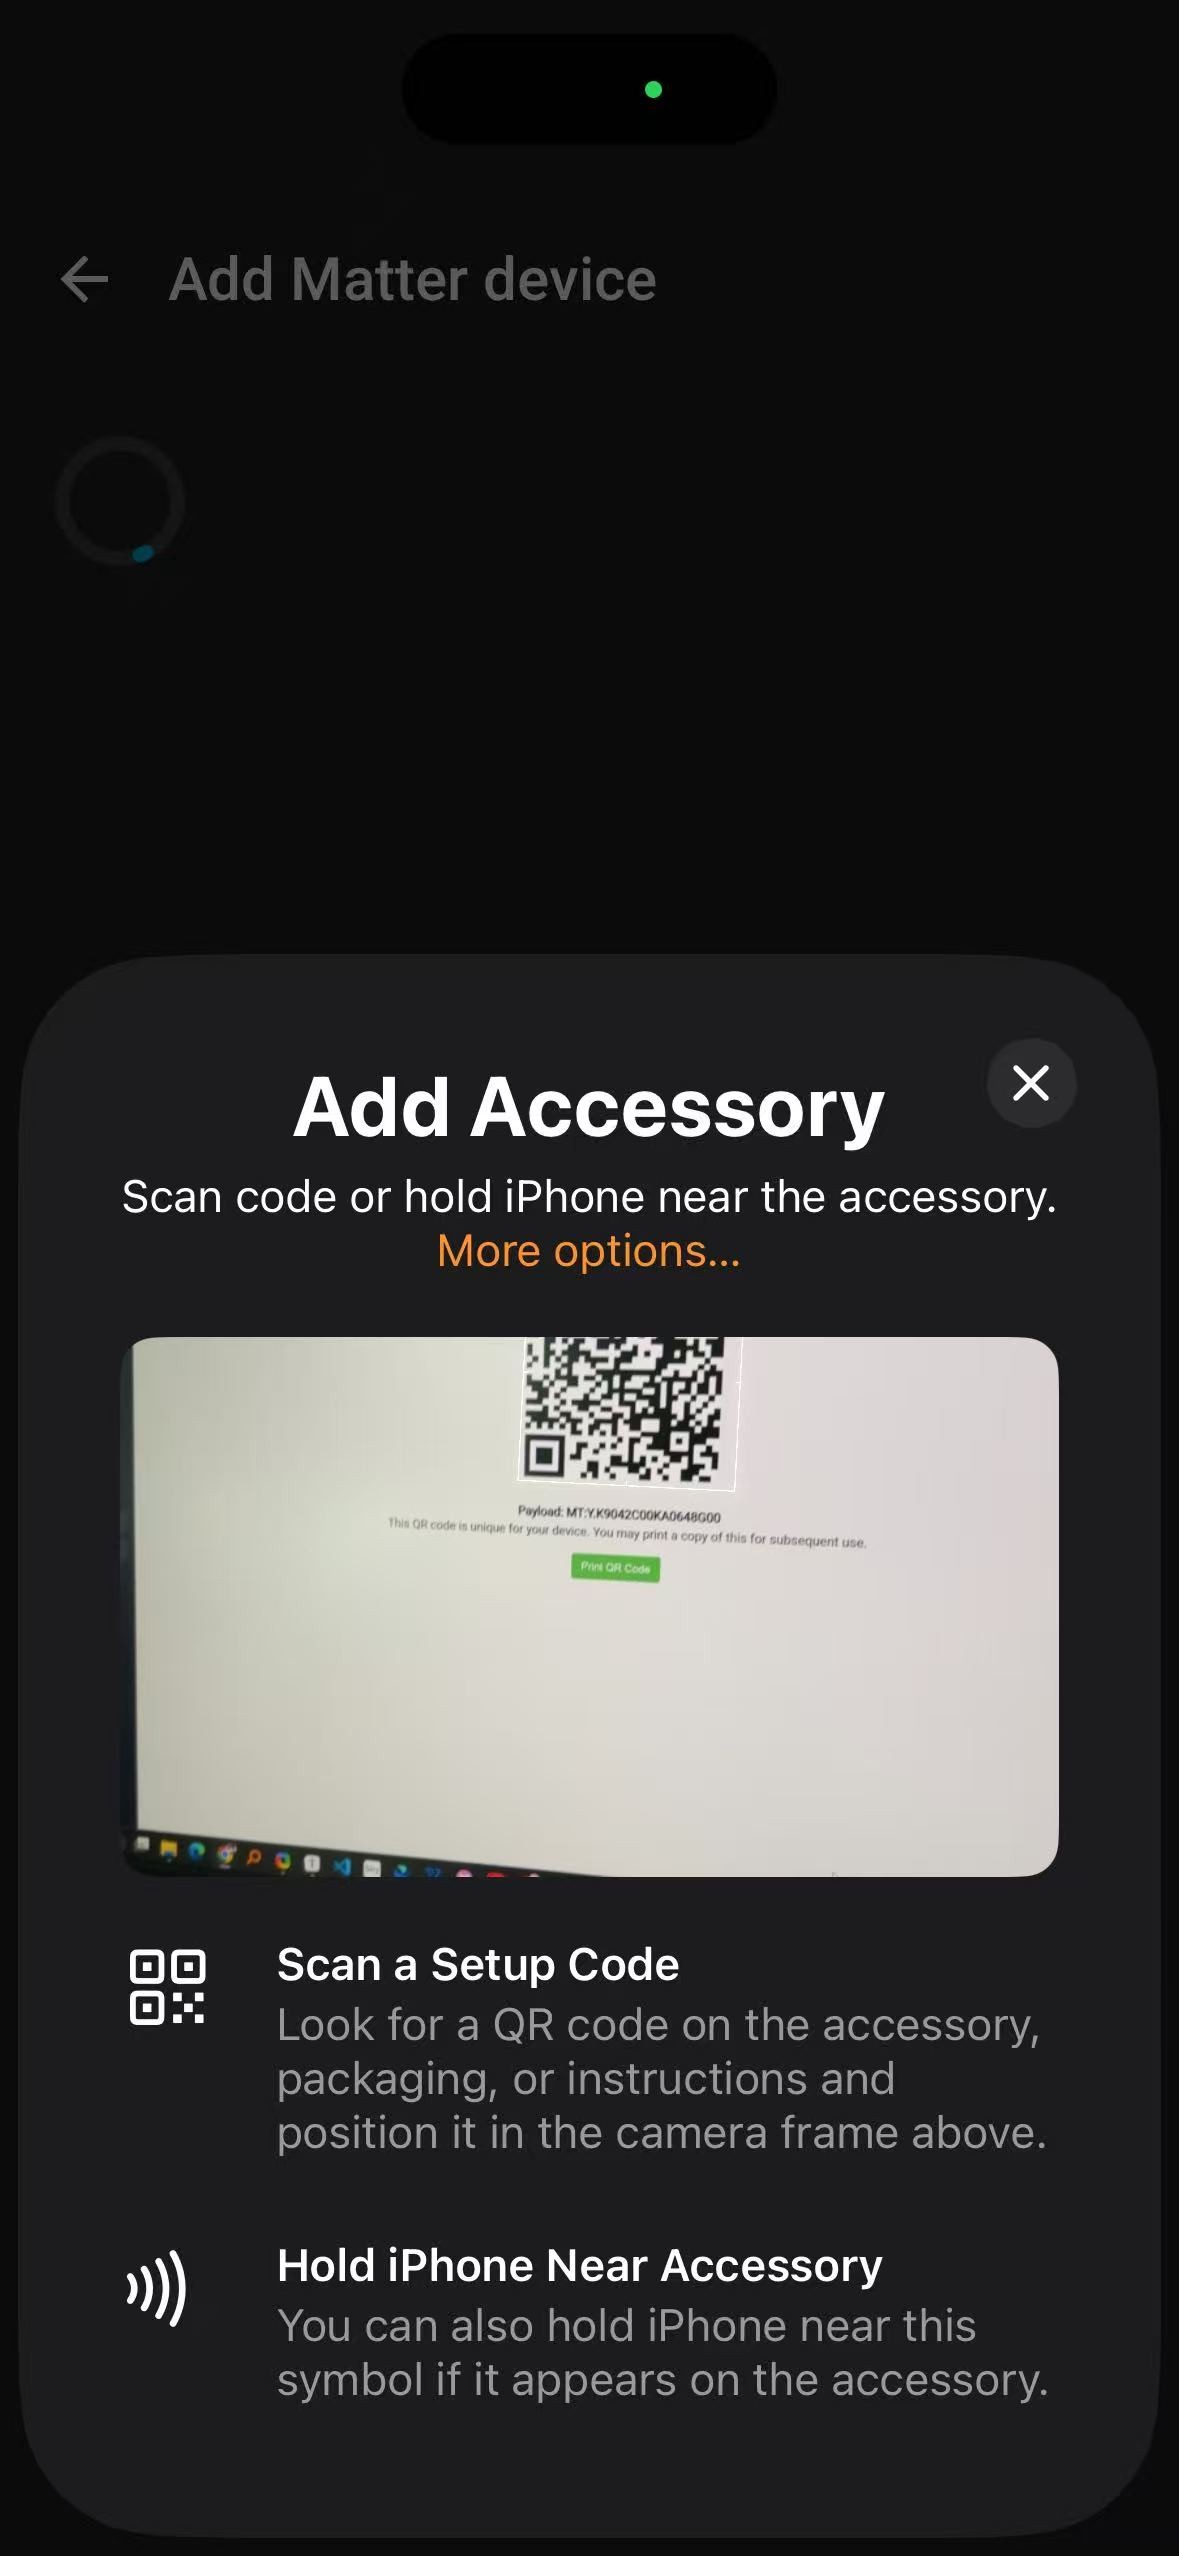
- 通过手机应用将 Matter 设备加入 Home Assistant;扫描提供的二维码下载 App。
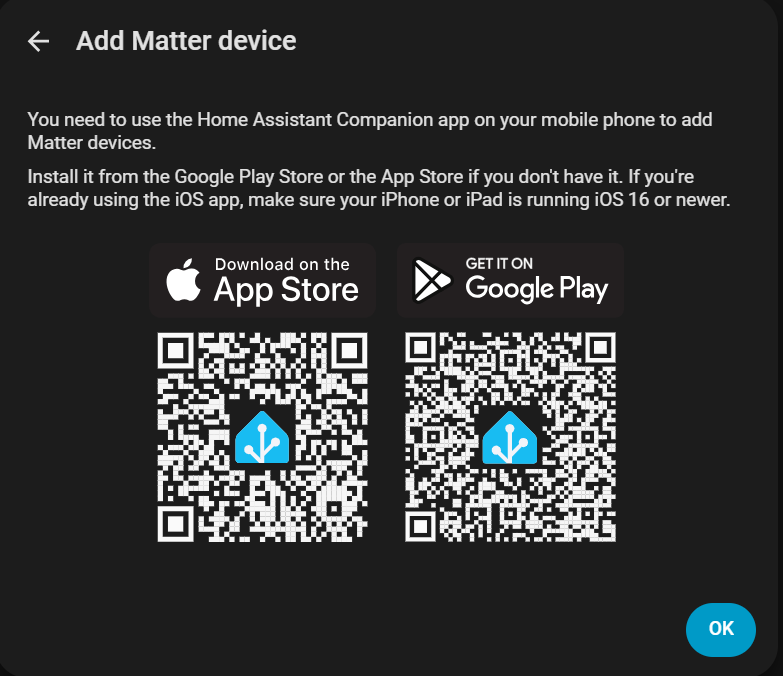
- 进入设置添加 Matter 设备,然后扫描浏览器中生成的二维码完成配对。
 |  |  |  |  |
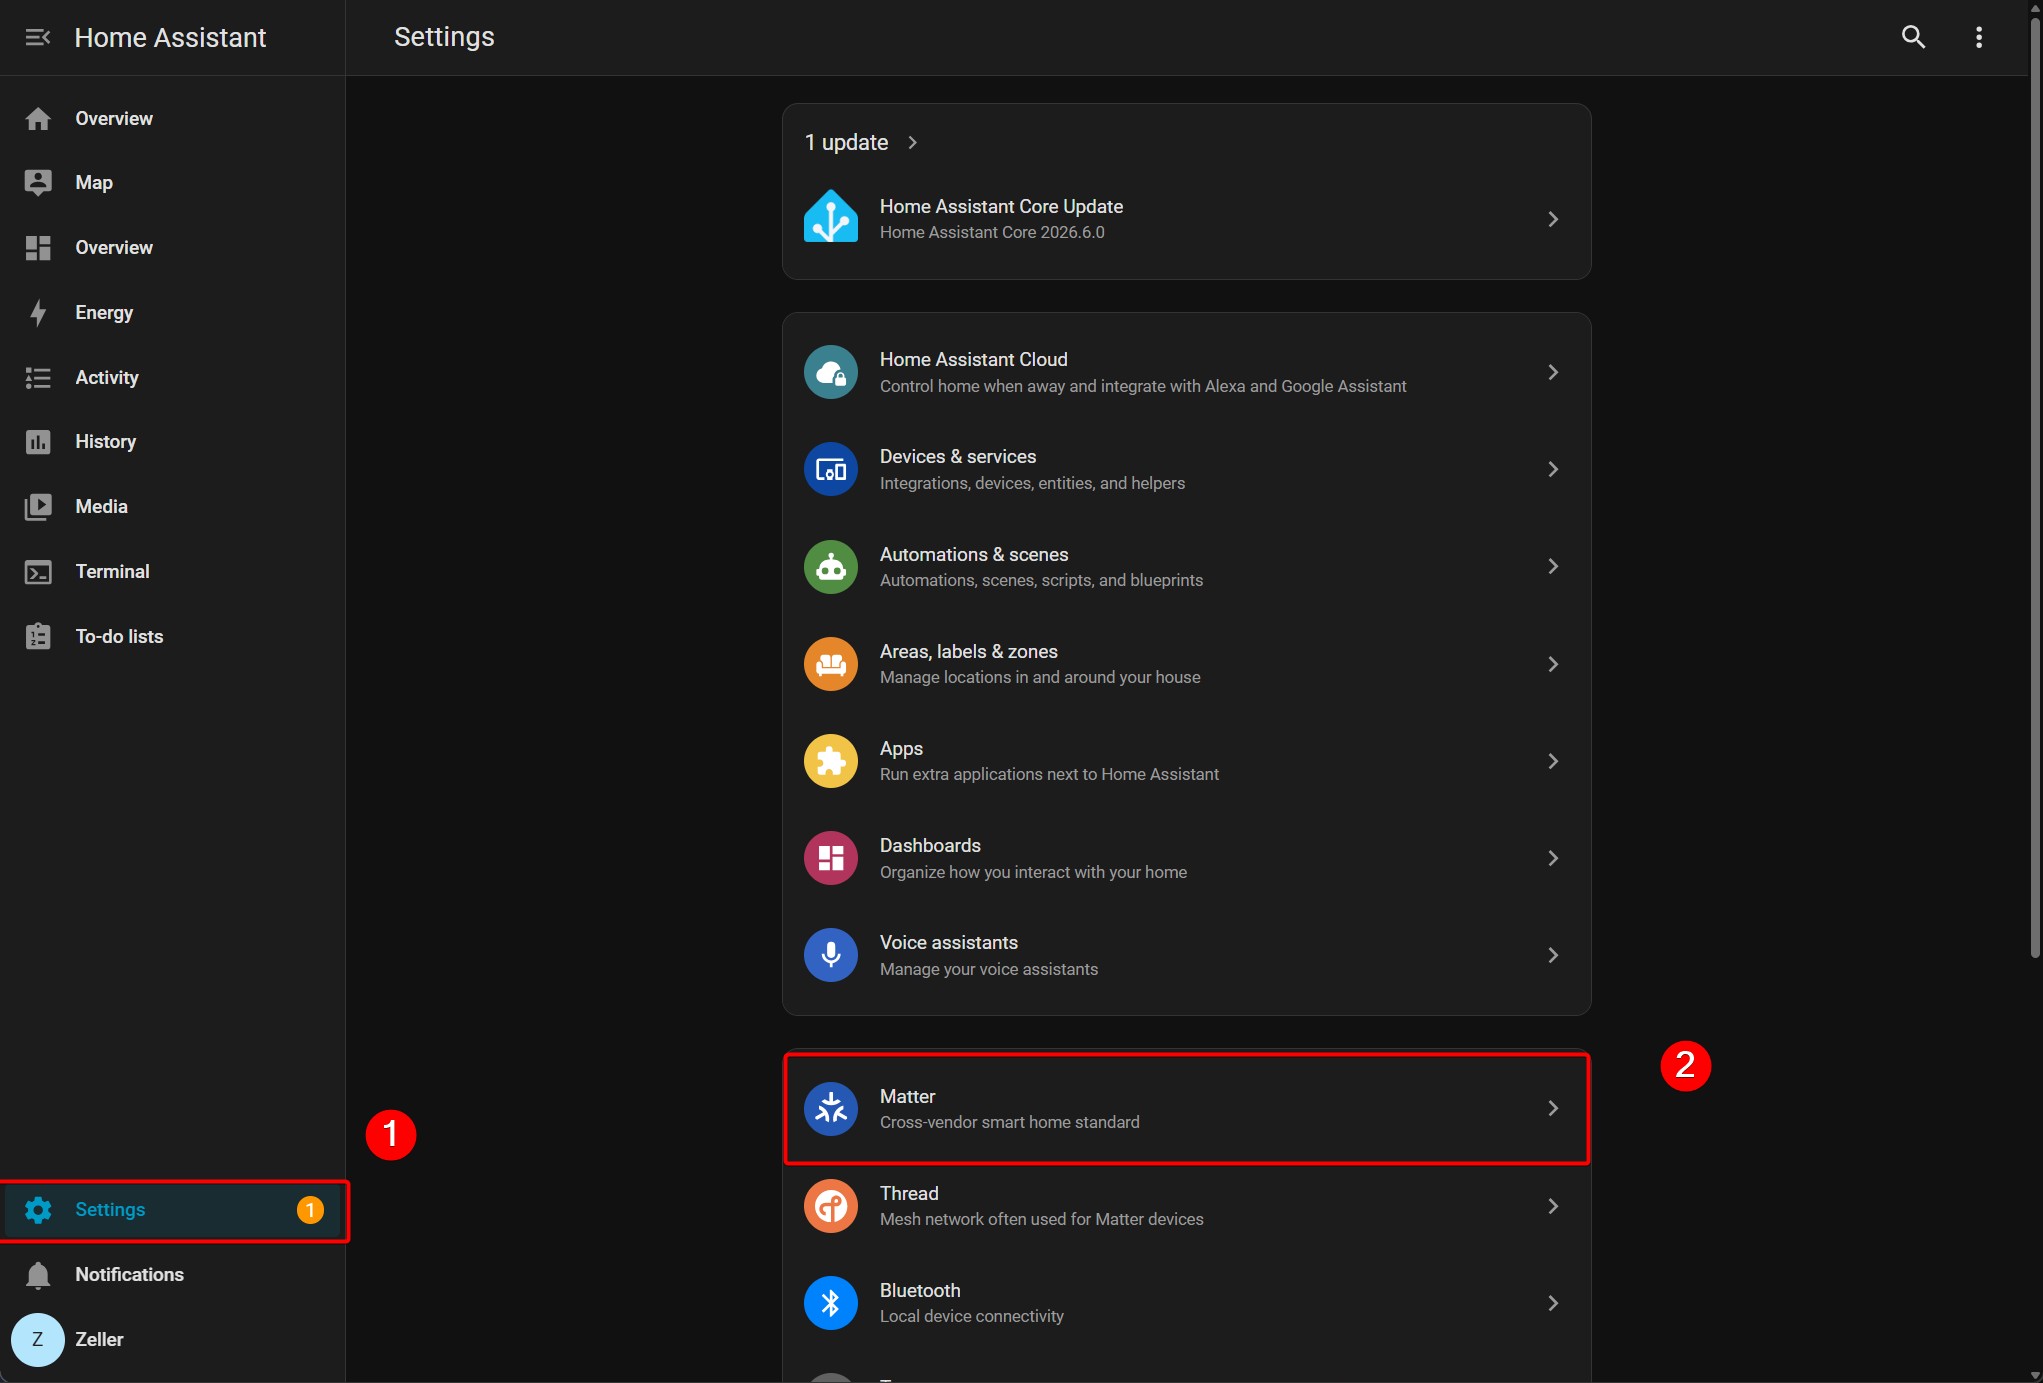
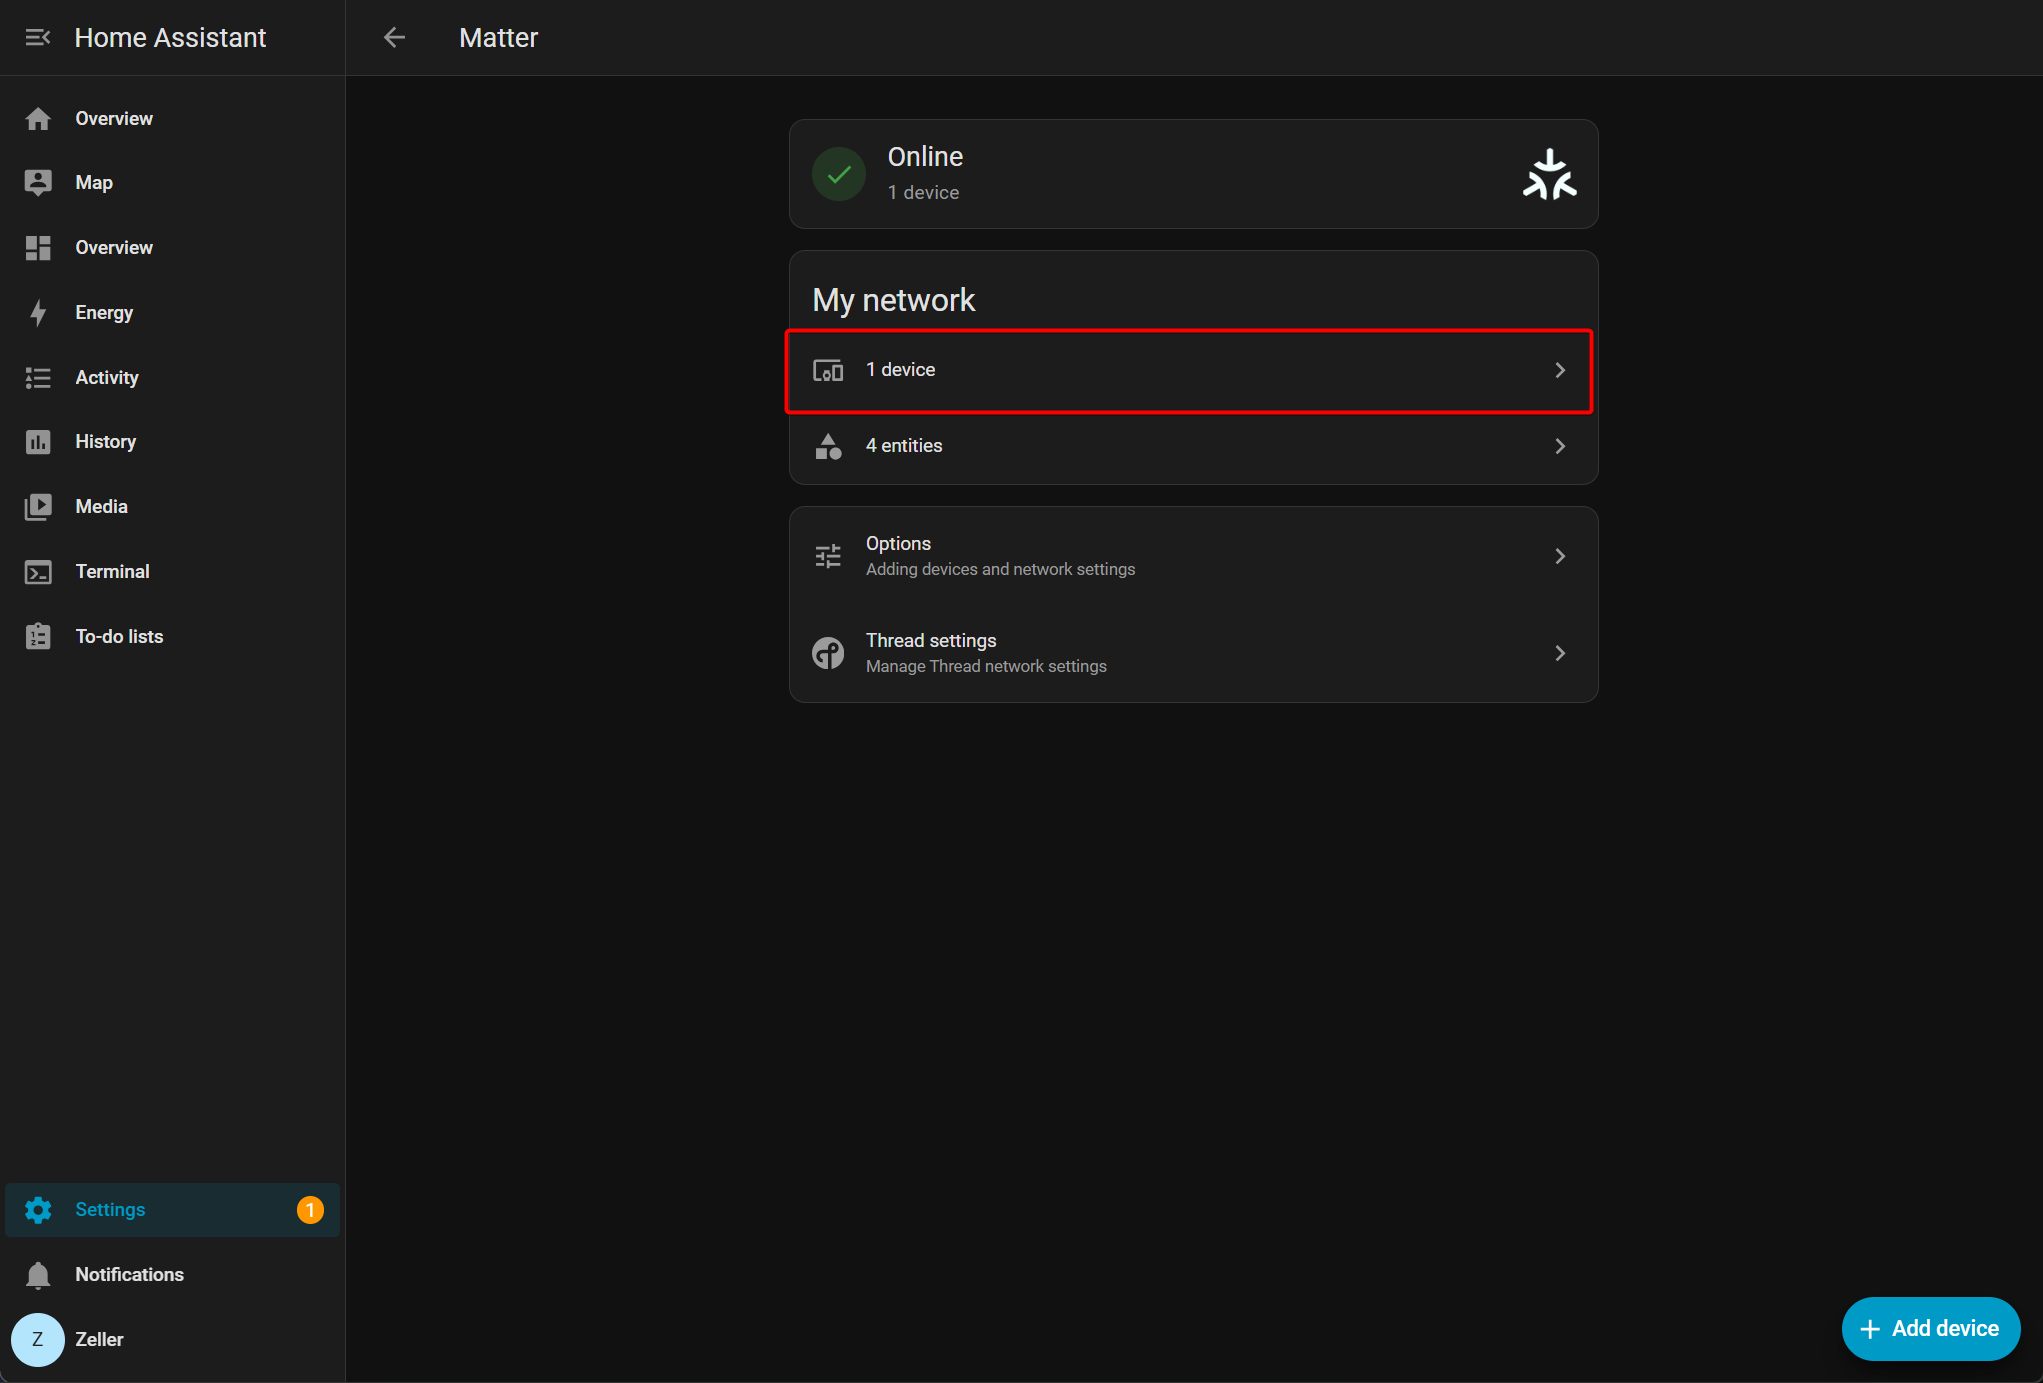
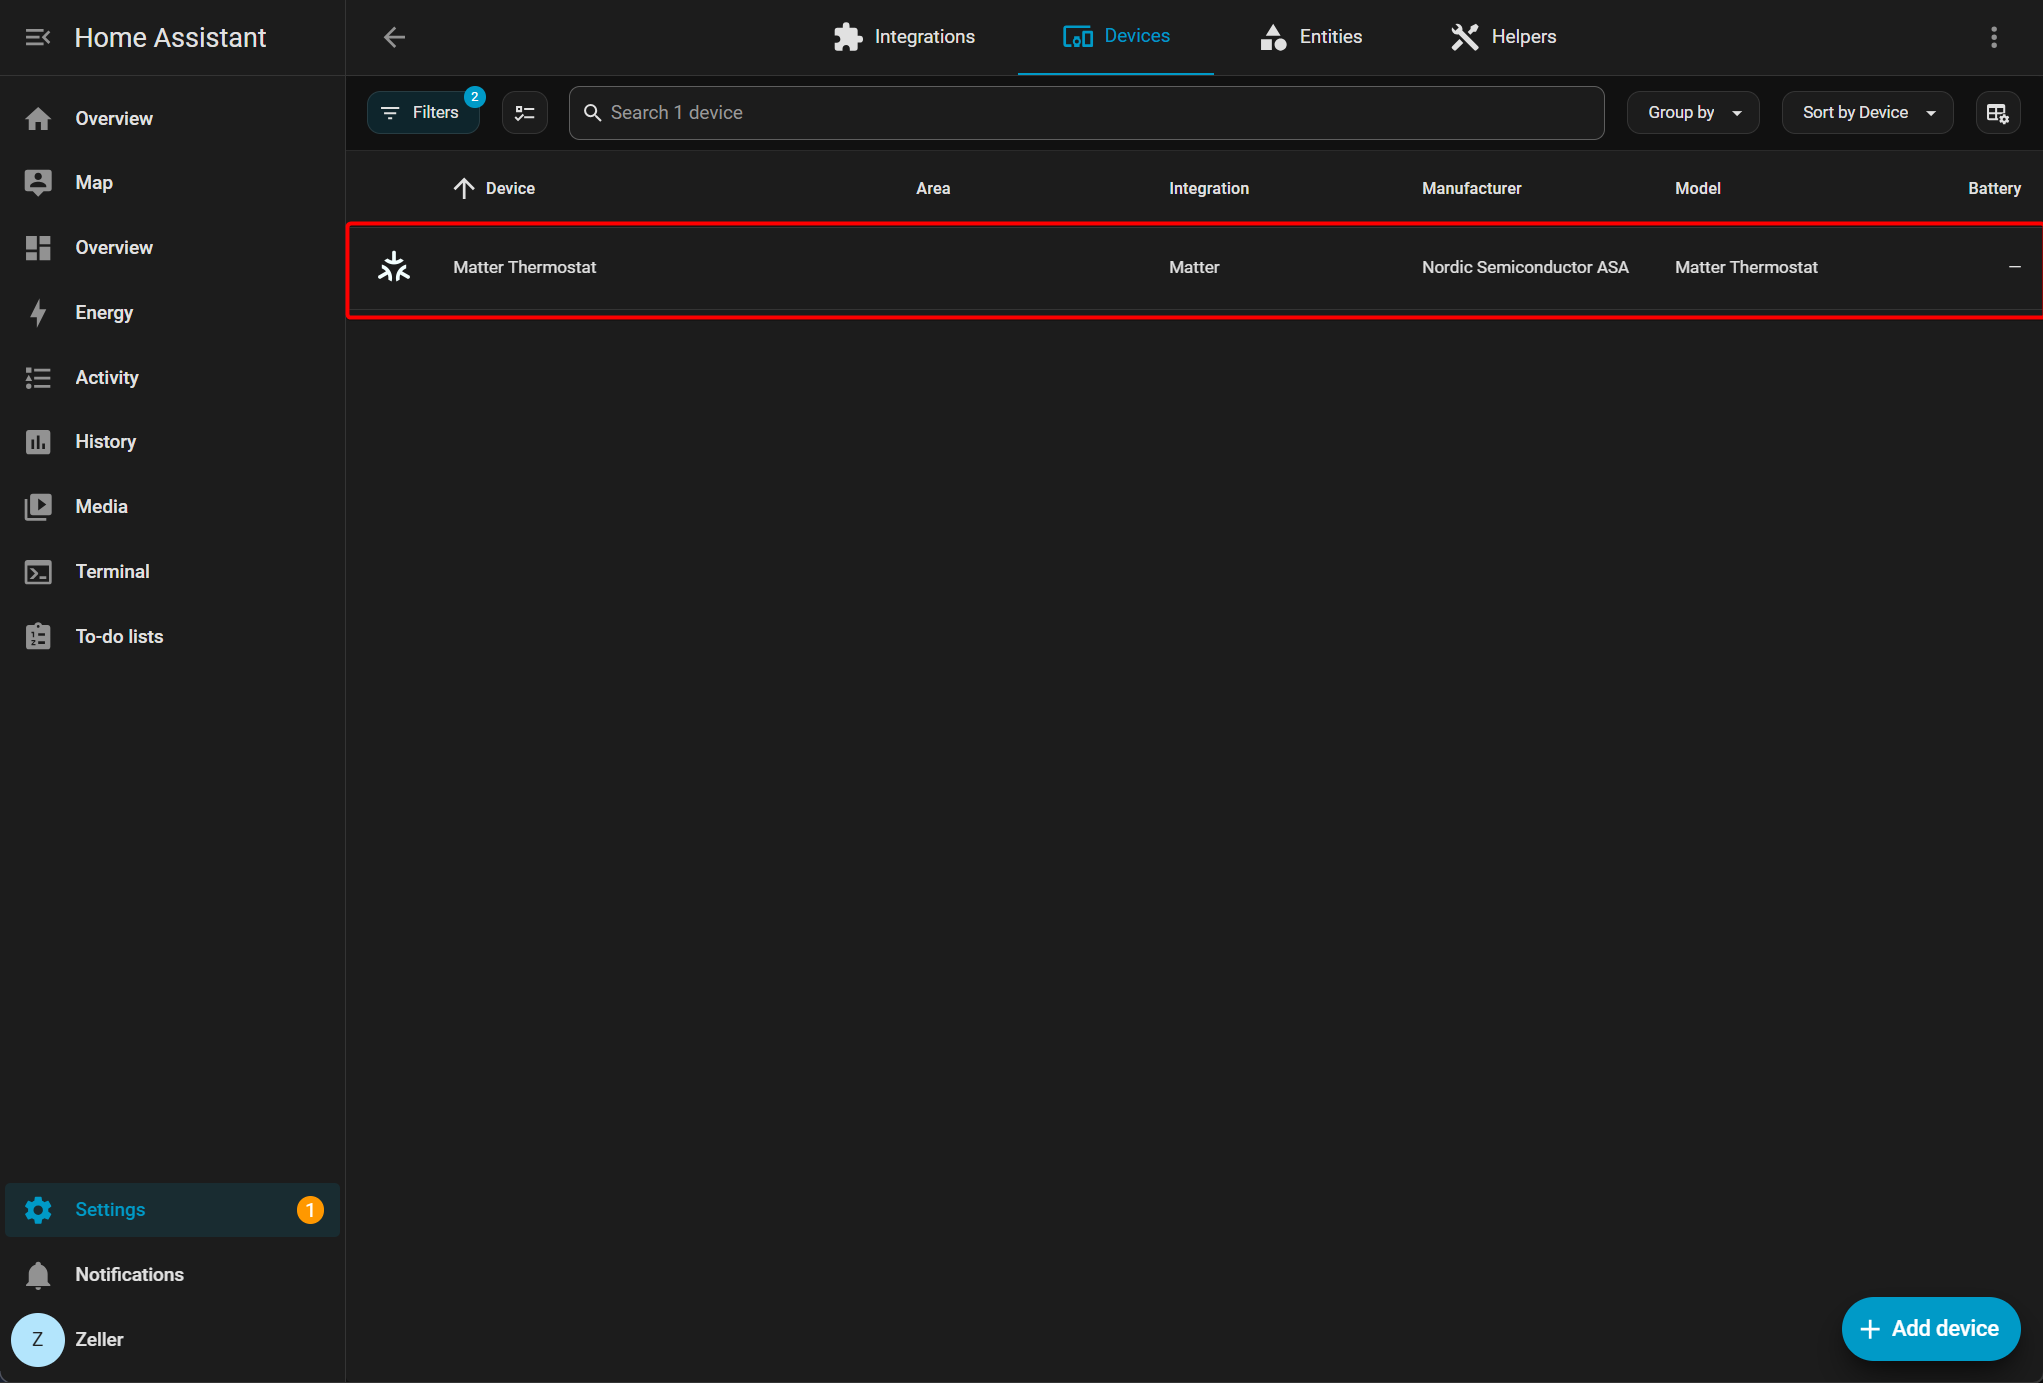
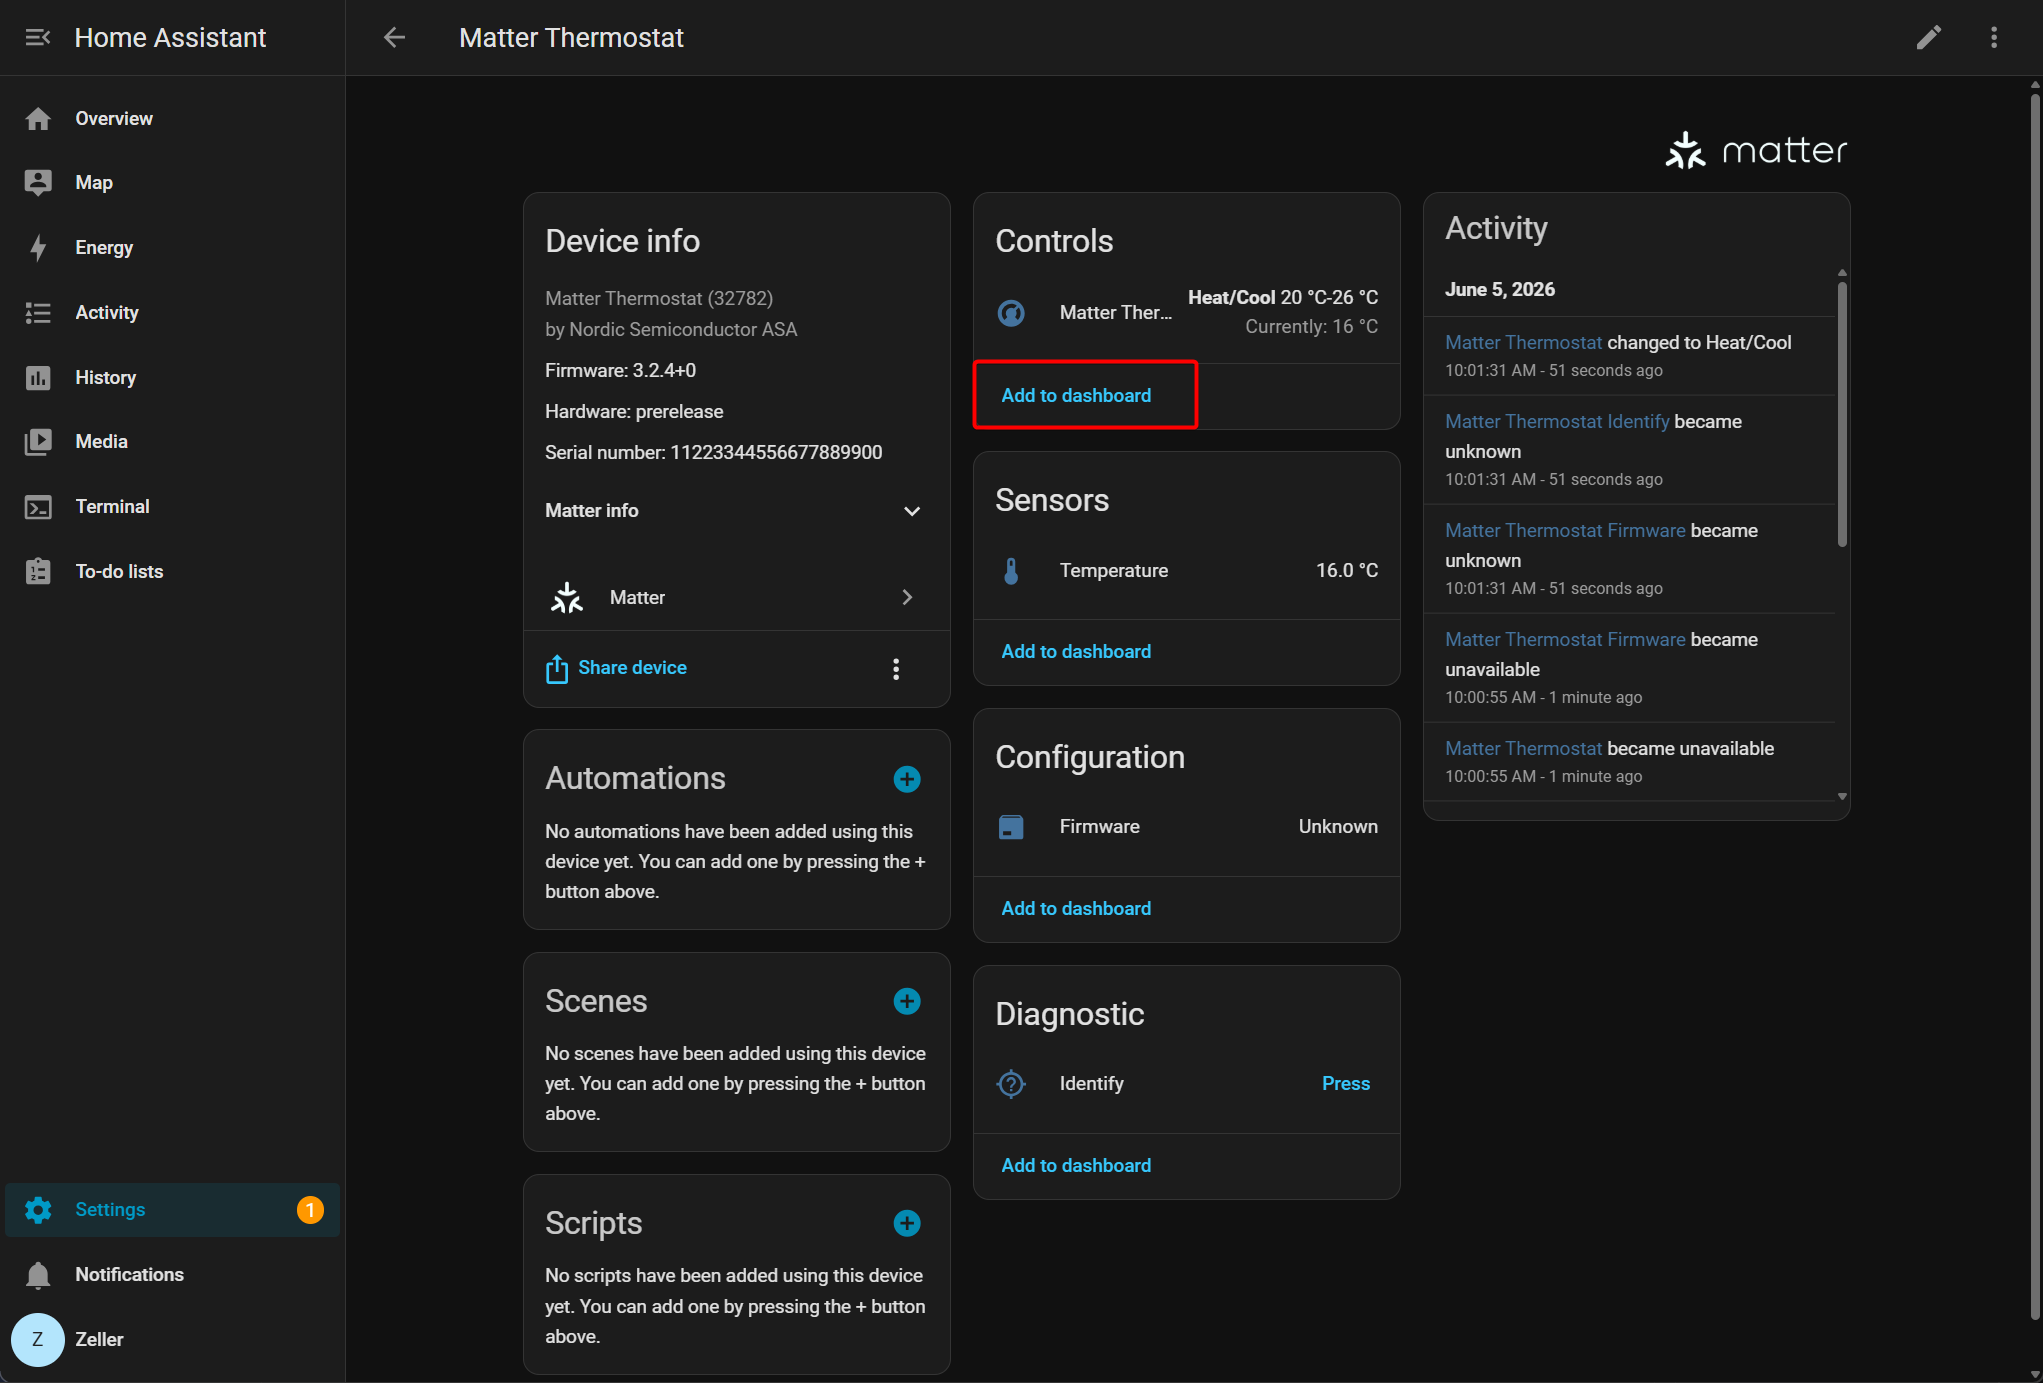
- 可以在 Home Assistant 的浏览器仪表盘上查看 Matter 设备信息。
 |  |  |
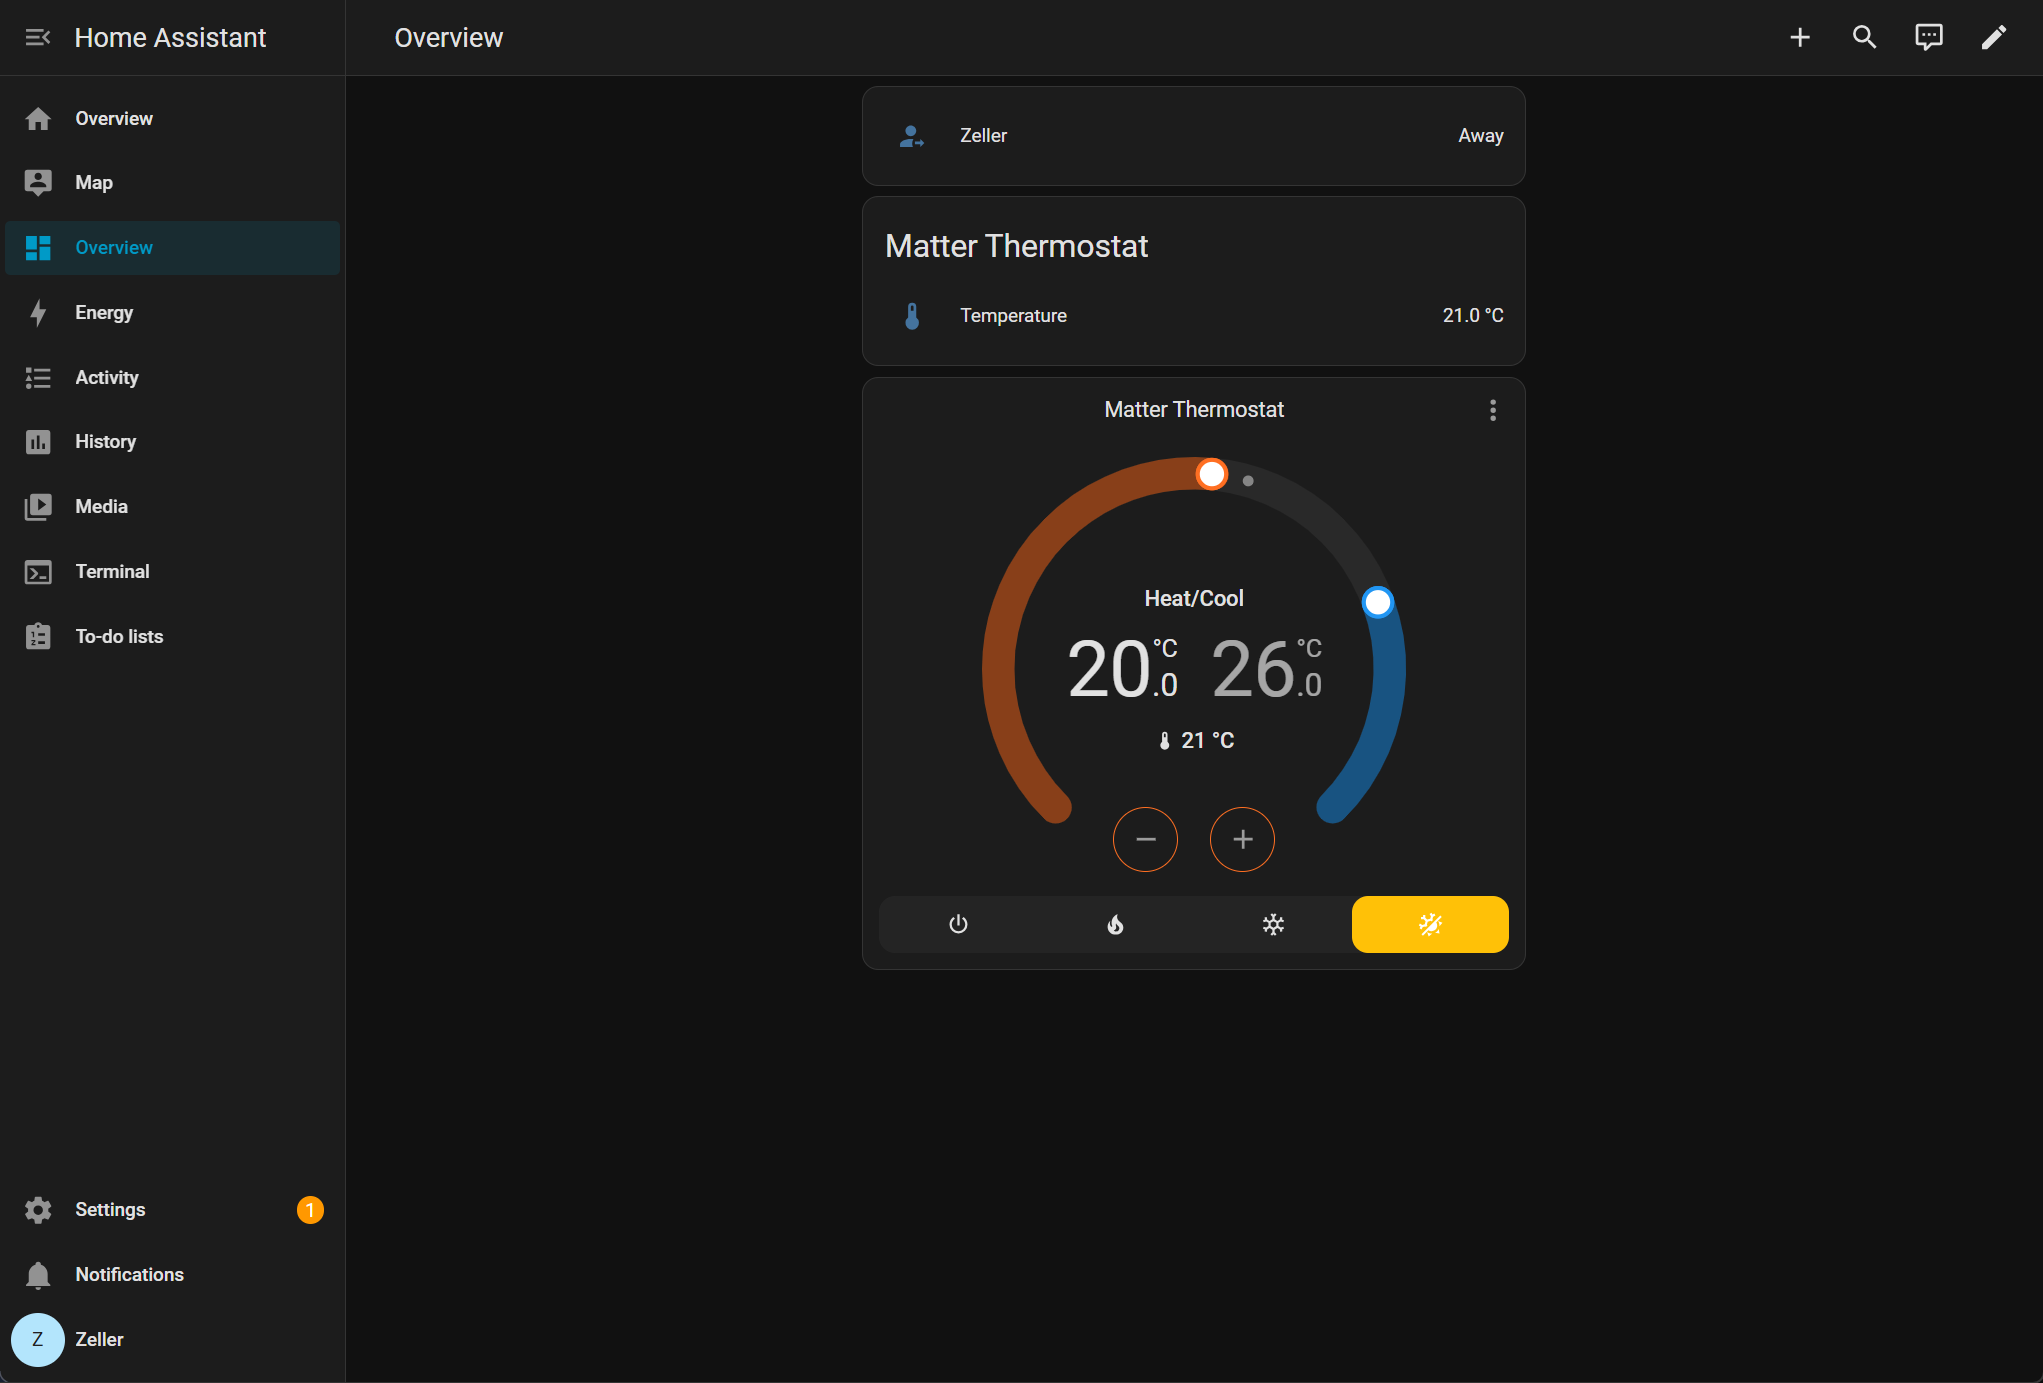
- 将设备添加到仪表盘。
- Matter 设备的实时数据将显示在仪表盘上。
总结
按照上述步骤,我们已经使用两块 XIAO nRF54LM20A 模块搭建了一个基于 Thread 的 Matter 网络,并成功将该网络连接到 Home Assistant。Matter 协议支持接入更广泛类型的传感器,而上述演示仅模拟了温湿度数据采集。在集成其他传感器设备时,请确认 Matter 规范中是否定义了匹配的 Cluster。更多详情请参考官方文档 Home Assistant Matter。
技术支持与产品讨论
感谢您选择我们的产品!我们将为您提供多种支持,确保您在使用我们产品的过程中尽可能顺利。我们提供多种沟通渠道,以满足不同的偏好和需求。