Control reBot Arm using voice with reSpeaker
This document will take you hand in hand from scratch to build a "listening and moving" intelligent robot arm system. Even if you have never touched the robotic arm or hardware development, as long as you follow the steps, you can successfully reproduce this project!
Hardware Required
| reBot Arm B601-DM |
|---|
 |
| reSpeaker Flex XVF3800 Circular | reSpeaker XVF3800 | |
|---|---|---|
 | OR |  |
1. Project Overview
1.1 What is this project?
This project is a voice-driven intelligent robot arm control system. Imagine this scene:
🎬Scenario Demo
When you say "hello" to the robotic arm on the table, the robotic arm will immediately turn to your direction and nod like a human. When you say "dance," it swings merrily. If you go to the other side of the room and clap your hands, it will immediately "hear" the direction of the sound and turn to face you-this is the intelligent robot we want to build!
In short, this system does three things:
-
Listen-capture your voice through the microphone array, and can also determine which direction the sound is coming from
-
understand-identify what you say through AI and understand your intention
-
move-control the mechanical arm to make corresponding actions (turn, nod, dance, wave, etc.)
1.2 Two Interaction Modes
The system provides two core working modes, which you can choose according to your needs:
| Mode | Name | Interaction | Fits Scene |
|---|---|---|---|
| Mode 1 | DOA sound source tracking | Automatically detect sound direction and turn | Exhibition hall demonstration, interactive device |
| Mode 2 | Voice Command Control | Press and hold Enter to control | Voice Assistant, Teaching Demo |
1.3 How does the system work?
Describe the architecture of the entire system in layman's terms:
You speak / make a sound
      ↓
[ reSpeaker ] —— An array composed of 4 "ears" can hear and determine the direction of sound.
      ↓
[ Ubuntu ] ——
      ↓
   There are two paths:
   ├─→ DOA Mode: Locally directly calculate the sound direction → Control the robotic arm to turn
   └─→ Voice mode: Upload to cloud AI for recognition → Understand your intention → Control the movement of the robotic arm
      ↓
[ reBot Arm ] —— An arm composed of 7 "joints" performs various actions.
A more specialized architecture diagram is described as follows:
Hardware layer (devices you can touch):
-
reSpeaker (4 Microphone Array XIAO ESP32S3 Controller)
-
reBot Arm B601-DM (6-DOF manipulator)
-
Ubuntu 22.04 computer (running the main program)
Driver Layer (enables hardware to communicate):
-
USB Audio communication (pyusb/libusb)-connect microphone array
-
Serial communication (MotorBridge)-Connect the mechanical arm
-
Web API(Groq Cloud)-connect to cloud AI services
Algorithm layer (the "brain" that processes the data):
-
DOA sound source localization (local real-time calculation)
-
Whisper speech recognition (Groq Cloud)
-
Llama-3.3 Intent Understanding (Groq Cloud)
-
Motion interpolation planning (local smoothing control)
Application Layer (you can see the effect):
- DOA tracking mode voice control mode breathing standby animation voice broadcast
2. hardware preparation
2.1 what do you need to prepare?
Before you begin, make sure you have all the following hardware ready. If you are the first contact with this kind of project, it is recommended to buy the complete package directly to avoid compatibility problems.
| Component | Model | Quantity | Approximate Features | Purchase Recommendations |
|---|---|---|---|---|
| Mechanical arm | reBot Arm B601-DM | 1 set | "body" to perform actions | Seeed Studio official |
| Microphone array | reSpeaker XVF3800 | 1 | Listen to sound and determine direction | Seeed Studio official |
| Master PC | Ubuntu 22.04 PC | 1 | Run the program's "brain" | x86_64 architecture |
| USB cable | USB-A to USB-C | 2 | connected devices | generally included with the device |
| Woodworking Fixture | 3 inches or more | 2 | Fixed mechanical arm base | Hardware store or included with the set |
| power supply | 24V 15A(XT30 interface) | 1 | power supply to mechanical arm | generally included with the package |
2.2 a brief introduction of each hardware
2.2.1 reBot Arm B601-DM Arm
This is a desktop-level mechanical arm with 7 "joints" (professionally called 7 degrees of freedom), just like a human arm, it can make various flexible movements.
Joint description (top to bottom):
| Joint | Popular | What can you do | Range of motion |
|---|---|---|---|
| J1 | Waist (base rotation) | Whole body left and right rotation | ± 149 ° |
| J2 | Big Arm Lift | Lift or Lower Big Arm | 0 ° ~ -206 ° |
| J3 | Extension of forearm | Extension or bending of forearm | 0 ° ~ -206 ° |
| J4 | Wrist Rotation | Wrist Rotation Left and Right | ± 85.9 ° |
| J5 | Wrist pitch | Wrist up and down swing | ± 85.9 ° |
| J6 | Wrist yaw | Wrist trim direction | ± 85.9 ° |
| J7 | Clamp | Grab object | Opening and closing control |
💡You can understand this:J1 is like the rotation of a person's waist, J2 is like the lifting of the shoulder, J3 is like the bending of the elbow, J4/J5/J6 is like the various rotations of the wrist, and J6 is like a finger. These joints are combined, and the robotic arm can make a very rich movement.
⚠Assembly Warning: If you are buying parts that need to be assembled by yourself, please pay special attention:
-
The kit contains a large number of screws and structural parts, and some parts are very similar in appearance
-
It is strongly recommended to use an electric screwdriver, the torque is adjusted to the middle and low range (3 ~ 6kgf.cm)
-
Excessive torque can easily lead to lock screw sliding wire
-
Please pay attention to safety when assembling to prevent hand clamping and crushing
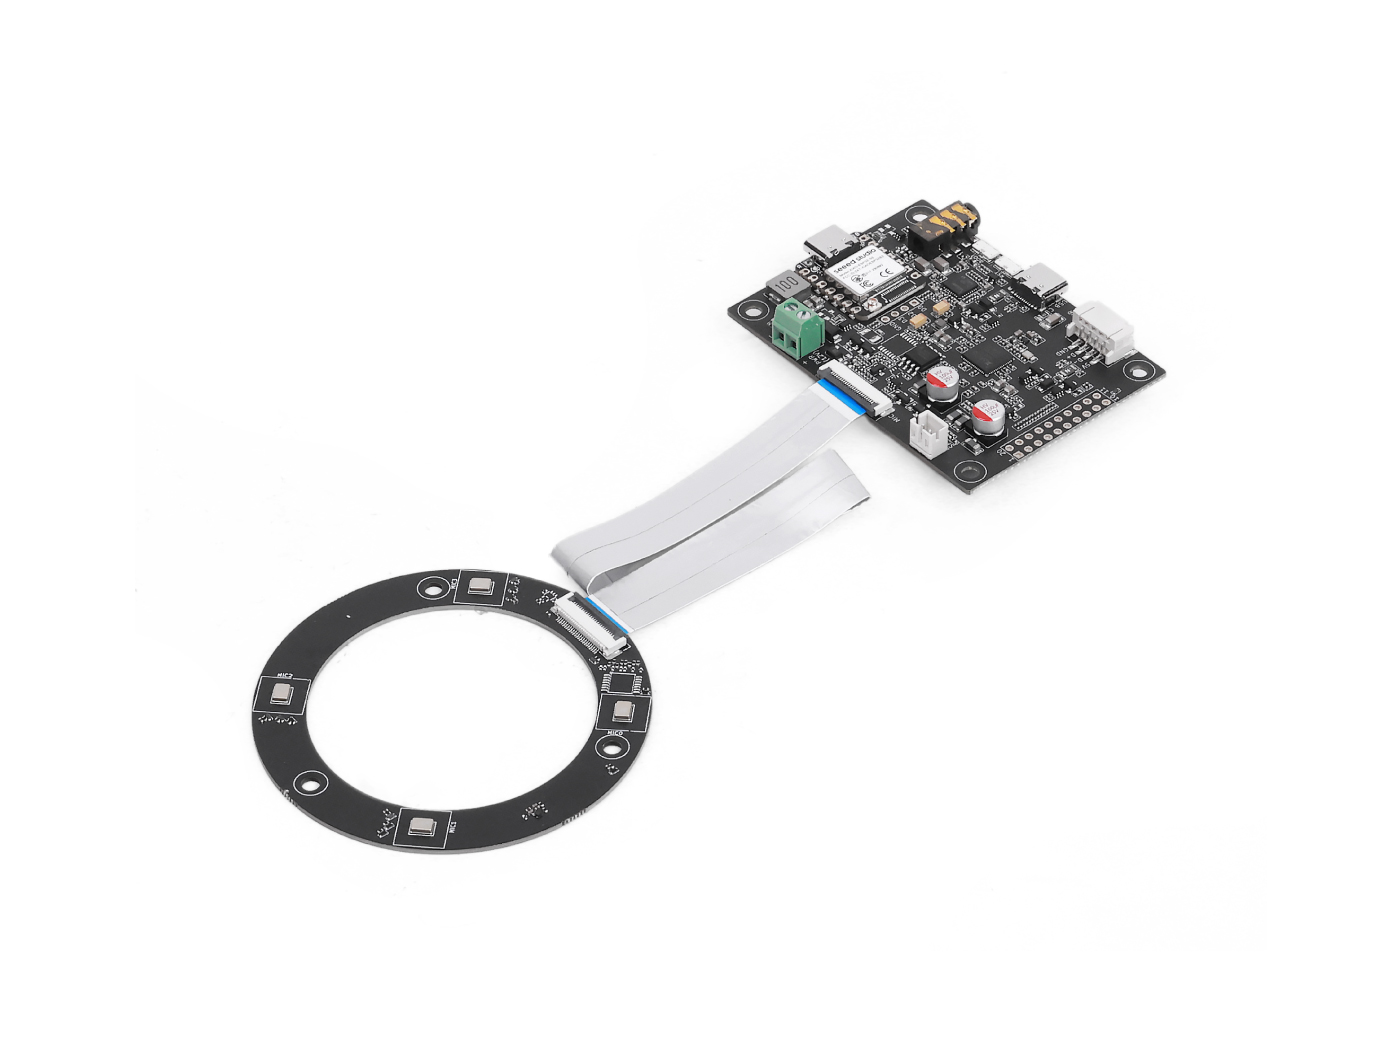
2.2.2 reSpeaker Microphone Array
This is a 4 microphone intelligent voice processing module, the core features are:
-
Split design: The core board and the microphone array board can be separated, which is convenient for you to arrange flexibly in different devices
-
360 ° pickup:4 microphones are arranged in a ring, which can receive sound from all directions
-
Built-in intelligent processing: Integrated XMOS XVF3800 chip, with echo cancellation, noise suppression, sound source localization (DOA) and other functions
-
Dual USB interface: There are two connection modes: USB-C interface and PH2.0 lock interface
-
Built-in power amplifier: can directly drive a 10W speaker (through JST interface)
Core Components:
| Component | Action |
|---|---|
| XMOS XVF3800 chip | The "brain" responsible for all audio processing |
| TLV320AIC3104 codec | converts analog sound signals into digital signals |
| 24-pin FPC interface | Connecting the microphone array board and the core board |
| USB-C interface | Connect computer, transmit audio and power |
| 3.5mm headphone jack | can plug in headphone monitor |
| JST speaker connector | Can be connected to external speakers |
💡Analogous understanding: You can think of it as a "downwind ear"-not only has 4 ears to listen to the sound from all directions, but also can analyze which direction the sound comes from, and can filter out the noise, only focus on you want to hear the sound.
2.2.3 Ubuntu 22.04 Computer
Ubuntu is a free and open source operating system (similar to Windows, but more popular with developers). Requirements of this project:
-
Operating System:Ubuntu 22.04 LTS(64-bit version)
-
Architecture:x86_64 (that is, a normal Intel/AMD processor computer)
-
Minimum configuration recommendations:
-
CPU:4 cores or above
-
Memory: 8GB or more
-
Hard disk: 50GB free space
-
Network: can access the Internet (used to call cloud AI)
💡What if you have a Windows system on your computer?
You have two options:
-
Install dual system: Keep Windows and Ubuntu on the computer at the same time (recommended)
-
Use virtual machine: run Ubuntu virtually with software (such as VMware) in the Windows (there will be some loss of performance, not recommended for this project)
Ubuntu 22.04 Installation Tutorial:https://ubuntu.com/download/desktop
2.3 hardware connection diagram
Before you begin, familiarize yourself with how all devices should be connected. The overall connection is very simple, only two USB cables are required:
          ┌─────────────────────────────────────┐
          │          Ubuntu 22.04            │
          │   ┌──────────┐                      │
          │   │  Python  │  ←── Run the main program       │
          │   │  3.10    │                      │
          │   └──────────┘                      │
          │          │                          │
          │   ┌──────┴──────┐                  │
          │   │  Groq API   │  ←── Cloud AI Service    │
          │   │  (Internet)   │                  │
          │   └─────────────┘                  │
          └─────┬────────┬────────────────────┘
                │        │
            USB-C Cable   USB-C Cable
                │        │
          ┌─────┴──┐  ┌─┴──────────┐
          │reSpeaker│  │ reBot Arm  │
          │         │  │ B601-DM    │
       │(Microphone) │  │ (Robot Arm)   │
          │        │  │            │
    │ 4-Microphone Array │  │ 7DOF    │
          └────────┘  └────────────┘
                │
          ┌─────┴──────┐
       │  Speaker/Headphone  │  (Optional, used for voice broadcast)
          └─────────────┘
Connection steps:
-
Connect the reSpeaker to the computer via USB-C cable
-
Connect the reBot Arm to the computer via a USB-C cable
-
(Optional) connect speakers or headphones to the audio output connector of the reSpeaker
-
Make sure the computer is connected to the Internet
3. environment preparation
Before installing the software, we need to confirm whether your system environment meets the requirements. Please open the Ubuntu terminal (Terminal, similar to the Windows "command prompt"), and then follow the steps below to check one by one.
3.1 Confirm Ubuntu Version
# Enter the following command in the terminal to view the system version
lsb_release -a
✅Expected output (something like this):
No LSB modules are available.
Distributor ID: Ubuntu
Description:    Ubuntu 22.04 LTS
Release:        22.04
Codename:       jammy
💡What if the display is not Ubuntu 22.04?
-
If it is Ubuntu 20.04 or other versions, it is recommended to upgrade to 22.04, because this project has been tested on this version
-
If not Ubuntu, you need to install Ubuntu 22.04
3.2 confirm Python version
# Check the default Python version in the system
python3 --version
✅Expected Output:
Python 3.10.12
As long as the version is 3.10.x (x is any number).
💡What if it's not a Python 3.10?
Don't worry, we will use Miniforge to create a special Python 3.10 environment later, which will not affect the system default Python.
3.3 check USB port
Before connecting the hardware, make sure that the computer can normally recognize the USB device:
# View the list of currently connected USB devices
lsusb
✅Expected output (something like this, showing your USB device):
Bus 001 Device 001: ID 1d6b:0002 Linux Foundation 2.0 root hub
Bus 002 Device 003: ID 2886:0018 Seeed Studio reSpeaker Flex  ← Microphone Array
Bus 002 Device 005: ID 1234:5678 STMicroelectronics Virtual COM Port  ← Robot Arm
💡What if I don't see the equipment?
Don't panic, maybe the device hasn't been connected yet. Continue to the next step and come back to check after installing the software.
3.4 check network connection
# Test whether the Internet can be accessed
ping -c 3 baidu.com
✅Expected Output:
PING baidu.com (xxx.xxx.xxx.xxx) 56(84) bytes of data.
64 bytes from ...: icmp_seq=1 ttl=54 time=25.3 ms
64 bytes from ...: icmp_seq=2 ttl=54 time=24.8 ms
64 bytes from ...: icmp_seq=3 ttl=54 time=25.1 ms
💡If you cannot access the Internet?
Voice mode requires networking to call the Groq API, please ensure that the network is smooth. If it is a campus/corporate network, additional proxy configuration may be required (explained later).
4. software installation
⚠️ Important Note: All the following commands need to be executed in the terminal. It is recommended to confirm that there is no error after each step before proceeding to the next step.
4.1 Step 1: Install Miniforge(Python Environment Management Tool)
What is Miniforge?
Miniforge is a Python environment management tool, similar to Python's "App Store Version Manager". It can help you:
-
Create an independent Python 3.10 environment without affecting the system default Python
-
One-click installation of all project dependencies
-
Switch between different Python versions for different projects
Install command:
# Download the Miniforge installation script
wget "https://github.com/conda-forge/miniforge/releases/latest/download/Miniforge3-$(uname)-$(uname -m).sh"

# Perform the installation (follow the prompts)
bash Miniforge3-$(uname)-$(uname -m).sh
The installation wizard appears after execution:
-
Press 'Enter' to view the license agreement
-
Enter 'yes' to agree to the agreement
-
Press 'Enter' to confirm the installation path (default)
-
Enter 'yes' to initialize conda (recommended)
After the installation is complete, close the current terminal window and open a new terminal to make the environment variable take effect.
✅Verify Installation:
# Enter in the new terminal
conda --version
Expected output: 'conda 24.x. x' (the version number may be different, as long as the version can be displayed, the installation is successful)
4.2 Step 2: Clone the project code base
# Download the main codebase of the project (voice control part)
git clone https://github.com/xr686/reBot-Arm-reSpeaker-Flex.git

# Enter the project directory
cd reBot-Arm-reSpeaker-Flex
✅Expected Output:
Cloning into 'reBot-Arm-reSpeaker-Flex'...
remote: Enumerating objects: ...
...
Resolving deltas: 100% (...)
💡What if git clone is slow or fails?
It may be a network problem, you can try:
# Use domestic mirroring for acceleration (if available)
git clone https://ghproxy.com/https://github.com/xr686/reBot-Arm-reSpeaker-Flex.git
4.3 Step 3: Create a Conda Environment
The project provides an 'environment.yml' file that lists all required dependency packages. We only need one command to automatically install all dependencies:
# Make sure you are in the reBot-Arm-reSpeaker-Flex directory.
# One-click to create an environment and install all dependencies
conda env create -f environment.yml
This process may take 10-30 minutes, depending on your network speed. It will automatically:
-
Create a Python 3.10.2 environment called 'flex'
-
Install pinocchio, numpy and other scientific computing libraries from the conda-forge channel
-
Install pyusb for USB communication
✅Sign of successful installation (the last few lines look like this):
Executing transaction: ... done
#
# To activate this environment, use
#
#     $ conda activate flex
#
# To deactivate an active environment, use
#
#     $ conda deactivate
#
4.4 Step 4: Activate the Conda Environment
# Activate the newly created flex environment
conda activate flex
✅Flag for successful activation: '(flex)' appears in front of the terminal prompt:
(flex) user@computer:~/reBot-Arm-reSpeaker-Flex$
💡Important Reminder: Every time you open a new terminal, you need to re-execute the 'conda activate flex' to activate the environment.
4.5 Step 5: Install System Dependencies
# Update the system package list and install ffmpeg
sudo apt-get update && sudo apt-get install -y ffmpeg
What is ffmpeg?
ffmpeg is an audio and video processing tool, this project uses it to process audio files after speech synthesis. Simply put, it is "to enable the computer to play and process sound".
✅Sign of successful installation:
ffmpeg is already the newest version (x.x.x).
4.6 Step 6: Install uv(Python Package Management Tool)
# Install uv (a fast Python package management tool)
curl -LsSf https://astral.sh/uv/install.sh | sh
Why do you need UV?
uv is a very fast Python package management tool that can be used to install packages in pip format. The 'motorbridge' library used in the project needs to be installed through uv.
✅After the installation is successful, close the terminal and reopen it.
4.7 Step 7: Cloning the Robot Arm Control Library
# Cloning robotic arm control library
git clone https://github.com/vectorBH6/reBotArm_control_py.git

# Enter the robotic arm control library directory
cd reBotArm_control_py

# Use uv to install dependencies
uv sync
✅Expected Output: Displays the installation progress without reporting an error.
4.8 Step 8: Set PYTHONPATH Environment Variables
# Add the robotic arm control library to the Python search path
export PYTHONPATH="$PWD:$PYTHONPATH"
What does that mean?
When Python is importing a library, it looks in the directory specified by the PYTHONPATH. This command tells Python to "look in this directory in addition to the default search path".
⚠️ Important Reminder:'export PYTHONPATH' This setting will become invalid every time the terminal is closed! You need:
Scheme A (temporary, to be executed every time) : Manually execute the above export command every time a new terminal is opened
Scheme B (recommended, permanent): Write this setting to the '~/.bashrc' file:
# Write environment variables to the configuration file so that they will be automatically set every time the terminal is opened.
echo 'export PYTHONPATH="'$PWD':$PYTHONPATH"' >> ~/.bashrc

# Make the configuration take effect immediately
source ~/.bashrc
4.9 Step 9: Set Serial Port Permission
In order for the current user to access the USB serial device (used to communicate with the robot arm), you need to set permissions:
# Set USB serial device permissions (to allow the current user to access without sudo)
sudo chmod 666 /dev/ttyACM*
✅No error can be reported after execution.
💡Why do you need this?
The Linux system has strict authority management for hardware devices. By default, ordinary users cannot directly access serial devices. This command allows all users to read and write to these devices.
⚠️ This setting will be invalid after restarting. If you want to be permanent, you can add your users to the 'dialout' group:
# Add the current user to the dialout group (permanently resolve the permission issue)
sudo usermod -a -G dialout $USER
The modification requires logout and logon again to take effect.
4.10 Step 10: Configure Groq API Key
This project uses Groq's cloud AI service for speech recognition and intent understanding. You need to register a Groq account and get the API Key.
To obtain the API Key:
-
Open the browser and visit the https://console.groq.com/keys
-
Register an account (you can use email or GitHub account)
-
After logging in, click "Create API Key"
-
Copy the generated Key (format is similar to' gsk_xxxxxxxxxxxx)
Configure the API Key in the code:
# First return to the main project directory
cd ~/reBot-Arm-reSpeaker-Flex

# Edit the main program file
nano sound_tracking_arm.py
Find the following section in the file (approximately around line 60):
VOICE_CFG = {
    "api_key": "12345678",   # ← Replace this line with your actual API Key
    ...
}
Replace '"12345678"' with the API Key you just copied, for example:
"api_key": "gsk_aBcDeFgHiJkLmNoPqRsTuVwXyZ",
Save the file: Press 'Ctrl O', then 'Enter', then 'Ctrl X' to exit.
⚠️ Safety Reminder:
-
Don't share your API Key to a public code repository or forum
-
Don't send API Key screenshots to social media
-
If the API Key is leaked, please delete it in the Groq console and generate a new one.
4.11 Step 11: Network Proxy Settings (if needed)
If you are in mainland China or in certain network environments, you may not be able to access Groq's services directly. Test it first:
# Test whether Groq can be accessed
ping console.groq.com -c 3
If you can receive a reply (display time), it means that the network is normal and you can skip this step.
If 'unknown host' or 'Request Timeout' is displayed, the proxy needs to be configured.
How to configure the agent:
Edit 'sound_tracking_arm.py 'again and find the 'proxy' entry in the 'VOICE_CFG:
VOICE_CFG = {
    ...
    "proxy": None,   # ← Change it to your proxy address
}
For example, if your proxy address is' http:// 192.168.4.7:7897 ':
"proxy": "http://192.168.4.7:7897",
💡How do I know my proxy address?
-
If you use Clash: usually at 'http:// 127.0.0.1:7890'
-
If you use v2rayN: usually at 'http:// 127.0.0.1:10809'
-
If it is a LAN proxy server: Please ask the network administrator
-
The proxy format is usually: 'http:// IP address: port number'
5. hardware connection and assembly
5.1 hardware connection steps
Now that all the software has been installed, let's connect the hardware.
Step 1: Connect reSpeaker
-
Connect reSpeaker to computer with USB-A to USB-C cable
-
After connection, the indicator light on the reSpeaker should light up
-
Enter 'lsusb' in the terminal and you should be able to see the equipment of Seeed Studio.
Step 2: Connect the reBot Arm
-
Ensure that the base of the mechanical arm has been firmly fixed on the desktop with a woodworking fixture
-
Connect the robotic arm to the computer with a USB-A to USB-C cable
-
Connect 24V power supply (XT30 interface), but do not power on first
⚠️ Safety checklist before power-on:
-
The base of the mechanical arm has been firmly fixed (clamped with a woodworking fixture)
-
There are no obstacles in the range of movement of the robotic arm
-
No personnel close to the range of motion of the robot arm
-
USB cable connected
-
Power supply wiring is correct
STEP 3: POWER ON START
-
After checking, turn on the 24V power switch
-
The mechanical arm will make a slight motor power-on sound
-
Enter 'ls /dev/ttyUSB * 'in the terminal, and you should be able to see devices similar to'/dev/ttyUSB0'
5.2 Verify Hardware Connections
# View USB audio device (reSpeaker)
arecord -l
✅Expected output (similar):
**** List of CAPTURE Hardware Devices ****
card 2: XVF3800 [reSpeaker XVF3800], device 0: USB Audio [USB Audio]
  Subdevices: 1/1
  Subdevice #0: subdevice #0
# View USB serial device (robotic arm)
ls -la /dev/ttyUSB0
Or:
ls -la /dev/ttyACM0
✅Expected Output:
crw-rw-rw- 1 root dialout 188, 0 ... /dev/ttyUSB0
💡If you can't see the device?
-
Check whether the USB cable is plugged tightly
-
Try changing a USB port
-
Check whether the cable is a data cable (some lines can only be charged and cannot transmit data)
-
refer to [9. troubleshooting guide](#9 troubleshooting guide-faq)
6. first run
Verification before 6.1 operation
Before the official launch, let's do a few simple verifications to ensure that all components are working properly.
Validation 1: Check Python dependencies
Make sure you are in the 'flex' environment and in the main project directory:
# Activate the environment
conda activate flex

# Enter the project directory
cd ~/reBot-Arm-reSpeaker-Flex

# Verify pyusb and numpy
python -c "import usb.core; import numpy; print('pyusb + numpy OK')"
✅Expected Output:
pyusb + numpy OK
Validation 2: Validate the robotic arm library
# Ensure that PYTHONPATH is set
export PYTHONPATH="$HOME/reBotArm_control_py:$PYTHONPATH"

# Verify the robotic arm library
python -c "from reBotArm_control_py.actuator import RobotArm; print('Robot Arm Library OK')"
✅Expected Output:
Robot Arm Library OK
💡If the error is 'ModuleNotFoundError'?
Description PYTHONPATH is not set correctly. Please confirm:
-
The reBotArm_control_py directory does exist.
-
'export PYTHONPATH' command executed
-
If not, try to use the full path:
export PYTHONPATH="/home/Your username/reBotArm_control_py:$PYTHONPATH"
Verification 3: Test the Microphone
# Record a 3-second test audio
arecord -D plughw:2,0 -c 6 -r 16000 -f S16_LE -d 3 /tmp/test.wav

# Play the recorded audio (if a speaker/headphone is connected)
aplay -D plughw:2,0 /tmp/test.wav
If you can hear the recorded sound, the microphone array is working properly.
6.2 Startup Procedure
After all the verification is passed, the program can be officially started!
# Ensure in the flex environment
cd ~/reBot-Arm-reSpeaker-Flex

# Start the program (a mode selection menu will pop up)
python sound_tracking_arm.py
✅Expected Output:
==================================================
  reBot Arm B601-DM + reSpeaker Flex
  Please select the operating mode:
==================================================
  [1] DOA Interaction Mode (Sound Source Tracking + Standby Animation)
  [2] Voice control mode (button trigger + AI LLM control)
==================================================
Please enter the mode number (1 or 2):
At this time, enter '1' to enter DOA sound source tracking mode, or enter '2' to enter voice control mode.
Directly specify the mode to start
You can also specify the mode directly in the start command, skipping the selection menu:
# DOA Sound Source Tracking Mode
python sound_tracking_arm.py --mode doa

# Voice command control mode
python sound_tracking_arm.py --mode voice
6.3 First Run Test
DOA Mode Test
When Mode 1 is selected, the program:
-
Initialize the USB device
-
Connect the mechanical arm
-
Enter the standby state
Test method: Stand next to the robotic arm and talk or clap your hands to observe whether the robotic arm:
-
Turn in the direction you are
-
Perform nodding movements
-
Then back to standby
Voice Mode Test
When mode 2 is selected, the program:
-
Initialize all components
-
Wait for you to press Enter
Test Method:
-
Press the 'Enter' key
-
After seeing the "recording" prompt, say "hello" or "say hello"
-
Wait for about 5 seconds
-
Observe whether:
-
Recognize your voice
-
The mechanical arm performs the greeting action
-
Hear voice broadcast reply
7. Detailed explanation of function
7.1 mode 1:DOA sound source tracking mode
What is DOA?
The full name of DOA is Direction of Arrival (sound wave arrival direction), which is simply: judge from which direction the sound comes. Just as you can use both ears to roughly determine whether the sound is on the left or right, reSpeaker uses four microphones to calculate the direction of the sound more accurately.
Workflow
Start the system
    ↓
Initialize USB device
    ↓
Connect reSpeaker  ←──→ Connect reBot Arm
    ↓
Loop Execution:
    ├─ Read DOA angle data (0°~360°)
    ├─ Is a valid sound source detected?
    │   ├─ No → Breathing Standby Animation → Continue Reading
    │   └─ Yes → 4-frame Angle Buffer Queue → Calculate Weighted Average Angle
    │           → Cosine Similarity Smoothing Filtering
    │           → Angle change > Trigger Threshold?
    │               ├─ No → Continue Reading
    │               └─ Yes → The robotic arm turns towards the target direction
    │                       → Perform a nodding motion
    │                       → Enter Cool Down
    │                       → Continue Reading
    ↓
Exit (Press Ctrl+C)
Detailed explanation of core technical points
4 Frame Angle Buffer Queue
Imagine you're listening to a moving person speak, and if each frame (about 50 milliseconds) of angular change directly drives the robotic arm, it will shake and shake. The system uses a "ring buffer" to store the DOA angle data from the last 4 frames and then averages it to make the motion smoother.
Cosine similarity smoothing filter
Sometimes the microphone will misjudge the direction (such as a sudden noise). This filter will check whether the angles of the last few frames are "consistent"-if the difference is too large, it may be misjudged and will not respond. Just like when you hear a sound, you will confirm the direction before turning your head.
Trigger Threshold
Only when the angle change exceeds the set threshold (default 15 °) will the arm movement be triggered. This avoids frequent movements due to minor angle fluctuations.
Cooldown
After each action, the system will enter a cooling period (default 3 seconds), during which it will not respond to new sound sources. This prevents the robot arm from shaking due to continuous triggering.
Breathe Standby Animation
When no one is talking, the robot arm will not be completely stationary, but will enter a "breathing" state-slightly like a human. This is both beautiful and lets the user know that the system is running.
7.2 Mode 2: Voice Command Control Mode
Complete interaction closed loop
The voice control mode supports the complete recording → recognition → understanding → execution → broadcast closed loop.
Workflow
The user presses the Enter key.
    ↓
arecord starts recording (6 channels, 16kHz, 5 seconds)
    ↓
User releases Enter → Stop recording
    ↓
NumPy Audio Normalization Processing (Extract First Channel + Gain Amplification)
    ↓
Upload to Groq API
    ↓
Whisper model performs speech-to-text (STT) recognition
    ↓
Obtain text commands (e.g., "turn left")
    ↓
Send to Llama-3.3-70B large language model
    ↓
LLM understands intent + outputs JSON structured results
    ↓
Analysis results
    ├─ Invalid → Broadcast "Sorry, I didn't catch that. Could you please repeat?"
    └─ Valid → Execute the corresponding robotic arm action
              ↓
         Edge-TTS Voice Announcement Execution Result
              ↓
         Return to standby state
Supported voice commands
| Instruction Type | Example Statement | Execute Action | Description |
|---|---|---|---|
| turn left | "turn left"/"look left"/"turn left" | the robot arm base rotates 45 degrees to the left | the angle can be adjusted by parameters |
| turn right | "turn right"/"look right"/"turn right" | rotate the robot arm base 45 degrees to the right | same as above |
| greeting | "say hello"/"hello"/"hi" | perform nodding greeting | nod twice in a row |
| Wave | "Wave"/"Say Goodbye"/"Bye" | Perform a wave | Wave 2 times left and right |
| return to zero | "return to initial position"/"reset"/"return to zero" | all joints return to zero position | return to initial posture |
| Stop | "Stop"/"Don't move"/"Stop" | Stop the current action now | Emergency stop command |
Interaction Example
$ python sound_tracking_arm.py --mode voice

========================================
  🤖 reBot Arm Voice Control System has been activated
  Press Enter to start recording, release to stop.
  Press Ctrl+C to exit
========================================

[Interaction] >>> 🟢 System is idle, please press Enter to start recording... <<< [User presses Enter]
🔴 Recording... Please speak (5 seconds)
[User says: "Turn to the left a bit"]
[User releases Enter]
🟢 Recording completed, processing...

   --- Speech Recognition ---
   📝 Recognition result: "turn left"

   --- Intent Understanding ---
   🤖 Parsed action: turn_left, parameters: {"angle": 45}

   --- Execute Action ---
   => Start executing action: turn_left

   --- Voice Announcement ---
=======================================================
 🤖 [Voice Output] Okay, turning left.
=======================================================

[Interaction] >>> 🟢 System is idle, press Enter to start recording... <<< [Waiting for next input]
How do AI understand your words?
The project uses a well-designed Prompt that allows a large language model (Llama-3.3-70B) to understand various natural language statements and translate them into structured instructions.
For example, if you say "help me turn my head to the left",AI will understand it:
{"action": "turn_left", "params": {"angle": 45}, "reply": "Okay, turning left."}
The advantage of this design is that you don't need to say fixed command words, just speak naturally like chatting!
8. command line parameters
8.1 complete parameter table
When you start the program, you can add various parameters to customize the behavior:
python sound_tracking_arm.py [Parameter]
| Parameter | Short | Default | Description |
|---|---|---|---|
| '-- mode' | '-m' | 'doa' | Operation mode: 'doa' (sound source tracking) or 'voice' (voice control) |
| '-- device' | '-d' | '0' | reSpeaker USB Device ID |
| '-- port' | '-p' | '/dev/ttyUSB0' | Path of mechanical arm serial port device |
| '-- threshold' | '-t' | '15' | DOA angle trigger threshold (in degrees) |
| '-- cooldown' | '-c' | '3' | Action cooldown (in seconds) |
| '-- buffer-size' | '-B ' | '4' | DOA Angle Buffer Frames |
| '-- groq-key' | '-k' | 'None' | Groq API Key (can also be configured by code) |
| '-- tts-voice' | '-v' | 'zh-CN-XiaoxiaoNeural | Edge-TTS voice |
| '-- debug' | - | 'False' | Enable debug log output |
8.2 usage example
Basic Usage
# DOA Tracking Mode (Default)
python sound_tracking_arm.py

# Voice control mode
python sound_tracking_arm.py --mode voice
Adjust the DOA sensitivity
# Increase the trigger threshold (requires a larger change in sound direction to respond, reducing false triggers)
python sound_tracking_arm.py --threshold 25

# Lower the trigger threshold (more sensitive, but also more prone to false triggering)
python sound_tracking_arm.py --threshold 10

# Extend Cool Down (longer "rest time" after action)
python sound_tracking_arm.py --cooldown 5

# Adjust multiple parameters simultaneously
python sound_tracking_arm.py --threshold 20 --cooldown 5
Specify the hardware device
# The robotic arm is connected to different serial ports.
python sound_tracking_arm.py --port /dev/ttyACM0

# Specify Groq API Key (command-line input will override the configuration in the code)
python sound_tracking_arm.py --mode voice --groq-key gsk_xxxxxxxxxxx
Switch voice timbre
# Use Chinese male voice (Yun Jian)
python sound_tracking_arm.py --mode voice --tts-voice zh-CN-YunjianNeural

# Use Chinese female voice (Xiaoxiao, default)
python sound_tracking_arm.py --mode voice --tts-voice zh-CN-XiaoxiaoNeural

# Use Chinese female voice (Xiaoxiao, multi-emotional)
python sound_tracking_arm.py --mode voice --tts-voice zh-CN-XiaoxiaoMultilingualNeural
Complete list of voices supported by the Edge-TTS:https://github.com/rany2/edge-tts#changing-the-voice
Enable Debug Mode
# Enable detailed log output (helpful for troubleshooting)
python sound_tracking_arm.py --debug
9. troubleshooting guide FAQ
This section collects the most common problems and solutions encountered by small white users. If you cannot find your problem here, please check whether the hardware connection is correct, and then check the error message output by the terminal.
9.1 installation phase problem
Q1: 'conda command not found'
Problem: After the installation is Miniforge, the command cannot be found by entering the'conda' prompt.
Cause: The environment variable is not set correctly.
Resolved:
# Option 1: Reinitialize the shell
~/miniforge3/bin/conda init bash
# Then close the terminal and reopen it.

# Option 2: Manual Activation
source ~/miniforge3/etc/profile.d/conda.sh
conda activate base
Q2: Failed to create environment for 'environment.yml'
Issue: An error is reported when you run 'conda env create -f environment.yml.
Possible Causes and Solutions:
- Network problems (most common):
# Switch to domestic mirroring source
conda config --add channels https://mirrors.tuna.tsinghua.edu.cn/anaconda/cloud/conda-forge/
conda config --add channels https://mirrors.tuna.tsinghua.edu.cn/anaconda/pkgs/main/
conda config --set show_channel_urls yes
# Then try again
conda env create -f environment.yml
- Not enough disk space:
# Check disk space
df -h
# Ensure there is at least 5GB of available space.
- conda version is too old:
conda update conda
Q3: 'uv: command not found'
Problem: After installing uv, the prompt cannot find the command.
Solution:
# Check if uv is installed
ls ~/.cargo/bin/uv

# If it exists, add it to PATH
echo 'export PATH="$HOME/.cargo/bin:$PATH"' >> ~/.bashrc
source ~/.bashrc
Q4: 'uv sync' reported an error
Issue: Failed to execute 'uv sync' in the 'reBotArm_control_py directory.
Possible causes:
-
Not in the correct directory
-
The Python version does not match.
Solution:
# Confirm that the directory is correct
ls -la pyproject.toml

# If it doesn't exist, it means you're not in the correct directory.
cd ~/reBotArm_control_py

# Confirm the Python version
python --version  # 应该是 3.10.x
9.2 USB Device Recognition Problem
Q5: 'lsusb' does not see reSpeaker
Troubleshooting steps:
-
Check whether the USB cable is plugged tightly: Plug and unplug the USB-C cable again
-
Change USB Port: Try other USB ports on your computer (especially USB 3.0 blue port)
-
Check the cable: Make sure you are using a data cable (some lines can only be charged)
-
View System Log:
# View USB connection logs
dmesg | tail -20
- Check if drive is required:
# View detailed information of USB devices
lsusb -v -d 2886:
Q6: 'lsusb' does not see the arm
Troubleshooting Steps:
-
Confirm that the USB cable is connected correctly
-
Confirm that the power of the robot arm is turned on (24V power switch)
-
Check whether the power indicator is on
-
View system logs:
dmesg | grep -i "ttyUSB\|ttyACM\|usb"
Q7: 'Permission denied: /dev/ttyUSB0'
Issue: You do not have permission to access the serial device.
Solution:
# Temporary solution
sudo chmod 666 /dev/ttyUSB0

# Permanently resolve (recommended)
sudo usermod -a -G dialout $USER
# Then log out and log back in.
9.3 Python runtime issues
Q8: 'ModuleNotFoundError: No module named 'usb.core''
Problem: Pyusb module not found.
Solution:
# Confirm in the flex environment
conda activate flex

# Manually install pyusb
conda install -c conda-forge pyusb

# If it still doesn't work, check the Python path.
which python  # Confirm that the output contains miniforge3/envs/flex
Q9: 'ImportError: cannot import name 'RobotArm''
Problem: The robotic arm control library cannot be found.
Solution:
# Confirm that reBotArm_control_py has been correctly cloned
ls ~/reBotArm_control_py

# Confirm that PYTHONPATH has been set
echo $PYTHONPATH  # should include the path to reBotArm_control_py

# If not, set it manually
export PYTHONPATH="/home/your_username/reBotArm_control_py:$PYTHONPATH"

# Or directly verify the path using Python
python -c "import sys; print(sys.path)"
Q10: 'libusb-1.0.so. 0: cannot open shared object file'
Problem: The libusb system library is missing.
Solution:
# Install the libusb development library
sudo apt-get update
sudo apt-get install -y libusb-1.0-0-dev

# If it still doesn't work, try
conda install -c conda-forge libusb
9.4 network/API issues
Q11: 'Groq API Key not set'
Problem: The program prompts that the API Key is not set.
Solution:
-
Check whether the VOICE_CFG["api_key"] in "sound_tracking_arm.py" has been modified
-
Confirm that the API Key format is correct (should start with 'gsk_')
-
You can also set environment variables:
export GROQ_API_KEY="gsk_xxxxxxxxxxxx"
Q12: When 'Connection error' or 'Timeout' calls Groq API
Problem: Unable to connect to the Groq server.
Troubleshooting Steps:
- Test network connectivity:
ping console.groq.com -c 3
-
-
- If the ping fails, you need to configure an agent **:
-
Edit the 'VOICE_CFG in 'sound_tracking_arm.py ':
proxy": "http://your proxy IP:port", # e.g., "http://127.0.0.1:7890
- If the agent does not work, check whether the agent is working properly:
# Test via proxy
curl -x http://your_proxy_IP:port https://console.groq.com
Q13: 'Rate limit exceeded' / 'Quota exceeded'
Problem: The API call frequency exceeds the limit or the quota is used up.
Solution:
-
Access https://console.groq.com/settings/limits to view limits
-
Groq free accounts have a limit on the number of requests per minute, reducing the frequency of use.
-
If it is a quota problem, you may need to upgrade to a paid account.
Q14: 'TTS broadcast failure'/'aplay not found'
Problem: The voice broadcast function is not normal.
Solution:
# Install alsa-utils (including aplay)
sudo apt-get install -y alsa-utils

# Check audio output device
aplay -l

# If the device is not visible, you may need to configure the default audio output.
9.5 mechanical arm problem
Q15: Mechanical arm does not respond/does not move
Troubleshooting Steps:
- Check Serial Device:
ls -la /dev/ttyUSB*
# or
ls -la /dev/ttyACM*
- Check Permissions:
# Ensure read and write permissions
ls -la /dev/ttyUSB0  # should show crw-rw-rw-
-
Check the power supply: Confirm that the 24V power supply is turned on
-
Check the program log: Is there an error message about 'ArmCtrl' when running the program?
-
Try specifying the correct serial port:
python sound_tracking_arm.py --port /dev/ttyACM0
# or
python sound_tracking_arm.py --port /dev/ttyUSB1
Q16: Abnormal mechanical arm movement/jitter
Possible Causes:
-
The mechanical arm is not properly fixed-check whether the base is firm
-
There are obstacles in the range of motion-clean up the motion space
-
Abnormal joint angle-try to reset: say "return to initial position" or restart the program
Q17: Abnormal heating of motor
⚠️Warning: If the motor heats up abnormally, please turn off the power immediately!
Possible Causes:
-
The mechanical arm is blocked by external force, and the motor continues to exert force
-
Moving too fast
-
Long continuous operation
Solution:
-
Turn off the power and wait for the motor to cool down
-
Check for mechanical obstruction
-
Reduce the frequency of movement
9.6 audio-related issues
Q18: No sound from microphone recording
Troubleshooting Steps:
- Check whether the device is recognized:
arecord -l # Should see reSpeaker XVF3800
- Check Equipment No.:
# View detailed device information
cat /proc/asound/cards
- Manual test recording:
# Record with a specified device number (adjust the card and device numbers according to the actual situation)
arecord -D plughw:2,0 -c 6 -r 16000 -f S16_LE -d 3 /tmp/test.wav
- Check whether the microphone array is correctly connected: Confirm that the FPC cable is plugged in tightly
Q19: DOA angle not allowed/jump
Possible Causes and Solutions:
-
The environment is too noisy: Test in a quiet environment
-
Microphone array is not flat: Ensure that the reSpeaker is placed horizontally
-
Strong sound source interference nearby: Keep away from fans, speakers and other equipment
-
Adjust the trigger threshold: Raise the '-- threshold' parameter.
9.7 other questions
Q20: Ctrl C cannot exit
Solution:
# Try pressing Ctrl+C multiple times
# Or open another terminal
killall python
Q21: Crash during program operation
Troubleshooting Steps:
-
View the last few error messages before the crash.
-
Use the '-- debug' mode to get more logs
-
Check if there is insufficient memory: 'free -h'
-
Check whether the USB connection is unstable
Q22: How to start over completely
If you want to reconfigure from scratch:
# 1. Delete Conda Environment
conda activate base
conda env remove -n flex

# 2. Delete the code directory
rm -rf ~/reBot-Arm-reSpeaker-Flex
rm -rf ~/reBotArm_control_py

# 3. Re-execute the installation steps according to this Wiki.
10. safety precautions
⚠️ When using this item, please be sure to read all the following safety instructions carefully. Improper operation may result in equipment damage or personal injury.
10.1 mechanical arm safety
Basic safety rules
| Rule | Description | Consequences |
|---|---|---|
| Do not forcibly move the mechanical arm | The joint of the mechanical arm is driven by a precision motor, and forced manual rotation may cause gear damage | Motor damage, high maintenance cost |
| Ensure that the range of motion is barrier-free | Check that there are no people, walls or other objects in the range of motion of the robot arm before operation | Collision causes damage to the robot arm or surrounding objects |
| Unplug the USB cable in case of emergency | In case of emergency, immediately unplug the USB cable of the mechanical arm to cut off the control signal | The mechanical arm stops moving |
| The load does not exceed 1500g | Do not hold objects exceeding 1.5kg on the jaws | Motor overload damage |
| Maintain a safe distance of 1.5m | Maintain a distance of at least 1.5m when the robotic arm is running | Avoid collision injuries |
Joint Angle Limits
The system has built-in joint limit protection, the following table is for reference. Note that the unit of radians (rad) is used in the code.
| Joint | Name | Min (Angle) | Max (Angle) | Description |
|---|---|---|---|---|
| J1 | Base rotation | -149.0 ° | 149.0 ° | Horizontal rotation, maximum range |
| J2 | Shoulder pitch | -206.3 ° | 0 ° | Boom up, only up |
| J3 | Elbow pitch | -206.3 ° | 0 ° | Forearm extended, forward only |
| J4 | Wrist Rotation | -85.9 ° | 85.9 ° | End Rotation Left and Right |
| J5 | Wrist Pitch | -85.9 ° | 85.9 ° | End Swing Up and Down |
| J6 | Wrist yaw | -85.9 ° | 85.9 ° | End trim direction |
| J7 | Jaw opening and closing | -320.9 | 0 | Jaw control, negative number is open |
10.2 Electrical Safety
-
No live plugging and unplugging: Before plugging and unplugging the XT30 2 2 power interface, the power must be turned off first
-
No motor hot plug: Do not plug or unplug the motor cable when the power is on
-
Use the correct power supply: Only 24V 15A power supply can be used, using other power supplies may cause damage to the equipment
-
Avoid humid environment: Do not use in humid, dusty, and high temperature environments
-
Check the cable: Check whether the power cord and signal line are intact and damaged before use
10.3 use environment safety
-
Minors need to use under adult supervision: the mechanical arm has a certain strength, improper operation may cause injury
-
Stable workbench: Ensure that the robotic arm is fixed on a stable horizontal table
-
Adequate space: At least 1 meter of safe space is reserved around the robotic arm
-
Good lighting: Easy to observe the operating status of the robotic arm
-
Keep away from water sources: Electronic equipment and water are not accessible
10.4 motor reset safety instructions
Before motor reset:
-
2 tooling fixtures (size ≥ 3 inches)
-
Maintain a safe distance of at least 1 m during commissioning and operation
-
It is forbidden to hot plug the motor; the power supply must be disconnected before plugging and unplugging the XT30 2 2 interface
-
Prohibit motor overload, overspeed operation
-
Check wiring and fasteners before equipment start-up
-
Do not use in humid, high temperature, dusty environment
11. Introduction to Technical Principles
This section briefly introduces the core technical principles involved in the project to help interested users understand the "magic behind it". Complete understanding is not required to use this item.
11.1 DOA sound source localization principle
Question: How to tell which direction the sound is coming from?
reSpeaker has 4 microphones arranged in a ring. When sound comes from a certain direction, there is a slight difference in the time of arrival at different microphones (called "time difference" or TDOA).
Popular explanation: Just like you close your eyes, if someone claps your hands on your left, your left ear will hear first, and your right ear will hear a little bit later. Based on this time difference, the brain can tell that the sound is on the left.
reSpeaker built-in XVF3800 chip is to do this:
-
4 microphones at the same time
-
The chip analyzes the phase difference/time difference of 4 signals
-
Calculate the direction (0 ° ~ 360 °) that the sound is most likely to come from.
-
Send DOA angle data to computer via USB
11.2 Speech Recognition Process
Question: How do you turn what you say into words?
The project uses OpenAI's Whisper model and uses Groq's accelerated API calls. The general process is:
-
Recording: 6 channels of 16kHz audio are collected arecord from the microphone array
-
Preprocessing: Use NumPy to extract the first channel (the signal after beamforming), normalize and gain amplification
-
Upload: Upload the processed audio file to the Groq server
-
Recognition: The Whisper model transcribe audio waveforms into text.
-
Return: Get the recognition result (for example, "turn left")
The Whisper model is one of the most advanced speech recognition models, which supports multiple languages and has high recognition accuracy.
11.3 Principle of Intent Understanding
Question: How can AI understand what you want the mechanical arm to do?
The project uses Meta's Llama-3.3-70B large language model, called through the Groq API.
Core Technology: Prompt Engineering
In the code, we give the AI a detailed "instruction template" and tell it:
-
What actions can be performed (turn left, turn right, say hello, etc.)
-
Meaning of each action
-
Output format requirements (JSON)
For example, when the user says "help me turn my head to the left:
-
Text is sent to Llama-3.3-70B
-
AI combined with system prompts to understand the intention
-
Output structured JSON:
{"action": "turn_left", "params": {"angle": 45}, "reply": "Okay, turning left."} -
The program parses JSON and executes the corresponding action
11.4 manipulator control principle
Question: How does the computer control the mechanical arm?
Kinematics (Kinematics):
The core of robotic arm control is kinematics-given the target joint angle, calculate the position of the end of the robotic arm in space (forward kinematics); or, conversely, given the end target position, calculate how much each joint should rotate (inverse kinematics).
The project uses the Pinocchio library for kinematic calculations and trajectory planning.
Motion Interpolation:
The manipulator does not "jump" directly from point A to point B, but smoothly transitions through an interpolation algorithm. The cosine easing function (cosine easing) is used in the code:
# Easing formula: makes motion smoother and more natural
ease = -(math.cos(math.pi * t) - 1) / 2.0
This causes the robotic arm to start slowly accelerating and slowly decelerating before stopping, just like a natural human motion.
Joint Limit Protection:
All target joint angles are clipped within a safe range:
np.clip(target_angle, JOINT_LIMITS_MIN, JOINT_LIMITS_MAX)
This ensures that the robot arm does not exceed physical limits, avoiding damage.
12. References
12.1 Project Related Links
| Resource | Link | Description |
|---|---|---|
| Main Warehouse of the Project | https://github.com/xr686/reBot-Arm-reSpeaker-Flex | Sound Control Master Program |
| Robot Arm Control Library | https://github.com/vectorBH6/reBotArm_control_py | Robot Arm Python Control Library |
| reBot Arm Official | https://www.rebotix.com/ | Robot Arm Official Website |
| Seeed Studio | https://www.seeedstudio.com/ | reSpeaker Flex Purchase and Technical Support |
12.2 reSpeaker Flex Related Wiki
| Resources | Links |
|---|---|
| reSpeaker Flex Official Wiki | https://wiki.seeedstudio.com/reSpeaker_USB_Mic_Array/ |
| XMOS XVF3800 Technical Documentation | https://www.xmos.com/xvf3800 |
| XVF3800 User Guide | https://www.xmos.com/download/XVF3800-User-Guide (1).pdf |
| Microphone array DOA algorithm description | See reSpeaker Flex official documentation |
12.3 Robotic Arm Related Wiki
| Resource | Link |
|---|---|
| reBot-DevArm GitHub | https://github.com/Seeed-Projects/reBot-DevArm |
| ReBot Arm Assembly Guide | See Seeed Studio Official Wiki |
| Pinocchio Kinematics Library | https://github.com/stack-of-tasks/pinocchio |
12.4 API and tool documentation
| Resource | Link | Description |
|---|---|---|
| Groq console | https://console.groq.com/keys | Management API Key |
| Groq API Documentation | https://console.groq.com/docs | API Instructions |
| Groq Developer Community | https://discord.gg/groq | Technical Support Community |
| Edge-TTS Project | https://github.com/rany2/edge-tts | Speech Synthesis Tool |
| Whisper Papers | https://arxiv.org/abs/2212.04356 | Speech Recognition Technical Papers |
| Llama Model | https://ai.meta.com/llama/ | Big Language Model Official |
12.5 Technology Learning Resources
| Topics | Recommended resources |
|---|---|
| Python Basics | https://docs.python.org/zh-cn/3/tutorial/ |
| Conda uses | https://docs.conda.io/projects/conda/en/latest/user-guide/getting-started.html |
| Ubuntu Basics | https://ubuntu.com/tutorials/command-line-for-beginners |
| Git Basics | https://www.progit.cc/ |
| Introduction to Robotics | Modern Robotics (Kevin Lynch) |
| Introduction to Speech Recognition | Andrew Ng Deep Learning Course-Sequence Model |
12.6 Community and Support
-
GitHub Issues: If you encounter a problem that is not covered by this document, you can submit an Issue in the project GitHub repository.
-
Seeed Studio Forum:https://forum.seeedstudio.com/ (reSpeaker related technical discussions)
-
Groq Discord:https://discord.gg/groq (API-related issues)
Write at the end
Congratulations on reading the end of the document! If you follow this Wiki step by step, I believe you have successfully built your own intelligent voice robot arm system.
This project involves sound processing, AI speech interaction, robot motion control and other fields of technology, for beginners is a good comprehensive practice project. I hope you can continue to explore this:
-
Try modifying voice commands to add more custom actions
-
Adjust DOA parameters to make sound source tracking more sensitive
-
Explore deploying projects to embedded devices such as Raspberry Pi
-
Added vision module to make the robot arm "see"
If you have any questions or suggestions, welcome feedback via GitHub Issue. Have fun!🤖
Disclaimer: This document is based on the open source code of the project and is for reference only. The operation of the mechanical arm is dangerous, please fully understand the safety precautions before operating. The author is not responsible for any damage to equipment or personal injury caused by the use of this document.
Tech Support & Product Discussion
Thank you for choosing our products! We are here to provide you with different support to ensure that your experience with our products is as smooth as possible. We offer several communication channels to cater to different preferences and needs.