Edge Box RPi 200 with Node Red and Modbus TCP
Introduction
Modbus is a widely used communication protocol in industrial environments, known for its simplicity and robustness. Modbus RTU (Remote Terminal Unit) is a serial communication protocol that operates over RS-232 or RS-485 physical layers. It uses a compact, binary representation of the data, making it efficient for transmission over long distances and in noisy environments. Modbus TCP, on the other hand, extends the protocol to Ethernet networks, encapsulating Modbus frames within TCP/IP packets. This allows for faster communication speeds and the integration of Modbus with modern IT infrastructure. Both versions are favored in industrial settings due to their reliability, ease of implementation, and ability to facilitate communication between a wide variety of devices and systems, such as PLCs, sensors, and SCADA systems.
Getting Start
Before you start this project, you may need to prepare your hardware and software in advance as described here.
Hardware Preparation
| Edge Box RPi 200 |
|---|
 |
Modbus Support Devices
The EdgeBox RPi 200 supports Modbus communication with various devices, including PLCs, VFDs, HMIs, energy meters, and BMS systems. For this case, the Siemens LOGO PLC will be utilized, which supports Modbus TCP/IP protocols.
Software Preparation
Edge Box-200 comes to your hand pre installed raspberry pi OS. If you are booting this device first time please read our Getting Started Wiki. We have prepared a Getting started Guide on Node-RED. It is recommended that you review this guide before proceeding to the wiki.
Configure Ethernet settings for Modbus TCP/IP
Since your PLC/Device IP domain is different from your wireless settings, you may have to change the IP configuration manually. For that,
- Step 01: Run the following command:
sudo nano /etc/dhcpcd.conf
- Step 02: Then configure the Ethernet port settings according to your PLC/Device network domain and set priorities using the metric command. The lowest metric has the highest priority.

Install Modbus node
To install the Modbus node, follow these steps:
Step 1. Click the Settings button, indicated by a three-dash icon, located at the top-right corner, then select Manage palette.
Step 2. In the palette tab, navigate to the Install tab.
Step 3. Use the node search bar to find the desired Modbus node.

Step 4. Click the Install button next to the node.
Step 5. If prompted, click the Install button from the dropdown warning window to confirm the installation.
Step 6. Wait for the installation process to complete. Once finished, the Install button should change to Installed.

Identifying Modbus Addresses
Identifying the correct Modbus addresses is a crucial step. It is recommended to consult the PLC or device manufacturer's datasheet for detailed information on Modbus addresses, including input, output, and holding registers.

Based on this information, you can adjust the Modbus address in the tag configuration. For example, if the datasheet lists the output coil Q1 as 8193, you should configure the address as 8192 in Node-RED (decrementing by one from the original address). Similarly, if a network input is listed as 1 and it is a coil type, the address should be set to 0 in Node-RED.
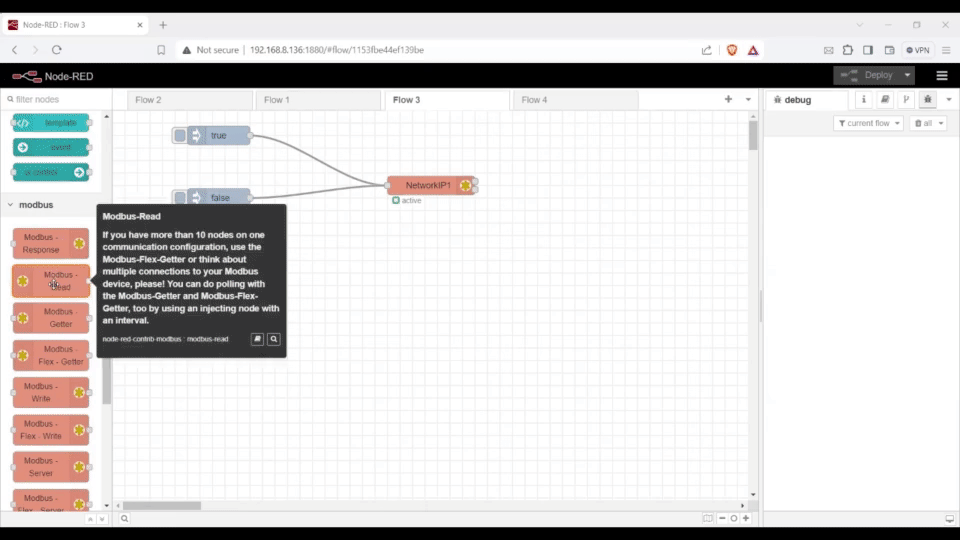
Configuring the Modbus-Write Node
Step 1. Drag and drop the Modbus-Write node onto the workspace, then double-click on the node to open its settings.
Step 2. In the Server tab, edit it to add your device by entering the following details:
- Name: Server Name
- Type: TCP
- Host: IP Address of the Modbus server
- Port: Port address of the Modbus server (typically 502)
- Unit-Id: 255 (Unit-ID is used to identify individual devices within a Modbus network, especially when multiple devices share the same communication line)

Step 3. Give your node an appropriate name, for example, "Network IP 1". For this demo, you are controlling a network input in the PLC program.
Step 4. Set the FC option to FC 5: Force Single Coil.
Step 5. Set the address to 0 (as we are addressing input 0).

Step 6. Using the inject node, we can inject boolean values. Here, we will use a couple of inject nodes for that purpose.
The overall steps can be demonstrated as follows
Configuring the Modbus-Read Node
Step 1. Drag and drop the Modbus-Read node onto the flow. You can find this node in the Modbus tab of your palette.
Step 2. Double-click on the Modbus-Read node to open its settings.
Step 3. Configure the following settings:
- Name: Give it an appropriate name, such as "ReadOutputs".
- FC value: Change the FC value to FC 5: Read Coil Status.
- Address: Set the address to 8192 (according to the manufacturer's datasheet).
- Quantity: Set the quantity to 4, This case,there are 4 digital outputs.
- Poll Rate: Change the poll rate to something suitable for your application needs.
- Server: Set the server to "MyPLC" (configured in the previous example).

Configuring the Modbus-Response Node
The Modbus-Response node is used to display the response of a Modbus Read/Write node.
Step 1. Drag and drop the Modbus-Response node onto the flow.
Step 2. Connect with Modbus Read Node. The response will display an array of numbers under your Modbus-Response node. These numbers represent the count of each digital output.
Step 3. Drag and Drop Debug Node for inspection purpose. Then connect with Modbus Read Node.
By following these steps, you can read and display the values of registers/coils from your Modbus TCP device effectively
The overall steps can be demonstrated as follows.
Tech Support & Product Discussion
Thank you for choosing our products! We are here to provide you with different support to ensure that your experience with our products is as smooth as possible. We offer several communication channels to cater to different preferences and needs.