EE04 ePaper Display Board(ESP32-S3) with EEZ Studio
This tutorial uses the XIAO ePaper Display Board(ESP32-S3) - EE04, based on EEZ Studio and by compiling and uploading the program using the Arduino IDE.
EEZ Studio
EEZ Studio represents a unique solution when both rapid development of an attractive GUI and remote control of devices for test and measurement (T&M) automation is required.
Created by a team with first-hand experience in designing resource-constrained complex embedded devices, EEZ Studio enables the design of responsive desktops and embedded GUIs using the drag & drop and flowcharting visual programming. A series of in-house developed Widgets and Actions as well as LVGL support (both 8.x & 9.x) and read-to-go project templates and examples enable rapid prototyping as well as development of final applications.
Hardware
Before starting to read this tutorial, please make sure that you have all the necessary items listed below ready.
| XIAO ePaper Display Board(ESP32-S3) - EE04 | 5.83 inch monochrome ePaper |
|---|---|
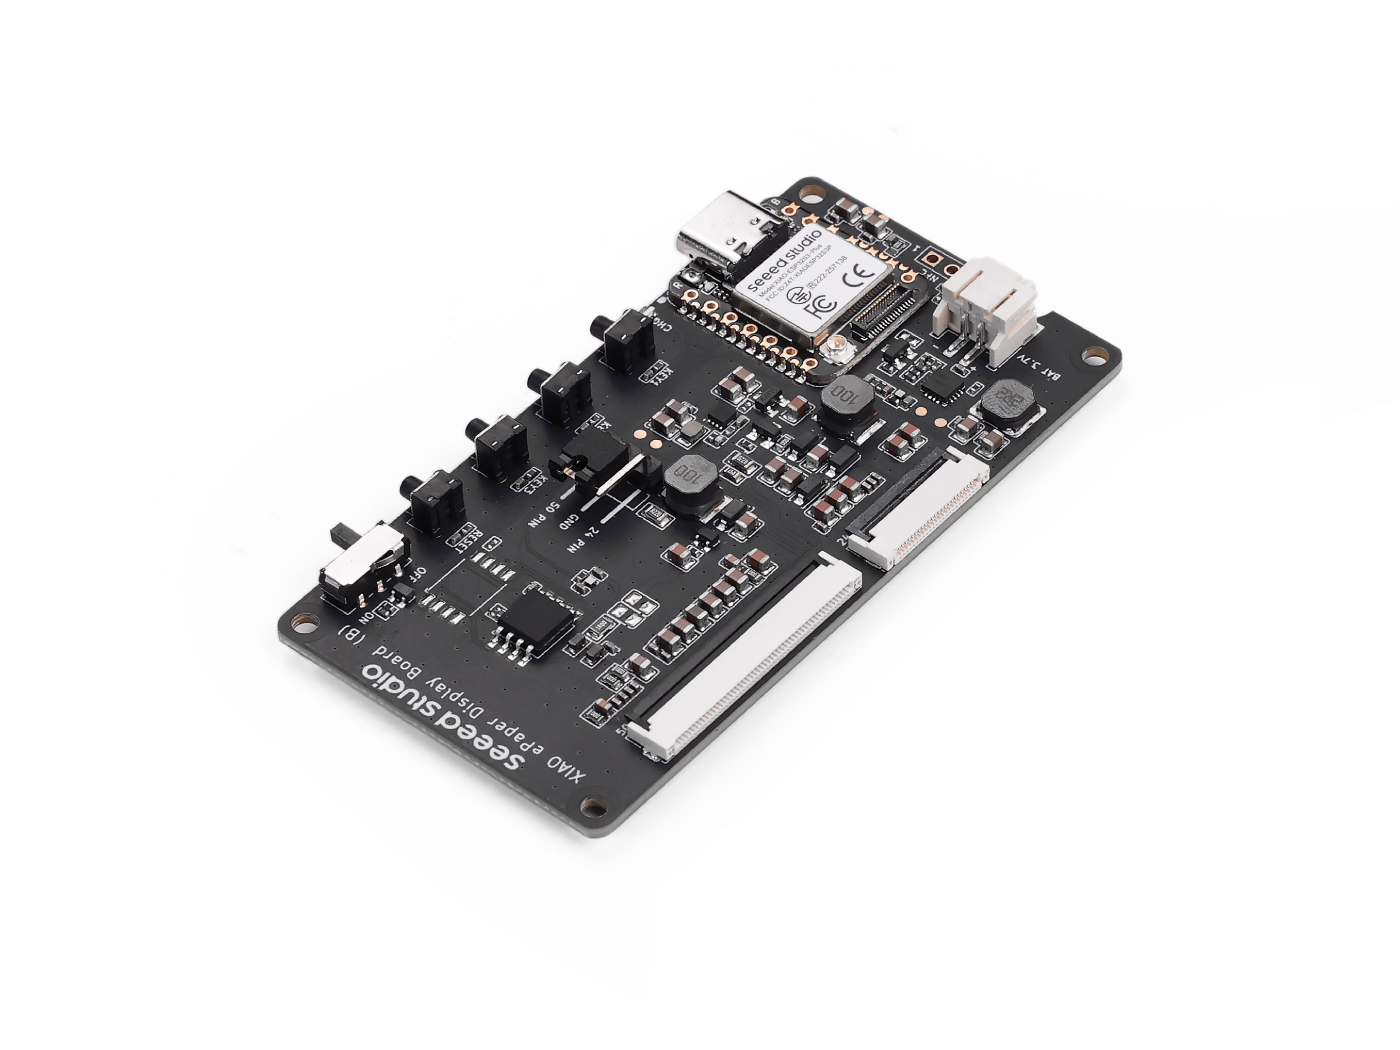 | 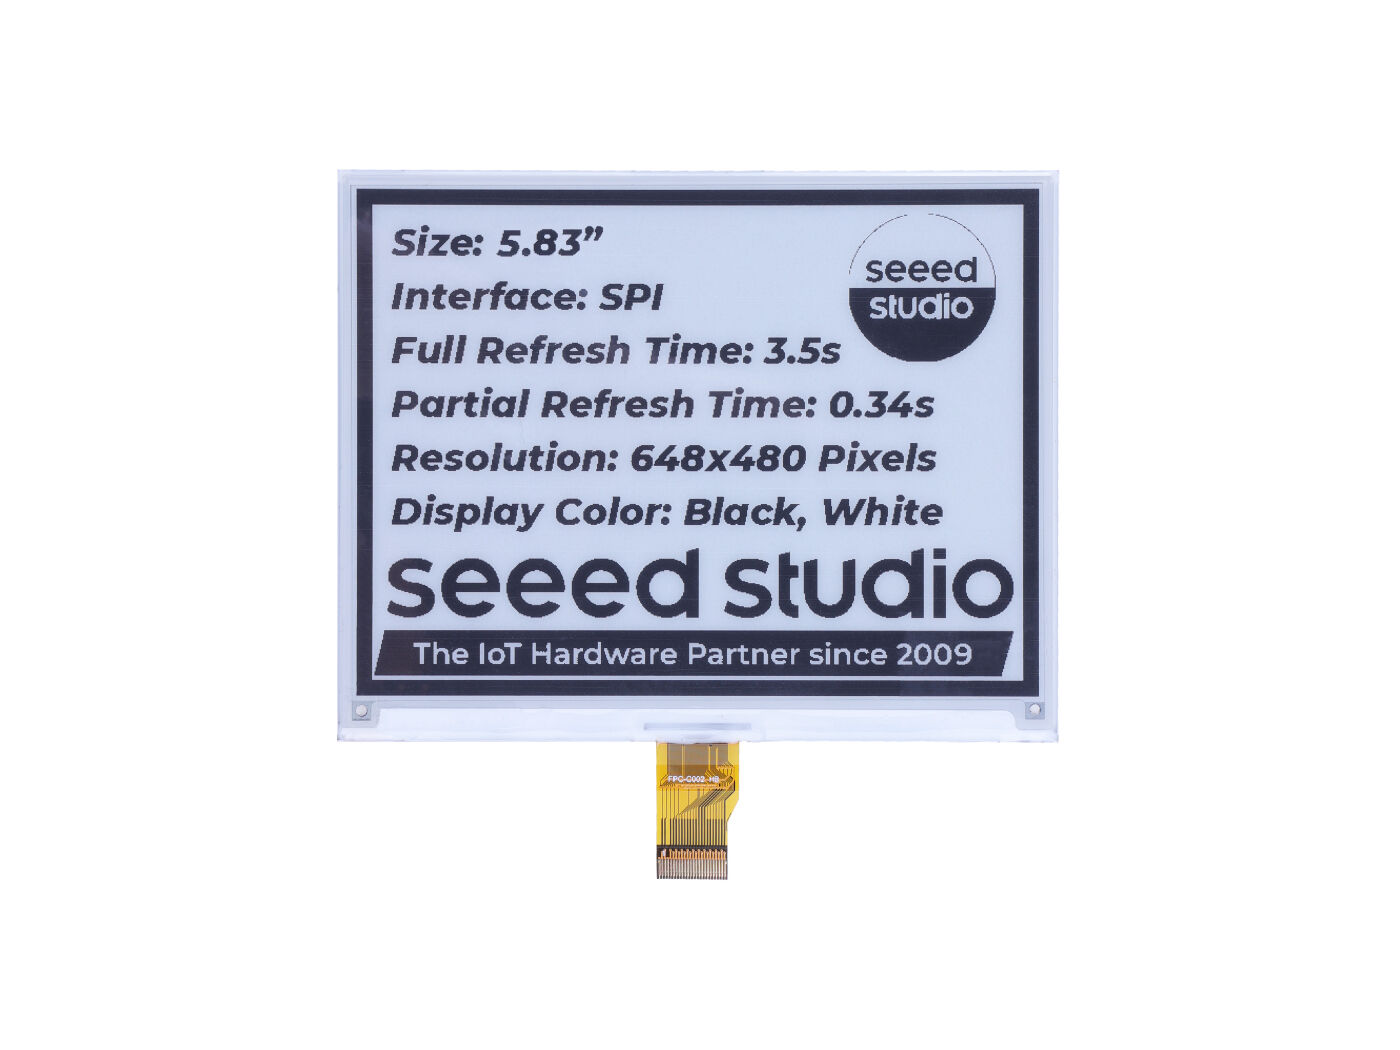 |
Create project
At the top, select Create, then click on LVGL, and in the adjacent PROJECT SETTING section, set the required parameters.
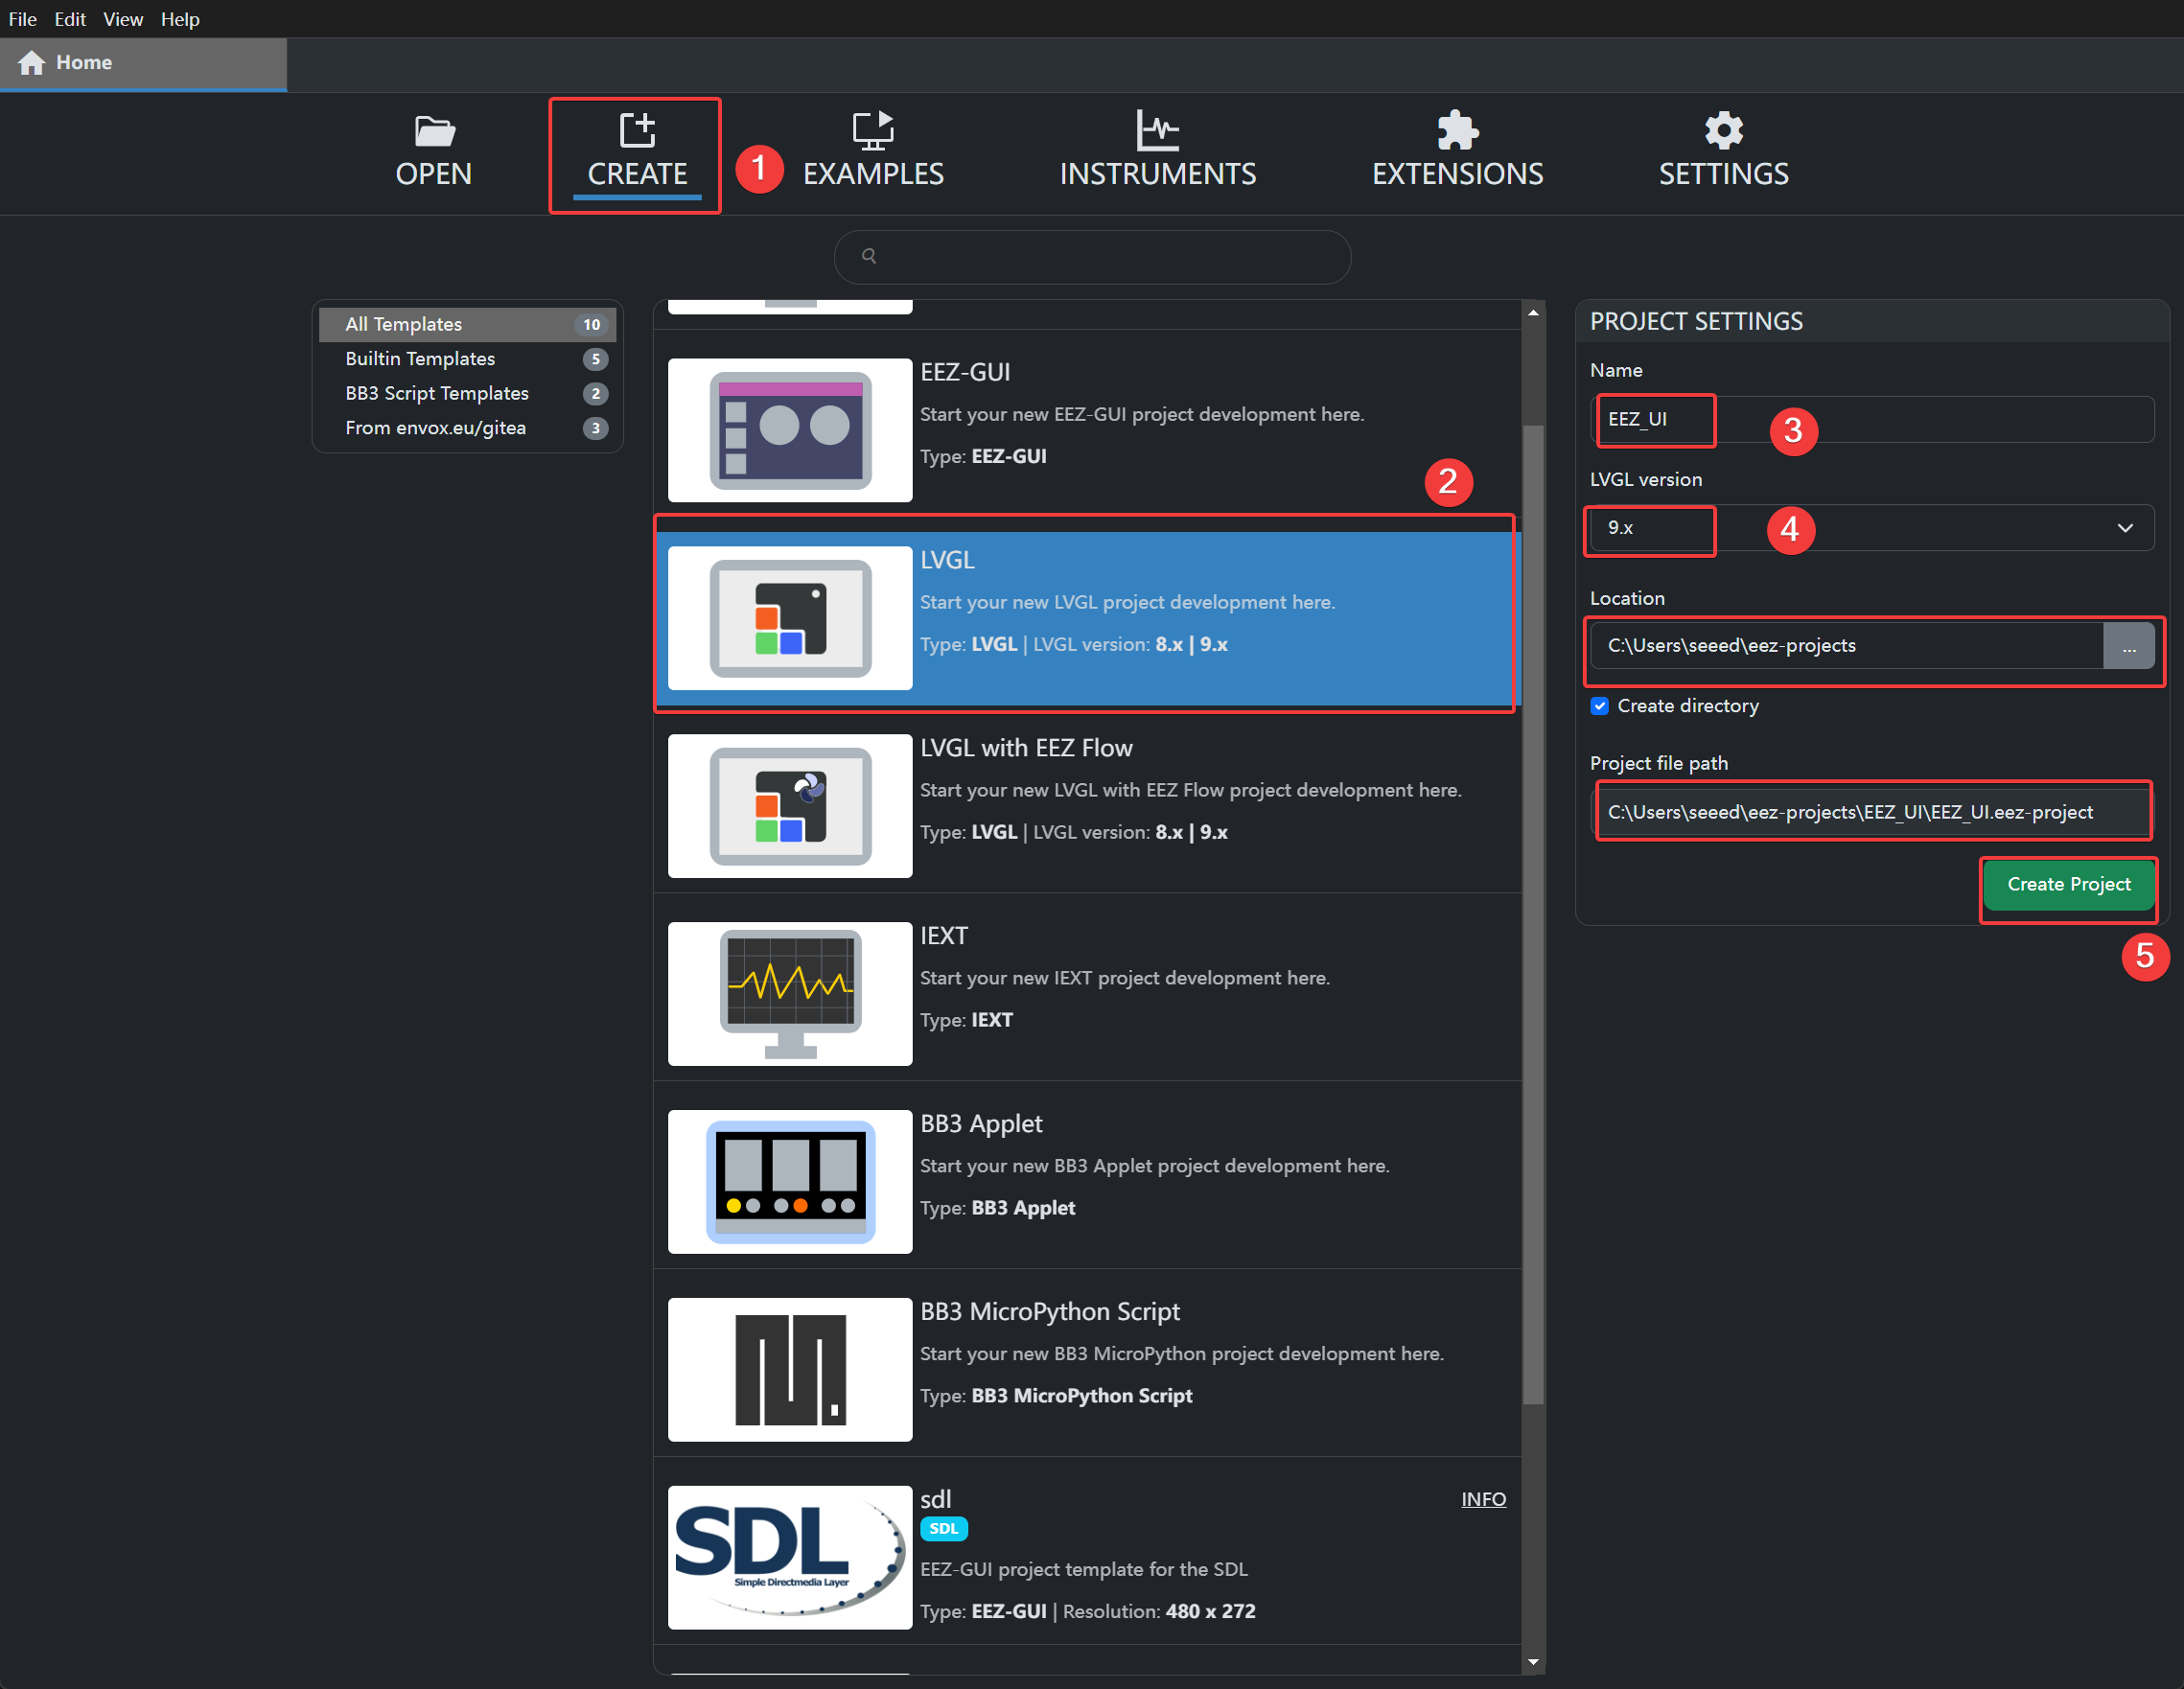
- Name: Project name
- LVGL version: Select version 9.x
- Location: The location for storing engineering files can be set to the default path or customized according to actual requirements.
- Project file path: The path of the engineering files. This path will be used later (this path is the default path on the computer; you can also customize the path)
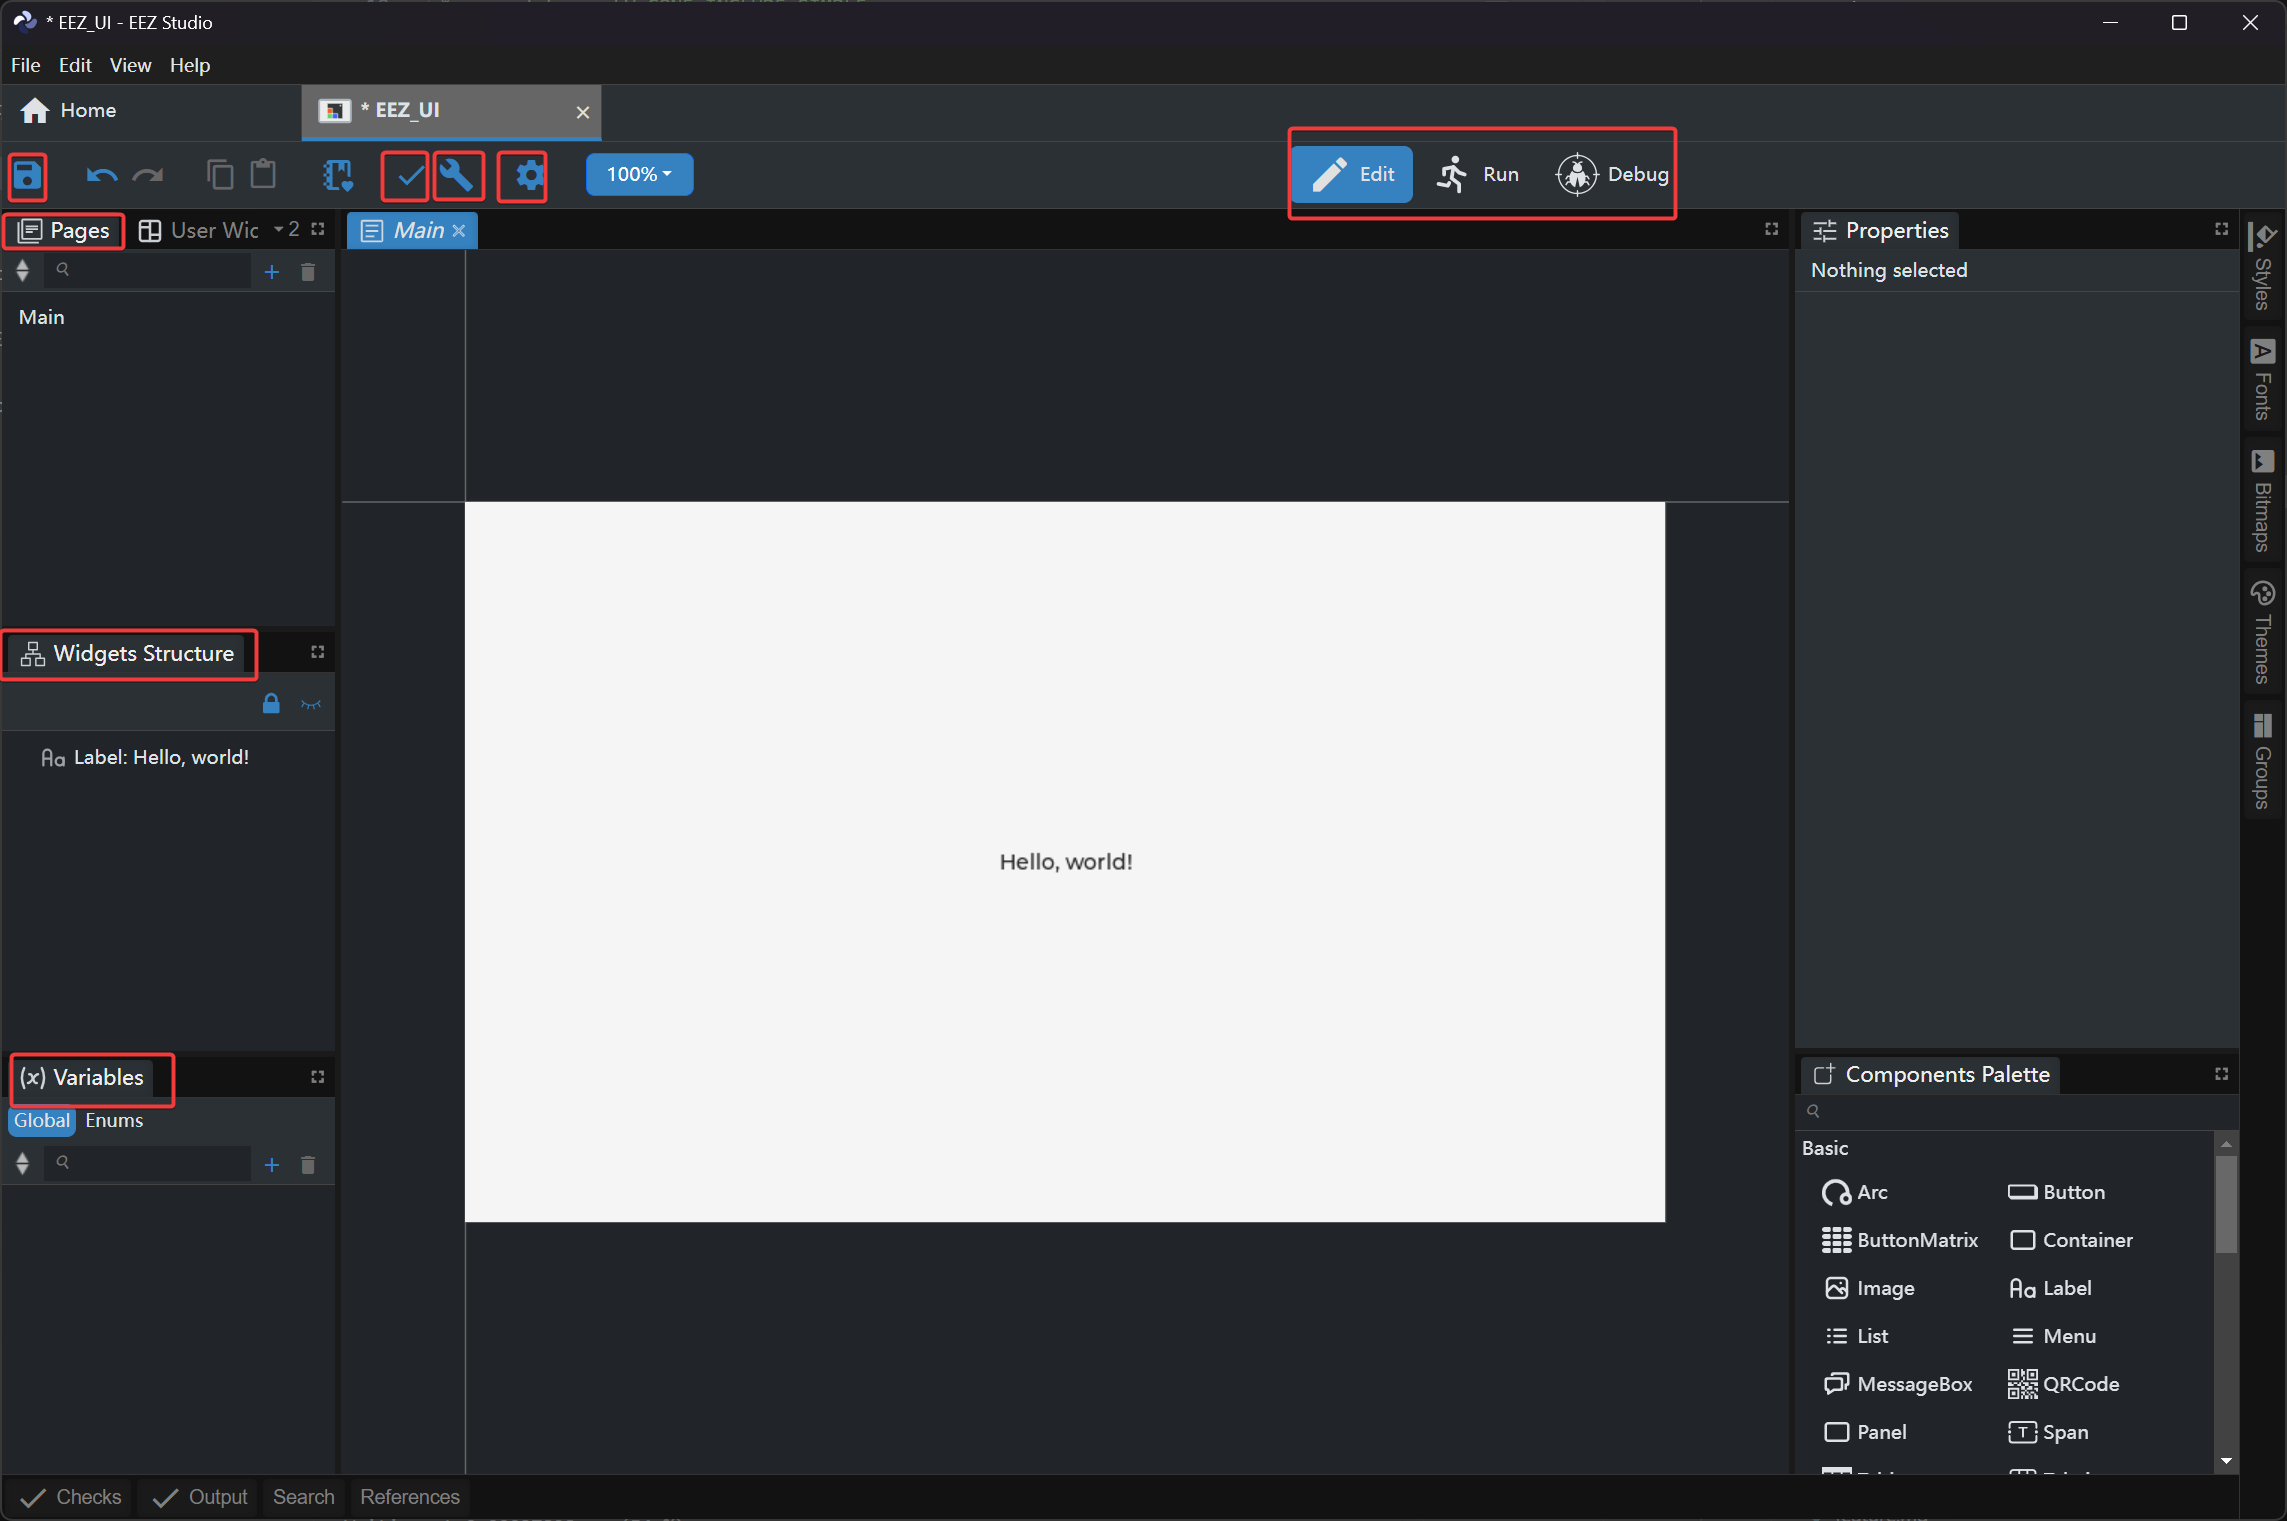
Engineering Page Intro
Below are some basic settings and controls for LVGL-based UI drawing in EEZ Studio, as well as the construction of the project files.
-
At the top (from left to right):
-
Save: Save the project
-
Check: Check the project
-
Build: Build the project and generate files
-
Settings: Modify parameter settings
-
Edit: Edit and draw on the main page
-
Run: Preview the drawing effect of the created design
-
Debug: Debug the drawn interface
-
-
Pages: Manage pages. click + to add a new page
-
Widgets Structure: Widget management, which allows you to intuitively manage and select your widgets
-
Variables: The core data management mechanism that connects UI widgets, Flow logic, and Action Script
-
Properties: Used to set and view the property parameters of objects or components
-
Components Palette: Provides a list of optional components, which can be dragged and dropped into the design interface for use
-
Styles: Define and apply style rules for unified fonts to maintain consistency
-
Fonts: Manage the font resources used in the project and their size settings
-
Bitmaps: Import and manage bitmap resource files such as images and icons
-
Themes: Create and apply unified color themes and visual style suites
-
Groups: Combine and manage multiple components to enable simultaneous operation and batch control
Building Project Files
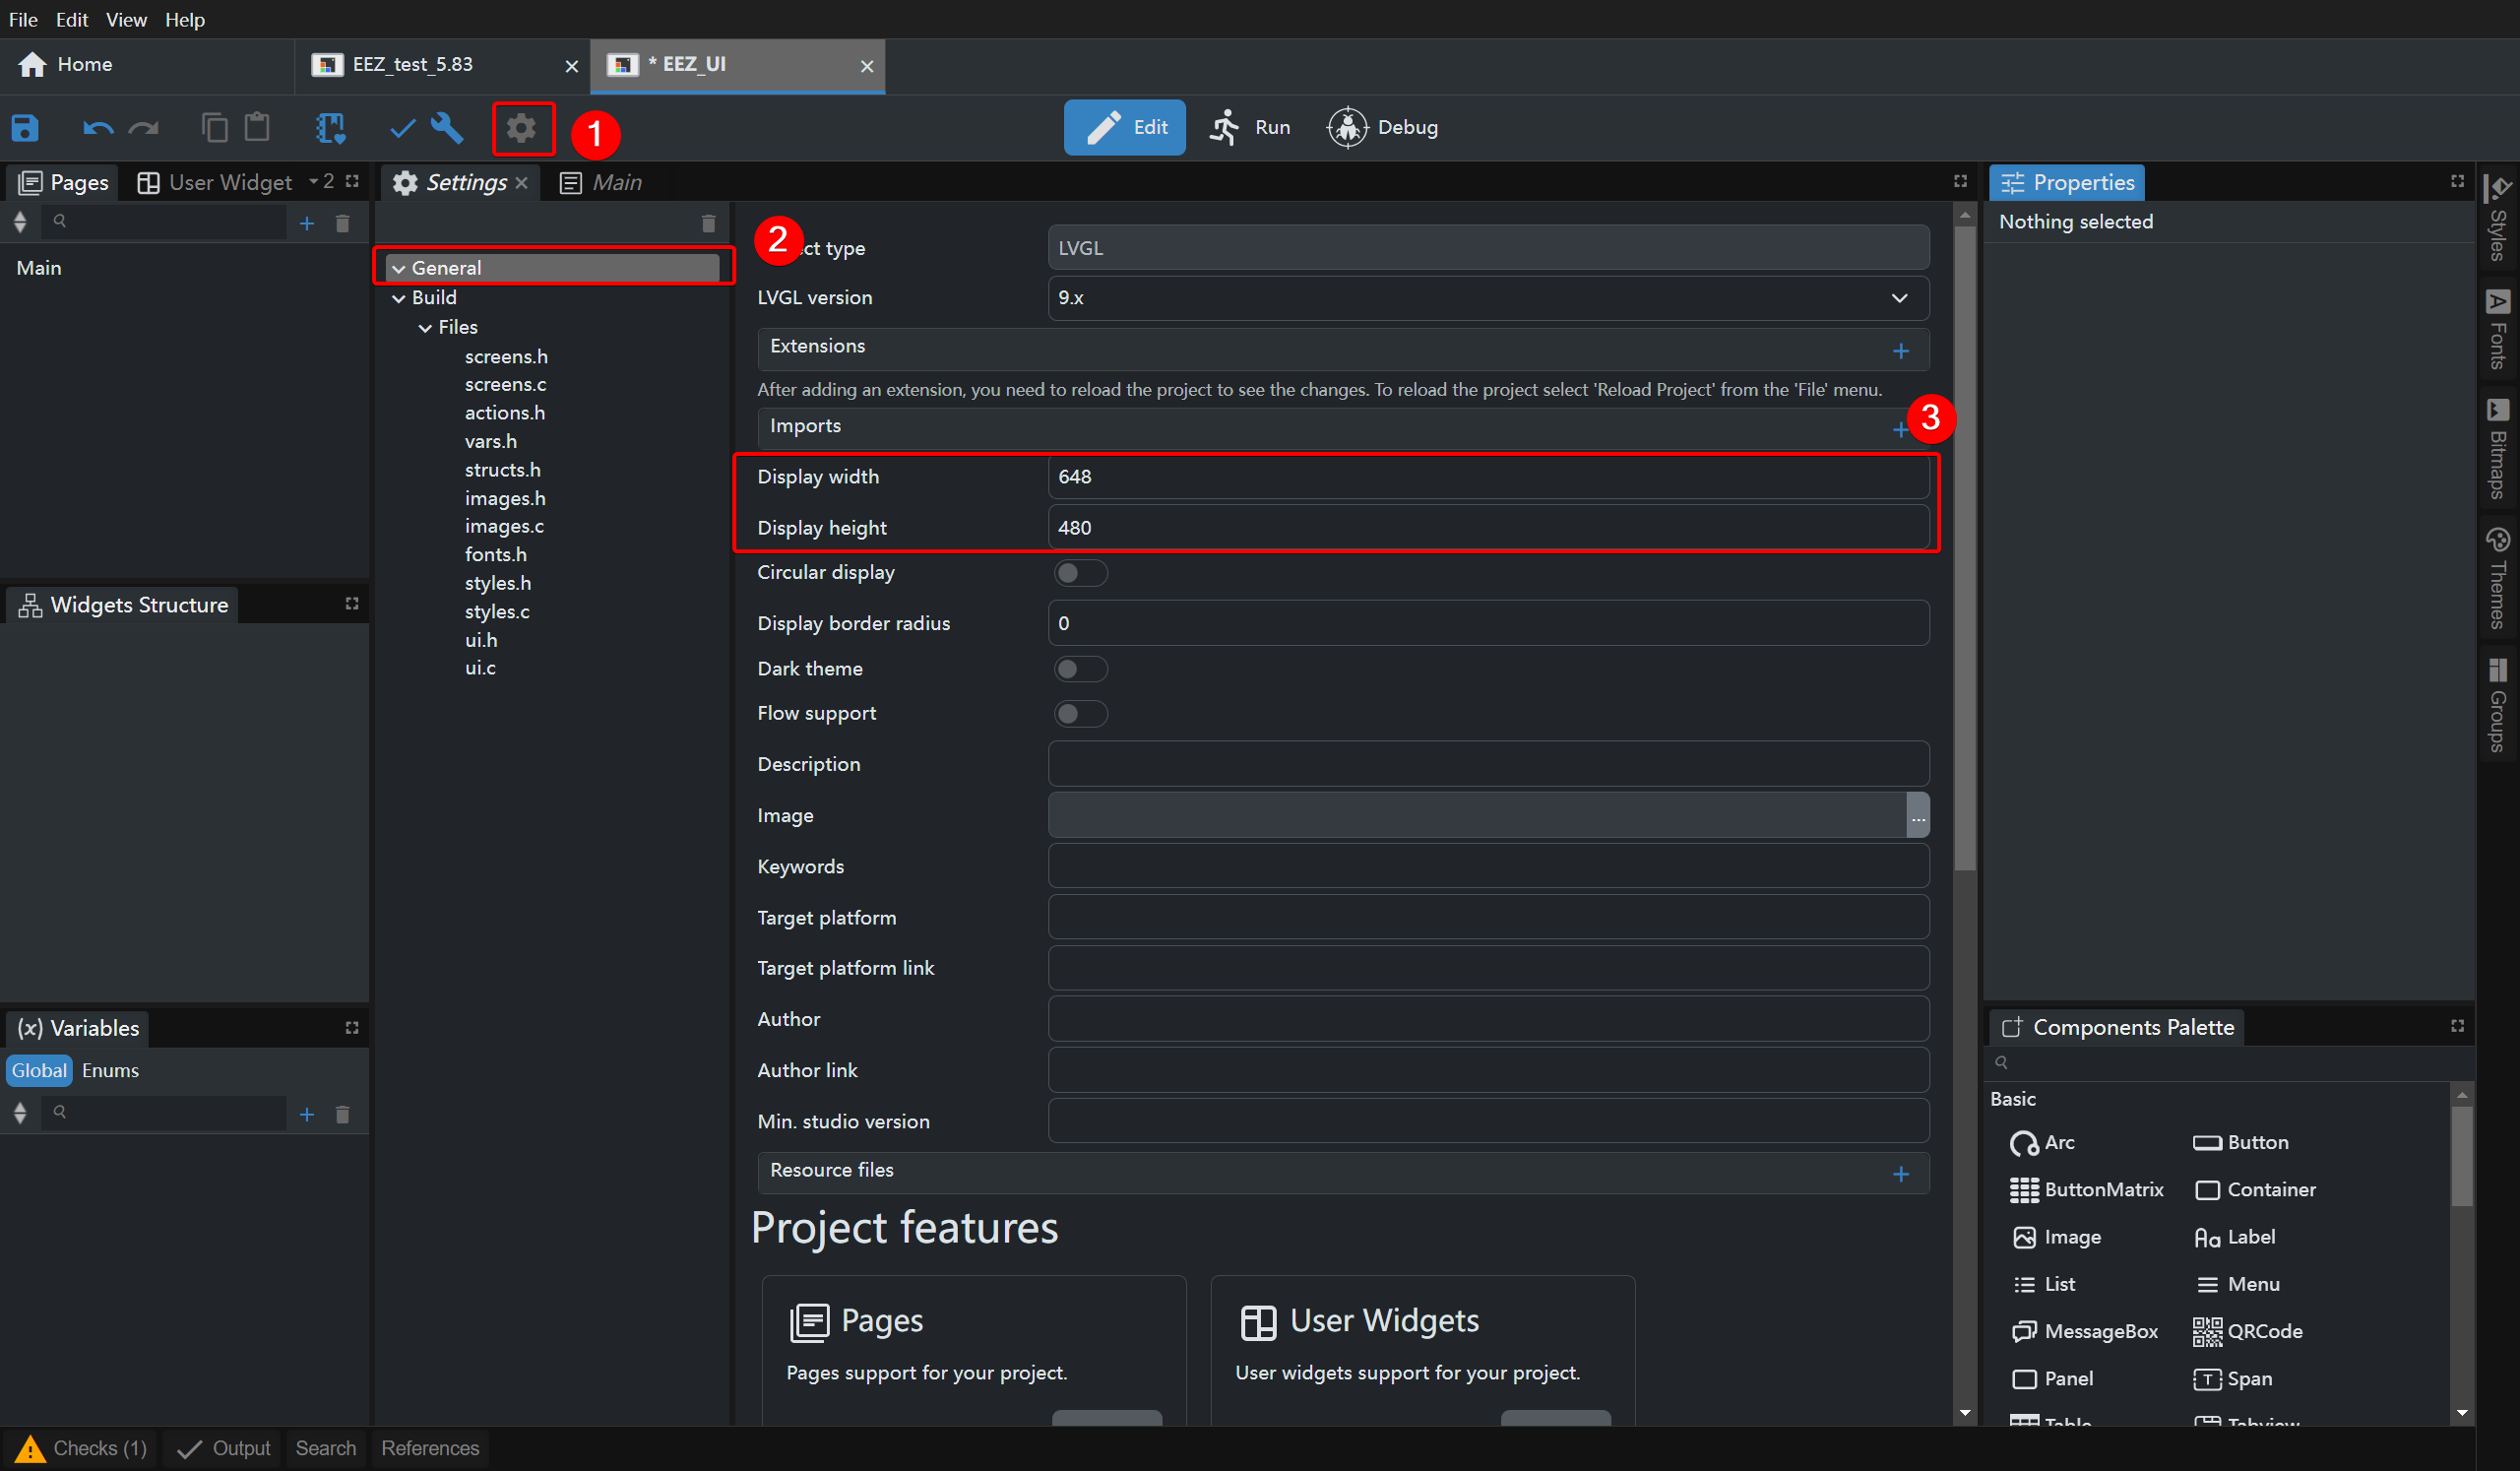
This project is designed for a 5.83" Monochrome eInk display with a resolution of 648*480. Therefore, some key parameters need to be modified.
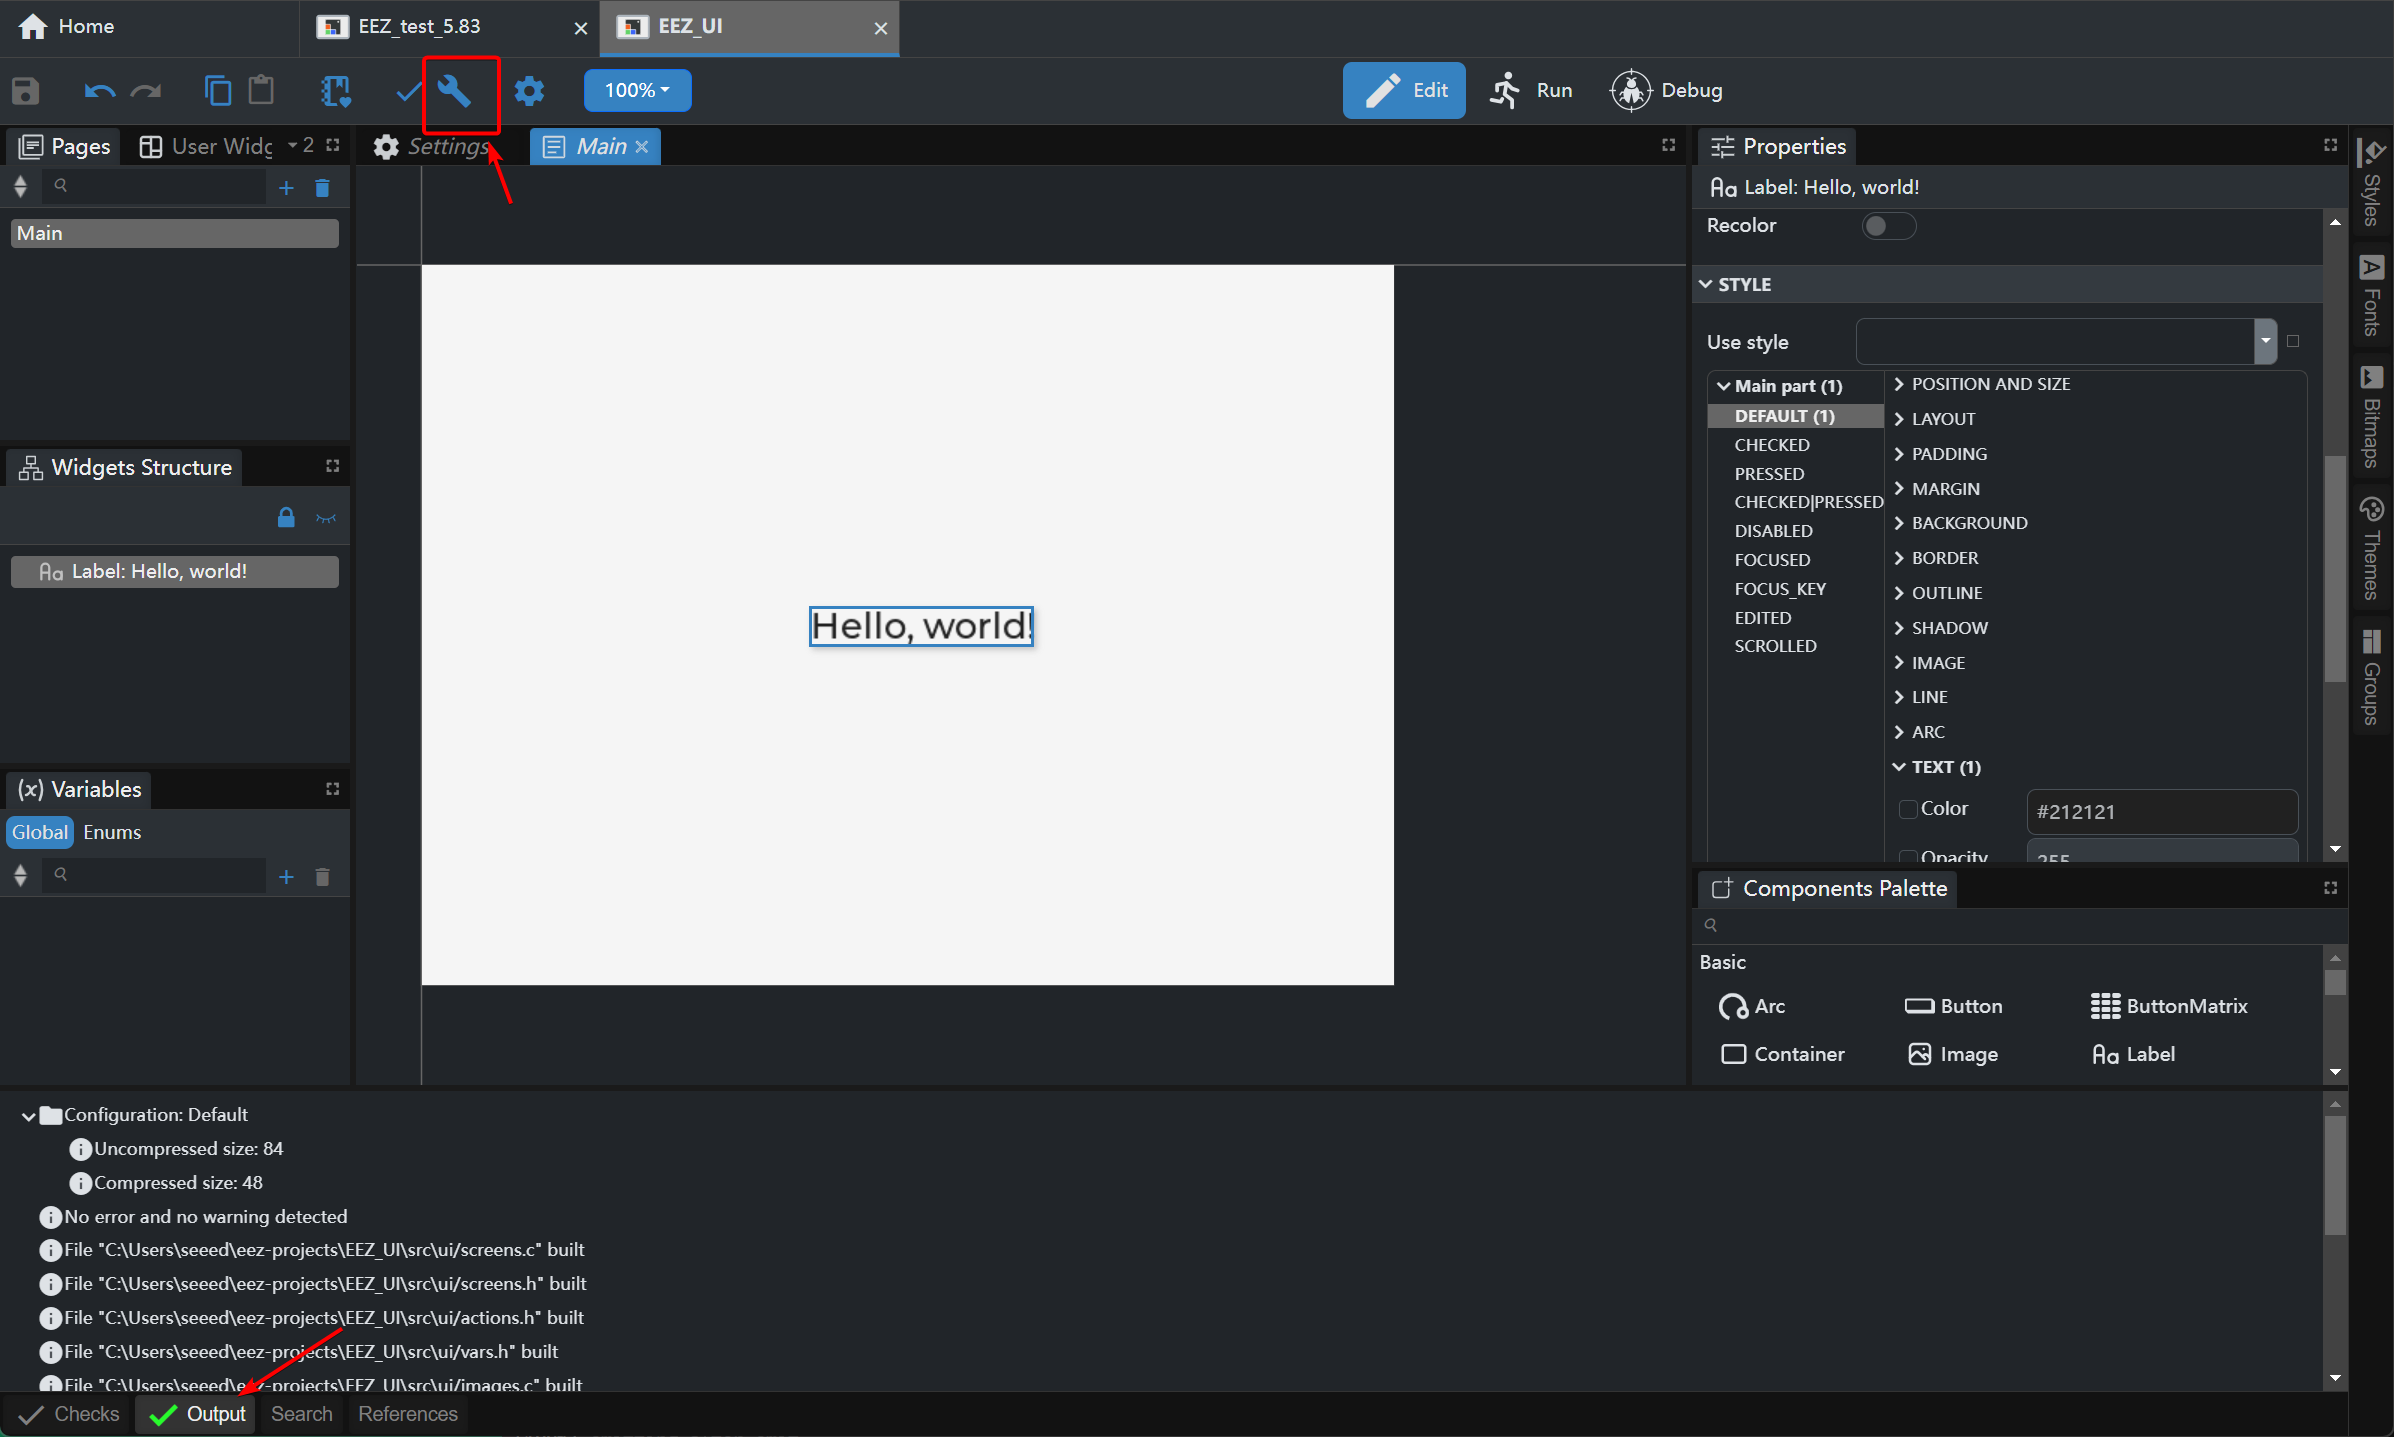
Step 1. Select Settings, then in the General tab, change Display width and Display height to 648 and 480 respectively.
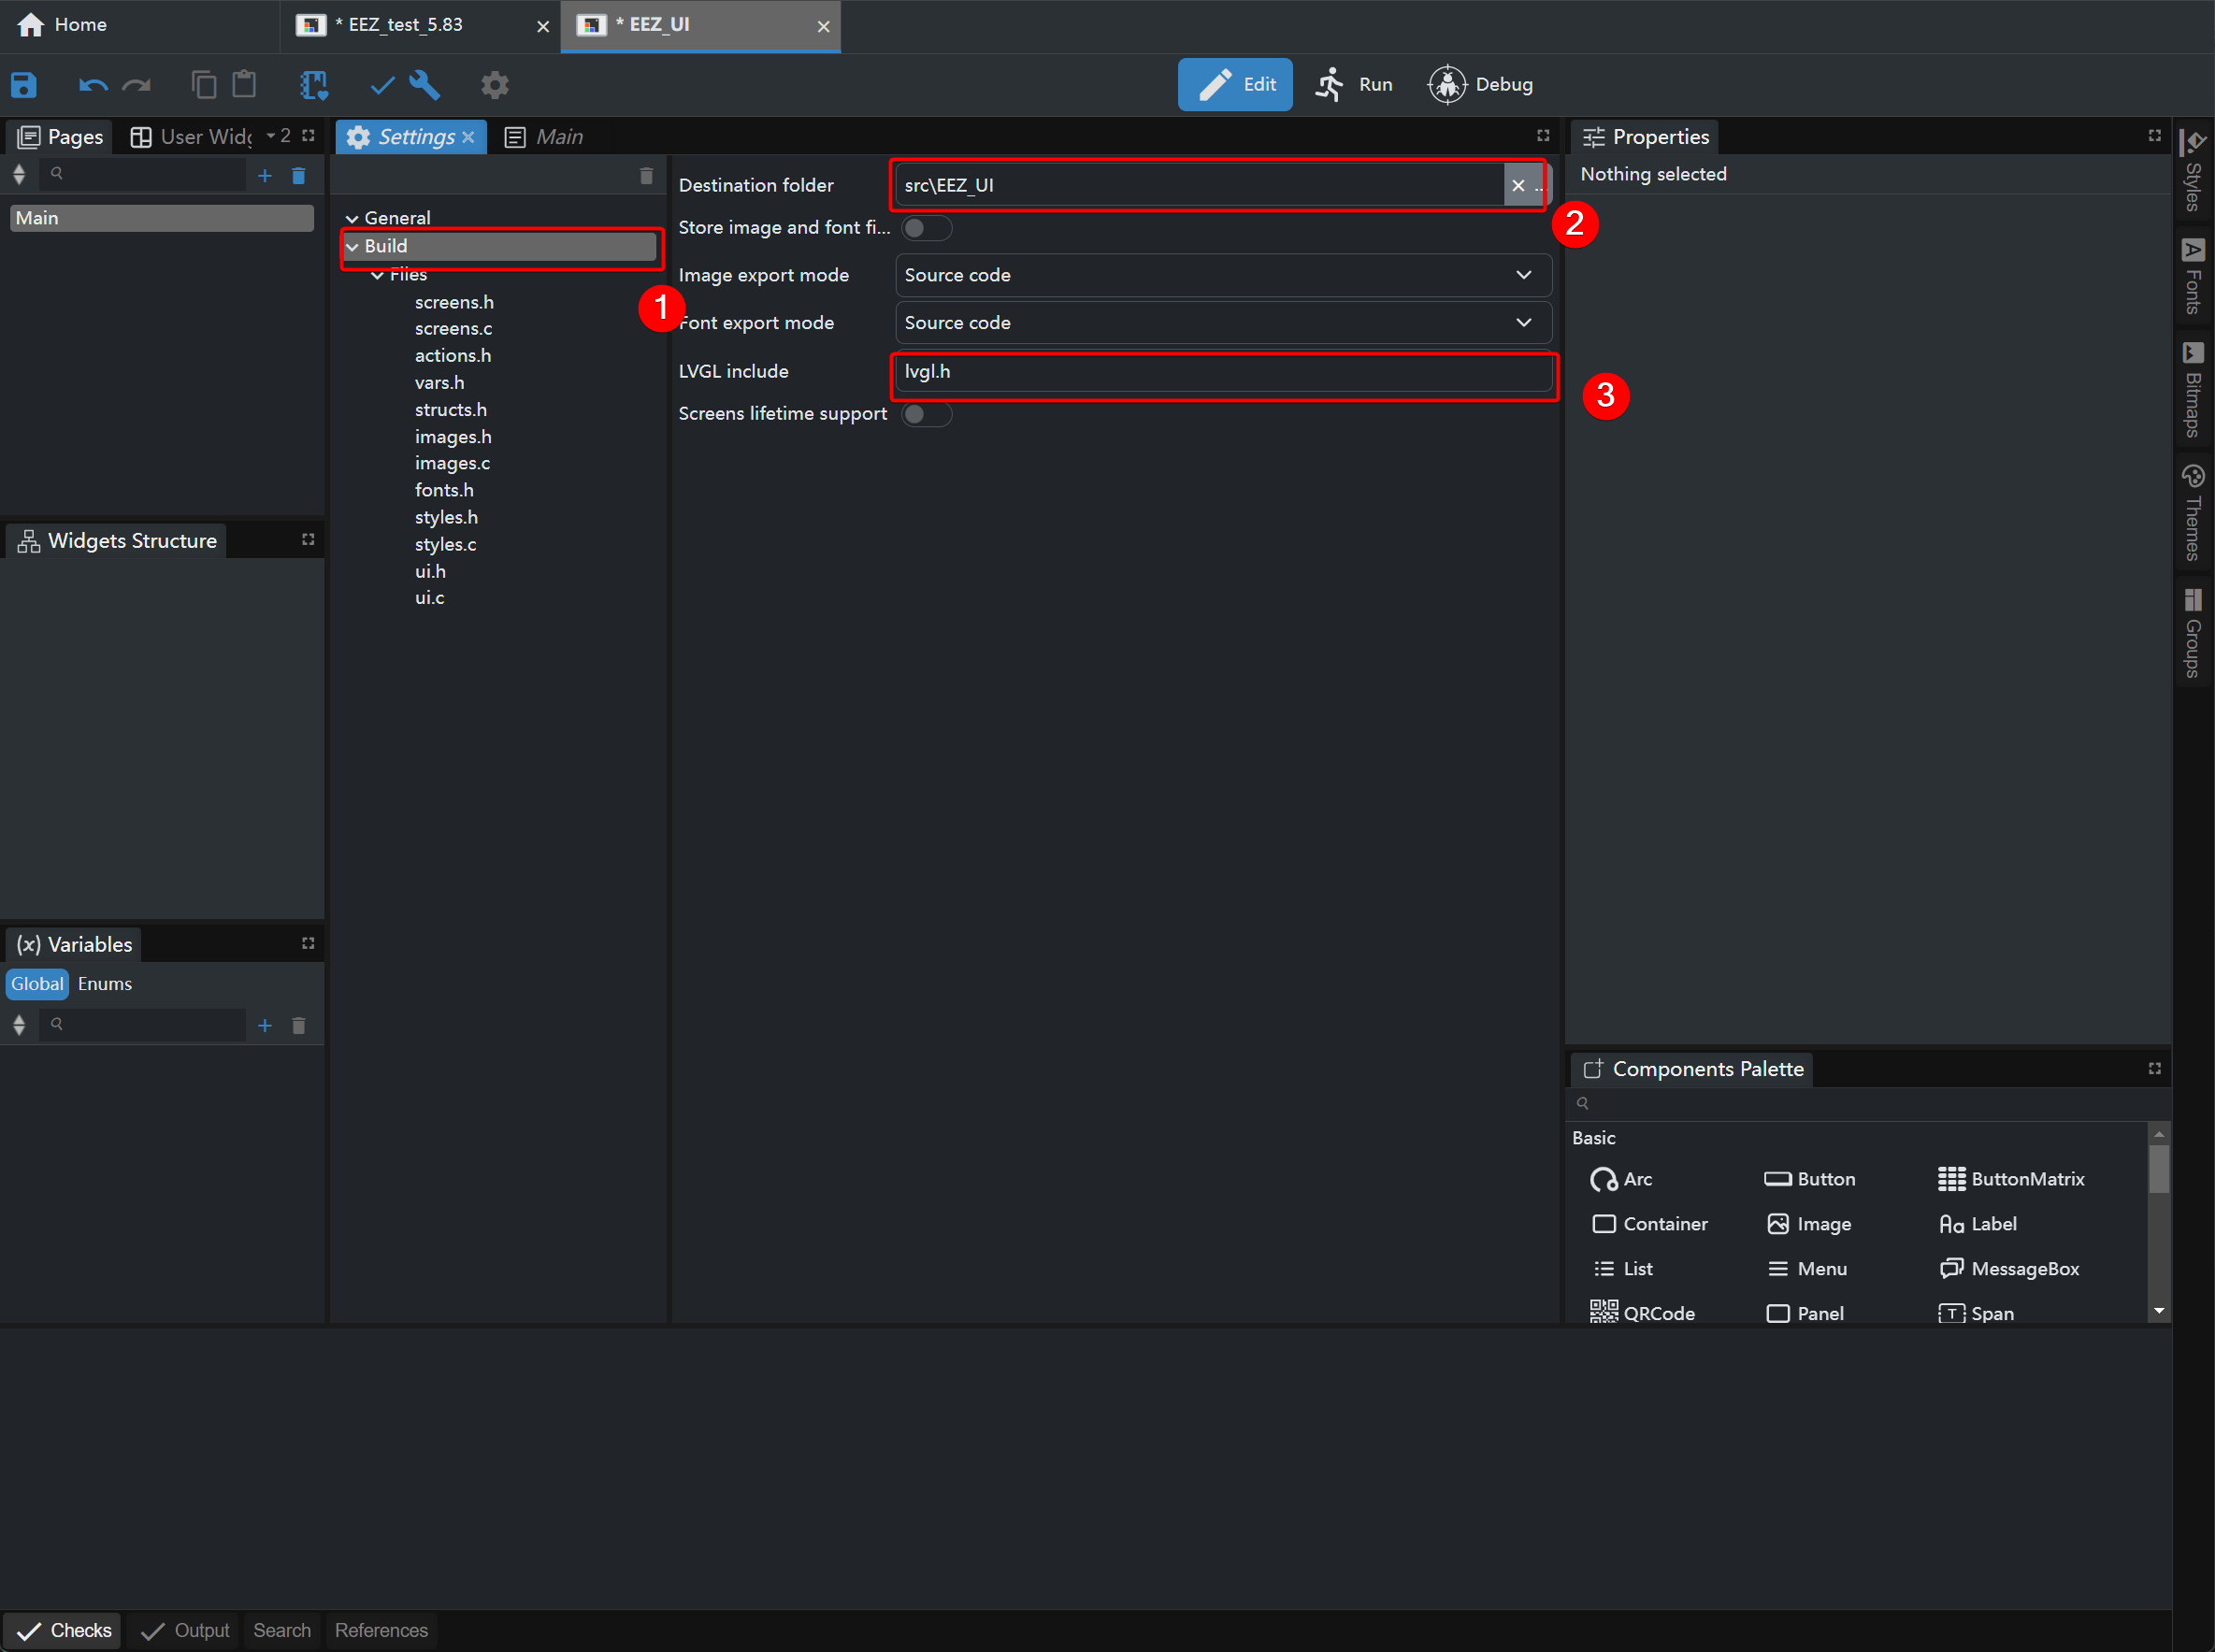
Step 2. Modify the generated files
-
Rename the folder path src/ui to src/EEZ_UI; all code files generated by EEZ Studio will be stored in this folder.
-
In the Build tab, change LVGL include to lvgl.h.
Step 3. Build the project
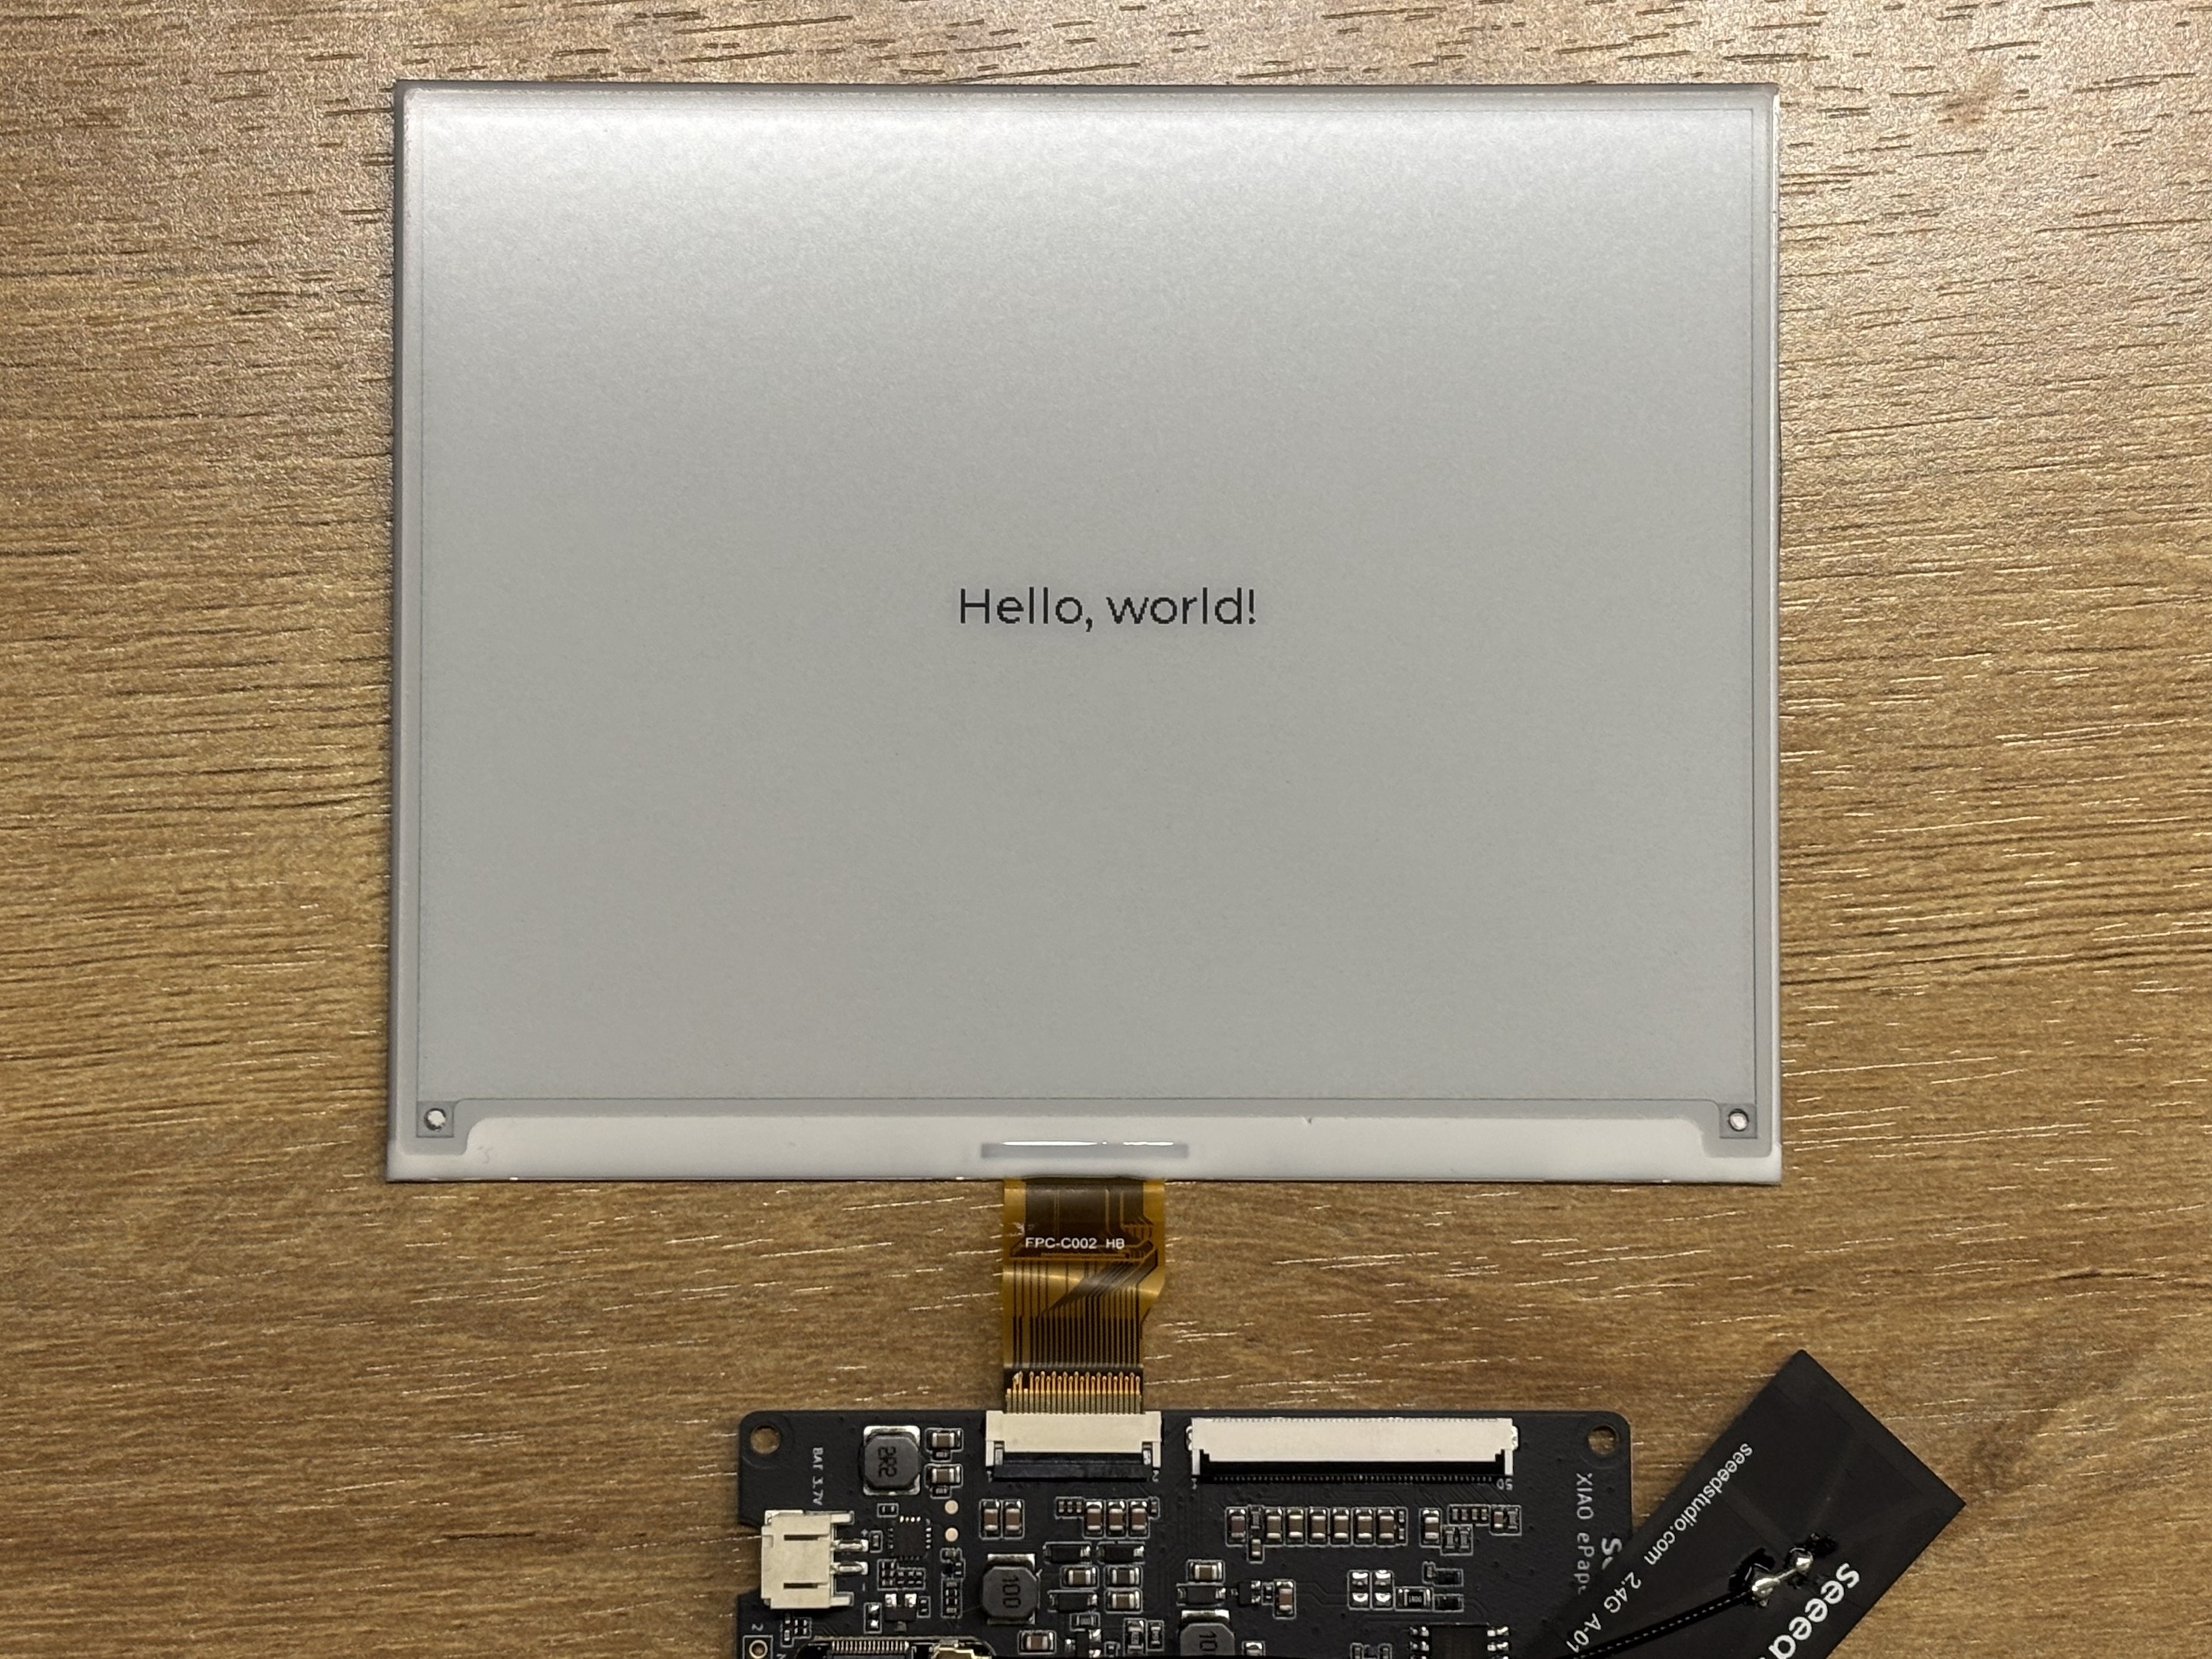
- Return to the Main interface and drag Hello World to the center of the screen.
- In the STYLE tab, adjust the font size or color.
- Select the option to build the project. If no errors are displayed in the OUTPUT panel, the project has been built successfully.
Next, deploy the built project files to the Arduino IDE, then upload them to the corresponding hardware device for display.
Arduino IDE Setup
If this is your first time using Arduino, we highly recommend you to refer to Getting Started with Arduino.
Step 1. Download and install the Arduino IDE and launch the Arduino application.
Step 2. Add ESP32 board support to Arduino IDE.
In Arduino IDE, go to File > Preferences and add the following URL to the Additional Boards Manager URLs field:
https://raw.githubusercontent.com/espressif/arduino-esp32/gh-pages/package_esp32_index.json
Step 3. Install ESP32 board package.
Navigate to Tools > Board > Boards Manager, search for esp32 and install the ESP32 package by Espressif Systems.
Step 4. Select the correct board.
Go to Tools > Board > ESP32 Arduino and select XIAO_ESP32S3_PLUS.
Step 5. Connect your reTerminal E Series ePaper Display to your computer using a USB-C cable.
Step 6. Select the correct port from Tools > Port.
Import the Seeed_GFX library
We'll use the Seeed_GFX library, which provides comprehensive support for various Seeed Studio display devices.
Step 1. Download the Seeed_GFX library from GitHub:
Step 2. Install the library by adding the ZIP file in Arduino IDE. Go to Sketch > Include Library > Add .ZIP Library and select the downloaded ZIP file.
If you have previously installed the TFT_eSPI library, you may need to temporarily remove or rename it from your Arduino libraries folder to avoid conflicts, as Seeed_GFX is a fork of TFT_eSPI with additional features for Seeed Studio displays.
Step 3. Open the color example sketch from the Seeed_GFX library: File > Examples > Seeed_GFX > ePaper > Colorful > HelloWorld
Step 4. Create a new driver.h file
- Enter the specifications of the display you are using on the tool page. Here, the selected display is the 5.83 inch monochrome ePaper Screen (UC8179), and the driver board is the XIAO ePaper Display Board(ESP32-S3) - EE04.
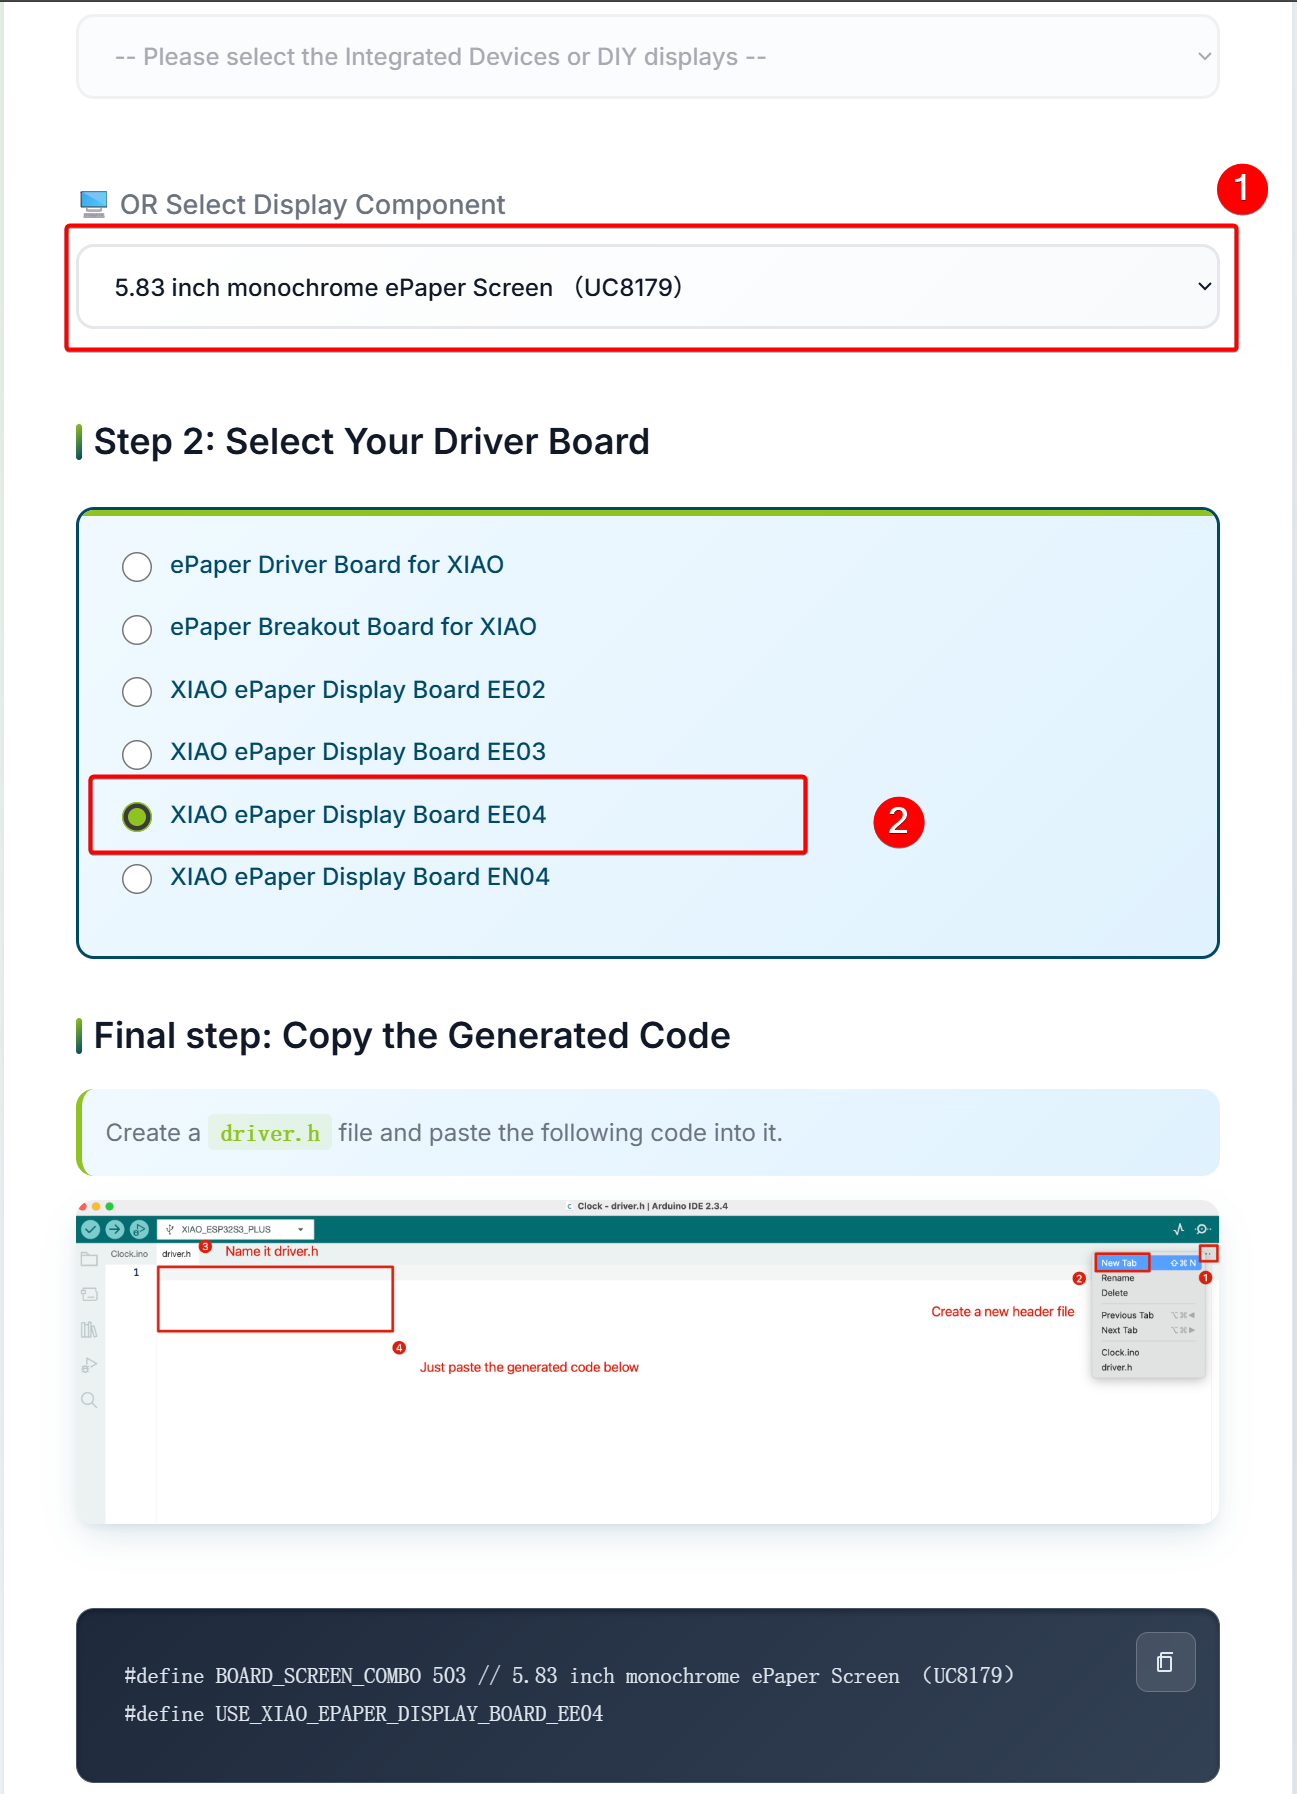
- Copy the program and save it to
driver.h.
#define BOARD_SCREEN_COMBO 503 // 5.83 inch monochrome ePaper Screen (UC8179)
#define USE_XIAO_EPAPER_DISPLAY_BOARD_EE04

If you make the wrong choice, the screen will display nothing. So please make sure your devices or components type.
Deploy to Arduino
Step 1. Add the files e1002_display.c , e1002_display.h lv_conf.h, and the lvgl library.The board should be selected as XIAO_ESP32S3.
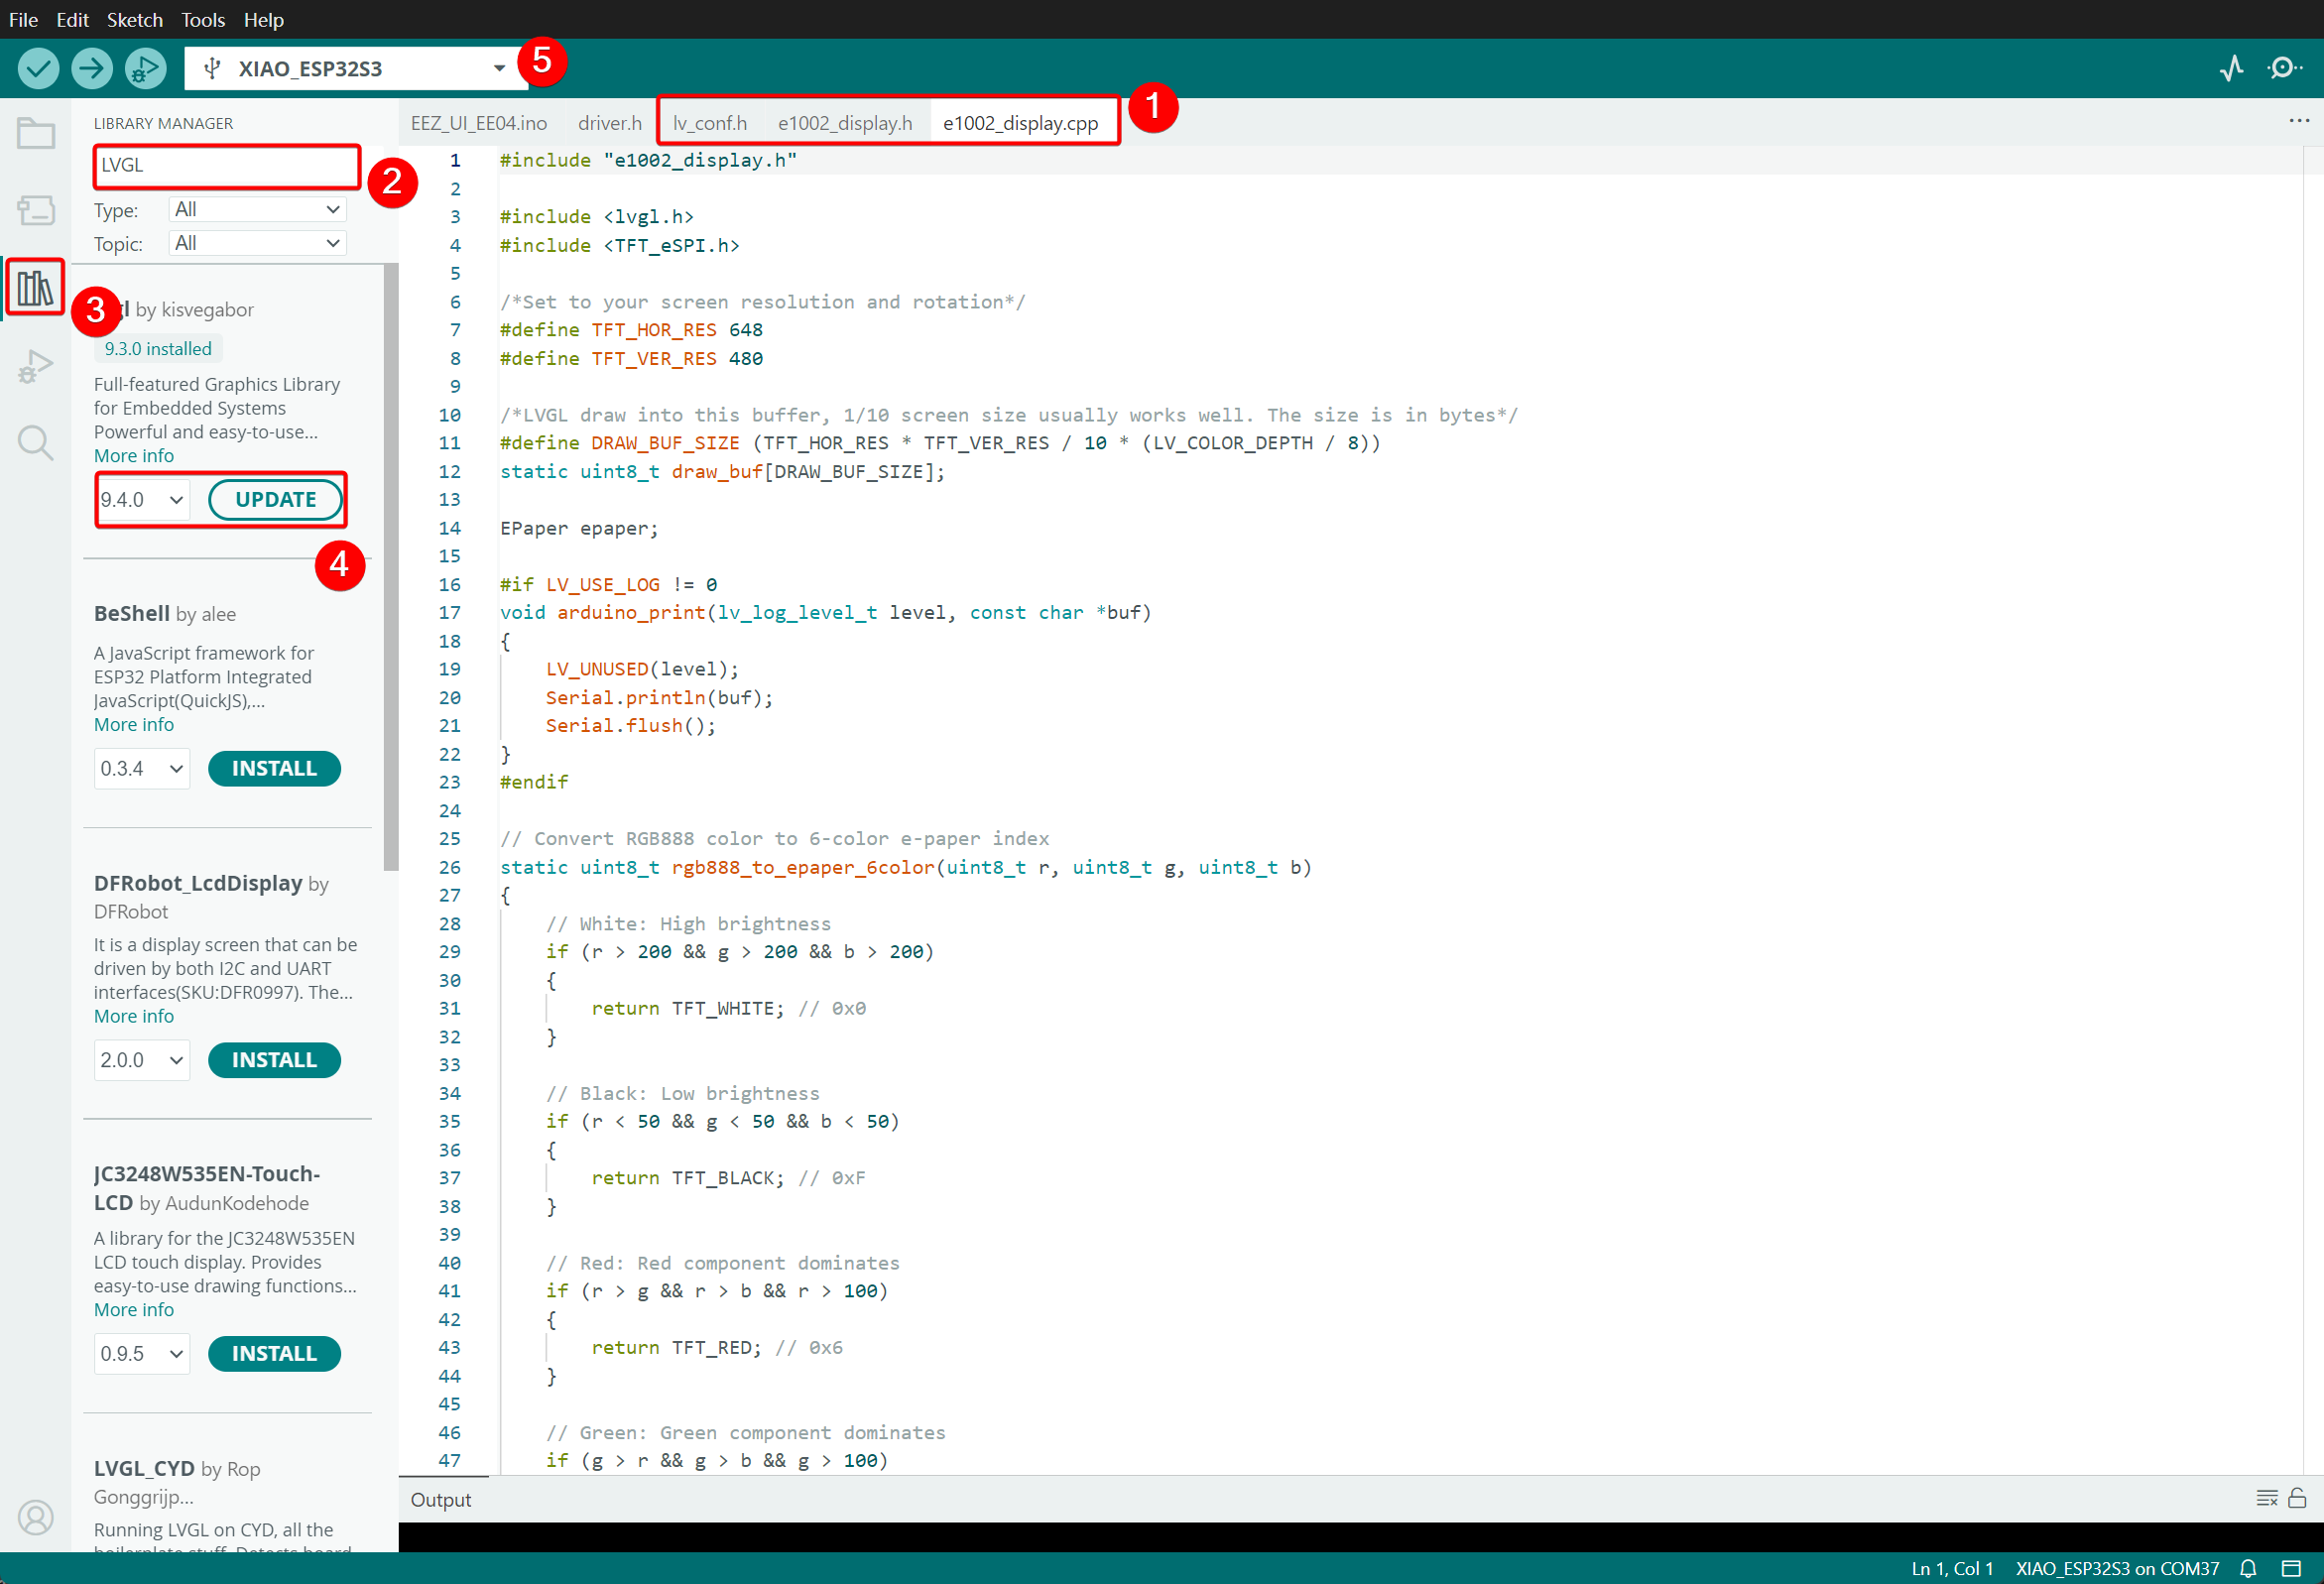
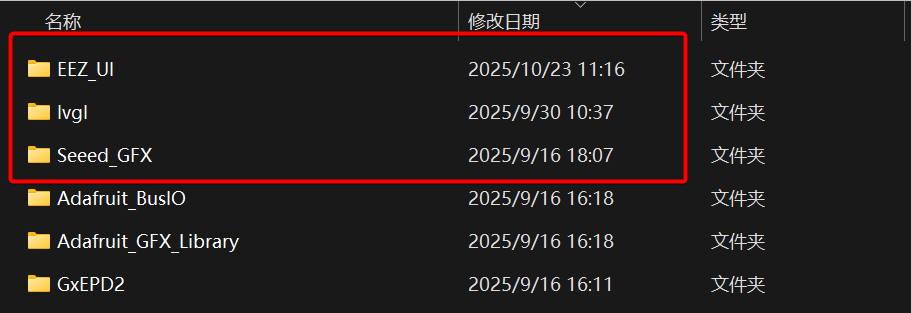
Step 2. Add the generated EEZ_UI code files to the library folder (The default storage path for Arduino IDE libraries is C:\Users\Users_name\Documents\Arduino\Libraries).
Step 3. Upload the program to the device.
EEZ_UI_EE04.ino
#include <TFT_eSPI.h>
#include <lvgl.h>
#include <ui.h>
#include "e1002_display.h"

int32_t page_index;

e1002_driver_t e1002_driver;

void setup()
{
  Serial.begin(115200);

  String LVGL_Arduino = "UI Dashboard - LVGL ";
  LVGL_Arduino += String('V') + lv_version_major() + "." +
                  lv_version_minor() + "." + lv_version_patch();
  Serial.println(LVGL_Arduino);

  Serial.println("Initializing e-paper display...");
  e1002_display_init(&e1002_driver);

  ui_init();
  page_index = SCREEN_ID_MAIN;
  loadScreen((ScreensEnum)page_index);
  e1002_display_refresh(&e1002_driver);

}

void loop()
{
  lv_timer_handler();
  ui_tick();


  if (e1002_display_should_refresh(&e1002_driver))
  {
    Serial.println("Refreshing e-paper display...");
    e1002_display_refresh(&e1002_driver);
    Serial.println("Display refresh complete");
  }

  delay(10);
}
Code Explanation
-
Header File Inclusion: Includes the TFT display library, LVGL graphics library, UI interface definition file (
ui.h), and e-paper display driver (e1002_display.h). -
Global Variables:
page_index: Used to record the index of the currently displayed page.e1002_driver: Driver object for the e-paper display.
-
setup() Function (Initialization):
- Initializes serial communication (baud rate: 115200) for printing debugging information.
- Prints LVGL library version information (e.g., "Smart Home Dashboard - LVGL Vx.x.x").
- Initializes the e-paper display (
e1002_display_init). - Initializes the UI interface (
ui_init). - Sets the initial page to "Main Screen" (
SCREEN_ID_MAIN) and loads it. - Refreshes the e-paper display to show the initial interface.
-
loop() Function (Main Loop):
- Processes LVGL timers and events (
lv_timer_handler). - Processes scheduled tasks for the UI interface (
ui_tick). - Checks if the e-paper display needs to be refreshed (
e1002_display_should_refresh); if so, performs the refresh and prints a log. - Loops every 10 milliseconds to ensure system responsiveness.
- Processes LVGL timers and events (
Effect demonstration:
UI Design
Next, we will demonstrate a UI example created with EEZ Studio, to further illustrate its capabilities in interface design.
When designing LVGL interfaces with EEZ Studio, you may find the following tools particularly useful:
- An online color palette generator for quickly creating, adjusting, and exporting color schemes: Color
- An online color palette tool for finding and matching web color schemes: Color Chart
- A large vector icon library platform for downloading and managing icons:Icon
- A free font resource site for browsing and downloading commercially usable fonts: Font
UI Drawing Introduction
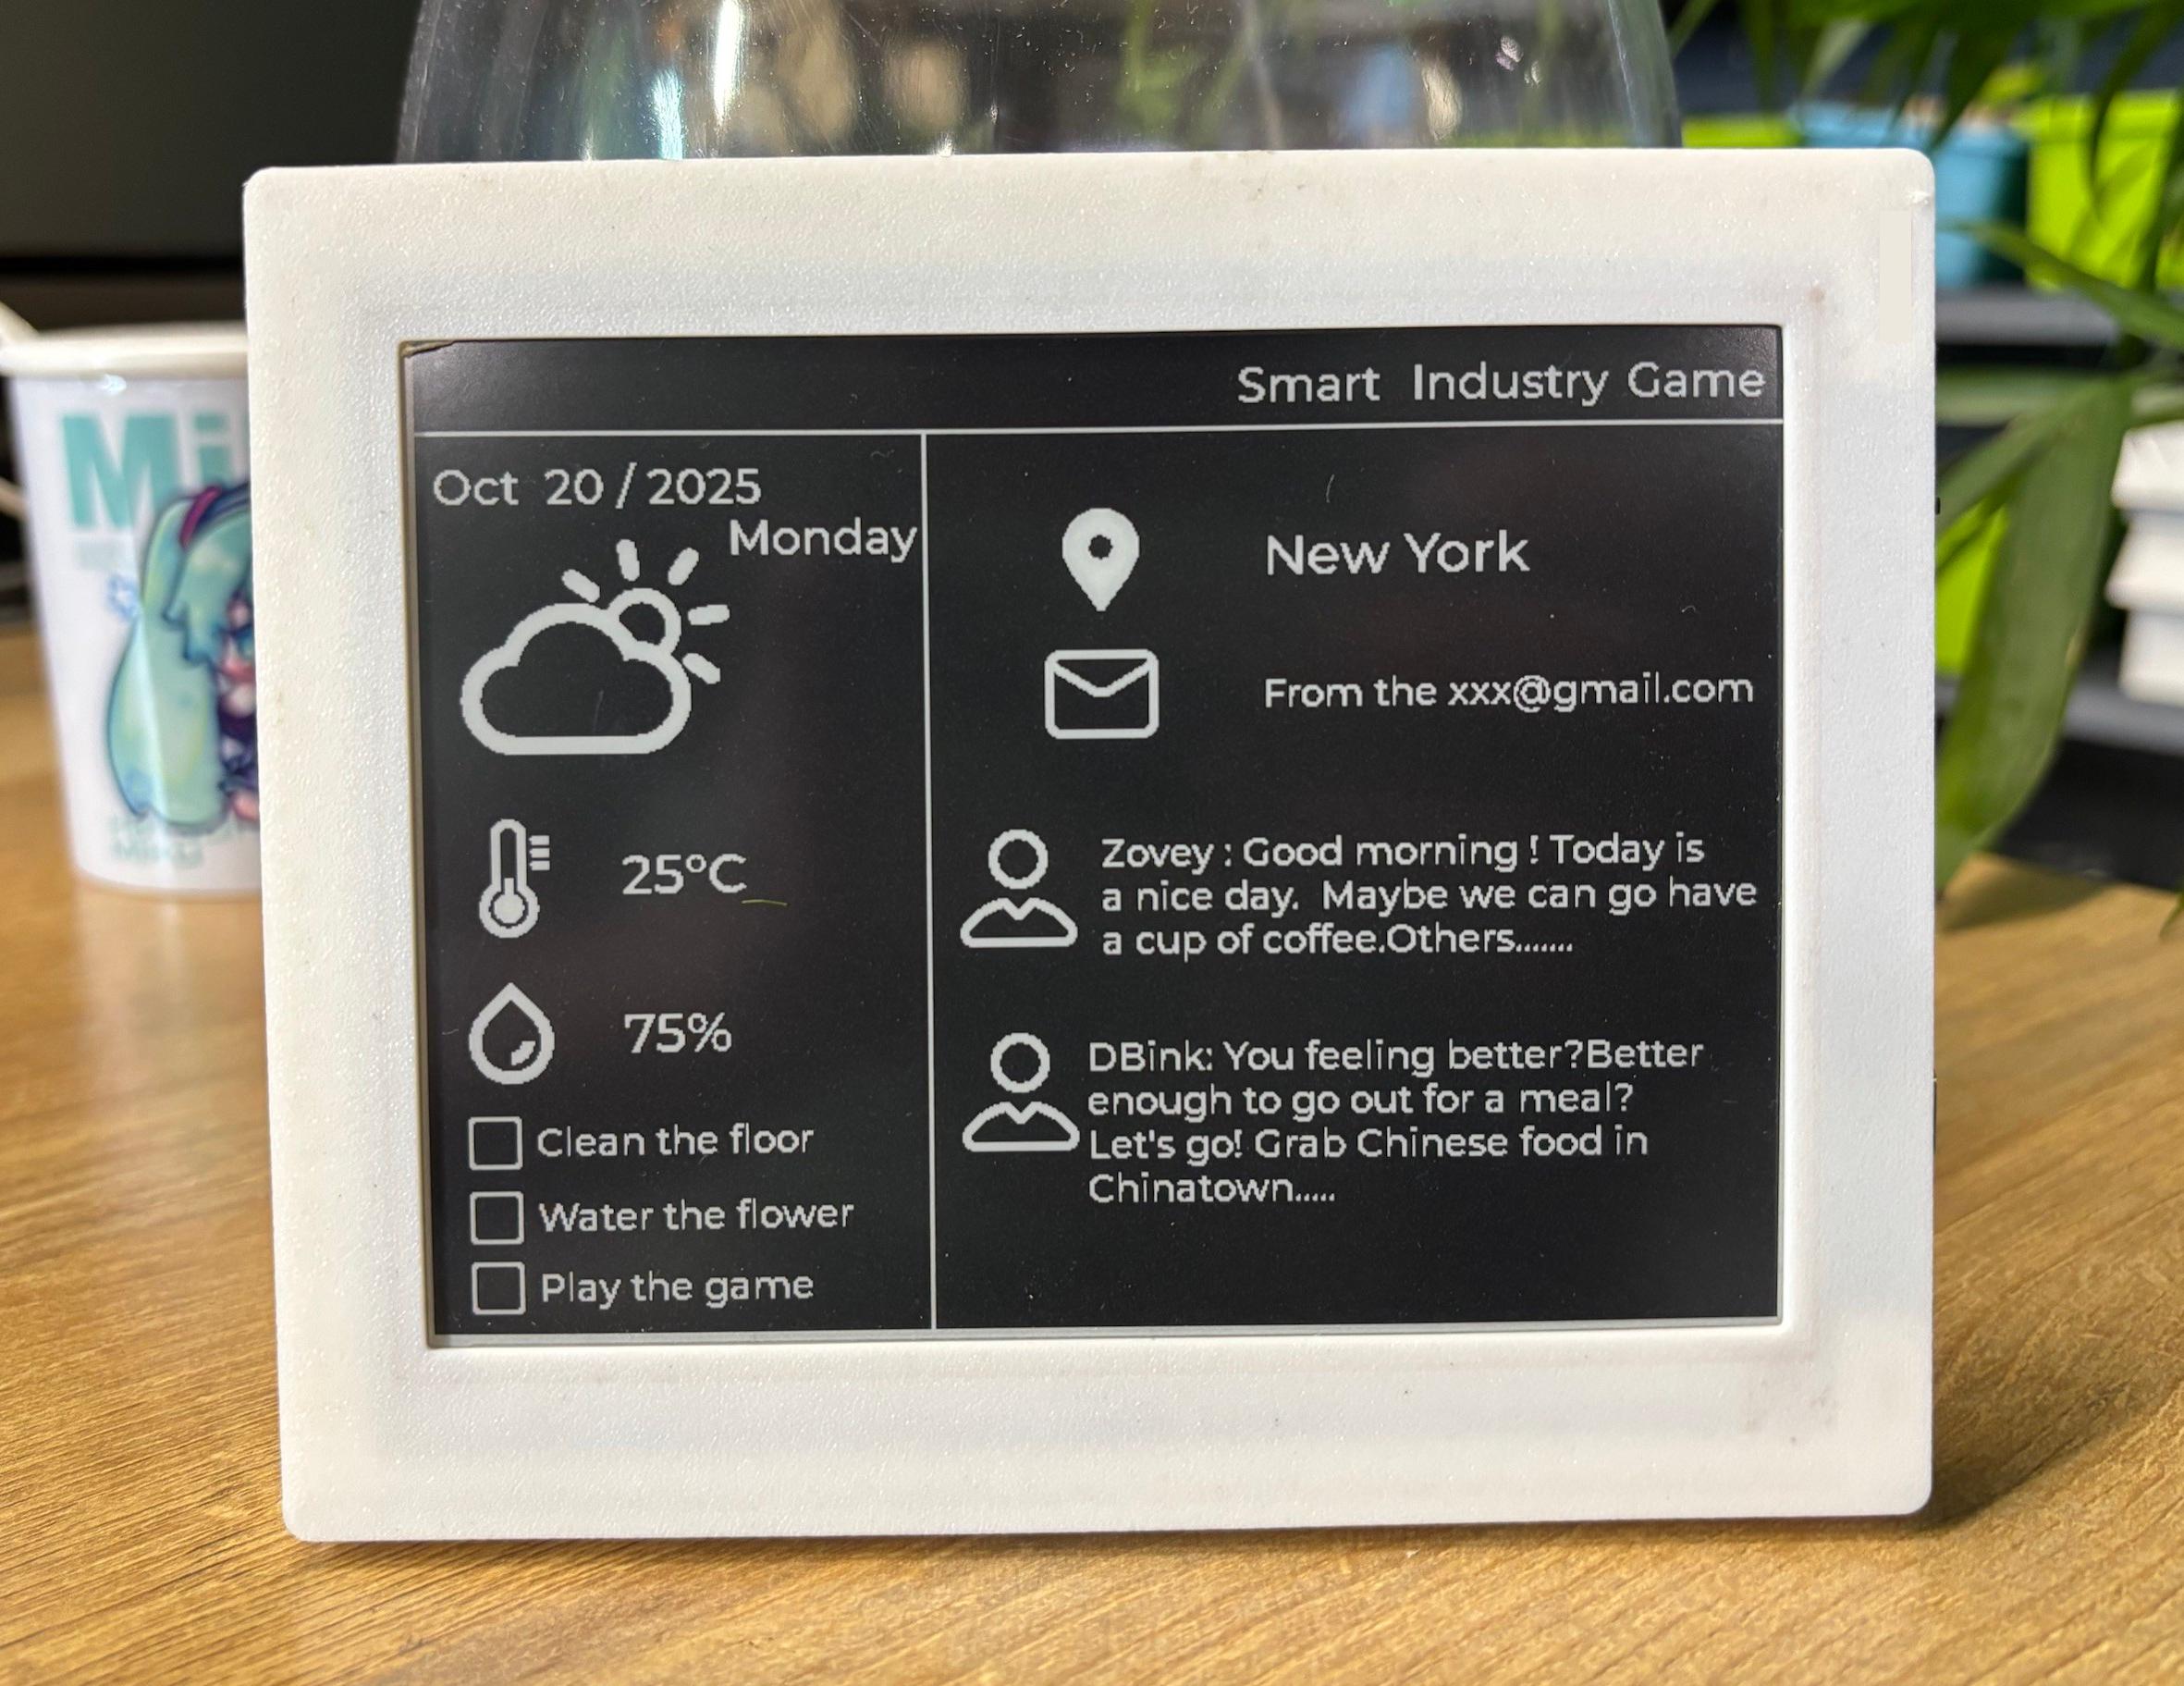
- Effect picture:
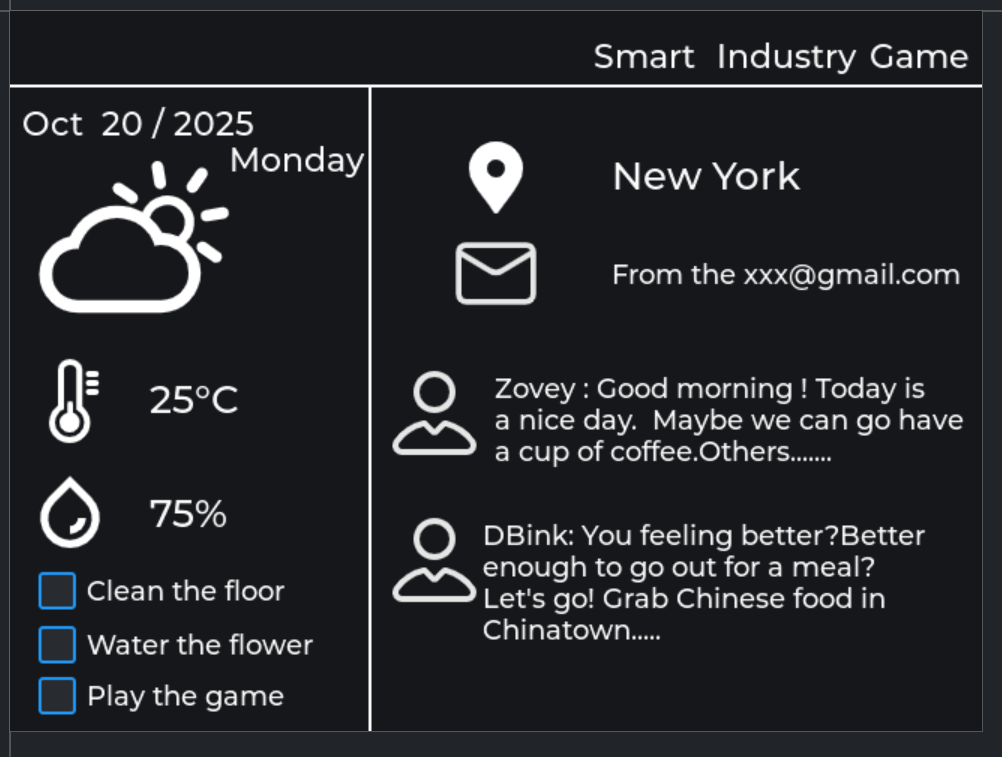
This UI is composed of four components:
- Label
- Line
- Checkbox
- Image
Step 1. Change the canvas background color
The default background color is white; you can change it according to your preferences.
-
Select the canvas for which you want to change the background color.
-
Check the Color option, then select your preferred hexadecimal color code.

Step 2. Add a Label
- Drag the Label component into the canvas, then select the desired font size and color.

Step 3. Add a line
- Drag the Line component into the canvas, and set the start and end points in the Points section to determine the line’s length and position. Reference points: 0,0 0,0 0,0 0,0,648,0

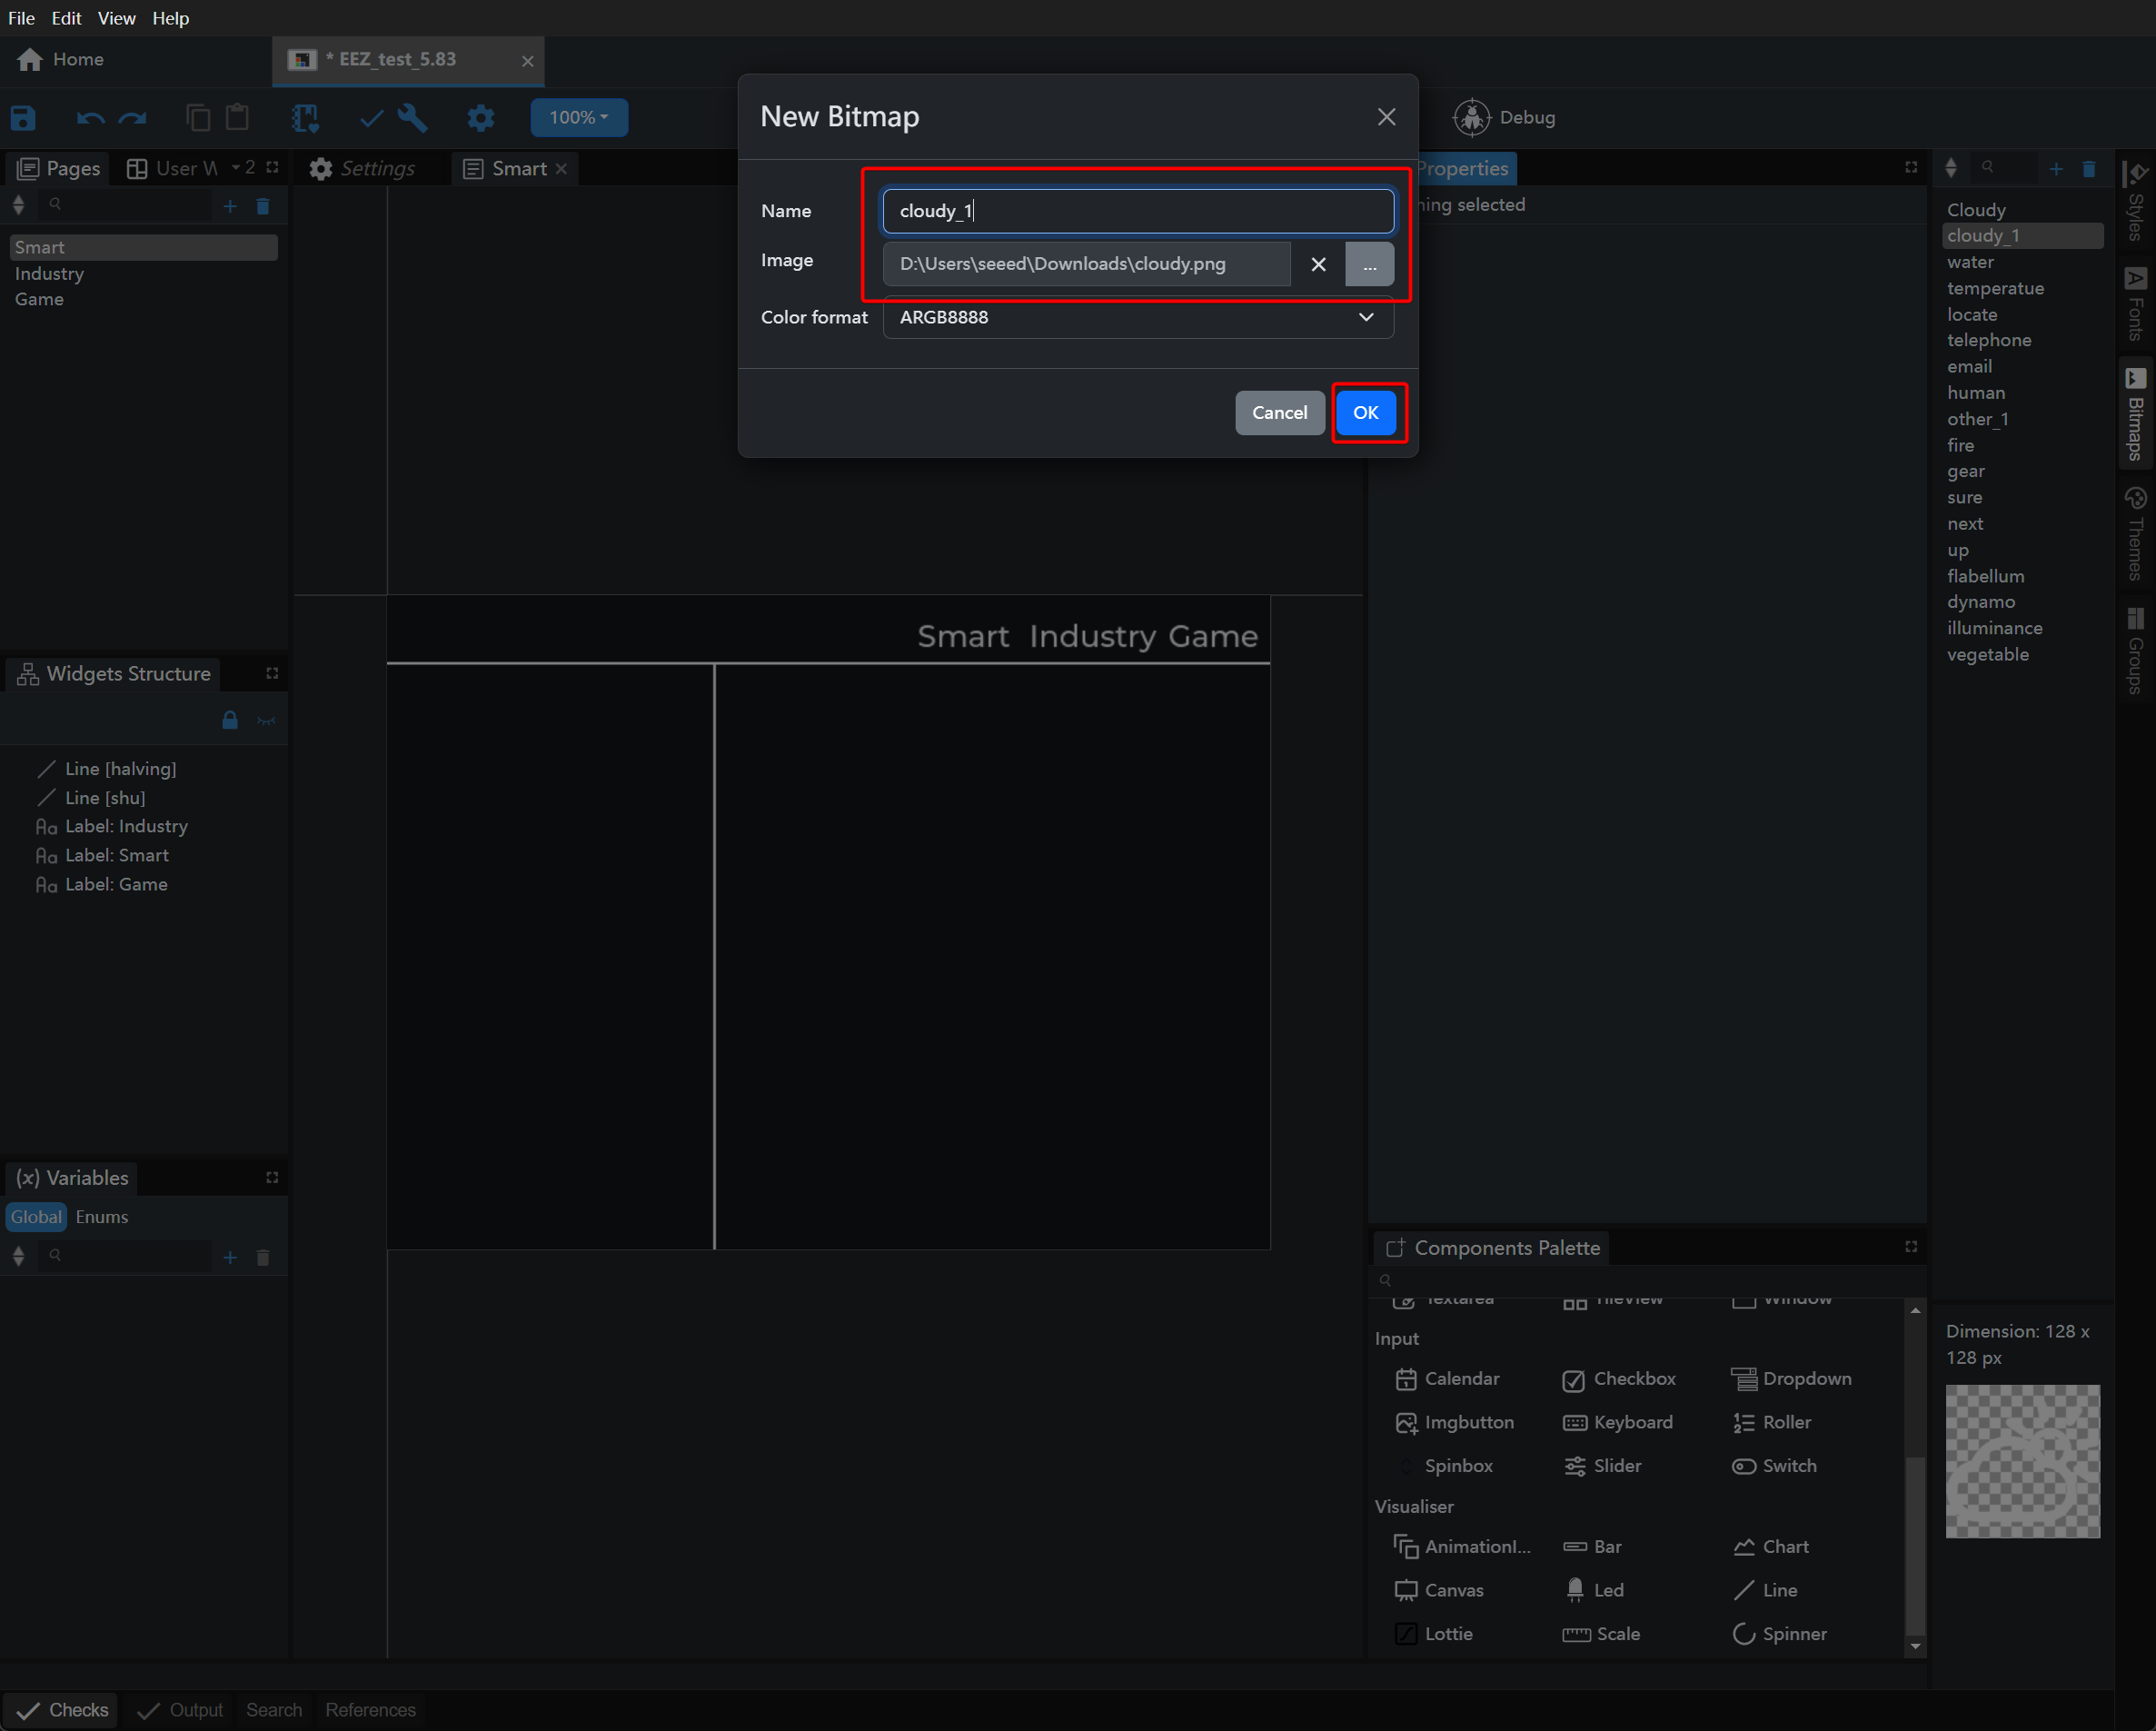
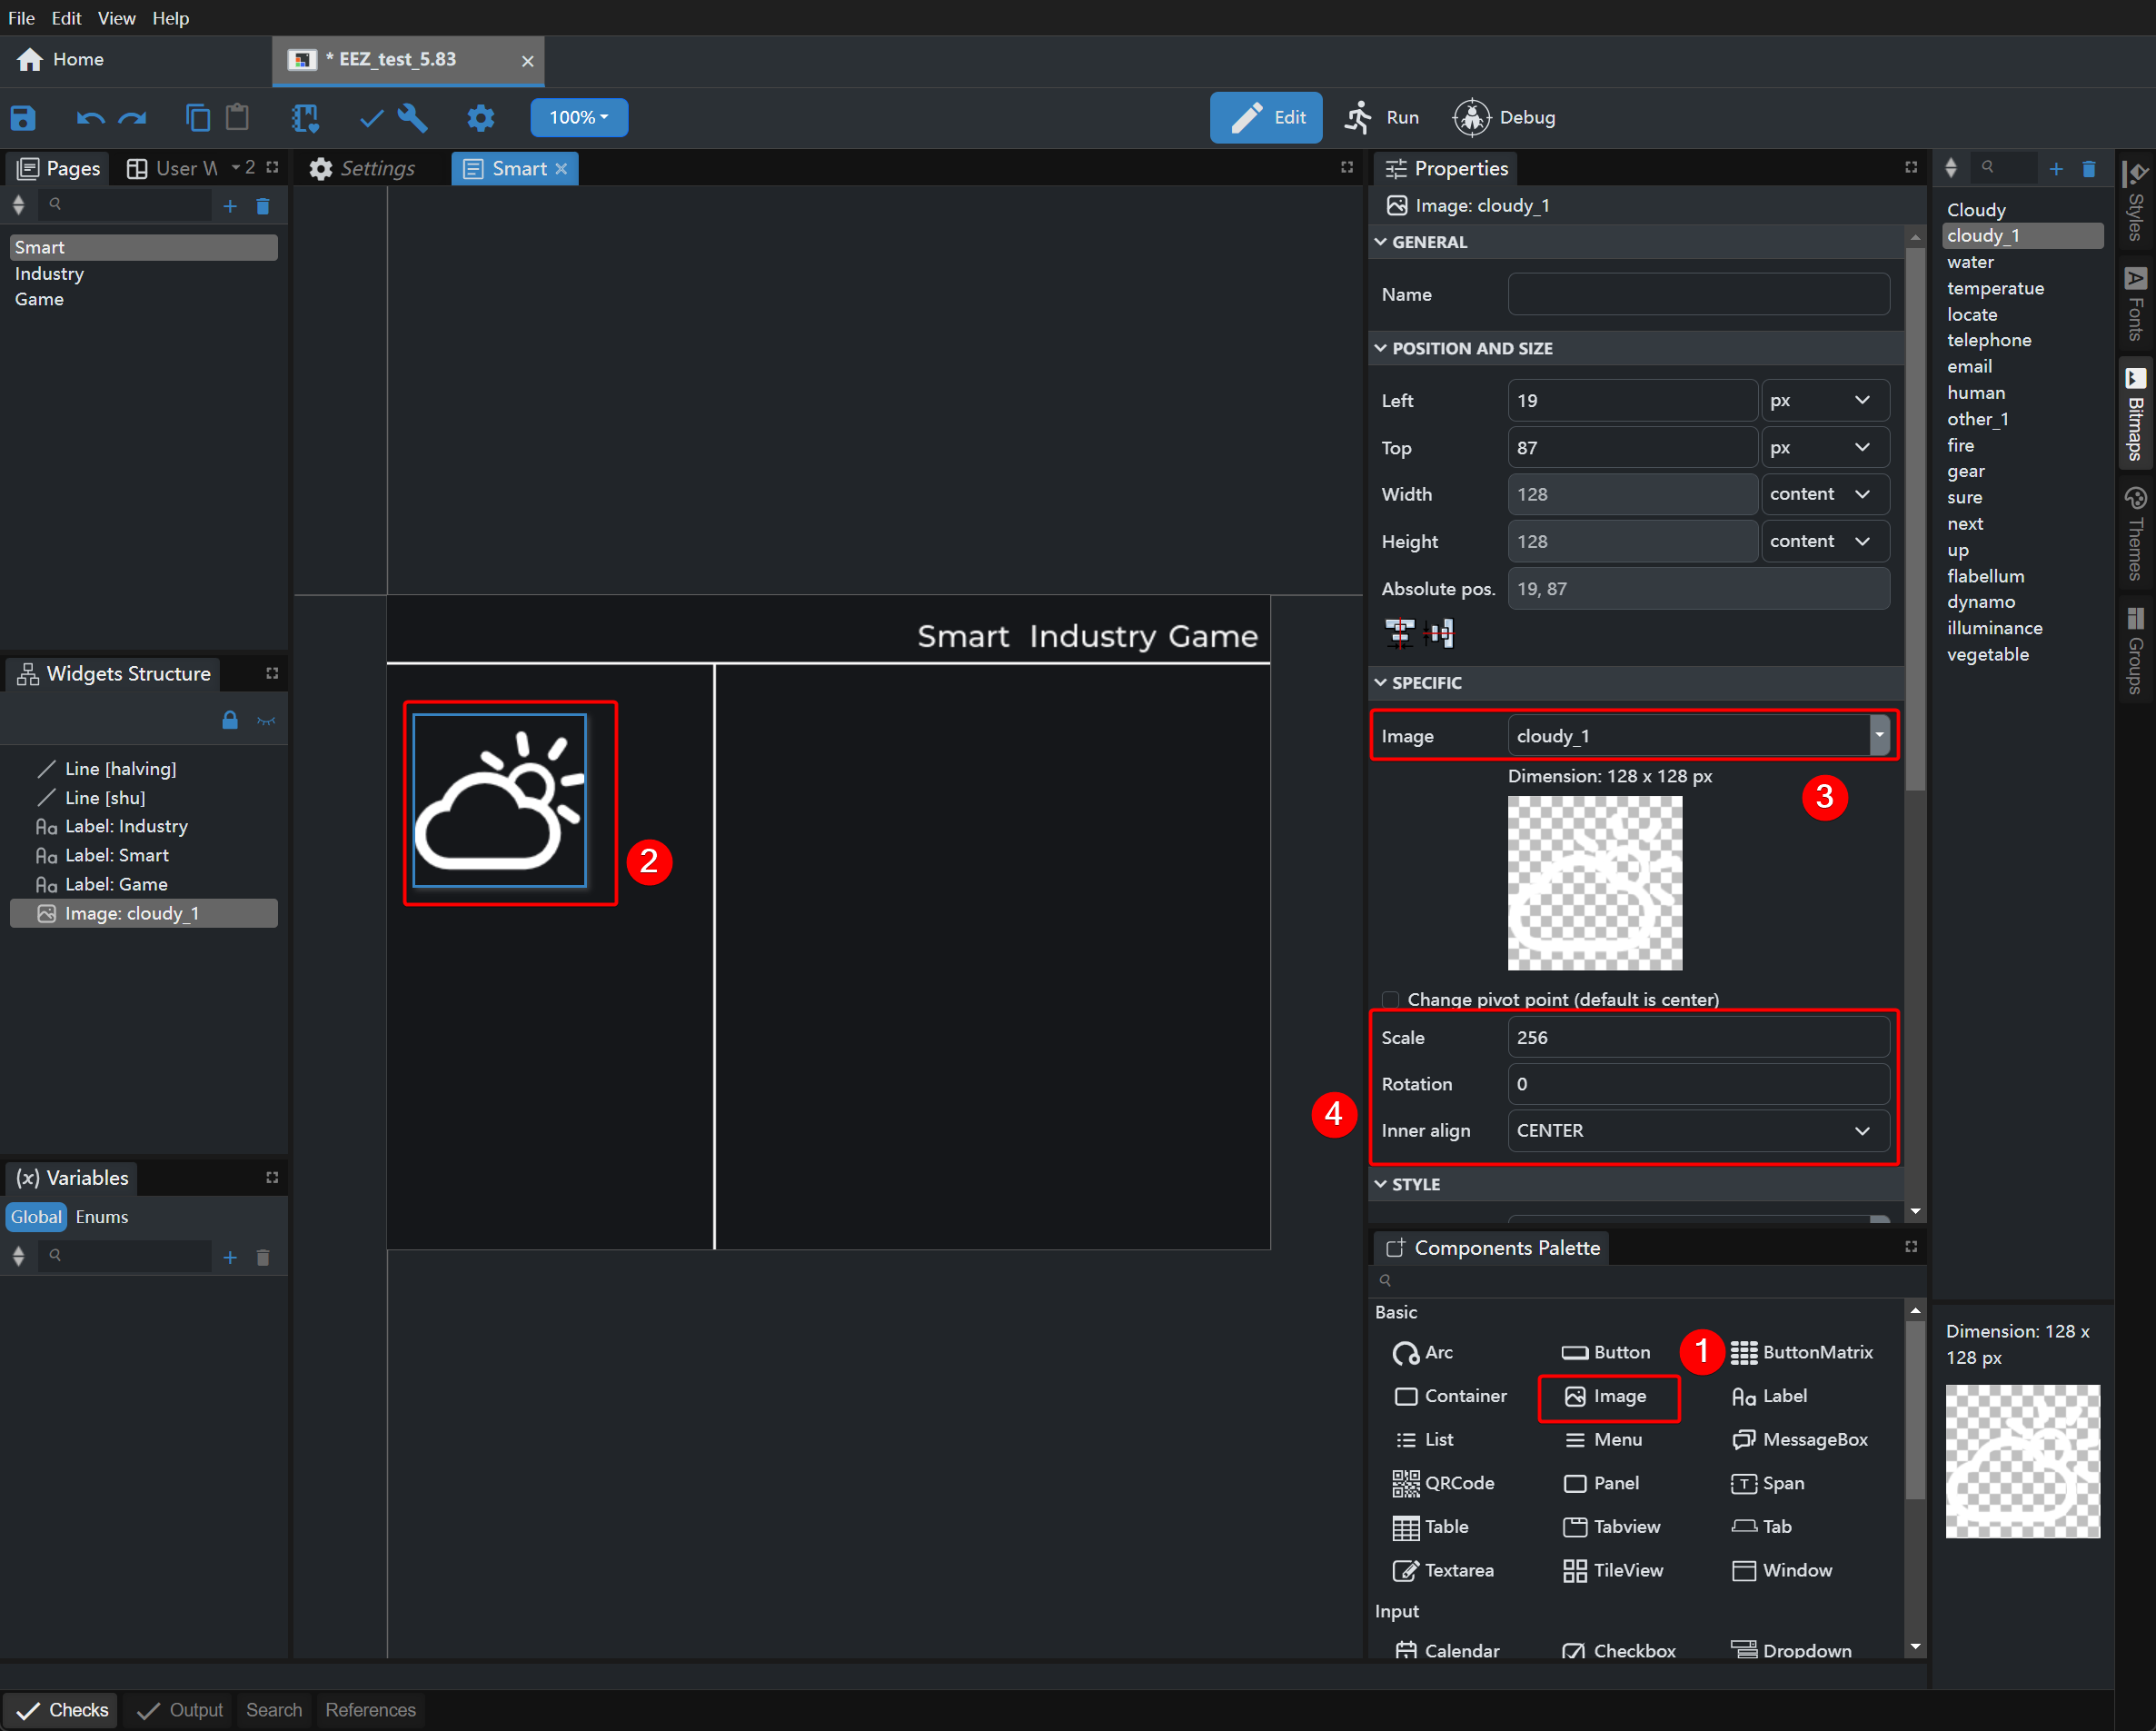
Step 4. Add bitmaps
- Click the Bitmaps option in the right sidebar and add the required images.
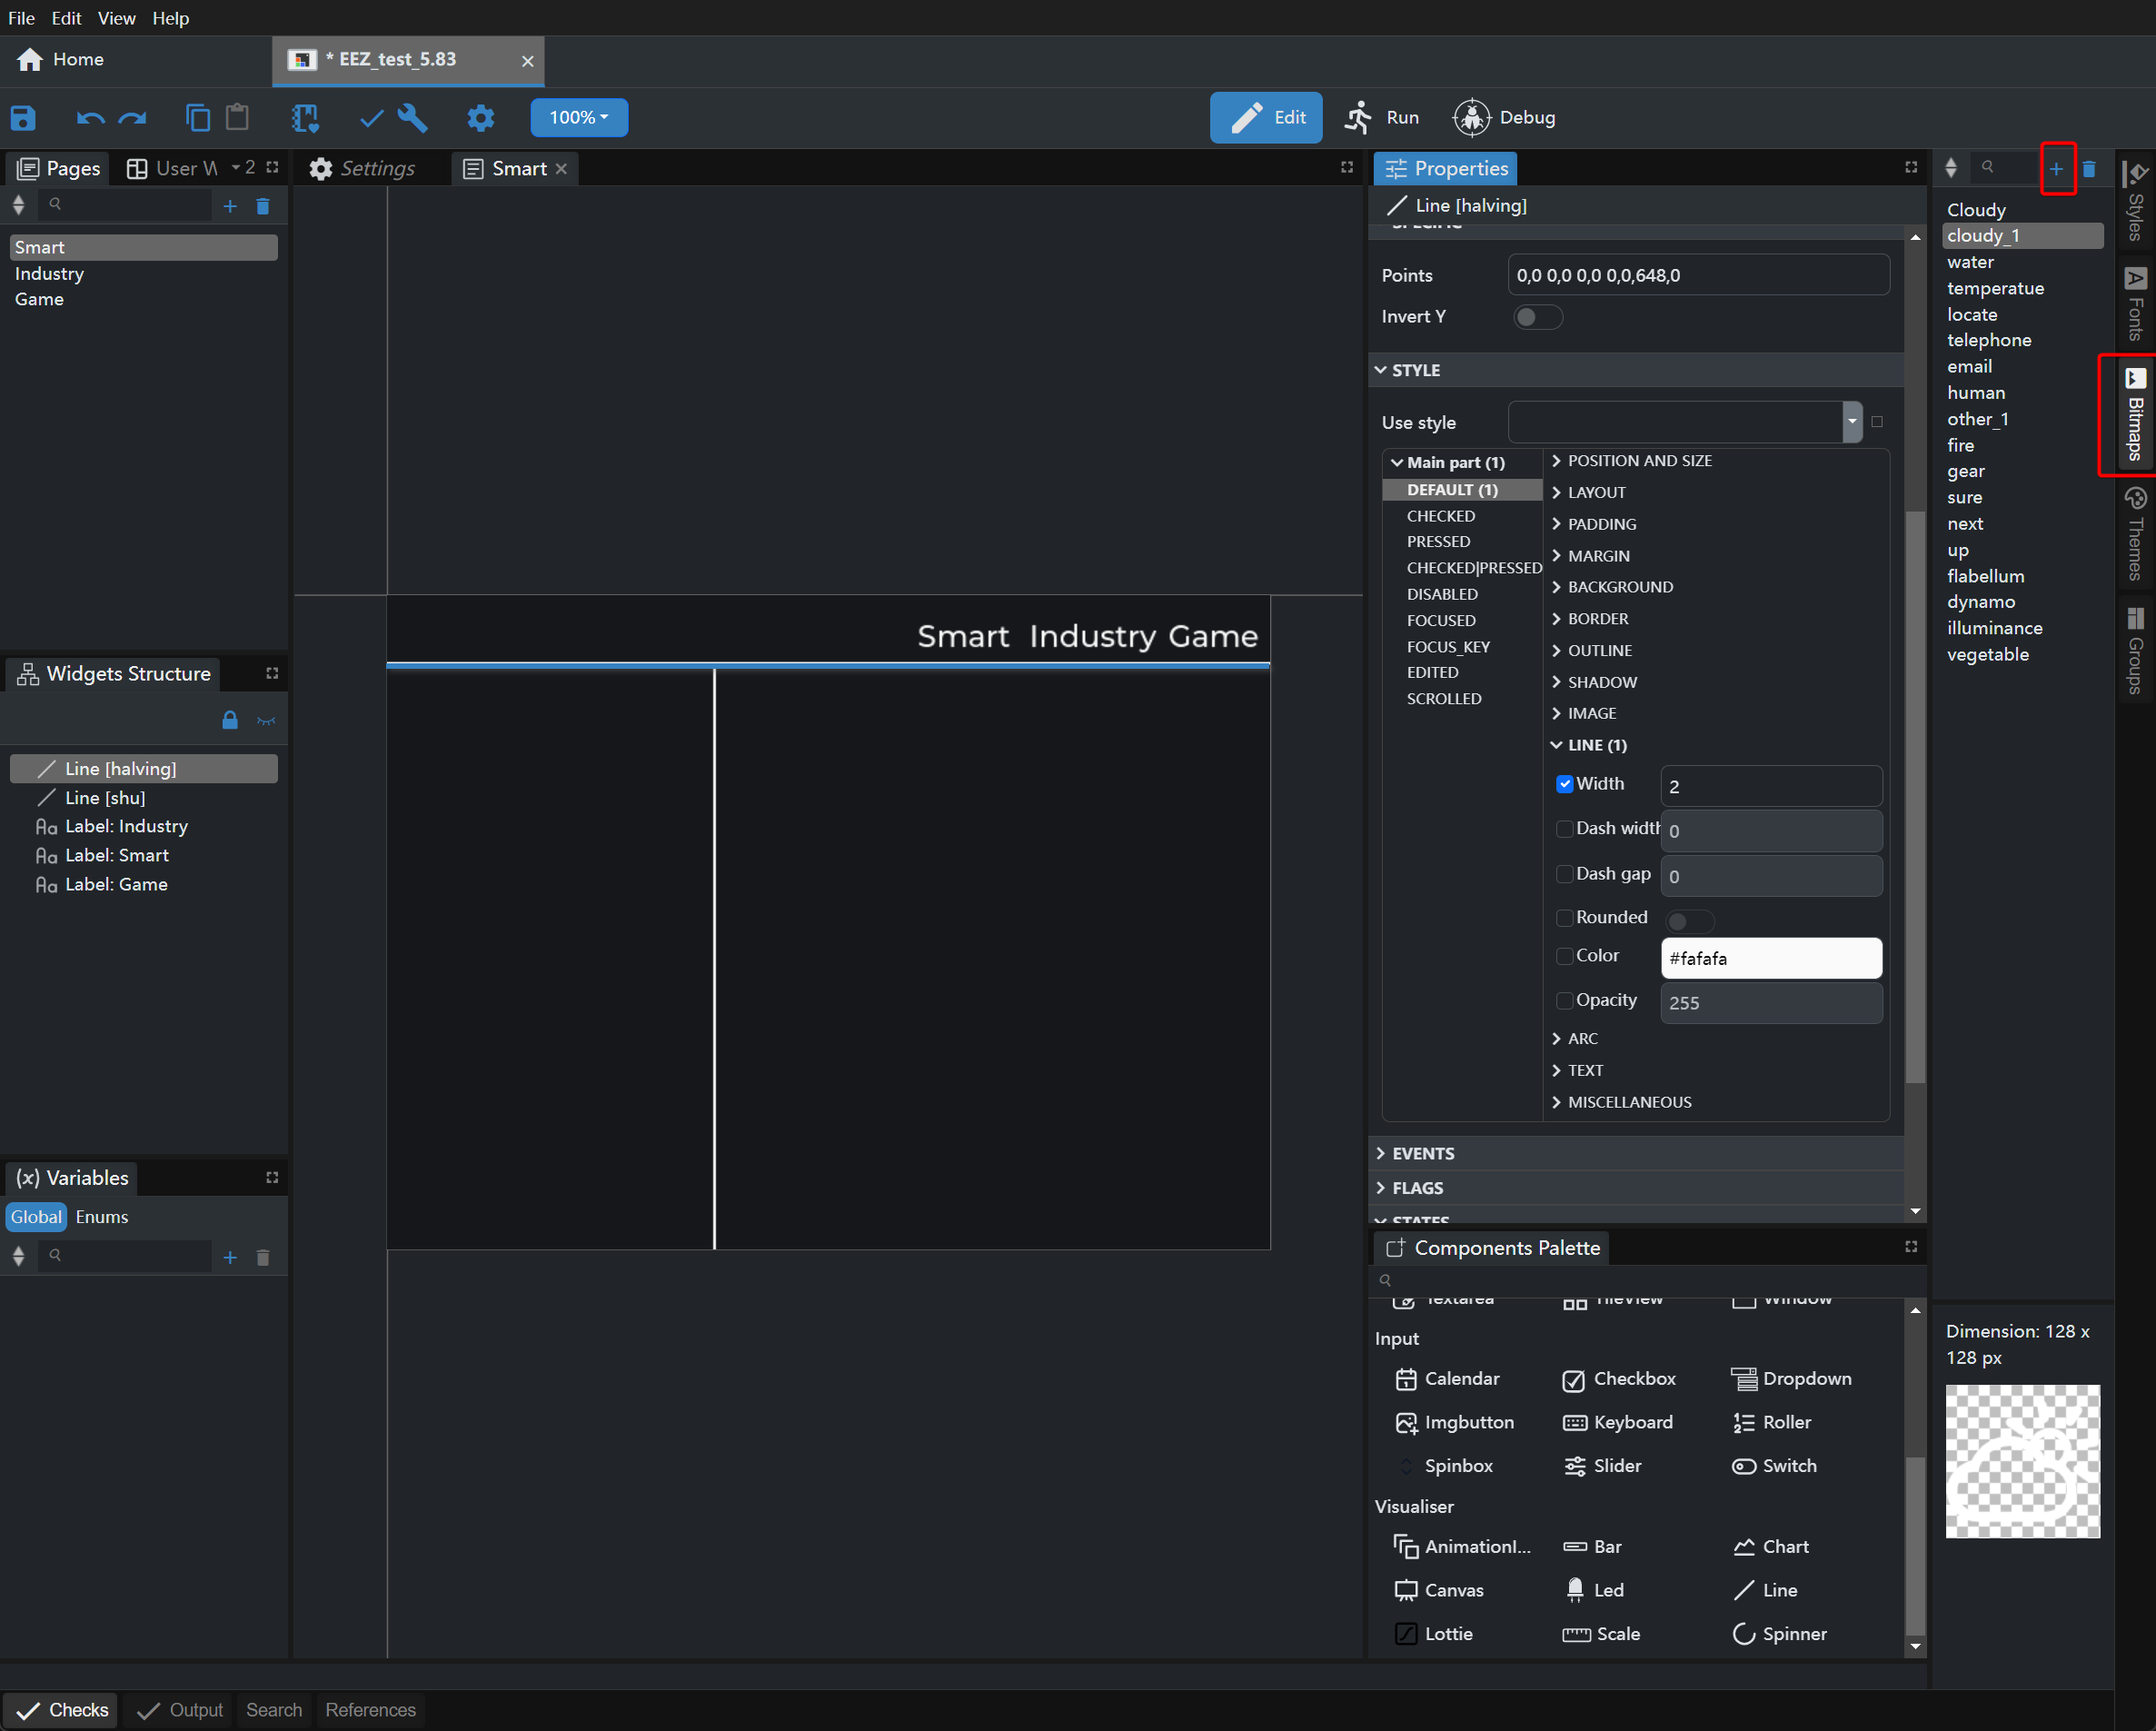
- Name the images as needed.
- Drag and drop the Image component into the canvas, and use the Scale option to set its size.
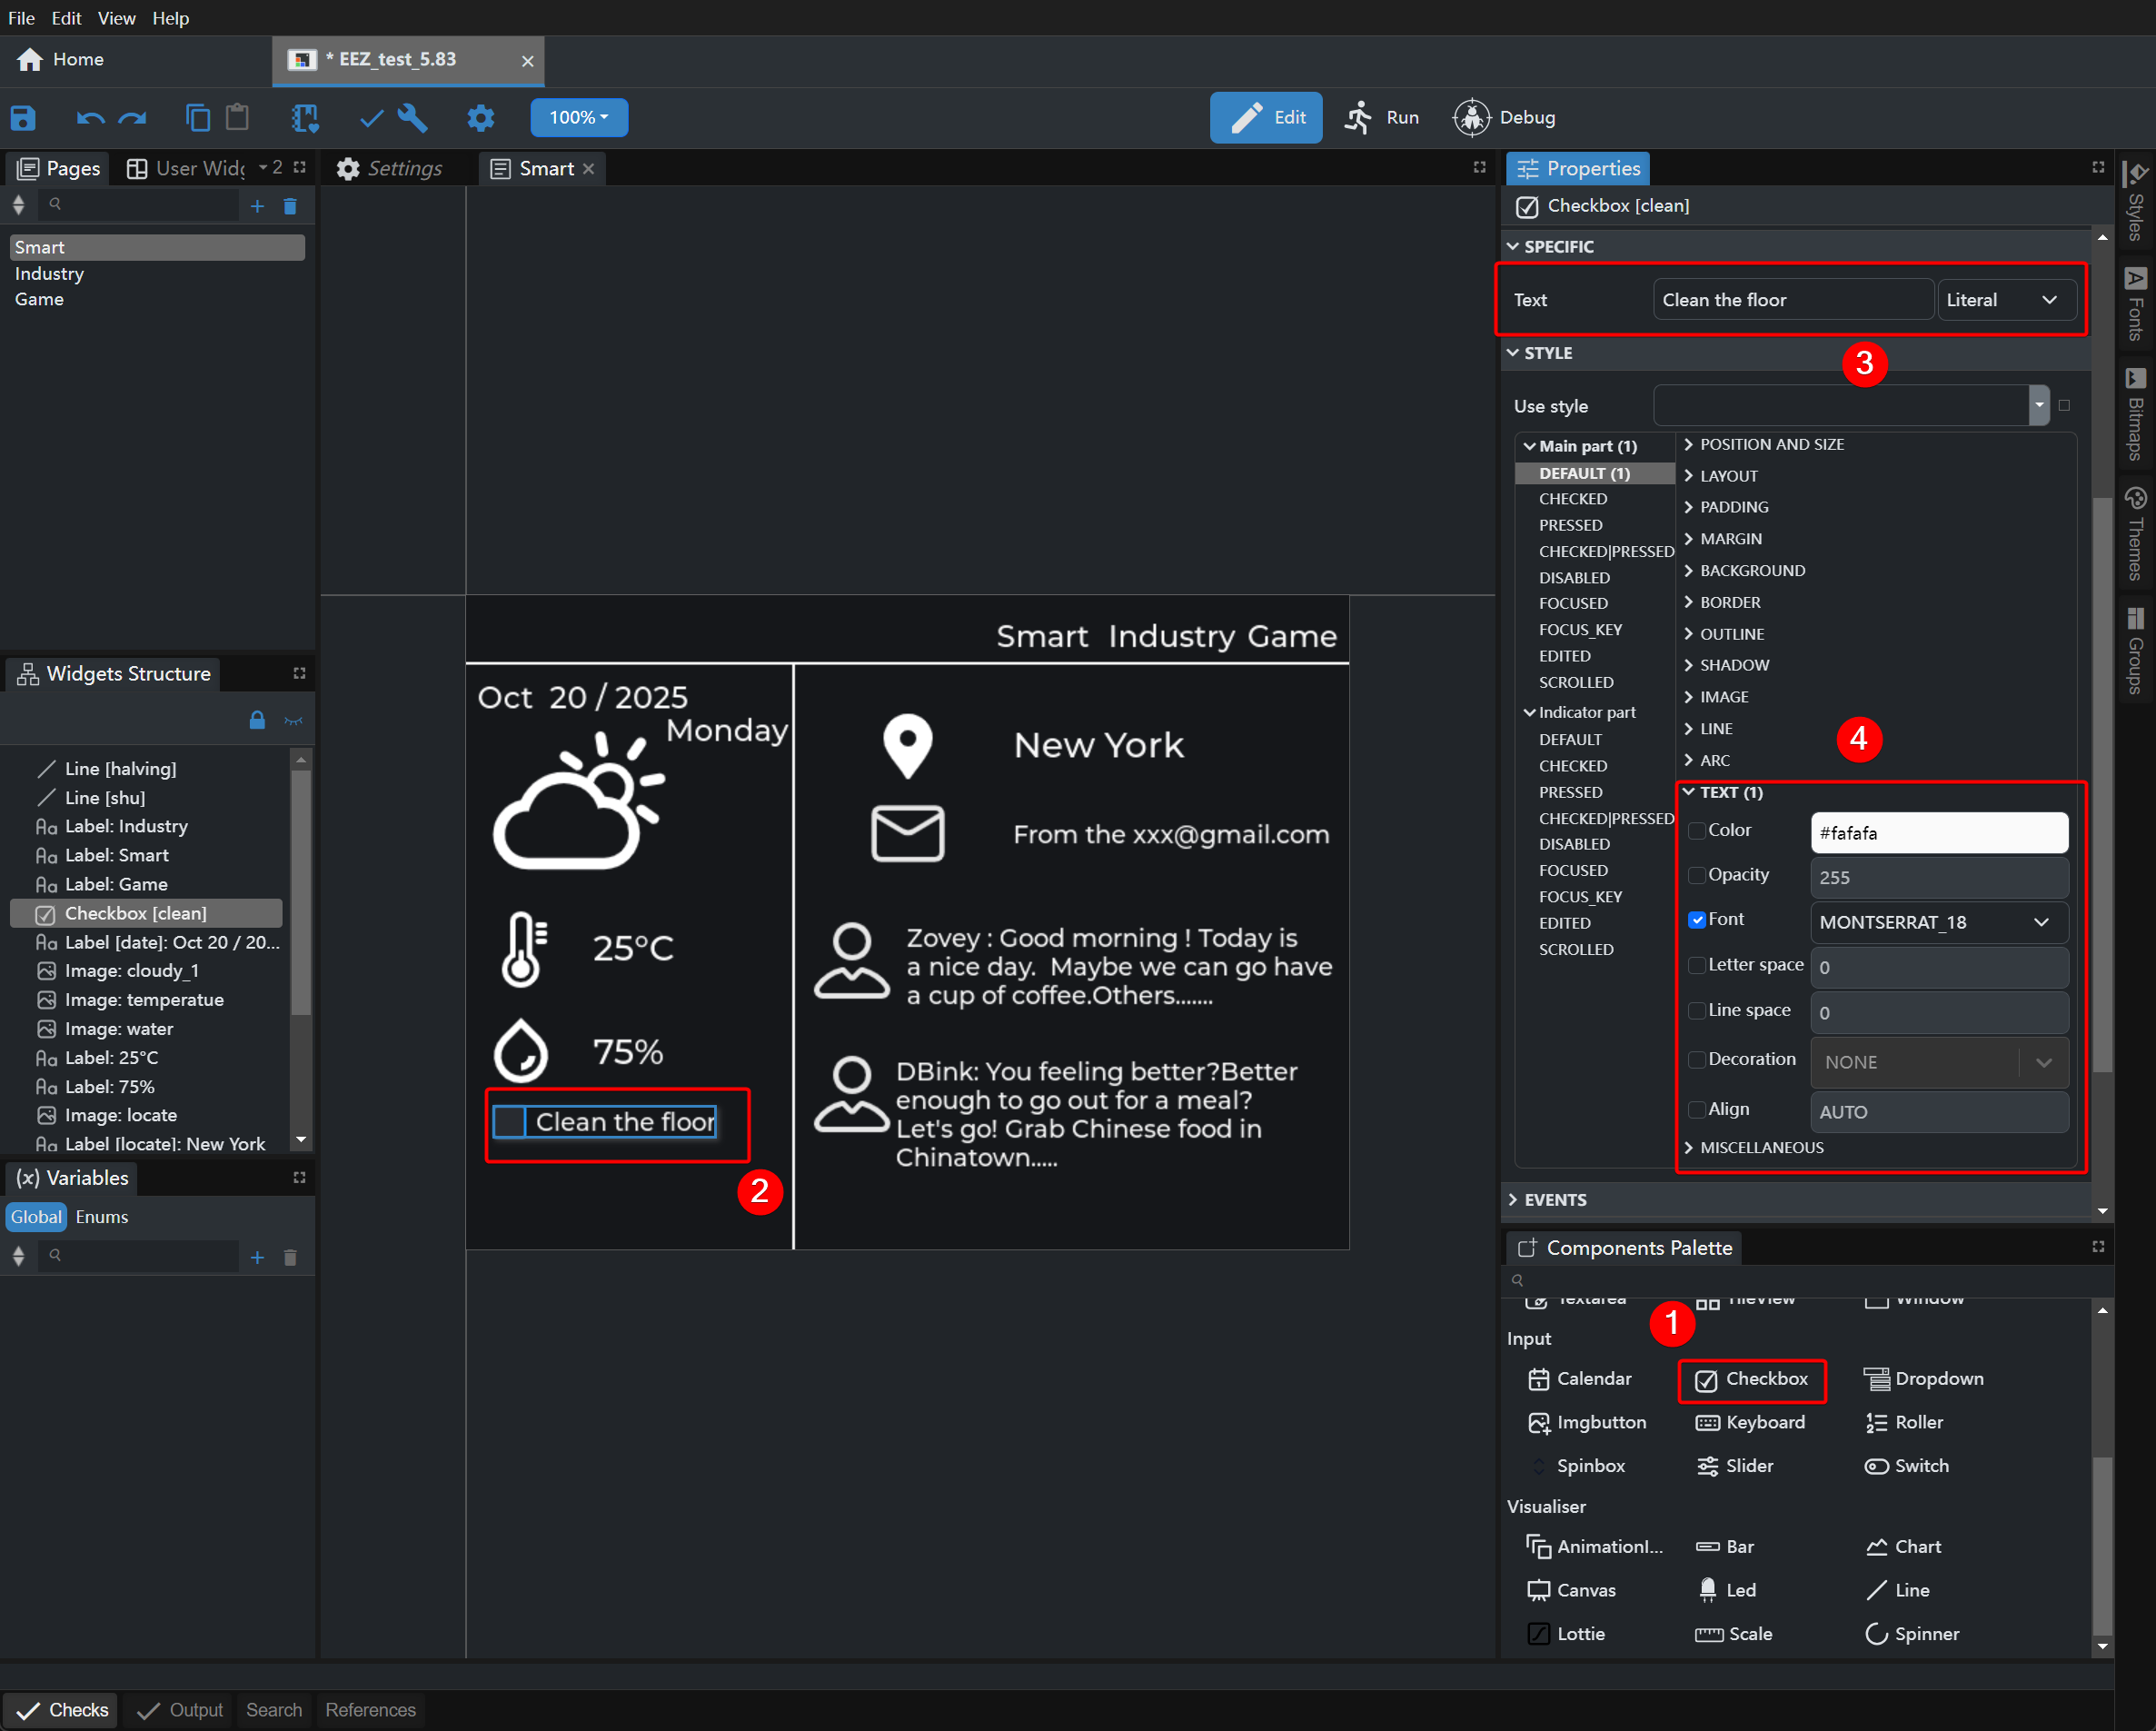
Step 5. Add a Checkbox
- Drag the Checkbox component into the canvas, enter the content, then adjust the font size and color.
Deployment and Demonstration
- Deployment
- Add the header files:
driver.h,e1002_display.c,e1002_display.h, andlv_conf.h. - Add the EEZ_UI files to the library folder of the Arduino IDE.
- Add the header files:
Complete reference code: EEZ_UI.zip
EEZ_UI_EE04.ino
#include <TFT_eSPI.h>
#include <lvgl.h>
#include <ui.h>
#include "e1002_display.h"

const int BUTTON_KEY1 = 2;
const int BUTTON_KEY2 = 3;
const int BUTTON_KEY3 = 5;

int32_t page_index;

bool lastKey0State = HIGH;
bool lastKey1State = HIGH;
bool lastKey2State = HIGH;

unsigned long lastDebounceTime0 = 0;
unsigned long lastDebounceTime1 = 0;
unsigned long lastDebounceTime2 = 0;
const unsigned long debounceDelay = 120;

e1002_driver_t e1002_driver;

unsigned long lastFullRefreshTime = 0;
const unsigned long fullRefreshCooldown = 1500;

bool buttonPressed(int pin, bool &lastState, unsigned long &lastDebounceTime)
{
  bool currentState = digitalRead(pin);

  if (lastState == HIGH && currentState == LOW &&
      (millis() - lastDebounceTime) > debounceDelay)
  {
    lastDebounceTime = millis();
    lastState = currentState;
    return true;
  }

  lastState = currentState;
  return false;
}

void switchPage(ScreensEnum targetScreen, const char *pageName)
{

  if (millis() - lastFullRefreshTime < fullRefreshCooldown)
  {
    Serial.println("[Skip] Refresh cooling down...");
    return;
  }

  Serial.printf("Switching to %s ...\n", pageName);

  e1002_driver.epd->fillScreen(TFT_WHITE);
  e1002_driver.epd->update();

  loadScreen(targetScreen);

  e1002_display_refresh(&e1002_driver);

  lastFullRefreshTime = millis();
  Serial.printf("[OK] %s refreshed.\n", pageName);
}

void setup()
{
  Serial.begin(115200);

  String LVGL_Arduino = "Smart Home Dashboard - LVGL ";
  LVGL_Arduino += String('V') + lv_version_major() + "." +
                  lv_version_minor() + "." + lv_version_patch();
  Serial.println(LVGL_Arduino);

  Serial.println("Initializing e-paper display...");
  e1002_display_init(&e1002_driver);

  pinMode(BUTTON_KEY1, INPUT_PULLUP);
  pinMode(BUTTON_KEY2, INPUT_PULLUP);
  pinMode(BUTTON_KEY3, INPUT_PULLUP);

  ui_init();
  page_index = SCREEN_ID_SMART;
  loadScreen((ScreensEnum)page_index);
  e1002_display_refresh(&e1002_driver);

  Serial.println("Boot: Main Screen");
}

void loop()
{0
  lv_timer_handler();
  ui_tick();

  if (buttonPressed(BUTTON_KEY1, lastKey0State, lastDebounceTime0))
  {
    page_index = SCREEN_ID_SMART;
    switchPage((ScreensEnum)page_index, "Main Screen");
  }

  if (buttonPressed(BUTTON_KEY2, lastKey1State, lastDebounceTime1))
  {
    page_index = SCREEN_ID_INDUSTRY;
    switchPage((ScreensEnum)page_index, "Plant Screen");
  }

  if (buttonPressed(BUTTON_KEY3, lastKey2State, lastDebounceTime2))
  {
    page_index = SCREEN_ID_GAME;
    switchPage((ScreensEnum)page_index, "Workstation Screen");
  }

  if (e1002_display_should_refresh(&e1002_driver))
  {
    Serial.println("Refreshing e-paper display...");
    e1002_display_refresh(&e1002_driver);
    Serial.println("Display refresh complete");
  }

  delay(10);
}
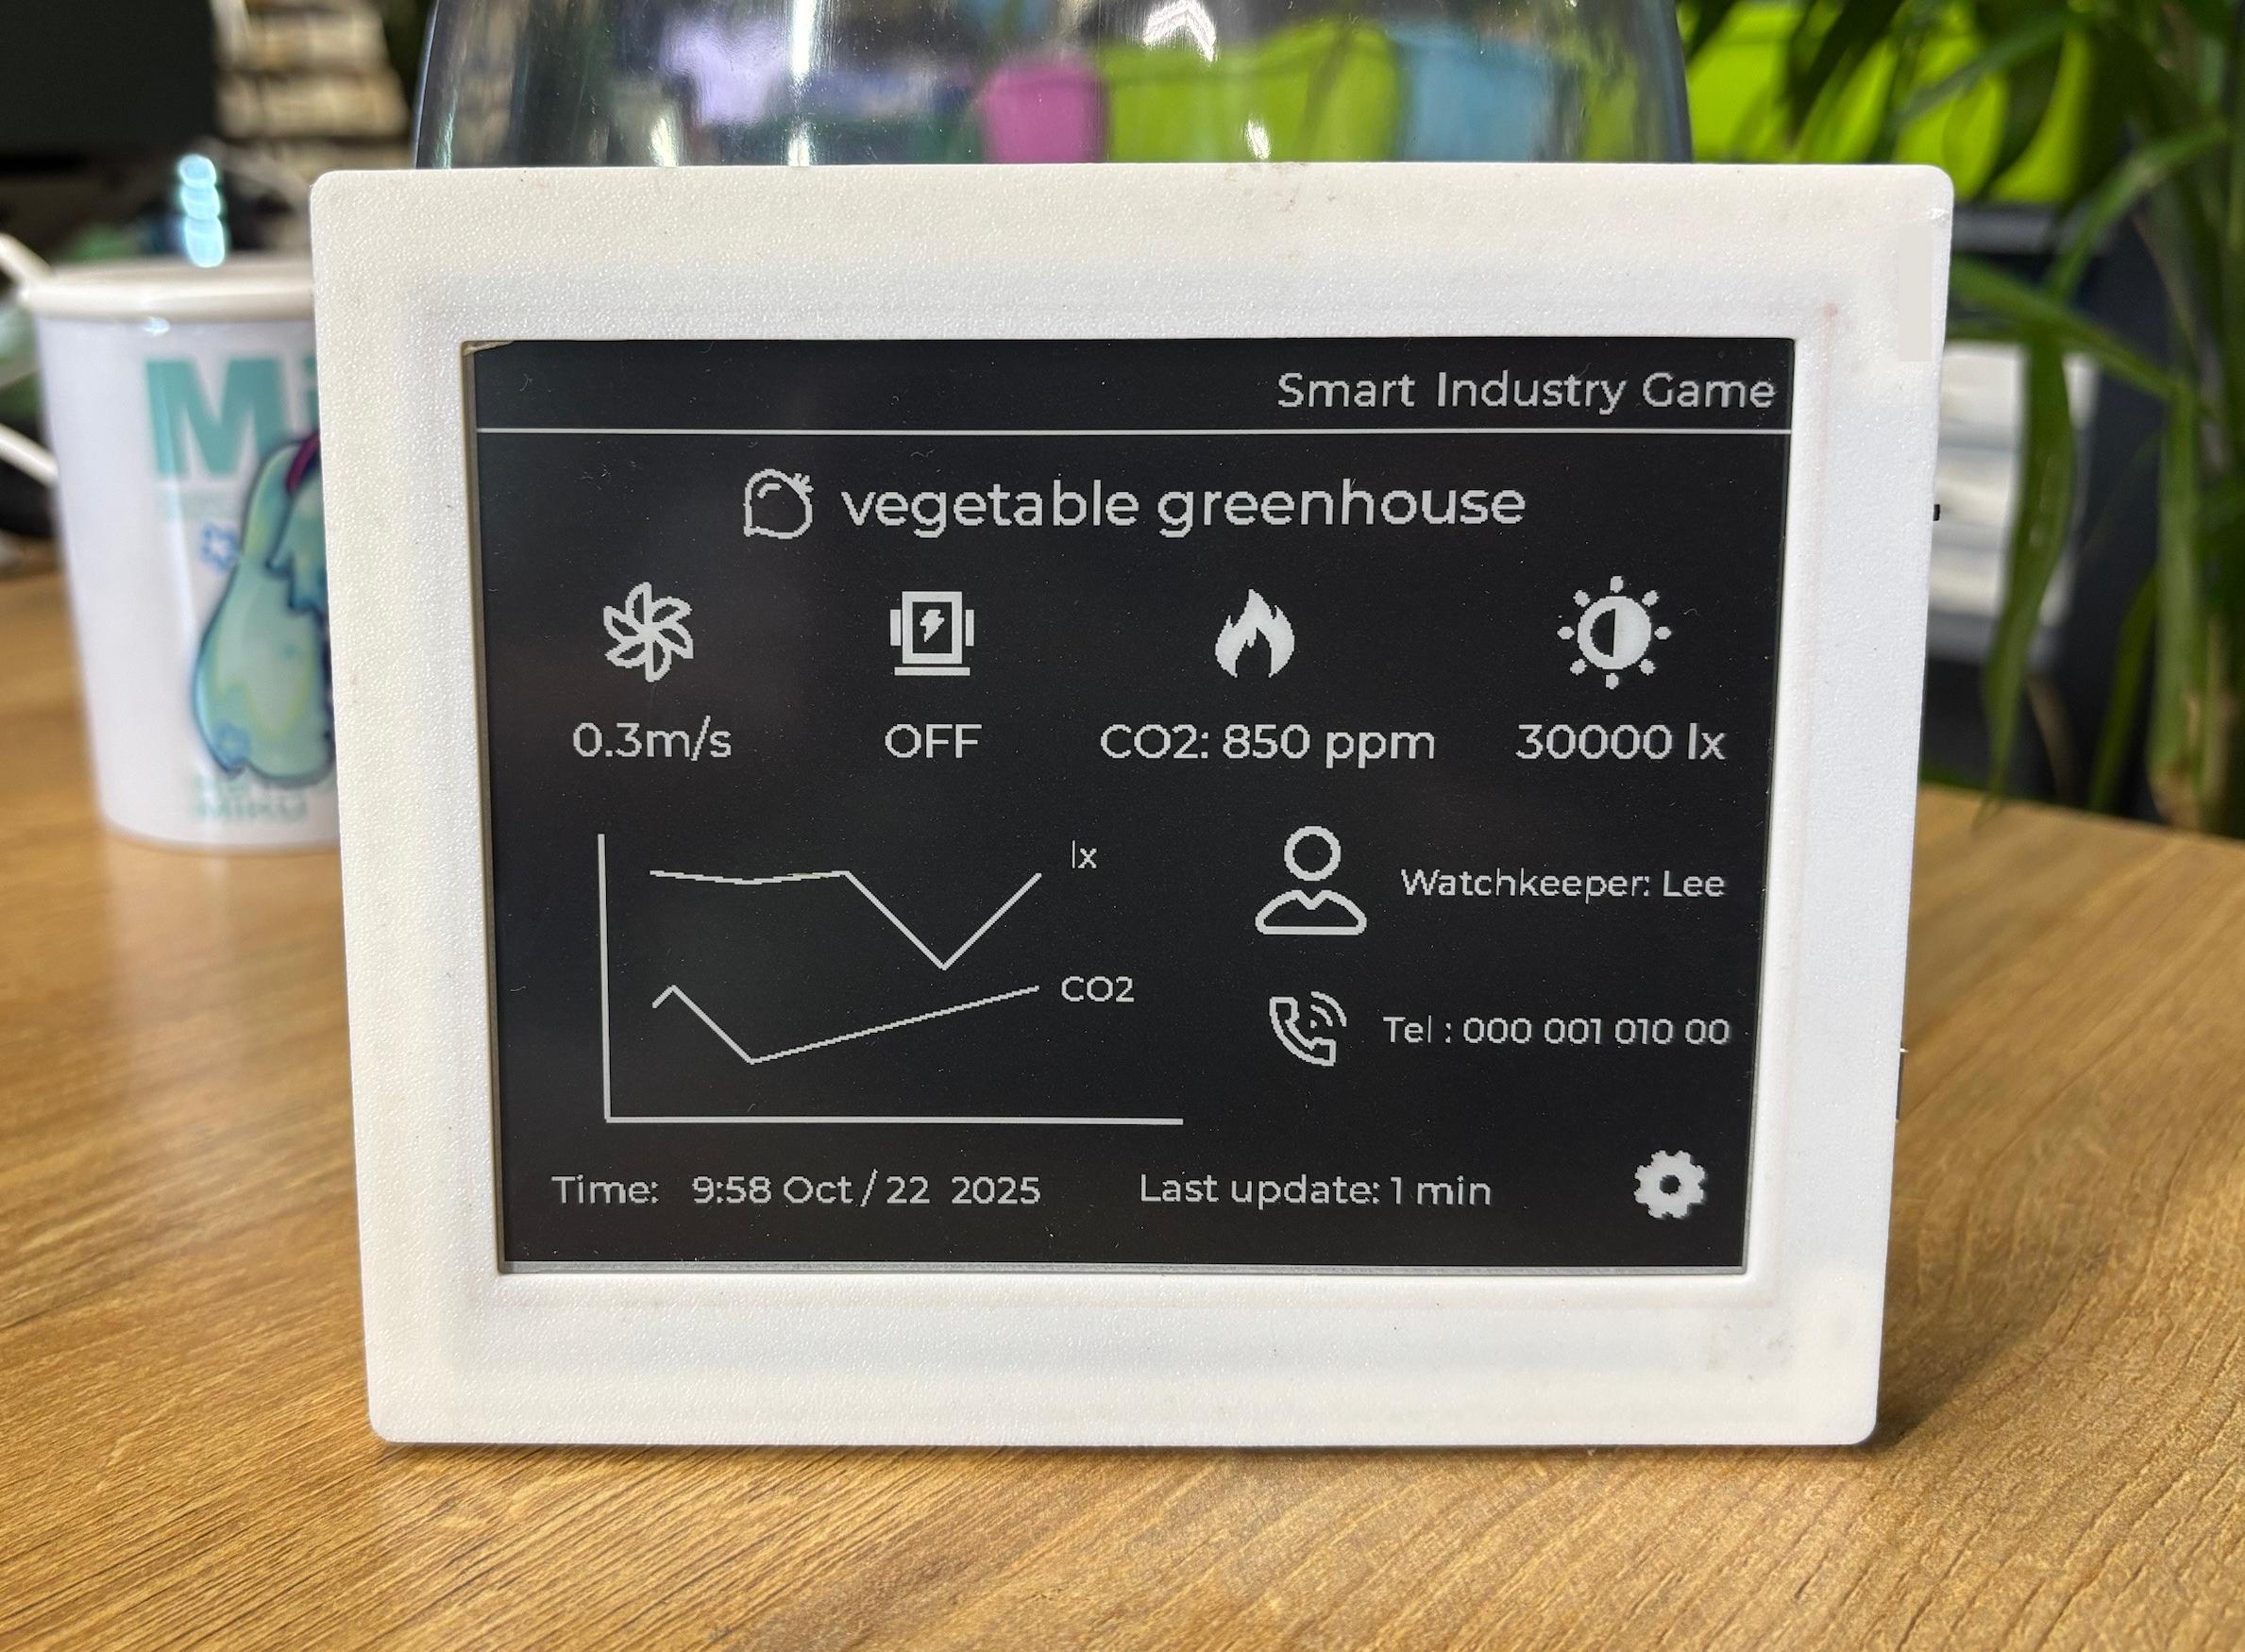
- Effect demonstration:
Three different UI screens are displayed here, and the XIAO ePaper Display Board (ESP32-S3) – EE04 utilizes its three onboard buttons to switch between these screens.The corresponding screen for each button is:
KEY1: Smart
KEY2: Industry
KEY3: Game
| Smart | Industry | Game |
|---|---|---|
 | | 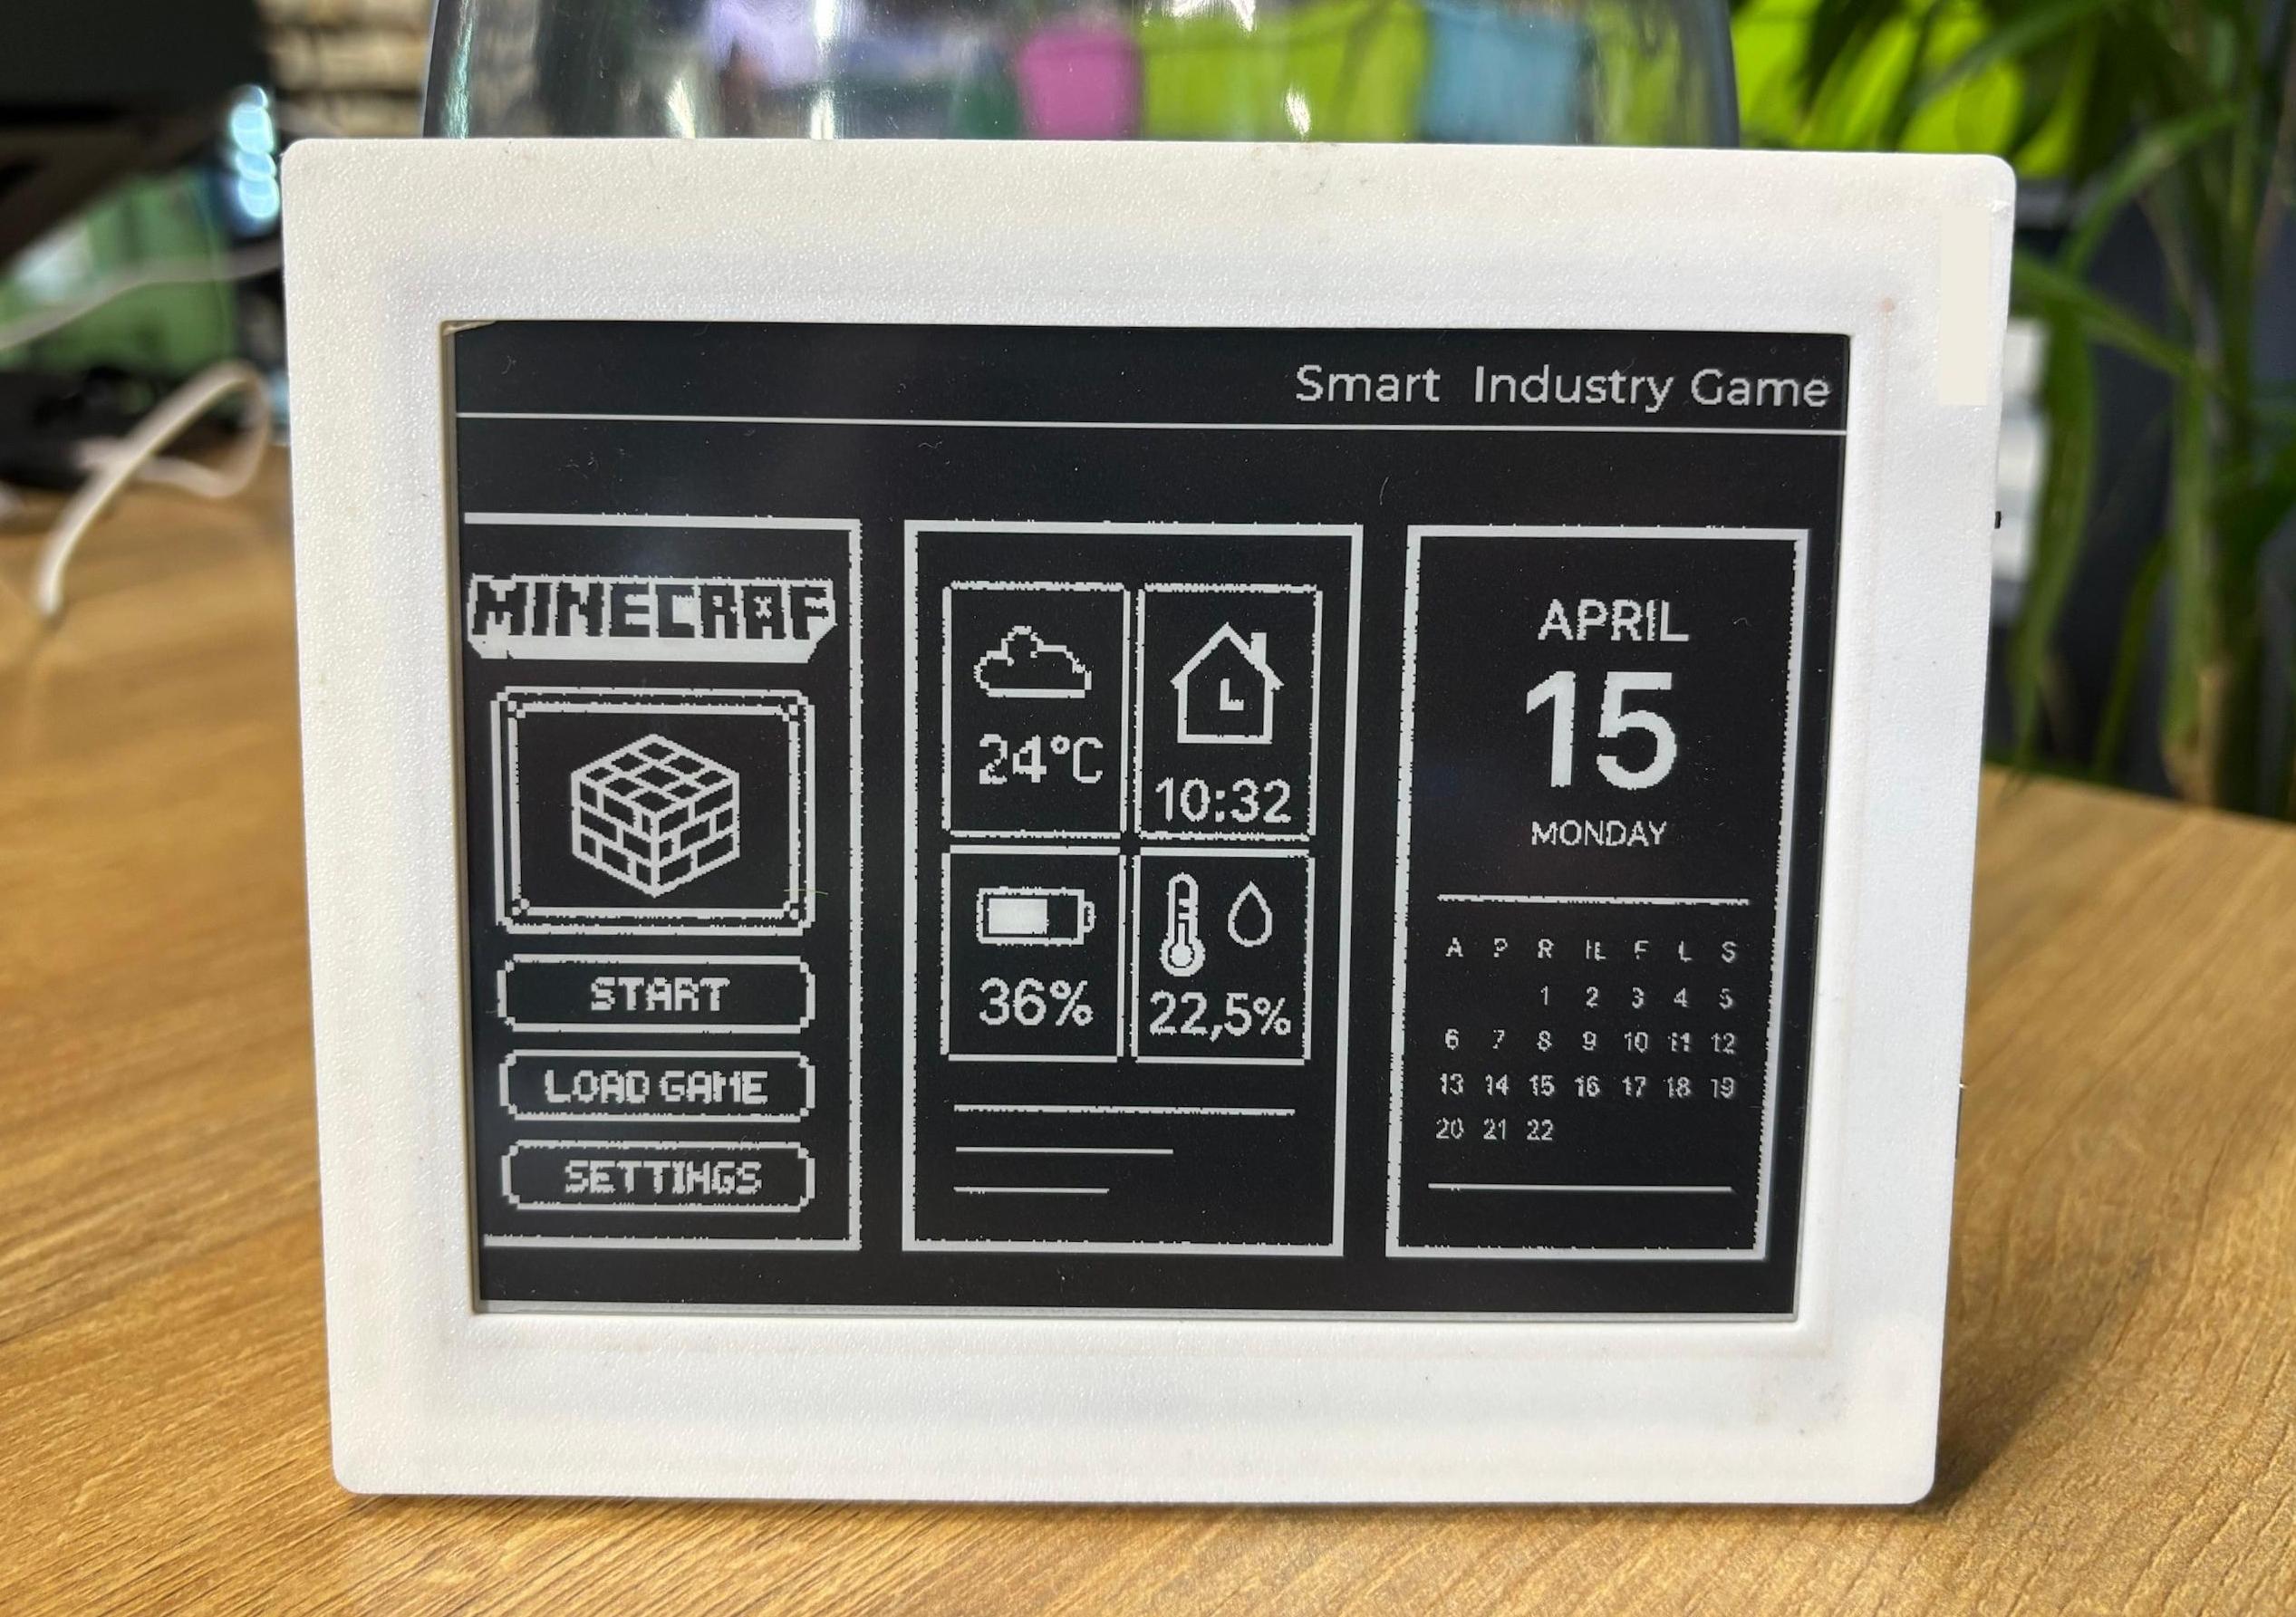 |
Reference & Resources
-
Drive-related files (Click to download)
-
3D Shell of 5.83"
Tech Support & Product Discussion
Thank you for choosing our products! We are here to provide you with different support to ensure that your experience with our products is as smooth as possible. We offer several communication channels to cater to different preferences and needs.