Work with Arduino
If you want to quickly preview project results or try the basic demo firmware before setting up a development environment, open the reTerminal E-Series Firmware Hub. You can choose a supported reTerminal E Series device and flash demo firmware directly from a browser.
This page is the reference manual for driving any compatible Seeed ePaper product from the Arduino IDE. It covers the parts that are identical across all hardware:
- Setting up the Arduino IDE and ESP32 board support.
- Installing the Seeed_GFX library — our maintained fork of
TFT_eSPIwith first-class support for Seeed ePaper. - Generating a
driver.hfor your board + screen combination using the Seeed GFX Configuration Tool. - (Optionally) using the third-party GxEPD2 library as an alternative driver.
For the end-to-end "open the box, flash a hello world, light up sensors and buttons" walkthrough, jump to the cookbook for your specific hardware — those pages reuse this reference for the boilerplate and then add product-specific examples (peripherals, code samples, troubleshooting):
- reTerminal E Series — ePaper Display cookbook — covers reTerminal E1001 / E1002 / E1003 / E1004 with Hello World examples using both
Seeed_GFXandGxEPD2. - reTerminal E Series — Onboard Peripherals cookbook — full peripheral examples for the same models: LED, buzzer, three user buttons, SHT4x sensor, battery monitor, microSD card, and BMP image rendering from SD.
- reTerminal E Series — RTC, Low Power, Audio & Touch cookbook — RTC time management, deep sleep / light sleep, I2S microphone recording, and capacitive touch drawing (E1003 only).
- More cookbooks (XIAO 7.5" Panel, EE0x driver boards, …) coming as the corresponding products are added to the platform.
If you only need the boilerplate (a Hello World on a brand-new product not yet covered by a cookbook), this page alone is enough.
Compatible Hardware
Every Seeed ePaper product on the main hub page that has an Arduino column ticked can run through this workflow. At a glance:
| Product line | MCU | Notes |
|---|---|---|
| reTerminal E1001 / E1002 / E1003 / E1004 | XIAO ESP32-S3 (integrated) | Cookbook available — see link above |
| EE02 / EE03 / EE04 / EE05 | XIAO ESP32-S3 / ESP32-S3 Plus | Use the Configuration Tool with your screen choice |
| EN04 / EN05 | XIAO nRF52840 Plus | Choose nRF52840 board package; primarily targeted by OpenDisplay (BLE) instead |
| XIAO 7.5" ePaper Panel | XIAO ESP32-C3 | See the dedicated XIAO 7.5" Panel + Arduino guide |
| TRMNL 7.5" (OG) DIY Kit | XIAO ESP32-S3 Plus | See the dedicated TRMNL DIY Kit + Arduino guide |
| XIAO eInk Expansion Board v2 / ePaper Breakout Board | Whichever XIAO you plug in | Use the Configuration Tool with your XIAO + screen choice |
Step 1: Set up the Arduino IDE
To drive any Seeed ePaper product running on an ESP32 / ESP32-S3 / ESP32-C3 from Arduino, you need the Arduino IDE plus ESP32 board support.
If this is your first time using Arduino, see Getting Started with Arduino first.
Step 1. Download and install the Arduino IDE.
Step 2. Add ESP32 board support. In Arduino IDE go to File → Preferences and add to the Additional Boards Manager URLs field:
https://raw.githubusercontent.com/espressif/arduino-esp32/gh-pages/package_esp32_index.json
Step 3. Install the ESP32 board package: Tools → Board → Boards Manager, search for esp32, install the package by Espressif Systems.
Step 4. Pick the right board for your hardware:
- reTerminal E Series / EE04 with EE04 plus / TRMNL DIY Kit:
XIAO_ESP32S3_PLUS - EE02 / EE03 / EE04 / EE05 standard / EN04 (Arduino path):
XIAO_ESP32S3(orXIAO_nRF52840for nRF52840-based boards) - XIAO 7.5" ePaper Panel:
XIAO_ESP32C3
If you're not sure which to pick, your product's cookbook will tell you.
Step 5. Connect your hardware via USB-C and select the correct port from Tools → Port.
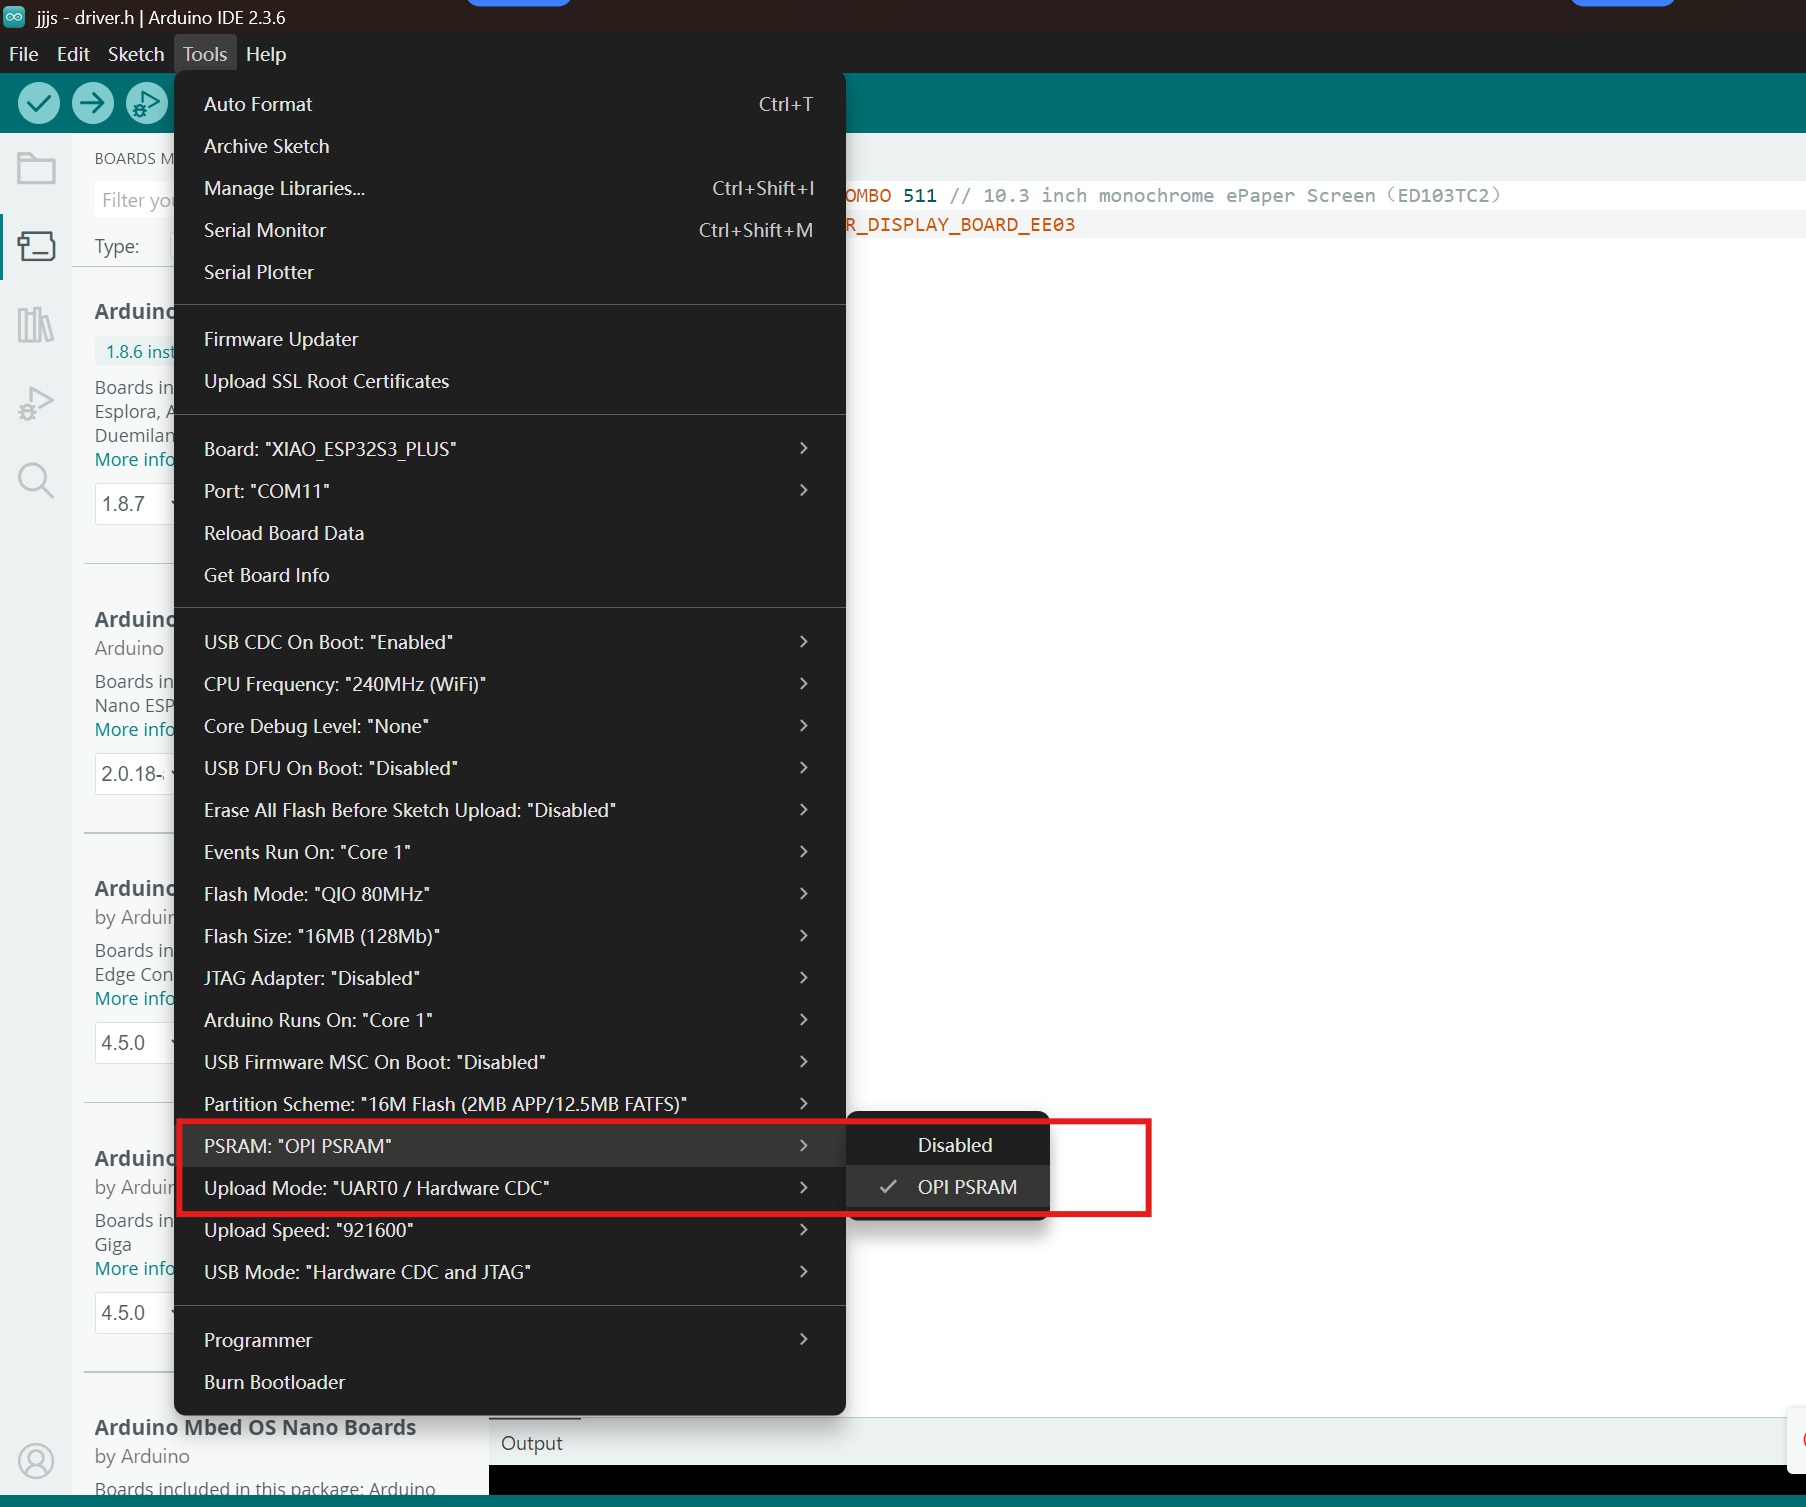
Step 6. For ESP32-S3 boards (most reTerminal E Series and EE0x boards) enable PSRAM:
Tools → PSRAM → OPI PSRAM
Step 2: Install the Seeed_GFX Library
Seeed_GFX is a fork of TFT_eSPI with first-class support for Seeed displays. It is the recommended library for our entire ePaper line.
Step 1. Download the Seeed_GFX library from GitHub:
Step 2. Sketch → Include Library → Add .ZIP Library and select the downloaded ZIP.
If you previously installed TFT_eSPI, temporarily remove or rename it from your Arduino libraries folder to avoid conflicts.
Step 3: Generate driver.h for Your Hardware
Every example sketch in Seeed_GFX looks for a local driver.h in the sketch folder. That header tells the library which board, screen controller, and pin map to use. The Configuration Tool generates it for you.
Step 1. Pick an example sketch:
- Monochrome screens: File → Examples → Seeed_GFX → ePaper → Basic → HelloWorld
- Colour screens: File → Examples → Seeed_GFX → ePaper → Colorful → HelloWorld
Step 2. In the same sketch folder, create a new file named driver.h (use the new-tab arrow in Arduino IDE).

Step 3. Open the Seeed GFX Configuration Tool and pick your hardware. Each pre-canned device produces the right BOARD_SCREEN_COMBO value (and any extra defines, e.g. USE_XIAO_EPAPER_DISPLAY_BOARD_EE04).

Step 4. Copy the generated content and paste it into your driver.h. Common values:
- reTerminal E1001
- reTerminal E1002
- reTerminal E1003
- reTerminal E1004
- EE04 + 5.83" mono
#define BOARD_SCREEN_COMBO 520 // reTerminal E1001 (UC8179)
#define BOARD_SCREEN_COMBO 521 // reTerminal E1002 (UC8179C)
#define BOARD_SCREEN_COMBO 522 // reTerminal E1003 (ED103TC2)
#define BOARD_SCREEN_COMBO 523 // reTerminal E1004 (T133A01)
#define BOARD_SCREEN_COMBO 503 // 5.83 inch monochrome ePaper Screen (UC8179)
#define USE_XIAO_EPAPER_DISPLAY_BOARD_EE04
For any other combination, always trust the Configuration Tool output — pick your XIAO board (or None if it's a reTerminal/EN04/integrated kit) plus the screen you have plugged in.
Step 5. Upload the sketch to your hardware. The first power-on may show a partial refresh; subsequent refreshes display the full Hello World example.
Step 4 (optional): Use GxEPD2 instead
Seeed_GFX is the recommended library, but if you already have a GxEPD2-based codebase, you can drive Seeed ePaper with it as well. GxEPD2 is a popular community library covering a wide range of e-paper displays.
To install it manually from GitHub for the latest device support:
Sketch → Include Library → Add .ZIP Library and pick the downloaded ZIP. The product cookbooks include concrete GxEPD2 examples where applicable (e.g. the reTerminal E Series cookbook shows full-color rendering on E1002).
Where to go next — Cookbooks
This page intentionally stops at the boilerplate. The hardware-specific code samples and end-to-end walkthroughs live in each product's cookbook:
- reTerminal E Series — ePaper Display cookbook — Hello World on E1001/E1002/E1003/E1004 with both
Seeed_GFXandGxEPD2. - reTerminal E Series — Onboard Peripherals cookbook — the full peripheral suite for the same models: LED control, buzzer (passive PWM beeps + melody playback), 3-button input, SHT4x temperature/humidity, battery management, microSD card, BMP image rendering from SD.
- reTerminal E Series — RTC, Low Power, Audio & Touch cookbook — RTC time management, deep sleep / light sleep, I2S microphone recording, and capacitive touch drawing (E1003 only).
- XIAO 7.5" ePaper Panel + Arduino — XIAO ESP32-C3 walk-through with
Seeed_GFX. - TRMNL 7.5" DIY Kit + Arduino — using the kit's hardware in custom Arduino sketches (rather than the TRMNL cloud platform).
When new ePaper products ship, the corresponding cookbook is added under each product's folder; this main page is updated to link to it.
Common Issues
Display shows nothing or doesn't refresh
- Most often the ePaper FPC cable is loose or upside-down. Re-seat it with the metal contacts facing up.
- Check that
OPI PSRAMis enabled in Tools → PSRAM for ESP32-S3 boards. - Confirm
BOARD_SCREEN_COMBOindriver.hmatches your hardware. The wrong value silently produces a blank screen. - Verify the example sketch you opened matches your screen (Basic vs Colorful).
Cannot upload to the board
- Try a different USB-C cable (data cable, not power-only).
- For ESP32-S3 boards: hold the BOOT button before plugging in the USB cable to enter download mode, then release.
- Confirm Tools → Port points to the right serial device after re-plugging.
For deeper troubleshooting on a specific product, check the cookbook for that hardware.
Tech Support & Product Discussion
Thank you for choosing our products! We are here to provide you with different support to ensure that your experience with our products is as smooth as possible. We offer several communication channels to cater to different preferences and needs.