Work with PlatformIO
This page is the PlatformIO configuration reference for Seeed ePaper products. It focuses on the parts that are different from the Arduino IDE workflow:
- Installing PlatformIO in Visual Studio Code.
- Understanding the project structure created by PlatformIO.
- Editing
platformio.ini, the main configuration file for board selection, framework selection, library dependencies, serial monitor speed, upload options, and build flags. - Choosing the correct PlatformIO environment for each Seeed ePaper product.
- Adding
Seeed_GFXand generating the matchingdriver.hwith the Seeed GFX Configuration Tool.
If you are looking for display drawing APIs, example sketches, or hardware-specific demo code, start from Work with Arduino and the product cookbooks linked at the end of this page. The C/C++ code used in PlatformIO is usually the same as the Arduino code. The main difference is how the project is configured.
Compatible Hardware
PlatformIO can be used with the code-based workflow for Seeed ePaper products that expose an Arduino-compatible firmware path. Use this page to prepare the PlatformIO project, then select the correct driver.h for your board and screen.
| Product line | Typical MCU / board target | Configuration notes |
|---|---|---|
| reTerminal E1001 / E1002 / E1003 / E1004 | ESP32-S3 based reTerminal E Series | Use an ESP32-S3 PlatformIO environment, then generate driver.h for the exact reTerminal model. |
| EE02 / EE03 / EE04 / EE05 driver boards | XIAO ESP32-S3 family | Use the same PlatformIO structure across the EE0x family. The BOARD_SCREEN_COMBO value changes with the selected board and screen. |
| TRMNL 7.5" (OG) DIY Kit | XIAO ESP32-S3 family | Use the ESP32-S3 environment when writing custom Arduino-style firmware instead of using the TRMNL cloud firmware. |
| XIAO 7.5" ePaper Panel | XIAO ESP32-C3 | Use the XIAO ESP32-C3 PlatformIO environment, then use the product cookbook for the screen-specific driver.h configuration. |
| EN04 / EN05 and nRF52840-based ePaper boards | XIAO nRF52840 family | Use the nRF52840 PlatformIO environment for firmware development. If an ePaper-specific cookbook is not published yet, use this page as the environment reference and the product schematic/cookbook for pins. |
The PlatformIO project is only the build and upload environment. The display still depends on the correct driver.h. If platformio.ini is correct but driver.h targets the wrong board or panel, the firmware may compile and upload while the screen stays blank.
Why PlatformIO for ePaper Development?
PlatformIO is useful when your ePaper project grows beyond a single sketch:
- It keeps board, framework, libraries, upload speed, serial monitor speed, and build flags in one version-controlled
platformio.inifile. - It can define multiple build environments in one project, so the same codebase can target several Seeed ePaper products.
- It downloads libraries through
lib_deps, which makes the project easier to reproduce on another computer. - It provides build, upload, clean, and serial monitor tasks inside VS Code.
For display drawing and hardware APIs, continue using the same Arduino-style C/C++ code used in the Arduino cookbook. PlatformIO mainly changes the project layout and configuration method.
Step 1: Install VS Code and PlatformIO
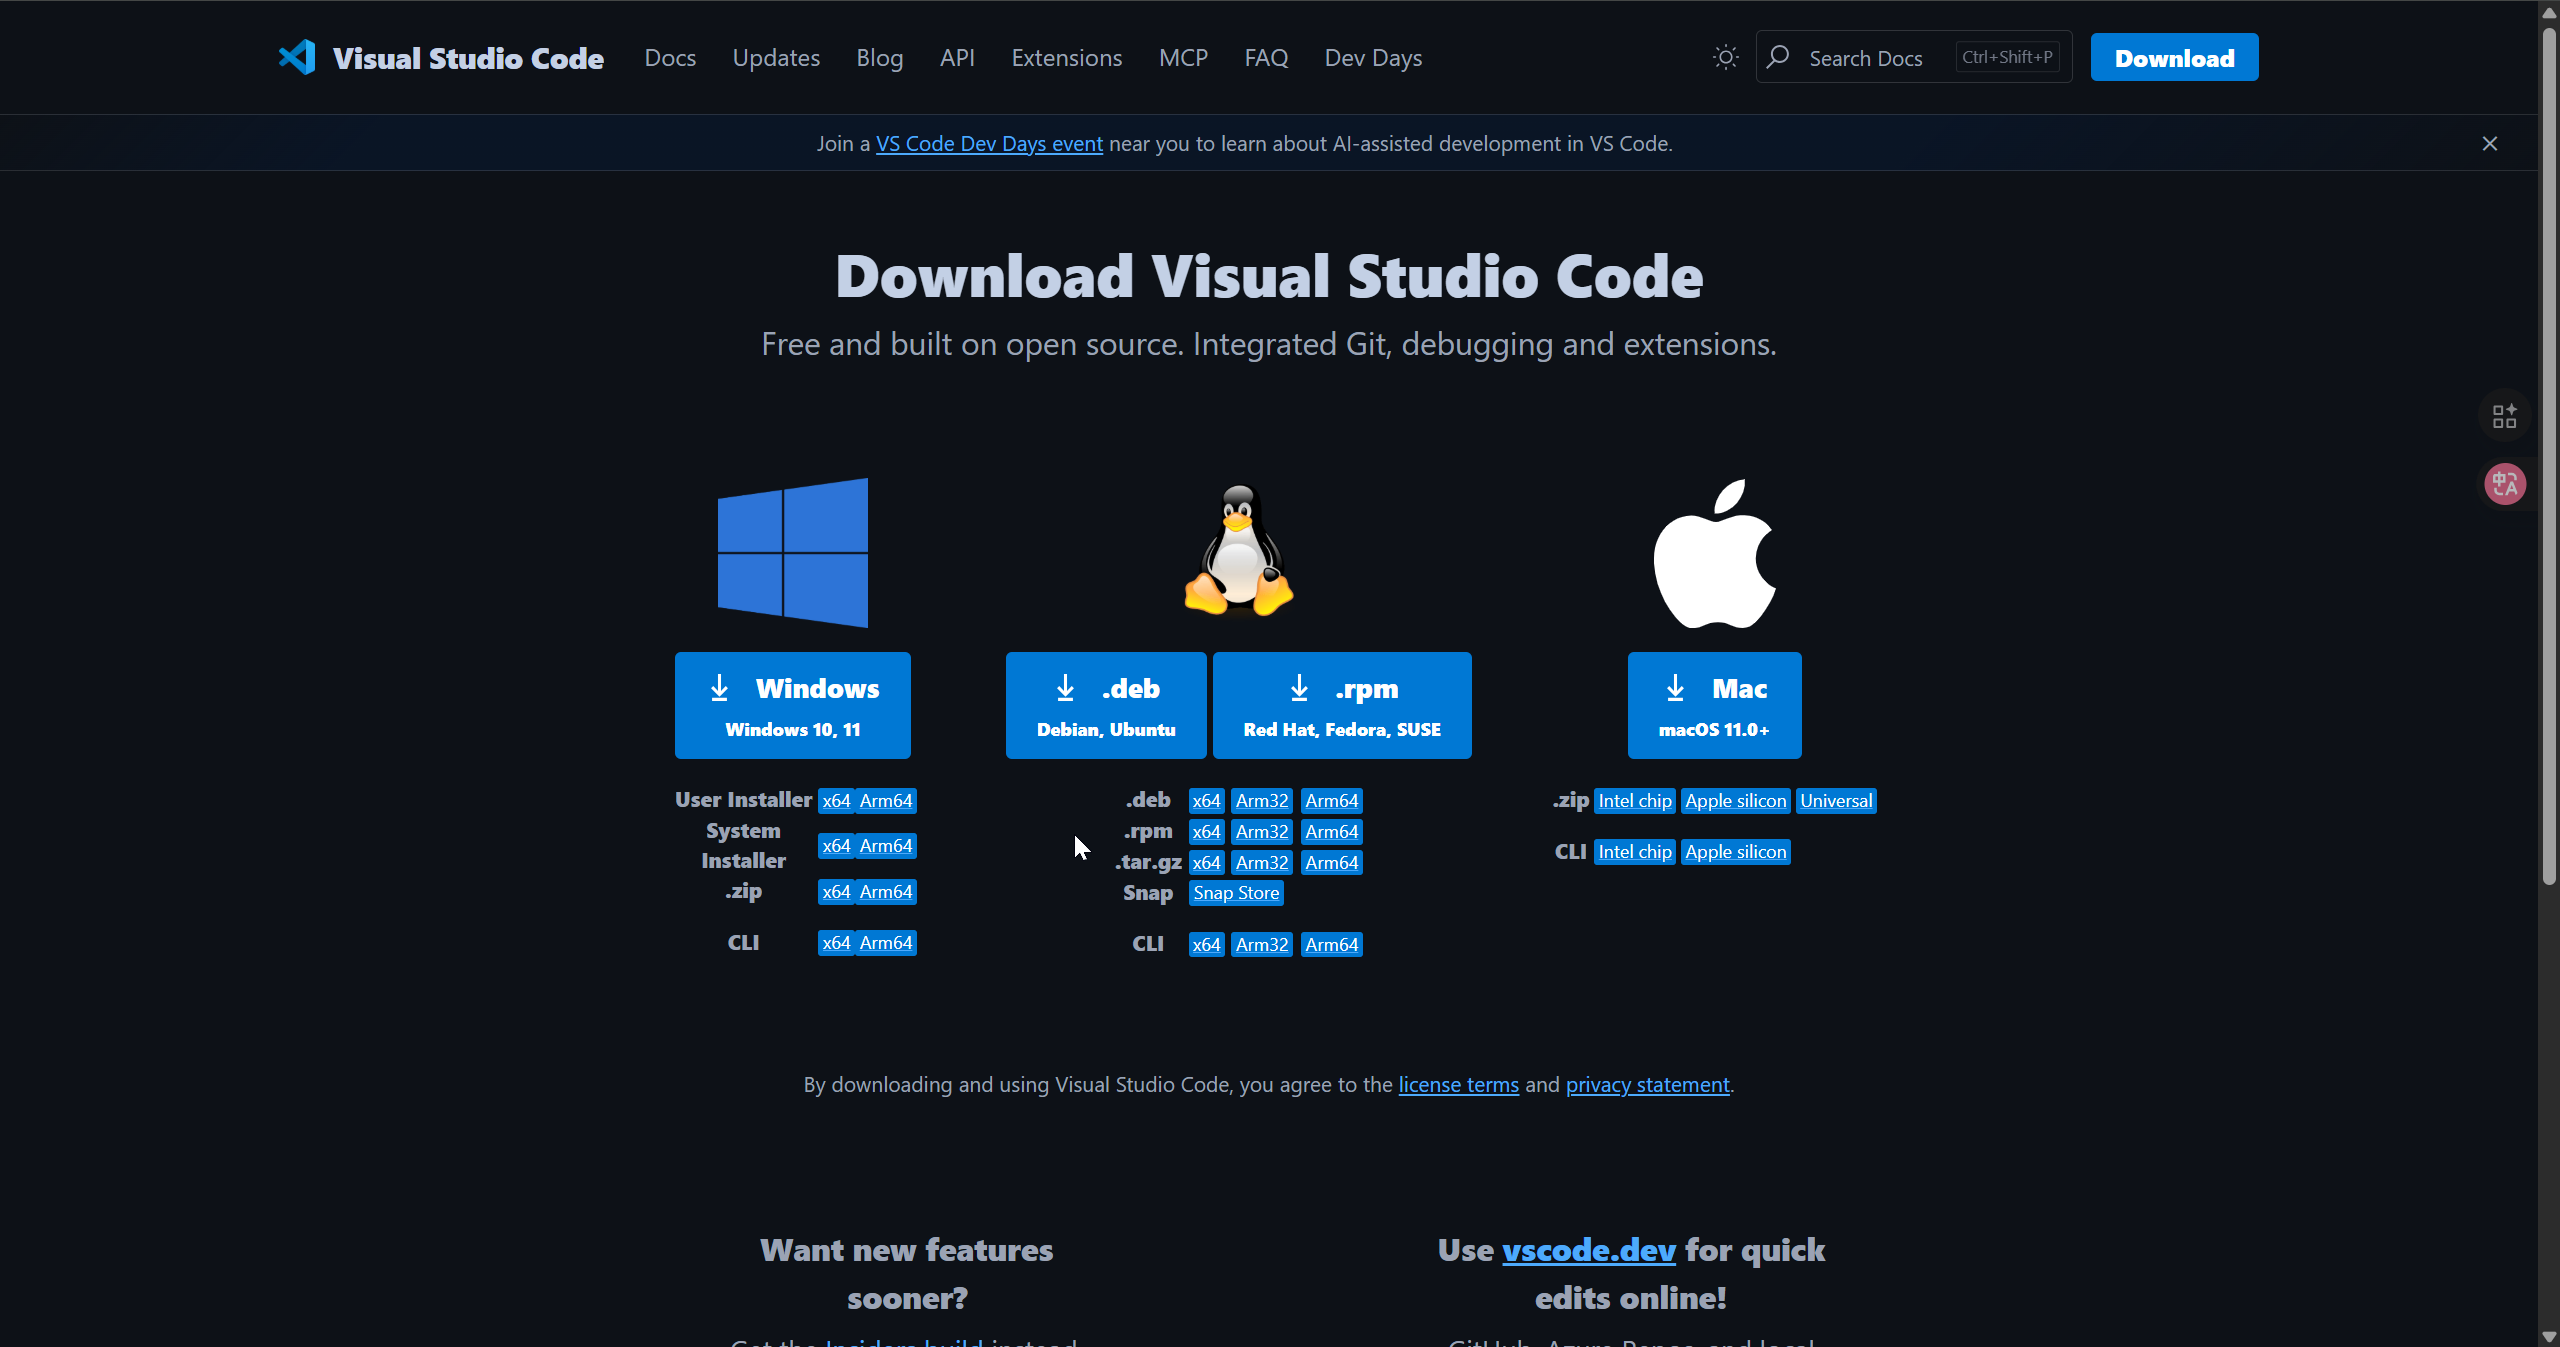
Step 1. Download and install Visual Studio Code.
Step 2. Open Extensions in VS Code, search for PlatformIO IDE, and install it.
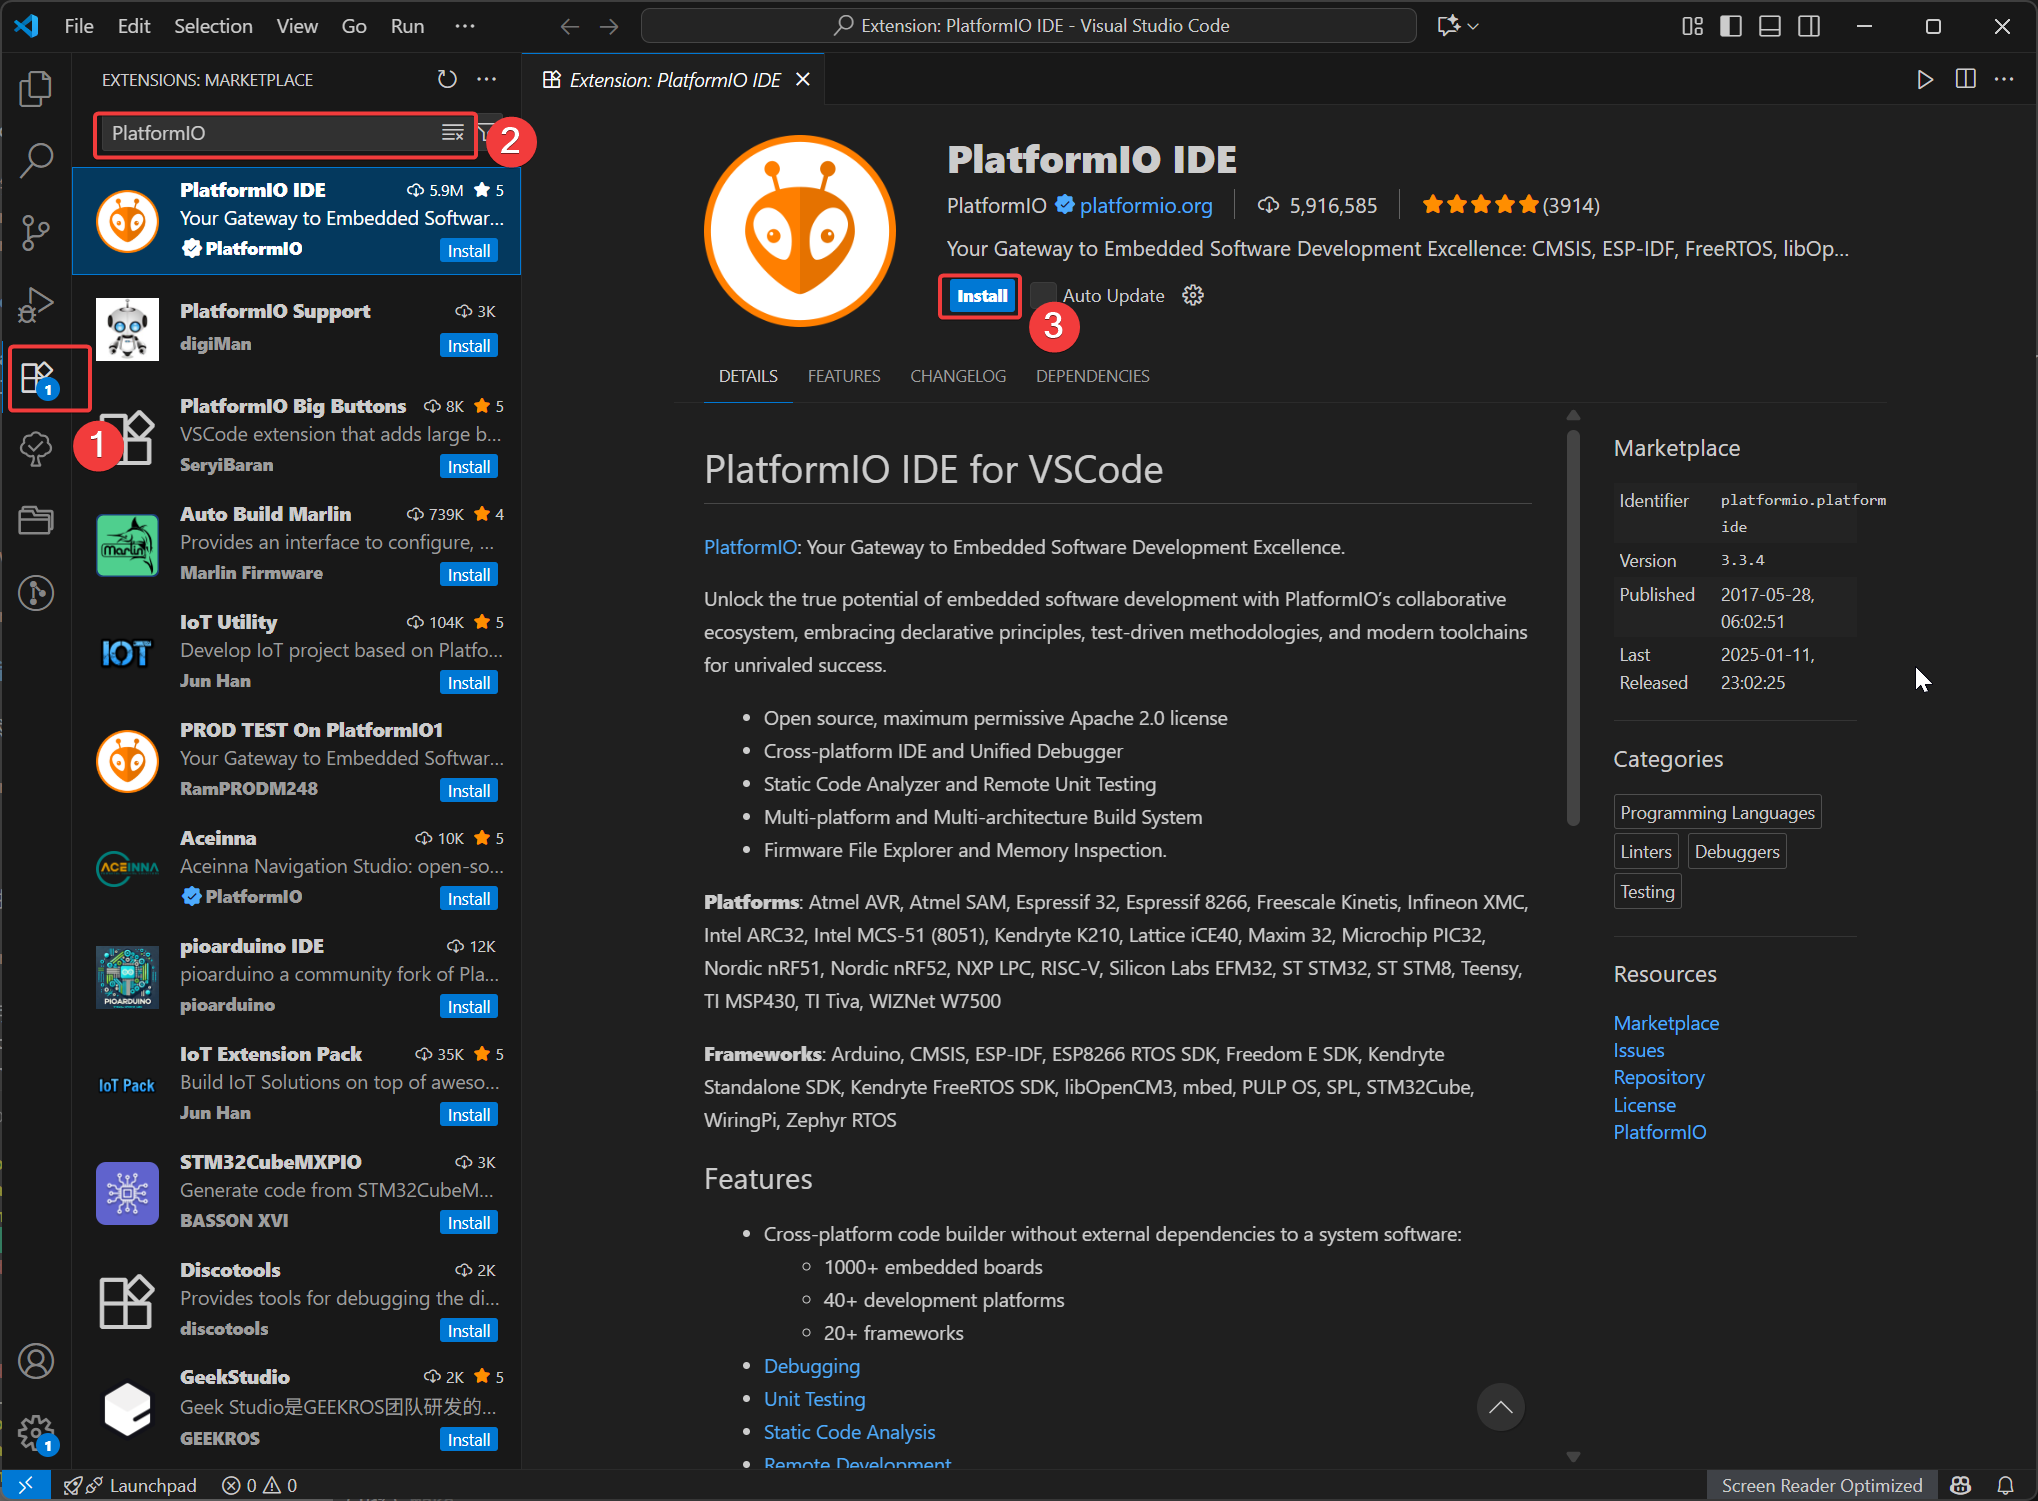
Step 3. Restart VS Code after the extension finishes installing.
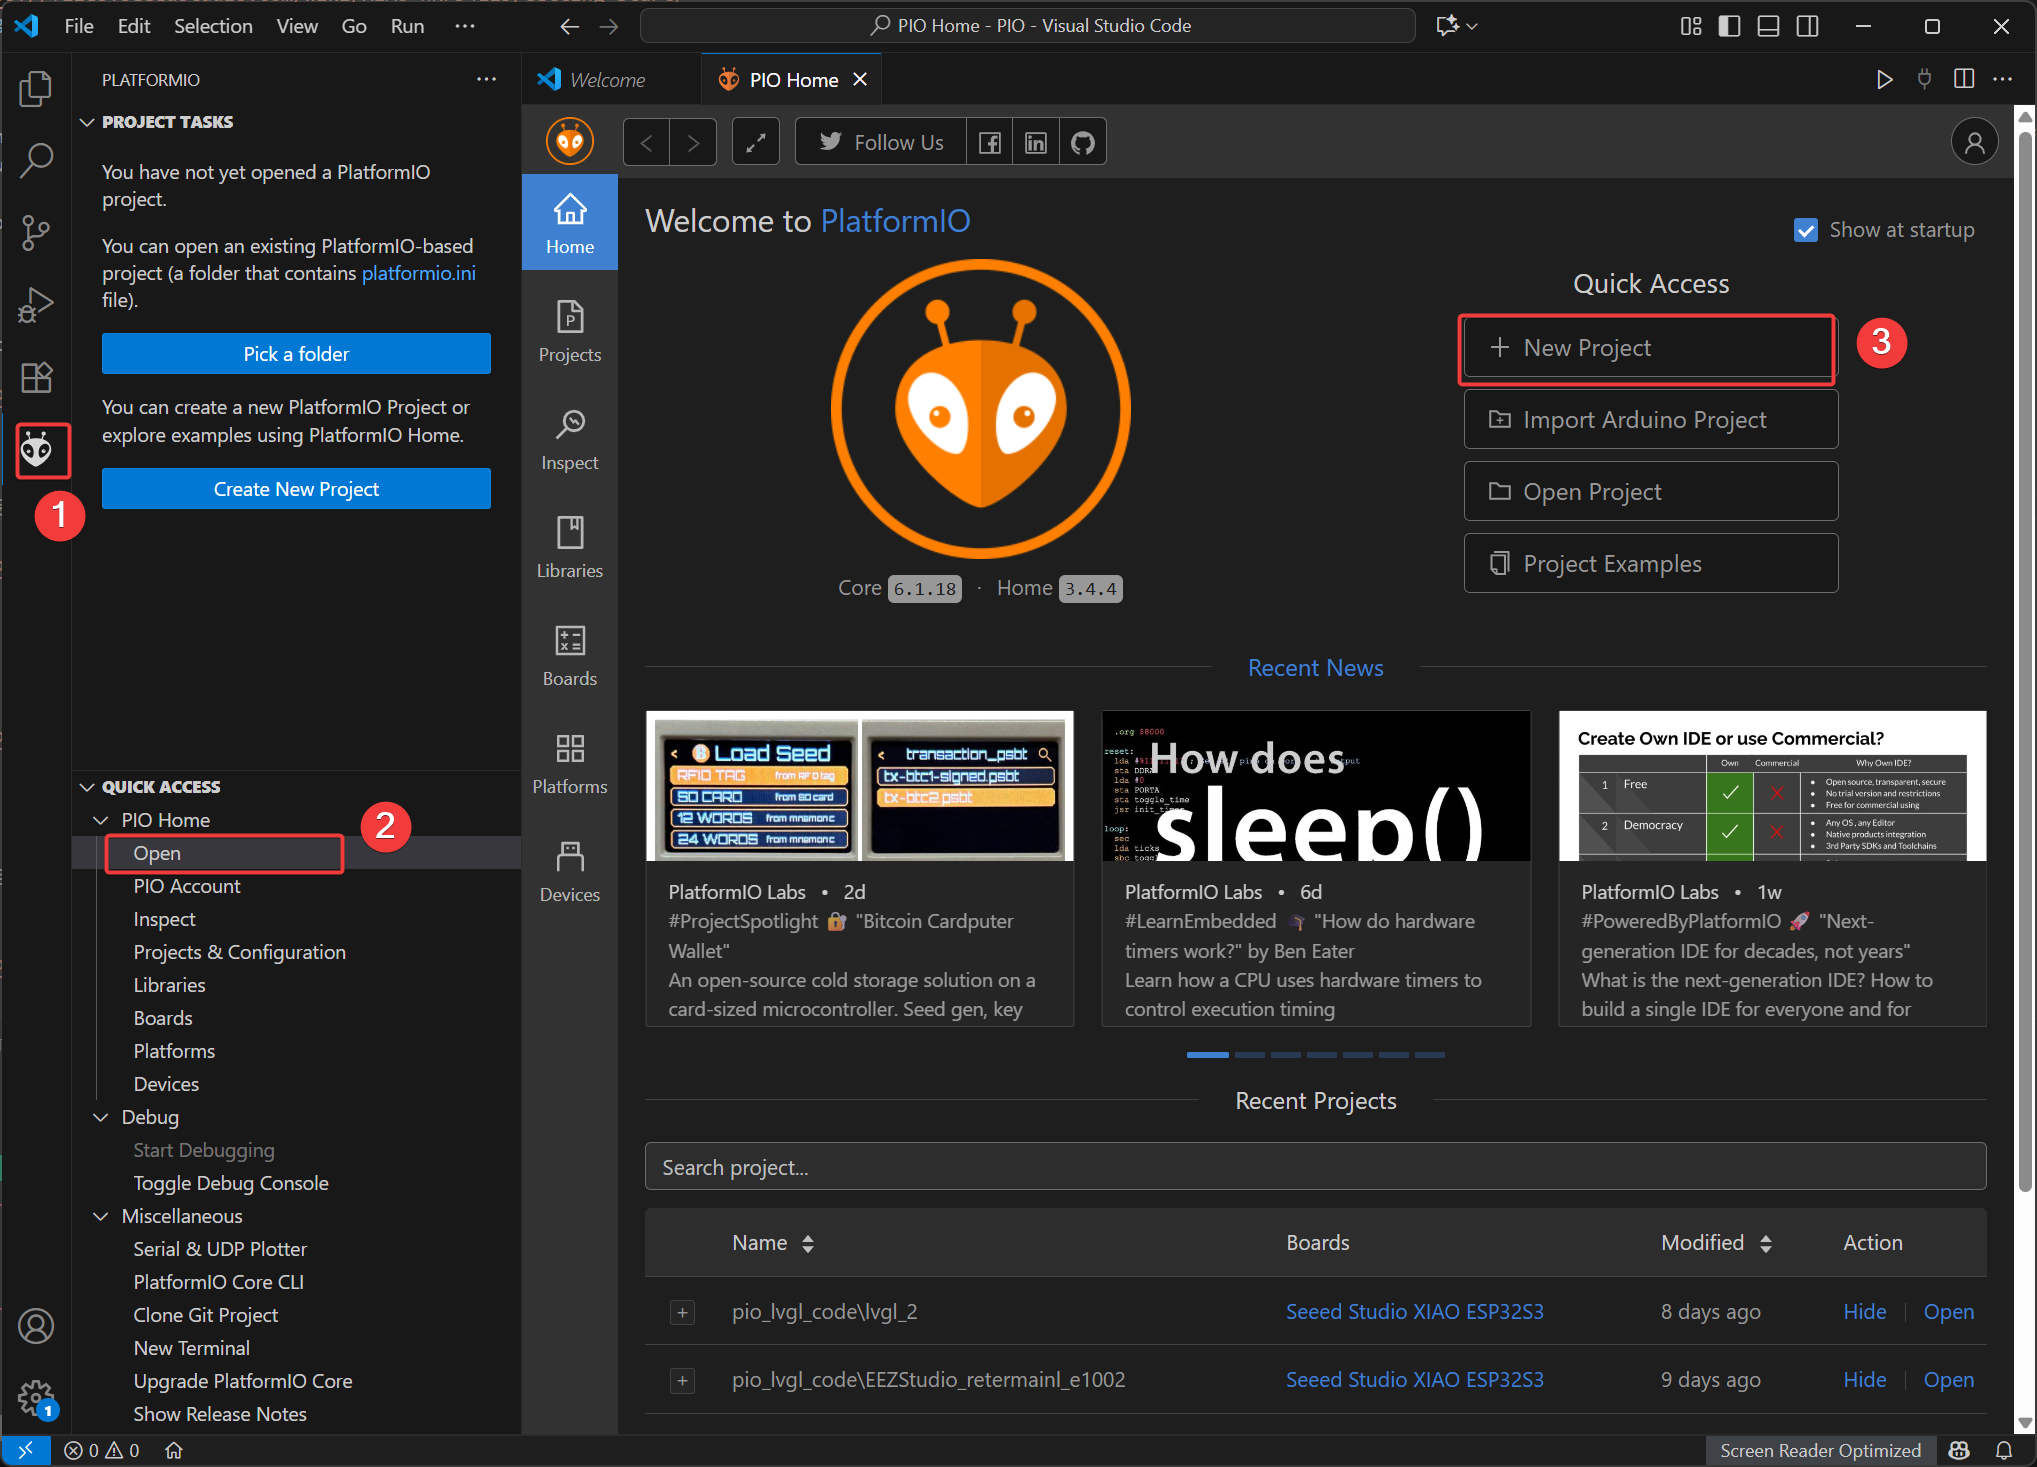
Step 4. Open PlatformIO Home from the PlatformIO icon in the VS Code activity bar.
If you use PlatformIO IDE in VS Code, PlatformIO Core is included with the extension. You only need to install PlatformIO Core separately if you want to use the pio command outside VS Code.
Step 2: Create a PlatformIO Project
Step 1. In PlatformIO Home, select New Project.
Step 2. Enter a project name.
Step 3. Select any temporary Arduino-compatible board that lets PlatformIO create the project. This first selection is only used to generate the project folder.
Step 4. Select Arduino as the framework.
Step 5. Click Finish and wait until PlatformIO creates the project.
Step 6. Open platformio.ini and replace the generated configuration with the Seeed configuration shown in the next sections.
Most Seeed Studio development boards used by this ePaper product line are maintained through Seeed's PlatformIO platform package, not only through PlatformIO's default board list. If you cannot find the exact Seeed board in the PlatformIO New Project window, that is expected. Create a temporary project first, then set platform = https://github.com/Seeed-Studio/platform-seeedboards.git and the correct board ID in platformio.ini.
After creation, the important files and folders are:
| Path | Purpose |
|---|---|
platformio.ini | Main PlatformIO configuration file. This is the most important file in this guide. |
src/main.cpp | Main firmware source file. Arduino-style code goes here. |
lib/ | Optional local libraries. This is also a convenient place for a local driver.h helper folder. |
.pio/ | PlatformIO build output and downloaded dependencies. Do not edit this folder manually. |
Step 3: Understand platformio.ini
platformio.ini is the center of a PlatformIO project. Each [env:name] section defines one build environment. The environment tells PlatformIO which board to compile for, which framework to use, which libraries to download, and how to upload or monitor the firmware.
For beginners, the easiest workflow is to copy the complete configuration for your device from Step 4, paste it into platformio.ini, and then create the matching driver.h file. You do not need to combine a shared base section with another device section by yourself.
The most important fields are:
| Field | What it controls | Example |
|---|---|---|
platform | The PlatformIO platform package. For Seeed boards in this guide, use Seeed's platform package URL so PlatformIO can download the board definitions. | platform = https://github.com/Seeed-Studio/platform-seeedboards.git |
board | The PlatformIO board ID. This decides the MCU, flash layout, upload tool, and default build settings. | board = seeed-xiao-esp32-s3-sense |
framework | The software framework used by the firmware. For Arduino-style examples, use arduino. | framework = arduino |
monitor_speed | The serial monitor baud rate. It should match Serial.begin(...) in the firmware. | monitor_speed = 115200 |
upload_speed | The upload baud rate used when PlatformIO flashes the firmware through USB serial. | upload_speed = 115200 |
lib_deps | Libraries that PlatformIO downloads automatically for this environment. | https://github.com/Seeed-Studio/Seeed_GFX |
build_flags | Extra compiler definitions. Use this only when your product cookbook or library requires it. | -DBOARD_HAS_PSRAM |
upload_port | Optional fixed serial port. Leave it unset if you prefer PlatformIO auto-detection. | upload_port = /dev/ttyACM0 |
Do not copy platformio.ini blindly between unrelated products. The same C/C++ source may be portable, but board, PSRAM settings, and driver.h must match the actual hardware.
Step 4: Copy the Configuration for Your Device
Pick your device tab, copy the whole platformio.ini block, and paste it into the platformio.ini file in your PlatformIO project. The configuration is intentionally repeated in each tab so you do not need to merge a shared base section with a device section.
The first build can take longer because PlatformIO downloads Seeed's platform package, the toolchain, the Arduino framework, and the Seeed_GFX library.
- reTerminal E1001
- reTerminal E1002
- reTerminal E1003
- reTerminal E1004
- EE02 / EE03 / EE04 / EE05
- TRMNL DIY Kit
- XIAO 7.5" Panel
- EN04 / EN05
Use this configuration for reTerminal E1001:
[env:reterminal_e1001]
platform = https://github.com/Seeed-Studio/platform-seeedboards.git
board = seeed-xiao-esp32-s3-sense
framework = arduino
upload_speed = 115200
monitor_speed = 115200
board_build.arduino.memory_type = qio_opi
build_flags =
    -D BOARD_HAS_PSRAM
    -I src
lib_deps = https://github.com/Seeed-Studio/Seeed_GFX
Use driver.h generated for reTerminal E1001. In existing Seeed_GFX examples, E1001 uses:
#define BOARD_SCREEN_COMBO 520
Use this configuration for reTerminal E1002:
[env:reterminal_e1002]
platform = https://github.com/Seeed-Studio/platform-seeedboards.git
board = seeed-xiao-esp32-s3-sense
framework = arduino
upload_speed = 115200
monitor_speed = 115200
board_build.arduino.memory_type = qio_opi
build_flags =
    -D BOARD_HAS_PSRAM
    -I src
lib_deps = https://github.com/Seeed-Studio/Seeed_GFX
Use driver.h generated for reTerminal E1002. In existing Seeed_GFX examples, E1002 uses:
#define BOARD_SCREEN_COMBO 521
Use this configuration for reTerminal E1003:
[env:reterminal_e1003]
platform = https://github.com/Seeed-Studio/platform-seeedboards.git
board = seeed-xiao-esp32-s3-sense
framework = arduino
upload_speed = 115200
monitor_speed = 115200
board_build.arduino.memory_type = qio_opi
build_flags =
    -D BOARD_HAS_PSRAM
    -I src
lib_deps = https://github.com/Seeed-Studio/Seeed_GFX
Use driver.h generated for reTerminal E1003. In existing Seeed_GFX examples, E1003 uses:
#define BOARD_SCREEN_COMBO 522
Use this configuration for reTerminal E1004:
[env:reterminal_e1004]
platform = https://github.com/Seeed-Studio/platform-seeedboards.git
board = seeed-xiao-esp32-s3-sense
framework = arduino
upload_speed = 115200
monitor_speed = 115200
board_build.arduino.memory_type = qio_opi
build_flags =
    -D BOARD_HAS_PSRAM
    -I src
lib_deps = https://github.com/Seeed-Studio/Seeed_GFX
Use driver.h generated for reTerminal E1004. In existing Seeed_GFX examples, E1004 uses:
#define BOARD_SCREEN_COMBO 523
Use this configuration for the EE02 / EE03 / EE04 / EE05 ESP32-S3 ePaper driver boards:
[env:ee0x_epaper_driver_board]
platform = https://github.com/Seeed-Studio/platform-seeedboards.git
board = seeed-xiao-esp32-s3-sense
framework = arduino
upload_speed = 115200
monitor_speed = 115200
board_build.arduino.memory_type = qio_opi
build_flags =
    -D BOARD_HAS_PSRAM
    -I src
lib_deps = https://github.com/Seeed-Studio/Seeed_GFX
Generate driver.h for your exact EE0x board and ePaper panel. For example, EE04 with a 7.5" monochrome ePaper panel uses:
#define BOARD_SCREEN_COMBO 502
#define USE_XIAO_EPAPER_DISPLAY_BOARD_EE04
Use this configuration for custom Arduino-style firmware on the TRMNL 7.5" (OG) DIY Kit:
[env:trmnl_diy_kit]
platform = https://github.com/Seeed-Studio/platform-seeedboards.git
board = seeed-xiao-esp32-s3-sense
framework = arduino
upload_speed = 115200
monitor_speed = 115200
board_build.arduino.memory_type = qio_opi
build_flags =
    -D BOARD_HAS_PSRAM
    -I src
lib_deps = https://github.com/Seeed-Studio/Seeed_GFX
Generate driver.h for the TRMNL DIY Kit display combination before building.
Use this configuration for the XIAO 7.5" ePaper Panel:
[env:xiao_075_epaper_panel]
platform = https://github.com/Seeed-Studio/platform-seeedboards.git
board = seeed-xiao-esp32-c3
framework = arduino
upload_speed = 115200
monitor_speed = 115200
build_flags =
    -I src
lib_deps = https://github.com/Seeed-Studio/Seeed_GFX
Generate driver.h for the XIAO 7.5" ePaper Panel before building.
Use this configuration as the PlatformIO starting point for EN04 / EN05 nRF52840-based ePaper boards:
[env:en04_en05]
platform = https://github.com/Seeed-Studio/platform-seeedboards.git
board = seeed-xiao-afruitnrf52-nrf52840-plus
framework = arduino
upload_speed = 115200
monitor_speed = 115200
build_flags =
    -I src
The display driver, pin map, and library dependencies for EN04 / EN05 should follow the product-specific firmware or cookbook you are building from.
Step 5: Add driver.h
platformio.ini selects the MCU and build environment. driver.h selects the ePaper board and screen combination used by Seeed_GFX.
Step 1. Open the Seeed GFX Configuration Tool.
Step 2. Select your board and screen.
Step 3. Copy the generated configuration.
Step 4. Add the configuration to a driver.h file that can be included by your firmware.
A typical generated file looks like this:
#define BOARD_SCREEN_COMBO 502
#define USE_XIAO_EPAPER_DISPLAY_BOARD_EE04
Common BOARD_SCREEN_COMBO values used in existing ePaper documentation include:
| Hardware | Example generated setting | Source of truth |
|---|---|---|
| reTerminal E1001 | #define BOARD_SCREEN_COMBO 520 | Seeed GFX Configuration Tool |
| reTerminal E1002 | #define BOARD_SCREEN_COMBO 521 | Seeed GFX Configuration Tool |
| reTerminal E1003 | #define BOARD_SCREEN_COMBO 522 | Seeed GFX Configuration Tool |
| reTerminal E1004 | #define BOARD_SCREEN_COMBO 523 | Seeed GFX Configuration Tool |
| EE04 + 7.5" monochrome ePaper | #define BOARD_SCREEN_COMBO 502#define USE_XIAO_EPAPER_DISPLAY_BOARD_EE04 | Seeed GFX Configuration Tool |
| Other EE0x / screen combinations | Generated per board and screen | Seeed GFX Configuration Tool |
Always regenerate driver.h when you change the ePaper board, display size, display color type, or driver board. A mismatched BOARD_SCREEN_COMBO is one of the most common reasons for a blank screen.
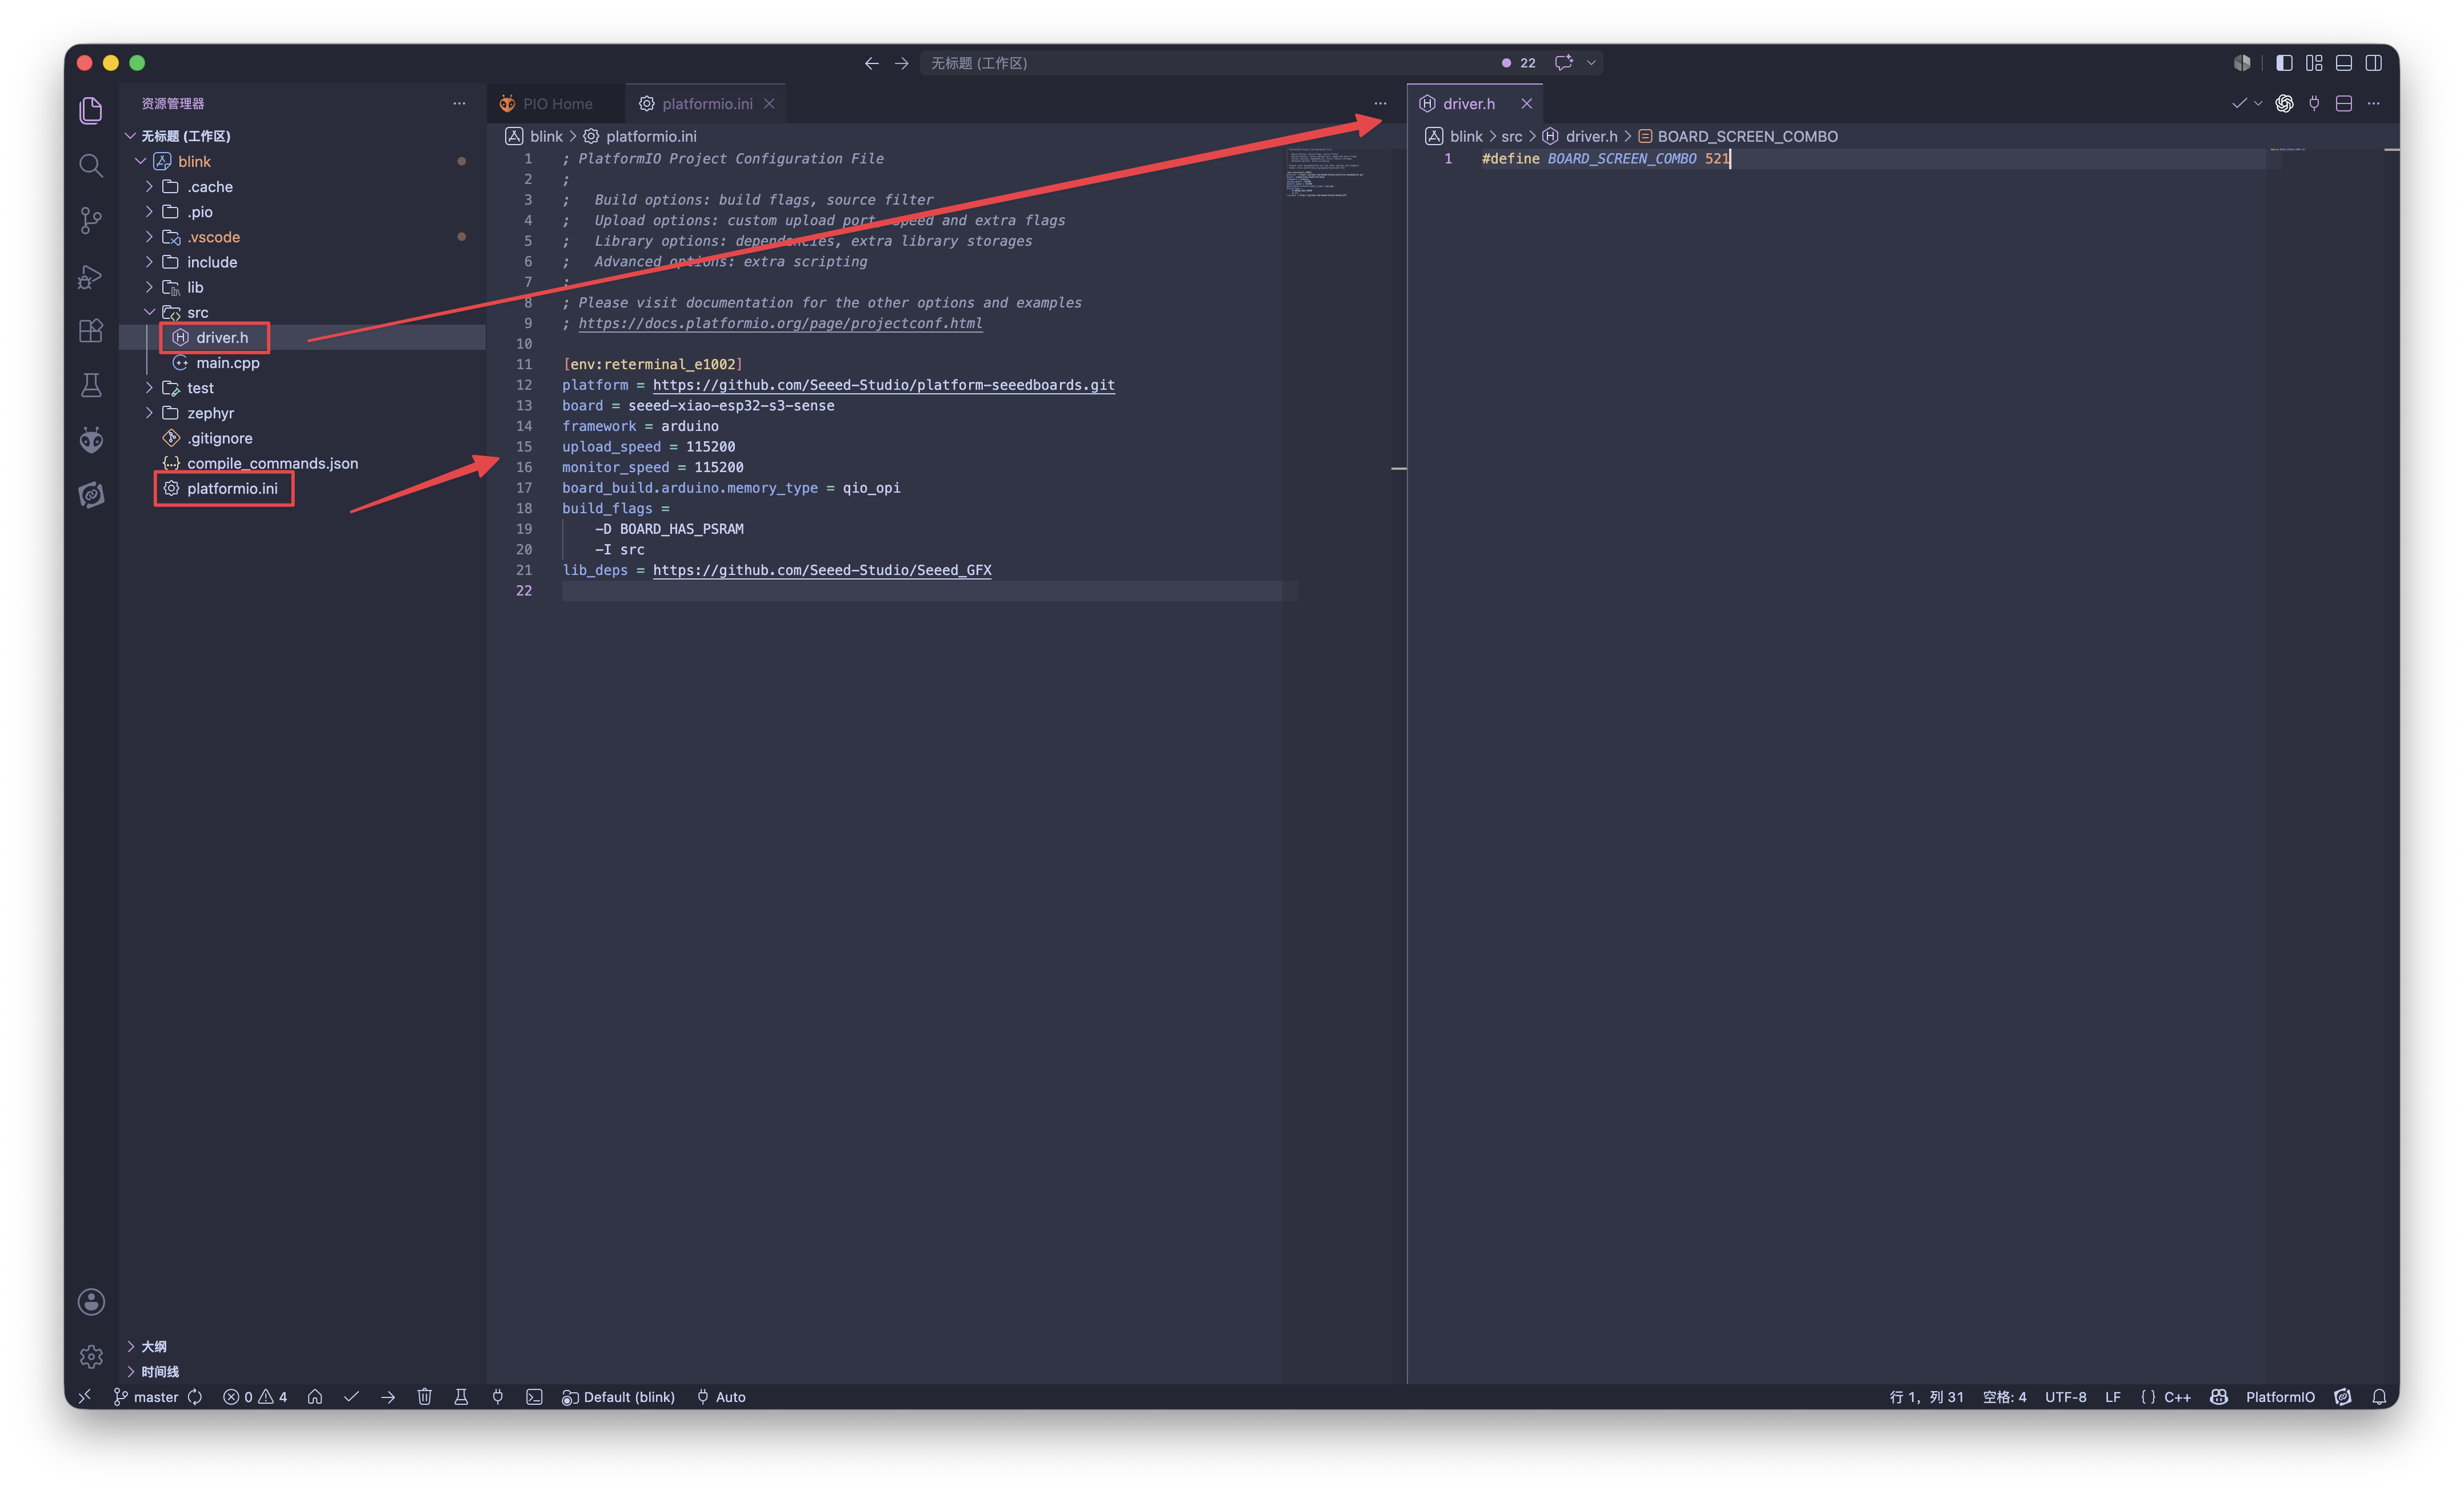
Ultimately, the code and project framework for a complete screen product using PlatformIO should be as follows:
Step 6: Build, Upload, and Monitor
After platformio.ini and driver.h are ready, use the PlatformIO toolbar in VS Code:
| Action | What it does |
|---|---|
| Build | Compiles the selected environment and checks whether the board, framework, libraries, and code are compatible. |
| Upload | Uploads the firmware to the connected device through the selected upload protocol. |
| Monitor | Opens the serial monitor using the baud rate from monitor_speed. |
| Clean | Removes previous build outputs. Use this after changing board packages, PSRAM settings, or major build flags. |
If the project has multiple environments, select the target environment from the PlatformIO project tasks before building or uploading.
Optional: Use the Seeed_GxEPD2 Library
The default examples on this page use Seeed_GFX. For projects that are based on the GxEPD2 display workflow, you can replace the display library dependency with Seeed's GxEPD2 fork.
Use this option only when the project code is written for Seeed_GxEPD2 / GxEPD2 APIs. If your code follows the standard Seeed_GFX examples, keep Seeed_GFX in lib_deps.
For example, a reTerminal E1001 configuration can be changed as follows:
[env:reterminal_e1001]
platform = https://github.com/Seeed-Studio/platform-seeedboards.git
board = seeed-xiao-esp32-s3-sense
framework = arduino
upload_speed = 115200
monitor_speed = 115200
board_build.arduino.memory_type = qio_opi
build_flags =
    -D BOARD_HAS_PSRAM
    -I src
lib_deps = https://github.com/Seeed-Projects/Seeed_GxEPD2
Only one display library is shown here to keep the configuration clear. If your project needs additional libraries, add them under lib_deps as separate lines.
Where to Go Next
This page intentionally focuses on PlatformIO environment configuration. Continue with the product-specific pages for wiring, screen selection, and firmware behavior:
- Work with Arduino — common Arduino and
Seeed_GFXworkflow. - XIAO ePaper Driver Boards PlatformIO Cookbook — EE0x PlatformIO workflow with EE04 as the running example.
- reTerminal E Series Arduino cookbook — display examples for E1001 / E1002 / E1003 / E1004.
- reTerminal E Series onboard peripherals cookbook — buttons, buzzer, battery monitor, SHT4x sensor, and microSD examples.
- XIAO 7.5" ePaper Panel Arduino guide — product-specific setup for the XIAO ESP32-C3 based panel.
- TRMNL DIY Kit Arduino guide — custom Arduino firmware path for the TRMNL kit hardware.
Common Issues
Q1: Why does PlatformIO not show my Seeed board in the board list?
This is expected for many Seeed development boards. The board definitions used in this guide come from Seeed's PlatformIO platform package, so they may not appear in PlatformIO's default New Project board search before the package is installed.
Use the Seeed package URL directly in platformio.ini:
platform = https://github.com/Seeed-Studio/platform-seeedboards.git
Then set board to the Seeed board ID used by your product, such as:
board = seeed-xiao-esp32-s3-sense
When you build for the first time, PlatformIO downloads the platform package and then recognizes the board ID.
Q2: Why does the firmware upload successfully but the ePaper display stays blank?
The most common cause is a wrong or missing driver.h.
- Regenerate
driver.hwith the Seeed GFX Configuration Tool. - Confirm the selected board and display match the real hardware.
- Confirm the generated
BOARD_SCREEN_COMBOis available to the source file that includesSeeed_GFX. - For ESP32-S3 products with large buffers, confirm whether the product cookbook requires PSRAM settings.
Q3: Why does PlatformIO fail to upload to the board?
For reTerminal E1003, a common cause is an upload baud rate that is too high. Set upload_speed to 115200 in the same environment block before checking other causes.
upload_speed = 115200
If the upload still fails, continue with the following checks:
- Use a USB-C cable that supports data transfer.
- Disconnect other serial devices and try again.
- Set
upload_portonly if auto-detection chooses the wrong port. - For ESP32-based boards, hold the boot button while connecting USB if the board does not enter download mode automatically.
Resources
- [Docs] PlatformIO Project Configuration File
- [Docs] PlatformIO IDE for VS Code
- [GitHub] Seeed PlatformIO Platform Package
- [GitHub] Seeed PlatformIO Arduino Blink Example
- [GitHub] Seeed_GFX Library
- [Tool] Seeed GFX Configuration Tool
- [Wiki] PlatformIO for Arduino-supported Boards
Tech Support & Product Discussion
Thank you for choosing our products! We are here to provide you with different support to ensure that your experience with our products is as smooth as possible. We offer several communication channels to cater to different preferences and needs.