Grove Beginner Kit para Proyectos Arduino
Proyecto 1: Alarma de Intrusión
Descripción general
Este wiki presenta cómo hacer una alarma de intrusión.
Características
- El sensor de movimiento PIR puede detectar personas si están en el área, luego se activa la alarma.
Componentes requeridos
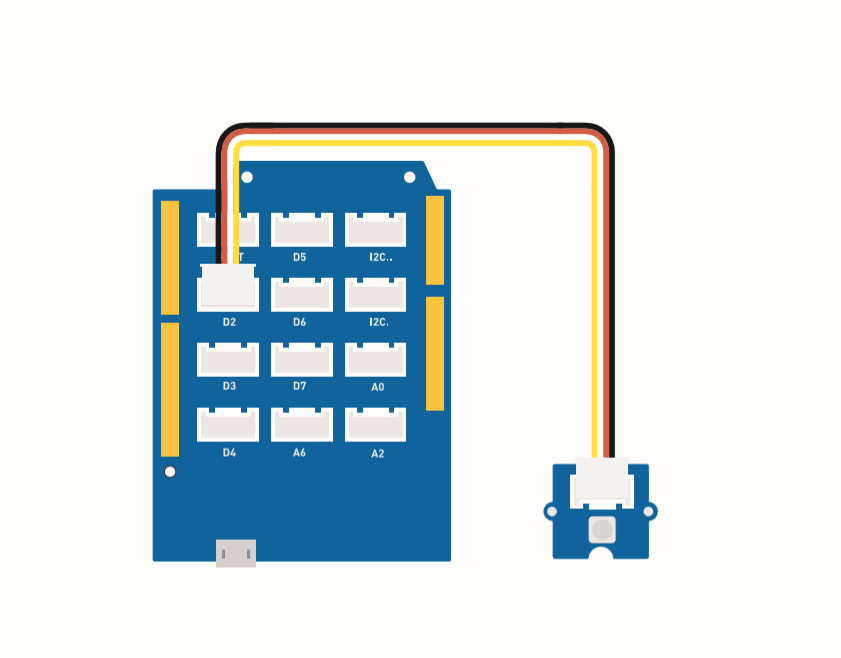
Conexión de Hardware
Por favor sigue la línea del mismo color para conectar cada sensor en la placa, coloca el cable grove del sensor de movimiento PIR en el D2.
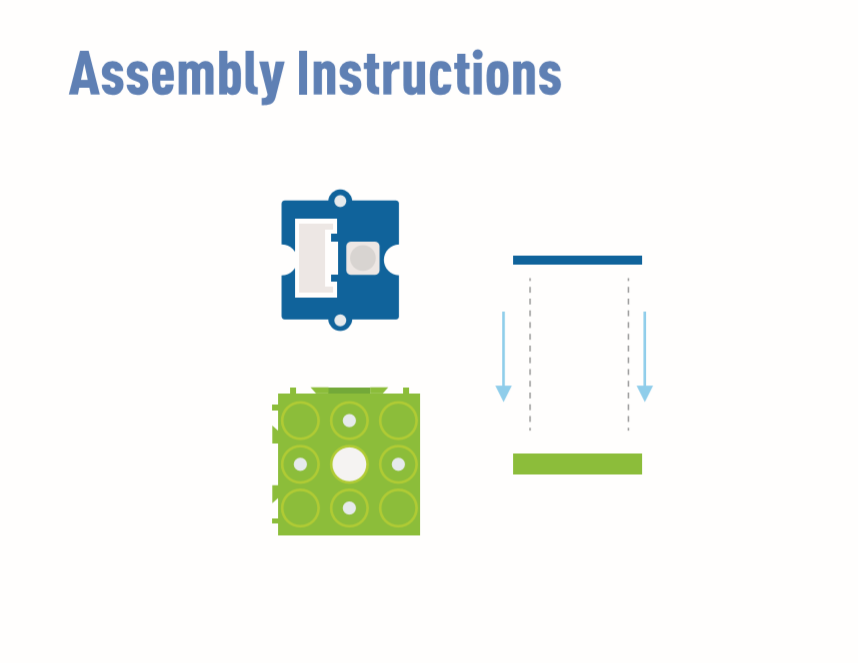
Instrucciones de ensamblaje
El zumbador (D5) y LED (D4) están integrados en la placa.
Instrucciones de Arduino
Paso 1. Descarga el Arduino IDE
Paso 2. Sigue la imagen de conexión para conectar todos los sensores en la placa.
Paso 3. Coloca el sensor de movimiento PIR Mini en la ubicación de detección.
Paso 4. Copia el código y pégalo en el Arduino IDE, luego súbelo.
Código
#define PIR_MOTION_SENSOR 2//Use pin 2 to receive the signal from the module

int BuzzerPin = 5;     // set D5 as buzzer
int LED_RAD = 4;       // set D4 as LED

void setup() {
  Serial.begin(9600);
  pinMode(PIR_MOTION_SENSOR, INPUT);
  pinMode(BuzzerPin, OUTPUT);
  pinMode(LED_RAD, OUTPUT);
}

void loop() {

  if (digitalRead(PIR_MOTION_SENSOR)) {
    analogWrite(BuzzerPin, 100);
    digitalWrite(LED_RAD, HIGH);
    delay(3000);
    analogWrite(BuzzerPin, 0);
    digitalWrite(LED_RAD, LOW);
    delay(4000);
  }

}
proyecto 2: Ventilador oscilante
Descripción general
Este wiki presenta cómo hacer un mini ventilador para colocar en tu habitación y mantenerte fresco.
Característica
- Ventilador de oscilación automática
Componentes requeridos
Conexión de hardware
Por favor conecta el cable grove del ventilador a D7, el cable grove del Servo a D3.
Instrucciones de ensamblaje
Instrucciones de Arduino
Paso 1. Descarga el Arduino IDE
Paso 2. Copia el código y pégalo en el Arduino IDE
Paso 3. Selecciona el puerto actual: Tools -> Port -> COM (número)
Paso 4. Sube el código
Por favor coloca el ventilador en la posición de seguridad.
Código
#include <Servo.h>

Servo myservo;  // create servo object to control a servo

int pos = 0;    // variable to store the servo position
int fanPin = 7;  // set D6 as control switch
int fanState = LOW;

void setup() {
    Serial.begin(9600);
    myservo.attach(3);  // attaches the servo on pin 2 to the servo object
    pinMode(fanPin, OUTPUT);
}

void loop() {

 fanState = HIGH;
 digitalWrite(fanPin, fanState);

   for (pos = 0; pos <= 100; pos += 1) { // goes from 0 degrees to 100 degrees
    // in steps of 1 degree
    myservo.write(pos);              // tell servo to go to position in variable 'pos'
    delay(40);                       // waits 15ms for the servo to reach the position
  }
  for (pos = 100; pos >= 0; pos -= 1) { // goes from 100 degrees to 0 degrees
    myservo.write(pos);              // tell servo to go to position in variable 'pos'
    delay(40);                       // waits 15ms for the servo to reach the position
  }
}
Proyecto 3: Ventilador Oscilante con Control Remoto
Descripción general
Este wiki presenta cómo hacer un ventilador oscilante con control remoto.
Características
-
La potencia del ventilador controlada por el controlador.
-
La forma de oscilación del ventilador se puede usar con control remoto.
Componentes requeridos
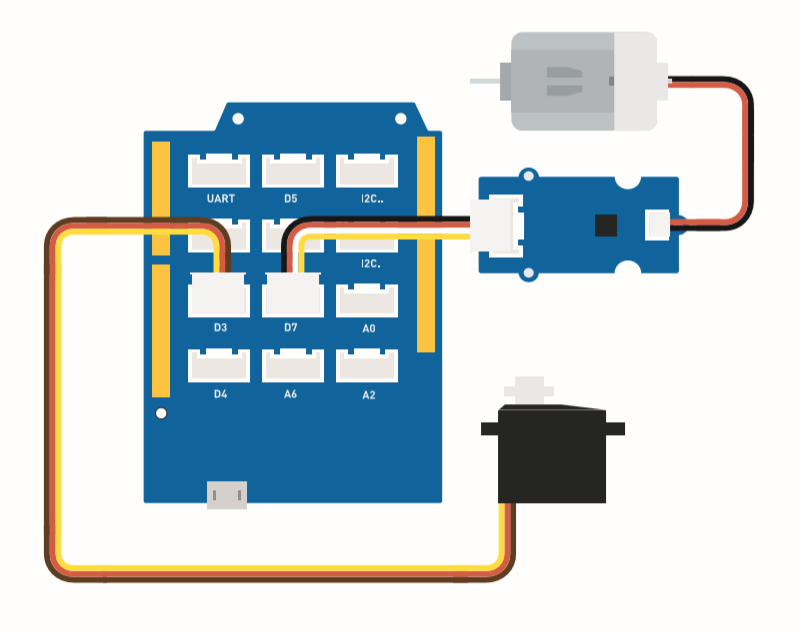
Conexión de Hardware
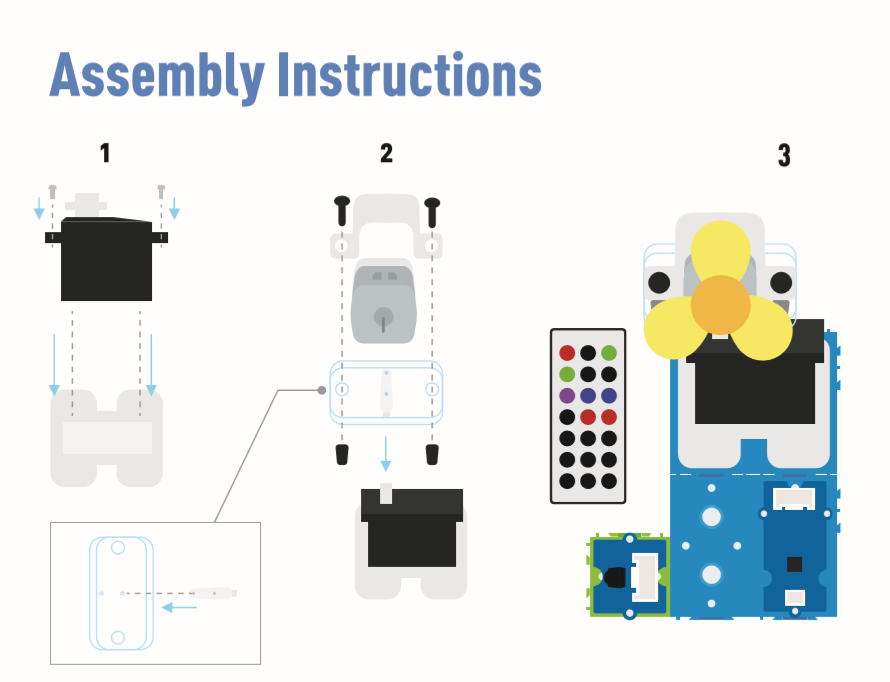
Por favor sigue la misma línea de color para conectar cada sensor en la placa. Por favor conecta el cable grove del ventilador a D7, el cable grove del servo a D3, el cable grove IR a D2.

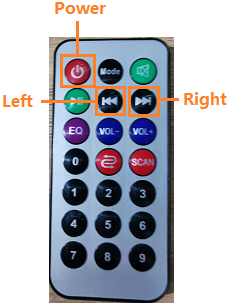
Esta es la función de los botones del controlador.
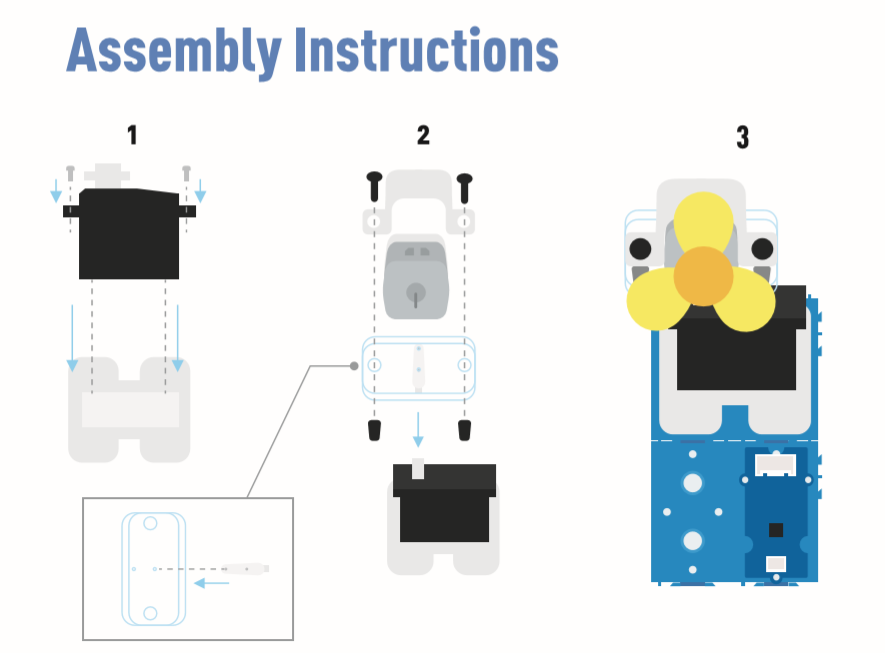
Instrucciones de ensamblaje
Instrucciones de Arduino
Paso 1. Sigue la imagen de conexión para conectar todos los sensores en la placa.
Paso 2. Descarga el Arduino IDE
Paso 3. Navega a Sketch -> Include Library -> Manage Libraries, busca IRremote y luego instálalo.
Paso 4. Copia el código y pégalo en el Arduino IDE y luego súbelo.
Paso 5. Coloca el Ventilador en una posición segura, trata de presionar el botón para asegurarte de que pueda funcionar de manera segura.
Consulta Cómo instalar biblioteca para instalar biblioteca para Arduino.
Código
#include <IRremote.h>
#include <Servo.h>

Servo myservo;  // create servo object to control a servo
int RECV_PIN = 2; // set pin 2 as IR control

IRrecv irrecv(RECV_PIN);

decode_results results;

int pos = 90;    // variable to store the servo position
int fanPin = 7;  // set D6 as control switch
int fanState = LOW;
int IO = 0;

void setup()
{
  Serial.begin(9600);
  Serial.println("Enabling IRin");  // remind enabling IR
  irrecv.enableIRIn(); // Start the receiver
  Serial.println("Enabled IRin");
  myservo.attach(3);  // attaches the servo on pin 2 to the servo object
  pinMode(fanPin, OUTPUT);

}

//  power_encode 2155829415     left  2155870215  right  2155821255

void loop() {
  if (irrecv.decode(&results)) { //checking IR signal
    if (results.value == 2155829415) {    // Power off/on
      IO++;
      if (IO % 2 == 0) {
        fanState = HIGH;
        digitalWrite(fanPin, fanState);
        delay(100);
      }
      else {
        fanState = LOW;
        digitalWrite(fanPin, fanState);
        delay(100);
      }
    }

    if (results.value == 2155821255 ) {    // fan swing to left
      for (pos; pos <= 89; pos += 1) { // goes from 0 degrees to 90 degrees
        // in steps of 1 degree
        myservo.write(pos);              // tell servo to go to position in variable 'pos'

        delay(40);                       // waits 15ms for the servo to reach the position
        if (irrecv.decode(&results)) {
          irrecv.resume();
          if (results.value == 2155870215)
            break;
        }
      }
    }

    if (results.value == 2155870215 ) {    // fan swing to right
      for (pos; pos >= 1; pos -= 1) { // goes from 90 degrees to 0 degrees
        myservo.write(pos);              // tell servo to go to position in variable 'pos'
        delay(40);                       // waits 15ms for the servo to reach the position

        if (irrecv.decode(&results)) {
          irrecv.resume();
          if (results.value == 2155821255)
            break;
        }
      }
    }
    Serial.println(pos);
    Serial.println(results.value, HEX);
    Serial.println(results.value);
    irrecv.resume();                    //recive next intrustion

  }
  delay(100);
}
Proyecto 4: Humidificador Inteligente
Descripción general
Este wiki presenta cómo hacer atomización de agua para mantener normal la humedad interior.
Características
-
Usar automáticamente la atomización de agua cuando la humedad es baja.
-
Mostrar la temperatura y humedad en tiempo real.
Componentes requeridos
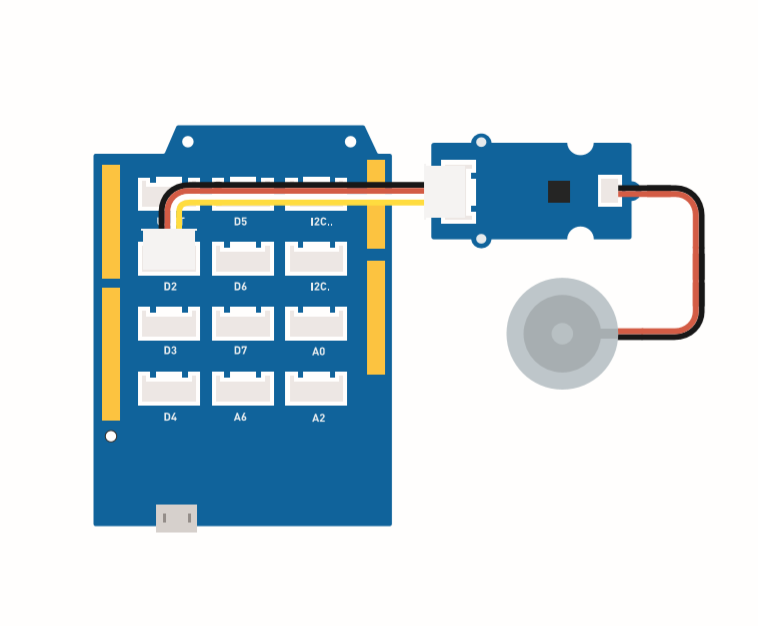
Conexión de Hardware
Por favor sigue la línea del mismo color para conectar cada sensor en la placa. Conecta el cable del Grove water atomization a D2.
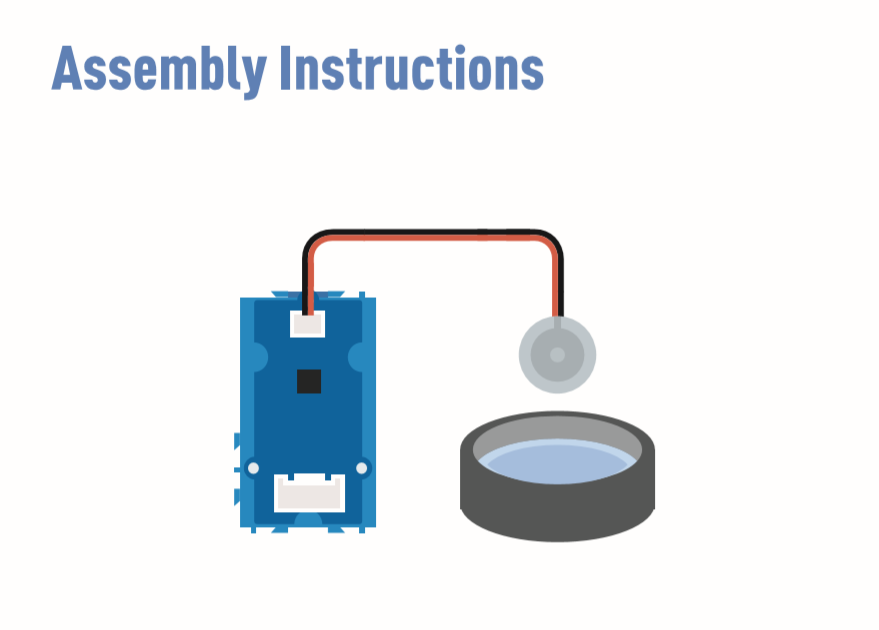
Instrucciones de ensamblaje
Instrucciones de Arduino
Paso 1. Sigue la imagen de conexión para conectar todos los sensores en la placa.
Paso 2 Descarga el Arduino IDE
Paso 3 Navega a Sketch -> Include Library -> Manage Libraries, busca U8g2 luego instálalo.
Paso 4 Descarga la Grove_Temperature_And_Humidity_Sensor library e instálala
Paso 5. Copia el código y pégalo en el Aruino IDE luego súbelo.
Paso 6. Prepara un contenedor con agua llena luego pon la atomización de agua en el agua.
Consulta Cómo instalar biblioteca para instalar biblioteca para Arduino.
Prepara algunos pañuelos y ponlos en el agua, deja que la atomización de agua se mantenga a flote. La función del pañuelo es conducir agua al transductor y mantener el lado superior del transductor sobre el agua.
Código
#include <Arduino.h>
#include <U8x8lib.h>

#include "DHT.h"
#define DHTTYPE DHT11   // DHT 11
#define DHTPIN 3     // what pin we're connected to
DHT dht(DHTPIN, DHTTYPE);

#include <Wire.h>

U8X8_SSD1306_128X64_NONAME_HW_I2C u8x8(/* reset=*/ U8X8_PIN_NONE);

void setup(void) {
  Serial.begin(115200);
  u8x8.begin();
  u8x8.setFlipMode(1);
  Wire.begin();
  dht.begin();
  pinMode(2,INPUT);
}

void loop(void) {
  float temp_hum_val[2] = {0};
  int b;
  int c;
  if (!dht.readTempAndHumidity(temp_hum_val)) {
     b = temp_hum_val[0];
     c = temp_hum_val[1];
  }
  else{
    Serial.println("Failed to get temprature and humidity value.");
    }
  u8x8.setFont(u8x8_font_chroma48medium8_r);   // choose a suitable font
  u8x8.setCursor(0, 0);
  u8x8.print("Temp: ");
  u8x8.setCursor(5, 0);
  u8x8.print(c);
  u8x8.setCursor(8, 0);
  u8x8.print("*C");
  u8x8.setCursor(0, 10);
  u8x8.print("Hum: ");
  u8x8.setCursor(5, 10);
  u8x8.print(b);
  u8x8.setCursor(8, 10);
  u8x8.print("%");
  u8x8.setCursor(0, 20);
  u8x8.print("atomizer: ");

  if(b > 70){
  u8x8.setCursor(9, 20);
  u8x8.print("OFF");
  digitalWrite(2, LOW);    // atomization stopped
  }
  if(b <= 70) {
  u8x8.setCursor(9, 20);
  u8x8.print("ON ");
  digitalWrite(2, HIGH);   // atomize
    }
  delay(1000);

}
Proyecto 5: Radar Ultrasónico
Descripción general
Este wiki presenta cómo hacer un Radar Ultrasónico para detectar objetos y distancia.
Características
-
Detecta la distancia del objeto
-
Escanea si existe el objeto alrededor
Componentes requeridos
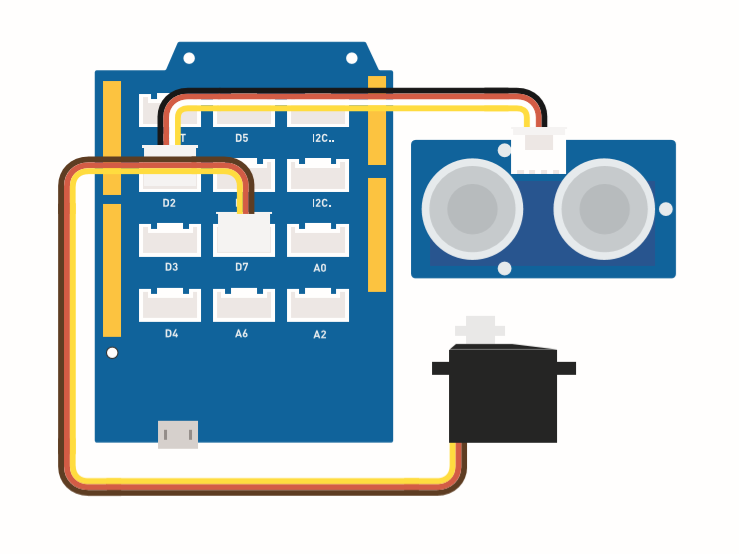
Conexión de Hardware
Por favor sigue la imagen, conecta el cable Grove del sensor ultrasónico al D2, conecta el servo al D7.
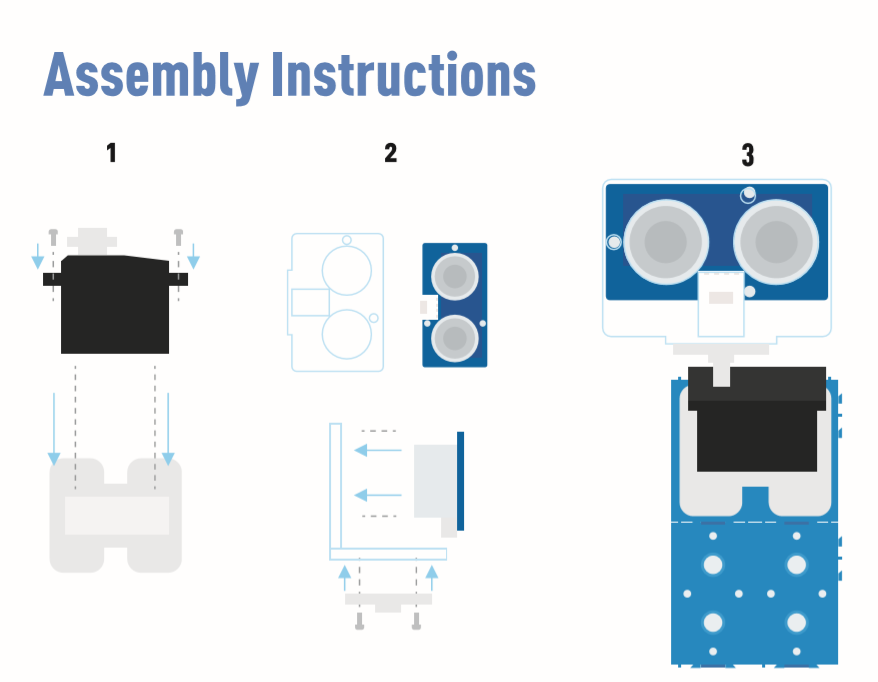
Instrucciones de ensamblaje
Instrucciones de Arduino
Paso 1. Sigue la Conexión para enchufar el cable en el puerto.
Paso 2. Descarga el Arduino IDE
Paso 3. Descarga Processing
Paso 4. Descarga la librería UltrasonicRanger desde Github.
Paso 5. Copia el código del Radar y pégalo en el Arduino IDE luego súbelo.
Paso 6. Descarga Processing para mostrar el mapa de escaneo del Radar.
Paso 7. Copia el Código Radar-Processing y pégalo en Processing.
Paso 8. Después de que el Servo comience a oscilar, haz clic en reproducir en el software Processing.
Si no sabes cómo instalar la librería, Haz clic aquí.
Código del radar
#include <Servo.h>
#include "Ultrasonic.h"

int distance;
Servo myServo;

Ultrasonic ultrasonic(2);

void setup() {
    Serial.begin(9600);
    myServo.attach(7);
}
void loop() {

    for(int pos = 15; pos <= 165; pos += 1){
        myServo.write(pos);
        delay(30);
        distance = ultrasonic.MeasureInCentimeters();
        Serial.print(pos);
        Serial.print(",");
        Serial.print(distance);
        Serial.print(".");
    }

    for(int pos = 165; pos >= 15; pos -= 1){
        myServo.write(pos);
        delay(30);
        distance = ultrasonic.MeasureInCentimeters();
        Serial.print(pos);
        Serial.print(",");
        Serial.print(distance);
        Serial.print(".");
    }
}
Código de Procesamiento de Radar
import processing.serial.*; // imports library for serial communication
import java.awt.event.KeyEvent; // imports library for reading the data from the serial port
import java.io.IOException;
Serial myPort; // defines Object Serial
// defubes variables
String angle="";
String distance="";
String data="";
String noObject;
float pixsDistance;
int iAngle, iDistance;
int index1=0;
int index2=0;
PFont orcFont;
void setup() {

 size (1000, 720); // ***CHANGE THIS TO YOUR SCREEN RESOLUTION***
 smooth();
 myPort = new Serial(this,"COM14", 9600); // starts the serial communication
 myPort.bufferUntil('.'); // reads the data from the serial port up to the character '.'. So actually it reads this: angle,distance.
 orcFont = loadFont("AgencyFB-Bold-48.vlw");
}
void draw() {

  fill(98,245,31);
  textFont(orcFont);
  // simulating motion blur and slow fade of the moving line
  noStroke();
  fill(0,4);
  rect(0, 0, width, height-height*0.065);

  fill(98,245,31); // green color
  // calls the functions for drawing the radar
  drawRadar();
  drawLine();
  drawObject();
  drawText();
}
void serialEvent (Serial myPort) { // starts reading data from the Serial Port
  // reads the data from the Serial Port up to the character '.' and puts it into the String variable "data".
  data = myPort.readStringUntil('.');
  data = data.substring(0,data.length()-1);

  index1 = data.indexOf(","); // find the character ',' and puts it into the variable "index1"
  angle= data.substring(0, index1); // read the data from position "0" to position of the variable index1 or thats the value of the angle the Arduino Board sent into the Serial Port
  distance= data.substring(index1+1, data.length()); // read the data from position "index1" to the end of the data pr thats the value of the distance

  // converts the String variables into Integer
  iAngle = int(angle);
  iDistance = int(distance);
}
void drawRadar() {
  pushMatrix();
  translate(width/2,height-height*0.074); // moves the starting coordinats to new location
  noFill();
  strokeWeight(2);
  stroke(98,245,31);
  // draws the arc lines
  arc(0,0,(width-width*0.0625),(width-width*0.0625),PI,TWO_PI);
  arc(0,0,(width-width*0.27),(width-width*0.27),PI,TWO_PI);
  arc(0,0,(width-width*0.479),(width-width*0.479),PI,TWO_PI);
  arc(0,0,(width-width*0.687),(width-width*0.687),PI,TWO_PI);
  // draws the angle lines
  line(-width/2,0,width/2,0);
  line(0,0,(-width/2)*cos(radians(30)),(-width/2)*sin(radians(30)));
  line(0,0,(-width/2)*cos(radians(60)),(-width/2)*sin(radians(60)));
  line(0,0,(-width/2)*cos(radians(90)),(-width/2)*sin(radians(90)));
  line(0,0,(-width/2)*cos(radians(120)),(-width/2)*sin(radians(120)));
  line(0,0,(-width/2)*cos(radians(150)),(-width/2)*sin(radians(150)));
  line((-width/2)*cos(radians(30)),0,width/2,0);
  popMatrix();
}
void drawObject() {
  pushMatrix();
  translate(width/2,height-height*0.074); // moves the starting coordinats to new location
  strokeWeight(9);
  stroke(255,10,10); // red color
  pixsDistance = iDistance*((height-height*0.1666)*0.025); // covers the distance from the sensor from cm to pixels
  // limiting the range to 40 cms
  if(iDistance<40){
    // draws the object according to the angle and the distance
  line(pixsDistance*cos(radians(iAngle)),-pixsDistance*sin(radians(iAngle)),(width-width*0.505)*cos(radians(iAngle)),-(width-width*0.505)*sin(radians(iAngle)));
  }
  popMatrix();
}
void drawLine() {
  pushMatrix();
  strokeWeight(9);
  stroke(30,250,60);
  translate(width/2,height-height*0.074); // moves the starting coordinats to new location
  line(0,0,(height-height*0.12)*cos(radians(iAngle)),-(height-height*0.12)*sin(radians(iAngle))); // draws the line according to the angle
  popMatrix();
}
void drawText() { // draws the texts on the screen

  pushMatrix();
  if(iDistance>40) {
  noObject = "Out of Range";
  }
  else {
  noObject = "In Range";
  }
  fill(0,0,0);
  noStroke();
  rect(0, height-height*0.0648, width, height);
  fill(98,245,31);
  textSize(25);

  text("10cm",width-width*0.3854,height-height*0.0833);
  text("20cm",width-width*0.281,height-height*0.0833);
  text("30cm",width-width*0.177,height-height*0.0833);
  text("40cm",width-width*0.0729,height-height*0.0833);
  textSize(40);
  text("Object: " + noObject, width-width*0.875, height-height*0.0277);
  text("Angle: " + iAngle +" °", width-width*0.48, height-height*0.0277);
  text("Distance: ", width-width*0.26, height-height*0.0277);
  if(iDistance<40) {
  text("        " + iDistance +" cm", width-width*0.225, height-height*0.0277);
  }
  textSize(25);
  fill(98,245,60);
  translate((width-width*0.4994)+width/2*cos(radians(30)),(height-height*0.0907)-width/2*sin(radians(30)));
  rotate(-radians(-60));
  text("30°",0,0);
  resetMatrix();
  translate((width-width*0.503)+width/2*cos(radians(60)),(height-height*0.0888)-width/2*sin(radians(60)));
  rotate(-radians(-30));
  text("60°",0,0);
  resetMatrix();
  translate((width-width*0.507)+width/2*cos(radians(90)),(height-height*0.0833)-width/2*sin(radians(90)));
  rotate(radians(0));
  text("90°",0,0);
  resetMatrix();
  translate(width-width*0.513+width/2*cos(radians(120)),(height-height*0.07129)-width/2*sin(radians(120)));
  rotate(radians(-30));
  text("120°",0,0);
  resetMatrix();
  translate((width-width*0.5104)+width/2*cos(radians(150)),(height-height*0.0574)-width/2*sin(radians(150)));
  rotate(radians(-60));
  text("150°",0,0);
  popMatrix();
}