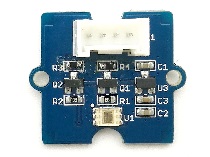
Grove - Sensor de Luz Digital
Este módulo está basado en el convertidor de luz a digital I2C TSL2561 para transformar la intensidad de luz en una señal digital. A diferencia del sensor de luz analógico tradicional, como el Grove - Sensor de Luz, este módulo digital cuenta con un rango de espectro de luz seleccionable debido a sus diodos fotosensibles duales: infrarrojo y espectro completo.
Podemos cambiar entre tres modos de detección para tomar las lecturas. Estos son el modo infrarrojo, espectro completo y modo visible humano. Cuando funciona en el modo visible humano, este sensor te dará lecturas muy cercanas a las sensaciones de tus ojos.

Versión
| Versión del Producto | Cambios | Fecha de Lanzamiento |
|---|---|---|
| Grove - Sensor de Luz Digital V1.1 | Inicial | Oct 2015 |
Actualizable a Sensores Industriales
Con el controlador S2110 y el registrador de datos S2100 de SenseCAP, puedes convertir fácilmente el Grove en un sensor LoRaWAN®. Seeed no solo te ayuda con el prototipado, sino que también te ofrece la posibilidad de expandir tu proyecto con la serie SenseCAP de sensores industriales robustos.
Los sensores industriales de la serie SenseCAP S210x proporcionan una experiencia lista para usar para el sensado ambiental. Por favor, consulta el Sensor de Intensidad de Luz Inalámbrico S2102 con mayor rendimiento y robustez para la detección de intensidad de luz. La serie incluye sensores para humedad del suelo, temperatura y humedad del aire, intensidad de luz, CO2, EC, y una estación meteorológica 8 en 1. Prueba la última SenseCAP S210x para tu próximo proyecto industrial exitoso.
| Sensor Industrial SenseCAP |
 |
| S2102 Luz |
Características
- Modos de detección seleccionables
- Salida digital de alta resolución de 16 bits a 400 kHz I2C Fast-Mode
- Amplio rango dinámico: 0.1 - 40,000 LUX
- Amplio rango de temperatura de funcionamiento: -40°C a 85°C
- Función de interrupción programable con configuraciones de umbral superior e inferior definidas por el usuario
- Dirección I2C 0x29
Si deseas usar múltiples dispositivos I2C, consulta Software I2C.
Para más detalles sobre los módulos Grove, consulta Sistema Grove
Especificaciones
| Elementos | Mín | Típico | Máx | Unidad |
|---|---|---|---|---|
| Voltaje de alimentación, VDD | 3.3 | 5 | 5.1 | V |
| Temperatura de funcionamiento | -30 | \ | 70 | ℃ |
| Voltaje bajo de entrada SCL,SDA | -0.5 | \ | 0.8 | V |
| Voltaje alto de entrada SCL,SDA | 2.3 | \ | 5.1 | V |
Plataformas Compatibles
| Arduino | Raspberry Pi | |||
|---|---|---|---|---|
Las plataformas mencionadas anteriormente como compatibles son una indicación de la compatibilidad de software o teórica del módulo. Solo proporcionamos biblioteca de software o ejemplos de código para la plataforma Arduino en la mayoría de los casos. No es posible proporcionar biblioteca de software / código de demostración para todas las plataformas MCU posibles. Por lo tanto, los usuarios tienen que escribir su propia biblioteca de software.
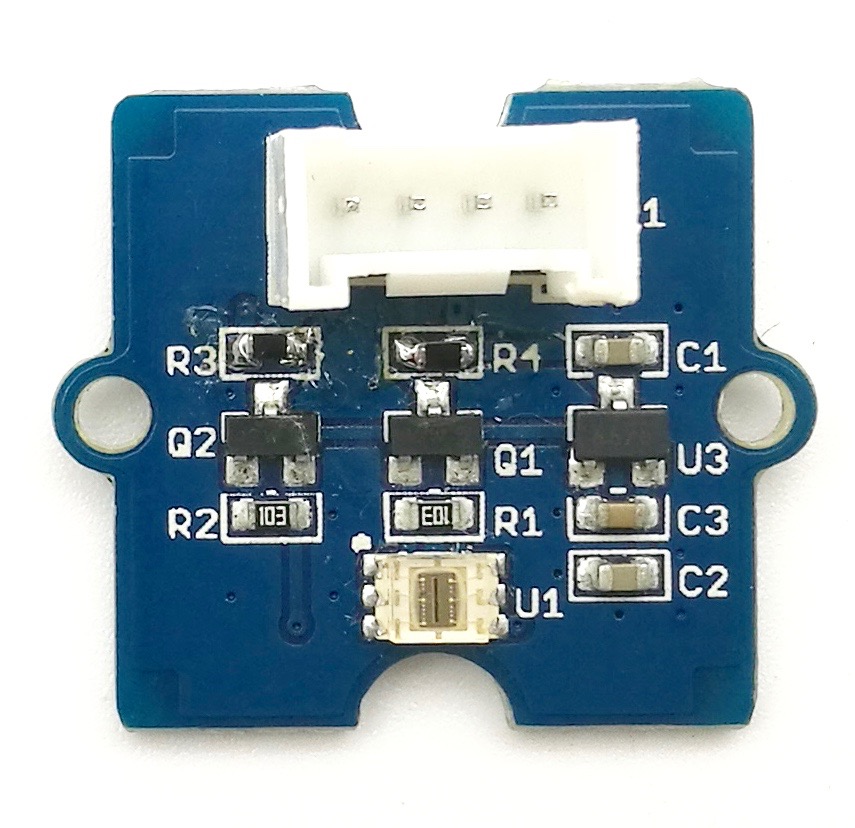
Descripción General del Hardware
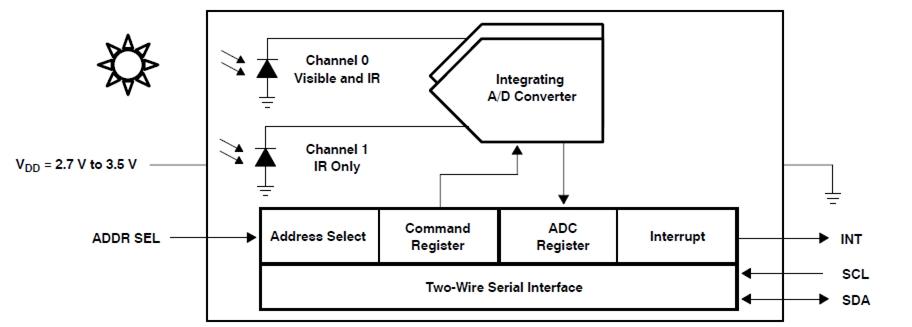
U1: IC TSL2561, Convertidor de Luz a Digital. Aquí está el Diagrama de Bloques Funcional.
-
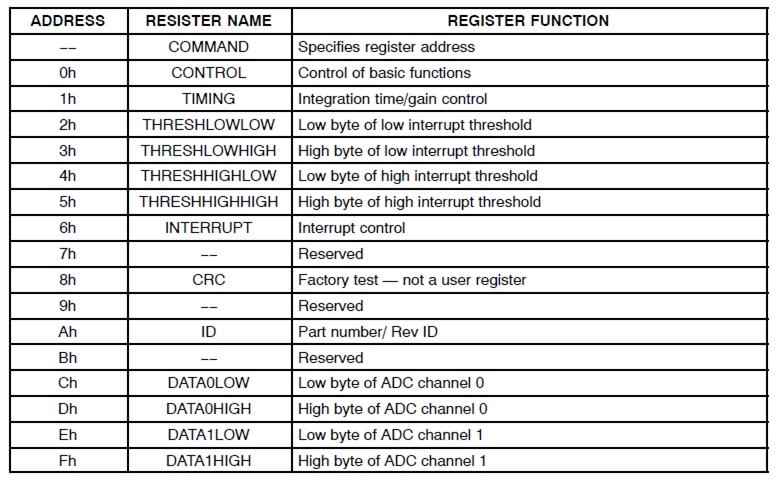
Mapa de Registros
El TSL2561 es controlado y monitoreado por dieciséis registros (tres están reservados) y un registro de comando accedido a través de la interfaz serie. Estos registros proporcionan una variedad de funciones de control y pueden ser leídos para determinar los resultados de las conversiones ADC. El conjunto de registros se resume como se muestra a continuación.
- Curva de Respuesta Espectral
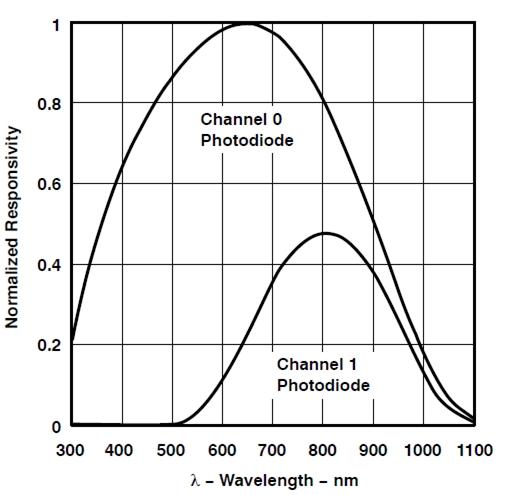
Dos canales del sensor de luz digital tienen diferentes características de respuesta. Por eso puedes elegir su modo de funcionamiento teniendo ambos encendidos o uno de ellos apagado.
U3: IC XC6206MR332, Reguladores de Voltaje Positivo.
Q1,Q2: IC BSN20, Transistor D-MOS Vertical de Modo de Mejora de Canal N.
SCL,SDA: Interfaz de Señal I2C
Primeros Pasos
Si esta es la primera vez que trabajas con Arduino, recomendamos firmemente que veas Primeros Pasos con Arduino antes de comenzar.
Jugar con Arduino
Hardware
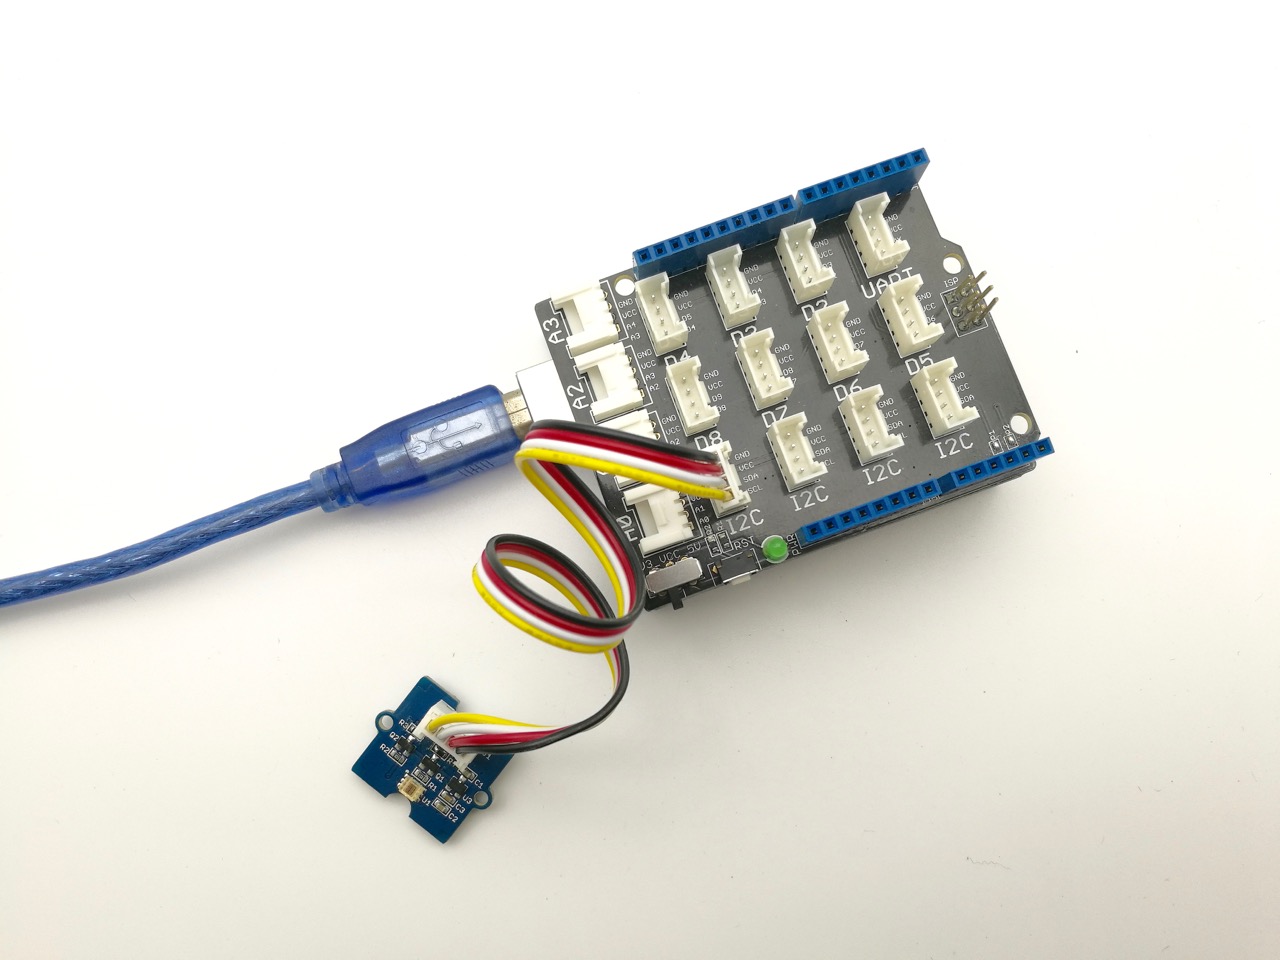
- Paso 1. Prepara los siguientes elementos:
| Seeeduino V4 | Base Shield | Grove - Sensor de luz digital |
|---|---|---|
 |  |  |
| Obtener UNO Ahora | Obtener UNO Ahora | Obtener UNO Ahora |
- Paso 2. Conecta Grove - Digital light Sensor al puerto I2C del shield base.
- Paso 3. Conecta el Shield base al Arduino.
- Paso 4. Conecta Arduino a la PC usando un cable USB.
Software
- Paso 1. Descarga la librería desde aquí Digital Light Sensor Library;
- Paso 2. Por favor sigue los procedimientos de cómo instalar una librería de arduino para instalar la librería.
- Paso 3. Abre el código directamente por la ruta: File -> Example ->Digital_Light_Sensor->Digital_Light_Sensor.

- O copia el código de abajo al IDE y súbelo al Arduino.
/*
    Digital_Light_Sensor.ino
    A library for TSL2561

    Copyright (c) 2012 seeed technology inc.
    Author     : zhangkun
    Create Time:
    Change Log :

    The MIT License (MIT)

    Permission is hereby granted, free of charge, to any person obtaining a copy
    of this software and associated documentation files (the "Software"), to deal
    in the Software without restriction, including without limitation the rights
    to use, copy, modify, merge, publish, distribute, sublicense, and/or sell
    copies of the Software, and to permit persons to whom the Software is
    furnished to do so, subject to the following conditions:

    The above copyright notice and this permission notice shall be included in
    all copies or substantial portions of the Software.

    THE SOFTWARE IS PROVIDED "AS IS", WITHOUT WARRANTY OF ANY KIND, EXPRESS OR
    IMPLIED, INCLUDING BUT NOT LIMITED TO THE WARRANTIES OF MERCHANTABILITY,
    FITNESS FOR A PARTICULAR PURPOSE AND NONINFRINGEMENT. IN NO EVENT SHALL THE
    AUTHORS OR COPYRIGHT HOLDERS BE LIABLE FOR ANY CLAIM, DAMAGES OR OTHER
    LIABILITY, WHETHER IN AN ACTION OF CONTRACT, TORT OR OTHERWISE, ARISING FROM,
    OUT OF OR IN CONNECTION WITH THE SOFTWARE OR THE USE OR OTHER DEALINGS IN
    THE SOFTWARE.
*/

#include <Wire.h>
#include <Digital_Light_TSL2561.h>
void setup()
{
  Wire.begin();
  Serial.begin(9600);
  TSL2561.init();
}

void loop()
{
  Serial.print("The Light value is: ");
  Serial.println(TSL2561.readVisibleLux());
  delay(1000);
}
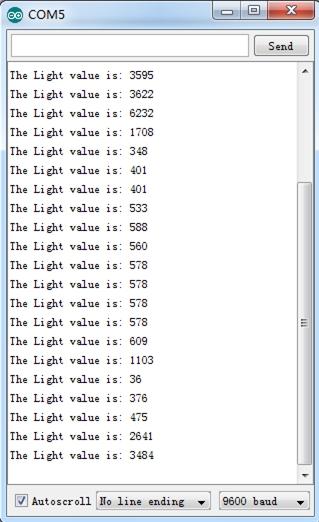
- Paso 4. Abre el monitor serie para monitorear el resultado.
Jugar Con Raspberry Pi
Hardware
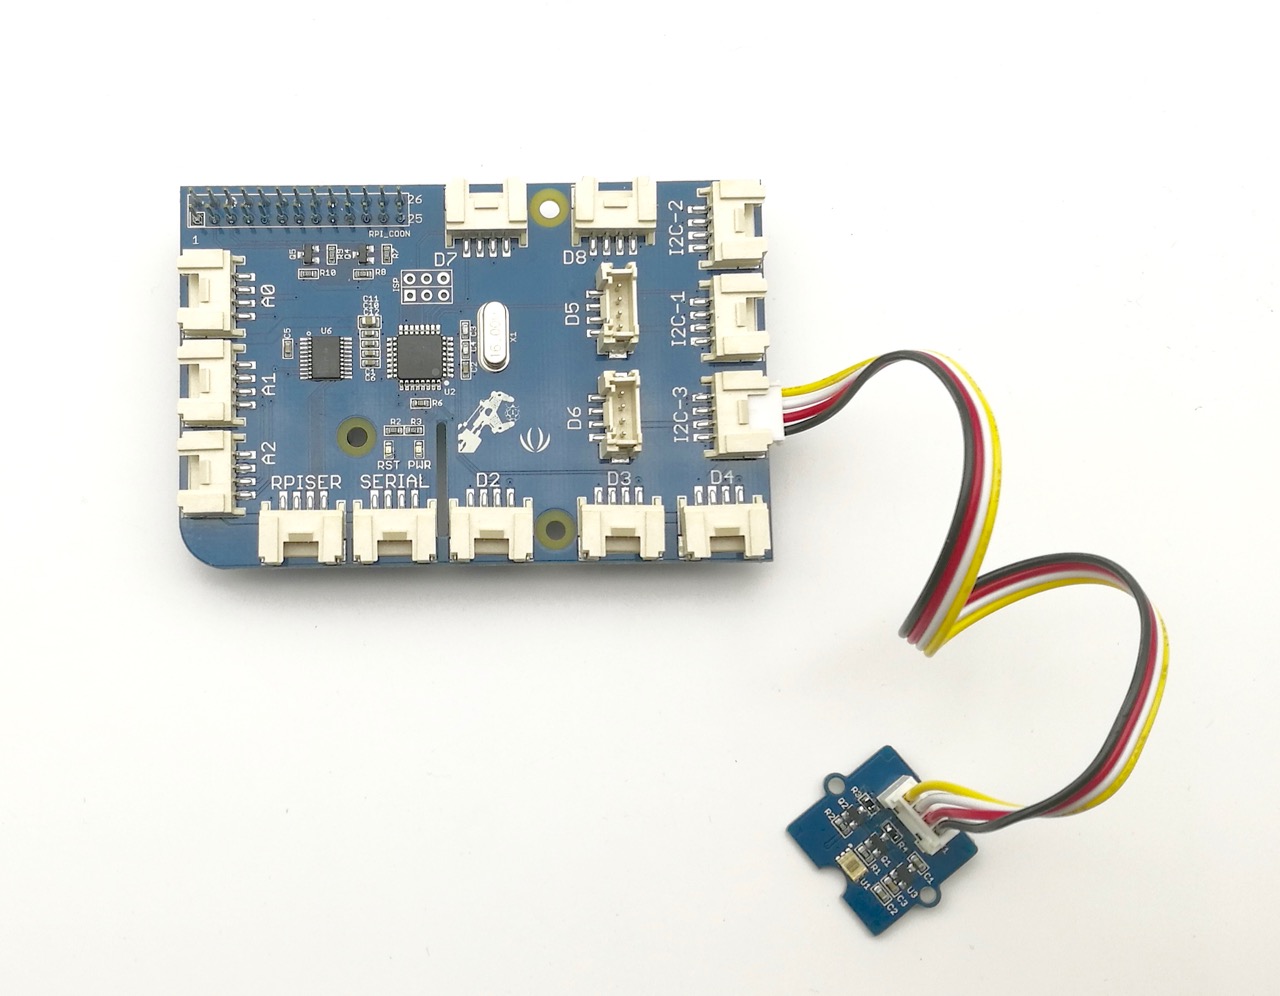
- Paso 1. Prepara los siguientes elementos:
| Raspberry pi | GrovePi_Plus | Grove - Sensor de luz digital |
|---|---|---|
 |  | |
| Consigue UNO Ahora | Consigue UNO Ahora | Consigue UNO Ahora |
- Sigue las instrucciones para configurar el entorno de desarrollo.
- Conecta el sensor al socket I2C del grovepi+ usando un cable grove.
Software
Si estás usando Raspberry Pi con Raspberrypi OS >= Bullseye, tienes que usar esta línea de comandos solo con Python3.
-
Paso 1. Sigue Configuración de Software para configurar el entorno de desarrollo.
-
Paso 1. Navega al directorio de las demos:
cd yourpath/GrovePi/Software/Python/grove_i2c_digital_light_sensor/
- Paso 2. Para ver el código
nano grove_i2c_digital_light_sensor.py # "Ctrl+x" to exit #
#!/usr/bin/python
# TSL2561 I2C Light-To-Digital converter library for the Raspberry Pi.
# Datasheet: https://www.adafruit.com/datasheets/TSL2561.pdf
#
# This library is based on the work by Cedric Maion https://github.com/cmaion/TSL2561
#
# Read http://www.dexterindustries.com/topic/greehouse-project/ for the forum discussion about the sensor

from time import sleep
import smbus
from Adafruit_I2C import Adafruit_I2C
import RPi.GPIO as GPIO
from smbus import SMBus

TSL2561_Control = 0x80
TSL2561_Timing = 0x81
TSL2561_Interrupt = 0x86
TSL2561_Channel0L = 0x8C
TSL2561_Channel0H = 0x8D
TSL2561_Channel1L = 0x8E
TSL2561_Channel1H = 0x8F

TSL2561_Address = 0x29 #device address

LUX_SCALE = 14 # scale by 2^14
RATIO_SCALE = 9 # scale ratio by 2^9
CH_SCALE = 10 # scale channel values by 2^10
CHSCALE_TINT0 = 0x7517 # 322/11 * 2^CH_SCALE
CHSCALE_TINT1 = 0x0fe7 # 322/81 * 2^CH_SCALE

K1T = 0x0040 # 0.125 * 2^RATIO_SCALE
B1T = 0x01f2 # 0.0304 * 2^LUX_SCALE
M1T = 0x01be # 0.0272 * 2^LUX_SCALE
K2T = 0x0080 # 0.250 * 2^RATIO_SCA
B2T = 0x0214 # 0.0325 * 2^LUX_SCALE
M2T = 0x02d1 # 0.0440 * 2^LUX_SCALE
K3T = 0x00c0 # 0.375 * 2^RATIO_SCALE
B3T = 0x023f # 0.0351 * 2^LUX_SCALE
M3T = 0x037b # 0.0544 * 2^LUX_SCALE
K4T = 0x0100 # 0.50 * 2^RATIO_SCALE
B4T = 0x0270 # 0.0381 * 2^LUX_SCALE
M4T = 0x03fe # 0.0624 * 2^LUX_SCALE
K5T = 0x0138 # 0.61 * 2^RATIO_SCALE
B5T = 0x016f # 0.0224 * 2^LUX_SCALE
M5T = 0x01fc # 0.0310 * 2^LUX_SCALE
K6T = 0x019a # 0.80 * 2^RATIO_SCALE
B6T = 0x00d2 # 0.0128 * 2^LUX_SCALE
M6T = 0x00fb # 0.0153 * 2^LUX_SCALE
K7T = 0x029a # 1.3 * 2^RATIO_SCALE
B7T = 0x0018 # 0.00146 * 2^LUX_SCALE
M7T = 0x0012 # 0.00112 * 2^LUX_SCALE
K8T = 0x029a # 1.3 * 2^RATIO_SCALE
B8T = 0x0000 # 0.000 * 2^LUX_SCALE
M8T = 0x0000 # 0.000 * 2^LUX_SCALE


K1C = 0x0043 # 0.130 * 2^RATIO_SCALE
B1C = 0x0204 # 0.0315 * 2^LUX_SCALE
M1C = 0x01ad # 0.0262 * 2^LUX_SCALE
K2C = 0x0085 # 0.260 * 2^RATIO_SCALE
B2C = 0x0228 # 0.0337 * 2^LUX_SCALE
M2C = 0x02c1 # 0.0430 * 2^LUX_SCALE
K3C = 0x00c8 # 0.390 * 2^RATIO_SCALE
B3C = 0x0253 # 0.0363 * 2^LUX_SCALE
M3C = 0x0363 # 0.0529 * 2^LUX_SCALE
K4C = 0x010a # 0.520 * 2^RATIO_SCALE
B4C = 0x0282 # 0.0392 * 2^LUX_SCALE
M4C = 0x03df # 0.0605 * 2^LUX_SCALE
K5C = 0x014d # 0.65 * 2^RATIO_SCALE
B5C = 0x0177 # 0.0229 * 2^LUX_SCALE
M5C = 0x01dd # 0.0291 * 2^LUX_SCALE
K6C = 0x019a # 0.80 * 2^RATIO_SCALE
B6C = 0x0101 # 0.0157 * 2^LUX_SCALE
M6C = 0x0127 # 0.0180 * 2^LUX_SCALE
K7C = 0x029a # 1.3 * 2^RATIO_SCALE
B7C = 0x0037 # 0.00338 * 2^LUX_SCALE
M7C = 0x002b # 0.00260 * 2^LUX_SCALE
K8C = 0x029a # 1.3 * 2^RATIO_SCALE
B8C = 0x0000 # 0.000 * 2^LUX_SCALE
M8C = 0x0000 # 0.000 * 2^LUX_SCALE

# bus parameters
rev = GPIO.RPI_REVISION
if rev == 2 or rev == 3:
 bus = smbus.SMBus(1)
else:
 bus = smbus.SMBus(0)
i2c = Adafruit_I2C(TSL2561_Address)

debug = False
cooldown_time = 0.005 # measured in seconds
packageType = 0 # 0=T package, 1=CS package
gain = 0        # current gain: 0=1x, 1=16x [dynamically selected]
gain_m = 1      # current gain, as multiplier
timing = 2      # current integration time: 0=13.7ms, 1=101ms, 2=402ms [dynamically selected]
timing_ms = 0   # current integration time, in ms
channel0 = 0    # raw current value of visible+ir sensor
channel1 = 0    # raw current value of ir sensor
schannel0 = 0   # normalized current value of visible+ir sensor
schannel1 = 0   # normalized current value of ir sensor


def readRegister(address):
 try:
  byteval = i2c.readU8(address)

  sleep(cooldown_time)
  if (debug):
   print("TSL2561.readRegister: returned 0x%02X from reg 0x%02X" % (byteval, address))
  return byteval
 except IOError:
  print("TSL2561.readRegister: error reading byte from reg 0x%02X" % address)
  return -1


def writeRegister(address, val):
 try:
  i2c.write8(address, val)

  sleep(cooldown_time)
  if (debug):
   print("TSL2561.writeRegister: wrote 0x%02X to reg 0x%02X" % (val, address))
 except IOError:

  sleep(cooldown_time)
  print("TSL2561.writeRegister: error writing byte to reg 0x%02X" % address)
  return -1

def powerUp():
 writeRegister(TSL2561_Control, 0x03)

def powerDown():
 writeRegister(TSL2561_Control, 0x00)

def setTintAndGain():
 global gain_m, timing_ms

 if gain == 0:
  gain_m = 1
 else:
  gain_m = 16

 if timing == 0:
  timing_ms = 13.7
 elif timing == 1:
  timing_ms = 101
 else:
  timing_ms = 402
 writeRegister(TSL2561_Timing, timing | gain << 4)

def readLux():
 sleep(float(timing_ms + 1) / 1000)

 ch0_low  = readRegister(TSL2561_Channel0L)
 ch0_high = readRegister(TSL2561_Channel0H)
 ch1_low  = readRegister(TSL2561_Channel1L)
 ch1_high = readRegister(TSL2561_Channel1H)

 global channel0, channel1
 channel0 = (ch0_high<<8) | ch0_low
 channel1 = (ch1_high<<8) | ch1_low

 sleep(cooldown_time)
 if debug:
  print("TSL2561.readVisibleLux: channel 0 = %i, channel 1 = %i [gain=%ix, timing=%ims]" % (channel0, channel1, gain_m, timing_ms))

def readVisibleLux():
 global timing, gain

 powerUp()
 readLux()

 if channel0 < 500 and timing == 0:
  timing = 1
  sleep(cooldown_time)
  if debug:
   print("TSL2561.readVisibleLux: too dark. Increasing integration time from 13.7ms to 101ms")
  setTintAndGain()
  readLux()

 if channel0 < 500 and timing == 1:
  timing = 2
  sleep(cooldown_time)
  if debug:
   print("TSL2561.readVisibleLux: too dark. Increasing integration time from 101ms to 402ms")
  setTintAndGain()
  readLux()

 if channel0 < 500 and timing == 2 and gain == 0:
  gain = 1
  sleep(cooldown_time)
  if debug:
   print("TSL2561.readVisibleLux: too dark. Setting high gain")
  setTintAndGain()
  readLux()

 if (channel0 > 20000 or channel1 > 20000) and timing == 2 and gain == 1:
  gain = 0
  sleep(cooldown_time)
  if debug:
   print("TSL2561.readVisibleLux: enough light. Setting low gain")
  setTintAndGain()
  readLux()

 if (channel0 > 20000 or channel1 > 20000) and timing == 2:
  timing = 1
  sleep(cooldown_time)
  if debug:
   print("TSL2561.readVisibleLux: enough light. Reducing integration time from 402ms to 101ms")
  setTintAndGain()
  readLux()

 if (channel0 > 10000 or channel1 > 10000) and timing == 1:
  timing = 0
  sleep(cooldown_time)
  if debug:
   print("TSL2561.readVisibleLux: enough light. Reducing integration time from 101ms to 13.7ms")
  setTintAndGain()
  readLux()

 powerDown()

 if (timing == 0 and (channel0 > 5000 or channel1 > 5000)) or (timing == 1 and (channel0 > 37000 or channel1 > 37000)) or (timing == 2 and (channel0 > 65000 or channel1 > 65000)):
  # overflow
  return -1

 return calculateLux(channel0, channel1)

def calculateLux(ch0, ch1):
 chScale = 0
 if timing == 0:   # 13.7 msec
  chScale = CHSCALE_TINT0
 elif timing == 1: # 101 msec
  chScale = CHSCALE_TINT1;
 else:           # assume no scaling
  chScale = (1 << CH_SCALE)

 if gain == 0:
  chScale = chScale << 4 # scale 1X to 16X

 # scale the channel values
 global schannel0, schannel1
 schannel0 = (ch0 * chScale) >> CH_SCALE
 schannel1 = (ch1 * chScale) >> CH_SCALE

 ratio = 0
 if schannel0 != 0:
  ratio = (schannel1 << (RATIO_SCALE+1)) / schannel0
 ratio = (ratio + 1) >> 1

 if packageType == 0: # T package
  if ((ratio >= 0) and (ratio <= K1T)):
   b=B1T; m=M1T;
  elif (ratio <= K2T):
   b=B2T; m=M2T;
  elif (ratio <= K3T):
   b=B3T; m=M3T;
  elif (ratio <= K4T):
   b=B4T; m=M4T;
  elif (ratio <= K5T):
   b=B5T; m=M5T;
  elif (ratio <= K6T):
   b=B6T; m=M6T;
  elif (ratio <= K7T):
   b=B7T; m=M7T;
  elif (ratio > K8T):
   b=B8T; m=M8T;
 elif packageType == 1: # CS package
  if ((ratio >= 0) and (ratio <= K1C)):
   b=B1C; m=M1C;
  elif (ratio <= K2C):
   b=B2C; m=M2C;
  elif (ratio <= K3C):
   b=B3C; m=M3C;
  elif (ratio <= K4C):
   b=B4C; m=M4C;
  elif (ratio <= K5C):
   b=B5C; m=M5C;
  elif (ratio <= K6C):
   b=B6C; m=M6C;
  elif (ratio <= K7C):
   b=B7C; m=M7C;

 temp = ((schannel0*b)-(schannel1*m))
 if temp < 0:
  temp = 0;
 temp += (1<<(LUX_SCALE-1))
 # strip off fractional portion
 lux = temp>>LUX_SCALE
 sleep(cooldown_time)
 if debug:
  print("TSL2561.calculateLux: %i" % lux)

 return lux

def init():
 powerUp()
 setTintAndGain()
 writeRegister(TSL2561_Interrupt, 0x00)
 powerDown()

def main():
 init()
 while (True):
  print("Lux: %i [Vis+IR=%i, IR=%i @ Gain=%ix, Timing=%.1fms]" % (readVisibleLux(), channel0, channel1, gain_m, timing_ms))
  sleep(1)

if __name__ == "__main__":
        main()
- Paso 3. Ejecuta la demostración.
sudo python3 grove_i2c_digital_light_sensor.py
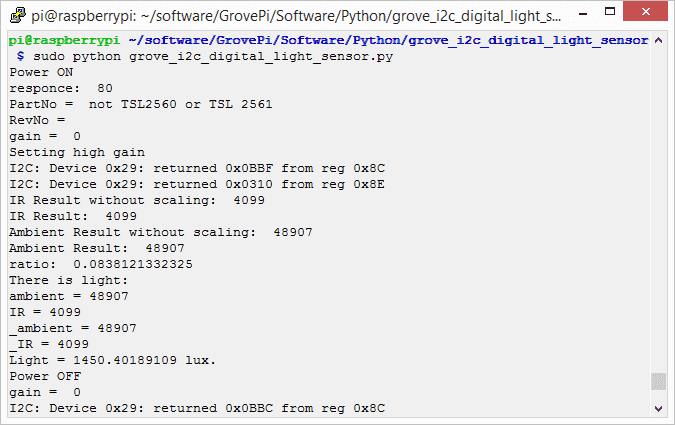
- Paso 4. Aquí está el Resultado.
Visor de Esquemático en Línea
Recursos
- [Eagle] Grove - Esquemático del Sensor de Luz Digital
- [PDF] Grove - Archivo PDF del Esquemático del Sensor de Luz Digital
- [PDF] Grove - Archivo PDF del PCB del Sensor de Luz Digital
- [Library] Librería Github Grove-Digital Light
- [Datasheet] Hoja de Datos TSL2561
Proyectos
Solución Seeed LoRa IoTea: Un sistema automático de recolección de información aplicado a plantaciones de té. Es parte de la recolección inteligente de información agrícola.
Controlador Hidropónico IoT Intel Edison: Un Controlador de Hidroponía habilitado para IoT usando el Intel Edison durante el Boston IoT Hackathon.
COI - Medidor de Transmisión de Luz: El producto terminado usa el sensor de luz proporcionado en el Grove Starter Kit Plus para medir cambios en la intensidad de luz.
Soporte Técnico y Discusión de Productos
¡Gracias por elegir nuestros productos! Estamos aquí para brindarle diferentes tipos de soporte para asegurar que su experiencia con nuestros productos sea lo más fluida posible. Ofrecemos varios canales de comunicación para atender diferentes preferencias y necesidades.