Grove - GPS
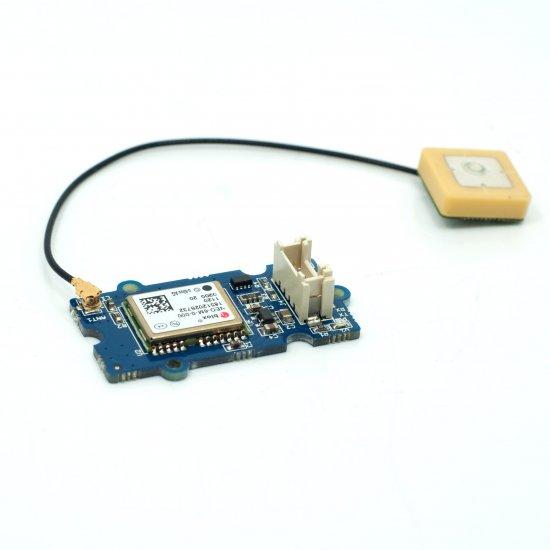
Este módulo Grove - GPS es un dispositivo rentable y programable en campo equipado con un SIM28 (u-blox 6 es la versión anterior) y configuración de comunicación serie. Cuenta con un receptor GPS de 22 canales de seguimiento / 66 canales de adquisición. La sensibilidad tanto de seguimiento como de adquisición alcanzan hasta -160dBm, convirtiéndolo en una excelente opción para proyectos de navegación personal y servicios de localización, así como en un producto destacado entre los de su misma clase de precio.
Hemos lanzado la Guía de Selección de Módulos GPS de Seeed, te ayudará a elegir el Módulo GPS que mejor se adapte a tus necesidades.
Versión
| Versión del Producto | Cambios | Fecha de Lanzamiento |
|---|---|---|
| Grove - GPS V1.2 | Inicial | Oct 2015 |
Características
- Soporta protocolos NMEA y u-blox 6. (Hasta el 10 de enero de 2014, después de esa fecha SIM28 en su lugar)
- Bajo consumo de energía
- Velocidades de baudios configurables
- Interfaz compatible con Grove
Más detalles sobre los módulos Grove consulte Sistema Grove
Especificaciones
| Parámetro | Rango/Valor |
|---|---|
| Voltaje de Entrada | 3.3/5V |
| Velocidad de Baudios | 4800 - 57600(versión u-blox) |
| Velocidad de Baudios | 9600 - 115200(versión SIM28) |
| Velocidad de Baudios por Defecto | 9600 |
Plataformas Compatibles
| Arduino | Raspberry Pi | |||
|---|---|---|---|---|
Las plataformas mencionadas anteriormente como compatibles son una indicación de la compatibilidad de software o teórica del módulo. Solo proporcionamos biblioteca de software o ejemplos de código para la plataforma Arduino en la mayoría de los casos. No es posible proporcionar biblioteca de software / código de demostración para todas las plataformas MCU posibles. Por lo tanto, los usuarios tienen que escribir su propia biblioteca de software.
Primeros Pasos
Si esta es la primera vez que trabajas con Arduino, te recomendamos firmemente que veas Primeros Pasos con Arduino antes de comenzar.
Jugar con Arduino
Esta muestra simplemente lee del GPS usando serial por software y lo envía de vuelta al puerto serie.
Hardware
- Paso 1. Prepara los siguientes elementos:
| Seeeduino V4.2 | Base Shield | Grove - GPS |
|---|---|---|
 |  |  |
| Obtener Uno Ahora | Obtener Uno Ahora | Obtener Uno Ahora |
- Paso 2. Conecta Grove - GPS al puerto D2 del Grove-Base Shield.
- Paso 3. Conecta Grove - Base Shield al Seeeduino.
- Paso 4. Conecta Seeeduino a la PC mediante un cable USB.

Si no tenemos Grove Base Shield, también podemos conectar directamente Grove - GPS al Seeeduino como se muestra a continuación.
| Seeeduino | Grove - GPS |
|---|---|
| 5V | Rojo |
| GND | Negro |
| D3 | Blanco |
| D2 | Amarillo |
Software
Ten en cuenta que el software u-center es solo para Windows.
- Paso 1. Instala el software u-center.
- Paso 2. Copia el código en Arduino IDE y súbelo. Si no sabes cómo subir el código, consulta cómo subir código.
#include <SoftwareSerial.h>
SoftwareSerial SoftSerial(2, 3);
unsigned char buffer[64];                   // buffer array for data receive over serial port
int count=0;                                // counter for buffer array
void setup()
{
    SoftSerial.begin(9600);                 // the SoftSerial baud rate
    Serial.begin(9600);                     // the Serial port of Arduino baud rate.
}

void loop()
{
    if (SoftSerial.available())                     // if date is coming from software serial port ==> data is coming from SoftSerial shield
    {
        while(SoftSerial.available())               // reading data into char array
        {
            buffer[count++]=SoftSerial.read();      // writing data into array
            if(count == 64)break;
        }
        Serial.write(buffer,count);                 // if no data transmission ends, write buffer to hardware serial port
        clearBufferArray();                         // call clearBufferArray function to clear the stored data from the array
        count = 0;                                  // set counter of while loop to zero
    }
    if (Serial.available())                 // if data is available on hardware serial port ==> data is coming from PC or notebook
    SoftSerial.write(Serial.read());        // write it to the SoftSerial shield
}


void clearBufferArray()                     // function to clear buffer array
{
    for (int i=0; i<count;i++)
    {
        buffer[i]=NULL;
    }                      // clear all index of array with command NULL
}
-
Paso 3. Abrir U-center.
-
Paso 4. Hacer clic en Receiver -> Port y seleccionar el puerto COM que está usando el Arduino.
-
Paso 5. Hacer clic en Receiver -> Baudrate y asegurarse de que esté seleccionado 9600.
-
Paso 6. Hacer clic en View -> Text Console y deberías obtener una ventana que transmitirá datos NMEA.
-
Paso 7. Abrir el monitor serie, puedes ver como se muestra a continuación:

También podemos ver los datos en Google Earth:
-
Paso 1. Hacer clic en File -> Database Export -> Google Earth KML
-
Paso 2. Esto debería iniciar Google Earth con el historial que fue capturado por u-center.
-
Paso 3. Alternativamente, los datos pueden ser grabados presionando el círculo rojo en la barra de herramientas que luego preguntará dónde quieres guardar la grabación.
-
Paso 4. Cuando hayamos capturado suficientes datos, hacer clic en el cuadrado negro para detener la grabación.
-
Paso 5. Luego podemos convertir el archivo .ubx generado a KML subiendo el archivo ubx a GPSVisualizer.
Jugar Con Raspberry Pi
Hardware
- Paso 1. Preparar las siguientes cosas:
| Raspberry pi | GrovePi_Plus | Grove - GPS |
|---|---|---|
 |  | |
| Obtener Uno Ahora | Obtener Uno Ahora | Obtener Uno Ahora |
- Paso 2. Conecta el GrovePi_Plus al Raspberry.
- Paso 3. Conecta el sensor al socket RPISER del grovepi+ usando un cable grove.
- Paso 4. Conecta el Raspberry a la PC a través del cable USB.

Software
-
Paso 1. Sigue Setting Software para configurar el entorno de desarrollo.
-
Paso 2. Navega al directorio de las demos:
cd ~
git clone https://github.com/DexterInd/GrovePi.git
cd GrovePi/Software/Python/grove_gps
- Paso 3. Para ver el código
nano grove_gps_data.py # "Ctrl+x" to exit #
import serial, time
import smbus
import math
import RPi.GPIO as GPIO
import struct
import sys
#import ir_receiver_check

enable_debug=1
enable_save_to_file=0

#if ir_receiver_check.check_ir():
# print("Disable IR receiver before continuing")
# exit()

ser = serial.Serial('/dev/ttyAMA0',  9600, timeout = 0) #Open the serial port at 9600 baud
ser.flush()

def cleanstr(in_str):
 out_str = "".join([c for c in in_str if c in "0123456789.-" ])
 if len(out_str)==0:
  out_str = "-1"
 return out_str

def safefloat(in_str):
 try:
  out_str = float(in_str)
 except ValueError:
  out_str = -1.0
 return out_str

class GPS:
 #The GPS module used is a Grove GPS module https://www.seeedstudio.com/depot/Grove-GPS-p-959.html
 inp=[]
 # Refer to SIM28 NMEA spec file https://www.seeedstudio.com/wiki/images/a/a0/SIM28_DATA_File.zip
 GGA=[]


 #Read data from the GPS
 def read(self):
  while True:
   GPS.inp=ser.readline()
   if GPS.inp[:6] =='$GPGGA': # GGA data , packet 1, has all the data we need
    break
   time.sleep(0.1)     #without the cmd program will crash
  try:
   ind=GPS.inp.index('$GPGGA',5,len(GPS.inp)) #Sometimes multiple GPS data packets come into the stream. Take the data only after the last '$GPGGA' is seen
   GPS.inp=GPS.inp[ind:]
  except ValueError:
   print ("")
  GPS.GGA=GPS.inp.split(",") #Split the stream into individual parts
  return [GPS.GGA]

 #Split the data into individual elements
 def vals(self):
  if enable_debug:
   print(GPS.GGA)

  time=GPS.GGA[1]

  if GPS.GGA[2]=='':  # latitude. Technically a float
   lat =-1.0
  else:
   lat=safefloat(cleanstr(GPS.GGA[2]))

  if GPS.GGA[3]=='':  # this should be either N or S
   lat_ns=""
  else:
   lat_ns=str(GPS.GGA[3])

  if  GPS.GGA[4]=='':  # longitude. Technically a float
   long=-1.0
  else:
   long=safefloat(cleanstr(GPS.GGA[4]))

  if  GPS.GGA[5]=='': # this should be either W or E
   long_ew=""
  else:
   long_ew=str(GPS.GGA[5])

  fix=int(cleanstr(GPS.GGA[6]))
  sats=int(cleanstr(GPS.GGA[7]))

  if  GPS.GGA[9]=='':
   alt=-1.0
  else:
   # change to str instead of float
   # 27"1 seems to be a valid value
   alt=str(GPS.GGA[9])
  return [time,fix,sats,alt,lat,lat_ns,long,long_ew]

 # Convert to decimal degrees
 def decimal_degrees(self, raw_degrees):
  try:
   degrees = float(raw_degrees) // 100
   d = float(raw_degrees) % 100 / 60
   return degrees + d
  except:
   return raw_degrees


if __name__ == "__main__":
 g=GPS()
 if enable_save_to_file:
  f=open("gps_data.csv",'w') #Open file to log the data
  f.write("name,latitude,longitude\n") #Write the header to the top of the file
 ind=0
 while True:
  time.sleep(0.01)
  try:
   x=g.read() #Read from GPS
   [t,fix,sats,alt,lat,lat_ns,longitude,long_ew]=g.vals() #Get the individial values

   # Convert to decimal degrees
   if lat !=-1.0:
    lat = g.decimal_degrees(safefloat(lat))
    if lat_ns == "S":
     lat = -lat

   if longitude !=-1.0:
    longitude = g.decimal_degrees(safefloat(longitude))
    if long_ew == "W":
     longitude = -longitude

   # print ("Time:",t,"Fix status:",fix,"Sats in view:",sats,"Altitude",alt,"Lat:",lat,lat_ns,"Long:",long,long_ew)
   try:
    print("Time\t\t: %s\nFix status\t: %d\nSats in view\t: %d\nAltitude\t: %s\nLat\t\t: %f\nLong\t\t: %f") %(t,fix,sats,alt,lat,longitude)
   except:
    print("Time\t\t: %s\nFix status\t: %s\nSats in view\t: %s\nAltitude\t: %s\nLat\t\t: %s\nLong\t\t: %s") %(t,str(fix),str(sats),str(alt),str(lat),str(longitude))

   s=str(t)+","+str(safefloat(lat)/100)+","+str(safefloat(longitude)/100)+"\n"

   if enable_save_to_file:
    f.write(s) #Save to file
   time.sleep(2)
  except IndexError:
   print ("Unable to read")
  except KeyboardInterrupt:
   if enable_save_to_file:
    f.close()
   print ("Exiting")
   sys.exit(0)
- Paso 4. Ejecuta la demostración.
sudo python grove_gps_data.py
Nota
GPS funciona mejor al aire libre. Se recomienda colocar tu raspberry pi fuera de la ventana o en cualquier lugar al aire libre.Nota del módulo SIM28
- Paso 1. Grove-GPS ha cambiado el módulo por SIM28 que tiene la misma huella que la versión original.
- Paso 2. Debemos usar las herramientas "SIMCom GPS DEMO" para recibir los datos del módulo SIM28.
- Paso 3. Abrir las herramientas SIMCom_GPS_DEMO, ir a Module->properties->module->seleccionar SIM28.
- Paso 4. SIMCom_GPS_DEMO_V1.07 es solo para Windows.

- Paso 5. Abrir las herramientas SIMCom_GPS_DEMO, ir a Module->connect. Seleccionar el puerto serie que usa el módulo GPS.

Visor de Esquemático en Línea
Recursos
- [Eagle] Archivo Eagle de Grove-GPS
- [PDF] Esquemático GPS(PDF)
- [Hoja de datos] Hoja de datos E-1612-UB
- [Hoja de datos] Especificación de protocolo de descripción del receptor U-Blox6
- [Software] Software de evaluación GPS U-Blox u-center
- [Documento] Archivo de datos SIM28
- [Documento] SIMCom_GPS_DEMO_V1.07
Proyectos
Proyecto de rastreador GPS/GPRS: En este nuevo proyecto presentaremos nuestro rastreador GPS conectado usando la técnica GPRS y el protocolo MQTT.
Soporte técnico y discusión de productos
¡Gracias por elegir nuestros productos! Estamos aquí para brindarle diferentes tipos de soporte para asegurar que su experiencia con nuestros productos sea lo más fluida posible. Ofrecemos varios canales de comunicación para satisfacer diferentes preferencias y necesidades.