Grove - Temperature Sensor

El Grove - Temperature Sensor utiliza un Termistor para detectar la temperatura ambiente. La resistencia de un termistor aumentará cuando la temperatura ambiente disminuya. Es esta característica la que utilizamos para calcular la temperatura ambiente. El rango detectable de este sensor es -40 - 125ºC, y la precisión es ±1.5ºC.

Especificaciones
-
Voltaje: 3.3 ~ 5V
-
Potencia máxima nominal a 25℃: 300mW
-
Resistencia de potencia cero: 10 KΩ
-
Rango de temperatura de funcionamiento: -40 ~ +125 ℃
Demostración
Con Arduino
Aquí hay un ejemplo para mostrarte cómo leer información de temperatura del sensor.
-
Conecta el módulo al puerto Analógico 0 del Grove - Basic Shield usando el cable grove de 4 pines.
-
Conecta el Grove - Basic Shield al Arduino.
-
Conecta Arduino a la PC usando un cable USB.

- Sube el código de abajo. Por favor haz clic aquí si no sabes cómo subir código.
/*
/* Grove - Temperature Sensor demo v1.0
* This sensor detects the environment temperature,
* Connect the signal of this sensor to A0, use the
* Serial monitor to get the result.
* By: https://www.seeedstudio.com
*/
#include <math.h>
int a;
float temperature;
int B=3975; //B value of the thermistor
float resistance;
void setup()
{
Serial.begin(9600);
}
void loop()
{
a=analogRead(0);
resistance=(float)(1023-a)*10000/a; //get the resistance of the sensor;
temperature=1/(log(resistance/10000)/B+1/298.15)-273.15;//convert to temperature via datasheet ;
delay(1000);
Serial.print("Current temperature is ");
Serial.println(temperature);
}
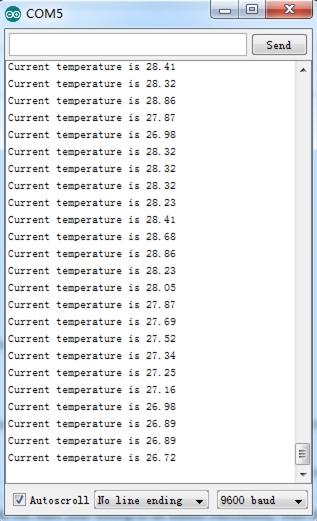
- Puedes verificar las lecturas a través del Monitor Serie. La unidad predeterminada es grados Celsius.
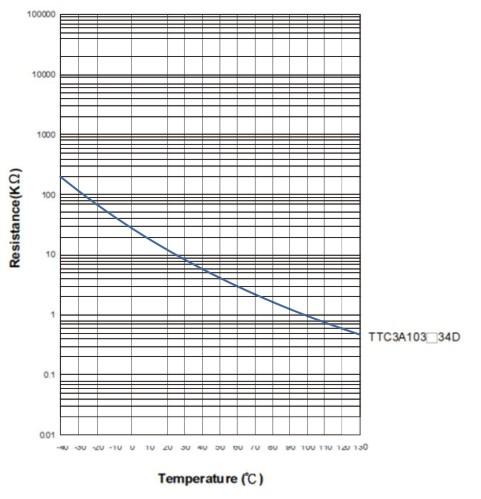
Como referencia, la siguiente es la curva de resistencia del TTC3A103*39H, el termistor que utilizamos en este sensor. Mientras más alta sea la temperatura, menor se vuelve la resistencia.
Con Raspberry Pi
1.Deberías tener una raspberry pi y un grovepi o grovepi+.
2.Deberías haber completado la configuración del entorno de desarrollo, de lo contrario sigue aquí.
3.Conexión
- Conecta el sensor al socket D3 del grovepi usando un cable grove.
4.Navega al directorio de las demos:
cd yourpath/GrovePi/Software/Python/
- Para ver el código
nano grove_temperature_sensor.py # "Ctrl+x" to exit #
import time
import grovepi

# Connect the Grove Temperature Sensor to analog port A0
# SIG,NC,VCC,GND
sensor = 0

while True:
try:
temp = grovepi.temp(sensor,'1.1')
print "temp =", temp
time.sleep(.5)

except KeyboardInterrupt:
break
except IOError:
print "Error"
5.Run the demo.
sudo python grove_temperature_sensor.py
Con Beaglebone Green
Para comenzar a editar programas que residen en BBG, puedes usar el IDE Cloud9.
Como un ejercicio simple para familiarizarse con el IDE Cloud9, crear una aplicación simple para hacer parpadear uno de los 4 LEDs programables por el usuario en el BeagleBone es un buen comienzo.
Si esta es tu primera vez usando el IDE Cloud9, por favor sigue este enlace.
Paso1: Haz clic en el "+" en la parte superior derecha para crear un nuevo archivo.

Paso2: Copia y pega el siguiente código en la nueva pestaña
from Adafruit_I2C import Adafruit_I2C
import time

ADDR_ADC121 = 0x50

REG_ADDR_RESULT = 0x00
REG_ADDR_ALERT = 0x01
REG_ADDR_CONFIG = 0x02
REG_ADDR_LIMITL = 0x03
REG_ADDR_LIMITH = 0x04
REG_ADDR_HYST = 0x05
REG_ADDR_CONVL = 0x06
REG_ADDR_CONVH = 0x07

i2c = Adafruit_I2C(ADDR_ADC121)

class I2cAdc:
def __init__(self):
i2c.write8(REG_ADDR_CONFIG, 0x20)

def read_adc(self):
"Read ADC data 0-4095."
data_list = i2c.readList(REG_ADDR_RESULT, 2)
        #print 'data list', data_list
data = ((data_list[0] & 0x0f) << 8 | data_list[1]) & 0xfff
return data

if __name__ == '__main__':
    # Connect the Grove - I2C ADC to I2C Grove port of Beaglebone Green.
adc = I2cAdc()
while True:
print 'sensor value ', adc.read_adc()
time.sleep(.2)
Paso 3: Guarda el archivo haciendo clic en el icono del disco con el nombre "grove_i2c_adc.py".
Paso 4: Crea un nuevo archivo. Copia el siguiente código en la nueva pestaña y guárdalo con la extensión .py.
import time
import math
import grove_i2c_adc
import Adafruit_BBIO.GPIO as GPIO

BUZZER = "P9_22"            # GPIO P9_22
GPIO.setup(BUZZER, GPIO.OUT)

# The threshold to turn the buzzer on 28 Celsius
THRESHOLD_TEMPERATURE = 28

adc = grove_i2c_adc.I2cAdc()

#   The argument in the read_temperature() method defines which Grove board(Grove Temperature Sensor) version you have connected.
#   Defaults to 'v1.2'. eg.
#       temp = read_temperature('v1.0')          # B value = 3975
#       temp = read_temperature('v1.1')          # B value = 4250
#       temp = read_temperature('v1.2')          # B value = 4250
def read_temperature(model = 'v1.2'):
"Read temperature values in Celsius from Grove Temperature Sensor"
    # each of the sensor revisions use different thermistors, each with their own B value constant
if model == 'v1.2':
bValue = 4250  # sensor v1.2 uses thermistor ??? (assuming NCP18WF104F03RC until SeeedStudio clarifies)
elif model == 'v1.1':
bValue = 4250  # sensor v1.1 uses thermistor NCP18WF104F03RC
else:
bValue = 3975  # sensor v1.0 uses thermistor TTC3A103*39H

total_value = 0
for index in range(20):
sensor_value = adc.read_adc()
total_value += sensor_value
time.sleep(0.05)
average_value = float(total_value / 20)

    # Transform the ADC data into the data of Arduino platform.
sensor_value_tmp = (float)(average_value / 4095 * 2.95 * 2 / 3.3 * 1023)
resistance = (float)(1023 - sensor_value_tmp) * 10000 / sensor_value_tmp
temperature = round((float)(1 / (math.log(resistance / 10000) / bValue + 1 / 298.15) - 273.15), 2)
return temperature

# Function: If the temperature sensor senses the temperature that is up to the threshold you set in the code, the buzzer is ringing for 1s.
# Hardware: Grove - I2C ADC, Grove - Temperature Sensor, Grove - Buzzer
# Note: Use P9_22(UART2_RXD) as GPIO.
# Connect the Grove Buzzer to UART Grove port of Beaglebone Green.
# Connect the Grove - I2C ADC to I2C Grove port of Beaglebone Green, and then connect the Grove - Temperature Sensor to Grove - I2C ADC.
if __name__ == '__main__':

while True:
try:
            # Read temperature values in Celsius from Grove Temperature Sensor
temperature = read_temperature('v1.2')

            # When the temperature reached predetermined value, buzzer is ringing.

print "temperature = ", temperature

except IOError:
print "Error"
Paso5: Conecta Grove Temperature a Grove I2C ADC que está conectado al socket Grove I2C en BBG.
Paso6: Ejecuta el código. Encontrarás que la terminal muestra el valor de Temperatura cada 2 segundos.
Visor de Esquemas en Línea
Recursos
Proyectos
¡El Cubo del Ambiente! Conoce la Tierra Bajo Ti usando Sigfox: Un cubo con todos los sensores necesarios, adecuado para una amplia gama de aplicaciones como agricultura, monitoreo, etc.
Soporte Técnico y Discusión de Productos
¡Gracias por elegir nuestros productos! Estamos aquí para brindarte diferentes tipos de soporte para asegurar que tu experiencia con nuestros productos sea lo más fluida posible. Ofrecemos varios canales de comunicación para satisfacer diferentes preferencias y necesidades.