Proyecto FRIGATE NVR con Seeed Odyssey
¿Qué es Frigate NVR?
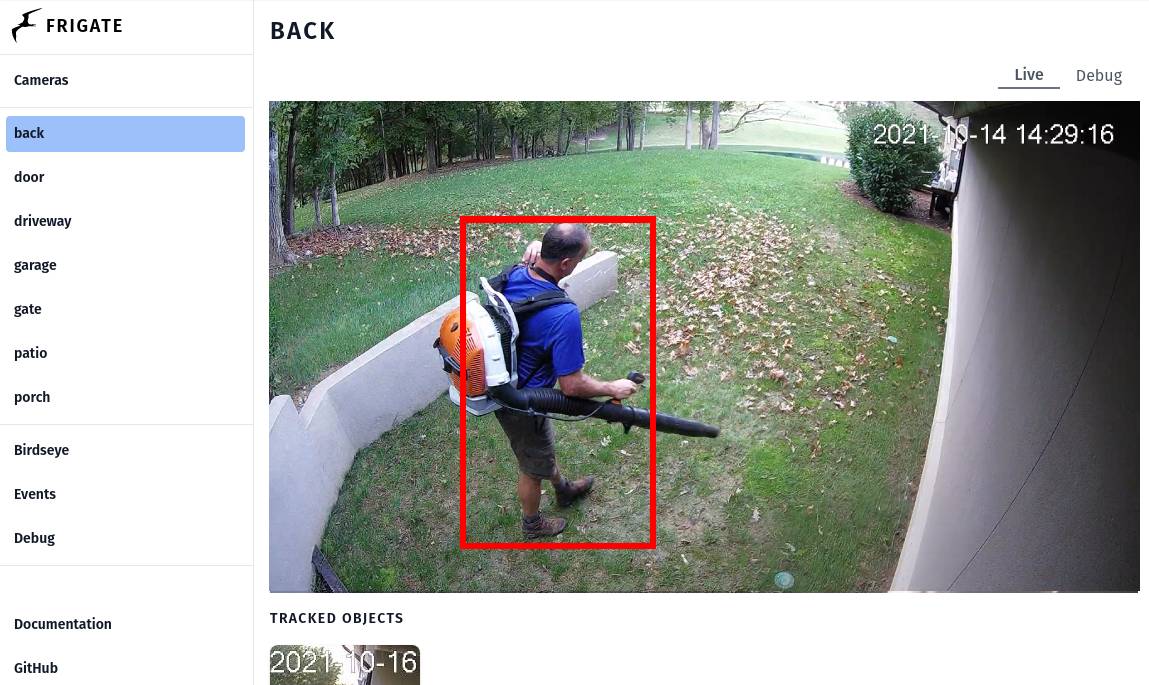
*imagen de demostración de frigate del sitio oficial de frigate
"Frigate es un NVR de código abierto construido alrededor de la detección de objetos con IA en tiempo real. Todo el procesamiento se realiza localmente en tu propio hardware, y las transmisiones de tus cámaras nunca salen de tu hogar." -- Frigate NVR
Frigate NVR es uno de los proyectos de grabador de video en red más populares que añade funciones de IA procesadas localmente a tus cámaras de seguridad, por lo tanto no solo no se te cobrará una cantidad ridícula de dinero por el servidor de inferencia en la nube, sino que también tus valiosos datos privados de transmisión de cámara no necesitarán ser expuestos al internet salvaje. Frigate puede procesar más de 100 detecciones de objetos por segundo con un solo Google Coral TPU a bordo, puedes personalizar las zonas de detección y máscaras para satisfacer tu caso de uso, también puede integrarse con Home Assistant y otras plataformas de automatización con una cantidad mínima de esfuerzo de configuración para proporcionar más características de seguridad e integrar soluciones de IA Edge a tu valiosa propiedad.
Prerrequisitos
- 1 x Odyssey Blue: Mini PC Quad Core Celeron J4125 con SSD externo de 128GB
- 1 x Coral USB Accelerator (opcional)
- Transmisión de cámara(s) RTSP
- Teclado y pantalla HDMI
Asegúrate de que Odyssey Blue esté conectado a la misma red o tenga acceso a tu cámara web RTSP.
Comenzando
En esta guía, te mostraremos cómo configurar el entorno docker de Frigate para realizar detección de IA local en la transmisión de cámara RTSP en Seeed Studio Odyssey Blue con Coral USB Accelerator, para la configuración del complemento de home assistant, ¡¡mantente atento!!
PASO 1: Asegúrate de haber instalado Debian 11 en Odyssey Blue
Por favor, procede a descargar la imagen del SO Debian 11 y sigue esta guía de configuración para instalar el Sistema Operativo Debian 11 en Odyssey Blue.
PASO 2: Asegúrate de haber instalado Docker Engine y Docker Compose en Debian 11
Por favor, sigue la guía Instalar Docker Engine en Debian para instalar Docker Engine y Docker Compose.
Para verificar si has instalado exitosamente Docker:
Por favor, abre la aplicación de terminal y escribe el siguiente comando:
docker -v
deberías ver la siguiente salida impresa en la terminal:

PASO 3: Crear archivo Docker de frigate
Escribe el siguiente comando en la aplicación de terminal para crear el archivo docker de frigate con el editor de texto vi:
1 mkdir ~/Documents/frigate
2 cd ~/Documents/frigate
3 vi frigate.yml
Inserta las siguientes líneas en el archivo frigate.yml para la configuración de docker-compose de frigate, y reemplaza la parte necesaria según la configuración de tu entorno.
version: "3.9"
services:
  frigate:
    container_name: frigate
    privileged: true # this may not be necessary for all setups
    restart: unless-stopped
    image: blakeblackshear/frigate:stable-amd64
    shm_size: "64mb" # update for your cameras based on calculation above
    devices:
      - /dev/bus/usb:/dev/bus/usb # passes the USB Coral, needs to be modified for other versions
      - /dev/apex_0:/dev/apex_0 # passes a PCIe Coral, follow driver instructions here https://coral.ai/docs/m2/get-started/#2a-on-linux
      - /dev/dri/renderD128 # for intel hwaccel, needs to be updated for your hardware
    volumes:
      - /etc/localtime:/etc/localtime:ro
      - /path/to/your/config.yml:/config/config.yml:ro
      - /path/to/your/storage:/media/frigate
      - type: tmpfs # Optional: 1GB of memory, reduces SSD/SD Card wear
        target: /tmp/cache
        tmpfs:
          size: 1000000000
    ports:
      - "5000:5000"
      - "1935:1935" # RTMP feeds
    environment:
      FRIGATE_RTSP_PASSWORD: "password"
Para más detalles sobre las opciones de configuración del docker-compose yaml de frigate, por favor ve a la página de documentación de frigate
En mi caso, mi frigate.yml se ve así:
version: "3.7"
services:
  frigate:
    container_name: frigate
    privileged: true # this may not be necessary for all setups
    restart: unless-stopped
    image: blakeblackshear/frigate:stable-amd64
    shm_size: "64mb" # update for your cameras based on calculation above
    devices:
      - /dev/bus/usb:/dev/bus/usb # passes the USB Coral, needs to be modified for other versions
      - /dev/apex_0:/dev/apex_0 # passes a PCIe Coral, follow driver instructions here https://coral.ai/docs/m2/get-started/#2a-on-linux
      - /dev/dri/renderD128 # for intel hwaccel, needs to be updated for your hardware
    volumes:
      - /etc/localtime:/etc/localtime:ro
      - /home/seeed/Documents/frigate/config/config.yml:/config/config.yml:ro
      - /home/seeed/Documents/frigate:/media/frigate
      - type: tmpfs # Optional: 1GB of memory, reduces SSD/SD Card wear
        target: /tmp/cache
        tmpfs:
          size: 1000000000
    ports:
      - "5000:5000"
      - "1935:1935" # RTMP feeds
    environment:
      FRIGATE_RTSP_PASSWORD: "password"
PASO 4: Crear archivo de configuración de frigate
Escribe el siguiente comando en la aplicación de terminal para crear una carpeta de configuración:
1 cd ~/Documents/frigate
2 mkdir config/
3 cd config/
Escribe el siguiente comando para crear el archivo de configuración de frigate con el editor de texto vi:
1 vi config.yml
Luego copia las siguientes líneas para la configuración mínima necesaria para que frigate funcione:
mqtt:
  host: mqtt.server.com #Please replace with a valid mqtt broker
cameras:
  back:
    ffmpeg:
      inputs:
        - path: rtsp://viewer:{FRIGATE_RTSP_PASSWORD}@10.0.10.10:554/cam/realmonitor?channel=1&subtype=2 #replace with your RTSP camera url
          roles:
            - detect
            - rtmp
    detect:
      width: 1280
      height: 720
Por favor, ve a la página de documentación de frigate en la sección de configuración para todas las opciones de configuración
En mi caso, además de la siguiente lista de configuraciones que he personalizado según mi configuración, todas las demás configuraciones se mantienen como predeterminadas:
- MQTT: broker.hivemq.com
- Detector: Coral USB Accelerator
- Cámaras: rtsp://192.168.8.34:8080/unicast
- Objeto de seguimiento: person, cup (Nota: la lista de etiquetas de objetos se puede encontrar en la página de documentación de frigate en la sección Objects)
- Grabación: cuando se detecta Person o Cup, la duración de la grabación es 2s antes de la detección y 2s después de la detección.
Así que mi config.yml se ve así:
mqtt:
  host: broker.hivemq.com # using HiveMQ MQTT Broker for testing purpose
detectors:
  # Required: name of the detector
  coral:
    # Required: type of the detector
    # Valid values are 'edgetpu' (requires device property below) and 'cpu'.
    type: edgetpu
    # Optional: device name as defined here: https://coral.ai/docs/edgetpu/multiple-edgetpu/#using-the-tensorflow-lite-python-api
    device: usb
# Optional: model modifications
model:
  # Optional: path to the model (default: automatic based on detector)
  path: /edgetpu_model.tflite
  # Optional: path to the labelmap (default: shown below)
  labelmap_path: /labelmap.txt
  # Required: Object detection model input width (default: shown below)
  width: 320
  # Required: Object detection model input height (default: shown below)
  height: 320
cameras:
  back:
    ffmpeg:
      inputs:
        - path: rtsp://192.168.8.34:8080/unicast
          roles:
            - detect
            - rtmp
# Optional: Detect configuration
# NOTE: Can be overridden at the camera level
detect:
  # Optional: width of the frame for the input with the detect role (default: shown below)
  width: 800
  # Optional: height of the frame for the input with the detect role (default: shown below)
  height: 600
  # Optional: desired fps for your camera for the input with the detect role (default: shown below)
  # NOTE: Recommended value of 5. Ideally, try and reduce your FPS on the camera.
  fps: 8
  # Optional: enables detection for the camera (default: True)
  # This value can be set via MQTT and will be updated in startup based on retained value
  enabled: True
  # Optional: Number of frames without a detection before frigate considers an object to be gone. (default: 5x the frame rate)
  max_disappeared: 25
  # Optional: Configuration for stationary object tracking
  stationary:
    # Optional: Frequency for confirming stationary objects (default: shown below)
    # When set to 0, object detection will not confirm stationary objects until movement is detected.
    # If set to 10, object detection will run to confirm the object still exists on every 10th frame.
    interval: 0
    # Optional: Number of frames without a position change for an object to be considered stationary (default: 10x the frame rate or 10s)
    threshold: 50
    # Optional: Define a maximum number of frames for tracking a stationary object (default: not set, track forever)
    # This can help with false positives for objects that should only be stationary for a limited amount of time.
    # It can also be used to disable stationary object tracking. For example, you may want to set a value for person, but leave
    # car at the default.
    # WARNING: Setting these values overrides default behavior and disables stationary object tracking.
    #          There are very few situations where you would want it disabled. It is NOT recommended to
    #          copy these values from the example config into your config unless you know they are needed.
    max_frames:
      # Optional: Default for all object types (default: not set, track forever)
      default: 3000
      # Optional: Object specific values
      objects:
        person: 1000
# Optional: Object configuration
# NOTE: Can be overridden at the camera level
objects:
  # Optional: list of objects to track from labelmap.txt (default: shown below)
  track:
    - person
    - cup
# Optional: Record configuration
# NOTE: Can be overridden at the camera level
record:
  # Optional: Enable recording (default: shown below)
  # WARNING: If recording is disabled in the config, turning it on via
  #          the UI or MQTT later will have no effect.
  # WARNING: Frigate does not currently support limiting recordings based
  #          on available disk space automatically. If using recordings,
  #          you must specify retention settings for a number of days that
  #          will fit within the available disk space of your drive or Frigate
  #          will crash.
  enabled: True
  # Optional: Number of minutes to wait between cleanup runs (default: shown below)
  # This can be used to reduce the frequency of deleting recording segments from disk if you want to minimize i/o
  expire_interval: 60
  # Optional: Retention settings for recording
  retain:
    # Optional: Number of days to retain recordings regardless of events (default: shown below)
    # NOTE: This should be set to 0 and retention should be defined in events section below
    #       if you only want to retain recordings of events.
    days: 0
    # Optional: Mode for retention. Available options are: all, motion, and active_objects
    #   all - save all recording segments regardless of activity
    #   motion - save all recordings segments with any detected motion
    #   active_objects - save all recording segments with active/moving objects
    # NOTE: this mode only applies when the days setting above is greater than 0
    mode: all
  # Optional: Event recording settings
  events:
    # Optional: Maximum length of time to retain video during long events. (default: shown below)
    # NOTE: If an object is being tracked for longer than this amount of time, the retained recordings
    #       will be the last x seconds of the event unless retain->days under record is > 0.
    max_seconds: 300
    # Optional: Number of seconds before the event to include (default: shown below)
    pre_capture: 2
    # Optional: Number of seconds after the event to include (default: shown below)
    post_capture: 2
    # Optional: Objects to save recordings for. (default: all tracked objects)
    objects:
      - person
      - cup
    # Optional: Restrict recordings to objects that entered any of the listed zones (default: no required zones)
    required_zones: []
    # Optional: Retention settings for recordings of events
    retain:
      # Required: Default retention days (default: shown below)
      default: 10
      # Optional: Mode for retention. (default: shown below)
      #   all - save all recording segments for events regardless of activity
      #   motion - save all recordings segments for events with any detected motion
      #   active_objects - save all recording segments for event with active/moving objects
      #
      # NOTE: If the retain mode for the camera is more restrictive than the mode configured
      #       here, the segments will already be gone by the time this mode is applied.
      #       For example, if the camera retain mode is "motion", the segments without motion are
      #       never stored, so setting the mode to "all" here won't bring them back.
      mode: motion
      # Optional: Per object retention days
      objects:
        person: 2
        cup: 3
PASO 5: Iniciar el contenedor docker de frigate
1 cd ~/Documents/frigate
2 sudo docker-compose -f frigate.yml up
Para solucionar problemas, puedes identificar errores imprimiendo el registro de docker:
sudo docker logs frigate
PASO 6: Ver la interfaz web de frigate
Encuentra la dirección IP de tu servidor Odyssey Blue escribiendo el siguiente comando en la terminal:
1 ip a
deberías ver una salida similar impresa en la terminal, puedes encontrar la dirección IP válida según tu configuración de conexión:
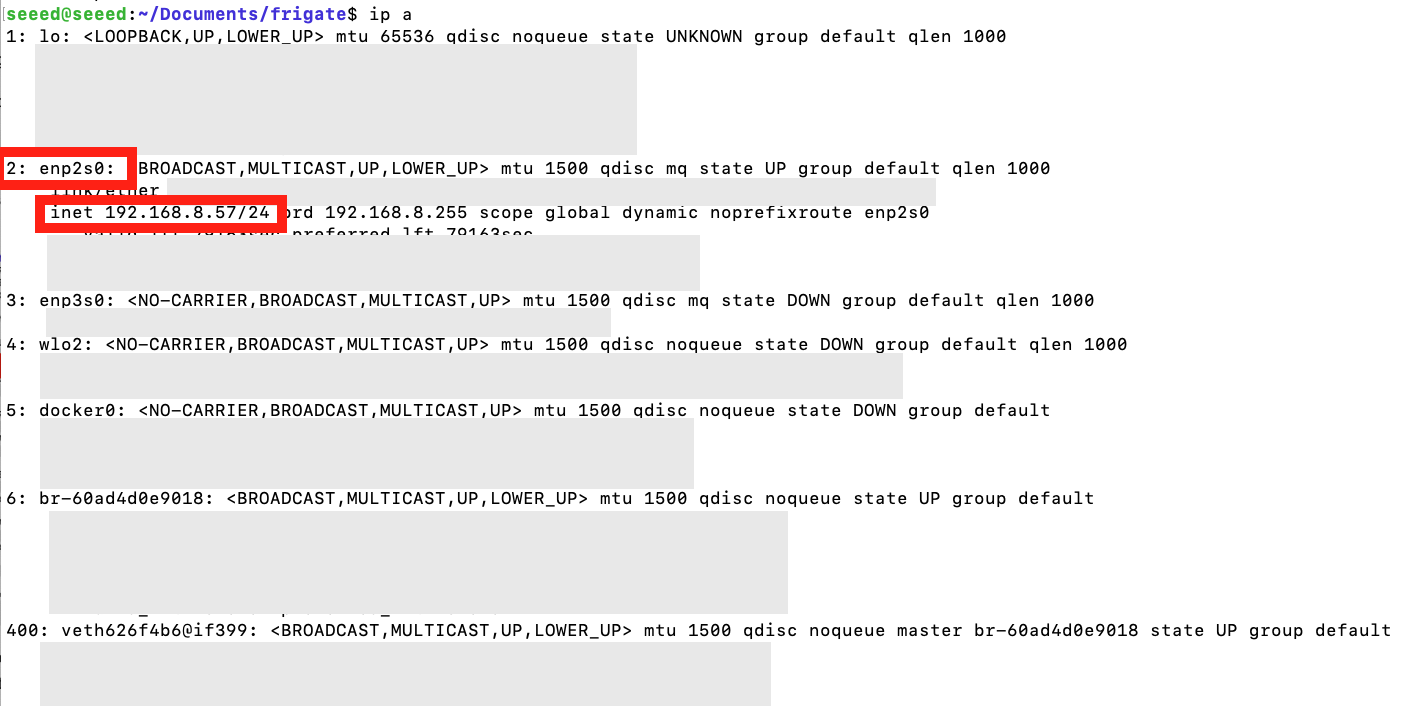
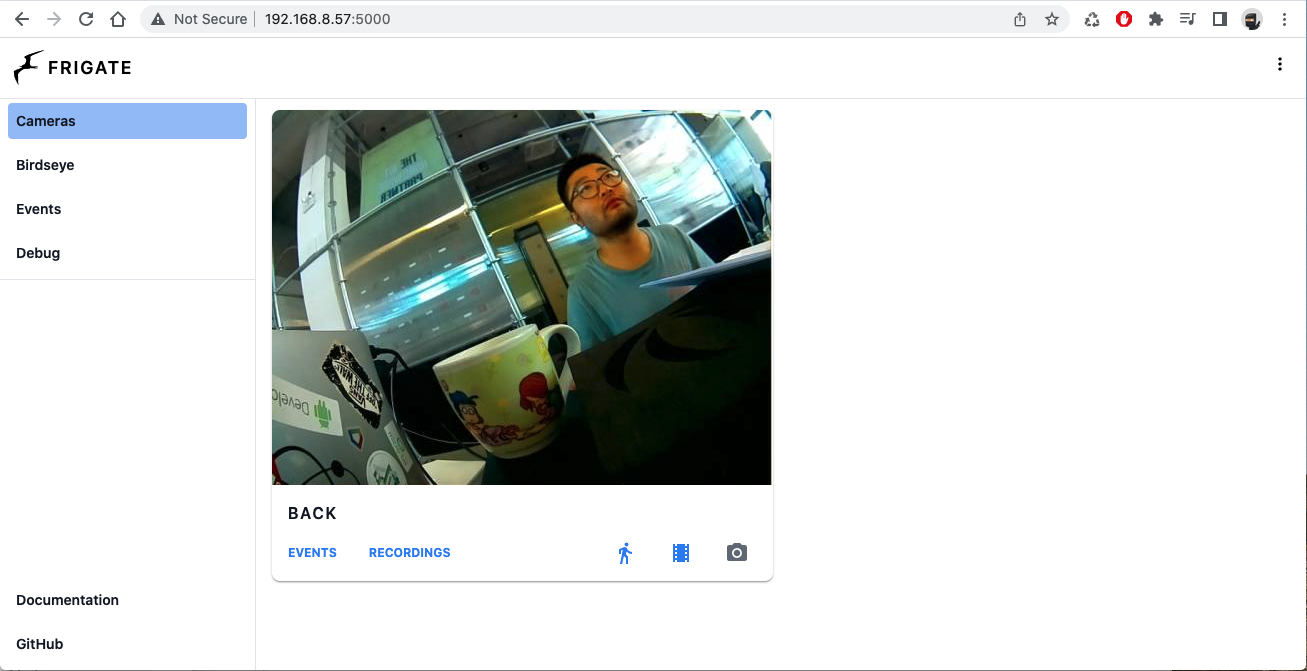
una vez que hayas localizado la dirección IP de tu Odyssey Blue, por favor abre tu navegador web favorito y escribe dirección-ip:5000 en la barra de direcciones. En mi caso, la dirección IP es 192.168.8.57, por lo tanto la URL que pongo en la barra de direcciones del navegador web es 192.168.8.57:5000, deberías llegar a una página de inicio similar a la imagen de abajo:
Para observar la detección en vivo por favor haz clic en el feed de video y haz clic en Debug en la esquina superior derecha de la vista principal, luego haz clic en el botón SHOW OPTIONS debajo del feed en vivo, luego marca Bonding Box o cualquier otra opción que te guste ver en el feed en vivo.

Diviértete explorando más opciones en Frigate con Odyssey Blue, siéntete libre de revisar otras opciones de SBC como la serie reComputer para añadir Edge AI a tus aplicaciones.
Soporte Técnico y Discusión de Productos
¡Gracias por elegir nuestros productos! Estamos aquí para brindarte diferentes tipos de soporte para asegurar que tu experiencia con nuestros productos sea lo más fluida posible. Ofrecemos varios canales de comunicación para atender diferentes preferencias y necesidades.