SD Card shield V4.0

Este es el shield de tarjeta SD V4.0 recientemente lanzado. Proporciona un espacio de almacenamiento para tu Arduino. Los usuarios pueden leer/escribir tarjetas SD a través de la biblioteca SD integrada de Arduino. Es compatible con tarjetas SD, SDHC y Micro SD. Solo ocupará el puerto SPI de tu Arduino. En comparación con versiones anteriores, combina la ranura SD estándar y la ranura Micro SD en una estándar, el adaptador incluido permite el uso de tarjetas Micro SD. Puedes apilar otros shields que funcionen con los pines no utilizados. Además, los puertos I2C y UART preformados facilitan tu conexión con módulos Grove.

Ideas de Aplicación
Si quieres hacer algunos proyectos increíbles con el SD Card Shield, aquí tienes algunos proyectos para tu referencia.
Aquí presentamos un proyecto sobre LinkIt ONE usando tarjeta SD.
Reproductor de Música con LinkIt One

Este proyecto usa Grove - Water Sensor para crear una solución simple pero efectiva para regar plantas.
Más Proyectos Increíbles con Tarjeta SD
Características
- Compatible con tarjetas SD estándar, tarjetas SDHC y tarjetas TF
- Compatible con conexión UART Grove e I2C
- Biblioteca SD completamente compatible
- Número mínimo de puertos SPI
- Verdaderamente apilable
Especificaciones
Elemento | Mín | Típico | Máx | Unidad |
Voltaje | 3.5 | 5.0 | 5.5 | V |
Corriente | 0.159 | 100 | 200 | mA |
Tipo de Tarjeta Compatible | Tarjeta SD(menos de 32GB); Tarjeta Micro SD(menos de 32GB); Tarjeta SDHC(menos de 32GB) | / | ||
Dimensión | 68.7x53.5x19.00 | mm | ||
Peso Neto | 14.8 | g |
Descripción General del Hardware
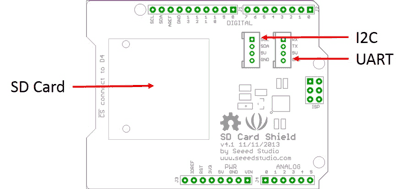
Uso de pines en Arduino (con tarjeta SD)
D4: SD_CS;
D11: SD_DI;
D12: SD_DO;
D13: SD_CLK.
El formato de la tarjeta SD puede ser FAT16 o FAT32. No se admite el tamaño de tarjeta SD y la tarjeta SDHC de más de 16GB.
Uso
Lo siguiente es la instalación del shield de tarjeta SD.
Instalación del Hardware
- Inserta tu tarjeta SD en el socket, conecta el Shield de Tarjeta SD al Arduino.
- Conecta el Arduino a la PC usando el cable USB.
Cuando uses una tarjeta Micro SD, por favor inserta la tarjeta Micro SD en el adaptador, y luego inserta el Adaptador de tarjeta Micro SD en el socket como se muestra a continuación.
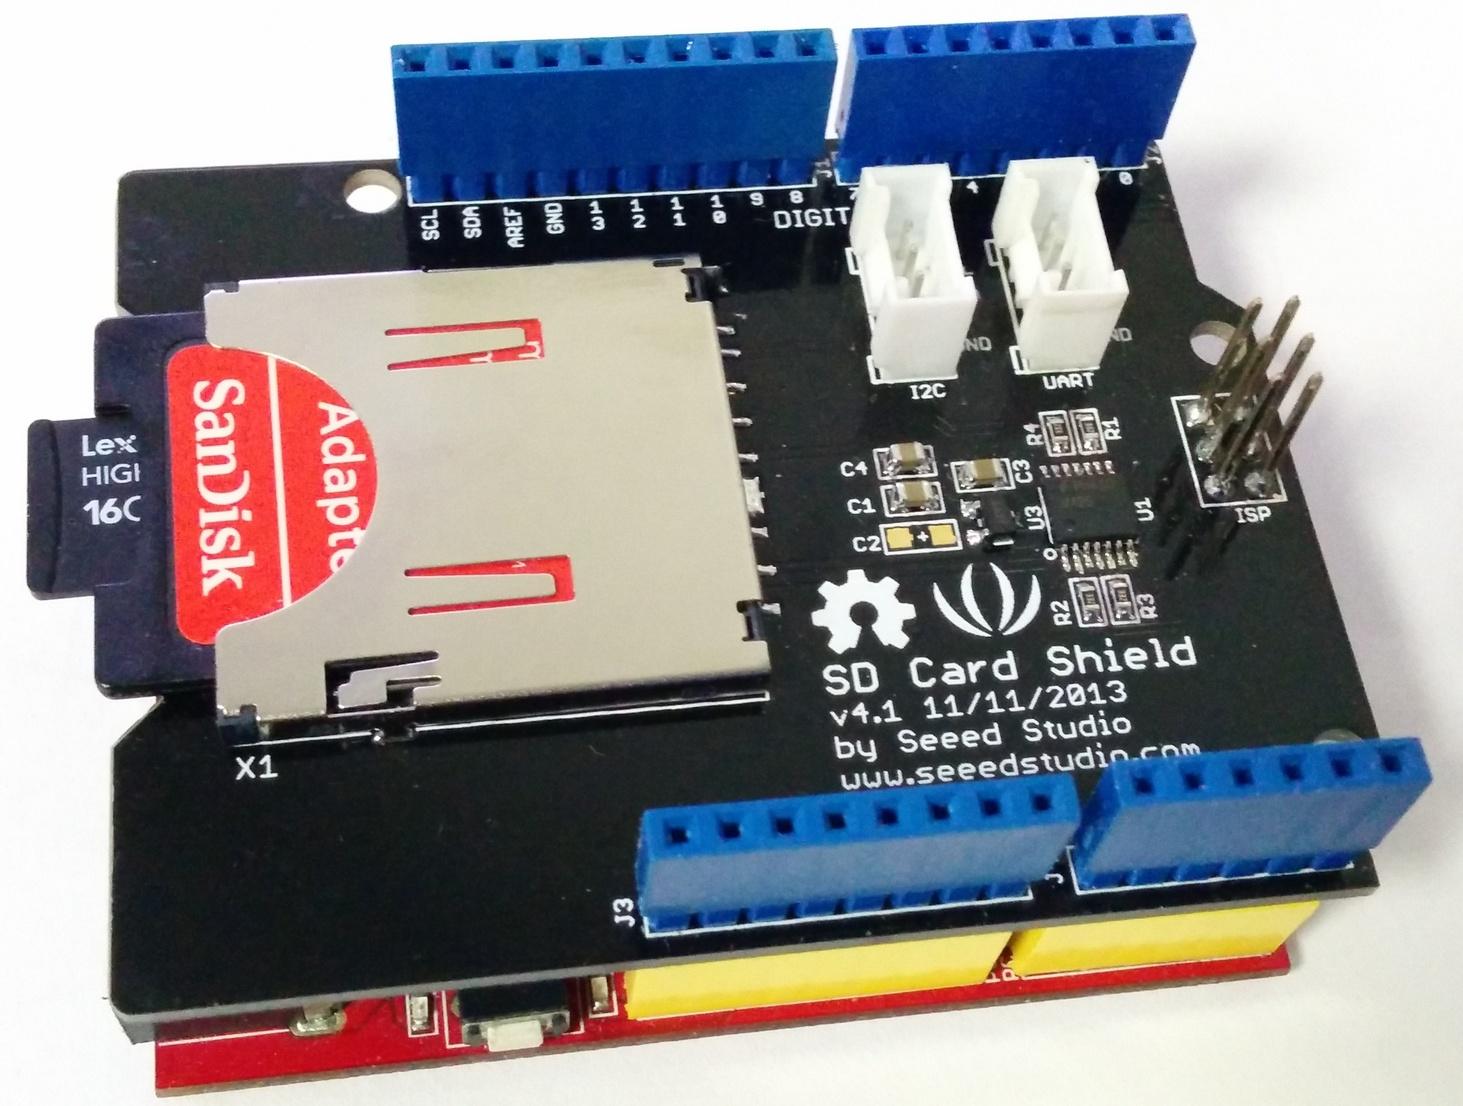
Cuando completes la instalación del hardware, debería verse así

Cargar el programa
-
Reinicia el IDE de Arduino. Abre el ejemplo "CardInfo" a través de la ruta: File --> Examples --> SD --> CardInfo.
Este ejemplo muestra cómo usar las librerías de utilidad en las que se basa la librería SD para obtener información sobre tu tarjeta SD. Muy útil para probar una tarjeta cuando
No estás seguro de si está funcionando o no. También hay muchos otros ejemplos en esta librería, como "ReadWrite". Siempre puedes probarlos.

Hay una breve descripción del código anterior:
Primero verifica si la tarjeta está funcionando. Si no, mostrará algunas razones que pueden llevar a este resultado.
En el caso de que la tarjeta SD funcione normalmente, imprimirá el tipo de tarjeta SD. Luego imprime el tipo y tamaño del volumen tipo FAT.
Finalmente, obtiene la información de archivos como nombre, fecha y tamaño en bytes que se encuentran en la tarjeta.
-
Carga el código.
-
Ver Resultados. Puedes ver la siguiente imagen después de hacer clic en el monitor serie.

- Si ocurre un error, por favor revisa todos los pasos anteriores, y asegúrate de que la tarjeta SD esté funcionando. Si nada de eso soluciona el problema, intenta reemplazar la tarjeta SD.
El código predeterminado de Arduino devuelve el tamaño de SD incorrectamente si tu tarjeta SD es de más de 4G. El siguiente código puede resolver este problema.
    /*
      SD card test

     This example shows how use the utility libraries on which the'
     SD library is based in order to get info about your SD card.
     Very useful for testing a card when you're not sure whether its working or not.

     The circuit:
      * SD card attached to SPI bus as follows:
     ** MOSI - pin 11 on Arduino Uno/Duemilanove/Diecimila
     ** MISO - pin 12 on Arduino Uno/Duemilanove/Diecimila
     ** CLK - pin 13 on Arduino Uno/Duemilanove/Diecimila
     ** CS - depends on your SD card shield or module.
     ** Pin 4 used here for consistency with other Arduino examples


     created  28 Mar 2011
     by Limor Fried
     modified 9 Apr 2012
     by Tom Igoe
     */
    // include the SD library:
    #include <SPI.h>
    #include <SD.h>

    // set up variables using the SD utility library functions:
    Sd2Card card;
    SdVolume volume;
    SdFile root;

    // change this to match your SD shield or module;
    // Arduino Ethernet shield: pin 4
    // Adafruit SD shields and modules: pin 10
    // Sparkfun SD shield: pin 8
    const int chipSelect = 4;

    void setup()
    {
      // Open serial communications and wait for port to open:
      Serial.begin(9600);
      while (!Serial) {
        ; // wait for serial port to connect. Needed for Leonardo only
      }


      Serial.print("\nInitializing SD card...");
      // On the Ethernet Shield, CS is pin 4. It's set as an output by default.
      // Note that even if it's not used as the CS pin, the hardware SS pin
      // (10 on most Arduino boards, 53 on the Mega) must be left as an output
      // or the SD library functions will not work.
      pinMode(10, OUTPUT);     // change this to 53 on a mega


      // we'll use the initialization code from the utility libraries
      // since we're just testing if the card is working!
      if (!card.init(SPI_HALF_SPEED, chipSelect)) {
        Serial.println("initialization failed. Things to check:");
        Serial.println("* is a card is inserted?");
        Serial.println("* Is your wiring correct?");
        Serial.println("* did you change the chipSelect pin to match your shield or module?");
        return;
      } else {
        Serial.println("Wiring is correct and a card is present.");
      }

      // print the type of card
      Serial.print("\nCard type: ");
      switch (card.type()) {
        case SD_CARD_TYPE_SD1:
          Serial.println("SD1");
          break;
        case SD_CARD_TYPE_SD2:
          Serial.println("SD2");
          break;
        case SD_CARD_TYPE_SDHC:
          Serial.println("SDHC");
          break;
        default:
          Serial.println("Unknown");
      }

      // Now we will try to open the 'volume'/'partition' - it should be FAT16 or FAT32
      if (!volume.init(card)) {
        Serial.println("Could not find FAT16/FAT32 partition.\nMake sure you've formatted the card");
        return;
      }


      // print the type and size of the first FAT-type volume

      uint64_t volumesize64;
      uint32_t volumesize32;
      Serial.print("\nVolume type is FAT");
      Serial.println(volume.fatType(), DEC);
      Serial.println();

      volumesize64 = volume.blocksPerCluster();    // clusters are collections of blocks
      volumesize64 *= volume.clusterCount();       // we'll have a lot of clusters
      volumesize64 *= 512;                            // SD card blocks are always 512 bytes

      Serial.print("Volume size (bytes): ");
      printLLNumber(volumesize64, DEC);
      Serial.println();

      Serial.print("Volume size (Kbytes): ");
      volumesize32 = volumesize64/1024;
      Serial.println(volumesize32);

      Serial.print("Volume size (Mbytes): ");
      volumesize32 /= 1024;
      Serial.println(volumesize32);
      /*uint64_t volumesize;
      Serial.print("\nVolume type is FAT");
      Serial.println(volume.fatType(), DEC);
      Serial.println();

      volumesize = volume.blocksPerCluster();    // clusters are collections of blocks
      volumesize *= volume.clusterCount();       // we'll have a lot of clusters
      volumesize *= 512;                            // SD card blocks are always 512 bytes
      Serial.print("Volume size (bytes): ");
      Serial.println(volumesize,DEC);
      Serial.print("Volume size (Kbytes): ");
      volumesize /= 1024;
      Serial.println(volumesize,DEC);
      Serial.print("Volume size (Mbytes): ");
      volumesize /= 1024;
      Serial.println(volumesize,DEC);
    */

      Serial.println("\nFiles found on the card (name, date and size in bytes): ");
      root.openRoot(volume);

      // list all files in the card with date and size
      root.ls(LS_R | LS_DATE | LS_SIZE);
    }


    void loop(void) {

    }
    void printLLNumber(uint64_t n, uint8_t base)
    {
      unsigned char buf[16 * sizeof(long)];
      unsigned int i = 0;

      if (n == 0)
      {
        Serial.print((char)'0');
        return;
      }

      while (n > 0)
      {
        buf[i++] = n % base;
        n /= base;
      }

      for (; i > 0; i--)
        Serial.print((char) (buf[i - 1] < 10 ?
          '0' + buf[i - 1] :
          'A' + buf[i - 1] - 10));
    }
Visor Online de Esquemático SD Card Shield v4.0
Visor Online de Esquemático SD Card Shield v4.0a
Visor Online de Esquemático SD Card Shield v4.3
Recursos
Soporte Técnico y Discusión de Productos
¡Gracias por elegir nuestros productos! Estamos aquí para brindarle diferentes tipos de soporte para asegurar que su experiencia con nuestros productos sea lo más fluida posible. Ofrecemos varios canales de comunicación para satisfacer diferentes preferencias y necesidades.