Cómo usar FreeRTOS para Multitarea en Arduino
Qué es RTOS
Uno de los componentes más importantes de los sistemas embebidos actuales es el RTOS también conocido como Sistema Operativo de Tiempo Real, que es responsable de todo, desde la programación de tareas hasta la ejecución de aplicaciones.
RTOS está diseñado para proporcionar un modo de ejecución predecible. Cuando el procesamiento debe cumplir con el límite de tiempo del sistema, se utiliza RTOS. Por lo tanto, comparado con GPOS (Sistema Operativo de Propósito General), RTOS es usualmente ligero y pequeño en tamaño, y generalmente solo proporciona funciones requeridas para ejecutar tipos específicos de aplicaciones en hardware específico. En algunos casos, los desarrolladores pueden modificar el RTOS existente, reducirlo para proporcionar solo la funcionalidad requerida por una aplicación específica, y/o personalizar su funcionalidad o características de rendimiento.
Cómo funciona RTOS
El kernel es el componente central en el sistema operativo. Los sistemas operativos como Linux usan un kernel, permitiendo a los usuarios parecer acceder a la computadora al mismo tiempo. Cada programa que se está ejecutando es una tarea (o hilo) bajo el control del sistema operativo. Si un sistema operativo puede realizar múltiples tareas de esta manera, se puede decir que es multitarea.
- Multitarea
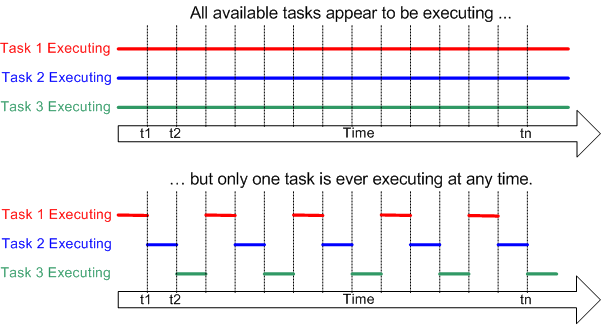
Los procesadores tradicionales solo pueden ejecutar una tarea a la vez, pero un sistema operativo multitarea puede hacer que cada tarea parezca ejecutarse simultáneamente cambiando rápidamente entre tareas. La siguiente figura muestra la relación entre el modo de ejecución de tres tareas y el tiempo.
- Programación
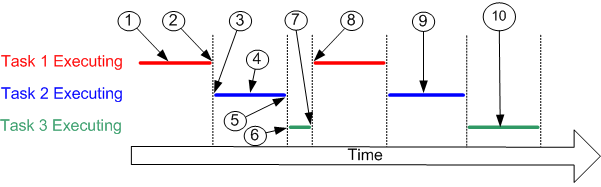
El programador es la parte del kernel que es responsable de decidir qué tarea ejecutar en cualquier momento particular. El kernel puede pausar y reanudar una tarea múltiples veces durante el ciclo de vida de la tarea.
Una estrategia de programación es un algoritmo usado por el programador para decidir qué tarea realizar en cualquier punto en el tiempo. Una estrategia de sistema multiusuario (no de tiempo real) es probable que dé a cada tarea una proporción "justa" del tiempo del procesador.
Además de ser suspendida involuntariamente por el kernel, una tarea también puede elegir suspenderse a sí misma. Si quiere retrasarse (dormir) por un período de tiempo, o esperar (bloquear) a que un recurso esté disponible (como un puerto serie) o un evento (como presionar una tecla), lo hará.
Referencia: Fundamentos de FreeRTOS
Qué es FreeRTOS
FreeRTOS es una clase de RTOS que está diseñado para ser lo suficientemente pequeño para ejecutarse en un microcontrolador – aunque su uso no se limita a aplicaciones de microcontrolador. FreeRTOS incluye un kernel y un conjunto creciente de bibliotecas de software adecuadas para uso en sectores industriales y aplicaciones. ¡Con la ayuda de FreeRTOS, puedes hacer multitarea en hardware basado en microcontrolador!
Para compatibilidad con Arduino, hemos portado FreeRTOS al framework de Arduino para que puedas usar FreeRTOS con tus placas Arduino favoritas con facilidad!
En 2017, Amazon ha tomado la administración de FreeRTOS lo que lo hace confiable y seguro para el mundo embebido.
Inicio Rápido con FreeRTOS Para Arduino
Instalación de las Librerías de FreeRTOS para Arduino
-
Visita los repositorios de Seeed_Arduino_FreeRTOS y descarga todo el repositorio a tu unidad local.
-
Ahora, la librería Seeed_Arduino_FreeRTOS puede ser instalada en el IDE de Arduino. Abre el IDE de Arduino, y haz clic en
sketch->Include Library->Add .ZIP Library, y elige el archivoSeeed_Arduino_FreeRTOSque acabas de descargar.

Esta librería porta la última versión de FreeRTOS(10.2.1) y te permite crear proyectos de FreeRTOS en el IDE de Arduino.
Placas Compatibles
El Seeed_Arduino_FreeRTOS es compatible con todas las placas SAMD de Seeed:
- Wio Terminal
- Seeeduino XIAO
- Serie Seeeduino Zero:
- Seeeduino LoRaWAN
Ejemplos de FreeRTOS para Arduino
El FreeRTOS puede ser muy poderoso al proporcionar al microcontrolador funcionalidad de programación en tiempo real, comunicación entre tareas, primitivas de temporización y sincronización.
Para ayudarte a comenzar con FreeRTOS fácilmente, aquí se proporcionan algunos ejemplos para referencia. Los siguientes ejemplos están construidos y ejecutados en Wio Terminal.
Ejemplo Hello World
Este ejemplo simplemente crea dos hilos que imprimen diferentes cadenas al Monitor Serie a una velocidad diferente.
#include <Seeed_Arduino_FreeRTOS.h>

TaskHandle_t Handle_aTask;
TaskHandle_t Handle_bTask;

static void ThreadA(void* pvParameters) {
    Serial.println("Thread A: Started");

    while (1) {
        Serial.println("Hello World!");
        delay(1000);
    }
}

static void ThreadB(void* pvParameters) {
    Serial.println("Thread B: Started");

    for (int i = 0; i < 10; i++) {
        Serial.println("---This is Thread B---");
        delay(2000);
    }
    Serial.println("Thread B: Deleting");
    vTaskDelete(NULL);
}

void setup() {

    Serial.begin(115200);

    vNopDelayMS(1000); // prevents usb driver crash on startup, do not omit this
    while(!Serial);  // Wait for Serial terminal to open port before starting program

    Serial.println("");
    Serial.println("******************************");
    Serial.println("        Program start         ");
    Serial.println("******************************");

    // Create the threads that will be managed by the rtos
    // Sets the stack size and priority of each task
    // Also initializes a handler pointer to each task, which are important to communicate with and retrieve info from tasks
    xTaskCreate(ThreadA,     "Task A",       256, NULL, tskIDLE_PRIORITY + 2, &Handle_aTask);
    xTaskCreate(ThreadB,     "Task B",       256, NULL, tskIDLE_PRIORITY + 1, &Handle_bTask);

    // Start the RTOS, this function will never return and will schedule the tasks.
    vTaskStartScheduler();
}

void loop() {
    // NOTHING
}
Ejemplo de Parpadeo
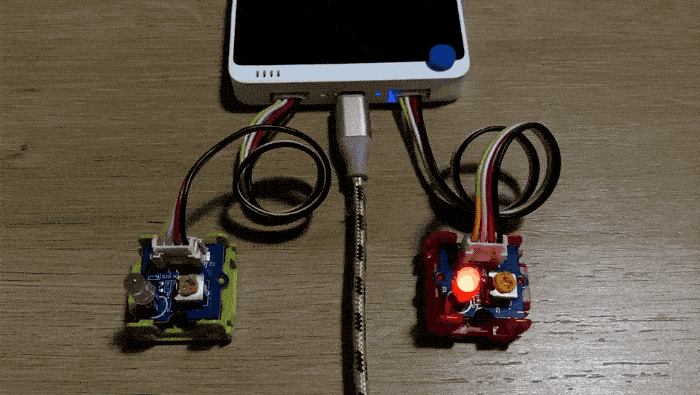
Este ejemplo también crea dos hilos y señales de salida para encender el LED. Uno es para simplemente hacer parpadear el LED, y el otro es para hacer respirar el LED.
Asegúrate de que el LED de Respiración esté en un pin PWM.
#include <Seeed_Arduino_FreeRTOS.h>

#define LEDPIN_1 PIN_WIRE_SCL // Left side of Grove Port of Wio Terminal
#define LEDPIN_2 D0 // Right side of Grove Port of Wio Terminal

TaskHandle_t Handle_aTask;
TaskHandle_t Handle_bTask;

// Blinking LED
static void LED_1(void* pvParameters) {
    while (1) {
        digitalWrite(LEDPIN_1, HIGH);
        delay(1000);
        digitalWrite(LEDPIN_1, LOW);
        delay(1000);
    }
}

// Breathing LED
static void LED_2(void* pvParameters) {
    int cnt = 5;
    while (1) {
        for (byte value = 0 ; value < 255; value+=cnt) {
            analogWrite(LEDPIN_2, value);
            delay(20);
        }
        delay(200);
        for (byte value = 255 ; value > 0; value-=cnt) {
            analogWrite(LEDPIN_2, value);
            delay(20);
        }
    }
}

void setup() {
    Serial.begin(115200);

    vNopDelayMS(1000); // prevents usb driver crash on startup, do not omit this
//    while(!Serial);  // Wait for serial terminal to open port before starting program

    pinMode(LEDPIN_1, OUTPUT);
    pinMode(LEDPIN_2, OUTPUT);

    xTaskCreate(LED_1,     "Task A",       256, NULL, tskIDLE_PRIORITY + 2, &Handle_aTask);
    xTaskCreate(LED_2,     "Task B",       256, NULL, tskIDLE_PRIORITY + 1, &Handle_bTask);

    // Start the RTOS, this function will never return and will schedule the tasks.
    vTaskStartScheduler();
}

void loop() {

}
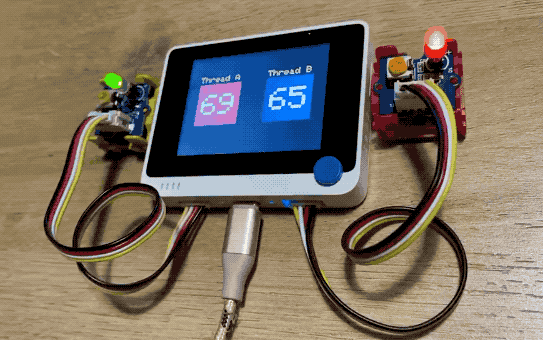
Ejemplo LCD
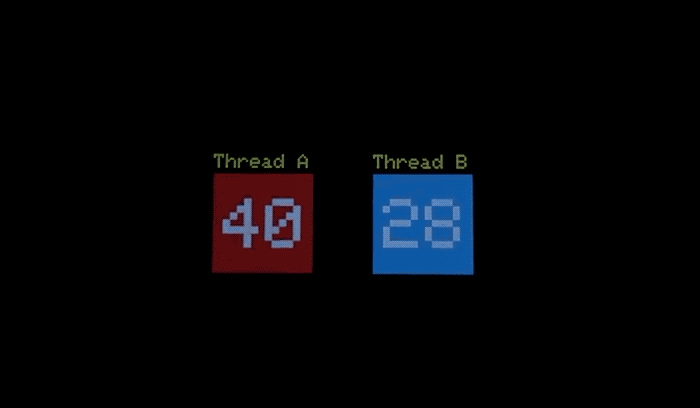
Este ejemplo es una demostración de FreeRTOS con otras librerías de Arduino como LCD Sprites en Wio Terminal. Este ejemplo crea dos sprites en dos hilos para contar números de manera opuesta. taskMonitor es una función utilizada para monitorear hilos e imprime información de pilas sobre cada hilo.
#include <Seeed_Arduino_FreeRTOS.h>
#include <TFT_eSPI.h>

TaskHandle_t Handle_aTask;
TaskHandle_t Handle_bTask;
TaskHandle_t Handle_monitorTask;

TFT_eSPI tft = TFT_eSPI();
TFT_eSprite img = TFT_eSprite(&tft);
TFT_eSprite img2 = TFT_eSprite(&tft);

static void LCD_TASK_1 (void* pvParameters) {
    Serial.println("Thread A: Started");
    img.createSprite(100, 100);
    img.fillSprite(tft.color565(229,58,64)); // RED
    img.setTextSize(8);
    img.setTextColor(TFT_WHITE);
    for(int i = 0; i < 100; i++) {
        img.drawNumber(i, 10, 25);
        img.pushSprite(30, 70);
        img.fillSprite(tft.color565(229,58,64));
        delay(1000);
        if(i== 99) i = 0;
    }
}

static void LCD_TASK_2 (void* pvParameters) {
    Serial.println("Thread B: Started");
    img2.createSprite(100, 100);
    img2.fillSprite(tft.color565(48,179,222)); // BLUE
    img2.setTextSize(8);
    img2.setTextColor(TFT_WHITE);
    for(int x = 99; x >= 0; x--) {
        img2.drawNumber(x, 10, 25);
        img2.pushSprite(190, 70);
        img2.fillSprite(tft.color565(48,179,222));
        delay(500);
        if(x== 0) x = 99;
    }
}

void taskMonitor(void* pvParameters) {
    int x;
    int measurement;

    Serial.println("Task Monitor: Started");

    // run this task a few times before exiting forever
    for (x = 0; x < 10; ++x) {

        Serial.println("");
        Serial.println("******************************");
        Serial.println("[Stacks Free Bytes Remaining] ");

        measurement = uxTaskGetStackHighWaterMark(Handle_aTask);
        Serial.print("Thread A: ");
        Serial.println(measurement);

        measurement = uxTaskGetStackHighWaterMark(Handle_bTask);
        Serial.print("Thread B: ");
        Serial.println(measurement);

        measurement = uxTaskGetStackHighWaterMark(Handle_monitorTask);
        Serial.print("Monitor Stack: ");
        Serial.println(measurement);

        Serial.println("******************************");

        delay(10000); // print every 10 seconds
    }

    // delete ourselves.
    // Have to call this or the system crashes when you reach the end bracket and then get scheduled.
    Serial.println("Task Monitor: Deleting");
    vTaskDelete(NULL);
}

void setup() {

    Serial.begin(115200);

    vNopDelayMS(1000); // prevents usb driver crash on startup, do not omit this
    while (!Serial) ;  // Wait for Serial terminal to open port before starting program

    tft.begin();
    tft.setRotation(3);
    tft.fillScreen(tft.color565(9,7,7)); // BLACK background
    tft.setTextColor(tft.color565(239,220,5)); // YELLOW text
    tft.setTextSize(2);
    tft.drawString("Thread A", 30, 50);
    tft.drawString("Thread B", 190, 50);

    Serial.println("");
    Serial.println("******************************");
    Serial.println("        Program start         ");
    Serial.println("******************************");

    // Create the threads that will be managed by the rtos
    // Sets the stack size and priority of each task
    // Also initializes a handler pointer to each task, which are important to communicate with and retrieve info from tasks
    xTaskCreate(LCD_TASK_1,     "Task A",       256, NULL, tskIDLE_PRIORITY + 3, &Handle_aTask);
    xTaskCreate(LCD_TASK_2,     "Task B",       256, NULL, tskIDLE_PRIORITY + 2, &Handle_bTask);
    xTaskCreate(taskMonitor, "Task Monitor",    128, NULL, tskIDLE_PRIORITY + 1, &Handle_monitorTask);

    // Start the RTOS, this function will never return and will schedule the tasks.
    vTaskStartScheduler();
}

void loop() {
    //NOTHING
}
FreeRTOS en Cpp Para Arduino
Para más información, también proporcionamos Seeed_Arduino_ooFreeRTOS, que es una colección de envoltorios de C++ que encapsulan la funcionalidad de FreeRTOS, y funciona bajo el framework de Arduino.
Instalando las Librerías de FreeRTOS Cpp Arduino
-
Visita los repositorios de Seeed_Arduino_ooFreeRTOS y descarga todo el repositorio a tu unidad local.
-
Ahora, la librería Seeed_Arduino_ooFreeRTOS puede ser instalada en el Arduino IDE. Abre el Arduino IDE, y haz clic en
sketch->Include Library->Add .ZIP Library, y elige el archivoSeeed_Arduino_ooFreeRTOSque acabas de descargar.
Ejemplo Blink en Cpp
#include <Seeed_Arduino_ooFreeRTOS.h>
#include "thread.hpp"
#include "ticks.hpp"

using namespace cpp_freertos;

class BlinkThread : public Thread {

public:

  BlinkThread(int i, int delayInSeconds)
    : Thread( 256, 1),
      Id (i),
      DelayInSeconds(delayInSeconds)
  {
    Start();
  };

protected:

  virtual void Run() {
    while (true) {
      Serial.printf("Blink Therad: %d\n\r", Id);
      digitalWrite(LED_BUILTIN, HIGH);   // turn the LED on (HIGH is the voltage level)
      Delay(Ticks::SecondsToTicks(DelayInSeconds));
      digitalWrite(LED_BUILTIN, LOW);    // turn the LED off by making the voltage LOW
      Delay(Ticks::SecondsToTicks(DelayInSeconds));
    }
  };

private:
  int Id;
  int DelayInSeconds;
};


void setup (void)
{

  // start up the serial interface
  Serial.begin(115200);
  Serial.println("Testing FreeRTOS C++ wrappers");
  Serial.println("Simple Tasks");

  // initialize digital pin LED_BUILTIN as an output.
  pinMode(LED_BUILTIN, OUTPUT);

  static BlinkThread p1(1, 3);
  static BlinkThread p2(2, 5);

  Thread::StartScheduler();

  //
  //  We shouldn't ever get here unless someone calls
  //  Thread::EndScheduler()
  //
  Serial.println("Scheduler ended!");

}

void loop()
{
  // Empty. Things are done in Tasks.
}