Uso Avanzado de Wi-Fi
Este wiki introduce algunos de los usos avanzados de las librerías de Wi-Fi como las librerías HTTPClient, DNSServer y WebServer. Con estas librerías implementadas, puedes desarrollar tus proyectos IoT con APIs simples.
Por favor asegúrate de haber seguido la Descripción General de Red para actualizar el firmware más reciente y las librerías dependientes.

Asegúrate de que la versión del firmware RTL8720 sea >= v2.0.2
Uso de HTTPClient
HTTPClient se utiliza para hacer peticiones HTTP GET, POST y PUT a un servidor web de manera muy fácil. ¡Aquí tienes algunos ejemplos para comenzar!
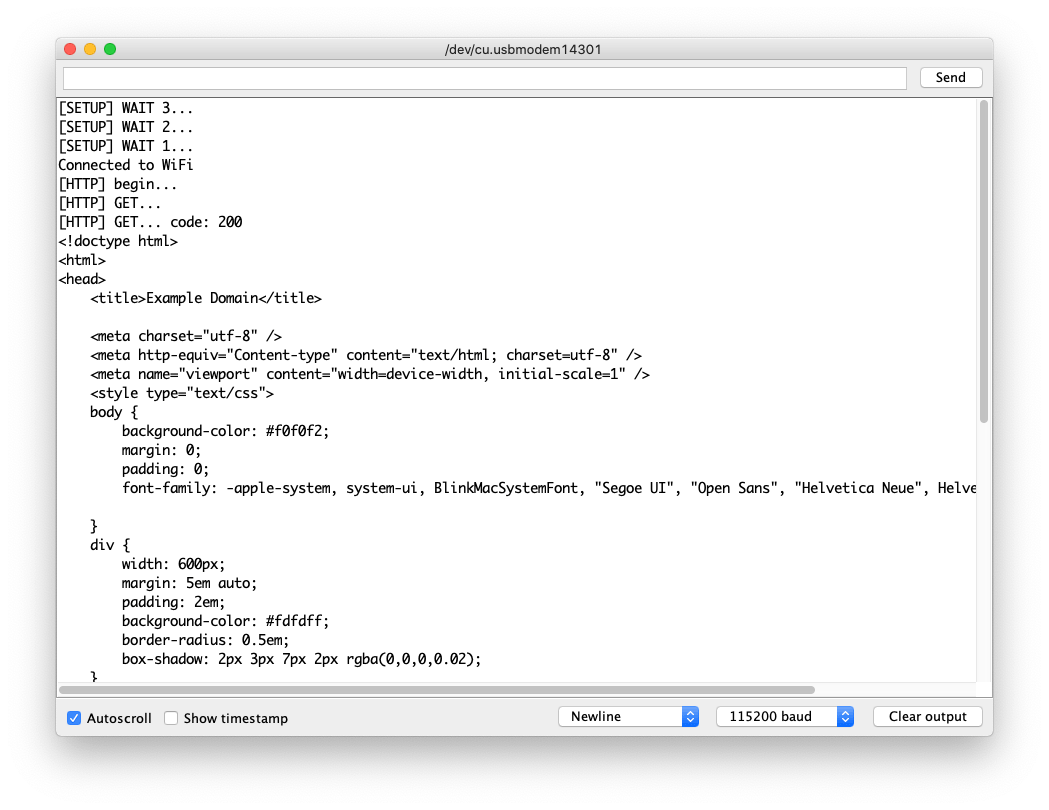
Ejemplo de HTTP GET
Este es un ejemplo de uso de HTTPClient para una conexión HTTP simple e imprime la respuesta de vuelta al Monitor Serie.
-
Cambia
yourNetworkyyourPasswordpor tu ssid y contraseña de WiFi. -
Sube el código al Wio Terminal.
#include <rpcWiFi.h>
#include <HTTPClient.h>

const char* ssid = "yourNetwork";
const char* password =  "yourPassword";

void setup() {

  Serial.begin(115200);
  WiFi.begin(ssid, password);

  while (WiFi.status() != WL_CONNECTED) { //Check for the connection
    delay(500);
    Serial.println("Connecting..");
  }
  Serial.print("Connected to the WiFi network with IP: ");
  Serial.println(WiFi.localIP());
}

void loop() {
    // wait for WiFi connection
    if((WiFi.status() == WL_CONNECTED)) {
        HTTPClient http;
        Serial.print("[HTTP] begin...\n");
        // configure traged server and url
        http.begin("http://www.example.com/index.html"); //HTTP
        Serial.print("[HTTP] GET...\n");
        // start connection and send HTTP header
        int httpCode = http.GET();
        // httpCode will be negative on error
        if(httpCode > 0) {
            // HTTP header has been send and Server response header has been handled
            Serial.printf("[HTTP] GET... code: %d\n", httpCode);
            // file found at server
            if(httpCode == HTTP_CODE_OK) {
                String payload = http.getString();
                Serial.println(payload);
            }
        } else {
            Serial.printf("[HTTP] GET... failed, error: %s\n", http.errorToString(httpCode).c_str());
        }
        http.end();
    }
    delay(5000);
}
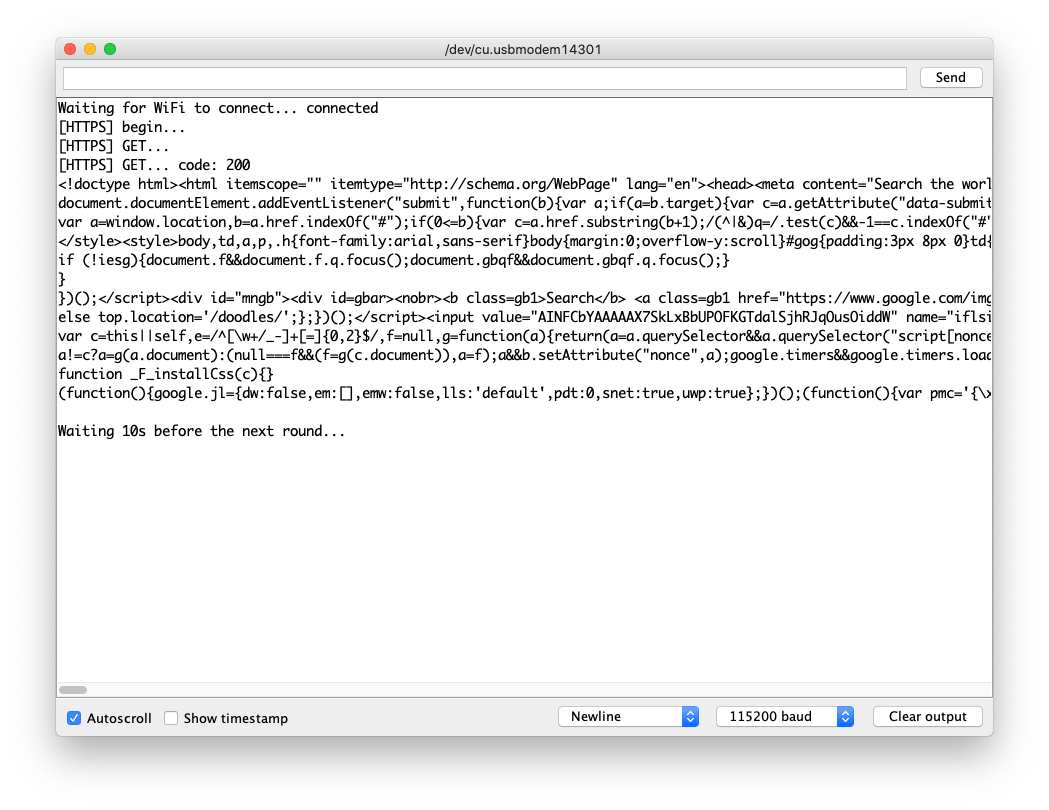
Ejemplo de HTTPs GET
Esta es la conexión HTTPs usando la biblioteca HTTPClient. ¡Puedes consultar esto para enviar solicitudes HTTPs GET a sitios web que quieras visitar!
Puedes encontrar el CA raíz del sitio web siguiendo esto.
-
Cambia
yourNetworkyyourPasswordpor tu ssid y contraseña de WiFi. -
Sube el código a Wio Terminal.
#include <rpcWiFi.h>
#include <HTTPClient.h>
#include <WiFiClientSecure.h>

const char* ssid = "yourNetwork";
const char* password =  "yourPassword";

const char* test_root_ca = \
                            "-----BEGIN CERTIFICATE-----\n"
                            "MIIESjCCAzKgAwIBAgINAeO0mqGNiqmBJWlQuDANBgkqhkiG9w0BAQsFADBMMSAw\n"
                            "HgYDVQQLExdHbG9iYWxTaWduIFJvb3QgQ0EgLSBSMjETMBEGA1UEChMKR2xvYmFs\n"
                            "U2lnbjETMBEGA1UEAxMKR2xvYmFsU2lnbjAeFw0xNzA2MTUwMDAwNDJaFw0yMTEy\n"
                            "MTUwMDAwNDJaMEIxCzAJBgNVBAYTAlVTMR4wHAYDVQQKExVHb29nbGUgVHJ1c3Qg\n"
                            "U2VydmljZXMxEzARBgNVBAMTCkdUUyBDQSAxTzEwggEiMA0GCSqGSIb3DQEBAQUA\n"
                            "A4IBDwAwggEKAoIBAQDQGM9F1IvN05zkQO9+tN1pIRvJzzyOTHW5DzEZhD2ePCnv\n"
                            "UA0Qk28FgICfKqC9EksC4T2fWBYk/jCfC3R3VZMdS/dN4ZKCEPZRrAzDsiKUDzRr\n"
                            "mBBJ5wudgzndIMYcLe/RGGFl5yODIKgjEv/SJH/UL+dEaltN11BmsK+eQmMF++Ac\n"
                            "xGNhr59qM/9il71I2dN8FGfcddwuaej4bXhp0LcQBbjxMcI7JP0aM3T4I+DsaxmK\n"
                            "FsbjzaTNC9uzpFlgOIg7rR25xoynUxv8vNmkq7zdPGHXkxWY7oG9j+JkRyBABk7X\n"
                            "rJfoucBZEqFJJSPk7XA0LKW0Y3z5oz2D0c1tJKwHAgMBAAGjggEzMIIBLzAOBgNV\n"
                            "HQ8BAf8EBAMCAYYwHQYDVR0lBBYwFAYIKwYBBQUHAwEGCCsGAQUFBwMCMBIGA1Ud\n"
                            "EwEB/wQIMAYBAf8CAQAwHQYDVR0OBBYEFJjR+G4Q68+b7GCfGJAboOt9Cf0rMB8G\n"
                            "A1UdIwQYMBaAFJviB1dnHB7AagbeWbSaLd/cGYYuMDUGCCsGAQUFBwEBBCkwJzAl\n"
                            "BggrBgEFBQcwAYYZaHR0cDovL29jc3AucGtpLmdvb2cvZ3NyMjAyBgNVHR8EKzAp\n"
                            "MCegJaAjhiFodHRwOi8vY3JsLnBraS5nb29nL2dzcjIvZ3NyMi5jcmwwPwYDVR0g\n"
                            "BDgwNjA0BgZngQwBAgIwKjAoBggrBgEFBQcCARYcaHR0cHM6Ly9wa2kuZ29vZy9y\n"
                            "ZXBvc2l0b3J5LzANBgkqhkiG9w0BAQsFAAOCAQEAGoA+Nnn78y6pRjd9XlQWNa7H\n"
                            "TgiZ/r3RNGkmUmYHPQq6Scti9PEajvwRT2iWTHQr02fesqOqBY2ETUwgZQ+lltoN\n"
                            "FvhsO9tvBCOIazpswWC9aJ9xju4tWDQH8NVU6YZZ/XteDSGU9YzJqPjY8q3MDxrz\n"
                            "mqepBCf5o8mw/wJ4a2G6xzUr6Fb6T8McDO22PLRL6u3M4Tzs3A2M1j6bykJYi8wW\n"
                            "IRdAvKLWZu/axBVbzYmqmwkm5zLSDW5nIAJbELCQCZwMH56t2Dvqofxs6BBcCFIZ\n"
                            "USpxu6x6td0V7SvJCCosirSmIatj/9dSSVDQibet8q/7UK4v4ZUN80atnZz1yg==\n"
                            "-----END CERTIFICATE-----\n";

WiFiClientSecure client;

void setup() {

  Serial.begin(115200);
  WiFi.begin(ssid, password);

  while (WiFi.status() != WL_CONNECTED) { //Check for the connection
    delay(500);
    Serial.println("Connecting..");
  }
  Serial.print("Connected to the WiFi network with IP: ");
  Serial.println(WiFi.localIP());
  client.setCACert(test_root_ca);
}

void loop() {
  if(&client) {
    {
      // Add a scoping block for HTTPClient https to make sure it is destroyed before WiFiClientSecure *client is
      HTTPClient https;
      Serial.print("[HTTPS] begin...\n");
      if (https.begin(client, "https://www.google.com/index.html")) {  // HTTPS
        Serial.print("[HTTPS] GET...\n");
        // start connection and send HTTP header
        int httpCode = https.GET();
        // httpCode will be negative on error
        if (httpCode > 0) {
          // HTTP header has been send and Server response header has been handled
          Serial.printf("[HTTPS] GET... code: %d\n", httpCode);
          // file found at server
          if (httpCode == HTTP_CODE_OK || httpCode == HTTP_CODE_MOVED_PERMANENTLY) {
            String payload = https.getString();
            Serial.println(payload);
          }
        } else {
          Serial.printf("[HTTPS] GET... failed, error: %s\n", https.errorToString(httpCode).c_str());
        }
        https.end();
      } else {
        Serial.printf("[HTTPS] Unable to connect\n");
      }
      // End extra scoping block
    }
  } else {
    Serial.println("Unable to create client");
  }
  Serial.println();
  Serial.println("Waiting 10s before the next round...");
  delay(10000);
}
Ejemplo de HTTP POST
Este es un ejemplo de envío de solicitud HTTP POST usando el HTTPClient desde Wio Terminal a un servidor web. Para esta demostración, estamos usando python para configurar un servidor web simple en nuestra PC que puede recibir y responder a solicitudes HTTP.
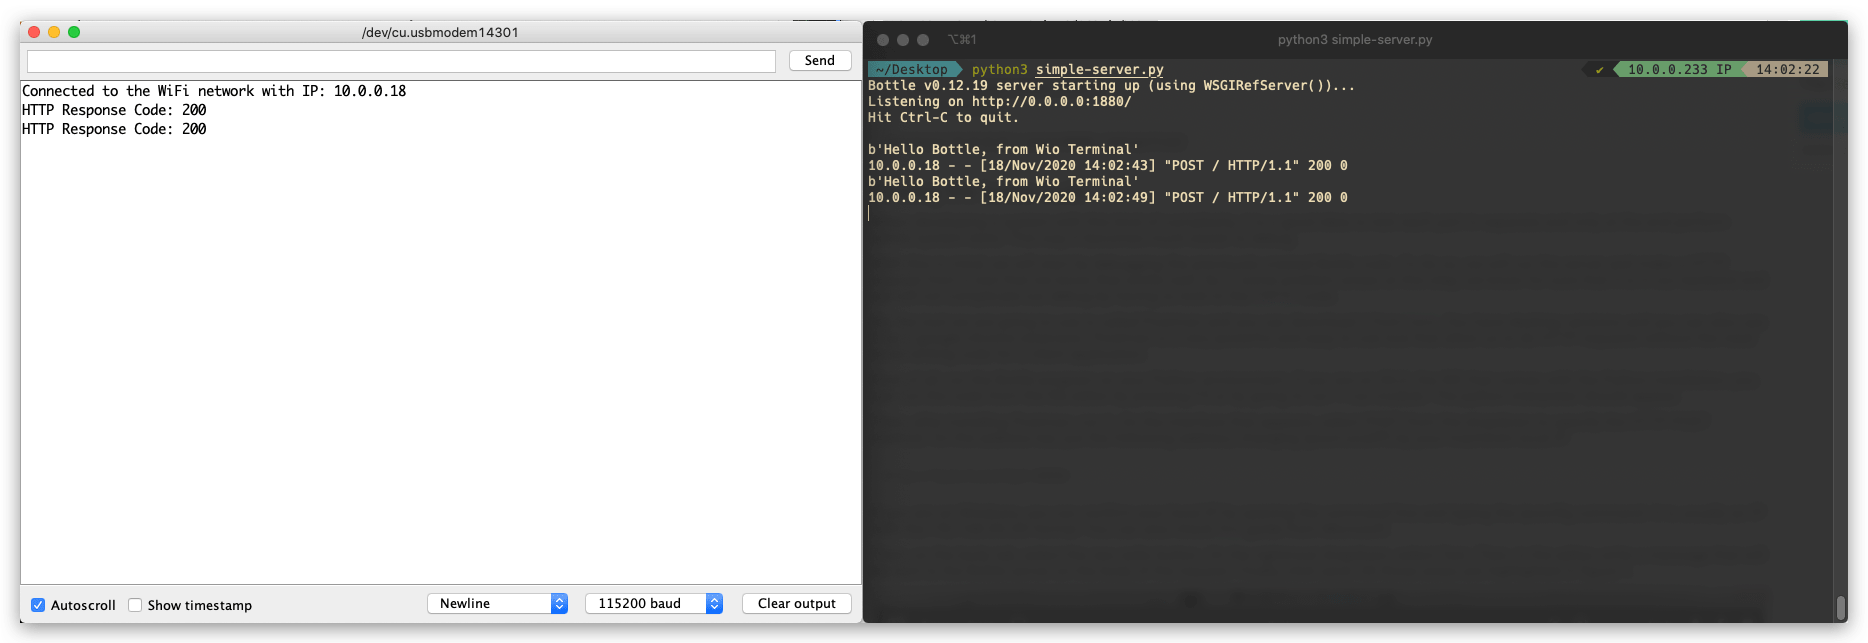
Código del Servidor Python
Primero, necesitamos usar pip para instalar la librería bottle necesaria en Python. Ejecuta lo siguiente en la terminal para instalar bottle:
pip install bottle
Una vez importada la botella, copia el siguiente código y guárdalo como simple-server.py. También puedes cambiar el puerto a algo que prefieras, pero asegúrate de que coincida con el lado de Arduino.
from bottle import run, request, post

@post('/')
def index():
    data = request.body.read()
    print(data)

run(host='0.0.0.0', port=1880, debug=True)
Código Arduino
-
Cambia
yourNetworkyyourPasswordpor tu ssid y contraseña de WiFi. -
Sube el código al Wio Terminal.
-
Verifica el Terminal y podrás ver el mensaje de solicitud HTTP entrante desde el Wio Terminal.
#include <rpcWiFi.h>
#include <HTTPClient.h>

const char* ssid = "yourNetwork";
const char* password =  "yourPassword";

// Change the following IP to your computer's IP running the server, make sure the Port also match
const char* yourLocalIp =  "http://10.0.0.233:1880/";

void setup() {

  Serial.begin(115200);
  WiFi.begin(ssid, password);

  while (WiFi.status() != WL_CONNECTED) { //Check for the connection
    delay(500);
    Serial.println("Connecting..");
  }
  Serial.print("Connected to the WiFi network with IP: ");
  Serial.println(WiFi.localIP());
}

void loop() {

 if(WiFi.status()== WL_CONNECTED){   //Check WiFi connection status

   HTTPClient http;

   http.begin(yourLocalIp);  //Specify destination for HTTP request
   http.addHeader("Content-Type", "text/plain");             //Specify content-type header

   int httpResponseCode = http.POST("Hello Bottle, from Wio Terminal");   //Send the actual POST request

   if(httpResponseCode>0){
    Serial.print("HTTP Response Code: ");
    Serial.println(httpResponseCode);   //Print return code
   }else{
    Serial.print("Error on sending request: ");
    Serial.println(httpResponseCode);
   }

   http.end();  //Free resources

 }else{
    Serial.println("Error in WiFi connection");
 }
  delay(5000);  //Send a request every 5 seconds
}
Uso de WebServer
Con la ayuda de la biblioteca WebServer, puedes configurar un servidor web que se ejecute en el Wio Terminal. Al acceder al servidor con un navegador ejecutándose en cualquier computadora conectada a la misma red que el Wio Terminal, puedes controlar hardware desde la página web, leer el valor de un sensor ¡y mucho más!
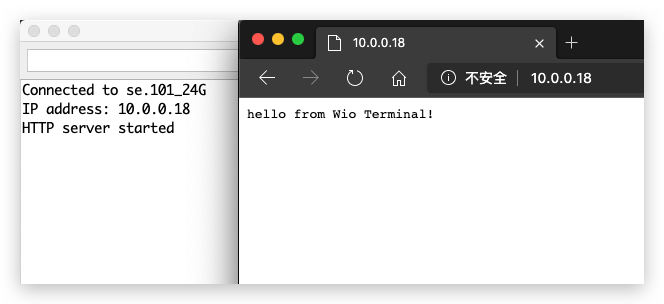
Ejemplo Simple de HelloServer
Esto configura un servidor web simple en la red conectada usando Wio Terminal.
-
Cambia
yourNetworkyyourPasswordpor tu ssid y contraseña de WiFi. -
Sube el código al Wio Terminal.
-
Accede al servidor web ingresando la IP del Wio Terminal desde la misma red usando el navegador.
#include <rpcWiFi.h>
#include <WiFiClient.h>
#include <WebServer.h>

const char *ssid = "yourNetwork";
const char *password = "yourPassword";

WebServer server(80);

const int led = 13;

void handleRoot() {
  digitalWrite(led, 1);
  server.send(200, "text/plain", "hello from Wio Terminal!");
  digitalWrite(led, 0);
}

void handleNotFound() {
  digitalWrite(led, 1);
  String message = "File Not Found\n\n";
  message += "URI: ";
  message += server.uri();
  message += "\nMethod: ";
  message += (server.method() == HTTP_GET) ? "GET" : "POST";
  message += "\nArguments: ";
  message += server.args();
  message += "\n";
  for (uint8_t i = 0; i < server.args(); i++) {
    message += " " + server.argName(i) + ": " + server.arg(i) + "\n";
  }
  server.send(404, "text/plain", message);
  digitalWrite(led, 0);
}

void setup(void) {
  pinMode(led, OUTPUT);
  digitalWrite(led, 0);
  Serial.begin(115200);
  WiFi.mode(WIFI_STA);
  WiFi.begin(ssid, password);

  // Wait for connection
  while (WiFi.status() != WL_CONNECTED) {
    delay(500);
    Serial.print(".");
  }
  Serial.print("Connected to ");
  Serial.println(ssid);
  Serial.print("IP address: ");
  Serial.println(WiFi.localIP());

  server.on("/", handleRoot);

  server.on("/inline", []() {
    server.send(200, "text/plain", "this works as well");
  });

  server.onNotFound(handleNotFound);

  server.begin();
  Serial.println("HTTP server started");
}

void loop(void) {
  server.handleClient();
}
Ejemplo de Servidor Web con Autenticación HTTP
Este ejemplo configura un servidor web que requiere un proceso de autenticación, lo cual puede ser muy útil en algunos casos para propósitos de seguridad.
-
Cambia
yourNetworkyyourPasswordpor el ssid y contraseña de tu WiFi. -
Sube el código al Wio Terminal.
-
Accede al servidor web ingresando la IP del Wio Terminal desde la misma red usando un navegador, e ingresa el nombre de usuario y contraseña preestablecidos.
#include <rpcWiFi.h>
#include <WebServer.h>

const char *ssid = "yourNetwork";
const char *password = "yourPassword";

WebServer server(80);

const char* www_username = "admin";
const char* www_password = "password";

void setup() {
  Serial.begin(115200);
  WiFi.mode(WIFI_STA);
  WiFi.begin(ssid, password);
  if (WiFi.waitForConnectResult() != WL_CONNECTED) {
    Serial.println("WiFi Connect Failed! Rebooting...");
    delay(1000);
    NVIC_SystemReset(); // Reset Wio Terminal
  }

  server.on("/", []() {
    if (!server.authenticate(www_username, www_password)) {
      return server.requestAuthentication();
    }
    server.send(200, "text/plain", "Login OK");
  });
  server.begin();

  Serial.print("Open http://");
  Serial.print(WiFi.localIP());
  Serial.println("/ in your browser to see it working");
}

void loop() {
  server.handleClient();
}
Uso de DNSServer
Hablamos sobre WebServer, que usamos dirección IP para acceder a él. Pero si quieres acceder a él escribiendo el nombre de dominio (como www.google.com), entonces necesitas usar el DNSServer.
-
Usar DNSServer debe estar bajo modo AP.
-
Introduce la biblioteca correspondiente
#include <DNSServer.h>. -
Declara objetos
DNSServer. -
Inicia el servidor DNS usando el método
start(). -
Procesa solicitudes de clientes usando el método
processNextRequest(). -
Sube el Código al Wio Terminal y Conecta tu PC al Wi-Fi
DNSServer example. -
Escribe
www.wioterminal.comywww.wioterminal.com/p1.
#include <rpcWiFi.h>
#include <DNSServer.h>
#include <WebServer.h>

IPAddress local_IP(192, 168, 1, 1);
IPAddress gateway(192, 168, 1, 1);
IPAddress subnet(255, 255, 255, 0);

const byte DNS_PORT = 53;

DNSServer dnsServer;
WebServer webserver(80);

void handleRoot()
{
  webserver.send(200, "text/plain", "Root page accessed via domain name");
}

void handleP1()
{
  webserver.send(200, "text/plain", "Page 1 accessed via domain name");
}

void setup()
{
  WiFi.mode(WIFI_AP);
  WiFi.softAPConfig(local_IP, gateway, subnet);
  WiFi.softAP("DNSServer example");

  webserver.on("/", handleRoot);
  webserver.on("/p1", handleP1);

  dnsServer.start(DNS_PORT, "www.wioterminal.com", local_IP); //Start the DNS service, example.com is the registered domain name.
  webserver.begin();
}

void loop()
{
  dnsServer.processNextRequest();
  webserver.handleClient();
}
Uso de mDNS
¿Qué es el DNS Multidifusión (mDNS)?
El protocolo DNS multidifusión (mDNS) resuelve nombres de host a direcciones IP dentro de redes pequeñas que no incluyen un servidor de nombres local. El DNS multidifusión está diseñado para redes pequeñas y tiene la intención de aumentar su facilidad de uso. La idea es que los usuarios puedan conectar dispositivos en LANs secretas sin ningún problema.
Instalar el Seeed_Arduino_rpcmDNS
-
Visita los repositorios de Seeed_Arduino_rpcmDNS y descarga todo el repositorio a tu unidad local.
-
Ahora, la biblioteca Seeed_Arduino_rpcmDNS puede instalarse en el IDE de Arduino. Abre el IDE de Arduino, y haz clic en
sketch->Include Library->Add .ZIP Library, y elige el archivoSeeed_Arduino_rpcmDNSque acabas de descargar.
Ejemplo de Servidor Web mDNS
Este es un ejemplo que configura un servidor web mDNS en el Wio Terminal para que otros dispositivos conectados en la misma red puedan navegar por el servidor web en un sitio definido.
-
Cambia
yourNetworkyyourPasswordpor tu ssid y contraseña de WiFi. -
Sube el código al Wio Terminal.
-
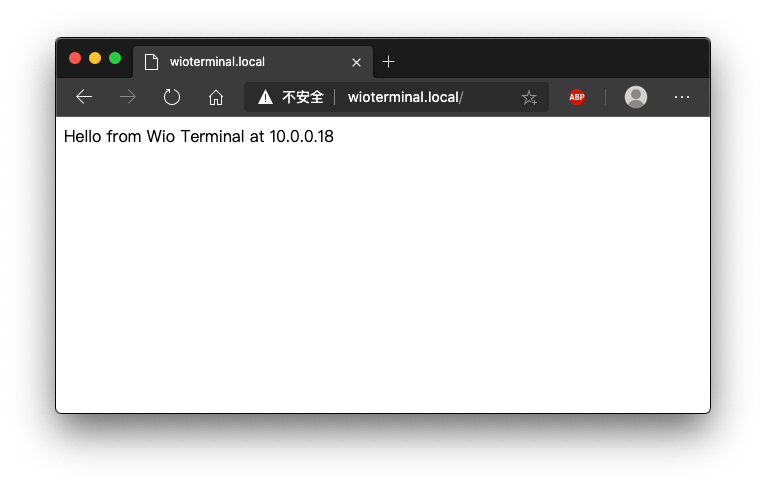
Accede al servidor web ingresando http://WioTerminal.local/ desde la misma red usando el navegador, e ingresa el nombre de usuario y contraseña preestablecidos.
#include <rpcWiFi.h>
#include <RPCmDNS.h>
#include <WiFiClient.h>
const char* ssid = "yourNetwork";
const char* password = "yourPassword";
// TCP server at port 80 will respond to HTTP requests
WiFiServer server(80);
void setup(void)
{
Serial.begin(115200);
while(!Serial){
;
}
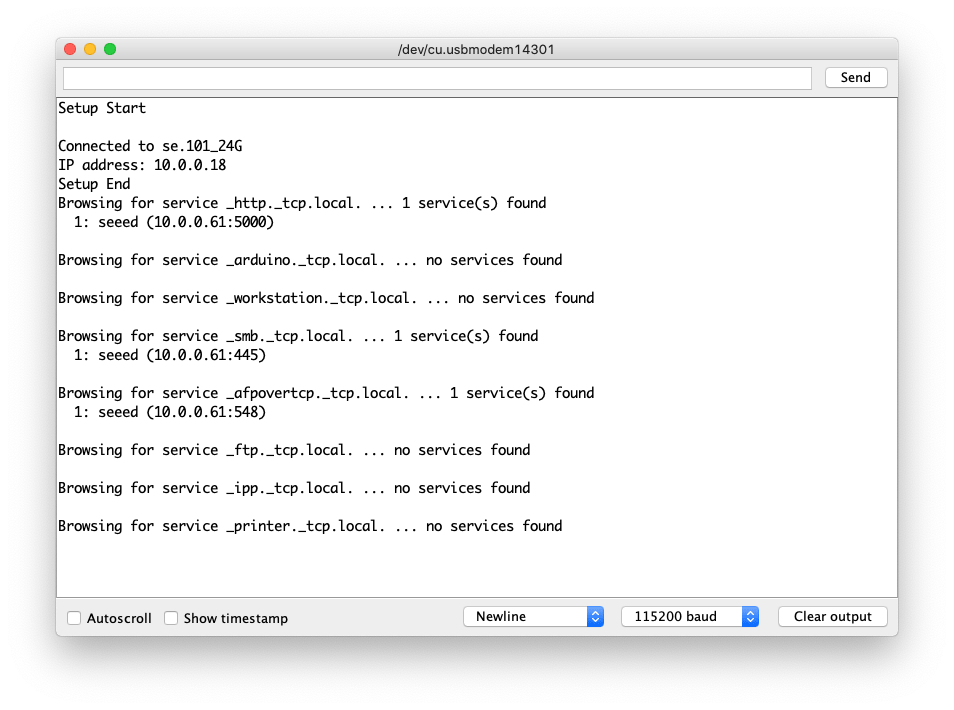
Serial.printf("Setup Start \r\n");
// Connect to WiFi network
WiFi.begin(ssid, password);
Serial.println("");
// Wait for connection
while (WiFi.status() != WL_CONNECTED) {
delay(500);
Serial.print(".");
}
Serial.println("");
Serial.print("Connected to ");
Serial.println(ssid);
Serial.print("IP address: ");
Serial.println(WiFi.localIP());
// Set up mDNS responder:
// - first argument is the domain name, in this example
// the fully-qualified domain name is "esp8266.local"
// - second argument is the IP address to advertise
// we send our IP address on the WiFi network
if (!MDNS.begin("WioTerminal")) {
Serial.println("Error setting up MDNS responder!");
while(1) {
delay(1000);
}
}
Serial.println("mDNS responder started");
// Start TCP (HTTP) server
server.begin();
Serial.println("TCP server started");
// Add service to MDNS-SD
MDNS.addService("http", "tcp", 80);
Serial.printf("Setup Done \r\n");
}
void loop(void)
{
// Check if a client has connected
WiFiClient client = server.available();
if (!client) {
return;
}
Serial.println("");
Serial.println("New client");
// Wait for data from client to become available
while(client.connected() && !client.available()){
delay(1);
}
// Read the first line of HTTP request
String req = client.readStringUntil('\r');
// First line of HTTP request looks like "GET /path HTTP/1.1"
// Retrieve the "/path" part by finding the spaces
int addr_start = req.indexOf(' ');
int addr_end = req.indexOf(' ', addr_start + 1);
if (addr_start == -1 || addr_end == -1) {
Serial.print("Invalid request: ");
Serial.println(req);
return;
}
req = req.substring(addr_start + 1, addr_end);
Serial.print("Request: ");
Serial.println(req);
String s;
if (req == "/")
{
IPAddress ip = WiFi.localIP();
String ipStr = String(ip[0]) + '.' + String(ip[1]) + '.' + String(ip[2]) + '.' + String(ip[3]);
s = "HTTP/1.1 200 OK\r\nContent-Type: text/html\r\n\r\n<!DOCTYPE HTML>\r\n<html>Hello from Wio Terminal at ";
s += ipStr;
s += "</html>\r\n\r\n";
Serial.println("Sending 200");
}
else
{
s = "HTTP/1.1 404 Not Found\r\n\r\n";
Serial.println("Sending 404");
}
client.print(s);
client.stop();
Serial.println("Done with client");
}
Ejemplo de mDNS-SD
Este es un ejemplo de mDNS-SD(Service Discovery) que te permite descubrir servicios en la misma red.
-
Cambia
yourNetworkyyourPasswordpor tu ssid y contraseña de WiFi. -
Sube el código al Wio Terminal.
#include <rpcWiFi.h>
#include <RPCmDNS.h>
#include <WiFiClient.h>

const char* ssid     = "yourNetwork";
const char* password = "yourPassword";

// TCP server at port 80 will respond to HTTP requests
WiFiServer server(80);

void setup(void)
{
    Serial.begin(115200);
    while(!Serial){
        ;
    }
    Serial.printf("Setup Start \r\n");
    // Connect to WiFi network
    WiFi.begin(ssid, password);
    Serial.println("");

    // Wait for connection
    while (WiFi.status() != WL_CONNECTED) {
        delay(500);
        Serial.print(".");
    }
    Serial.println("");
    Serial.print("Connected to ");
    Serial.println(ssid);
    Serial.print("IP address: ");
    Serial.println(WiFi.localIP());

    // Set up mDNS responder:
    // - first argument is the domain name, in this example
    //   the fully-qualified domain name is "esp8266.local"
    // - second argument is the IP address to advertise
    //   we send our IP address on the WiFi network
    if (!MDNS.begin("WioTerminal")) {
        Serial.println("Error setting up MDNS responder!");
        while(1) {
            delay(1000);
        }
    }
    Serial.println("mDNS responder started");

    // Start TCP (HTTP) server
    server.begin();
    Serial.println("TCP server started");

    // Add service to MDNS-SD
    MDNS.addService("http", "tcp", 80);

    Serial.printf("Setup Done \r\n");
}

void loop(void)
{
    // Check if a client has connected
    WiFiClient client = server.available();
    if (!client) {
        return;
    }
    Serial.println("");
    Serial.println("New client");
    // Wait for data from client to become available
    while(client.connected() && !client.available()){
        delay(1);
    }
    // Read the first line of HTTP request
    String req = client.readStringUntil('\r');
    // First line of HTTP request looks like "GET /path HTTP/1.1"
    // Retrieve the "/path" part by finding the spaces
    int addr_start = req.indexOf(' ');
    int addr_end = req.indexOf(' ', addr_start + 1);
    if (addr_start == -1 || addr_end == -1) {
        Serial.print("Invalid request: ");
        Serial.println(req);
        return;
    }
    req = req.substring(addr_start + 1, addr_end);
    Serial.print("Request: ");
    Serial.println(req);

    String s;
    if (req == "/")
    {
        IPAddress ip = WiFi.localIP();
        String ipStr = String(ip[0]) + '.' + String(ip[1]) + '.' + String(ip[2]) + '.' + String(ip[3]);
        s = "HTTP/1.1 200 OK\r\nContent-Type: text/html\r\n\r\n<!DOCTYPE HTML>\r\n<html>Hello from Wio Terminal at ";
        s += ipStr;
        s += "</html>\r\n\r\n";
        Serial.println("Sending 200");
    }
    else
    {
        s = "HTTP/1.1 404 Not Found\r\n\r\n";
        Serial.println("Sending 404");
    }
    client.print(s);

    client.stop();
    Serial.println("Done with client");
}
Uso de WiFiManager
Hemos portado el conocido WiFi Manager a la plataforma Wio Terminal para que puedas usar tu teléfono u otro dispositivo para configurar los ajustes de Wi-Fi para tu Wio Terminal!
Instalar el Seeed_Arduino_rpcWiFiManager
-
Visita los repositorios de Seeed_Arduino_rpcWiFiManager y descarga todo el repositorio a tu unidad local.
-
Ahora, la librería Seeed_Arduino_rpcWiFiManager puede ser instalada en el Arduino IDE. Abre el Arduino IDE, y haz clic en
sketch->Include Library->Add .ZIP Library, y elige el archivoSeeed_Arduino_rpcWiFiManagerque acabas de descargar.
Ejemplo de Conexión Automática WiFiManager
Este ejemplo es la demostración del ejemplo de conexión automática. Puedes usar el ejemplo para configurar los ajustes de WiFi para Wio Terminal.
-
Sube el código a Wio Terminal.
-
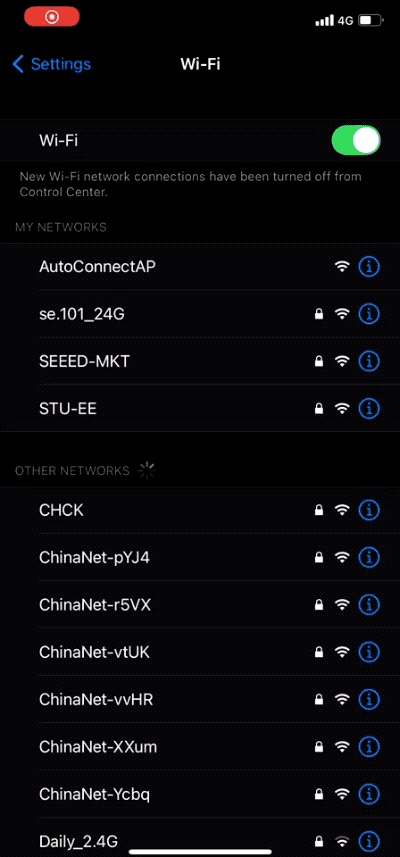
Si Wio Terminal se ha conectado a WiFi antes, se conectará automáticamente a la misma red. Si no puede conectarse a ningún WiFi entrará en modo AP y emitirá un WiFi. Usa tu teléfono para conectarte a este WiFi e introduce los ajustes de WiFi.
#include <rpcWiFi.h>
#include <DNSServer.h>
#include <WebServer.h>
#include <WiFiManager.h>

void setup() {
    Serial.begin(115200);
    while(!Serial); // wait till Serial is opened

    WiFiManager wifiManager;
    // Uncomment the resetSettings() will wipe out the saved settings
    //wifiManager.resetSettings();

    //Fetches ssid and pass from RTL8720 and tries to connect
    //if it does not connect it starts an access point with the specified name
    //here  "AutoConnectAP"
    //and goes into a blocking loop awaiting configuration
    wifiManager.autoConnect("AutoConnectAP");
    //or use this for auto generated name ESP + ChipID
    //wifiManager.autoConnect();

    //if you get here you have connected to the WiFi
    Serial.println("connected...yeey :)");
    Serial.println(WiFi.localIP());
}

void loop() {
    // put your main code here, to run repeatedly:
}