Conexión Ethernet para Wio Terminal
Este wiki presenta cómo usar el ENC28J60 OVERLAYS HAT para Raspberry Pi en Wio Terminal para conectividad de red estable. Este es un ejemplo perfecto de usar placas de extensión de 40 pines de Raspberry Pi en Wio Terminal.
Hardware Requerido
-
Placa adaptadora de 40 pines Pi HAT para Wio Terminal (Aún no lanzada)
Conexión de Hardware
Por ahora, si quieres probar el software, tendrás que usar cables volantes.
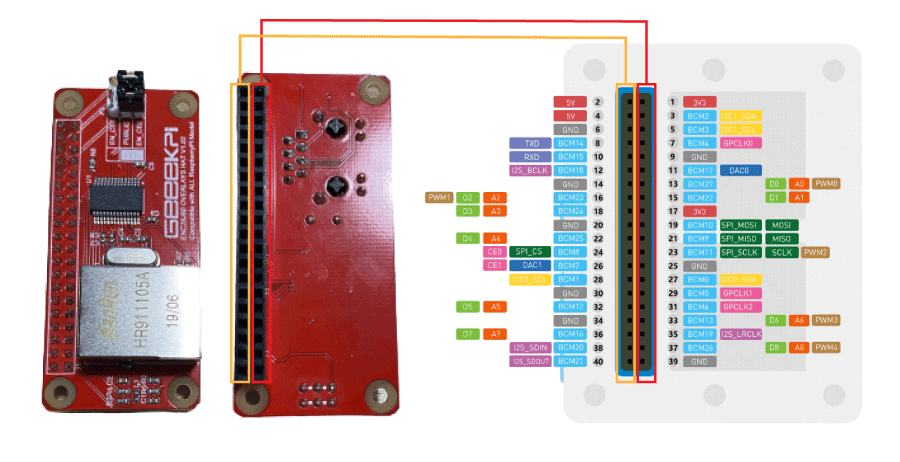
- Conecta el cable Ethernet al ENC28J60 Overlays Hat.
Instalación de la Librería Arduino UIPEthernet
-
Visita los repositorios de UIPEthernet y descarga todo el repositorio a tu unidad local.
-
Ahora, la librería puede ser instalada en el Arduino IDE. Abre el Arduino IDE, y haz clic en
sketch->Include Library->Add .ZIP Library, y elige el archivoUIPEthernetque acabas de descargar.

Ejemplo Simple de DHCP
Este ejemplo simplemente usa DHCP para obtener automáticamente configuraciones de red del host de red.

Código de Ejemplo
#include <UIPEthernet.h>

uint8_t mac[6] = {0x74,0x69,0x69,0x2D,0x30,0x31};

void setup() {
  // put your setup code here, to run once:
  Serial.begin(9600);
  while(!Serial);
  Serial.println(F("[testDHCP]"));

  Serial.print("MAC: ");
  for (byte i = 0; i < 6; ++i) {
    Serial.print(mac[i], HEX);
    if (i < 5)
      Serial.print(':');
  }
  Serial.println();

  if (Ethernet.begin(mac) != 1) {
     Serial.println("Failed to configure Ethernet using DHCP");
     while (true) {
        delay(1); // do nothing, no point running without Ethernet hardware
     }
  }

  Serial.print("My IP: ");
  Serial.println(Ethernet.localIP());
  Serial.print("Netmask: ");
  Serial.println(Ethernet.subnetMask());
  Serial.print("Gateway IP: ");
  Serial.println(Ethernet.gatewayIP());
  Serial.print("DNS: ");
  Serial.println(Ethernet.dnsServerIP());
}

void loop() {
  // put your main code here, to run repeatedly:
}
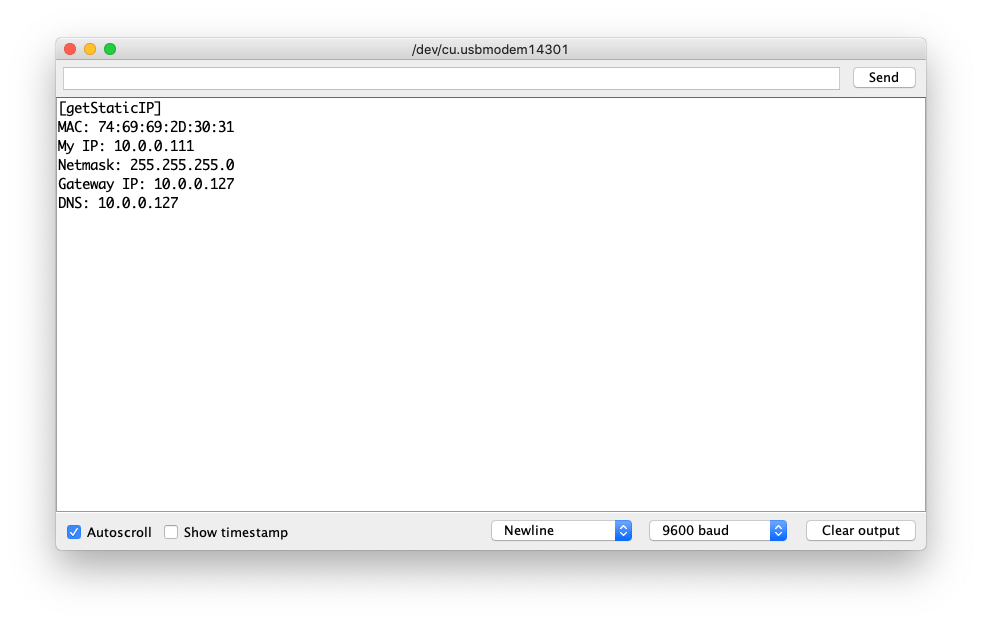
Conectando la Red mediante IP Estática
En lugar de DHCP, también puedes querer usar IP estática para conectarte al host de red para diferentes propósitos. En este ejemplo, puedes configurar cómo conectarte a la red manualmente estableciendo IP estática, Máscara de red, Puerta de enlace y DNS.
Código de Ejemplo
Esto podría ser muy útil cuando necesitas conectar el dispositivo a una Puerta de enlace y DNS específicos (es decir, Router/Puerta de enlace en Modo Bypass)
#include <UIPEthernet.h>

// Static Set-up, change the following according to your network
uint8_t mac[6] = {0x74,0x69,0x69,0x2D,0x30,0x31};
IPAddress myIP = {10,0,0,111};
IPAddress myMask = {255,255,255,0};
IPAddress myGatewayIP = {10,0,0,127};
IPAddress myDNS = {10,0,0,127};

void setup() {
  // put your setup code here, to run once:
  Serial.begin(9600);
  while(!Serial);
  Serial.println(F("[getStaticIP]"));

  Serial.print("MAC: ");
  for (byte i = 0; i < 6; ++i) {
    Serial.print(mac[i], HEX);
    if (i < 5)
      Serial.print(':');
  }
  Serial.println();

  Ethernet.begin(mac,myIP, myDNS, myGatewayIP, myMask);

  Serial.print("My IP: ");
  Serial.println(Ethernet.localIP());
  Serial.print("Netmask: ");
  Serial.println(Ethernet.subnetMask());
  Serial.print("Gateway IP: ");
  Serial.println(Ethernet.gatewayIP());
  Serial.print("DNS: ");
  Serial.println(Ethernet.dnsServerIP());
}

void loop() {
  // put your main code here, to run repeatedly:
}
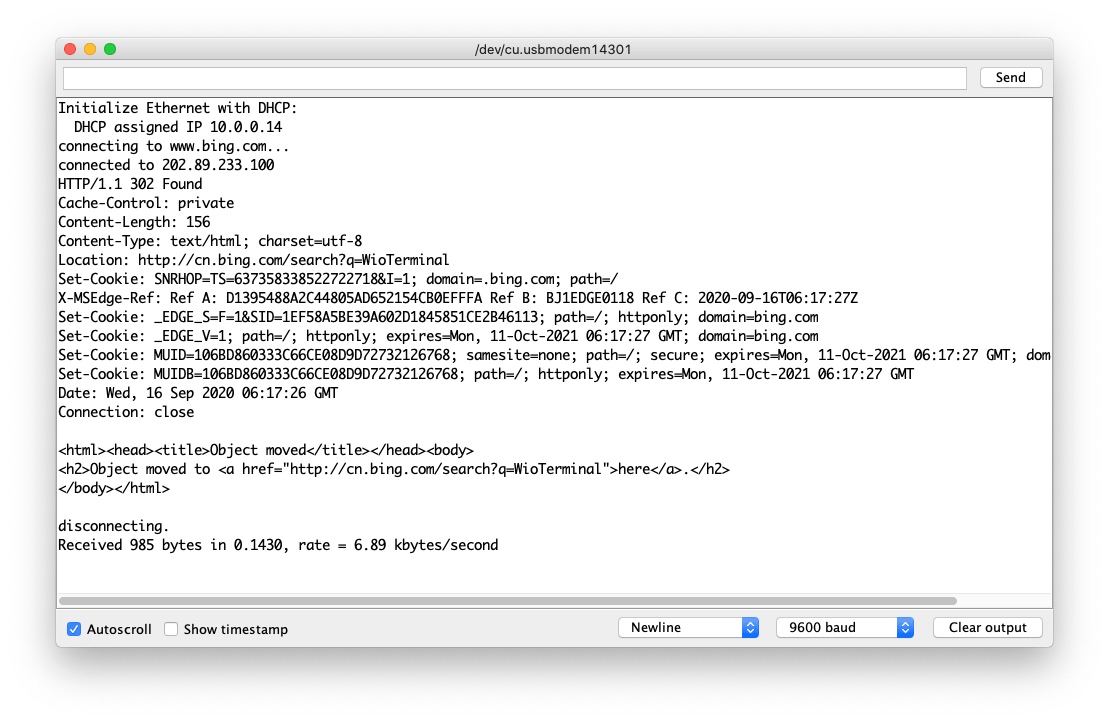
Cliente Web Simple
Una vez que tenemos la conexión de red a través del Ethernet, podemos usarla para cliente TCP. Por ejemplo, obtener datos de internet (HTTP) o obtener de un servidor en la misma red.
En este ejemplo, usará DHCP primero para configurar si falla, entonces usará IP estática para asignar. Este ejemplo se conecta a www.bing.com e imprime al monitor Serie.
Código de Ejemplo
#include <UIPEthernet.h>

// Enter a MAC address for your controller below.
byte mac[] = { 0xDE, 0xAD, 0xBE, 0xEF, 0xFE, 0xED };

char server[] = "www.bing.com";

// Set the static IP address to use if the DHCP fails to assign
IPAddress myIP(10, 0, 0, 187);
IPAddress myMask = {255,255,255,0};
IPAddress myGatewayIP = {10,0,0,127};
IPAddress dnsIP(10, 0, 0, 127);

// Initialize the Ethernet client library
// with the IP address and port of the server
// that you want to connect to (port 80 is default for HTTP):
EthernetClient client;

// Variables to measure the speed
unsigned long beginMicros, endMicros;
unsigned long byteCount = 0;
bool printWebData = true;  // set to false for better speed measurement

void setup() {
  // Open serial communications and wait for port to open:
  Serial.begin(9600);
  while (!Serial) {
    ; // wait for serial port to connect. Needed for native USB port only
  }

  // start the Ethernet connection:
  Serial.println("Initialize Ethernet with DHCP:");
  if (Ethernet.begin(mac) == 0) {
    Serial.println("Failed to configure Ethernet using DHCP");
    // Check for Ethernet hardware present
    if (Ethernet.hardwareStatus() == EthernetNoHardware) {
      Serial.println("Ethernet shield was not found.  Sorry, can't run without hardware. :(");
      while (true) {
        delay(1); // do nothing, no point running without Ethernet hardware
      }
    }
    if (Ethernet.linkStatus() == LinkOFF) {
      Serial.println("Ethernet cable is not connected.");
    }
    // try to congifure using IP address instead of DHCP:
    Ethernet.begin(mac,myIP, dnsIP, myGatewayIP, myMask);
  } else {
    Serial.print("  DHCP assigned IP ");
    Serial.println(Ethernet.localIP());
  }
  // give the Ethernet shield a second to initialize:
  delay(1000);
  Serial.print("connecting to ");
  Serial.print(server);
  Serial.println("...");

  // if you get a connection, report back via serial:
  if (client.connect(server, 80)) {
    Serial.print("connected to ");
    Serial.println(client.remoteIP());
    // Make a HTTP request:
    client.println("GET /search?q=WioTerminal HTTP/1.1");
    client.println("Host: www.bing.com");
    client.println("Connection: close");
    client.println();
  } else {
    // if you didn't get a connection to the server:
    Serial.println("connection failed");
  }
  beginMicros = micros();
}

void loop() {
  // if there are incoming bytes available
  // from the server, read them and print them:
  int len = client.available();
  if (len > 0) {
    byte buffer[80];
    if (len > 80) len = 80;
    client.read(buffer, len);
    if (printWebData) {
      Serial.write(buffer, len); // show in the serial monitor (slows some boards)
    }
    byteCount = byteCount + len;
  }

  // if the server's disconnected, stop the client:
  if (!client.connected()) {
    endMicros = micros();
    Serial.println();
    Serial.println("disconnecting.");
    client.stop();
    Serial.print("Received ");
    Serial.print(byteCount);
    Serial.print(" bytes in ");
    float seconds = (float)(endMicros - beginMicros) / 1000000.0;
    Serial.print(seconds, 4);
    float rate = (float)byteCount / seconds / 1000.0;
    Serial.print(", rate = ");
    Serial.print(rate);
    Serial.print(" kbytes/second");
    Serial.println();

    // do nothing forevermore:
    while (true) {
      delay(1);
    }
  }
}
Ejemplo de Servidor Web
Por otro lado, también hemos ejecutado la configuración como un servidor web y permitimos que otros dispositivos en la misma red se conecten a él (es decir, leer los valores del sensor observados en el Wio Terminal). Esto podría ser muy útil en algunos casos debido a que la estabilidad de Ethernet es mucho mejor que la de Wi-Fi.
Código de Ejemplo
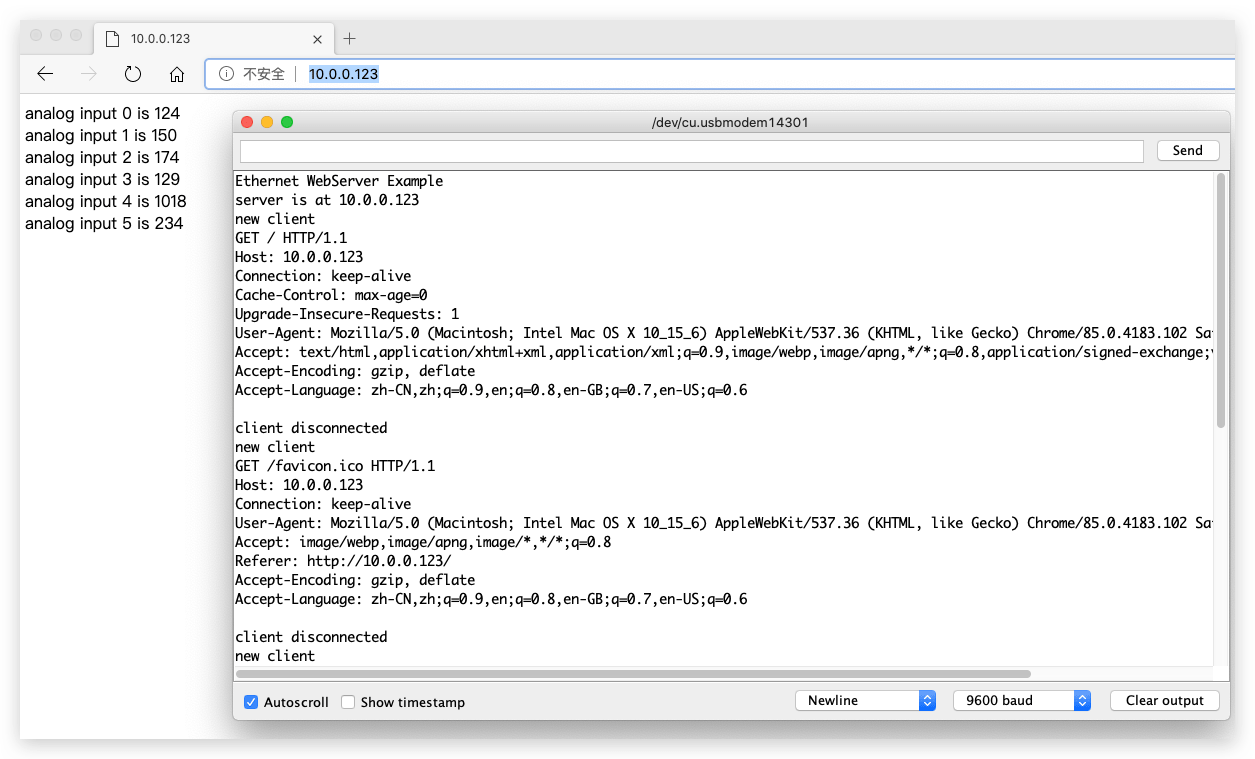
Este ejemplo se configura como Servidor Web y establece una página web simple que imprime los valores de lectura desde A0 hasta A5. Puedes acceder a esto desde tu PC conectada en la misma red a través de la dirección IP.
#include <UIPEthernet.h>

// Enter a MAC address and IP address for your controller below.
// The IP address will be dependent on your local network:
byte mac[] = {
  0xDE, 0xAD, 0xBE, 0xEF, 0xFE, 0xED
};
IPAddress ip(10, 0, 0, 123);

// Initialize the Ethernet server library
// with the IP address and port you want to use
// (port 80 is default for HTTP):
EthernetServer server(80);

void setup() {
  // Open serial communications and wait for port to open:
  Serial.begin(9600);
  while (!Serial) {
    ; // wait for serial port to connect. Needed for native USB port only
  }
  Serial.println("Ethernet WebServer Example");

  // start the Ethernet connection and the server:
  Ethernet.begin(mac, ip);

  // Check for Ethernet hardware present
  if (Ethernet.hardwareStatus() == EthernetNoHardware) {
    Serial.println("Ethernet shield was not found.  Sorry, can't run without hardware. :(");
    while (true) {
      delay(1); // do nothing, no point running without Ethernet hardware
    }
  }
  if (Ethernet.linkStatus() == LinkOFF) {
    Serial.println("Ethernet cable is not connected.");
  }

  // start the server
  server.begin();
  Serial.print("server is at ");
  Serial.println(Ethernet.localIP());
}

void loop() {
  // listen for incoming clients
  EthernetClient client = server.available();
  if (client) {
    Serial.println("new client");
    // an http request ends with a blank line
    bool currentLineIsBlank = true;
    while (client.connected()) {
      if (client.available()) {
        char c = client.read();
        Serial.write(c);
        // if you've gotten to the end of the line (received a newline
        // character) and the line is blank, the http request has ended,
        // so you can send a reply
        if (c == '\n' && currentLineIsBlank) {
          // send a standard http response header
          client.println("HTTP/1.1 200 OK");
          client.println("Content-Type: text/html");
          client.println("Connection: close");  // the connection will be closed after completion of the response
          client.println("Refresh: 5");  // refresh the page automatically every 5 sec
          client.println();
          client.println("<!DOCTYPE HTML>");
          client.println("<html>");
          // output the value of each analog input pin
          for (int analogChannel = 0; analogChannel < 6; analogChannel++) {
            int sensorReading = analogRead(analogChannel);
            client.print("analog input ");
            client.print(analogChannel);
            client.print(" is ");
            client.print(sensorReading);
            client.println("<br />");
          }
          client.println("</html>");
          break;
        }
        if (c == '\n') {
          // you're starting a new line
          currentLineIsBlank = true;
        } else if (c != '\r') {
          // you've gotten a character on the current line
          currentLineIsBlank = false;
        }
      }
    }
    // give the web browser time to receive the data
    delay(1);
    // close the connection:
    client.stop();
    Serial.println("client disconnected");
  }
}
Pruebas del Servidor Web
Esto también proporciona un boceto de prueba simple usando la configuración.
Esta es la captura de pantalla de hacer ping al servidor web durante 10 horas.
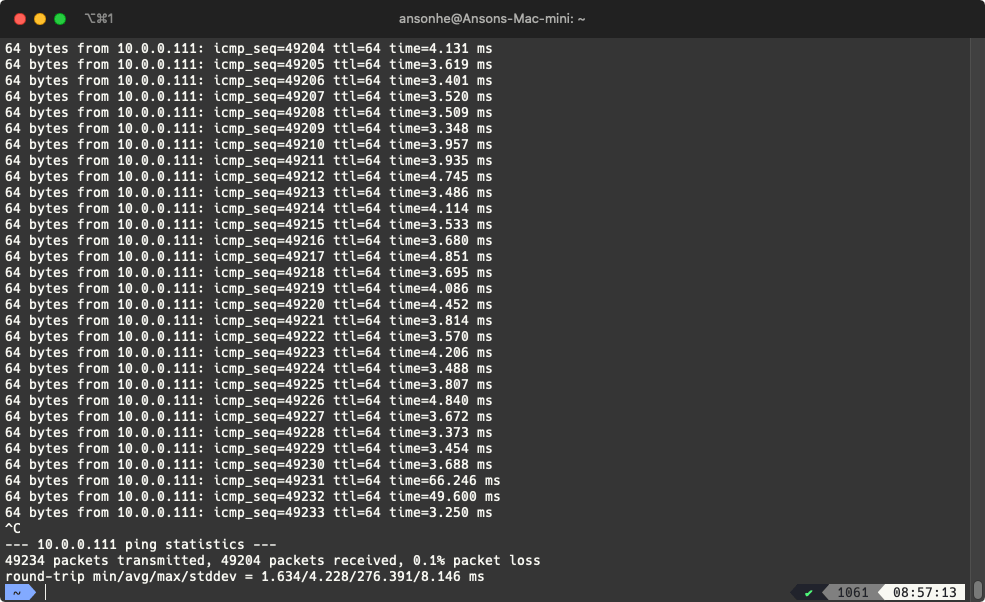
- Bajo la misma red, usa tu computadora para hacer ping a la IP del servidor:
#include <UIPEthernet.h>

// Static IP Set-up
uint8_t mac[6] = {0x74,0x69,0x69,0x2D,0x30,0x31};
IPAddress myIP = {10,0,0,111};
EthernetServer server = EthernetServer(80);

void setup() {
  Serial.begin(9600);
  while(!Serial);
  Ethernet.begin(mac, myIP);
  server.begin();

  Serial.print("My IP: ");
  Serial.println(Ethernet.localIP());
  Serial.print("Netmask: ");
  Serial.println(Ethernet.subnetMask());
  Serial.print("Gateway IP: ");
  Serial.println(Ethernet.gatewayIP());
  Serial.print("DNS: ");
  Serial.println(Ethernet.dnsServerIP());
}

void loop() {
  // get client
  EthernetClient client = server.available();
  if(client && client.connected()) {
        // do stuff (snipped but basically parses HTTP and responds with no other processing)
        client.stop();
  }
}
Usando UDP Para Tiempo NTP
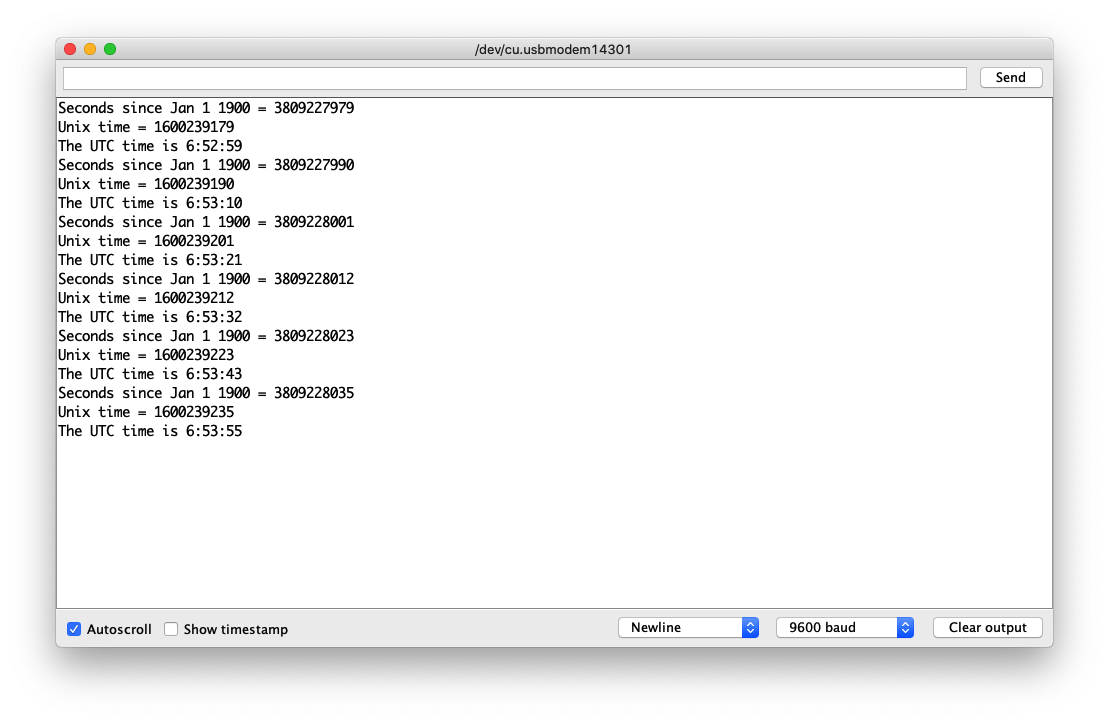
Para algunas situaciones, UDP se usa para comunicación de red. NTP es el ejemplo perfecto para esto. Este ejemplo simplemente obtiene tiempo del servidor NTP time.nist.gov e imprime al monitor Serie.
Código de Ejemplo
#include <UIPEthernet.h>

// Enter a MAC address for your controller below.
// Newer Ethernet shields have a MAC address printed on a sticker on the shield
byte mac[] = {
  0xDE, 0xAD, 0xBE, 0xEF, 0xFE, 0xED
};

unsigned int localPort = 8888;       // local port to listen for UDP packets

const char timeServer[] = "time.nist.gov"; // time.nist.gov NTP server

const int NTP_PACKET_SIZE = 48; // NTP time stamp is in the first 48 bytes of the message

byte packetBuffer[NTP_PACKET_SIZE]; //buffer to hold incoming and outgoing packets

// A UDP instance to let us send and receive packets over UDP
EthernetUDP Udp;

void setup() {
  // Open serial communications and wait for port to open:
  Serial.begin(9600);
  while (!Serial) {
    ; // wait for serial port to connect. Needed for native USB port only
  }

  // start Ethernet and UDP
  if (Ethernet.begin(mac) == 0) {
    Serial.println("Failed to configure Ethernet using DHCP");
    // Check for Ethernet hardware present
    if (Ethernet.hardwareStatus() == EthernetNoHardware) {
      Serial.println("Ethernet shield was not found.  Sorry, can't run without hardware. :(");
    } else if (Ethernet.linkStatus() == LinkOFF) {
      Serial.println("Ethernet cable is not connected.");
    }
    // no point in carrying on, so do nothing forevermore:
    while (true) {
      delay(1);
    }
  }
  Udp.begin(localPort);
}

void loop() {
  sendNTPpacket(timeServer); // send an NTP packet to a time server

  // wait to see if a reply is available
  delay(1000);
  if (Udp.parsePacket()) {
    // We've received a packet, read the data from it
    Udp.read(packetBuffer, NTP_PACKET_SIZE); // read the packet into the buffer

    // the timestamp starts at byte 40 of the received packet and is four bytes,
    // or two words, long. First, extract the two words:

    unsigned long highWord = word(packetBuffer[40], packetBuffer[41]);
    unsigned long lowWord = word(packetBuffer[42], packetBuffer[43]);
    // combine the four bytes (two words) into a long integer
    // this is NTP time (seconds since Jan 1 1900):
    unsigned long secsSince1900 = highWord << 16 | lowWord;
    Serial.print("Seconds since Jan 1 1900 = ");
    Serial.println(secsSince1900);

    // now convert NTP time into everyday time:
    Serial.print("Unix time = ");
    // Unix time starts on Jan 1 1970. In seconds, that's 2208988800:
    const unsigned long seventyYears = 2208988800UL;
    // subtract seventy years:
    unsigned long epoch = secsSince1900 - seventyYears;
    // print Unix time:
    Serial.println(epoch);

    // print the hour, minute and second:
    Serial.print("The UTC time is ");       // UTC is the time at Greenwich Meridian (GMT)
    Serial.print((epoch  % 86400L) / 3600); // print the hour (86400 equals secs per day)
    Serial.print(':');
    if (((epoch % 3600) / 60) < 10) {
      // In the first 10 minutes of each hour, we'll want a leading '0'
      Serial.print('0');
    }
    Serial.print((epoch  % 3600) / 60); // print the minute (3600 equals secs per minute)
    Serial.print(':');
    if ((epoch % 60) < 10) {
      // In the first 10 seconds of each minute, we'll want a leading '0'
      Serial.print('0');
    }
    Serial.println(epoch % 60); // print the second
  }
  // wait ten seconds before asking for the time again
  delay(10000);
  Ethernet.maintain();
}

// send an NTP request to the time server at the given address
void sendNTPpacket(const char * address) {
  // set all bytes in the buffer to 0
  memset(packetBuffer, 0, NTP_PACKET_SIZE);
  // Initialize values needed to form NTP request
  // (see URL above for details on the packets)
  packetBuffer[0] = 0b11100011;   // LI, Version, Mode
  packetBuffer[1] = 0;     // Stratum, or type of clock
  packetBuffer[2] = 6;     // Polling Interval
  packetBuffer[3] = 0xEC;  // Peer Clock Precision
  // 8 bytes of zero for Root Delay & Root Dispersion
  packetBuffer[12]  = 49;
  packetBuffer[13]  = 0x4E;
  packetBuffer[14]  = 49;
  packetBuffer[15]  = 52;

  // all NTP fields have been given values, now
  // you can send a packet requesting a timestamp:
  Udp.beginPacket(address, 123); // NTP requests are to port 123
  Udp.write(packetBuffer, NTP_PACKET_SIZE);
  Udp.endPacket();
}
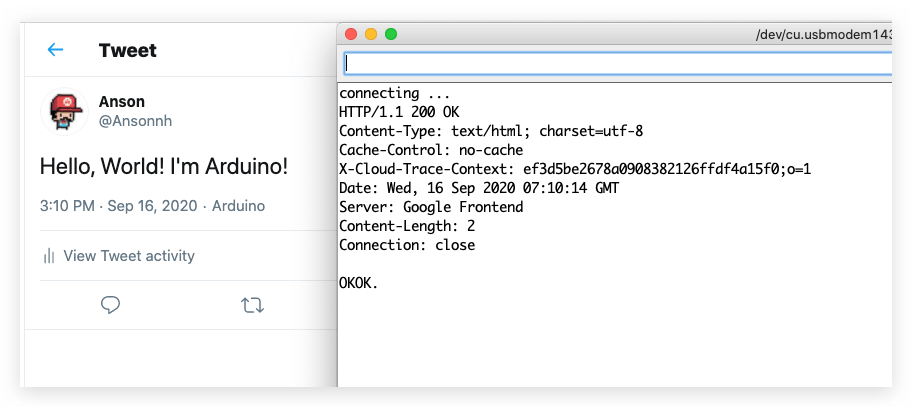
Ejemplo de Envío de Twitter
Este es un ejemplo divertido que usa el Wio Terminal para enviar twitter. Esto usa la Librería Tweet para Arduino para solucionar las conexiones directas de HTTPs.
Instalar la Librería Tweet para Arduino
-
Visita los repositorios de Arduno-Twitter-library y descarga todo el repositorio a tu unidad local.
-
Ahora, la librería puede ser instalada en el Arduino IDE. Abre el Arduino IDE, y haz clic en
sketch->Include Library->Add .ZIP Library, y elige el archivoArduno-Twitter-libraryque acabas de descargar.
Esta es la solución alternativa para conectarse a twitter, que puede no ser segura, hazlo bajo tu propio riesgo.
Obtener Token
Obtén un token para publicar un mensaje usando OAuth haciendo clic aquí.
Por favor visita http://arduino-tweet.appspot.com/ para más referencia.
Código de Ejemplo
- Copia el token que obtuviste de arriba, y pégalo en el sketch de Arduino.
/*
 *  Check http://arduino-tweet.appspot.com/ for more reference
 */

#include <UIPEthernet.h>
#include <Twitter.h>

uint8_t mac[6] = {0x74,0x69,0x69,0x2D,0x30,0x31};

// Your Token to Tweet (get it from http://arduino-tweet.appspot.com/)
Twitter twitter("YOUR-TOKEN-HERE");

// Message to post
char msg[] = "Hello, World! I'm Arduino!";

void setup()
{
  delay(1000);
  Ethernet.begin(mac);
  // or you can use DHCP for autoomatic IP address configuration.
  // Ethernet.begin(mac);
  Serial.begin(9600);
  while(!Serial);

  Serial.println("connecting ...");
  if (twitter.post(msg)) {
    // Specify &Serial to output received response to Serial.
    // If no output is required, you can just omit the argument, e.g.
    // int status = twitter.wait();
    int status = twitter.wait(&Serial);
    if (status == 200) {
      Serial.println("OK.");
    } else {
      Serial.print("failed : code ");
      Serial.println(status);
    }
  } else {
    Serial.println("connection failed.");
  }
}

void loop()
{
}