Aprendizaje Automático con Wio Terminal - Reconocimiento de Gestos
Este tutorial demostrará cómo usar Wio Terminal para configurar una demostración simple de reconocimiento de gestos con aprendizaje automático con la ayuda de TensorFlow Lite.
Este ejemplo está modificado de la demostración oficial del equipo de Arduino junto con el equipo de TensorFlow Lite. Para más información y referencia, por favor visita Get started with machine learning on Arduino. Se realizaron algunas modificaciones para hacer la demostración compatible con Wio Terminal.
Referencia: How-to Get Started with Machine Learning on Arduino
Lista de Componentes
Características
-
Aprendizaje Automático en Wio Terminal
-
Reconocimiento de Gestos
-
TensorFlow Lite
Librerías de Arduino Necesarias
-
Instala la librería del acelerómetro integrado
Seeed_Arduino_LIS3DHTR, Por favor visita Wio Terminal IMU para más información. -
Instala la librería Arduino TensorFlow Lite, por favor visita Wio Terminal TensorFlow Lite para más información.
Entrenamiento de datos IMU desde el Wio Terminal
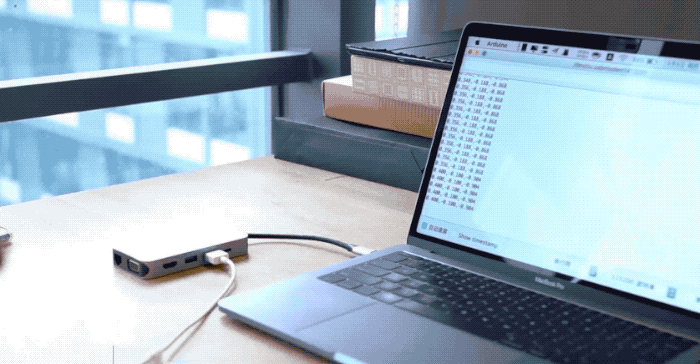
Al igual que otros proyectos de aprendizaje automático, obtendremos algunos datos de sensores para ser utilizados para entrenar el modelo más tarde. Primero, ejecutaremos un programa simple de arduino para transmitir datos de sensores desde Wio Terminal.
Copia el siguiente código y sube el código a Wio Terminal:
#include"LIS3DHTR.h"
LIS3DHTR<TwoWire> lis;

const float accelerationThreshold = 2; // threshold of significant in G's
const int numSamples = 119;

int samplesRead = numSamples;

void setup() {
  Serial.begin(9600);
  lis.begin(Wire1);

  if (!lis) {
    Serial.println("ERROR");
    while(1);
  }

  lis.setOutputDataRate(LIS3DHTR_DATARATE_25HZ); //Data output rate
  lis.setFullScaleRange(LIS3DHTR_RANGE_2G); //Scale range set to 2g

  Serial.println("Acceleration in G's");
  Serial.println("X\tY\tZ");
}

void loop() {
  float x, y, z;

  while (samplesRead == numSamples) {
    x=lis.getAccelerationX();
    y=lis.getAccelerationY();
    z=lis.getAccelerationZ();


     float aSum = fabs(x) + fabs(y) + fabs(z);

      // check if it's above the threshold
      if (aSum >= accelerationThreshold) {
        // reset the sample read count
        samplesRead = 0;
        break;
      }
  }

  while (samplesRead < numSamples) {
    x=lis.getAccelerationX();
    y=lis.getAccelerationY();
    z=lis.getAccelerationZ();

    samplesRead++;

    Serial.print(x, 3);
    Serial.print(',');
    Serial.print(y, 3);
    Serial.print(',');
    Serial.print(z, 3);
    Serial.println();

    if (samplesRead == numSamples) {
      Serial.println();
    }
  }
}
O descarga el código aquí y sube el código al Wio Terminal. Si abres el Monitor Serie, deberías poder ver los datos del IMU.
Capturando Datos de Entrenamiento de Gestos
Captura datos del IMU como CSV y úsalos para TensorFlow:
-
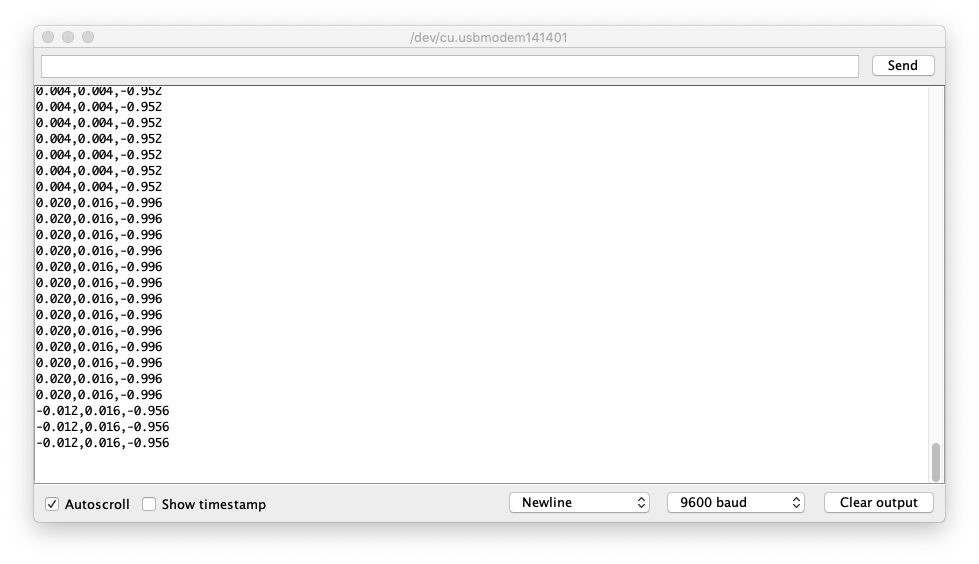
Abre el Monitor Serie y toma el Wio Terminal.
-
Haz un gesto de puñetazo, asegúrate de haber activado la captura.
-
Repite el mismo movimiento al menos 10 veces, mientras más datos de entrenamiento, mejor.
-
Copia y pega los datos del Monitor Serie a un nuevo archivo de texto llamado
punch.csv. -
Limpia y reinicia el Wio Terminal, y esta vez repite todos los pasos anteriores con un gesto de flexión y guárdalo como
flex.csv.
Nota: Si estás usando Linux o Mac, puedes enviar directamente los datos del sensor desde el Wio Terminal a un archivo .csv usando:
cat /dev/cu.usbmodem[nnnnn] > punch.csv
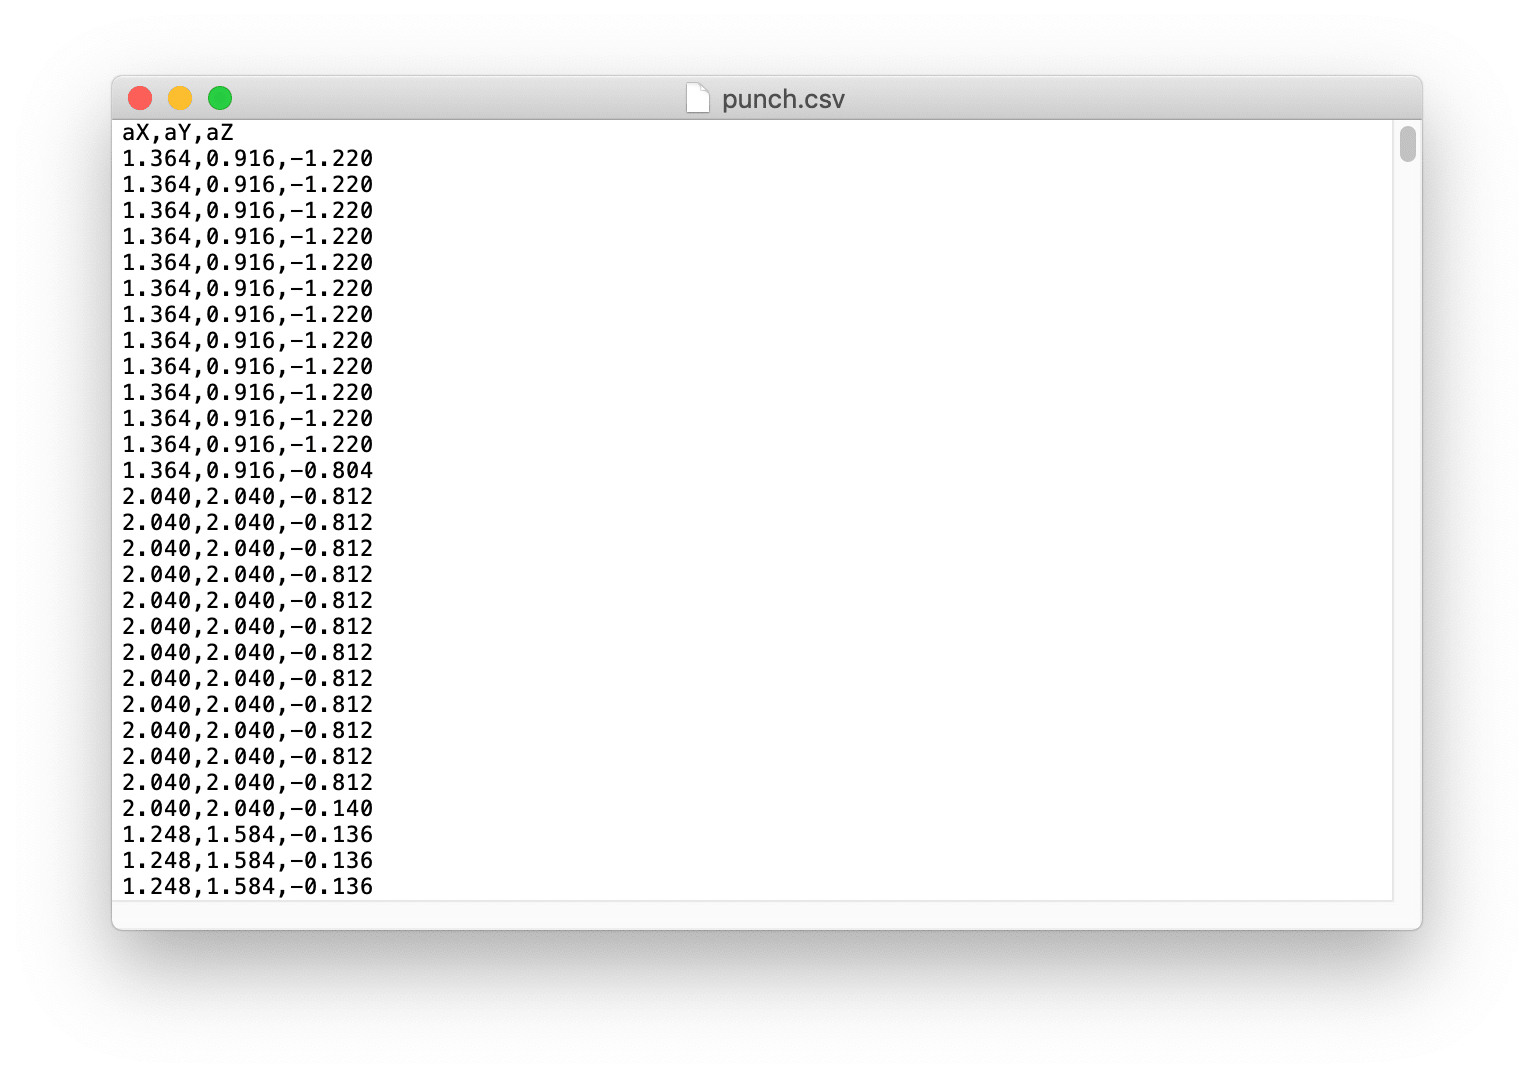
Verificando los Archivos .csv
Abre los archivos punch.csv y flex.csv y asegúrate de que la primera línea de los archivos csv sea aX,aY,aZ revisa a continuación para referencia:
Entrenando Datos en TensorFlow
Aquí usaremos el proyecto de Google Colab que fue creado por el equipo de Arduino. Colab proporciona un notebook de Jupyter que nos permite ejecutar nuestro entrenamiento de TensorFlow en un navegador web. El colab configurará el entorno, entrenará el modelo y convertirá el modelo en un modo TensorFlow Lite y codificará el modelo en un archivo de cabecera de Arduino.
Haz clic aquí para acceder al proyecto de Google Colab.
Modificaciones en el Proyecto de Google Colab
Se necesitan algunas modificaciones en el Proyecto de Google Colab para adaptar Wio Terminal:
-
No se necesitan cambios en Setup the Python Environment.
-
No se necesitan cambios en Upload Data.
-
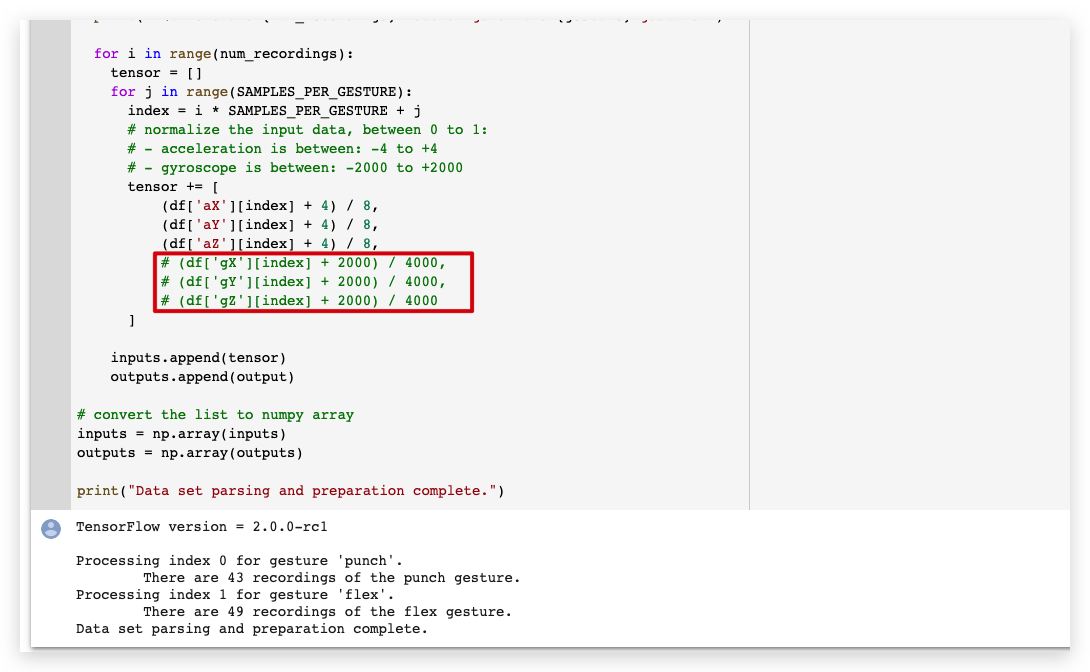
En Graph Data, comenta todas las secciones de datos del giroscopio como se muestra:
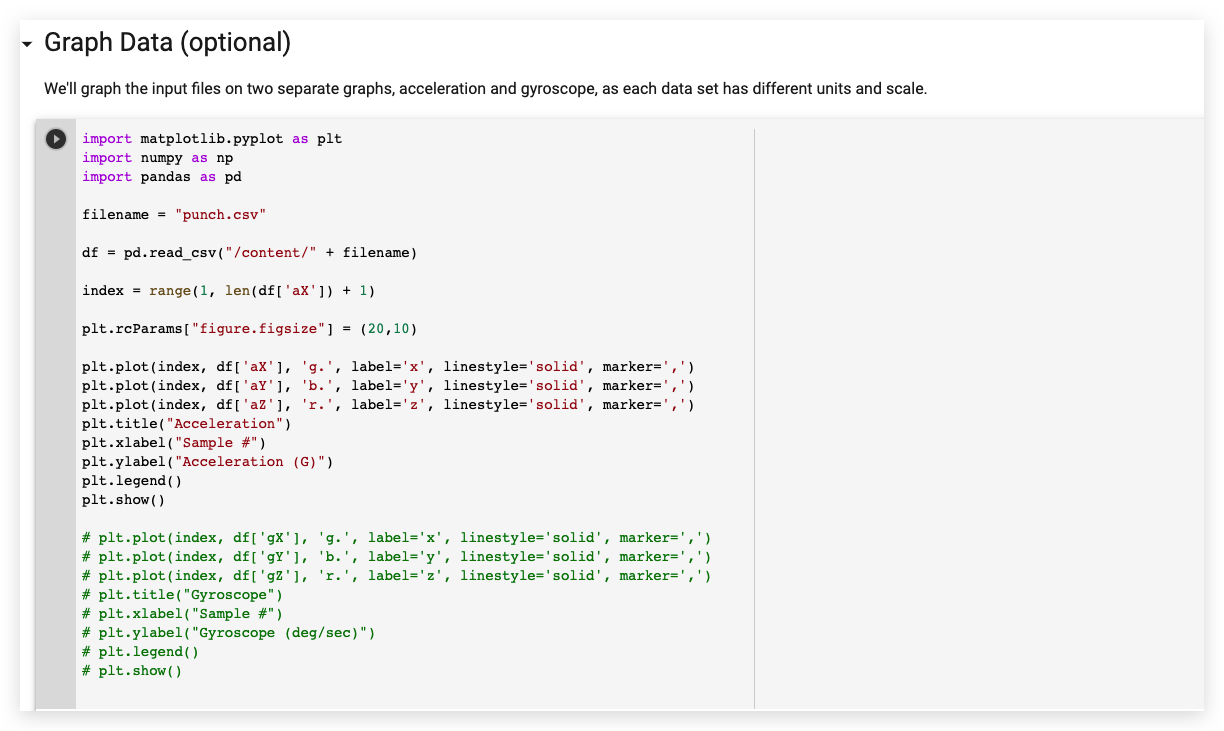
- En Parse and prepare the data, comenta todas las secciones de datos del giroscopio como se muestra:
-
No se necesitan cambios en Randomize and split the input and output pairs for training.
-
No se necesitan cambios en Build & Train the Model.
-
No se necesitan cambios en Graph the loss.
-
No se necesitan cambios en Graph the loss again, skipping a bit of the start.
-
No se necesitan cambios en Graph the mean absolute error.
-
No se necesitan cambios en Run with Test Data.
-
No se necesitan cambios en Convert the Trained Model to Tensor Flow Lite.
-
No se necesitan cambios en Encode the Model in an Arduino Header File.
Descarga los archivos model.h desde el panel izquierdo.
Subiendo el Código en Wio Terminal
- Una vez descargados los archivos de cabecera del modelo. Abre IMU_Classifier.ino o copia el siguiente código en Arduino IDE:
/*
  IMU Classifier
  This example uses the on-board IMU to start reading acceleration and gyroscope
  data from on-board IMU, once enough samples are read, it then uses a
  TensorFlow Lite (Micro) model to try to classify the movement as a known gesture.
  Note: The direct use of C/C++ pointers, namespaces, and dynamic memory is generally
        discouraged in Arduino examples, and in the future the TensorFlowLite library
        might change to make the sketch simpler.
  The circuit:
  - Arduino Nano 33 BLE or Arduino Nano 33 BLE Sense board.
  Created by Don Coleman, Sandeep Mistry
  Modified by Dominic Pajak, Sandeep Mistry
  This example code is in the public domain.

  Modified to adapt for Wio Terminal - Anson (Seeed Studio)
*/

#undef min
#undef max
#include <TensorFlowLite.h>
#include <tensorflow/lite/experimental/micro/kernels/all_ops_resolver.h>
#include <tensorflow/lite/experimental/micro/micro_error_reporter.h>
#include <tensorflow/lite/experimental/micro/micro_interpreter.h>
#include <tensorflow/lite/schema/schema_generated.h>
#include <tensorflow/lite/version.h>

#include "model.h"
#include"LIS3DHTR.h"
LIS3DHTR<TwoWire> lis;


const float accelerationThreshold = 2; // threshold of significant in G's
const int numSamples = 119;

int samplesRead = numSamples;

// global variables used for TensorFlow Lite (Micro)
tflite::MicroErrorReporter tflErrorReporter;

// pull in all the TFLM ops, you can remove this line and
// only pull in the TFLM ops you need, if would like to reduce
// the compiled size of the sketch.
tflite::ops::micro::AllOpsResolver tflOpsResolver;

const tflite::Model* tflModel = nullptr;
tflite::MicroInterpreter* tflInterpreter = nullptr;
TfLiteTensor* tflInputTensor = nullptr;
TfLiteTensor* tflOutputTensor = nullptr;

// Create a static memory buffer for TFLM, the size may need to
// be adjusted based on the model you are using
constexpr int tensorArenaSize = 8 * 1024;
byte tensorArena[tensorArenaSize];

// array to map gesture index to a name
const char* GESTURES[] = {
  "punch",
  "flex"
};


#define NUM_GESTURES (sizeof(GESTURES) / sizeof(GESTURES[0]))

void setup() {
  Serial.begin(9600);
//  while (!Serial);

  lis.begin(Wire1);

  // initialize the IMU
  if (!lis) {
    Serial.println("Failed to initialize IMU!");
    while (1);
  }


  // get the TFL representation of the model byte array
  tflModel = tflite::GetModel(model);
  if (tflModel->version() != TFLITE_SCHEMA_VERSION) {
    Serial.println("Model schema mismatch!");
    while (1);
  }

  // Create an interpreter to run the model
  tflInterpreter = new tflite::MicroInterpreter(tflModel, tflOpsResolver, tensorArena, tensorArenaSize, &tflErrorReporter);

  // Allocate memory for the model's input and output tensors
  tflInterpreter->AllocateTensors();

  // Get pointers for the model's input and output tensors
  tflInputTensor = tflInterpreter->input(0);
  tflOutputTensor = tflInterpreter->output(0);
}

void loop() {
  float x, y, z;

  // wait for significant motion
  while (samplesRead == numSamples) {
    x=lis.getAccelerationX();
    y=lis.getAccelerationY();
    z=lis.getAccelerationZ();

    float aSum = fabs(x) + fabs(y) + fabs(z);

      // check if it's above the threshold
      if (aSum >= accelerationThreshold) {
        // reset the sample read count
        samplesRead = 0;
        break;
      }
  }

  // check if the all the required samples have been read since
  // the last time the significant motion was detected
  while (samplesRead < numSamples) {
    // check if new acceleration AND gyroscope data is available
      // read the acceleration and gyroscope data
      x=lis.getAccelerationX();
      y=lis.getAccelerationY();
      z=lis.getAccelerationZ();


      // normalize the IMU data between 0 to 1 and store in the model's
      // input tensor
      tflInputTensor->data.f[samplesRead * 6 + 0] = (x + 4.0) / 8.0;
      tflInputTensor->data.f[samplesRead * 6 + 1] = (y + 4.0) / 8.0;
      tflInputTensor->data.f[samplesRead * 6 + 2] = (z + 4.0) / 8.0;

      samplesRead++;

      if (samplesRead == numSamples) {
        // Run inferencing
        TfLiteStatus invokeStatus = tflInterpreter->Invoke();
        if (invokeStatus != kTfLiteOk) {
          Serial.println("Invoke failed!");
          while (1);
          return;
        }

        // Loop through the output tensor values from the model
        for (int i = 0; i < NUM_GESTURES; i++) {
          Serial.print(GESTURES[i]);
          Serial.print(": ");
          Serial.println(tflOutputTensor->data.f[i], 6);
        }
        Serial.println();
      }
  }
}
-
Coloca el archivo de cabecera
model.hentrenado en la misma carpeta que el archivo IMU_Classifier.ino y sube el código al Wio Terminal. -
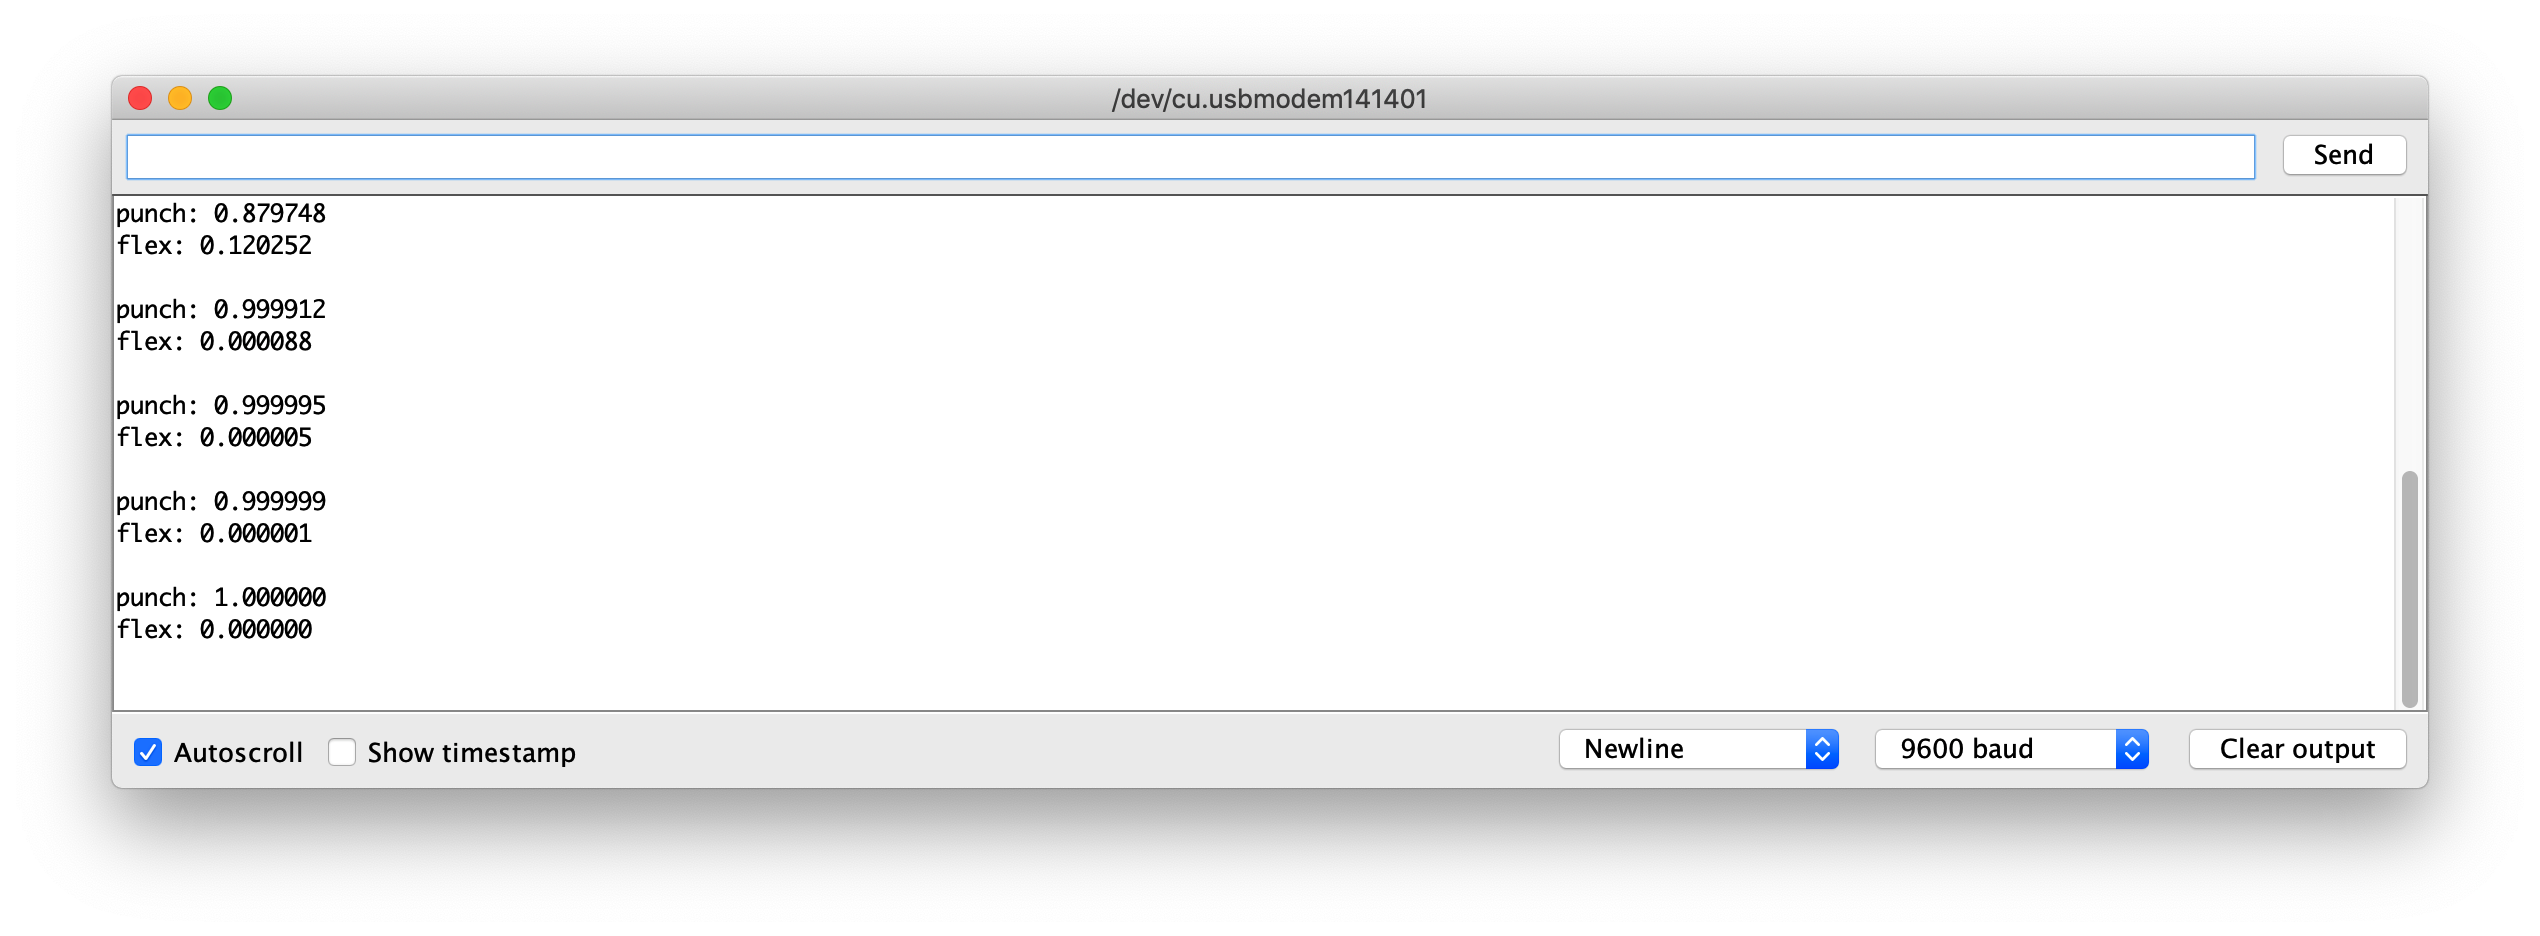
Ahora, abre el monitor serie y realiza tus gestos! Deberías ver la confianza de cada gesto impresa (0 = baja confianza, 1 = alta confianza).
Archivos de Modelo de Ejemplo
Para referencia, he adjuntado el modelo entrenado de los archivos model.h para descargar. Puedes usar esto con IMU_Classifier.ino para probar.
Desarrollo Adicional
Para desarrollo adicional, se pueden entrenar más gestos en Wio Terminal a través de IMU, y para activar diferentes salidas! ¡Explora con Aprendizaje Automático en Microcontrolador con TensorFlow Lite!